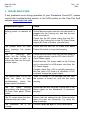
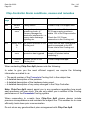
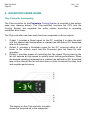
1
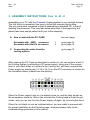
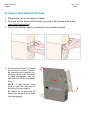
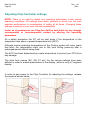
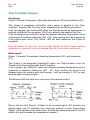
PROMETEIA
USER MANUAL
Version 1.10
Chip Con ApS
Løgstørvej 81
9500 Hobro.
www.chip-con.com
Date: 04-09-02
Page 2
Rev. 1.10
SMH
Disclaimer
Although every effort has been made to insure that the contents of this manual
is up to date and accurate in every way, no responsibility neither implied nor
direct or indirect is granted.
Chip-Con ApS reserves the right to alter product specifications and raw
materials at will, without prior notification, in order to provide the best possible
product at all times.
Although it is possible to thermally accelerate the processor far beyond
specifications, under no circumstances can Chip-Con ApS be held responsible
for any damage caused by inappropriate or incorrect mounting, utilizing of
excessive operating parameters, or negligence to the use of common sense.
Trademarks:
Prometeia™ is trademark of Chip-Con ApS.
Intel® and Pentium™ are registered trademarks of Intel Corporation.
AMD®, Athlon™, Duron™ and Thunderbird™
are registered trademarks of Advanced Micro Devices.
Author: Steen Hansen
Technical Assistance: Martin Kloster
Cover illustration: Greg Joy Design
Drawings and illustrations: Detail Design, v. Trine Schack & Dean Grundy
Rev. 1.10
SMH
Date: 04-09-02
Page 3
Detail Design & Illustration
CONTENTS
Chapter Contents
Page
1.
INTRODUCTION and CHECKLIST
4
2.
SYSTEM OVERVIEW
6
3.
ASSEMBLY INSTRUCTIONS, Your A-B-C
7
A.
How to deal with the PC-Case
8
B.
Assembling with various processors
10
1. AMD Duron, Athlon socket-462 (A)
2. Intel Pentium 4
socket-478
C.
10
12
Connecting the wires
14
4.
STARTING UP AND RUNNING YOUR PC
Restarting your PC
Maintaining your system
16
17
17
5.
TROUBLESHOOTING
18
• Alarm conditions, causes and remedies
20
ADVANCED USERS GUIDE
22
• Chip-Controller functionality
• Chip-Controller adjusting settings
• Chip-Controller operations
22
24
25
7.
TECHNICAL SPECIFICATIONS
27
8.
CONTACT
28
6.
Date: 04-09-02
Page 4
Rev. 1.10
SMH
1. INTRODUCTION
Congratulations on your purchase of your new Prometeia Cooling
System.
Prometeia utilizes state of the art proven technologies in a genuine
high performance quality product. We at Chip-Con ApS are proud of
this product, which in flexibility and performance surpasses anything
else you have seen so far. Nevertheless we continuously work to
enhance current products and develop new ones to provide the best
and leading technology at all times.
Chip-Con ApS sets very high standards for product quality and long life
stability.
Please take the time to read this manual thoroughly. It explains in detail
how to assemble and operate your Prometeia Cooling System
correctly.
If you have any questions or comments regarding your Prometeia
Cooling System, please feel free to contact us.
Rev. 1.10
SMH
Date: 04-09-02
Page 5
CHECKLIST
Before you start assembling the system, please ensure that you have received
everything and that it has arrived in good condition. First check the container
box for any obvious damage or dents, then open the box and unpack your
System. The Prometeia Cooling System consists of the following components:
•
•
•
•
Prometeia Cooling Unit mounted with:
Enlight PC-Case incl. accessories
IEC Interconnecting Power cord
Processor kit: AMD or Intel: For list of kit contents, please
refer to the checklist on the kit plastic bag.
If any of these components are missing, please contact your supplier
immediately.
If your Prometeia Cooling system shows any indication of shipping damage,
please contact either your carrier or supplier immediately. Under no
circumstances should you proceed working with such a system. Chip-con can
not be held responsible for any damage to you, or to your other H/W, if you
decide to ignore this warning and proceed using such a system.
Please use a wall-outlet IEC-mains power-cord suitable for the local requirements in your country. As these vary we are not able to supply such. The
approval of this equipment is granted under the assumption that it operates with
a Ground (Earth) connection.
Please note: The Cooling unit does not contain any user serviceable parts
inside.
Under no circumstances take off the side panels, before having disconnected all
mains power-cables to the Prometeia unit and your PC. The Cooling unit
contains mains circuitry which is accessible when the side panels are removed.
Date: 04-09-02
Page 6
2. SYSTEM OVERVIEW
Rev. 1.10
SMH
Rev. 1.10
SMH
Date: 04-09-02
Page 7
3. ASSEMBLY INSTRUCTIONS, Your A - B - C
Assembling your PC with the Prometia Cooling system is very straight forward.
The first time you assemble it be sure to follow this manual step by step.
The only extra work compared to that of assembling a standard PC, is that of
isolating the processor. This may take some extra time in the beginning, but
please take care and be patient with your initial assembly.
see next page
A. How to deal with the PC-CASE
Assemble with AMD processor
Assemble with Intel-P4 processor
C. Connecting the wires from the
cooling system
1
2
go to page 10
go to page 12
go to page 14
After opening the PC-Case as described in section A, you can perform a test of
the Cooling system by attaching a PC-power supply, using one of the connectors for your Hard drives to connect to the Cooling unit, and then jumpstart the
Power supply by shorting pin 13-14 or 14-15 on the ATX connector as shown on
the illustration below (viewed from the bottom).
When the Power supply turns on, the display turns on, and the fans as well as
the compressor starts up. After a few minutes the Cooling head will start to get
colder, and you can now turn the Power supply off again, by removing the short.
When the unit starts to cool as indicated above, you are ready to proceed with
the actual installation on the following page, otherwise please refer to the
troubleshooting guide later in this manual.
Date: 04-09-02
Page 8
Rev. 1.10
SMH
A. How to deal with the PC-Case
1. Place entire unit on the edge of a table.
2. First pull off the bottom front bezel by prying it off at each side at the
top of the Cooling Unit
3. Then lift the bottom bezel out carefully, see illustration below.
4. At the bottom of the PC-Casing
front bezel is a little “handle”.
By pressing this towards you,
the hasp which holds the bezel
in place disengages, and you
can now lift out the entire bezel.
Step 1
NOTE - it might require some
force to open the hasp due to
the snug fit to the chassis.
Be careful not to pull bezel off
before the hinges at the top are
fully disengaged.
Rev. 1.10
SMH
Date: 04-09-02
Page 9
5. Remove the screws for the PC-Casing side covers and slide each side
cover towards you and lift up and out, as shown above step 2 and 3.
6. From the right side you can now remove the 6 screws that hold the
Mainboard mounting metal plate in place, shift it towards the front and lift it
out.
7. You can also shift out the Floppy- and Hard disk drawer, by pressing the 2
clips on each side of the drawer and pull it out. This allows you to
comfortably mount the drives. For proper HF-shielding do remember to
place the blind shield cover in any unused slots.
8. Any 5.25” drives like CD-Rom or DVD can likewise easily be installed by
mounting small gliders on each side of the drives. This enables your
drives to also slide into the PC-Case. For proper HF-shielding do
remember not to remove the protective metal plates in front of any unused
slots.
9. Before placing any of the drives back into the PC-Case, mount the
switches and LEDs in the front at their respective positions to fit the front
Bezel buttons and indicator holes.
10. After having mounted all the
cooling accessories (as described
in Chapter B) and the Mainboard
onto the base mounting Plate, care
should be taken when putting it
back into the PC-Case, so that the
edge of the base Plate is placed
under the 4 hasps in the bottom of
the PC-Case, before swinging it
into the position where you can
push it back into its place.
Date: 04-09-02
Page 10
Rev. 1.10
SMH
B. 1. Assemble with AMD processor
To ensure proper operation and avoid any system malfunction, please
follow these instructions very carefully. It is very important that the
instructions are carried out exactly as described and shown on the
illustrations and in the correct order.
Put the fitting foam Gasket in the Rear Cover and
place Seal-string onto the perimeter of the rear
Cover, without it touching the Gasket.
Firmly press the rear Cover onto the back of the
Mainboard. Place it so that it will match the position
of the mounting bracket that you install on the next
picture. It is imperative that they become aligned.
Now you can install the Mainboard on the PCmounting plate. Please make sure not to place any
more stands under the MB than required for that MB!!
Install the CPU in the Socket and place a Shim plate
on top. If necessary, cut it so that it does not interfere
with any SMD components on top of the CPU, and
remember to peel off the brown paper that protects
the adhesive side.
Now mount the Clips on the socket by pressing
stands towards each other in order to “open”
Clips slightly, making it easier to slide it over
socket taps. The Clips should be oriented so that
opening is centered over the CPU.
the
the
the
the
The Clips has 2 asymmetrically positioned threaded stands. The outer stand must point
either towards the rear or the bottom of the Mainboard, otherwise you cannot mount the
Cooling head!
The upper bracket has several thin 2.5mm support legs on the bottom. This is to allow it
to stand straight on the Mainboard, even if a few small components are located just
around the socket underneath the bracket. In case one or two of the support legs conflict
with such a component, just cut off that leg with a sharp knife. Make sure the bracket
does not touch the socket itself, as that could cause some outside condensation.
Be sure to place extra Seal-string all around components that are caught going in under
the bracket, to prevent any false air to find its way underneath such component into the
hermetic Cell. For additional protection, press some Seal-string on top of such
components and around the bottom of the bracket too, to seal it off entirely.
2 rounds of Seal-string should be placed on the bottom side of the upper bracket (the
side with the support legs), in order to insure proper sealing, and the upper bracket then
placed so it surrounds the CPU socket, with the Seal-string against the Mainboard. Make
sure to press the bracket firmly against the Mainboard, so all the legs touch on the PCB.
Finally install the Mainboard on its mounting plate back in the PC-Case.
Rev. 1.10
SMH
Date: 04-09-02
Page 11
Turn the Microfreezer so the centre of the evaporator is
placed over the CPU core. The socket-A may be
oriented in two ways, so the Microfreezer either fits
upright or sideways.
Be sure that the Microfreezer is placed according to
your Mainboard requirements and the illustrations.
Put a thin layer of thermal compound on the evaporator
just enough to cover the entire surface.
Now press the Microfreezer down over the CPU until
they have physical contact, and lift it carefully off again
to inspect that the Microfreezer makes a full surface
contact with the CPU Core.
Check that the entire CPU core is covered with a thin
layer of heat-conducting compound. If this is not the
case re-check all previous steps.
It is of utmost importance that the Microfreezer obtains good contact with the
CPU core, in this fact a large amount of your subsequent success is hidden.
Now you can place 1 round of Seal-string on the
Microfreezer (or if you prefer on top of the mounting
bracket), and gently press the Microfreezer against the
upper mounting bracket.
The Microfreezer is secured in place with two screws
into the Clips. The screws have to be tightened evenly
and almost simultaneously, but only to the bottom of the
threaded brass stands, don’t over tighten them!
Increased pressure is regulated through the use of extra
spacer rings instead.
Note! The screws are spring loaded, and should be
turned only until they reach the bottom. Due to
tolerances, you may need to adjust the pressure by
inserting up to 4 extra spacer-rings on the screws
underneath each screw head.
Finally press two small lumps, made up of Seal-string
down over the screws, to seal them off properly and
close the last possible entry to the Cell.
If your MB is having a protective piece of plastic around
the socket, be sure to seal this also, or remove it.
When you want to change processor, unscrew the Cooling Head, and drag it off slowly,
but forcefully. Have a bit of patience doing it. You do not need to take off the mounting
bracket, just the clips, which is detached from the socket, by pressing the stands towards
each other to “open” the clips slightly, and then pull it off first at one side.
Date: 04-09-02
Page 12
Rev. 1.10
SMH
B. 2. Assemble with Intel - P4 processor
To ensure proper operation and avoid any system malfunction, please
follow these instructions very carefully. It is very important that the
instructions are carried out exactly as described and shown on the
illustrations and in the correct order.
Put the fitting foam Gasket in the rear Cover and
place Seal-string onto the inside perimeter of the
rear Cover, without it touching the Gasket.
Now using 2 of the Cover screws as guides in diagonally opposite holes around the CPU socket, firmly
press the rear Cover onto the back of the Mainboard.
Support with the other hand from the front side of the
Mainboard just opposite where you press, to avoid
bending the PCB.
Now install the CPU in the Socket-478, be careful not
to bend any legs.
Place the metal Clips in the upper asymmetric
bracket, note that the Clips has 2 asymmetric
positioned threaded brass stands. The outermost
brass stand must always point either towards the rear
or the bottom of the Mainboard, but the mounting
bracket may turn either way. This way you can shift
the position of the hole over the CPU Core for the
best fit.
Place Seal-string on the inside perimeter on the bottom of the upper bracket. The upper
bracket can now be mounted in place with the 4 screws entering from the rear Cover. Be
sure to place extra seal string all around components that are caught going in under the
bracket, to prevent any false air to find its way underneath such components into the
hermetic Cell. For additional protection, press some Seal-string on top of such
components too, to seal them entirely.
Now you can install the Mainboard on the PC-mounting metal plate. Please make sure
not to place any more stands under the MB than what is required!! Install the Mainboard
on its mounting plate back in the PC-Case.
Finally install the Mainboard on its mounting plate
back in the PC-Case.
Turn the Microfreezer so the centre of the evaporator
is placed over the CPU core. Be sure that the
Microfreezer is placed according to your Mainboard
requirements and the illustrations.
Rev. 1.10
SMH
Date: 04-09-02
Page 13
Put a thin layer of thermal compound on the evaporator just enough to cover the entire surface.
Now press the Microfreezer down over the CPU
until they have physical contact, and lift it carefully
off again to inspect that the Microfreezer makes a
full surface contact with the CPU heat spreader.
If this is not the case recheck all previous steps.
Thin layer means “Less is better”
It is of utmost importance that the Microfreezer obtains good contact with the CPU
core, a large amount of your subsequent success depends of this.
Now you can place 1 round of Seal string on the
perimeter of the Microfreezer, and gently press the
Micro freezer against the upper mounting bracket.
The Microfreezer should be secured in place with
two screws into the Clips.
The screws have to be tightened evenly and almost
simultaneously, but only to the bottom of the
threaded brass stands, don’t over tighten them,
increased pressure is regulated through the use of
extra spacer rings instead.
Note! The screws are spring loaded, and should be
turned until they reach the bottom. Due to
tolerances, you may need to adjust the pressure by
inserting up to 4 extra spacer rings on the screws
underneath each screw head.
Finally press two small lumps, made up of Sealstring down over the screws, to seal them off
properly and close the last possible entry to the
Cell.
When you want to change processor, unscrew the Cooling Head, and drag it off slowly,
but forcefully. Have a bit of patience doing it. You do not need to take off the mounting
bracket, just the clips, which is detached from the bracket, by pulling the stands away
from each other to “bend” the clips slightly, and then pull it off first at one side.
Date: 04-09-02
Page 14
Rev. 1.10
SMH
C. Connecting the wires from the cooling system
Before powering up the cooling system, be sure to connect all the necessary
wires from the bottom case to the motherboard and the PSU.
Before you start connecting the wires, you need to make sure that the Thermal
bus is positioned so that it does not seat up against the side panel, when you
put the side panel back on again. Otherwise the shape of the insulation on the
thermal bus will deform, and the insulation capability will be reduced, resulting
in possible risk of condensation.
When you try to fit the thermal bus in place, be sure not to make any sharp
bends, as that may cause damage to the thermal bus soldering and flexible
tube.
In case the stocking is not making a tight fit around the thermal bus, where it
makes a turn, you may need to wrap some self adhesive insulation foam,
around it to prevent still standing air in such gap, as that may cause formation of
condensation.
Rev. 1.10
SMH
Date: 04-09-02
Page 15
There are 3 wires with connectors coming from the Cooling Unit, which have to
be connected before powering up the system.
1. The grey wire controls the Reset signal and must be connected to the reset
switch input on the Mainboard. There is an additional plug on the wire, which
should be connected with the connector from the PC-Case front panel Reset
Switch, which is also grey.
2. The blue/white wire controls the safety Shutdown function and must also be
connected to the Mainboard. This cable also has an additional plug which
must be connected to the PC-Case front panel Power-On button which is
also blue/white.
3. Now the power cable (yellow +12v and black) should be connected to an
unused power connector same as used for the drives.
4. Connect the reset switch (grey wire), ON/OFF switch (blue/white wire) and
LED connectors to the appropriate connectors on the Mainboard, for further
details consult your Mainboard manual.
5. Connect the ATX (and P4) power connectors to the Mainboard. If in doubt,
consult your Mainboard manual on where to connect the power cables.
6. Before connecting the Mains Power Cords, complete the installation of all the
other PC hardware in your PC.
7. Finally attach the IEC interconnecting Power Cord supplied with the Unit between the Cooling unit and the PC-Power Supply. Attach a wall outlet Power
Cord to the IEC Power inlet in the bottom of the Cooling Unit.
This completes the installation of the system.
Note: Before starting the PC, make sure that all wires are connected securely
and correctly.
Date: 04-09-02
Page 16
Rev. 1.10
SMH
4. STARTING UP AND RUNNING YOUR PC
When all the wires have been installed correctly the start-up procedure for
entire system should not cause any problems. Once the power button on
PC is pressed (or hotkey power-up from the keyboard activated), power
also be supplied to the Cooling Unit and the Chip-Controller insuring that
compressor also starts.
the
the
will
the
At first the fan in the Cooling Unit will run at high speed until a certain operating
temperature is reached (as defined by (St2) in the Chip Controller, described
later in this manual).
During start-up the Chip-Controller insures that the processor is held idle by
means of the Reset signal applied to the Mainboard. The Reset signal is
maintained until the desired operating temperature for the processor has been
reached (as defined by (St1) in the Chip-Controller, also described later in this
manual).
If the system has been standing unused for a longer period of time, the start-up
procedure may take a while. The temperature on the processor may also
increase, but after a minute or so, it starts to drop towards normal operating
levels. Do not worry about this initial temperature rise that might occur. In the
unlikely event that the temperature on the processor rises above 40ºC, the
Chip-controller will just shut down the entire system automatically. Wait for 2-3
minutes and try again.
During the start-up procedure your monitor will remain in stand-by mode (black
screen), since it is not receiving any signal from the PC – as it is held idle by
the Reset signal applied to it. The release point of the Reset signal has been
preset from the factory to a temperature of -33ºC (for more information on this
please refer to the Advanced User Guide later in this manual).
Rev. 1.10
SMH
Date: 04-09-02
Page 17
Restarting the PC
Note! If you have turned of the PC and wants to restart it again immediately
afterwards, please wait for at least 2 - 3 minutes before turning it back on
again, in order to avoid the protection circuit to cut-off power to the
compressor. In case this happens, you need to wait 15-20 minutes before you
can restart the Cooling system.
You will not see the temperature rise much after restarting the PC, as the
pressure in the Cooling Unit will still be sufficient to initiate Cooling almost at
once.
Maintaining your System
Like any PC with fans, your Prometeia Cooling System also needs a bit of maintenance in order to continue to cool your PC properly. Take off the mains
connection, but do NOT take off the side panels of the Cooling unit. There are
no user serviceable parts inside.
All you need to do is turning the unit off and remove the front bezel of the
Cooling unit (as described earlier). Using a standard household vacuum cleaner,
clean the Condenser in vertical movements only, taking care not to bend any of
the fins. Likewise you can also clean the air-outlet on the rear of the Cooling
unit, as well as the air-outlet from the PC-Power supply, to remove dust from the
rear grills and fans there.
Depending on your environment it is recommended, you perform this simple
maintenance at least once a month, in very dusty environments perhaps twice a
month.
Date: 04-09-02
Page 18
Rev. 1.10
SMH
5. TROUBLESHOOTING
If any problems occur during operation of your Prometeia Cooled PC, please
consult this troubleshooting section or the FAQ section on the Chip-Con ApS
website www.chip-con.com.
Problem description
Check
Nothing works, no reaction at
all.
Check that the power cord from the wall outlet is
plugged into the Cooling unit, and that the wall
outlet is turned on.
Check that the IEC power cable from the IECoutlet of the Cooling unit to the PC-Case Power
supply IEC-Inlet is in place, and sits firmly.
The system does not start
when pressing the power
switch
Check that the wire for PC-Case front panel
Power-On switch is connected properly.
The PC seemingly gets
power, but the Cooling unit
does not seem to start, i.e.
neither the fans nor the compressor starts.
Check that the power cord from the wall outlet is
not plugged directly into the IEC-inlet of the PCCase Power supply.
Check that the 12V power cable to the Cooling
unit is connected to a HD-power cord from the
PC-Power supply.
Possibly check that +12V is actually present on
this line (with a 12V bulb or a voltmeter). If 12V
is absent change the power supply.
The system starts, but the fan
does not seem to start
simultaneously
when the
power switch is pressed.
There is a delay of 3-4 seconds from the time
the system is turned on, until the fan starts
running.
The
PC
starts
booting
immediately after pressing the
PC-Case front panel Power
button.
Check that the wire from the Cooling unit to the
Reset signal on the Mainboard is connected
properly.
The PC resets when the temperature rises just a little.
Ensure that the settings for the Chip-controller
have not been set incorrectly. Try using the
default settings.
The condenser fan is not
running.
Contact Chip-Con ApS for further assistance.
Rev. 1.10
SMH
Date: 04-09-02
Page 19
The temperature of the
Cooling system is higher than
normal.
The temperature of the Cooling system is
dependant on the temperature of the
surroundings. So on a very hot day it may not
be able to keep the same low temperature.
The temperature of the
Cooling system seems OK,
but the system is unstable.
Check the temperature on the processor; if it is
significantly higher, the evaporator of the Micro
freezer may have poor contact with the CPU
core.
Alternatively you may have over-clocked your
PC too ambitiously.
The compressor
stops.
suddenly
Turn off the PC (alternatively an automatic
shutdown will occur). The compressor has a
built-in overheating protection. Contact ChipCon ApS for further assistance.
If this section does not solve your actual problem, please feel free to contact
the Chip-Con support crew via e-mail [email protected]
Date: 04-09-02
Page 20
Rev. 1.10
SMH
Chip-Controller Alarm conditions, causes and remedies
Message
Er0
Er2
Description
Sensor
error
Memory
error
Cause
Remedies
Faulty sensor.
Contact Chip-Con support staff.
Voltage drop during programming mode, or
memory damaged by
electronic interference. i.e.
heavy static discharge,
lightning etc.
Ensure that the +12v from the
PC-Power supply provides a
stable 12V to the Chip-controller.
Check the 12V Power
connection to the Cooling unit.
Er3
Mains error
Or
↓
No power detected on the
Cooling unit.
Check that the wall outlet power
cord is connected to the IEC
Power inlet of the Cooling unit.
Er3
Overload
error
The Condenser overheat
protection has triggered
Turn off system and wait for a
couple of minutes before
restarting it.
Er4
Overheat
error
System failure on the
Cooling Unit.
Contact Chip-Con ApS.
When contacting Chip-Con ApS please note the following:
In order to give you the most efficient support, we require the following
information e-mailed to us:
•
•
•
•
The serial number of the Prometeia Cooling Unit in the subject line.
A detailed description of the problem.
A detailed description of the hardware being used.
A detailed description of any setup changes in the Chip-Controller.
Note: Chip-Con ApS cannot assist you in any questions regarding how much
each processor will over-clock. We can only assist you in relation to the Cooling
performance of the Prometeia Cooling system
When responding to e-mails from Chip-Con ApS please always include
previous correspondence and maintain the subject line. This enables us to more
efficiently track down prior communication.
Do not return any goods without prior arrangement with Chip-Con ApS.
Rev. 1.10
SMH
Date: 04-09-02
Page 21
This page has intentionally been left blank.
Date: 04-09-02
Page 22
Rev. 1.10
SMH
6. ADVANCED USERS GUIDE
Chip Controller functionality
The Chip-controller for the Prometeia Cooling System is mounted in the bottom
case (see drawing below). The Chip-controller monitors the CPU and the
Cooling System and regulates the entire system according to operating
conditions at all times.
The Chip-controller has three main functions supported via three outputs.
1.
2.
3.
Output 1: provides a Reset signal for the PC, enabling it to delay the start
until the desired start temperature is reached (as defined by St1, described
later in this manual)
Output 2: provides a Shutdown signal for the PC, ensuring safety at all
times. In the unlikely event that the Processor gets too warm for safe
operation.
Output 3: provides means of controlling the Fan speed. During start-up the
fan will operate at high speed to quickly boost cooling performance. When
the desired operating temperature is reached (as defined by St2, described
later in this manual) the fan will slow down in order to reduce the noise level
and regulate performance.
The display on the Chip-controller normally
shows the temperature in the evaporator.
Rev. 1.10
SMH
Date: 04-09-02
Page 23
1. Reverse LED
Flashes when at least one relay working in the ‘reverse’ mode is active. The
Led flashes as many times as the number of active ‘reverse’ relays. There is
a two seconds pause between a flashing stage and the next one.
2. Direct LED
Flashes when at least one relay working in ‘Direct’ mode is active. Its working
logic is the same as the “Reverse” LED.
3. PRG/mute
Pressing the PRG button for 5 seconds causes the Chip-Controller to change
from normal mode into a mode where you can enter changes to hysteresis
settings. In the event of an alarm condition, pressing the button will silence
the buzzer.
4. Up Arrow
Pressing the Up Arrow button will increase a value i.e. a selected parameter.
5. Down Arrow
Pressing the Down Arrow will decrease a value i.e. a selected parameter.
Holding Down Arrow pressed will not show any valid information.
6. SEL
Pressing the SEL button will cause the Chip Controller to change from the
normal mode into a mode where you can enter the desired temperature
switch point values for the Fan-speed and the Reset signal.
7. Display
Shows the measured temperature of the evaporator in the Micro freezer. In
the event of an alarm condition the short form name of the sensor causing
the alarm is showed alternating with the temperature itself. During
reprogramming/changing the settings, the display shows the short form name
of the setting and the value respectively.
8. Decimal Point LED
All positive temperatures are shown with one decimal point. Negative
temperatures below 10 degrees Celsius are shown without decimals.
Date: 04-09-02
Page 24
Rev. 1.10
SMH
Adjusting Chip-Controller settings
NOTE: There is no need to adjust any operating parameters under normal
operating conditions. All settings have been selected to insure you the best
possible performance in consideration of safety at all times. Changing these
settings is entirely on your own risk and responsibility.
Under no circumstances can Chip-Con ApS be held liable for any damage
consequential or inconsequential caused by altering the operating
parameters.
As a safety precaution the PC will be shut down if the temperature of the
evaporator rises above a preset temperature limit (40ºC).
Although normal operating temperatures of the Cooling system will never reach
that level, the temperature might rise to this level during power-up after a
prolonged period without being used.
The 40ºC has been determined as a safe temperature to prevent your CPU from
any damage.
The short form names (St1, St2, P1 etc.) for the various settings have been
defined in order to enable presentation in the display, which is only a 7-segment
display.
In order to get access to the Chip Controller for adjusting the settings, release
the panel as shown below.
Rev. 1.10
SMH
Date: 04-09-02
Page 25
Chip Controller Outputs.
Fan Speed:
Output 3 (Direct). Parameters: Operating temperature (St2) and hysteresis (P2).
This Output is energized (active/On) when power is applied to the Chipcontroller. Therefore the Fan runs at full speed during the start-up procedure.
It will de-energize (go Inactive/Off) when the desired operating temperature is
reached, defined by the parameter (St2), thus reducing the speed of the Fan.
It will re-energize (go active/On) when the desired operating temperature minus
a hysteresis is reached, defined by (St2 + P2), thus causing the Fan to speed up
if the system gets hotter. The “Direct” LED will flash whenever this Output is
energized.
Note: Whenever the fans are running at high speed, the Micro freezer heating
elements are turned off, so do not operate the unit in this mode continuously.
Reset signal:
Output 1 (Inverse). Parameters: Operating temperature (St1) and hysteresis
(P1).
This Output is de-energized (Inactive/Off) when the Chip-Controller turns on.
Therefore the Reset signal holds the PC inactive.
It will energize (go active/On) when the desired operating temperature plus a
hysteresis is reached, defined by (St1 - P1), thus causing the Reset to be
released when the system gets cold enough. It will de-energize if (St1) is ever
reached again during operation.
The Reverse LED will flash only in the event of energized output.
Due to the fact that Output 1 (Reset) is an inversed signal, St1 provides the
highest temp. and P1 subtracts from this point towards a lower temperature.
Output 3 (Fan speed) on the other hand, St2 sets the lowest temperature and P2
adds to this and increase the temperature towards 0.
Date: 04-09-02
Page 26
Rev. 1.10
SMH
The Chip-controller has been preset to the following operating parameters:
Output 1 (Reset signal) - St1 is set to -20ºC and P1 is set to 13, thus the PC will
not commence booting until the temperature drops below -33ºC and keep
operating as long as the temperature stays below -20ºC, at which point the PC
will again be prohibited from working any more due to the Reset signal being
applied again.
Output 3 (Fan speed) - St2 is set to -33ºC and P2 is set to 13, thus the Fan will
operate at full speed until the temperature drops below -33ºC, at which point it
slows down to normal low-noise operating speed, only if the temperature rises
more than 13ºC to -20ºC the fan will again run at full speed.
Changing St1, St2.
Changing P1 and P2.
In the normal operating mode, the display
shows the temperature measured by the
temperature probe attached to the evaporator.
For operation of the system the Chip-controller
requires two set points. To modify both of
them:
To modify the factory-set and default
hysteresis for the Reset signal and
Fan-speed (P1 and P2);
a) hold down "PRG" for 5 seconds:
the display starts showing "P1";
a) hold down "SEL" for a few seconds; the display starts showing “St1”;
b) press "SEL"; the actual value of
P1 appears in the display;
b) release "SEL"; the actual value of St1 now
flashes;
c) press Up- or Down Arrow until
you reach the desired new value;
c) press Up- or Down Arrow until you reach
the desired new value;
d) press "SEL" to confirm and enter
the new value;
d) press "SEL" to confirm and enter this new
value for St1;
e) press Up- or Down Arrow until the
display shows "P2";
e) having confirmed St1 the display shows
“St2” for a few seconds, and then its current
value begins to flash;
f) press "SEL"; the actual value of
P2 appears in the display;
f) press Up- or Down Arrow until you reach
the desired new value, or just;
g) press Up- or Down Arrow until you
reach the desired value;
g) press "SEL" to confirm the new or unchanged value for St2;
h) press "SEL" to confirm the new or
unchanged value for P2;
h) the display goes back into normal operation
mode, and shows again the value
measured by the probe
i) press "PRG" to store all changes
and return to normal working
operating mode.
Important Note: Only change these values if you are absolutely certain about
the results of these changes.
Rev. 1.10
SMH
Date: 04-09-02
Page 27
7. TECHNICAL SPECIFICATIONS
Model Name.
Prometeia 10020x
PC-Case Model and type
- Main Board Size
- Drive Bays external access
EN-7238 ATX Midi-Tower
Baby AT, Full-ATX
4 x 5-1/4" (normal height)
1 x 3-1/2" (1" height)
2 x 3-1/2"
6 Full Size; 1 Half Size
ATX 300W-500W (Not included)
- Drive Bays internal only
- Expansion Slots
- Fitting Power Supply
Power requirements
200 - 240VAC 50Hz or
103 - 127VAC 60Hz
Cooling Capacity Evaporator
-40 to -30ºC @ 25 - 105W,
(-25ºC at 145W) at 20ºC ambient
Operating environment ambient
15º - 30º Celsius, max. 75% humidity
Noise-level
36 db(A) under normal operation
42 db(A) during start-up
Overall Dimensions
(W x H x D)
191 x 672 x 485mm (incl. PC-Case)
7.5" x 26.5" x 19.1"
- Cooling unit only
191 x 246 x 485mm
7.5" x 9.7" x 19.1"
Weight excl. power supply
(G.W.) 27Kg. 60 lbs. (Incl. PC-Case)
Standards:
This equipment has been designed to comply with the safety regulations and
standards applicable within the EU, and meets the requirements as set forth in
the CE and DEMKO regulations.
Please note, that the approvals require that you operate the equipment with a
Ground (Earth) connection.
Date: 04-09-02
Page 28
Rev. 1.10
SMH
8. CONTACT
For any questions or comments please feel free to contact us either by email or telephone. Please contact the specific department for a quick and
precise reply. The different Chip-Con departments are listed below:
Chip-Con ApS
Løgstørvej 81, Hørby
9500 Hobro
Denmark
www.chip-con.com
Tel: +45 70 27 22 12
Fax: +45 70 27 22 13
Sales & Marketing Department
[email protected]
Tel:
Support Department
[email protected]
+45 70 27 22 42
General questions & comments
[email protected]