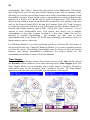
1
Astracadabra v1 User Manual © 2004-2008 Esoteric Technologies Pty Ltd Adelaide, Australia No part of this manual may be reproduced in any form or by any means, electronic or mechanical, including photocopying and recording, for any purpose without the express permission of Esoteric Technologies Pty Ltd i TABLE OF CONTENTS INTRODUCTION ............................................................................................1 About Esoteric Technologies Pty Ltd. .............................................................1 About Pocket PCs...........................................................................................1 Pocket PCs and the Microsoft Windows Mobile operating system ...........1 Terminology.............................................................................................3 Resetting the Pocket PC..........................................................................4 Wireless Technology ...............................................................................4 INSTALLING / REMOVING ASTRACADABRA .............................................5 Pocket PCs – Technical Requirements ...........................................................5 Background to Installation...............................................................................5 Installing Astracadabra ...................................................................................6 Removing Astracadabra ...............................................................................11 GETTING STARTED: A GUIDED TOUR OF ASTRACADABRA ................13 Main Menus ..................................................................................................13 Home Setting ................................................................................................14 To Enter a New Chart ...................................................................................15 Chart Control Centre.....................................................................................16 To View Aspect Lines and Use the Aspect Toolbar ......................................16 To View the Aspect Grid ...............................................................................17 To View Reports ...........................................................................................17 Chart Details ..........................................................................................17 Sorted Aspects, Sorted Declinations .....................................................18 Essential Dignities .................................................................................19 Dasas, Divisional Charts and KP Details (for Vedic Astrology) ..............19 To Display Transits, Progressions and Directions .........................................21 To Save a Chart ...........................................................................................22 To Download Your Solar Fire Chart Files......................................................23 To Open a Saved Chart in Astracadabra ......................................................24 To Edit or Copy & Edit a Chart ......................................................................24 To Start the Transit Clock Feature ................................................................24 To View the Current Version of Astracadabra ...............................................25 End of Tour ...................................................................................................25 ASTRACADABRA: A CLOSER LOOK........................................................26 Astracadabra Startup ....................................................................................26 Entering a New Chart or Editing a Chart .......................................................26 Wheel Display / Show Tab ............................................................................27 Synastry Chart ..............................................................................................29 The Swiss Ephemeris ...................................................................................30 ii Opening an Existing Saved Chart .................................................................30 Chart Name Sorting ......................................................................................31 Large Chart File Collections..........................................................................31 Seamless Interaction with Solar Fire .............................................................32 Editing Charts ...............................................................................................33 Opened Chart List / Opened Tab ..................................................................33 How to Save a Chart.....................................................................................34 Toolbar Buttons ............................................................................................34 Clock Toolbar Button .............................................................................34 Taskbar Toolbar Button .........................................................................34 Aspect Lines ..........................................................................................34 Aspect Grid / Aspects Tab ............................................................................35 Info Tab ........................................................................................................35 Reports .........................................................................................................36 Chart Details ..........................................................................................36 Sorted Aspects ......................................................................................37 Sorted Declinations ...............................................................................37 Essential Dignities .................................................................................37 Dasas (Vedic) ........................................................................................37 Divisional Charts (Vedic) .......................................................................38 KP Details (Vedic) .................................................................................38 Additional Information on Clock Mode ..........................................................38 Solar Eclipses ...............................................................................................39 Move Astracadabra to Another Memory Location .........................................39 Time Stepper ................................................................................................40 Adjust Ascendant ..........................................................................................41 KP Horary .....................................................................................................42 Tools / Options .............................................................................................43 Planets Tab ...........................................................................................43 Points Tab .............................................................................................43 Aspects Tab ..........................................................................................43 Calcs Tab ..............................................................................................44 Prog. Tab...............................................................................................44 Display Tab ...........................................................................................45 Ess.Dign. Tab ........................................................................................45 Vedic Tab ..............................................................................................45 Dasa Tab ...............................................................................................45 Home Tab..............................................................................................46 Options Screenshots .............................................................................46 Tools / About ................................................................................................50 To Close Down Astracadabra .......................................................................50 Saving Charts When Closing Down Astracadabra ........................................50 INDEX ..........................................................................................................51 1 INTRODUCTION The idea of being able to enter and display an astrology chart anywhere, anytime using a Pocket PC was the primary reason Astracadabra was created. With such a program, you can explore astrology and cast charts on trains, buses, „planes and even while you are in your car. You can easily slip your Pocket PC from out of your pocket or bag and do your astrology while at lunch or dinner with friends. Being able to quickly research something astrological using the Pocket PC while out and about, is a real bonus. From the beginning, Astracadabra was designed to allow interaction with Solar Fire chart files so that you can instantly have access to all of your current charts already stored in Solar Fire. It was also decided that Astracadabra‟s design should have a similar "look and feel" to that of Solar Fire so you would be comfortable in operating Astracadabra. While there are some similarities with Solar Fire there are also differences in the operation of Astracadabra due to the Pocket PC's smaller screen size and its functional differences with desktop and laptop computers. An early decision was taken to incorporate the Swiss Ephemeris into Astracadabra so that you can gain accuracy in calculations leading to consistent results with Solar Fire charts and listings. For the convenience of birthplace lookups, the full ACS PC Atlas was also chosen to be embedded in Astracadabra enabling you to make instant, accurate lookups of over 250,000 cities or towns while you are out and about with the Pocket PC. About Esoteric Technologies Pty. Ltd. Esoteric Technologies Pty Ltd is a company specialising in technology for the harnessing and beneficial use of esoteric knowledge. The company has developed all the astrological software packages “Solar Fire”, “Solar Maps”, “Solar Writer”, “Solar Spark” and “Solar Font” and others. In addition to the development of astrological software, it offers various astrological services, including chart printing and consultations. Esoteric Technologies‟ directors are Stephanie Johnson and Neville Lang. About Pocket PCs Pocket PCs and the Microsoft Windows Mobile operating system In the handheld computer market, there are primarily two major lines of devices – the Pocket PC and the Palm. These handheld computers are also known as PDAs – Personal Digital Assistants. Like desktop computers where there are PCs and Apple Macs and their software is not compatible with each other, in handheld computers there is the Pocket PC and the Palm (or the earlier Palm Pilot) where the software between the two is also not compatible. However, there is a new model of the Palm 2 that actually runs the Windows Mobile operating system so things are changing here too. We are also seeing a convergence of Pocket PCs and mobile (cell) phones. These devices are called Pocket PC Phone Editions or simply Pocket PC Phones. These devices are primarily a Pocket PC with a built-in phone and Astracadabra can generally operate on these types of devices. There are also devices called “Smartphones” that are primarily a phone but have some Pocket PC functionality. At this time, Astracadabra is unable to operate on these types of devices due to their different layout of screens and their lack of a touch screen. The processors (CPUs) in Pocket PCs, are generally based on Intel‟s ARM or XScale processors that run between 200Mz and 600Mhz depending on the model of Pocket PC. Besides Intel, there are also a number of other companies now producing XScaleequivalent CPUs. RAM memory is important on a Pocket PC since there is no hard disk, though this may change in future. The majority of Pocket PCs, at the moment, come equipped with 64Mb RAM though there are some newer models with 128Mb RAM. No doubt, the amount of RAM memory in Pocket PCs will increase over time. The Pocket PC comes loaded with a version of Microsoft Windows that is much smaller in size than Microsoft‟s Windows XP as used in desktop and laptop computers. Microsoft Windows on these small devices is generally called Microsoft Windows CE. This smaller version of Windows is able to run on not only Pocket PCs but also on other forms of devices like Barcode Scanners and the latest SmartPhones. The current version of Windows that operates on the latest Pocket PC is called Windows Mobile 5.0. As a matter of interest, the previous versions of the Windows Mobile operating system were called Windows Mobile 2003, Windows Mobile 2003 Second Edition and the earlier Pocket PC 2002 operating system. Due to the design of the Pocket PC and of the Windows Mobile operating system, another good feature is that whenever the Pocket PC is powered on, instant access to Windows is obtained – there is no boot-up time delay, and you are always returned to the last screen that you were on when you last turned the Pocket PC off. Generally, Pocket PCs come equipped with a touch screen and stylus (pointer) instead of a keyboard or mouse for data entry. There is a “soft” keyboard that you can tap on to enter information, however, you can also “hand write” your entries using the other options of Block Recognizer, Letter Recognizer or Transcriber. Letter Recognizer allows you to quickly enter information by the natural writing of each letter once you get used to the stroke of each letter. Block Recognizer is the equivalent of the “Graffiti” system used in Palm handheld computers. If you have a requirement to enter a lot of text in the Pocket PC such as in creating Word documents or long emails then there are fold-up full-size keyboards available that can be connected to a Pocket PC either via direct cable or infrared wireless. 3 Terminology Tap and Tap and Hold Because the Pocket PC does not use a mouse but use a stylus instead, you will find that the term “tap” is used to indicate that you must tap on something on the screen, for example, a button. There is also another term that is used and that is “tap and hold”. This means that once you tap a particular object you keep the stylus down for a few seconds and, usually, if the program allows it, a menu will pop up enabling you to do other things. “Tap and hold” is somewhat equivalent to the right-click feature on a mouse. Today screen – On a Pocket PC, the Today screen is the main screen where you see the Start button and the Windows background picture. On a desktop or laptop computer, the main screen is called the Windows Desktop. TaskBar – On a Pocket PC, the TaskBar is at the top of the screen and is the bar that contains the Start button, the window title, the notification area and the “ok” or “x” button. MenuBar – On a Pocket PC, the MenuBar is located at the bottom of the screen. It may also contain a Toolbar next to the menu items where button-type icons are located. On the right-hand side of the MenuBar is the icon called the Soft Input Panel (SIP) where you can select from a soft Keyboard, Block Recognizer, Letter Recognizer or Transcriber. Resetting the Pocket PC During the operation of your Pocket PC, there may be occasions when you find that your Pocket PC “locks up” causing you to lose control of the Pocket PC. In these cases, you need to do a “soft reset” of the Pocket PC. You will find that on all models of Pocket PC there is a tiny reset button that can only be activated by the tip of the stylus or by inserting a pin or the tip of a paper clip. This action will reset your Pocket PC and allow you to get back to Windows and your programs. Check your Pocket PC manual to see how you can “soft reset” your Pocket PC as the procedure varies from model to model and from brand to brand. NOTE: There is also a “hard reset” available on Pocket PCs but you need only use this feature on very rare occasions. This type of reset forces all of your programs and data to be lost, specifically those applications not initially provided by the manufacturer of the Pocket PC. Effectively, RAM memory is blanked out on a hard reset. Wireless Technology There are many models of Pocket PC now on the market, some without wireless technology and some with wireless technology. Currently, Pocket PCs offer two types of wireless communications – Bluetooth and WiFi (Wireless Fidelity, aka the 802.11b or 802.11g specification). These are often packaged in Pocket PCs as 4 Bluetooth only or both Bluetooth and WiFi. These technologies are both short-range, high-bandwidth wireless solutions. However, unlike mobile phones, they have a very limited range. WiFi has a maximum range of about 100 meters while Bluetooth has a maximum range of about 10 meters. Bluetooth is used to wirelessly connect to mobile phones, printers, headsets and other peripherals that also have Bluetooth capabilities. WiFi is the preference for connecting the Pocket PC to other computers or networks that also have wireless “access points” or “hot spots”, as WiFi has a greater range. A number of retail outlets, like McDonalds and the Starbucks chains, are now “wiring” their shops for WiFi so that customers with laptops and Pocket PCs can wirelessly access the Internet to check emails and browse the web while they are having a cup of coffee. 5 INSTALLING / REMOVING ASTRACADABRA Pocket PCs – Technical Requirements Astracadabra is designed to operate on the Pocket PC type of handheld computer running the Windows Mobile operating system but NOT on the Palm or Palm Pilot type of handheld computer running the Palm operating system. A Pocket PC needs to have the Windows Mobile 5.0, Windows Mobile 2003 Second Edition, Windows Mobile 2003 or the earlier Pocket PC 2002 operating system installed and a CPU using Intel‟s StrongARM or XScale processors (or equivalents). The Pocket PC also requires a minimum of 64Mb RAM in order to run Astracadabra safely with other programs. After installation, Astracadabra consumes close to 14Mb of RAM not including the storage of chart files. The bulk of this installation size is due the full ACS PC Atlas - a large 9Mb. However, the convenience of this feature is well worth its size. To give you an idea of the number of charts Astracadabra can store and the amount of RAM they use, downloading 65 chart files from Solar Fire containing a total of nearly 2,500 charts consumes about 300kb of RAM. For the technically minded, each chart record stored can vary in size but averages around 120 bytes (or characters). The Windows Mobile 5.0, Windows Mobile 2003 Second Edition and the Windows Mobile 2003 operating system, as well as the earlier Pocket PC 2002 operating system, incorporates automatic memory management. This means that if Astracadabra requires more RAM for calculating charts or reports, the operating system itself will automatically shut down any other running program to give more memory to Astracadabra. However, it has been noticed that even automatic memory management has its limits when many other programs are running with Astracadabra. Sometimes, Astracadabra and the Pocket PC can appear as if they are running more slowly than normal. This can be a sign of “RAM cram”. Background to Installation Astracadabra has been designed to operate in Microsoft‟s .NET Compact Framework environment on a Pocket PC and so during installation a check is performed to see whether the .NET Compact Framework exists on the Pocket PC and, if so, whether it is the latest version. The .NET Compact Framework is already installed on your Pocket PC if you have the Windows Mobile 5.0, Windows Mobile 2003 Second Edition or the Windows Mobile 2003 operating systems. If you have any version of Solar Fire on your desktop or laptop computer (main computer) then two additional programs will automatically be installed on your main computer to later enable Astracadabra to either convert and download your Solar Fire chart file collection or, if any charts are entered into Astracadabra on the Pocket PC, 6 to automatically upload them onto your main computer and convert them for later access by Solar Fire. The two supplementary programs also operate in the .NET Framework environment on your main computer and so during installation a check is performed to see whether the .NET Framework exists on that computer and, if so, determines whether it is the latest version. During installation, the Astracadabra Installer will scan your main computer to check whether Solar Fire is installed and, if so, determine what disk drive it is installed on. The Astracadabra Installer will install the two supplementary programs files onto the same drive as Solar Fire so that access to Solar Fire chart files can be achieved. The Astracadabra installation process incorporates the Microsoft Windows Installer technology such that all Astracadabra programs are stored inside a MSI file contained on the CD or the download version of Astracadabra. It is this Installer that controls the installation process and prompts and informs you of each step during installation. The Microsoft Windows Installer program is required to be on your computer at the start so when the installation process begins, there is also a check for its existence and its version. During the process of installation, you may be notified that your computer will need to perform a reboot. Installing Astracadabra Preliminary Steps: 1) ENSURE THAT YOUR POCKET PC IS CONNECTED TO YOUR MAIN COMPUTER either via its cradle or cable. In addition, check that the Microsoft ActiveSync icon located in the “system tray” of the Windows Desktop (near the system time at the bottom right of the screen) is GREEN in colour. If it is GREY then the connection to the Pocket PC has not been fully activated. 2) ENSURE THAT YOU HAVE THE CORRECT VERSION OF ACTIVESYNC. If your Pocket PC uses the Windows Mobile 5.0 (or later) operating system then you need to ensure that you have ActiveSync 4.1 (or later) installed on your main computer. If you have an earlier version of the Windows Mobile operating system then you need to ensure that you have ActiveSync 3.8 installed on your main computer. To check the version you have on your desktop or laptop computer, click on the Start button then click on the All Programs icon then click on the Microsoft ActiveSync menu item and you will see the standard ActiveSync screen. Click on the “Help” menu item then click on the “About Microsoft ActiveSync” menu item. Ensure that the top line on the resulting screen shows you either Version 4.1.0 (or later) or Version 3.8 (if you have an operating system earlier than Windows Mobile 5.0). If your version is earlier than this then check your manuals for more details or log on to the Microsoft website to download the latest version at: http://www.microsoft.com/downloads/ and look for the correct version of ActiveSync. 7 The following steps are required to correctly install Astracadabra onto your main computer and your Pocket PC: a) On your main computer, ENSURE ALL PROGRAMS ARE CLOSED and that you are back at the Windows Desktop b) Ensure that your Pocket PC is connected to your main computer either via its cradle or cable and correctly communicating with your main computer by checking that the ActiveSync icon in the “system tray” is coloured GREEN. Also, ensure that you are back to the Today screen on your Pocket PC. c) For the CD Version of Astracadabra: INSERT THE ASTRACADABRA CD INTO THE CD-ROM DRIVE on your main computer and wait for about 30 seconds while the CD spins up. There is an AutoRun feature on the CD that will automatically launch the Setup program on the CD. For the Download Version of Astracadabra: Once you have access to the Internet website where the download version of Astracadabra resides, click on the link and you will most likely see a screen titled “File Download – Security Warning” that has three buttons on it: Run, Save, Cancel. The most convenient button to click on here is the Run button as it allows to you download Astracadabra and then launches the Setup program of Astracadabra. d) After the Setup program has been launched, the installation process begins and, at this point, a check is done for the Microsoft Windows Installer program and the Microsoft .NET Framework program on your main computer if they are not already installed or not up to the latest version. It is at this stage a reboot of your main computer may be performed. If the reboot does occur with your main computer, you will need to restart the installation sequence again from step a) above. However, for computers that have the Microsoft Windows Installer and the Microsoft .NET Framework already installed, the next thing you will see is the Astracadabra Welcome screen. When you have read the information, click on the Next button. e) You will now see the Astracadabra Confirmation screen. After reading the information, click on the Next button. f) Astracadabra will begin to install automatically on both your main computer as well as the Pocket PC. You will notice there will be a screen where the progress bar is very near the end but it may not seem to be doing anything for quite a while. During this pause, if the .NET Compact Framework needs to be updated on the Pocket PC, you may notice a message on the Pocket PC screen – [Confirm File Replace, The file “\Windows\mscoree.dll” is hidden, read-only, or a system file.] If you see this message, simply tap the “Yes To All” button. Once the .NET Compact Framework has been installed and is the latest version, you will not see this screen. g) NOTE: If you do not see the .NET Replace message (the step above), you will notice a pause in activity on your main computer‟s progress bar. This part of 8 the procedure takes about three minutes or so to complete if a USB port connection is used to the Pocket PC or about twelve minutes or so if a serial port is used. The Astracadabra program package is 16Mb in size and therefore takes a little time to download to the Pocket PC. Also, during this period, the Pocket PC is checked to see if it has the .NET Compact Framework already installed and, if so, whether it is the latest version. The .NET Compact Framework may be downloaded during this pause when you may not see anything actually occurring. h) For Pocket PCs with Windows Mobile 5.0 (or later): After a few minutes, you will then see the Microsoft ActiveSync screen “Add/Remove Programs” pop up on your main computer and see the progress bar as this process downloads Astracadabra to your Pocket PC. When this is completed, you will then see some activity on your Pocket PC. You will most likely see a warning screen (reddish in colour) indicating that Astracadabra is from an “unknown publisher” – just tap on the “Yes” button at the bottom of the screen to proceed. On the next screen, you get the opportunity to select to install Astracadabra onto your Device‟s main memory or onto a removable memory card, “\SD Card” is an example, if you have one installed. Tap on your choice of location and tap on the “Install” button at the bottom of the screen and the installation process will proceed. When it is completed, another screen pops up indicating that it has been successfully installed – just tap on the “ok” button on the top right-hand corner of the screen. Back on your main computer, you will see an “Application Downloading Complete” message – just click on the “OK” button. You will also see an “Installation Complete” screen – just click on the “Close” button. For Pocket PCs with Windows Mobile 2003 Second Edition (or earlier): After about three minutes or so (or twelve minutes or so in the case of a serial port), you will see some activity on the Pocket PC itself as it begins to install the Astracadabra automatically. At the same time, an “Installation Complete” screen will be displaying on your main computer indicating that it has finished. When you see the Pocket PC‟s activity completed (it goes back to the Today screen), just click on the Close button on your main computer. i) At this point, the Astracadabra program has fully installed onto both your main computer and the Pocket PC. The only difference you will notice on your main computer‟s Windows Desktop screen is a new icon – “Copy Charts to Astracadabra”. j) On the Pocket PC, tap on Start at the top of the screen. If you previously had less than 7 items on the Start menu for Windows Mobile 5.0 (or later) or 9 items on the Start menu for Windows Mobile 2003 (or earlier) then you should now see Astracadabra as a new item. Tap on it to start it up. If you previously had the maximum of 7 (or 9) items on the Start menu then you will need to tap on the Programs menu item, locate the Astracadabra icon and tap on it to start it up. 9 k) Since this is a new installation of Astracadabra, the first thing you will see is the End User License Agreement (EULA) screen. After reading that information and if you agree to the terms then tap on the Accept button otherwise tap on the Decline button to abort. l) If the EULA is accepted then Astracadabra will start up in Trial Version mode. This mode allows you access, for 7 DAYS, to all of the features of Astracadabra except the ability to Save charts or to Edit or Copy & Edit a chart. Each time you start up Astracadabra in trial version mode, you will be prompted with the number of days left in the 7-day trial period, the Serial Number as well as whether you wish to register the program. If you do not register Astracadabra before the 7day trial period expires, the program will only display the Registration screen when started up. No access will be given to any other part of the program. m) During either the Trial mode or the fully registered mode of Astracadabra, it is recommended that you enter your local city or town as your Home setting particularly for the calculation of the current transiting Ascendant or Mc. To do this tap on the Tools menu item at the bottom of the screen, then tap the Options menu item, and then scroll across the tabs to the Home tab to enter your Home information. The ACS PC Atlas will automatically perform a lookup, if that is your requirement. n) Once your Home has been entered, simply tap the “ok” button at the top right corner of the screen to return to the main screen of Astracadabra. Alternatively, you can tap the OK button near the bottom of that screen to make any other Option changes. o) REGISTRATION: To register Astracadabra in order to give you full access to all of the program‟s features, you first need to start up Astracadabra then tap on the Yes button when prompted whether you wish to register the program now. p) THE NEXT SCREEN WILL NOW SHOW YOU THE POCKET PC’S SERIAL NUMBER. MAKE A NOTE OF THE NUMBER THAT IS DISPLAYED ON YOUR POCKET PC AND THEN CONTACT YOUR DISTRIBUTOR FOR THE RELEVANT PASSWORD IF YOU HAVE NOT ALREADY RECEIVED YOUR FULL REGISTRATION DETAILS. Tap the Abort button if you need time to make contact and receive your password. If you now have your password then proceed to the next step. q) Tap or write in your registered name then tap on the ENTER key on the Soft Input Panel (SIP) and the cursor will move to the Password entry field, 10 skipping over the Serial Number which is already filled with the Pocket PC‟s Device ID. NOTE: If you are using the soft keyboard of the Pocket PC for entering the password, you will notice the CAP key temporarily removes the numbers across the top of the keyboard. For correct password entry, you may need to alternate between numbers and capital letters by tapping the CAP key. r) Once the password has been entered, then tap on the OK button. The entries you have made at this point are verified and if not correct, you will see a message indicating the error and that you should “try again” and when it is cleared, you will return to the Opened tab of the program allowing you to try again or continue with the 7-day Trial period. If the details you have entered are correct then you will return to the Astracadabra program and you will then see the Save button displayed on the Opened tab. In addition, you will now see both the Edit… and Copy & Edit… menu items activated on the Chart menu item. 11 Removing Astracadabra The following steps are required to correctly remove Astracadabra from your main computer and your Pocket PC. For Pocket PCs with Windows Mobile 5.0 (or later): a) On your main computer, ensure all programs are closed and that you are back at the Windows Desktop b) Ensure that your Pocket PC is connected to your main computer either via its cradle or cable and correctly communicating with your main computer. Also, ensure that you are back to the Today screen on your Pocket PC c) On your main computer, click on the Start button then click on the All Programs then locate and click on Microsoft ActiveSync. This action will start up the Microsoft ActiveSync screen. d) Click on the Tools menu item then click on the Add/Remove Programs menu item. You should now see a list of installed programs on your Pocket PC. e) Locate the Astracadabra 2004 Astracadabra item and click on the checkbox to remove the tick mark. Now click on the Remove button on that screen. This process removes Astracadabra from your Pocket PC. f) We now need to remove the extra programs on your main computer by performing the next steps. On your main computer, click the Start button then click the Control Panel menu item to get to the Control Panel screen, if you have Microsoft Windows XP or Microsoft Windows 2000. (On earlier versions of Windows, you need to double-click the “My Computer” icon on the Desktop then double-click the Control Panel icon to get to the Control Panel.) g) Double-click the “Add or Remove Programs” item and you will see a list of installed programs on your computer. Scroll down and locate the Astracadabra entry and click it once only to highlight it. Now, click the Remove button (or Add/Remove button on earlier versions of Windows) and confirm its removal by clicking on the “Yes” button to begin the removal process. h) Once the removal process has begun, you will see some progress bar activity and then it will return to the Astracadabra entry. Wait a moment and you will then see that the Astracadabra entry will disappear from the list and it is likely that the previous entry will now be highlighted. i) Close all windows by clicking on the X button at the top right of each window and return to the Windows Desktop screen. Astracadabra will now be fully removed from both your main computer and from your Pocket PC. For Pocket PCs with Windows Mobile 2003 Second Edition (or earlier): a) On your main computer, ensure all programs are closed and that you are back at the Windows Desktop b) Ensure that your Pocket PC is connected to your main computer either via its cradle or cable and correctly communicating with your main computer. Also, ensure that you are back to the Today screen on your Pocket PC c) On your main computer, click the Start button then click the Control Panel menu item to get to the Control Panel screen, if you have Microsoft Windows 12 XP or Microsoft Windows 2000. (On earlier versions of Windows, you need to double-click the “My Computer” icon on the Desktop then double-click the Control Panel icon to get to the Control Panel.) d) Double-click the “Add or Remove Programs” item and you will see a list of installed programs on your computer. Scroll down and locate the Astracadabra entry and click it once only to highlight it. Now, click the Remove button (or Add/Remove button on earlier versions of Windows) and confirm its removal by clicking on the “Yes” button to begin the removal process. e) Once the removal process has begun, you will see some progress bar activity and then it will return to the Astracadabra entry. Wait a moment and you will then see that the Astracadabra entry will disappear from the list and it is likely that the previous entry will now be highlighted. f) Close all windows by clicking on the X button at the top right of each window and return to the Windows Desktop screen. Astracadabra will now be fully removed from both your main computer and from your Pocket PC. 13 GETTING STARTED: A GUIDED TOUR OF ASTRACADABRA One of the best ways to quickly become familiar with a new piece of software is to be able to take a tour though the various features it has using an example chart. The following paragraphs will enable you to do just that but first there are one or two preliminary steps. Main Menus Perhaps a good start to this tour is to become familiar with the main two menus of Astracadabra. The screenshots give you an idea of the main menu structure where you can gain access to different parts of the program. A number of these menu items will be used in this tour. NOTE: If your Pocket PC is using the Windows Mobile 5.0 (or later) operating system then you will not see the Move Astracadabra… menu item, as this feature is now part of the installation options. 14 Home Setting After having installed Astracadabra, one of the first things you should do is to change the Home setting – the city or town that you want to use for your current transits. After starting up Astracadabra, tap on the Tools menu item then tap on the Options menu item. Using the right-pointing arrow on the right of the tabs, tap on it a few times until you see a tab called Home. Tap on that tab and enter your particular Place and Country that you want to use as your default Home. The ACS PC Atlas is handy for you here in that it will automatically locate your city or town and add the Timezone, Latitude and Longitude for you. Alternatively, if your particular city or town is not found in the ACS PC Atlas, you can tap on the “Auto lookup” checkbox making the tick disappear and then manually enter you particular city or town, including you Timezone, Latitude and Longitude. Removing the tick first prevents automatic lookup. Once you have entered your city or town, simply tap on the “ok” button at the top right of your screen to return to Astracadabra, specifically to the Opened Chart List where you will see the current transit entry. 15 To Enter a New Chart Tap on the Chart menu item then tap on the New… menu item. You will now see the New Entry screen where the entries are loaded with the current transit details for your new Home setting. For the name, tap in “Jenny Johnson” (not including the quotes) then the tap the ENTER key on the keyboard, located at the bottom of the screen. The highlight will now move to the Date entry. Next, tap in “6.11.82” (not including the quotes) then tap on the ENTER key and the display for the date will change to 6 Nov 1982, its standard output for a date. For the Time entry tap in “10.15” (not including the quotes) then tap on the ENTER key and the Time entry will change to “10:15 am”. Note: If you wanted to enter a night birth, simply tap in “10.15p” (not including the quotes). This will automatically change to “10:15 pm”. So, for day births, you do not need to enter “a” or “am” and for night births then you only need to enter “p” for ”pm” or, if you like, the full “pm” or “am” is also acceptable. Next, for the Place tap in “Bath” then tap on the ENTER key then tap in “UK” for the Country then tap on the ENTER key. The ACS PC Atlas will automatically load in UT +00:00 for the Timezone and 51N23 for the Latitude and 002W22 for the Longitude. The “N” button is the Now button - it loads the current date and time from the Pocket PC. The “H” button is the Home button – it loads the default Home, located in Tools / Options, previously set by you. The “X” button is simply used to Exit or Abort the entry. The “>” button is the “Next Screen” button where you can change the chart‟s default Classification, House System and Zodiac. For now, just tap on the OK button and you will next see the natal chart for Jenny Johnson displayed. Chart Control Centre This screen is your main chart control centre for viewing other charts associated with this chart or for viewing Aspects or Reports. To View Aspect Lines and Use the Aspect Toolbar 16 To view aspect lines on screen, simply tap on the Aspect button (trine symbol) located on the toolbar at the bottom of the screen. You will see a black square surrounding the button indicating that it is depressed. Tap it again to restore the screen if you wish. When the aspect lines are displaying in the middle of the chart, sometimes it will look a bit cluttered if there are too many lines. You can examine one or more aspect type by tapping on the Aspect Toolbar button, the one to the right of the Aspect button (trine symbol). This will display a toolbar displaying each of the aspects as a separate button. These aspect buttons are colour-coded as either Green (selected) or Red (unselected). You can tap on various combinations of these buttons to more closely inspect each aspect type, see the screen showing a display of trines only. Once you have tapped one or more aspect buttons, you then you need to tap the “S” button on the Aspect Toolbar to Set the screen. While the Aspect Toolbar is displaying, all other parts of the screen are disabled. When you are finished with the Aspect Toolbar, tap the “X” button on the Aspect Toolbar to exit this feature. All of the aspects previously displayed are now restored. 17 To View the Aspect Grid If you wish to take a closer look at aspects using the aspect grid, tap on the Aspects tab. The aspect grid will display not only the aspect but also the orb and whether the aspect is applying (A) or separating (S). Use either the vertical or horizontal scroll bar to see more planet combinations. To View Reports Chart Details If you wish to view a selection of reports pertaining to the current chart, simply tap on the Info tab. By default, the Chart Details report is always displayed first. This report shows various details of the chart that includes positions of points and planets down to minutes of arc. Since there is a lot of information on this report, you are required to scroll down to the various details. Next to the Longitude column, if a planet is moving in a retrograde motion then the retrograde symbol will be displayed. In addition to this, if a planet is in combustion with the Sun then a small “c” letter is also displayed. You may also see both the retrograde symbol and the combustion symbol for the same planet. The combustion orbs used can be seen in the table on page 36 of this manual. Next to the Travel value for each planet, you may notice one of two classifications – “Slow” or “Stat.” (Stationary). A planet is regarded as “stationary” when it is has a travel of one minute per day or less. A planet is regarded as “slow” when it is 20% or less of its “normal” daily travel. See a table of slow values for each planet on page 36 of this manual. To view other reports, tap on the Reports button on the toolbar. Sorted Aspects, Sorted Declinations 18 You can view a list of all of the aspects sorted in closest orb order if you tap on the Sorted Aspects menu item. You can also view a list of sorted declinations, regardless of whether they are North (+) or South (-) of the equator, if you tap on the Sorted Declinations menu item. Essential Dignities You may wish to view the Essential Dignities, from Classical astrology, calculated for each planet. There are various option settings for Triplicities and for Terms 19 located in the Tools / Options / Ess.Dign. See pages 37 and 45 for more details. Tap on the Show tab to return to the chart wheel. Dasas, Divisional Charts and KP Details (for Vedic Astrology) Viewing any one of these reports typically requires a chart to calculated in one of the sidereal zodiacs, like Lahiri. However, for flexibility and research, these reports can be displayed using any zodiac you select. Dasas: The Dasa report is in fact the Vimshottari Dasa of 120 years, normally displayed to three levels but optionally can be displayed from one level to five levels. This screen has a scrolling mechanism so that by tapping on the up or down arrows, the dasa report scroll 9 lines at a time. The left and right arrow buttons decrease or increase the number of levels displayed, respectively. The “<” button is the Restore button and tapping it restores the Dasas report back to the default three levels for today‟s date. The Dasas display automatically allows you to extend beyond the 120-year limit of the dasas. So, if you have a chart of a country, like the USA, which has a “birth” year of 1776, then the dasa calculations for today‟s date are based on the fact that the 120year dasa cycle repeats itself. When calculating a natal chart, the vimshottari dasas have a Dasa Balance usually in Years, Months and Days. This figure is now displayed and is important to Vedic astrologers. The Progressed Dasa Point (PDP) of the Ascendant, Moon and Sun is also shown at the zodiacal degree for today‟s date or at the zodiacal degree of a particular date when viewing dasas only at the fifth level. Today‟s PDPs are displayed in the colour Black while PDPs for other dates are displayed in the colour Red. 20 Divisional Charts: Selecting this report enables you to instantly see the sign a planet is located in each of the divisional charts D3 to D12. While these are somewhat like western harmonic charts, they use different calculations. Conveniently, this table indicates the signs where a planet is debilitated with a left-pointing arrowhead symbol. KP Details: This report contains all of the essential details required for the Krishnamurti (KP) system. It lists both planet and house cusp longitudes to seconds of arc as well as displaying the Star, Sub and Sub Sub lord for each planet and house cusp. A list of the House and Planet Significators is derived from the planet‟s longitude, its house location and its lordships of houses. This report also lists the Badhaka and Maraka planets for that chart. Together with the preceding details, a list of Ruling Planets (RPs) is also given with indicators as to whether a RP is located in the Star or Sub of a retrograde planet or is retrograde itself. Vedic aspects to Rahu and Ketu are also given. 21 To Display Transits, Progressions and Directions From the Show tab screen, the main chart control centre, you have access to various calculations primarily used in western astrology. Tap on the drop down box where you see the word Natal. From this list, you can produce bi-wheels that show any one of the following: 22 Synastry = Synastry angles typically between two Natal charts Tr>N = Transits to Natal SP>N = Secondary Progressions to Natal TP>N = Tertiary Progressions to Natal MP>N = Minor Progressions to Natal SA>N = Solar Arc to Natal SR>N = Solar Return to Natal (single wheel showing the current Solar Return) UP>N = User-defined Progressions to Natal UD>N = User-defined Directions to Natal See pages 28 and 44 to see more details for each of these calculation options. The calculations used for these types of charts are based on today‟s date and time. If you want to base the calculations on another date, time and place you can do so by tapping on the Now drop down box and select either the Change option or the Select option. Selecting the Change option will allow you to enter new base details for calculations. This is handy if you wish to investigate a particular event date of the person. Choosing the Select option allows you to select any chart that is currently on the Opened Chart List. If you have a number of events charts stored in chart files and you have previously opened them, you can select them here for use as event charts to be displayed around the outside of a natal chart. To Save a Chart Having entered a new chart, you can now save it to an Astracadabra chart file. To do this, tap on the Opened tab to see the Jenny Johnson entry highlighted on the Opened Chart List. This is the screen that has the Save button. If the chart has not been Saved then it will be a Red colour. Tap on the Save button and you will see the File Manager screen. If you have not yet downloaded any Solar Fire chart files, it is likely 23 that there will be no chart files on the list. In this case, tap on the Create button and type in the chart file name “MyCharts” (not including the quotes) and tap on the OK button. This action will create a new chart file of this name and add it to the list and it will be highlighted. Now all you need to do is to tap on the Select button to Save this new chart to that file. On return to the Opened Chart List, you will see that the Save button has now changed its colour to Green indicating that this chart has now been saved. A second way to save a new chart is to tap on the Chart menu item and tap on the Save… menu item. This action will also take you to the File Manager screen, as described above. To Download Your Solar Fire Chart Files On your main computer, either a desktop or laptop computer, you will see an icon named “Copy Charts to Astracadabra”. Double-click on the icon to start up the Transfer chart files program resulting in the screen opposite. By default, each chart file is ticked (or selected). There are buttons to UnSelect All or Select All. Alternatively, you can click on individual chart files to remove the tick therefore un-selecting the entry. Finally, if you do not wish to ever download some chart files then untick them and then click on the Save Profile button. This button will save the unticked entries ensuring that these are not downloaded to Astracadabra each time. You can, of course, re-tick the entry and then click on the Save Profile button again to save your current entries that are un-selected. When your list is ready, click on the OK button and this will commence the download and conversion of the selected Solar Fire chart files to Astracadabra on the Pocket PC. To Open a Saved Chart in Astracadabra Tap on the Chart menu item then tap on the Open… menu item and you will see the Chart Manager screen. You should now see the list of chart files that you have downloaded from Solar Fire, including the one you previously created. As an 24 example, tap on the “clif2000.amc” (or “clifford.amc” if from Solar Fire v4) file and when highlighted, a list of charts will be displayed in the list below. Scroll down and locate “Ball, Lucille”. Tap on this entry to highlight it and tap on the Select button. This action will open the chart and display the chart. To Edit or Copy & Edit a Chart Tap on the Opened tab and then tap on the Jenny Johnson entry to highlight it. Once the “wait” cursor has finished, the details of Jenny‟s chart will display in Blue below the list of charts. Tap on the Chart menu item then tap on the Edit… menu item to display a screen where you can now edit the details. Tap on the Time field to highlight it and tap in “10.45” (not including the quotes), to change it to 10:45 am. Now tap on the ENTER key then tap on the OK button. After you return to the Opened Chart List, you will now see the entry details (in Blue) display the new time of 10:45 am. Now tap on the Show tab to display the chart. Tap on the Chart menu item then tap on the Copy & Edit… menu item to see a screen where you can change the details of the chart. This time, tap on the “>” button to display the next screen where you will be able to change the Classification, House System and Zodiac. For our example, simply tap on the down arrow for the House System and change the setting to Hindu Bhava. Do the same for the Zodiac and change it to Lahiri, a zodiac that is commonly used in Vedic astrology. Tap on the Calculate button to return to the Opened Chart List and you will see a new entry for Jenny Johnson added to the list. Note the change of House System and Zodiac for this entry on the details line. You will also see that the Save button is now Red indicating this is a new chart that has yet to be saved. Tap on the Show tab to see the Vedic chart in a round wheel. To Start the Transit Clock Feature Astracadabra has a Clock feature where you can see the current transits “ticking over” every 30 seconds on a single wheel. For our example, tap on the Opened tab then tap on the first Jenny Johnson entry. This will be the tropical chart for Jenny. Now, tap on the Show tab to display the chart. Now, tap on the Clock icon at the bottom of the screen on the toolbar and this will begin the 30-second clock. You will see at the top of the screen, today‟s date and time and every 30 seconds you will see the “wait” cursor indicating that the chart is being updated. The black square around the Clock button indicates that it is depressed and in operation. 25 This feature can also apply to a bi-wheel where a natal chart is the inner chart and the outside chart is the current transits, updating every 30 seconds. To see an example of this, tap on the Clock button to stop the current transits “ticking over” from the previous paragraph. On Jenny Johnson‟s natal chart, tap on the drop down box where you see the word “Natal” and tap on “Tr>N” to display transits around the outside of the natal chart. Finally, tap on the Clock button and you will see that the bi-wheel remains showing the transits around the outside and every 30 seconds you will see the “wait” cursor updating the outer wheel transits. For both conditions described above, you can tap on the Aspect button (trine symbol) and watch the aspects change over time. You can also tap on the Aspects tab to display the Aspect Grid for a more precise view of aspect orbs changing over time. Finally, you can tap on the Info tab and watch the points and planet positions change over time. To automatically stop the Clock feature “ticking over”, all you need to do is to tap on the Opened tab or tap on one of the Chart menu items or one of the Tools menu items. To View the Current Version of Astracadabra Tap on the Tools menu item then tap on the About… menu item and, as described above, the Clock feature will be disabled and you will now see the About screen where the About tab has been selected. This screen displays information about Astracadabra. You will see the name of the program and its Version number. When you seek technical support, you may be asked to report this number. You will also see the registered user‟s name, the Serial # and the Distributor‟s details. In addition, there are two more tabs on the screen. The Copyrights tab specifies the companies who hold the copyright over parts of the software, and tapping on the EULA tab allows you review the End User License Agreement, the same one you originally agreed to the terms of Astracadabra when registering the program. To exit this screen, simply tap on the “ok” button at the top right of the screen and you will return to Opened Chart List. End of Tour This concludes the tour of Astracadabra. It is hoped that you will now be able to make the most of the features that have been built into the program. Being able to enter and view an astrology chart anywhere anytime is the main purpose behind using Astracadabra on the Pocket PC. ASTRACADABRA: A CLOSER LOOK Astracadabra Startup When Astracadabra starts up it displays a “splash” screen for 4 seconds while initiating the Astracadabra program and then it disappears and automatically displays 26 a chart wheel of the current transits. This chart can be handy especially for those who do Horary. Entering a New Chart or Editing a Chart Date and Time entry box Tapping on the Chart / New menu item enables you to enter a new chart. Both the Date and Time fields accept various formats. One of the fastest ways to enter a date is using natural writing with the stylus is to enter the Day number then a dot then the Month number then a dot then the two digit Year. For example, “21.7.88”. For birth times, you can also use a dot separator, for example 11.25 = 11:25am (for AM births you do not need you to enter “am”. In the case of “pm” births, you only need to tap in a “p”, for example 11.25p will result in 11:25pm. For moving to the next input field, you can either tap on the next text box or tap on the ENTER key on the soft input panel. If a place or country is not found, you will be presented with options from the built-in ACS PC Atlas. US or British Date Formats The detection of whether Astracadabra uses US date format (Month/Day/Year) or the British format (Day/Month/Year) depends on the setting of the Pocket PC‟s Regional Settings in Windows (Start / Settings / System / Regional Settings). If the regional setting is set to English (United States) then the US date format is used in Astracadabra otherwise the Day/Month/Year format is used for all other settings. Place and Country entry box You can now enter a single asterisk (*) in the Place text box and/or the Country text box in cases where you do not have an actual Place or Country but only the Latitude and Longitude of a location. A single asterisk on these two text boxes will bypass the automatic lookup of the ACS PC Atlas. Timezone entry box Generally, the ACS PC Atlas will automatically fill in the Timezone text box for you. However, there may be times when you need to enter a timezone yourself. You can enter numbers for the timezone representing Hours, Minutes and Seconds (HMS), foe example –10:23:36. You can also enter the letters LMT (Local Mean Time) or LAT (Local Apparent Time) and Astracadabra will manually calculate the equivalent HMS for you and display these in the Timezone text box. Finally, you can simply enter a known timezone code, such as EST in the Timezone text box and Astracadabra will fill in the HMS. The “N”, “H”, “X”, “OK” and “>” Buttons On the Chart / New data entry screen, the “N” button means “Now” – it loads the current computer‟s Date and Time into those fields and updates the Name field accordingly. The “H” button means “Home” – it loads the default Place, Country, Timezone, Latitude and Longitude as previously stored in the Options area for Home. The “X” button allows you to Exit that screen and return back to the previous 27 screen. The OK button simply calculates the chart and adds it to the Opened Chart List and then automatically displays the chart wheel. This action assumes that you require the default House System and Zodiac. Tapping the “>” button takes you to the next input screen and on that screen, you have the ability to Classify that chart as Unspecified (default), Male, Female, Event or Horary as well as the ability to select a different House System and Zodiac other than the default ones permanently set in the Options. Data Entry Errors If any errors are detected during data entry, such as a blank input or where the first character is not a letter or number then an error message is raised and the previous value that was displayed in the data entry box is restored. On a Pocket PC, you may find this feature can be quite handy when errors are made as it saves tapping in or writing the entry again. Krishnamurti Zodiac Option When selecting a zodiac for a chart (the ayanamsa if a sidereal zodiac is chosen), the Krishnamurti New zodiac option will calculate the new Krishnamurti ayanamsa as defined by the Krishnamurti group in India in 2003. The original Krishnamurti ayanamsa can be accessed via the SVP zodiac option, mentioned in the Tools / Options section of this User Manual. Wheel Display / Show Tab For speed of displaying a chart, you will find that when you tap on either Chart / New or Chart / Open that the resulting chart is automatically displayed after your chart has been entered or selected. Unlike other screens, the Show tab removes the TaskBar and Start button at the top and replaces that area with two lines of chart details for a single wheel. In the case of a bi-wheel display, the single lines in this position are used for details of the Inner and Outer wheels. Due to space limitations, you will notice that the planet or point positions as well as house cusps on a chart wheel only show a degree value (rounded) in a sign. For more detailed information on a planet or point‟s position down to the minute of arc, go to the Chart Details report on the Info tab. When displaying a chart wheel, if there are any intercepted signs, they will be automatically displayed on the wheel. On the wheel display, you will notice that there are two drop down (combo) boxes. The one on the left enables you to select information for an outer wheel resulting in a bi-wheel being displayed. Besides the default first selection “Natal”, the other selection options are: 28 Synastry = Synastry angles typically between two Natal charts Tr>N = Transits to Natal SP>N = Secondary Progressions to Natal TP>N = Tertiary Progressions to Natal MP>N = Minor Progressions to Natal SA>N = Solar Arc to Natal SR>N = Solar Return to Natal (single wheel showing the current Solar Return) UP>N = User-defined Progressions to Natal UD>N = User-defined Directions to Natal If any one of these options is selected, a bi-wheel results where the inner wheel is the Natal chart and the outer wheel contains the option selected. The exception to this is the Solar Return chart (SR>N) where it displays a single wheel using the ascendant and houses of the Solar Return itself. All of the calculations are based on the current computer‟s date and time the option was selected. The purpose of the other drop down box on the right is to enable you to select another base date and time for the calculations or select another opened chart on the Opened Chart List. For example, you may want to check the transits, progressions and directions for a particular date of an event. The Change option on the second drop down box enables you to enter a new date, time and place to be used as the base chart for the outer wheel calculations using a screen just like the Chart / New screen. Alternatively, if you have already opened an event chart that was previously saved in a chart file, you can tap on the Select menu item to see a list of charts on the Opened Chart List. Tapping on one of these will display it as the outside wheel on a bi-wheel. In the case of Secondary Progressions (SP>N), Tertiary Progressions (TP>N) and Minor Progressions (MP>N), also see the Tools / Options / Prog. tab later in this document for a description of the options you have for progressing the angles and for defining the Day. For Tertiary Progressions, please note that these are calculated using the mean Moon position and are therefore known as a Mean Tertiary Progression. True Tertiary Progressions are likely to be included in Astracadabra in a future release. A Solar Return is always calculated for the last birthday and is therefore the “current” Solar Return. For a Solar Return chart for another year, use a different base date in right-hand drop down box Change item or choose the Select option if an event chart is already opened. 29 The User-defined Progressions and User-defined Direction options, display a list of up to 10 different rates for progression or direction. Initially, there is just one rate displayed for the progression or direction list - the Secondary Progression rate and One-Degree Per Year rate, respectively. You can select any of these entries for the current progression or direction. In the case of User-defined Directions, you can also select whether these will be calculated Direct or Converse, converse meaning going backwards in time. Additional progression and direction rates may be entered in the Tools / Options / Prog tab of Astracadabra, described later in this document. When a bi-wheel is displayed, if a planet is retrograde on the outer wheel, its degree number will be displayed in RED. Synastry Chart This feature allows you to view two previously opened and/or entered charts as a bi-wheel and thus be able to view the interaspects between them, as used in the Synastry technique. One of the features when a Synastry bi-wheel is displaying is that a “Swap” toolbar button becomes active. By tapping on the “Swap” button, the two charts are swapped over from outer to inner. This allows you to see the impact of one chart‟s planets in the houses of the other chart. Once a Synastry bi-wheel is displaying, you can easily tap on the Aspects tab to view the inter-aspects in a Synastry grid. You can also tap on the Info tab then tap on the 30 Reports toolbar button and tap on “Sorted Aspects” to see which aspects are the closest between the two charts. The Swiss Ephemeris Astracadabra is powered by the Swiss Ephemeris. This is the same ephemeris found in Solar Fire. While a chart can be calculated for dates from 1 A.D. to 3000 A.D. on Astracadabra, exact planet positions when comparing with Solar Fire can only be obtained for the 1200-year block between 1200 A.D. and 2399 A.D. Both before and after these dates, the Swiss Ephemeris switches to a slightly less accurate set of calculations called the Moshier Ephemeris. However, when comparing charts for the year 1 A.D. with Solar Fire, the results are very close. Positions for Chiron and the 4 asteroids (Ceres, Pallas, Juno and Vesta) cannot be calculated in the Moshier Ephemeris so that any charts for dates earlier than the year 1200 will automatically leave these 5 planets out of any displays or reports. Opening an Existing Saved Chart The Chart / Open takes you to the Chart Manager screen where it displays a list of Astracadabra chart files (the top list) and displays the individual charts stored in that file on the bottom list. First, tap on the required chart file to highlight it then tap on the chart required to highlight it and then tap on the Select button. On this screen, you will find that the Delete button will only be operational if you have first saved a new chart into this chart file within this session of Astracadabra. If the highlighted chart has been previously downloaded from Solar Fire, that chart cannot be deleted in Astracadabra. You can only delete charts from a chart file from within Solar Fire once a chart has been saved with Solar Fire. Chart Name Sorting When you go to open a chart via the menus Chart / Open, there is a sorting feature for the chart names. By default, the chart names are sorted in Lastname order (“by Name” option). However, you can also sort them by: i) the chart‟s date and time order (“by Date” option) and, ii) the order in which the charts were added to the chart file (“by Add” option) Additionally, you can change whether the order is ascending or descending by tapping the “Descend” checkbox. Large Chart File Collections Astracadabra has the ability to handle large chart file collections. If a chart file has up to 500 charts in it then Astracadabra is able to open it and display a list of all of the charts contained in the chart file, within a few seconds. However, when chart files 31 contain more than 500 charts, then a separate process for opening a chart takes place. The reason this is necessary is that the more charts there are in a chart file, the longer it takes to create and display the list of charts. If you had a chart file with say, 10,000 charts in it, the method of displaying all of the charts would take several minutes before you could begin to see the list of charts. The method that Astracadabra now uses to select charts within a large chart file collection (chart files with more than 500 charts in them) is to display just the first character of all of the chart file's last names, such as the letters A to Z (see the screenshot). You then select the first letter you are looking for then the list of charts for that letter is then displayed. This method is a fast way to get to a particular chart in chart file collection. See the screenshots below for an example. Associated with this feature is an Indexer that you may see operating after you transfer chart files from Solar Fire to Astracadabra. If you have any chart files that contain over 500 charts then these chart files are automatically indexed after transfer. The Indexer displays a progress bar on the Pocket PC while indexing. Seamless Interaction with Solar Fire If you have any version of Solar Fire installed on your desktop or laptop computer then you will find a new icon named “Copy Charts to Astracadabra” on your Windows Desktop after Astracadabra has been installed. Double-clicking on it brings up a window where you can select any or all of your Solar Fire chart files to download to Astracadabra. This screen also allows you to Select All or UnSelect All chart files using the appropriate buttons. You can also tick or untick each chart file for transfer. If there are some chart files that you do not wish to ever put on the Pocket PC then after you unselect them (by clicking on the entry to remove the tick) you can then click on the Save Profile button. This action will save the entries that are currently unselected so that when this selection screen is displayed the next time, 32 these entries will automatically not be ticked. Any new Solar Fire charts that have been created since the last transfer to Astracadabra will be ticked for selection. Any new chart that you may have entered and saved in Astracadabra on the Pocket PC will automatically be available in that chart file on Solar Fire once the Pocket PC has been re-connected to your main computer either via its cradle or cable and you proceed to Backup the files on your main computer. The direction of transferring chart files between Solar Fire and Astracadabra is controlled by a “semaphore” interlock mechanism so that chart files that have new entries on either Solar Fire or Astracadabra cannot be automatically overwritten. This simply means that if you try to transfer chart files in one direction more than once, you will be warned and then have the option of confirming the overwrite. This warning is not displayed if you are transferring files correctly in the right direction at the right time, that is, from Solar Fire to Astracadabra then Astracadabra back to Solar Fire. Editing Charts The Chart / Edit allows you to edit the details of the current chart while the Chart / Copy & Edit allows you to edit the details of a chart but adds these changes as a separate chart entry on the Opened Chart List. If you open a chart file that has been downloaded from Astracadabra it cannot be edited directly – the Edit option is not enabled. Instead, you need to use the Copy & Edit feature and then save the resulting chart. If you do not require the former chart after using Copy & Edit, then you need to delete it in Solar Fire, not in Astracadabra. This action is required to keep chart file maintenance manageable between the two programs. Opened Chart List / Opened Tab At any time you tap on the Opened tab, you will see a list of currently opened charts. If there is more than one chart listed in the Opened Chart List then tapping on any one of them will highlight it. As you tap on one, you will find that the Save button will indicate whether that chart has been previously saved (Green) or whether it has yet to be saved (Red). Tapping on the Save button brings up the File Manager screen where you can: a) Delete a chart file, b) Create a new chart file, c) Copy an existing chart file to a new one, d) Rename an existing chart file or e) Select a highlighted chart file when you want to save a chart. On the Opened Chart List whenever you tap a particular chart on the list near the bottom of the screen, it will display the current details about that chart over four text lines. This can be useful if you keep charts for the same person but use different house systems or different zodiacs. These text details enable you to distinguish between similar charts. 33 If you want to remove a chart from the Opened Chart List, you may do so by using the “tap and hold” technique on the chart in question. Tap and hold on the chart entry on the Opened Chart List and, after a few seconds, a Delete menu pops up enabling you to confirm the deletion of that chart. If you do confirm the deletion, the chart will be removed from the list. How to Save a Chart After having entered a new chart and displayed it, you may wish to save it. To save a new chart, you need to tap on the Opened tab to display a list of opened charts. Tap on the chart you wish to save to highlight it and then tap on the Save button near the bottom right-hand side of the screen. On the next screen, if you have previously downloaded your chart files from Solar Fire, then tap on the chart file into which you want to save this chart and then tap on the Select button. The chart will be saved and you will return to the Opened Chart List where you will notice the Save button has now turned GREEN indicating that the chart has been saved. If you have not previously downloaded any Solar Fire chart files OR you want to save this chart into a new chart file then you will need to create a new chart file. Do this by tapping on the Create button and enter a filename you wish to call this new chart file. Tap on the OK button when you have entered a new filename and the new chart file will be created and highlighted on the list. To complete saving your chart to the highlighted chart file, simply tap on the Select button. The chart will be saved here and you will return to the Opened Chart List where you will notice the Save button has now turned GREEN indicating that the chart has been saved. You can also save a chart by tapping on the Chart menu item then tap on the Save… menu item. The remaining steps for saving a chart are listed in the above paragraph. Toolbar Buttons Clock Toolbar Button As you tap on the different tabs, you will notice that the number of toolbar buttons below the tabs change. However, the Clock button remains visible for all of the tabs allowing you to start that feature any time. When the Show tab has been selected and the Clock button is tapped and a single wheel is displaying then this will automatically show a chart wheel of the current transits, ticking over every 30 seconds. Once the Clock button has been tapped, a black square is drawn around the button to indicate that it is depressed and therefore in “Clock” mode. If a bi-wheel was displaying at the time the Clock button was tapped then only the outer wheel will update every 30 seconds. Tapping on another tab or on one of the menu items or simply tapping the Clock button itself will stop the chart updating allowing you to do other things. 34 Taskbar Toolbar Button When the four-colour Taskbar button on the Toolbar (see above screenshots) is tapped, it enables you to display the Windows Taskbar at the top of the screen on Show tab by dropping the chart down. Once you can see the Taskbar, you then have access to the Start button and to other Pocket PC features. Another tap on the fourcolour Taskbar button on the Toolbar restores the chart on the Show tab. Aspect Lines When you tap the Show tab, you will notice that a button with a trine symbol appears at the bottom on the Toolbar. This button is the Aspect button and it allows you to display aspects lines in the centre of that chart, whether it is a single wheel or a biwheel. Like the Clock button, when the Aspect button is tapped, a black square is drawn around it indicating that it is depressed. When the Aspect button is tapped again, the aspects are removed and the house numbers reappear on the chart. When aspect lines are displayed on either a single wheel or bi-wheel, you will notice another button appears on the Toolbar, displaying small aspect symbols. Tapping this button displays another Toolbar that has on it various aspect buttons enabling you to selectively show or not show certain combinations of aspects. If the button is Green then that means that the aspect is selected and that aspect line is displayed. If the button is Red then it means the aspect has been unselected and the aspect line will not be drawn. The “As/Mc” button selectively allows you to show or not show any aspects to the Ascendant or MC. Tapping The “S” button sets the chart to now display the combination of aspects you have selected. If the Clock button is activated then during the 30-second updates, any changes to the aspect buttons are then displayed. While this Aspect Toolbar is showing, you will find that tapping anywhere outside of the toolbar area will not do anything so to get back to the other operations of Astracadabra, you now need to tap on the “X” button (Exit). The Aspect Toolbar only allows a temporary selection of aspects and does not permanently store these changes. To selectively use or not use a particular aspect for chart aspect line displays, you need to go to the Tools / Options menu item and make the changes there. Aspect Grid / Aspects Tab By tapping on the Aspect tab, you will display a chart‟s aspect grid. The grid not only displays any planet or point aspects that are within a pre-defined orb (also see Tools / Options / Aspects later) but also displays the actual degree and minutes from the exact aspect angle. The notation also indicates whether the aspect is applying (A) or separating (S). The aspect grid was designed with both horizontal and vertical scroll bars so that you can navigate around the aspect grid. To draw the entire aspect grid onto one page would have required making the information much smaller than it is now. It was decided to use the scroll bars and leave the aspect information in a more readable size. 35 If a bi-wheel has been selected then the aspect grid shows the inter-aspects between the two charts. The horizontal list of planets at the top belongs to the inner wheel and the vertical list of planets on the left belongs to the outer wheel. Info Tab This tab displays all of the reports for a particular chart. Once this tab is selected, a Reports button appears on the Toolbar. Tapping the Reports icon itself will simply re-select the default Chart Details report. However, tapping the Up arrow button next to it, displays a list of reports. Tapping on any of these will display those reports on the Info tab. Reports A list of all reports may be displayed by tapping on the Reports toolbar button when you have first tapped on the Info tab. All reports are displayed regardless of the zodiac a chart has been calculated in. You can display a Vedic report using the tropical zodiac, and vice versa. Obviously, care must be used if you use different zodiacs, however, this feature does allow flexibility. Chart Details: Specific details concerning the current selected chart are displayed on the Info tab screen if the Chart Details report is selected. More details of the planets, points and house cusp positions are displayed on this report, down to a minute of arc. Use the vertical scroll bar to view the full report. While a wheel display only shows positions to the nearest degree, the Chart Details report gives you more accuracy. It is also on this report that you see the status of most of the current settings from the Tools / Options settings that affect calculations. When a bi-wheel is displayed then if the Chart Details report is selected, the report has been designed to first display the Chart B (the outer wheel) details followed by the Chart A (the inner wheel) details. On the list of planets that show a planet‟s longitude, if it has retrograde motion then the retrograde symbol is indicated. If a planet is near the Sun and within the Combustion orb range then the letter “c” will be indicated. In some cases, a planet can be both retrograde and combust and in these cases, both the retrograde symbol and the combustion indicator will be shown. The combustion orbs used are those generally used in Vedic astrology, as follows: Moon = 12°, Mercury = 14°, Venus = 10°, Mars = 17°, Jupiter = 11°, Saturn = 15°. On the planet list, not only is the daily travel shown for each planet but there is also an indication of whether the planet is slow or stationary. The words “Slow” or “Stat.” will be displayed in these cases next to the Travel column. These indicators are based on the rate of daily travel. For the stationary indicator, a planet is regarded as stationary when it has a daily travel of one minute of arc or less. For the “slow” 36 indicator, a planet is regarded as slow when it is 20% or less of its “normal” daily travel. The following table shows both the “normal” values and the 20% slow rate: Daily Travel Normal Slow Mercury 1° 50‟ 0° 22‟ Venus 1° 13‟ 0° 15‟ Mars 0° 38‟ 0° 08‟ Jupiter 0° 14‟ 0° 03‟ Saturn 0° 08‟ 0° 02‟ North/South Node 0° 13‟ 0° 03‟ If a chart has been cast using one of the sidereal zodiacs, next to the Rt. Asc. and Declin. columns for each planet in the Chart Details report, you will see the short name of the Nakshatra the planet or point is located in together with its Pada number (1 to 4) used in Vedic astrology. Sorted Aspects: When you select the Sorted Aspects report, you will see all of the aspects displayed listed in order from the closest orb to the widest orb. Next to the orb degree and minute, you will also see whether the aspect is applying (“A”) or separating (“S”). This is a handy report to assemble the closest aspects in a chart and to study their impact. Sorted Declinations: When you select the Sorted Declinations report, a list of declinations for each of the planets or points can be seen as a numerical sort (low to high values), independent of whether the value is a “plus” value (North of equator) or a “minus” value (South of the equator). Listing the values this way easily shows, in a visual way, any planets or points that are either Parallel or Contra-Parallel. This list also displays a sorted list next to the first chart for a second chart when a bi-wheel is displayed. You can visually see planets that are Parallel or Contra-Parallel to each other between the two charts. The second chart may be another person‟s natal chart, a transit chart or a person‟s progression or direction chart. Essential Dignities: This report displays a table of the Essential Dignities for each planet in a chart. From the position a planet is located in the chart, the planets that are associated to a particular dignity for that sign and degree are displayed. If a particular planet position coincides with its own dignity position then a plus (+) symbol is placed next to that planet. If a planet is in its Detriment or Fall sign then a minus (-) symbol is displayed next to the planet. If a planet does not have any dignities in a chart then it is said to be in “Peregrine”. The scoring that is used in Astracadabra is as follows: Rulership = +5, Exalted = +4, Triplicity = +3, Term = +2, Face = +1 Detriment = -5, Fall = -4, Peregrine = -5 37 Astracadabra allows you to select from three types of Triplicity and from two types of Terms in the Tools / Options menu for the calculations in this report. The column headings used in this report are as follows: Pt = Planet/Point, Ru = Ruler, Ex = Exalted, Tr = Triplicity, Te = Term, Fc = Face, De = Detriment, Fa = Fall Dasas (Vedic): This report lists the full 120-year vimshottari dasa cycle down to five levels with the default being three levels, which are the main period lord, the sub-period lord and the sub-sub period lord. This report displays a date when that sub-sub period begins. A further feature of this report is that it highlights the date earlier than today‟s date to show the current dasa sequence. From here, you can scroll up or down to view past or future dasas or increase or reduce the number of dasa levels. Divisional Charts (Vedic): This report has been designed to show the signs that each planet and point is located in each of the divisional charts, D3 to D12. If a planet is located in its debilitated sign (the sign opposite its Exalted sign), an “arrow” indicator is shown next to the sign. This report and the indicator is a convenient way to quickly ascertain in which divisions, or sectors of life, the planet exhibits a weakness. KP Details (Vedic): This report displays the various items required for Krishnamurti Padhdhati (KP) system of Vedic astrology. In this system, the planets representing the Stars, Subs and Sub Subs for each planet, point and house cusp are listed as well as a summary of Significators for the different houses. There is also information displayed on the Ruling Planets too, mainly used in KP Horary astrology. It is on this report that the vimshottari dasa sequence is displayed, down to five levels. The dasa sequence displayed is dependent on the zodiac used for the chart. Additional Information on Clock Mode Once you have tapped the Clock button and are in Clock mode, the chart wheel will be updated every 30 seconds. Our experience has shown that a 30 second refresh allows a fairly good response to you tapping various items. However, if you tapped an item just as the Pocket PC is about to refresh the screen after 30 seconds, you might find that you will experience a slight delay to the computer‟s response to your tap. As Pocket PC processors become faster over time, this delay should not be so noticeable. While you are in Clock mode, tapping on either the Aspects or Info tabs will also reveal that these screens are being updated every 30 seconds as well. If Astracadabra is running in Clock mode (Clock button depressed and automatically updating the screen every 30 seconds) and the Pocket PC‟s power button is pressed to 38 turn it off OR the Pocket PC powers off after a set time period, when the Power button is pressed to turn the Pocket PC back on, an immediate update of the screen in Clock mode is performed. This new improvement only applies to Windows Mobile 2003 or later and not to the Pocket PC 2002 operating system due to the power detection mechanism supplied in the later operating system. Previously, when the Power button was pressed, a user had to wait a while until the next 30-second update was performed. 39 Solar Eclipses Once this screen is opened, you will see a listing of 300 years of Solar Eclipses, from 1801 to 2100. You will notice that the one highlighted is always the last Solar Eclipse (SE) that has occurred. The list of Solar Eclipses is displayed in Courier font so that the SE details line up nicely. The default for the type of eclipse is the Exact Conjunction of the Sun and Moon, rather than the point of the maximum eclipse because on many occasions the maximum eclipse occurs at a time when the Sun and Moon are not exactly conjunct. Astrologers usually prefer the exact conjunction of Sun and Moon in charts. The last SE is highlighted because of today‟s date. If you want to find the last SE prior to an event, you can either scroll back and find the nearest date, tap on it then tap on Select to put in on the Opened Charts List OR enter or open the event chart itself on the Opened Charts List then get back into the Solar Eclipses module then tap on the “Current Chart” option. This will automatically find and highlight the last SE prior to that event. Once the SE chart is on the Opened Chart List you can then go back and highlight the natal chart you require on the Opened Chart List then display it by tapping on the Show tab. Now, tap on the "Natal" dropdown box and then tap on the "Tr>N" option. This will produce a bi-wheel with the current transits around the outside. Now, to put the last SE around the outside, simply tap on the "Now" dropdown box then tap on the "Select" option. On the list of charts presented, tap on the SE chart then tap on the Select button. This action will now place the last SE chart around the outside of the natal chart. Move Astracadabra Memory Location To Another For Pocket PC operating systems with Windows Mobile 2003 Second Edition (or earlier), this feature allows you to be able to move the bulk of Astracadabra to different memory locations, such as a memory card, without the need to uninstall and reinstall 40 Astracadabra. This “Move” feature has been placed on the Tools menu. This feature was designed to scan for any non-volatile memory areas such as memory cards, allowing you to select one and then transfer most of the Astracadabra program to that new memory location. If you decide to move Astracadabra to a memory card then the memory in a Pocket PC‟s RAM will be freed up significantly. This feature also allows for the situation where some Pocket PC models have two memory card slots, such as the Secure Digital (SD) Card and the Compact Flash (CF) Card, however, you can only select one of them at a time. This feature will also display a Pocket PC‟s internal non-volatile memory such as HP‟s “iPAQ File Store”, however, it is not advised to store Astracadabra there. This feature also allows you to transfer Astracadabra to any other memory location at a later date without the need to uninstall or reinstall Astracadabra. For example, you may want to move Astracadabra back to the Pocket PC RAM when replacing your memory card to a higher capacity one at a later date. For Windows Mobile 5.0 (or later) operating systems on a Pocket PC, this feature is not provided in this way. Under the Windows Mobile 5.0 (or later) operating system, you have the choice of installing Astracadabra onto the device or onto an external memory card during Astracadabra‟s installation. For further details, see the Astracadabra Installation section of this User Manual. Time Stepper To access the Time Stepper feature, first ensure you are on the Info tab then tap on the Dynamic toolbar button to see a menu then tap on the Time Stepper item. The Time Stepper allows you to manually step a single wheel or bi-wheel, forward or backward in time, by any increment from 1 second to 99 years. The Time Stepper appears as a bar that sits across the tabs, near the bottom of the screen. 41 The items on the Time Stepper bar are: - Left and Right arrow buttons: Tap the left button to go back in time or the Right button to go forward in time. - Number entry box: Defaults to “1” but can be any value up to 99 for the selected increment type. If you decide to change the default number of “1” to something else, the moment you tap on the number, the Soft Input Panel (SIP) is raised allowing you to enter a number. You then tap the “#” button as it acts like an ENTER button allowing you to drop the SIP and begin stepping. - Increment type dropdown box: Defaults to “Day” but you can also select Second, Minute, Hour, Week, Month, Year. - Vertical Scroll Bar (Reports only): When the Time Stepper is displaying a Report you will see a vertical scroll bar on the Time Stepper bar. This item allows you to scroll the report up or down since you cannot use the normal vertical scroll bar on the Report screen while the Time Stepper bar is displaying. - Store button (“S”): While stepping a chart, the Store button enables you to store one or more charts after stepping. These charts are simply stored onto the Opened Charts List so that you may select and use them later. - Switch button (“>”): The Switch button enables you to switch from the Show tab for wheel display, to the Info tab to display Reports. When you are displaying reports, you will also see the Reports icon on the Toolbar below allowing you to change the report. - Exit button (“X”): This button simply allows you to close the Time Stepper feature. Adjust Ascendant To access the Adjust Ascendant feature, first ensure you are on the Info tab then tap on the Dynamic toolbar button to see a menu then tap on the Adjust Asc. item. The Adjust Ascendant feature allows you to adjust a chart‟s ascendant in two ways. First, by either manually entering a particular Sign and degree (and optionally the minute and second of a degree) or, secondly, by entering a Sign, Star lord and Sub lord. When selecting a Sign and entering a degree, like the Time Stepper, you need to tap on the “#” button to ENTER the degree and the optional minute and second values. The second type of adjustment is another way of determining an ascendant through the use of Ruling Planets (RPs) in the KP system. Like the Time Stepper, these facilities also have a Store button (“S”), a 42 Switch button (“>”) and Exit button (“X”). Once you have adjusted an ascendant for one or more charts, use the Store button to place it on the Opened Charts List for later use and/or saving. KP Horary The KP Horary feature allows you to run a Horary chart in a special way. Prof. K.S.Krishnamurti came up with a unique solution to allow an astrologer to answer a number of questions using astrology that may be on different subjects and within a short space of time. A horary chart is usually cast for the date, time and place a question is asked. In other words, the question relates to a particular moment in time. The astrologer then answers the question based on the house positions of the planets and points. The ascendant for a horary chart is calculated for the moment the question is asked. However, if you get a series of questions asked within a short time, the horary chart cast for that moment in time might not change very much from the previous one. By asking a person to think of a number between 1 and 249 while dwelling on the question, then a different ascendant is created for each question while the planet positions remain for that moment of time. In the KP system, there are 249 different combinations of ascendants in 24 hours, from 0ºAries to 29º59' Pisces. By entering a number between 1 and 249, Astracadabra automatically determines the ascendant for that number and sets the houses for the planets and points at that moment of time. You can optionally enter a question as well. 43 Tools / Options The Options menu item contains a number of items that you can select or set. The Planets tab allows you to select the planets that you want to see displayed on the chart wheel, aspect grid and reports. The Points tab allows you to select the points you want to see on the chart wheel, aspect grid and reports. Unlike Solar Fire, you can now select the Descendant, IC, AntiVertex and Equatorial Descendant separately. You can also select Michael Munkasey‟s CoAscendant (CA) or Polar Ascendant (PA) as points that can be displayed on a chart and that can be shown with aspects to and from them. Briefly, the CoAscendant is the Ascendant calculated at the CoLatitude of the place. Say you have a place located at 37ºS00' then the CoLatitude is 90º00' less 37º00', which equals 53ºS00'. So if you erect the same chart date and time for the new latitude of 53ºS00' then the resulting Ascendant becomes the CoAscendant of the first chart and the resulting Vertex becomes the Polar Ascendant of the first chart. Aspects tab. At present, there is a fixed list of aspects that you can select. You can choose to Use or not Use an individual aspect by tapping on the associated checkbox. You can also select orbs for each of the aspects by tapping on the Up and Down arrows. These change the aspect by half -degree increments. There are separate orbs for Natal / Transits (Natal/Tr) and Progressions (Prog) for each aspect though, like Solar Fire, the orbs for Transits (Tr>N) displayed on the outer wheel of a bi-wheel, use the natal orbs. There is also an option to 44 display or not display aspects to the As/Ds/Mc/Ic points for aspect displays or reports. Calcs tab. These options allow you to select your default House System and Zodiac. At installation, these are set to Placidus and Tropical respectively. All house systems currently used in Solar Fire are available and Astracadabra also includes the Horizontal house system. All zodiacs used in Solar Fire are available. True or Mean Node, Part of Fortune calculation, the Parallax Moon and Geocentric Latitude are other options that you can set on this screen. All of these settings are also listed in the Chart Details report. In the case of the Geocentric Latitude correction setting, if it is selected, you will see a “G” after the Latitude value on the text detail for a chart on the Opened tab. There are two text boxes: Offset (1900) and Precess. (1900). These text boxes are for Offset values from the tropical zodiac - ayanamsas used in Vedic or Sidereal astrology - and a Precession value, which is the annual rate of Precession for a particular Offset. These two items are only activated if you select the SVP zodiac option - the last one on the zodiac list. Before any changes are made in these two text boxes, the default figures displayed are those for the Krishnamurti “original” ayanamsa, at 1 January 1900. You may enter any values you like for research purposes and these must be values for 1 January 1900 for proper calculations. To assist you to easily restore the Krishnamurti original default ayanamsa values, after a research exercise, you need only “blank” out the both the Offset and Precession boxes (by tapping on the Backspace key) then when you tap on the ENTER key on the keyboard to move to the next text box, a default value is loaded into each of these text boxes for the Krishnamurti original ayanamsa. Another option that has been provided is that if you enter -1 (minus one) into the two text boxes, you will get default values for the Lahiri ayanamsa. Whatever values are entered, the corresponding ayanamsa value can be seen next to the SVP option on the zodiac list so that you can always see what custom ayanamsa you have set. The Prog. tab allows you to select and/or add new values to the User-defined Progressions Rate or the User-defined Directions Rate. A maximum of 10 values can exist for selection. Additional values after 10 will cause the oldest one to be dropped of the list, except the topmost one, which is the initial default. For the User Progs. Rate, the default value displayed is for Secondary Progressions while the default for the User Dirns. Rate is the one-degree per year rate. The Load Defaults button enables you to quickly re-select both default values. On this tab, you can also select how you want to progress the Mc (and as a result, the Ascendant and other angles) for the progression method selected. It also allows you select the definition of a “day”. There is a choice of progressing the Mc by i) Solar Arc in Longitude (S.A. in Long.), ii) Solar Arc in Right Ascension (S.A. in R.A.), Naibod in Longitude, Naibod in Right Ascension and Mean Quotidian. The Naibod measure is a fixed amount of progression per day – 59‟ 08” longitude per day or 3min 56.5 secs. R.A. per day. The Mean Quotidian is the position of the progressed Mc based on the 45 exact date and time of the current progression at the current location. If “Standard (Q2)” is selected the day is equal to 24 hours for the Mc to return to the same position whereas the Bija (Q1) is a sidereal measure of a day where the Mc returns to a fixed position in relation to the background stars. This is slightly less than the standard 24-hour day. This option is only used for Secondary Progressions and Tertiary Progressions calculations. The Minor progressions do not use a day in its formula and so this setting is not used. The Display tab offers a choice of two glyphs each for Uranus, Pluto and Capricorn. There is also the option for displaying or not displaying the associated aspect glyphs on the aspect lines in the centre of the chart wheel. Other options allow you to: i) select whether you want all glyphs to be coloured (default) or display as black and white, ii) choose whether you want the degrees displayed on the single or bi-wheel to be rounded up (the default) to the nearest degree if the degree is at 0.5 or more, except for 29 degrees, or truncated, which means that the degree is not rounded at all, and iii) select the type of single wheel you want to display – either Round (the default) or any of the four square chart styles – Classical Western, North Indian, South Indian or East Indian. Square style chart notes: i) Even if you select one of these options for displaying a single chart on the Show tab, if you choose a bi-wheel, such as Tr>N (Transits to Natal) then you will always see two concentric wheels and not the square style that you have chosen. If you then switch back to the “Natal” option for a single chart then you will revert back to your selection. ii) If you choose one of the three Indian square charts, selecting a house system other than the “Whole Signs” house system will change the square chart to a “cuspal” chart, that is, the segments in the square are then shown as “houses” and not “signs”. The Ess.Dign. tab allows you to select one of three types of Triplicity (Ptolemy, Lilly or Dorothean) and one of two types of Terms (Ptolemy or Egyptian) for calculations used in the Essential Dignity report. The Vedic tab allows you select whether you want an orb for a house cusp, one that is mainly used in the KP astrology system. If an orb is selected then any planet coming into orb with the next house cusp is deemed to be in the next house even though it visually is located in the previous house. The actual house location of a planet is important for determining house Significators. It is on this screen you can also select whether you want to use glyphs for planets, as western astrologers do, or use the first two letters of the planet‟s name, as is often used by Vedic astrologers. The Dasa tab allows you to modify the normal allotted years to the planets used in the vimshottari dasa, for experimental purposes. You can also change the planetary order too by using the Move Up and Move Down buttons. The Defaults button simply resets the values and order of planets to those normally used in the vimshottari dasa while the Show Tabs button drops the soft input panel (SIP) so that you can continue with other Options settings. 46 The Home tab enables you to specify your default location (Home) for current transits. Like the Chart / New data entry screen, it incorporates the use of the ACS PC Atlas. The Show Tabs button two-thirds the way down the screen allows you to drop the soft input panel (SIP) so that you can continue with other Options settings. Common to all of the Option tabs is the “ok” button at the top right of the screen. Tapping this button automatically saves all options and returns you back to the previous screen you were on. In addition, after the options have been saved, the information on the Show, Aspects and Info tabs for the current selected chart are automatically updated to reflect any changed options. Screenshots of the Options tabs The following few pages show you the current screen layouts of the various tab pages for the Options. This set of screenshots also shows you the various square charts that Astracadabra can display. 47 48 49 50 Tools / About This menu item gives you information about Astracadabra. The first tab About provides you with the Version number of Astracadabra as well as the Registered owner‟s name, the Serial# and details of the Distributor. The second tab Copyrights lists the copyrights pertaining to Astracadabra, and the third tab EULA allows you to view the End User License Agreement at any time. If you wish to return to the main screen of Astracadabra, just tap the “ok” button at the top right-hand corner of the screen. To close down Astracadabra If you wish to close down Astracadabra on the Pocket PC, simply tap on the “ok” button at the top right-hand corner of the screen and confirm that you want to exit the program. If you happen to be displaying a chart wheel where the Show tab has been selected then you will need to tap on any of the other tabs, like the Opened tab, to enable you to see the “ok” button in the top right-hand corner. Saving charts when closing down Astracadabra If there are charts that have not yet been saved then you are given the opportunity of saving them before the program closes. Each chart that has not been saved on the Opened tab is highlighted and a query window pops up asking whether you want to save the chart. Tap on the “Yes” button to initiate the Save function or the “No” button to bypass the saving of that chart. ~~~~~~~~~~~~~~~~~~~~~~~~~~~~~~~ 51 INDEX .NET Compact Framework, 5, 7, 8 .NET Framework, 6, 7 > button, 15, 24, 27 About Esoteric Technologies, 1 Pocket PCs, 1 ACS PC Atlas, 1, 5, 9, 14, 15, 26, 46 ActiveSync, 6, 7, 8, 11 Adjust Ascendant, 41 Applying, 1, 17, 35, 37 Arc, 17, 20, 27, 36 As/Mc, 35 Ascendant, 28, 41, 42 Aspect button, 16, 25, 34 Aspect Grid, 17, 25, 35, 43 Aspect Lines, 16, 34 Aspect Toolbar, 16, 35 Aspects tab, 17, 25, 30, 43 Aspects Tab, 35 Asteroids, 30 Astracadabra Current Version, 25 Installing, 6 Removing, 11 Startup, 26 Ayanamsa, 27, 44 Base date, 28, 29 Bija, 45 Bi-wheel, 21, 25, 27, 28, 29, 30, 34, 35, 36, 37, 39, 40, 43, 45 Black square, 16, 25, 34 Blank input, 27 Calcs tab, 44 Calculate button, 24 Calculation Options, 22 Ceres, 30 Chart Copy & Edit, 9, 10, 24, 33 Edit, 10, 24, 33 New, 15, 26, 27, 28, 46 Open, 24, 27, 30, 31 Save, 7, 9, 10, 22, 23, 24, 32, 33, 34, 50 Wheel, 19, 26, 27, 28, 34, 38, 43, 45, 50 Chart / Edit, 33 Chart / New, 26, 27, 28, 46 Chart / Open, 27, 30, 31 Chart A, 36 Chart B, 36 Chart Control Centre, 16 Chart Details, 17, 27, 35, 36, 37, 44 Chart File Collection, 6, 31 Chart Manager, 24, 30 Chart menu, 10, 15, 23, 24, 25, 34 Chart Name Sorting, 31 Chart wheel, 19, 26, 27, 28, 34, 38, 43, 45, 50 Charts Edit, 33 Chiron, 30 Classical astrology, 19 Detriment, 37 Dignities, 37 Dignity, 37 Essential Dignities, 19, 37 Exalted, 37, 38 Face, 37 Fall, 37 Peregrine, 37 Rulership, 37 Terms, 19, 37, 45 Triplicities, 19 Classification, 15, 24 Classify, 27 Clock, 24, 25, 34, 35, 38 Close Down Astracadabra, 50 CoAscendant, 43 Combustion, 17, 36 Orbs, 17, 36 52 Symbol, 17 Copy & Edit, 9, 10, 24, 33 Copy Charts to Astracadabra, 8, 23, 32 Copyrights, 25, 50 Cradle, 6, 7, 11, 12, 32 cradle or cable, 6, 7, 11, 12, 32 Cradle or cable, 6, 7, 11, 12, 32 Create button, 23, 34 Current Transits, 14, 24, 25, 26, 34, 39, 46 Current Version of Astracadabra, 25 Ess.Dign. tab, 45 Essential Dignities, 19, 37 Event, 27 Exalted, 37, 38 D3 to D12, 20, 38 Dasa, 19, 37, 38, 45 Vimshottari, 19, 37, 38, 45 Dasa tab, 45 Dasas, 19, 37 Date format, 26 Day number, 26 Day/Month/Year, 26 Debilitated, 20, 38 Declination, 37 Degree, 19, 27, 29, 35, 36, 37, 41, 43, 44, 45 Delete button, 31 Detriment, 37 Dignity, 37 Directions Solar Arc, 22, 28, 44 Display tab, 45 Divisional, 19, 20, 38 D3 to D12, 20, 38 Hard Reset, 4 Harmonic, 20 Home, 9, 14, 15, 27, 46 Home tab, 9, 46 Horary, 26, 27, 38, 42 House cusps, 27 House System, 15, 24, 27, 44 Eclipses, 39 Solar, 39 Edit a Chart, 24 Editing Charts, 33 End User License Agreement, 9, 25, 50 EULA, 9, 25, 50 Enter a date, 26 Ephemeris, 1, 30 Moshier, 30 Swiss, 1, 30 Error message, 27 Errors, 27 Face, 37 Fall, 37 Female, 27 File Manager, 23, 33 Getting Started, 13 Info tab, 17, 25, 27, 30, 35, 36, 38, 40, 41, 46 Info Tab, 35 Inner wheel, 28, 35, 36 Installation, 5, 6, 7, 8, 9, 13, 40, 44 Installing, 6, 40 Intercepted signs, 28 Introduction, 1 Juno, 30 Jupiter, 36 KP, 19, 20, 27, 38, 42, 44, 45 Krishnamurti, 20, 27, 38, 42, 44 Latitude, 14, 15, 26, 27, 44 Longitude, 14, 15, 17, 26, 27, 44 Main Menu, 13 Male, 27 Mars, 36 MC, 35 Mean Tertiary, 28 Memory card, 8, 39, 40 Memory Location, 39 53 MenuBar, 3 Mercury, 36 Minor Progressions, 22, 28 Minute, 17, 27, 36, 37, 41 Month number, 26 Month/Day/Year, 26 Moon, 19, 28, 36, 39, 44 MP>N, 22, 28 MyCharts, 23 Nakshatra, 37 Natal, 21, 25, 28 Natural writing, 3, 26 New Chart, 15, 26 Normal, 5, 17, 36, 41, 45 North/South Node, 36 Now button, 15 Offset, 44 ok button, 3, 9, 14, 25, 46, 50 Open a Saved Chart, 24 Opened Chart List, 14, 22, 24, 25, 27, 28, 33, 34, 39 Opened charts, 33 Opened tab, 10, 22, 24, 25, 33, 44, 50 Options menu, 9, 14, 35, 37, 43 Orb, 17, 18, 35, 36, 37, 45 Outer wheel, 25, 28, 29, 34, 35, 36, 43 Pada, 37 Pallas, 30 Palm, 2, 3, 5 Password, 10 Peregrine, 37 Planet, 17, 19, 20, 25, 27, 29, 30, 35, 36, 37, 38, 42, 45 Planets tab, 43 Pluto, 45 Pocket PC, 1, 2, 3, 4, 5, 6, 7, 8, 9, 10, 11, 12, 13, 15, 23, 25, 26, 27, 31, 32, 34, 38, 39, 40, 50 Hard Reset, 4 Regional Settings, 26 Reset button, 4 Resetting, 4 Soft Reset, 4 Stylus, 3, 4, 26 Wireless, 3, 4 Bluetooth, 4 WiFi, 4 Pocket PC 2002, 3, 5, 38 Point, 7, 8, 10, 27, 35, 37, 38, 39 Points tab, 43 Polar Ascendant, 43 Precession, 44 Processors ARM, 2 XScale, 2, 5 Prog. tab, 28, 44 Progressing the angles, 28 Progressions Minor, 22, 28 Secondary, 22, 28, 44, 45 Solar Arc, 22, 28, 44 Tertiary, 22, 28, 45 Tertiary (Mean), 28 Tertiary (True), 28 Q1, 45 Q2, 45 RAM, 2, 4, 5, 40 Reboot, 6, 7 Regional Settings, 26 Register, 9 Registration, 9 Repair, 11, 12 Reports, 16, 17, 18, 30, 35, 36, 41 Chart Details, 17, 27, 35, 36, 37, 44 Dasas, 19 Divisional Charts, 19, 20, 38 Essential Dignities, 19, 37 KP Details, 19, 20, 38 Sorted Aspects, 18, 30, 37 Sorted Declinations, 18, 37 Retrograde, 17, 20, 29, 36 Retrograde symbol, 17, 36 Right Ascension, 37, 44 Rulership, 37 Ruling Planets, 20, 38, 42 54 S button, 16, 35 SA>N, 22, 28 Saturn, 36 Save a Chart, 22, 33 How to, 33 Save button, 10, 22, 24, 33, 34 Save Profile, 23, 32 Screenshots, 13, 31, 34, 46 Secondary Progressions, 22, 28, 44, 45 Select All, 23, 32 Select button, 23, 24, 30, 33, 34, 39 Semaphore, 32 Separating, 17, 35, 37 Serial Number, 9, 10 serial port, 8 Show tab, 19, 21, 24, 27, 34, 39, 41, 45, 50 Sidereal, 19, 27, 37, 44, 45 Single wheel, 22, 24, 27, 28, 34, 35, 40, 45 Slow, 17, 36 Soft Input Panel, 3, 10, 41 SIP, 3, 10, 41, 46 Soft Reset, 4 Solar Arc, 22, 28, 44 Solar Fire, 1, 2, 5, 23, 24, 30, 31, 32, 33, 34, 43, 44 Solar Return, 22, 28, 29 Sorted Aspects, 18, 30, 37 Sorted Declinations, 18, 37 Sorting Chart Name, 31 South Node, 36 SP>N, 22, 28 Splash screen, 26 Square, 16, 25, 34, 45, 46 SR>N, 22, 28 Stationary, 17, 36 Sun, 17, 19, 36, 39 SVP, 27, 44 Swiss Ephemeris, 1, 30 Synastry, 22, 28, 29, 30 System tray, 6, 7 Tap, 3, 8, 9, 10, 14, 15, 16, 19, 21, 23, 24, 25, 33, 34, 41, 50 Tap and Hold, 3, 33 TaskBar, 3, 27 Technical Requirements, 5 Terminology, 3 Terms, 19, 37, 45 Tertiary Progressions, 22, 28, 45 Time Stepper, 40, 41 Timezone, 14, 15, 26, 27 Today, 3, 7, 8, 11, 12, 19 Toolbar Buttons, 34 Black Square, 16, 25, 34 Tools About, 25, 50 Options, 9, 14, 15, 19, 27, 28, 29, 35, 36, 37, 43 Tools menu, 9, 11, 14, 25, 40 Tour, 25 TP>N, 22, 28 Tr>N, 22, 25, 28, 39, 43, 45 Transits, 21, 22, 28, 43, 45 Travel, 17, 36 Trial mode, 9 Trial period, 9, 10 Trial Version, 9 Trine symbol, 16, 25, 34 Triplicities, 19 Tropical, 24, 36, 44 True Tertiary, 28 UnSelect All, 23, 32 Unspecified, 27 Uranus, 45 USB port, 8 Vedic astrology, 1, 24, 36, 37, 38 Dasa, 19, 37, 38, 45 Dasas, 19, 37 Divisional, 19, 20, 38 KP, 19, 20, 38, 42, 45 Nakshatra, 37 Pada, 37 Vedic tab, 45 55 Venus, 36 Vesta, 30 View Aspect Grid, 17, 25, 35, 43 Aspect Lines, 16, 34, 35, 45 Aspect Toolbar, 16, 35 Aspects tab, 17, 25, 30, 35, 43 Clock, 24, 25, 34, 35, 38 Reports, 16, 17, 18, 30, 35, 36, 41 Vimshottari, 19, 37, 38, 45 Wait cursor, 24, 25 Wheel Inner, 28, 35, 36 Outer, 25, 28, 29, 34, 35, 36, 43 Wheel Display, 27 Windows CE, 2 Installer, 6, 7 Mobile, 2, 3, 5, 6, 8, 11, 13, 38, 39, 40 2003, 3, 5, 8, 9, 11, 38, 39 5.0, 2, 5, 6, 8, 11, 13, 40 operating system, 2, 3, 5, 6, 13, 38, 39, 40 XP, 2, 11, 12 Wireless, 3, 4 X button, 3, 15, 17, 27, 35 Zodiac, 15, 24, 27, 44