1
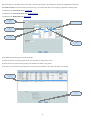
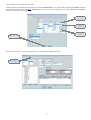
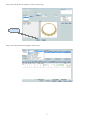
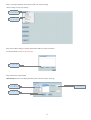
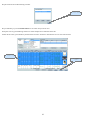
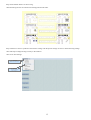
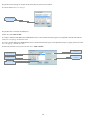
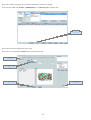
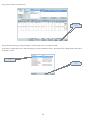
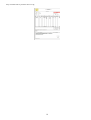
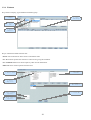
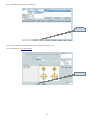
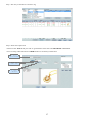
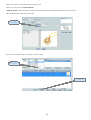
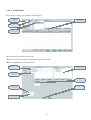
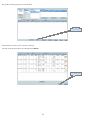
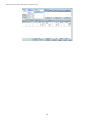
1 Finished Jewelry Management
1.1 Overview
When we give a unique identification by giving a Stock No to each item we have in bulk it becomes a Finished Jewelry Item.
Managing of Finished Jewelry includes many transactions which we will understand in this chapter.
1.2 Transactions
1.2.1 Bulk Purchase
It can be referred from Bulk and Finished Jewelery Management BulkPurchase
1.2.2 Tagging
After Bulk Purchase or when we receive the bulk jewelery items from the worker we tag each and every finished jewelery where we
define its Cost, Weight and Details, this is all done under this transaction.
Step 1:Select Company, Type and Reason and add a group.
1. Select
'Company'
4. Click
'Add Group'
2. Select
'Conversion'
3. Select
'Tagging'
1
Step 2:Add the relevant fields and click 'OK'.
•'From' specifies the location from where the Bulk Jewelry is to be subtracted.
•'To' location specifies where the Finished Jewelry is added to.
•Comments field can be used to input the payment terms or any other relevant information.
•Other ref can be used to input the supplier's bill no.
3. Select / Add
'Dept/Locn'
1. Select 'Date'
2. Select
'Dept/Locn'
4. Select
'Rate Profile'
7. Click 'OK'
5. Enter comments
(optional)
6. Enter other ref
(optional)
Step 3:After selecting the group we can add items one by one.
1. Click
'Add Item'
2
Step 4:Select the bulk jewelery Lot from which we want to tag it and make it a Finished Item.
1. Select
'Jewelry
Finished'
3. Click
'Details'
2. Select
'Bulk Lot No'
Step 5:We have to enter the details of the Finished Jewelry.
•Nett wt is calculated automatically by subtracting the weight of the studded items with the Gross Wt.
•Purity % is the purity of the material when we purchase it.
•Selling Scheme is a formula for calculating the projected selling price. For further information Refer Selling Schemes.
•Comments field can be used to add any extra information relevant to the item.
•Category is a tree structure in which we can add sub categories to a category.
3. Enter Cost
of material
1. Select
'Fin. Jewelry'
4. Enter
making cost
2. Enter
'Gross Wt'
5. Select
'Selling Schemes'
6. Add
Category
7. Click 'Add'
3
Step 6:The entry for No Value Color Stone Gms is shown in fig. Below is an example for entering the studded item in the item.
•No Value CS Gms are the items which do not have any price value but do have some weight eg. Thread, low quality pearls.
•To add entry for ColorStones Refer ColorStone.
•To add entry for ColorStones Gms Refer ColorStoneGms.
•To add entry for ReadyGold Refer ReadyGold.
1. Select
'Diamond'
5. Enter Size
2. Enter
'Shape'
3. Enter
'Color'
4. Enter
'Clarity'
Step 7:Make the following selection and click 'OK'.
•If there are packets of same properties as the ones selected, we will get this screen.
•If we do not have a packet of such property, the software will make a new packet.
•If we don’t want to select the same packet we will click cancel instead of 'OK', this will create a new packet.
1. Select
the Pkt
4. Click
'OK'
4
Step 8:Add the relevant fields and click 'OK'.
•Selling scheme for diamonds and colosrstones are as follows,'Master Rates' it is the rates that are defined in the Rates module of
the software for further details refer Rate, 'Fix Rates' is the rate which we define during the entry of the studded items and 'Fixed
Price' is the total price of the studded item.
1. Enter
wt in gms
2. Enter Pcs
(Optional)
3. Enter
'Cost Rate'
4. Click 'OK'
Step 9:The entry will be as shown in fig. Similarly, we will add other studded item details.
1. Select
'Design'
5
Step 10:We will enter the design of the item.
•We can insert the image by scanner as well. First we will put the item in scanner and click 'Scan' here.
•If the image is already in the software we can enter the Design No and press 'Tab' key else click 'Find' and search the design.
1. Select
Category
or..
1. Add Category
2. Click 'Add'
or...
2. Click
'Scan'
Step 11:After entering the design and click 'OK'.
1. Click 'OK'
6
Step 12:We will get the item summary screen as shown in fig.
1. Click 'OK'
Step 13:Now, the item has been tagged as shown in fig.
7
Step 14:We will print the tag as shown.
1. Select item
2. Click
'Print'
Step 15:Select the type of tag we want to print and click 'OK'.
•If the printer is not defined, we have to select the tag we want to print and click on 'Change Printer'.
2. Printer to
be defined
1. Select
'Finished Tag'
4. Click
'OK'
3. Click to add
printer to tag
Step 16:The Finished Tag is printed as shown in fig.
8
Step 17:To display the Rate on the Tag we need to do certain settings.
•These settings are one time settings.
1. Select
'Miscellaneous'
2. Select 'Form
Print Settings'
Step 18:Form Print settings is used for all the forms that are present in software.
•For further details on it Refer Print Settings .
1. Click 'Add'
Step 19:Select the required field.
•Rate Profile selection will display the Rate which you want to print on the tag.
1. Select
'Finished Tag'
2. Select
Rate Profile
3. Click 'OK'
9
Step 20:Close the 'Form Print Setting' window.
1.Click 'Close'
Step 21:Similarly, to print the Sticker Sheet we can select many items at once.
•Keep the 'Ctrl' key pressed during selection to select multiple non-continuous items OR
•Select the first item, press 'Shift' key and select the last item. All items in between the two are now auto-selected.
1. Select items
1. Click
'Print'
10
Step 22:Select the required sticker sheet option.
•If we want the change the printer then we will select the sheet we want to print (Selected item gets a blue background as shown).
•Click 'Change Printer ' then we will select any one printer we want.
1. Tick 'Sticker
Sheet'
2. Click 'OK'
Step 23:Select the required sticker sheet printing options.
•If we are using a fresh sticker sheet we will choose the option shown below.
1. Select the
option
2. Click 'OK'
11
Step 24:The Sticker Sheet is as shown in fig.
Step 25:Select the required sticker sheet printing options.
•If we are using a sticker sheet which has been partially used and still there are some blank tags that can be printed then, we will
choose the option shown below.
1. Select the
option
2. Click 'OK'
12
Step 26:The Sticker Sheet is as shown in fig.
•The blurred tags are the one which were already printed in the sheet.
Step 27:When we want to synchronize the software settings with the printer settings we have to do the following settings.
•This will help to realign the Tag correctly in the software.
•This is one time settings.
1. Select
'Miscellaneous'
2. Select
'Form Print
Settings'
13
Step 28:Form Print settings is used for all the forms that are present in the software.
•For more details Refer Print Settings.
1. Click 'Add'
Step 29:We have to measure the differences.
•Select any of the Rate Profile.
•For right or left hand side differences X axis distance have to be measured and if the tag has to be adjusted to the left hand side the
value is in '-ve' sign eg.'-10' and vise verse.
•For top or bottom differences Y axis distance have to measured and if the tag has to be adjusted to bring it to upper position the value
is in '-ve' sign eg. '-20' and vise verse.
•If the scale measures 1mm you have to enter 10 i.e 1mm= 10 units.
3. Enter x-axis
distance
2. Select
'Rate Profile'
4. Enter y-axis
distance
1. Select Sheet
you want to set
5. Click 'OK'
14
1.2.3 Cash Sale / Credit Sale
Transaction that involves sale of item with its billing.
Step 1:Select Company, Type and Reason and add a group.
1. Select
'Company'
4. Click
'Add Group'
2. Select
'Out'
3. Select
'Cash Sale'
Step 2:Add the relevant fields and click 'OK'.
•'From' is the location where finished jewelery item in located.
•'To' location specifies the customer whom we are selling the finished item.
•Comments field can be used to input the payment terms or any other relevant information.
•Other ref can be used to input the supplier's bill no or any other relevant information.
1. Select 'Date'
4. Add Customer
3. Add / Select
Dept / Locn
6. Select
'Tax Profile'
5. Select
'Rate Profile'
7. Select
'Salesman'
8. Enter Comments
(optional)
8. Click 'OK'
9. Enter ref
(optional)
15
Step 3:After selecting the group we can add the items that the customer has bought.
•If we are using a Bar-code Scanner or RFID Reader we will directly scan or read the item.
1. Click
'Add Item'
Step 4:The item will be displayed as shown in fig.
•If we want we can change the Amount of the item during this stage.
1. Select
'Finished'
2. Enter 'Item
No',press 'tab'
key
3. Change Amount
(optional)
4. Click 'OK'
16
Step 5:If we want to make a change in total or give discount to the customer click 'Change Total'.
• If we want to print the Bill at this stage, We can skip this step.
1. Click
'Change Total'
Step 6:This step is performed when we want to give a discount to the customer.
•If we want to reduce some amount from the total we will use By Total.
•Sub Total is the total which does not include any taxes or extra charges.
•'Reduce by %' and 'Increase by %' will allow to give discount Percentage wise.
•Similarly, we can decide in which price among Making, Gold or ReadyGold we have to adjust the reduced amount or discount.
Select the options in which we need adjustments of amount.
1. Keep tick
On 'Making'
2. Select
'Reduce by %'
4. Click 'OK'
3. Enter
the value eg.2%
17
Step 7:Click on 'Print' / 'Print Preview'.
1. Click
'Print'
Step 8:There are many types of bill provided we can choose the one we want and click 'OK'.
•If we want to change the printer or select the printer just click on the Bill we want to print and click on 'change Printer' and click on
the printer we want .
1. Select
'Bill'
2. Click
'OK'
18
Step 9:The Bill will be printed as shown in fig.
19
1.2.4 Estimate
Step 1:Select Company, Type and Reason and add a group.
1. Select
'Company'
4. Click
'Add Group'
2. Select
'Out'
3. Select
'Estimate'
Step 2: Add relevant fields and click 'OK'.
• 'From' is the location from where we have selected the items.
• The 'To' location specifies the customer to whom we are giving the estimation.
• The Comments field can be used to input any other relevant information.
• Other ref can be used to input the relevant ref no.
3. Add / Select
Customer
1. Select 'Date'
2. Select
'Dept/Locn'
4. Select
Rate Profile
5. Enter Comments
(optional)
7. Click 'OK'
6. Enter other ref
(optional)
20
Step 3: After adding the group we can add items
1. Click
'Add Item'
Step 4: We can change the selling Scheme or the Amount of the jewelery item.
• For more details Refer CC Sale Finished.
1. Click 'OK'
21
Step 5: The entry in the item table is as shown in fig.
1. Click
'Print'
Step 1: We will now select the form and the printer.
1. Click 'OK'
22
Step 2: The Estimate detail Form will be as shown in fig .
• This image is shrunken for the documentation purpose.
23
1.2.5 Modify Finished
Whenever we want to make any changes to the existing jewelry item this transaction is used.
Step 1: Select Company, Type, Reason and add a group.
1. Select
'Company'
4. Click
'Add Group'
2. Select
'Conversion'
3. Select
'Modify Finished'
Step 2: Add relevant fields and click 'OK'.
• 'From' location is the department from where we select the jewelery item.
• 'To' is the location where we want to relocate it or mostly it is the same location.
3. Add / Select
Department
1. Select
'Date'
2. Select
'Dept/Locn'
4. Select
Rate Profile
5. Enter Comments
(optional)
7. Click 'OK'
6. Enter other ref
(optional)
24
Step 3: After selecting the group we will add items.
1.Click
'Add Item'
Step 4: Select the required field.
• When we enter the 'Item No' and press 'Tab' key we get the details of the jewelery in 'Loaded Details' and 'Preview'.
• If we are using a Bar-code or RFID reader we can directly read the item.
1. Select
'Modify Finished'
2. Enter Item No
,press 'Tab'
3. Click
'Details'
25
Step 5: Now, we can make changes in any or all the fields same as we do in Tagging.
• For more information Refer Tagging.
1. Click 'OK'
Step 6: Now, click 'OK' and the jewelery item have been modified and its entry will be in the item table under modify finished.
26
Step 7: The entry in item table is as shown in fig.
Step 8: Select the required stock.
• When we enter 'Item No' and press 'tab' we get the details of the item in 'Loaded Details' and 'Preview'.
• If we are using a Bar-code Scanner or RFID Reader we can directly read the item.
1. Select
'Split Finished'
2. Enter Item No
Press 'Tab'
3. Click
'Details'
27
Step 9: We can now split the finished jewelery item.
• We can only Modify and Delete Studded items, Selling Scheme or Gross Wt.
• We can change or add the Category.
1. Click 'OK'
Step 10:We get the option whether we want this split finished item to be Finished or Unfinished.
•If we select any of the options it will show in that particular stock type in Stocks.
1. Select
'Un-Finished'
2. Click 'OK'
28
Step 11:We will now see the details that we have entered.
•There is an extra option of 'Balance Details'.
•'Balance Details' is the information or details of the remaining item in the finished item that we have recently split.
•We can add both the entries in the item table.
1. Click
'Balance Details'
Step 12:The entry of the both in item table is as shown in fig.
1. Click
'Balance Details'
1. Click
'Add Item'
29
Step 13:We will see how do we convert a Finished Jewelery Item to an Un-Finished Item.
•In some cases if we want to remove the studded diamond or Color Stone of an item and replace it and send for setting we have to do
this entry.
1. Select
'UnFinished »
Finished'
2. Select
'UnFinished »
Finished'
Step 14:We can change the gross weight here.
•We can delete the studded items if we have removed any colorstone or diamond from the item.
1. Change the
Gross Wt
2. We can
Delete if any
3. Click 'OK'
30
Step 15:Click 'OK'.
1. Click 'OK'
Step 16: Click 'OK'. And then the item will be displayed in the item table.
1. Click 'OK'
31
1.2.6 Un-Tagging
Step 1:Select Company, Type and Reason and add a group.
1. Select
'Company'
4. Click
'Add Group'
2. Select
'Conversion'
3. Select
'UnTagging'
Step 1: Select Company, Type and Reason and add a group.
1. Select
'Date'
3. Select / Add
'Dept / Locn'
2. Select
'Dept / Locn'
4. Select
'Rate Profile'
7. Click 'OK'
5. Enter Comments
(optional)
6. Enter other
ref (optional)
32
Step 2:Add the relevant fields and click 'OK'.
•If we have a Bar-code Scanner or RFID Reader we will directly read the item.
1. Select
'Finished Bulk
Jewelery'
2. Enter the 'Item
No', press 'Tab'
3. Select 'Bulk'
in which it was
earlier
4. Click 'OK'
Step 3:The entry in the item table is as shown in fig.
•The item is now back in the bulk jewelery from where it was originally tagged and
•The bulk jewelery stock total will be increased by that amount of weight.
33
1.2.7 Transfer
Step 1:Select Company, Type and Reason and add a group.
1. Select
'Company'
4. Click
'Add Group'
2. Select
'Conversion'
3. Select
'Transfer'
Step 2: Add the relevant field and click 'OK'.
3. Select / Add
'Dept'
1. Select Date
2. Select
'Dept / Location'
6. Click 'OK'
4. Enter Comments
(optional)
5. Enter other
ref (optional)
34
Step 3:After selecting the group we can add items.
1. Click
'Add Item'
Step 4:Enter the item code and press 'Tab' and Click 'OK'.
•If we have a Bar-code Scanner or RFID Reader we will directly read the item.
1.Click 'OK'
35
Step 5:The entry in the item table is as shown in fig.
36
1.2.8 CC Sale Return
Step 1:Select Company, Type and Reason and add a group.
1. Select
'Company'
4.Click
'Add Group'
2. Select 'IN'
3. Select 'Cash
Sale Return'
Step 2:Add the relevant fields and click 'OK'.
•'From' is the name of the customer returning the Finished jewelery item.
•Bill No is the Ref No of the Cash Sale Group.
3. Add / Select
Dept / locn
1. Select 'Date'
3. Enter
'Bill No'
7. Select
'Tax Profile'
5. Enter comments
(optional)
8. Click 'OK'
6. Enter other
ref (optional)
37
Step 3:After selecting the group we can add items.
1. Click
'Add Items'
Step 4:Select the jewelery item customer is returning.
•We will get all the items that were sold against that 'Bill No'.
1. Click 'OK'
38
Step 5:The entry in the item table is as shown in fig.
39