1
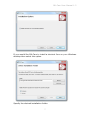
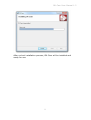
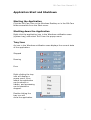
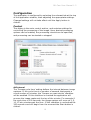
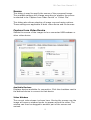
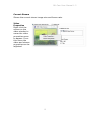
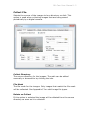
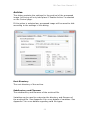
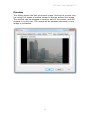
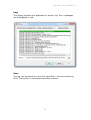
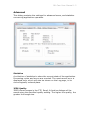
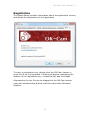
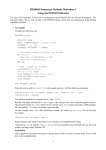
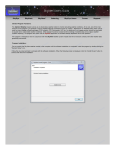
OK-Cam
User Manual
© 2011 Unflustered Software
OK-Cam User Manual 1.2
Table of Contents
Table of Contents .....................................................................2
Introduction.............................................................................3
Operation ................................................................................4
Quick Start Guide .....................................................................5
Installation ..............................................................................6
Application Start and Shutdown .................................................9
Starting the Application ..........................................................9
Shutting down the Application .................................................9
Tray Icon..............................................................................9
Configuration ......................................................................... 10
Control............................................................................... 10
Source ............................................................................... 12
Capture from Video Device ................................................... 12
Collect File .......................................................................... 14
Captions ............................................................................. 16
FTP .................................................................................... 18
Email ................................................................................. 20
Archive............................................................................... 22
Preview .............................................................................. 24
Log .................................................................................... 25
Advanced ........................................................................... 26
Registration ........................................................................... 28
Appendix A: Time & Date variables........................................... 29
Appendix B: Text import from external files ............................... 30
Appendix C: File types ............................................................ 30
2
OK-Cam User Manual 1.2
Introduction
OK-Cam captures still images from a video device, or collects them
from disk, then processes and uploads the images to a website via
FTP, sends them via email, or archives them to disk.
Images can be captured at specified timed intervals, or collected
from disk as soon as they are available.
The images can be automatically cropped and resized, and text
captions may be added. Text captions can be easily formatted for
position, font, colour and size, and may include the current date
and time, or data imported from external files.
The application works on all versions of Microsoft Windows from
Windows XP onwards.
3
OK-Cam User Manual 1.2
Operation
In order for the application to operate, a suitable source must be
selected. The source may be either a USB video device or a
directory on disk where images are saved at intervals by an
external application.
The main Control page of the application is used to select the
desired processing options, which may be a combination of:
-
Adding captions to the captured image.
Uploading the captured image to an FTP server.
Sending the captured image via email.
Archiving the captured image to disk.
Application operation can be summarised as:
Select a source on the Source page.
Select processing options on the Control page.
Enter the settings for the processing options on the respective
pages.
Apply the settings.
Click the Start button to start processing.
Start and Stop processing
Processing will begin when the Start button is clicked and will
continue until the Stop button is clicked. Any errors will be indicated
by the icon in the Windows notification area (commonly called the
system tray), and the details will be reported on the Log page.
Applying settings
Any changes to settings will not take effect until the Apply button is
clicked. If the Cancel button is pressed unapplied settings will be
discarded.
Showing and Hiding the application
Clicking the Cancel button, or the close button at the top right of
the window will minimise the application to the Windows notification
area, where it will continue to run. To exit the application right-click
on the icon and select the Exit option.
4
OK-Cam User Manual 1.2
Quick Start Guide
The most common form of operation is to use the application to
upload images from a video device to an FTP server. It is assumed
the video device is installed and is visible in the Windows Device
Manager.
To upload images from a video device to an FTP server
Start the application.
On the Source dialog:
Select ‘Capture from Video Device’.
Select the desired video device in the list.
On the FTP dialog:
Enter the details for the desired FTP server.
On the Control dialog:
Select ‘Enable FTP’
Select ‘At Interval’
Enter the desired Process Cycle Time.
Click Apply.
Click Start.
The application will begin to capture images and upload them to the
FTP server. The latest captured image can be previewed in the
Preview dialog. The Log dialog will report the ongoing progress of
the operations.
For more detailed explanation of the available options, consult the
relevant section of the manual.
5
OK-Cam User Manual 1.2
Installation
Double click on the OK-Cam_Setup.msi installation file.
Click ‘Next’.
6
OK-Cam User Manual 1.2
If you would like OK-Cam to install a shortcut Icon on your Windows
desktop then select the option.
Specify the desired installation folder.
7
OK-Cam User Manual 1.2
After a short installation process, OK-Cam will be installed and
ready for use.
8
OK-Cam User Manual 1.2
Application Start and Shutdown
Starting the Application
Click the OK-Cam icon on the Windows Desktop or in the OK-Cam
folder accessible from the Start menu.
Shutting down the Application
Right click the application icon in the Windows notification area
(system tray) and select ‘Exit’ from the popup menu.
Tray Icon
An icon in the Windows notification area displays the current state
of the application:
Stopped
Running
Error
Right-clicking the tray
icon will display a
popup menu, from
where the application
can be shown or
hidden, and processing
can be started or
stopped.
Double clicking the
tray icon will
show the application.
9
OK-Cam User Manual 1.2
Configuration
The application is configured by selecting the relevant tab at the top
of the application window, then adjusting the appropriate settings.
Changed settings will not take effect until the Apply button is
clicked.
Control
This dialog is the main control section, and contains settings for
controlling the processing of the image. Here, desired processing
options can be enabled, the processing interval can be specified,
and processing can be started or stopped.
At Interval
The ‘Process cycle time’ setting defines the interval between image
captures. If the cycle time is a number of seconds that equals a
round number of minutes, the ‘Process on exact stroke’ checkbox
will be enabled. If this checkbox is checked the application will
process the image capture at the top of the minute. For example if
the cycle time is 300 seconds, the image capture will occur at 0, 5,
10, 15 etc minutes past the hour. If this checkbox is unchecked the
300 second count will begin from the moment the Start button is
clicked.
10
OK-Cam User Manual 1.2
On Arrival
This setting is only used, and only selectable, when the image
source is set to ‘Collect File’ (see Source section for details). In this
mode the image will be collected as soon as it appears on disk.
Enable Captions
Enables text captions for the image. The captions are configured on
the Caption page.
Enable FTP
Enables the FTP transfer. The relevant details for your FTP server
must be filled in on the FTP page.
Enable Email
Enables SMTP email transfer. The relevant details for your SMTP
mail server must be filled in on the Email page.
Enable Archive
Enables archive of captured images to disk. The location can be
specified on the Archive page.
Start on Load
Starts processing as soon as the application is loaded.
Start minimised
The application will start minimised to the Windows notification
area.
Current Status
Displays information about the current status of the application.
Start & Stop
Starts or stops the image processing cycle.
Start and Stop can also be accessed by right-clicking the application
icon in the Windows notification area.
11
OK-Cam User Manual 1.2
Source
This dialog is used to specify the source of the processed image.
The available settings will change according to whether the source
is selected to be ‘Capture from Video Device’ or ‘Collect File’.
This dialog also allows selecting of image crop and resize options.
These settings are applicable to both video device and file sources.
Capture from Video Device
Selects the source of the images to be a connected USB webcam or
other video device.
Available Devices
Displays devices available for connection. Click the checkbox next to
the desired device to connect to that device.
Video Window
The current video stream is shown here. Moving the mouse over the
image will cause a window border to appear around the video. The
window can then be dragged to another part of the screen and
resized.
12
OK-Cam User Manual 1.2
Current Stream
Shows the current stream image size and frame rate.
Video
Properties
Right click the
mouse on the
video window to
cause the video
properties menu
to appear. From
this menu the
video and stream
properties can be
adjusted.
13
OK-Cam User Manual 1.2
Collect File
Selects the source of the images to be a directory on disk. This
option is used when collecting images that are being saved
periodically by a digital camera.
Collect Directory
The source directory for the images. The path can be edited
manually or browsed to by clicking the icon.
File Mask
The file mask for the images. Only images that match the file mask
will be collected. See Appendix C for valid image file types.
Delete on Collect
If this option is selected the image will be deleted from the source
directory as soon as it is collected.
14
OK-Cam User Manual 1.2
Latest File
Shows the details of the latest file to be collected; filename, time of
collection and image size.
Thumbnail Window
A thumbnail of the latest file to be collected is shown here. Moving
the mouse over the image will cause a window border to appear
around the image. The window can then be dragged to another part
of the screen and resized.
Crop
If unchecked, the whole image is processed by the application. If
checked, only a rectangular portion of the image is processed. The
dimensions of the rectangular portion can be specified here.
Alternatively, if the video stream or thumbnail window has been
dragged from the application, the crop rectangle can be adjusted
with the mouse.
Resize
Resizes the captured image. The resizing occurs after cropping, if
cropping is selected.
15
OK-Cam User Manual 1.2
Captions
In this dialog, text captions can be added to the captured image.
Each text caption has its own tab, where the text content, location
and appearance are specified. Captions will only be added to the
image if ‘Enable Captions’ is selected on the Control page.
Caption tabs
Each text caption has its own tab. Clicking on the tab brings up the
settings for that particular caption.
16
OK-Cam User Manual 1.2
Font (A)
Selects the caption font. All TrueType or OpenType fonts installed
on the computer are available.
Foregnd / Backgnd
Selects the text foreground and background colours.
Alpha
Selects the alpha value (transparency) of the foreground or
background colour. The value ranges from 0 to 255, 0 being
completely transparent and 255 being completely opaque.
Position
The X & Y coordinates of the caption, and whether these
coordinates specify a point on the left, right, or centre of the text.
Text
The caption text to be displayed. Variables can be used to display
the current time and date, or to import text from external files. See
Appendix A and Appendix B for more information.
Sample
A preview of what the caption will look like, and how it relates to
surrounding captions. Click the button to the top right of the sample
to expand or contract the image.
Caption Creation and Deletion
Click the ‘New’ tab to create a new caption. To delete a caption click
the close button in the top corner of the caption dialog.
17
OK-Cam User Manual 1.2
FTP
This dialog contains the settings for the FTP upload of the processed
image. FTP upload will only take place if ‘Enable FTP’ is selected on
the Control page.
Address
The address of the FTP server.
Port
The server port for connection. The default value of 21 will usually
be correct.
Username
The username used to log on to the FTP server.
18
OK-Cam User Manual 1.2
Password
The password used to log on to the FTP server. If the Save
checkbox is selected then the password will be saved in the
application settings between sessions.
Destination Directory and Filename
The directory to which the processed image is to be uploaded.
Destination Filename
The filename of the uploaded image. See Appendix C for more
details regarding valid file types.
Thumbnail
If this is selected a shrunken version of the main image is uploaded
in the specified location. The size of this image is specified in the
Width and Height boxes. The destination directory and filename can
be specified in the same manner as for the main image.
19
OK-Cam User Manual 1.2
Email
This dialog contains the settings for the email transmission of the
processed image. Email transmission will only take place if ‘Enable
Email’ is selected on the Control page.
Address
The address of the SMTP server.
Port
The server port for connection The default value of 25 will usually
be correct.
From Address
The address from which the email will be sent.
20
OK-Cam User Manual 1.2
To Address
The address to which the email will be sent. Multiple recipients can
be specified, separated by commas.
Subject
The subject of the sent email.
Filename
The filename of the image encoded in the email. See Appendix C for
more details regarding valid file types.
21
OK-Cam User Manual 1.2
Archive
This dialog contains the settings for the archival of the processed
image. Archiving will only take place if ‘Enable Archive’ is selected
on the Control page.
If this option is selected any processed image will be saved to disk
according to the settings in this dialog.
Root Directory
The root directory of the archive.
Subdirectory and Filename
The subdirectory and filename of the archived file.
Variables can be used to customise the directory and filename of
the archived file. See Appendix A for more details of variables. See
Appendix C for more details regarding valid file types.
22
OK-Cam User Manual 1.2
Quick Set
These buttons provide quick access to common archival directory
and filename formats.
23
OK-Cam User Manual 1.2
Preview
This dialog shows the last processed image. Moving the mouse over
the image will cause a window border to appear around the image.
The window can be dragged to another part of the screen, and will
expand to its full size. The image will be updated whenever a new
image is processed.
24
OK-Cam User Manual 1.2
Log
This dialog contains the application’s activity log. Error messages
are highlighted in red.
Save
The log can be saved as a text file, specified in the accompanying
field. The log file is maintained between sessions.
25
OK-Cam User Manual 1.2
Advanced
This dialog contains the settings for advanced users, and statistics
concerning application operation.
Statistics
A collection of statistics to show the current state of the application.
Processing cycles and errors are counted. The most recent error is
displayed here, which will also be shown on the Log page, in its
chronologically ordered place.
JPEG Quality
JPEG format images in the FTP, Email, & Archive dialogs will be
saved using the specified quality setting. The higher the quality, the
greater the image size.
26
OK-Cam User Manual 1.2
Enable VMR mixer
On systems with old graphics cards the application may have
trouble connecting to the video device. Disabling this option may
correct the problem, at the expense of the crop box not being
shown on the video stream, if cropping is enabled.
Low CPU
This option is useful on old systems when showing video in a
detached window. The video stream is paused every second, which
reduces CPU usage at the expense of smooth video.
27
OK-Cam User Manual 1.2
Registration
The About dialog contains information about the application version,
and allows the registration of the application.
To enter a registration key, double-click the OK-Cam banner or
press Ctrl-R on the keyboard. A Dialog will appear requesting the
location of the registration key. Locate the key and click Open.
Alternatively the key file can be dragged to the OK-Cam banner
using the standard drag & drop methods used within Windows
Explorer.
28
OK-Cam User Manual 1.2
Appendix A: Time & Date variables
When specifying filenames or caption text, the following variables
can be used within the text:
(assuming the current time is 23:59:00 on Friday 31st December
July 2010)
<YYYY>
<MO>
<DD>
<HH>
<MM>
<SS>
=
=
=
=
=
=
2010
12
31
23
59
00
-
Year in 4 digit format
Month in 2 digit format
Day in 2 digit format
Hour in 2 digit format (24 hour clock)
Minute in 2 digit format
Second in 2 digit format
<YY>
<MON>
<MONTH>
<DAY>
<DDD>
=
=
=
=
=
10
Dec
December
Friday
Fri
–
-
Year in 2 digit format
Month in 3 digit text format
Month in full length format
Day in full length format
Day in 3 digit text format
<SDATE> = 31/12/10
- Short date
<LDATE> = 31 December 2010 - Long date
(The above two variables follow the format specified in the
Regional Options section of the Windows Control Panel)
Eg 1: In the Archive dialog, if you were to specify an archive
filename of
MyPic-<YYYY><MO><DD>-<HH><MM><SS>.jpg the file would be saved as
MyPic-20101231-235900.jpg
Eg 2: In the Caption dialog, if you were to specify the caption text
The Current Time is <HH>:<MM>:<SS> the caption would appear as
The Current Time is 23:59:00
29
OK-Cam User Manual 1.2
Appendix B: Text import from external files
Within caption text, the following variable can be used to import
data from an external text file:
<FILELINE=fff|nn>
Where fff is a text file on disk, and nn is the line number of the file
to display.
Eg: In the Caption dialog, if the caption text is
The Current Temperature is <FILELINE=Z:\WeatherData.txt|02>
degrees
The second line of the file Z:\Weatherdata.txt will be substituted,
resulting in a caption of The Current Temperature is 25 degrees
assuming of course that the appropriate file contains the relevant
data on its second line.
The |nn is optional, and if omitted the first line of the file is used.
Appendix C: File types
In the Source, FTP, Email, & Archive dialogs, the following image
file types can be specified: JPG, BMP, GIF, PNG.
When saving a file, the file will automatically be saved with the
correct file type to suit the file extension.
Eg: In the Email dialog, if you specify the Filename to be
MyImage.png the file will be sent in PNG format.
The quality setting for JPEG images can be specified in the
Advanced dialog.
30