1
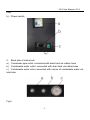
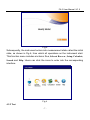
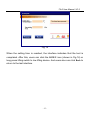
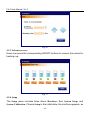
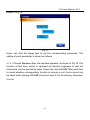
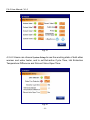
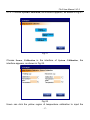
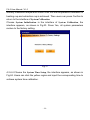
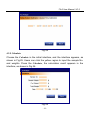
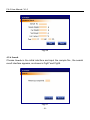
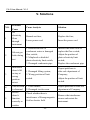
Contents
I. SUMMARY ......................................................................................................... - 1 II. PERFORMANCE.............................................................................................. - 2 III. STRUCTURE................................................................................................... - 3 V. SOLUTIONS ................................................................................................... - 24 VII. SUPPLEMENT ............................................................................................. - 25 IX. TEMPERATURE VALUE REFERENCE ..................................................... - 26 X. TRANSPORTATION ...................................................................................... - 27 -
FA-5 User Manual / V1.0
Safety Declaration
The protective function of this instrument can be impaired if the method
adopted by the user during the operation procedure is not the same as the
method specified by the manufacturer.
1.Safety regulations of lab should be strictly observed and all kinds of solvent
should be placed with care during analysis procedure. Furthermore, solvent
should be kept in proper material chosen based on the safety explanations in
the solvent manual. Besides, users must pay attention to eye protection
during procedure.
2.The organic solvent should avoid to be exposed to the condition with fire or
static electricity, for there is a risk of explosion in placing organic solvent!
3.The cover or plate should be removed only by the qualified personnel.
4.This instrument is equipped with three-phase plug, which is required to be
connected to a grounded power socket.
5.To avoid the possible burns, do not touch the surface of the stainless steel
and beaker that are hot during heating procedure.
6.Disconnect the power supply in prior to replacing the fuse.
FA-5 User Manual / V1.0
I. Summary
FA-5 Fat Analyzer, based on the Soxhlet extraction principle, is a
full-automatic crude fat analyzer designed according to international GB/T
14772-2008. Being an ideal instrument for fat determination in industries like
food, fuel and feed, it can also apply to the extraction and determination of
soluble organic compound in different fields such as agriculture, environment
and industry.
1.1 Features
(a) Automation is realized during working procedure, and the only
requirement is to weigh the sample by the user;
(b) This instrument uses color touch screen of big size for displaying;
(c) Five extraction methods: Soxhlet standard extraction, Soxhlet hot
extraction, continuous flow, hot extraction and CH standard hot extraction;
(d) Ether leaking warning;
(e) Experiment result can be calculated and printed;
(f) This instrument uses anti-corrosion treatment materials.
1.2 Application Scope
Determine the crude fat content in many samples, including food, feed, grain
and seeds, with the measurement scope between 0.1%-100%;
Extract the lipid from waste water and sludge;
Extract the SVOC, like herbicides and pesticides, from soils;
Extract the plasticizer in plastic, the rosin in paper and paper boards, and the
oil in leather;
Conduct digestion pretreatment to solid samples for the gas or liquid
chromatography procedure;
Used in other tests like extraction of soluble organic compound or
-1-
FA-5 User Manual / V1.0
determination of crude fat.
II. Performance
Technical data
1. Temperature range: Room temp. +5℃-300℃
2. Heating power: 2,600W
3. Rated power: 2,600W
4. Capacity per batch: 6pcs./batch
5. Solvent recovery: ≥85 %
6. Measurement speed: 1.5-2 hours, depend on sample type
7. Date storage capacity:1000sets;
8. Normal working condition
a) Ambient temperature: (5~30)℃
b) RH: not more than 80%
c) Power supply: AC (220±22) V; (50±1) Hz
d) No interference of electromagnetic field, except geomagnetic field
e) Good ventilation conditions
9: Dimension (mm): 605×334×740
10: Weight (kg): 61Kg
-2-
FA-5 User Manual / V1.0
III. Structure
Fig.1
1Sealing nuts
2 Extraction room
3 Heating plate 4 Heating cup (see
Fig.2) 5 Power switch 6 Lifting switch
7 Color touch screen
Fig.2
a Glass heating cup b Fluorine coated heating cup
Note: if heating temperature is lower than 260℃, please use easy cleaning
-3-
FA-5 User Manual / V1.0
fluorine coated heating cup; otherwise, glass heating cup.
IV. Operation
4.1 Installation
4.1.1 Installation Conditions
1. Input voltage: AC 220 V 50 Hz; an air switch, a leakage protector, and a
reliable earth wire must be provided;
2. This instrument should be mounted near water source and drain tank on
the work position equipped with power socket;
3. Power configurations should meet power-up requirements, so electrical
overload can be avoided; power supply should be grounded and has single
power switch and safety device, so operator’s safety is guaranteed during
electrical operation;
4. This instrument should be mounted on the place away from high power
consumption devices and free from the powerful EMI interference;
5. This instrument should be mounted on the place with good ventilation
conditions.
4.1.2 Installation Steps
This instrument should be mounted smoothly on the work position, with the
distance between its back and wall for at least twenty centimeters and
distance between machine itself and power socket for no more than one
meter. Besides, it should be provided with an air switch and a reliable earth
wire.
1. Left side of instrument
(a) Leakage protector (it will disconnect automatically to protect instrument
when there is too much electricity);
(b) Power plug and fuse, and it is the place to connect power and replace
-4-
FA-5 User Manual / V1.0
fuse;
(c) Power switch.
Fig.3
2. Back side of instrument
a) Condenser pipe outlet: connected with drain tank via rubber hose
b) Condensate water outlet: connected with drain tank via rubber hose
c) Condensate water inlet: connected with source of condensate water via
inlet tube
Fig.4
-5-
FA-5 User Manual / V1.0
4.2 Function Information
This instrument has five extraction methods: Soxhlet standard extraction,
Soxhlet hot extraction, continuous flow, hot extraction and CH standard hot
extraction. Users can choose proper extraction method according to different
requirements. Take Soxhlet standard extraction for example, after the
beginning of test, four icons can be displayed on instrument interface:
Extraction Temperature, Remaining Time and Over-temperature Warning,
Condensate Water Warning, Ether Leaking Warning and Lifting Function
Warning.
The five extraction methods are as follows:
1. Soxhlet standard extraction: it exactly follows the Soxhlet method;
2. Soxhlet hot extraction: based on the Soxhlet standard extraction, it
adopts double heating model, namely heating extraction cup and solvent in
extraction room simultaneously, to improve extraction efficiency;
3. Hot extraction: it adopts double heating model to keep sample in hot
solvent;
4. Continuous flow: it makes magnetic valve open all the time, so
condensed solvent will directly flow into heating cup through extraction room;
5. CH standard hot extraction: based on the Soxhlet hot extraction, it will
rinse the devices automatically after the end of test.
4.2.1 Start
Plug in, turn on power switch and controller switch in turn, then instrument
begins self-inspection, Start-Up Figure will be displayed later, as shown in
Fig.5.
-6-
FA-5 User Manual / V1.0
Fig.5
Subsequently, the instrument enters into measurement state called the initial
state, as shown in Fig.6, from which all operations on the instrument start.
This function menu includes six items: Test, Solvent Recover, Setup, Calculate,
Search and Help. Users can click the icons to enter into the corresponding
interface.
Fig.6
4.2.2 Test
-7-
FA-5 User Manual / V1.0
The Test menu includes five items: Soxhlet hot extraction, Soxhlet standard
extraction, Continuous flow, Hot extraction and CH standard hot extraction.
Its interface is shown in Fig.7:
Fig.7
Users can choose proper extraction method according to different test
requirements. Test starts after Extraction temperature, Extraction time and
Pre-drying time are set. And interfaces of each extraction method are shown
as follows from Fig.8 to Fig12.
-8-
FA-5 User Manual / V1.0
Fig.8
Fig.9
-9-
FA-5 User Manual / V1.0
Fig.10
Fig.11
- 10 -
FA-5 User Manual / V1.0
Fig.12
Users can touch the corresponding orange region to set the Extraction
Temperature, Extraction Time, Rinsing Time and Pre-drying Time via
keyboard, after which a numeric keyboard appears, as shown in Fig.13. Then
users can click the numeric key and press Confirm to complete the input of
one parameter. After setting corresponding parameters, users can press
Confirm to enter test interface, as shown in Fig.14.
Fig.13
- 11 -
FA-5 User Manual / V1.0
Fig.14
There are four icons on the lower right corner of screen representing system
over-temperature, water pressure shortage, solvent leaking and lifting failure
respectively. When abnormal cases occur, the responding icon will change,
along with warning prompts and screaming sound warning.
During the procedure, users can press Pause to pause heating if the test
needs. And, users can press Start to continue the test, as shown in Fig.15,
and users can press Back to exit the test.
- 12 -
FA-5 User Manual / V1.0
Fig.15
When the setting time is reached, the interface indicates that the test is
completed. After this, users can click the DOWN icon (shown in Fig.16) or
long press lifting switch to low lifting device. And users also can click Back to
return to the last interface.
- 13 -
FA-5 User Manual / V1.0
Fig.16
4.2.3 Solvent recovery
Users can press the corresponding ON/OFF buttons to recover the solvent in
heating cup.
Fig.17
4.2.4 Setup
The Setup menu includes three items: Hardware Test, System Setup, and
System Calibration. Choose Setup in the initial state, the interface appears, as
- 14 -
FA-5 User Manual / V1.0
shown in Fig.18.
Fig.18
Users can click the Setup item to set the corresponding parameter. The
setting of each parameter is shown as follows.
4.2.4.1 Choose Hardware Test, the interface appears, as shown in Fig.19. The
function of this item, which is operated by relevant engineers to test the
instrument, can be ignored by users. Users can click ON/OFF after each item
to check whether corresponding function is normal or not. And a sound can
be heard when clicking ON/OFF of solvent valve if it is functioning, otherwise,
it is not.
- 15 -
FA-5 User Manual / V1.0
Fig.19
4.2.4.2 Users can choose System Setup to see the working state of both ether
warmer and water tester, and to set Extraction Cycle Time, Hot Extraction
Temperature Difference and Solvent Valve Open Time.
Fig.20
- 16 -
FA-5 User Manual / V1.0
4.2.4.3 Choose System Calibration, the interface appears, as shown in Fig.21.
Fig.21
Choose Sensor Calibration in the interface of System Calibration, the
interface appears, as shown in Fig.22.
Fig.22
Users can click the yellow region of temperature calibration to input the
- 17 -
FA-5 User Manual / V1.0
actually measured temperature value. After this the temperature calibration of
heating cup and extraction cup is achieved. Then users can press Confirm to
return to the interface of System Calibration.
Choose System Initialization in the interface of System Calibration, the
interface appears, as shown in Fig.23. Press Yes, all system parameters
restore to the factory setting.
Fig.23
4.2.4.4 Choose the System Time Setup, the interface appears, as shown in
Fig.24. Users can click the yellow region and input the corresponding time to
achieve system time calibration.
- 18 -
FA-5 User Manual / V1.0
Fig.24
4.2.5 Calculate
Choose the Calculate in the initial interface, and the interface appears, as
shown in Fig.25. Users can click the yellow region to input the sample No.
and weights. Press the Calculate, the calculation result appears in the
interface, as shown in Fig.26.
Fig.25
- 19 -
FA-5 User Manual / V1.0
Fig.26
4.2.6 Search
Choose Search in the initial interface and input the sample No., the search
result interface appears, as shown in Fig27 and Fig28.
Fig.27
- 20 -
FA-5 User Manual / V1.0
Fig.28
4.2.7 Help
Choose the Help in the initial interface, the interface appears, as shown in
Fig.29.
Fig.29
- 21 -
FA-5 User Manual / V1.0
4.3 Pretreatment of sample
4.3.1 Pretreatment of food sample
4.3.1.1 Solid sample: take representative sample for at least 200g, and use a
mortar to smash, porphyrize and mix uniformly, then place it in sealed glass
container; as to sample hard to smash and porphyrize, cut (scissor) it into
particles, and place it in sealed glass container.
4.3.1.2 Powder sample: take representative sample for at least 200g (use a
mortar to smash if it is big), mix uniformly and place it in sealed glass
container.
4.3.1.3 Mushy sample: take representative sample for at least 200g, mix
uniformly and place it in sealed glass container.
4.3.1.4 Solid and liquid sample: take representative sample for at least 200g
in accordance with solid and liquid ratio, and smash it with waring blender.
4.3.1.5 Meat product: take representative sample without edible part at least
for 200g, and grind it twice with meat grinder, then mix uniformly and place it
in sealed glass container.
4.3.2 Pretreatment of feed sample
4.3.2.1 Sample that is already smashed or with low fat content refers to
treatment of 4.3.1.
4.3.2.2 Sample that is hard to smash, or with high fat content (over 200g/kg),
must go through pre-fetching.
4.4 Sample test
4.4.1 Install the instrument and connect the pipe line.
4.4.2 Take sample m, according to test requirement, and weigh the dry
heating cup m0; put the sample in extraction thimble, equipped with the
instrument, then place extraction thimble on sample bracket, and put them
together into the extraction room with sealing nut tightly screwed.
Take required solvent using graduated cylinder and put it in the extraction
- 22 -
FA-5 User Manual / V1.0
room, place the heating cup on the heating plate.
4.4.4 Open condensate water and start the instrument. And test starts after
setting the corresponding parameters. The solvent in heating cup is heated
on heating plate, then it volatilizes and gets condensed in condenser, after
such it flows back to extraction room, when the setting time is reached, it
goes back to heating cup, completing one cycle.
4.4.5 After the end of test, lower lifting device, remove the heating cup and
dry it in drying oven. Weigh both fat and heating cup m1 after it cools down.
4.4.6 Evacuate the liquor, put away the container and recover the solvent.
4.4.7 Calculate the fat content
X =
m1 − m0
× 100
m
Where:
X —— fat content of crude fat in sample (g/100g);
m1——weight of both heating cup and crude fat (g);
m0——weight of dry heating cup (g);
m ——sample weight (the weight before mixed with water)(g).
- 23 -
FA-5 User Manual / V1.0
V. Solutions
NO.
1
Probable
Cause
No
electricity
flows
through
instrument
Cause Analysis
Solution
Burned-out fuse;
Loose power cord.
Replace the fuse;
Insert the power cord.
1. Insufficient flow of
condensate water or damaged
flow switch;
2. Misplaced or disabled
photo-electricity limit switch;
3. Damaged condensate pipe.
Increase the water flow or
replace the flow switch;
Adjust the position of
photo-electricity limit
switch;
Replace the condensate pipe.
2
Solvent gas
leaks during
test
3
Instrument
doesn’t lift
or stay at
wrong
position
in test
1. Damaged lifting system;
2. Wrong position of limit
switch.
Report problems to
after-sale department of
Company;
Adjust the position of limit
switch.
4
Touch screen
is abnormal
1. Poor contact;
2. Damaged touch screen.
Report problems to after-sell
department of Company.
5
Device
doesn’t
function
correctly or
crashes
Check whether there is
interference of Strong magnetic
field or electric field.
- 24 -
Remove the interference
source and restart the
instrument.
FA-5 User Manual / V1.0
VI. Maintenance
1. It is necessary to offer good ventilation and radiation as the instrument
needs heated during work;
2. It is possible to use the same solvent in short period of one extraction
system to avoid cross contamination of solvent;
3. It is important to pay attention to cleanness of the beaker and extraction
tube, which should be cleaned at regular intervals.
VII. Supplement
The whole warranty lasts for one year from the date of product sale (starting
from the date on invoice), but the following cases are not in warranty:
1. The date over warranty period;
2. The damage caused by misuse;
3. The damage caused by dismantlement without manufacture’s permission;
4. The damage caused by improper transportation and storage.
VIII. Cautions
1. Be careful during transportation, for there is glass ware in the instrument;
2. Before internal parts repair, instrument must be switched off and the power
cord is unplugged, and the heating system is cooled down;
3. Condensate water outlets must be lower than instrument, so condensate
water can be evacuated smoothly;
4. If instrument is out of action for a long time, condensate water in
condensate pipe should be evacuated completely;
- 25 -
FA-5 User Manual / V1.0
5. It is possible to use the same solvent in short period of one extraction
system to avoid cross contamination of solvent;
6. It is normal to have liquor in instrument, for tests haven been done before
delivery;
7. Measures should be taken to avoid liquor from entering into interior of the
instrument;
8. To avoid the possibility of burns, don't touch surface of the heating plate
that is hot during heating;
9. During test, staff should not leave the lab.
IX. Temperature Value Reference
Affected by both room temperature and heat transfer efficiency between
heating plate and beaker, it is necessary to make adjustments in setting
extraction temperature. The proper temperature liquid adding rate is about
3-5 drops/sec.
Solvent
30-60 petroleum ether
Extraction Temperature (℃)
80
Ether
Acetone
60
76
dichloromethane
60
Hexane
methanol
89
85
Ethanol
98
chloroform
Benzene
82
100
- 26 -
FA-5 User Manual / V1.0
X. Transportation
The solvent and condensate water inside instrument should be evacuated
before the transportation. Steps of water evacuation are as follows:
a) Start instrument, press Setup and then Hardware Test, and click the ON
after Outlet Valve. After that, put inlet tube inside drain tank, which should be
lower than instrument at 10 centimeters.
b) Ventilate water outlet, the condensate water will automatically outflow to
the bottom;
c) After the condensate water is evacuated completely, switch off the power
supply and box the instrument.
- 27 -