1
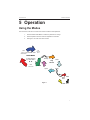
®
The Measurable Difference
Tru Pointe® 1100
Ultrasonic Leak Detector
Instruction 0028-9002
Operation and Maintenance
Rev. 1 - May 2010
WARRANTY
The Bacharach Tru Pointe® 1100 is warranted for one year to be free of manufacturing defects
adversely affecting performance. Should an instrument fail within the one year warranty period,
the unit will be repaired or replaced provided in the opinion of the factory, the instrument has not
been tampered with or abused.
If defective, return to the factory for repair and re-calibration. Maximum liability of Bacharach
shall be limited to replacement of unsatisfactory product.
Recommendations and product information are believed to be accurate, but the furnishing of it
does not constitute the making of a good process warranty of Seller.
Bacharach warrants that this product conforms to the Product Description contained in this
literature. Bacharach makes no other warranty, whether expressed or implied, including
warranties of merchantability or of fitness for a particular purpose or application. No
statements or recommendations contained herein are to be construed as inducements to infringe
any relevant patent, now or hereafter in existence. Bacharach neither assumes nor authorizes
any representatives or other person to assume for it any obligation of liability other than such as
expressly set forth herein.
Under no circumstances shall Bacharach be liable for incidental, consequential or other
damages from any alleged negligence, breach of warranty, strict liability or any other
theory, arising out of the use or handling of this product.
Contents
1 About This Manual ...................................................................................... 1
Warning Statements ....................................................................... 1
Caution Statements ........................................................................ 1
2 Introduction ................................................................................................. 2
What’s in the Kit ............................................................................. 2
0028-8002 ...................................................................................... 2
0028-8012 ...................................................................................... 2
3 Specifications ............................................................................................. 3
Physical Description ....................................................................... 4
4 Quick Start Guide ....................................................................................... 5
Battery Installation .......................................................................... 5
Turning the Instrument On/Off ........................................................ 5
Airborne Leak Detection ................................................................. 5
Using the Tru Pointe® 1100: ........................................................... 5
Touch Probe Applications ............................................................... 6
5 Operation .................................................................................................... 7
Using the Modes ............................................................................ 7
Setting the Sensitivity ..................................................................... 8
Setting the Volume ......................................................................... 8
Selecting the Sensor ...................................................................... 8
Adjusting the Display ...................................................................... 8
Checking the serial number............................................................ 8
Airborne Applications...................................................................... 9
Leaks .............................................................................................. 9
Reducing Background Noise Interference...................................... 9
Recording Overall System Noise ................................................. 10
Taking a Baseline Reading ........................................................... 10
Touch Probe Applications ............................................................. 10
Steam Traps ................................................................................. 10
Thermal Expansion Valves (TXV) ................................................ 11
Bearings and Moving Machinery .................................................. 11
Bearings... The First Test ............................................................. 12
Charting your results .................................................................... 12
Vibration ....................................................................................... 13
SoundBlaster® Sound Generator.................................................. 14
6 Principles of Operation ............................................................................. 15
5 Care and Service ...................................................................................... 16
Service ......................................................................................... 16
NOTES
Tru Pointe® 1100
Instruction 0028-9002
1 About This Manual
Thank you for investing in a Bacharach Tru Pointe® 1100 Ultrasonic Leak Detector.
To assure operator safety and the proper use of the Tru Pointe® 1100, please read the contents
of this manual, which provides important information on the operation and maintenance of the
detector.
Warning Statements
The use of the word WARNING (and the warning symbol
at left) in this manual denotes a potential hazard associated with the use of this equipment. It calls attention
to a procedure, practice, or condition, or the like, which
if not correctly performed or adhered to, could result in
personal injury or death.
Caution Statements
The use of the word CAUTION (and the caution symbol
at left) in this manual denotes a potential hazard associated with the use of this equipment. It calls attention
to a procedure, practice condition, or the like, which if
not correctly performed or adhered to, could result in
damage to the equipment.
1
Tru Pointe® 1100
Instruction 0028-9002
2 Introduction
Congratulations on your purchase of the Bacharach Tru Pointe® 1100 Ultrasonic Inspection
System. You have invested in the most sophisticated ultrasonic test instrument available.
The Tru Pointe® 1100 is the first ultrasonic leak detector to feature digital controls and displays,
and no other ultrasonic detector can produce such accurate readings and consistent results in
repeated tests. Using patented signal processing, the Tru Pointe® provides the most precise
readings available.
The Tru Pointe® 1100 can detect pressurized leaks of compressed air, refrigerant, steam, and
nitrogen, as well as detecting vacuum leaks. The Touch Probe allows the quick detection of flow
abnormalities in pumps, steam traps and valves, as well as mechanical wear in bearings and
other moving machine parts. Noise patterns can be recorded and compared to previous readings
for an accurate record of noise patterns.
What’s in the Kit
0028-8002
Tru Pointe® 1100 Kit
Tru Pointe® 1100..................... 0028-7002
Instruction Manual .................. 0028-9002
Probe Wrench ........................ 0028-0023
Solid Touch Probe .................. 0028-0021
Heavy Duty Headset .............. 0028-0020
Carrying Case ........................ 0028-0014
6” Wave Guide ....................... 0028-0004
9v Battery ............................... 0204-0024
Warranty Card ........................ 0006-8825
0028-8012
Tru Pointe® 1100 Kit w/ SoundBlaster®
Tru Pointe® 1100..................... 0028-7002
SoundBlaster® ........................ 0028-7006
Instruction Manual .................. 0028-9002
Probe Wrench ........................ 0028-0023
Solid Touch Probe .................. 0028-0021
Heavy Duty Headset .............. 0028-0020
Carrying Case ........................ 0028-0014
6” Wave Guide ....................... 0028-0004
9v Battery ............................... 0204-0024
Warranty Card ........................ 0006-8825
2
Tru Pointe® 1100
Instruction 0028-9002
3 Specifications
Physical
Dimensions
7.075”L X 2.4”W X .875”D (197.7
mm X 61 mm X 22.22 mm)
Overall Length
8.185” (207.8 mm)
Body Material
Aluminium and ABS
Body Finish
Anodized, Gold, and Black ABS
Connector
3.5 mm Stereo
Weight
0.5 lb. (233 g) including battery
Electrical
Sensitivity
-80 db/V-μbar
Ultrasound Converter Type
Digitally Controlled Heterodyne
Frequency Response, Airborne
34kHz to 42kHz
Frequency Response, Touch Probe
16kHz to 24kHz
Heterodyne Oscillator
Digital
Heterodyne Filter
4kHz
Controls
4 Buttons
Digital Sensitivity Control
256 Steps
Digital Volume Control
256 Steps
Output, Audio
0Hz to 4kHz
Output, Visual
20 Element Bar Graph with
Peak-Hold and Separate Alphanumeric Digital Display
Signal Output
Heterodyne
ON Indicator
Digital Display
Low Battery Indicator
Digital Display, BATT
Insufficient Battery Charge
Automatic Shut-Down
Battery Type
9 Volt
Run Time
58-80 hours
3
Tru Pointe® 1100
Instruction 0028-9002
Physical Description
To begin using the Tru Pointe® 1100, first take a moment to become familiar with the unit’s
controls.
ON/OFF
BAR GRAPH DISPLAY
TOUCH PROBE SENSOR
(INTERNAL)
AIRBORNE SENSOR &
FOCUSING CONE
HEADSET JACK
(SIDE)
4
UP/DOWN & SELECT
MODE SELECTOR
ALPHA-NUMERIC DISPLAY
Airborne Sensor
Detects external ultrasonic sound traveling through
the air, such as pressurized gas leaks, vacuum leaks,
external system noise and the SoundBlaster®. The
optional nose cone narrows the sensor’s field of view.
Touch Probe
Sensor
Detects internal system sounds such as internal valve
leaks, bearing wear and faulty steam traps.
Bar Graph Display
Shows relative strength of detected signal in bar graph
format and includes a Peak/Hold feature.
Power Button
Turns the Instrument On/Off
Alphanumeric
Display
Level/Mode indicator. Displays active mode, current
mode setting and numeric intensity reading. Also
indicates when battery power is low.
Mode Select Button
Scrolls through menu options for adjustment/selection
Up Adjustment
Increases a setting or scrolls through mode options
Down Adjustment
Decreases a setting or scrolls through mode options
Headphone Jack
For headphone plug
Tru Pointe® 1100
Instruction 0028-9002
4 Quick Start Guide
Battery Installation
The following instructions describe how to install/replace batteries in the Tru Pointe® 1100.
1.
Turn the unit over so the controls are facing the floor.
2.
Apply minimal pressure to the battery compartment panel and slide it toward the
bottom of the instrument.
3.
Install/Replace a 9v battery, noting the (+) and (-) positions on the inner label.
Turning the Instrument On/Off
1.
Plug the headphones into the jack on the right side of the instrument
2.
Press the On/Off Button once to turn the unit on.
3.
Press the On/Off Button again to turn the unit off.
NOTE: If the unit is in “AIR” mode, translated ultrasound
can be heard immediately. If the unit is in “PROB” mode,
the Touch Probe must be in contact with the item being
tested to translate the ultrasound.
Airborne Leak Detection
Use the Airborne Sensor for detecting pressurized gas leaks, vacuum leaks, or when using the
SoundBlaster®. Leaks must be turbulent to be detected ultrasonically.
Using the Tru Pointe® 1100:
1.
Insert the headset plug into the jack on the side of the instrument.
2.
Push the Power Button once.
3.
Push the Mode Select Button until the alphanumeric display reads “AIR”, then
press ▲ or ▼ to activate it. Once activated, the current sensitivity setting (0 to
255) will be displayed and translated ultrasound will be heard. The Bar Graph
Display will display the strength of the corresponding signal. The highest LED will
hold its place for 5 seconds before resetting its position.
4.
The instrument always resets itself so that sensitivity is the active mode. Pressing
the ▲ or ▼ buttons will adjust sensitivity up or down. If the LED Bar Graph Display is at maximum, reduce the sensitivity by pressing ▼ until it reads “5” or less,
and continue searching for the leak. Pointing the Tru Pointe® 1100 away from the
leak will cause the bar graph level to drop. Pointing the detector toward, or getting
closer to the leak, will cause the bar graph level to increase. Any deviation from
the direction of the leak will cause the LEDs to drop below the Peak Hold level.
Moving closer to the leak will cause Peak value to reset. The highest Peak value
will indicate the strongest leak point.
5
Tru Pointe® 1100
Instruction 0028-9002
5.
To adjust the volume, press the MODE button once. The alphanumeric display
reads “VOL”. Then use the ▲ and ▼ buttons to make the adjustment. The alphanumeric display will display the current setting as V###. The volume reading has
a range of 0 to 255.
6.
Listen for the leak. A gas or air leak will sound like a harsh rushing noise, or high
intensity hiss. This sound will increase as the instrument is drawn toward the leak
point, and will clearly disappear as the sensor is turned away.
7.
For more detailed information on specific applications, refer to page 9 of this
manual.
Touch Probe Applications
Use the touch probe to detect internally generated ultrasound such as leaks in steam traps,
valves, and sounds from bearings.
WARNING! To ensure a good contact and accurate
readings the touch probe has a sharp tip. Be careful not
to injure yourself or others.
1.
Insert the metal Touch Probe into the port on the nose of the Tru Pointe® 1100.
The Tru Pointe® 1100 Touch Probe should be snug but do not overtighten. Depress the mode select button until the display reads “PROB” and press the “▲”or
“▼” to activate the touch probe selection.
2.
Making a firm contact, touch the tip of the probe to the item being tested. Apply
just enough pressure to make good contact. A clear translation of the internally
generated ultrasonic sound will be heard.
3.
Listen for fluid leaks in valves, continuous flow or non-cycling in steam traps, and
knocking or scraping in bearings.
4.
The Tru Pointe® 1100 always defaults back to Sensitivity as the active mode,
therefore if readings are off the scale simply press the “▼” to reduce the reading
to within the range of the instrument. The alphanumeric display will display the
active sensor and current sensitivity setting before it begins to make the adjustments.
NOTE: When testing bearings or machinery vibration,
record your sensitivity setting, and use the reading
on the Alphanumeric display as a baseline for future
readings.
5.
6
For more specific information refer to page 10.
Tru Pointe® 1100
Instruction 0028-9002
5 Operation
Using the Modes
The Tru Pointe® 1100 uses a circular menu method of selection and adjustment.
1.
Press the Mode Select Button to select the parameter to change.
2.
Use the Up/Down arrows to make the adjustment or selection.
3.
See Figure 1 for a list of the views in order.
AIR
OPER
Operate, No Tru
Selection Made
®
Pointe 1100
Airborne
Sensor
MODE MENU
To Select press the
Up or Down Buttons
Sensitivity
Volume
Any
Sensor
▲▼
PROB
Probe Sensor
Operate
Display
OFF Display CONT
Menu
Figure 1.
PEAK
7
Tru Pointe® 1100
Instruction 0028-9002
Setting the Sensitivity
The Tru Pointe® 1100 always defaults to Sensitivity as the active mode. After any adjustment has
been made, it will store the setting in memory, and reset itself so that ▲ and ▼ adjust sensitivity.
Pressing the ▲ and ▼ arrows will adjust the sensitivity while in either sensor mode. The prefix
on the alphanumeric display indicates the sensor being changed. The display will read “A###”
when the Airborne sensor is selected, or “P###” when the Touch Probe is selected.
Setting the Volume
Pressing the “MODE” button once will set the Tru Pointe® 1100 in the Volume Adjust Mode. The
alphanumeric display will read “VOL” as long as the MODE button is pressed. When released
it will show “V###” indicating the current volume setting. Use the ▲ and ▼ buttons to make the
adjustment. The volume will change as the display changes from “V 000” to “V 255”.
NOTE: Volume and sensitivity are not the same.
Volume adjusts the loudness of the signal in the
headset. Sensitivity adjusts the meter’s reaction to the
incoming signal.
Selecting the Sensor
Press the “MODE” button until the alphanumeric display reads “AIR” or “PROB”. The instrument
will delay 3 seconds after releasing the MODE button, for the sensor selection to be made by
pressing the ▲ or ▼ button.
Adjusting the Display
The alphanumeric display offers three viewing options. Continuous, Peak, and OFF. Press the
“MODE” button twice. The display will read “DISP” until released, and then display the current
setting. Pressing the ▲ or ▼ buttons will scroll through the display options below.
“Cont” = Continuous, the alphanumeric display will show the level of the signal in real
time.
“Peak” = Peak Hold, the alphanumeric display will hold the highest reading for 3 seconds.
“Off” = Turns the alphanumeric display off (with the exception of the “-“). Since this
display is not necessary for most airborne applications, turning it off can save
battery life.
NOTE: The changes made will stay in the unit’s memory
until they are updated.
Checking the serial number
While the unit is powered OFF, hold down the “MODE” button. Now turn the unit on while holding
down the “MODE” button. The Tru Pointe® 1100 will show its serial number in the alphanumeric
display.
8
Tru Pointe® 1100
Instruction 0028-9002
Airborne Applications
The Airborne sensor is used to detect sound waves which travel to the Tru Pointe® 1100 through
the air. The most common airborne application is compressed air or refrigerant leak detection.
Leaks
When searching for leaks with the Tru Pointe® 1100, remember that you are listening for the
turbulent flow of the gas as it flows from the leak orifice (refer to “Principles of Operation” on page
15 for a more detailed explanation). The Tru Pointe® 1100 is capable of hearing leaks from over
fifty feet away, but it is best to hold the instrument as close to the test area as safely possible.
1.
Stand several feet from the suspected leak area and reduce the sensitivity of the
Tru Pointe® 1100 until only 1 or 2 LED’s are lit.
2.
Scan around fittings, flanges and all other suspected leak sources.
NOTE: If the LED Bar Graph Display is at maximum,
reduce the sensitivity and continue scanning.
3.
The sound in the headset and the LED Bar Graph Display will increase as the unit
gets closer to a leak.
In the case of refrigerant leaks in large areas remove the nose cone and the waveguide and
increase the sensitivity. Then sweep the instrument over the entire area.
Reducing Background Noise Interference
The Tru Pointe® 1100 detects a narrow band of ultrasonic sound, therefore although there may
appear to be an overwhelming background noise, the sound may not be within the detection
range of the Tru Pointe® 1100.
Leaks sound like a “hiss” or rushing sound, while compressors “chatter” a rhythmical mechanical
pattern. Fans should not produce any wind noise detectable by the Tru Pointe® 1100, although
the fan motor may produce a “buzz” or “hum”.
EXAMPLE: Mechanical vibrations sound very different
from leak sounds. Shake a set of keys, and then take a
short quick breath through the nose. Listening to both
sounds through the Tru Pointe® 1100 is a good example
of how its direct translation process helps to distinguish
the difference between the two signals.
Practice listening to different components of the test area, this will help to identify problems from
other normal operational sounds.
The following methods can help reduce the amount of background noise detected by the Tru
Pointe® 1100:
1.
Placing the flexible waveguide onto the airborne sensor will make the reception of
the Tru Pointe® 1100 more directional. This helps shield the sensor from competing sounds entering from other directions. Cupping a hand around the end of the
wave guide will also help to reduce the background noise.
9
Tru Pointe® 1100
2.
Instruction 0028-9002
Reducing the sensitivity will suppress the effect background noise has on the
display, and also in the headset. This will help make the leak sound more identifiable.
Sometimes the most interfering background sounds come from areas of high turbulence within
a pipe. This can be where high velocity flow changes direction, or is restricted such as within a
partially closed valve. These situations will produce a high frequency hiss which is very similar to
the sound of the leak. Use the methods above for reducing the background noise.
Recording Overall System Noise
Use the Tru Pointe® 1100 to record sound levels of compressor noise, fan vibration, fan belts,
motors, and even noisy ducts. The overall ultrasonic sound level of a system can be recorded
and compared to previous and current readings. The Tru Pointe® 1100 will only record the ultrasonic range of a noisy system. This part of the sound will increase in proportion to the sonic part
and is an indication of the problem.
Taking a Baseline Reading
When taking a reading of overall noise level, begin by reducing the sensitivity until the bar graph
reads less than 1/2. This will give you room on the display for future readings.
IMPORTANT: The digital circuitry of the Tru Pointe®
1100 allows for great accuracy and consistency, but
the operator must note the settings to ensure success.
Record the sensitivity, volume, sensor type and the
numeric level reading on the display, as well as the
position from which the reading was taken. This will be
your baseline for future tests.
Touch Probe Applications
Ultrasound not only travels through air but solid materials as well. The touch probe sensor is
used to detect abnormal system sounds which are internally generated. Such sounds include
abnormal flow in piping, valves, and steam traps. Other applications include the detection of
friction or increased wear in bearings, motors and gears.
Steam Traps
A steam trap is a device which works much like an automatic faucet, opening only at times when
condensed steam (water) has accumulated in the trap. The steam trap then will open to purge
the condensate, while retaining the steam for maximum efficiency. Common problems arise
when a malfunctioning steam trap fails in either the open or closed position. When this happens
it can often go undetected. Left uncorrected in the closed position, faulty steam traps will cause
problems such as “water hammer”. If failed in the open position, the trap will constantly release
live steam, drastically reducing system efficiency. These are problems that can be quite costly.
10
Tru Pointe® 1100
Instruction 0028-9002
NOTE: It is fairly common for large manufacturing and
processing plants to spend tens of thousands of dollars
on steam system conservation programs (equipment
and personnel) designed to locate and repair failing
steam traps. Ultrasonic detectors play an important role
in these programs.
To test steam traps you will use the touch probe sensor. Press the “MODE” button until the
display reads the desired probe mode, then press ▲ and ▼ to activate the touch probe sensor.
Making a firm contact, touch the end of the probe to the steam trap being tested. Apply just
enough pressure to make a good contact, but do not push too hard. You will hear a clear translation of the internally generated ultrasonic sound. If the trap sounds appear to be masked by other
system sounds, reduce the sensitivity, and touch just upstream and downstream from the trap to
verify that what you hear is only the steam trap being tested.
A properly functioning steam trap will have a distinct on and off flow cycle which is easy to
interpret with the Tru Pointe® 1100. A strong rushing sound indicates that the trap is purging.
You may want to listen to the sound of a good trap before trying to make important decisions
on the condition of others. Knowing what a healthy trap sounds like will be a great advantage.
There are many different types of steam traps. A “sputtering” sound may be quite normal for one
type and not another.
Thermal Expansion Valves (TXV)
The Tru Pointe®1100 can be used to test a TXV, check valve, ball, needle, gate… any type of
valve which may be leaking internally.
Any fluid or gas passing from the upstream side (high pressure) to the downstream side (low
pressure) through a poorly seated valve will generate ultrasound, and clearly be heard using the
Tru Pointe® 1100.
This test method is very similar to that of steam traps. Use the touch probe to test around the
perimeter of the valve housing. The sound will be loudest at the point of the leak (the area where
the gate, ball, needle, etc. seats into place to stop the flow. Use the sensitivity or frequency
adjustment to eliminate any extraneous pipe noise and you will be able to hear only the internal
flow of the valve.
By using the readings on the display and your ear, you can determine which side of the valve is
leaking.
Bearings and Moving Machinery
The most common mechanical failure is a broken or seized bearing. However this type of failure
normally does not happen instantly. When the bearing begins to fail, the sound that it makes
changes. These changes occur in the ultrasonic range and can be detected with the Tru Pointe®
1100 by touching the bearing housing with the touch probe and listening for abnormal sounds.
Periodic preventive maintenance tests can prevent major disasters in both the machinery and
down time.
11
Tru Pointe® 1100
Instruction 0028-9002
Bearings... The First Test
The first test is very important. This is the reading that all future tests will be based on.
With some experience you will be able to compare two similar bearings and identify the sound
of a good bearing from a worn one just by using your ear. When time passes between tests,
however, it is very important to log your results because the slope of the curve that you will
generate will predict the future failure of the bearing.
To take a reading on a mechanical system, such as a bearing or gear box, you must use the
touch probe attachment. Touch the end of the probe to the outer housing of the gear box or
bearing, making a good contact. Do not press very hard at any given point when collecting data.
Use just enough force to keep the tip of the probe in place, and try to be consistent with the
amount of pressure you use. It is often effective to use only the weight of the Tru Pointe® 1100
itself to hold the tip in place.
Adjust the sensitivity so that the intensity meter reads 5-6 LEDs. This gives you room on the
display for future readings.
As the bearing wears the ultrasonic sound intensity will increase. Future readings can indicate
the extent of this wear.
When testing a bearing or other moving machinery it is important to:
1.
Record your volume, sensitivity, and frequency range.
2.
Record the level on the alphanumeric display.
3.
Record or mark the test point where the level was taken.
4.
Record the temperature using a thermometer
By recording this Data you have the most accurate and repeatable test possible. Although the
sound of a moving machine member may fluctuate, the Tru Pointe® 1100’s built in peak hold
feature will allow you to assign a number to the sound level emanating from the item being tested.
Use this number to compare future tests.
Charting your results
Ultrasound will be produced differently for all types of systems. It may be strong on one side of
a bearing shaft, and weak on the other, depending upon the unique wear patterns. Therefore
it is very important to mark the test point, so that future readings can be taken from the exact
same position. Doing the same test with the sensitivity set differently can completely change
the results, therefore it is extremely important to keep track of the instruments settings for future
tests to be valid. These values can be entered into a computer spreadsheet program for creating
charts, and storing data.
Keep this information in your files, or tagged on the equipment itself. When returning to the same
equipment, perhaps several weeks or months later, you have the information you need to make a
decision as to the degree of wear in a particular piece of equipment.
It is worthwhile to show this information to supervisors and plant management. The problems you
identify and correct will eliminate costly downtime and energy loss, ultimately saving your Corporation money. More scheduled repairs and less emergency work keeps your business under
control.
12
Tru Pointe® 1100
Instruction 0028-9002
Vibration
Vibration, misalignment, or moving machinery which is not properly balanced can be deadly to
a system. These things can cause excessive wear bringing the life of any system to an early
demise.
All these problems have a common warning signal; increased ultrasonic energy. This ultrasonic
energy is generated from the friction associated with these problems, and can be detected with
the Tru Pointe® 1100.
EXAMPLE: Maintaining a system using multiple pumps
or motors all of the same type. After testing a sample
of these bearings, the will be able to determine what
readings are normal or abnormal for each type.
REMINDER: To insure success, be consistent. If you
test a compressor bearing, for example, test the same
place, at the same sensitivity setting. It is a good idea
(although not necessary) to test units when they are
new, and keep your own records of what is acceptable
for a new piece of equipment.
See the previous section on charting your results.
WARNING! Be careful when working around rotating
machinery. The headphones will dampen much of the
sound around you. Use care, and be alert at all times.
Make certain the headphone cord is away from moving
machine parts.
13
Tru Pointe® 1100
Instruction 0028-9002
SoundBlaster® Sound Generator
The SoundBlaster® ultrasonic sound generator is used to detect leaks in enclosures which are not
under pressure.
This item can be placed inside a vessel such as tank or walk-in freezer compartment. The sound
generator emits a powerful 115dB ultrasonic tone which will follow the empty passage a gas or
liquid would travel to produce a leak. The tone can then be identified at the point of exit by using
the Tru Pointe® 1100 detector.
14
Tru Pointe® 1100
6
Instruction 0028-9002
Principles of Operation
The principle of operation of the Tru Pointe® 1100 is based on the turbulent flow of fluids and
gasses. Turbulent flow has a high content of ultrasound, which the Tru Pointe® 1100 can detect.
Imagine air leaking from a tire. Because this is such a large leak, your ear can detect this sound,
however your ear hears only about 1/3 of the actual spectrum of sound which exists. The sound
of small leaks is mostly ultrasonic which your ear can not detect.
EXAMPLE: A piece of straight tubing connected to a
gas supply and left free to exhaust into the atmosphere
will not generate sound if the volume of gas through
it is such that turbulence does not take place. Yet for
that same flow, an opening as small as 0.005 of an inch
could generate enough sound to be heard several feet
away.
For a leak to happen there must be an opening in the system that carries a gas or fluid. Normally,
these openings are not clean smooth holes, but passages through cracks with many jagged
edges and internal chambers. Fluid or gas escaping through an “orifice” like this, is forced into
turbulence, random circular-like motions. Inside a tube where a gas may be flowing, the flow is
normally laminar which means that a given layer of gas does not mix with layers above it or below
it. This condition happens in a straight long tube when the velocity of the fluid is not high. A gas
leaking out of a straight and long tube will not generate as much sound as if it were leaking out of
a small crack because the flow is not turbulent.
The intensity of sound generated at a leak is a very complex function of the viscosity, the temperature, the speed the fluid is moving, the Reynolds number, the pressure differential across the
leak, and the physical dimensions and characteristics of the orifice. This is why it is impossible to
quantify the size of a leak with ultrasonic technology. A smaller leak may generate more sound
than a larger one.
The Tru Pointe® 1100 detects ultrasound NOT the presence of a specific gas. It is NOT a gas
“Sniffer”. Because of this fact, the Tru Pointe® 1100 can function in areas where heavy wind or a
concentration of fumes renders other detectors useless.
WARNING! Ultrasonic detectors will not indicate a
leak if there is no turbulent flow producing sound when
checked. If you suspect a toxic gas, natural gas, or
other combustible gas leak and it is not detected by the
Tru Pointe® 1100, do not assume it doesn’t exist, and
use another method as verification there is no gas leak
present.
15
Tru Pointe® 1100
Instruction 0028-9002
5 Care and Service
The Tru Pointe® 1100 is constructed of durable, impact resistant ABS; however it is also a
precision electronic test instrument which should be handled with care and respect. We suggest
you follow these simple instructions to insure many years of reliable performance.
1.
If you find yourself working in damp areas or the instrument is exposed to oils, or
chemical agents that corrode, make sure that you wipe it clean with a soft cloth
and window cleaner. Be very gentle around the front of the instrument so that the
sensor is not damaged. Periodically, use an automotive plastic polish on the case
to bring back its original luster.
2.
Keep both sensor openings free of dirt, oils, moisture, or any other foreign substances. Use the yellow waveguide to protect the airborne sensor when using the
unit in harsh environments.
3.
When performing touch probe applications, do not use excessive pressure on
the item being tested. Bent probes or cracked sensor housings are considered
abuse, and will not be covered under warranty.
4.
Keep the instrument stored in its protective carrying case when not in use.
5.
Your Tru Pointe® 1100 comes with a high quality, 9 Volt Battery. However, all batteries have the possibility of leaks. Remove the battery if the unit is not to be used
for longer periods of time and store it in one of the two storage locations at the
lower left portion of the carrying case foam.
Service
If you need service, please contact Bacharach Customer Service (800-736-4666 or 724-3345000) to obtain an RMA number for service returns. When you receive your RMA number, return
the instrument, postage paid and insured to:
Bacharach, Inc.
8975 Marshall Ct., Suite 100
Westminster, CO 80031
Email: [email protected]
16
Tru Pointe® 1100
Instruction 0028-9002
NOTES
17
Tru Pointe® 1100
Instruction 0028-9002
NOTES
18
Tru Pointe® 1100
Instruction 0028-9002
NOTES
19
®
The Measurable Difference
Bacharach, Inc.
Phone: 724-334-5000 • Toll Free: 800-736-4666• Fax: 724-334-5001
www.mybacharach.com • [email protected]