1
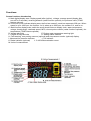
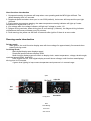
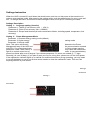
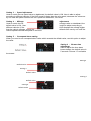
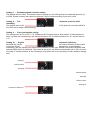
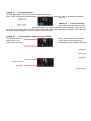
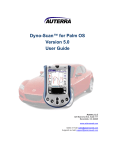
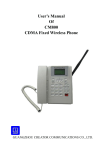
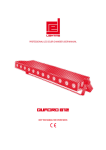
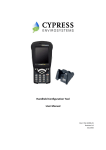
TSA HUD S300-SE User Manual
Contents
1. HUD Introduction ………………………. …………….………………………..……..Page 1
2. Functions ……………………………………………………………………………Page 2
Screen functions introduction ……………………………………………….……..Page 3
Buttons and interface introduction ……………………………….…….........Page 4
Alert functions introduction ……………………………..…………….….........Page 5
3. Running mode introduction……………………………………….. ………..................Page 5
Driving mode…………………………………………………..……………..…..…….. Page 5
4. Settings Instruction ………………………………………..................... Page 6~9
5. Notice............................... ……………………………………………………………. Page 10
6. Product Specifications
……………………………………………......... Page 10
7. Accessories ........………………………………………………….……………….. Page 10
8. Simple troubleshooting ……………………………………………………………… Page 11
Head-Up Display Introduction
HUD is an abbreviation for Head-Up Display, also known as horizontally viewing system.
When a vehicle is at high speed, especially at night, the driver may have to look down to see the
dashboard. If a car accident happens in front of a driver, he or she may not have enough time to
respond and will involve to that accident. To avoid this kind of situation, some high-end vehicles are
equipped with Head-Up Display (HUD) system,
It is able to present data on the front windshield. Also, the display position and display brightness are
adjustable, in order to avoid viewing down to the dashboard. It reduces the reaction time of visual blind
spot.
This has a big benefit in reducing car accidents caused from looking at lower instruments. This product
is a multi-functional HUD with low-cost developed based on the OBDII interface. It has stable
performance, nice appearance, more convenient and safer installation. It only takes three minutes to
complete the installation, adjustments and tests.
Please read the instructions before using this product in order to fully understand and use all the
features of the product.
It lets you experience the speed, and ensure your driving interest and driving safety at the same time.
Functions
1.
This product is an OBDII interface multifunctional HUD, with simple installation which you don't
need to break the car’s original circuits to use, just plug and play.
2. Metric to Imperial conversion, compatible for different standard vehicles.
3. Comprehensive information, like Vehicle speed, speed of revolution, clock, MPG, parking distance
control (not included in standard edition), tire pressure (not included in standard edition) is displayed
on the same screen.
4. All numbers displayed, convenient and direct.
5. Uses scroll wheel button for more convenience (complete all the settings with one finger)
6. Smart alert, with sound and lights for users to choose.
7. Gear shift reminding function for new drivers (suitable for hand shift and auto shift automobiles)
8. Screen brightness automatically changes for different environment.
9. Throttle angle display, knowing the throttle angle anytime.
10. Automatic voltage display after starting engine.
11. Automatic turn-on after starting engine and turn-off after shutting down engine.
12. Uses Cab6.0 soft flat wire for simple wiring.
13. Digital Clock display.
14. Real-time MPG display.
15. Seconds counting for 0-100 KM acceleration.
16. Fatigue driving reminder.
17. Overspeed alarm.
18. Low battery voltage alert.
19. High water temperature alarm.
20. Single driving time, mileage and average speed display (after shutting down engine)
21. Error code alarm(after ignition, when a failure happens, the yellow car on the right side will flash for
10 seconds)
22. Wireless real-life voice parking sensor.(optional)
23. Wireless tire pressure monitor.(optional)
Functions
Screen functions introduction
A. Main digital display area: Display speed (after ignition), mileage, average speed (display after
turn-off for 5 seconds), reversing distance (radar function optional), tire pressure value (TPMS
feature optional).
B. Rotational speed indicator display area: the first bar means 0, each bar represents 250 rpm. When
speed is up to 1000 rpm, the number 1 is lit; when up to 2000 rpm, the number 2 lit, and so on.
C. Multi-function display area: switch the scroll wheel button to display clock, water temperature,
voltage, throttle angle, rotational speed, MPG, closest probe number (radar functions optional), tire
temperature (TPMS feature optional).
D. Voltage alert light
E. Engine water temperature warning light
F. Fatigue driving reminder
G. Setting status indicator
H. Fault warning, rear parking sensors (optional) and tire pressure monitor (optional) display
I. Abnormal tire pressure indicator
J. Tire indicator
K. Radar indicator (optional)
L. 0-100 KM acceleration count
M. Units of measurement
Functions
Buttons and interface introduction
A. Power switch
B. Data connector
C. Automatic light sensor
D. Speaker
E. Scroll wheel button
1. Scroll down to switch the display of multiple functions
2. Scroll up for overspeed warning setting at 60, 80, 100, or 120. Each scroll will allocate the
set-up speed on the multi-function display area.
3. Remain scroll up more than 4 seconds to enter the 0 ~ 100 KM acceleration count mode.
Repeat to scroll up more than 4 seconds to exit the mode.
Alert functions introduction
1. Overspeed warning: the buzzer will beep when over speeding and the MPH light will flash. The
default beeping time is 5 seconds.
2. Rotational speed reminder: when rpm is over 2300 (default), the buzzer will beep and the rpm light
will flash.
3. Engine water temperature warning: the water temperature warning indicator will light up if water
temperature is higher than 110 °C.
4. Low voltage alert: the voltage indicator will light up if voltage is under 11V
5. Fatigue driving reminder: when driving time is over settings (1-8hours), the fatigue driving indicator
will flash and the buzzer will beep every 30 minutes.
6. Fault warning: the yellow car will flash 10 seconds after ignition if there is an error code.
Running mode introduction
Driving mode
After ignition, the multi-function display area will show voltage for approximately five seconds then
entering driving mode.
In driving mode,
.
Main digital display area displays speed
.
Rotational speed indicator displays RPM
.
Multi-function display area can switch to display clock, water temperature, voltage, throttle angle,
rotational speed (RPM), and MPG.
.
After engine turn-off, main digital display area will show mileage, multi-function area displays
driving time for 5 seconds.
.
4 green tires lighting in loop means temperature and pressure is in normal range.
Speed
Driving Mode
RPM
Driven Mileage
Driven Time
After Turn‐off
Settings Instruction
When the HUD is turned off, scroll down the wheel button, and turn on the power at the same time in
order to enter settings mode. After entering the setting mode, push the wheel button for entry, save and
exit. To change the value, scroll down for decreasing the value, scroll up for increasing the value.
Settings Description
Setting 1~ Language setting (location)
Parameter 1: Taiwan (Fuel economy unit ~ KM/ L)
Parameter 2: China (Fuel economy unit, L/100KM)
Parameter 3: Europe and America (all units converted to Metric; including speed, temperature, fuel
economy)
Setting 2~ Power Management Mode
Parameter 1: Smartest energy saving mode (default)
Parameter 2: Higher energy
saving mode
Parameter 3: Normal mode
Note: This option will directly
determine the Power
Management way of the HUD and
the communication method
with ECU. For private brand cars
in China, please use the
parameter 2 and 3 with caution. It
may cause the malfunction
light lit or central control out of
order. It may cause battery
power loss faster after turn-off engine if you choose parameter 3 in some car models (2 ~ 7 days.
Normally it is over 30 days). If you plan to park your car for a long time, please turn off the HUD power.
If the malfunction indicator lights up or central unit malfunctions due to wrong operating, you only need
to cut off the battery or go to our service center/ dealer to clear the malfunction code. This won’t do
anything harmful to your vehicle.
Setting 1
Parameter
Setting 2
Parameter
Setting 3 ~ Speed adjustment
Used to match the car speed value on dashboard, the default value is 108. User is able to adjust
according to different vehicles. If the HUD speed is faster than the car's speed, decrease the value one
by one until the speed matches the car’s speed on dashboard, vice versa.
Setting 4 ~ Mileage
Used to match the car
default value is 104. User
different vehicles. If the
than the vehicle mileage, reduce the
vehicle speed matches the speed on the HUD.
adjustment
mileage value on dashboard, the
is able to adjust according to
HUD displays the mileage higher
default value one by one until the
Setting 5 ~ Overspeed alarm setting
When you need to set overspeed alarm value which exceeds the default value, use this option to adjust
the value.
Setting 6 ~ Buzzer time
adjustment
Used to adjust the time alarm
buzzer beeps, the default value is
5 seconds. Choose “0” to disable
the buzzer.
Setting 3
Default Value
Setting 4
Default Value
Setting 5
Default Value
Setting 6
Default Value
Setting 7 ~ Rotational speed reminder setting
The default value is 2300. The buzzer beeps to remind you for shifting when the rotational speed is up
to 2300. Please increase the value to maximum 7,000 to avoid reminding if you don’t need.
Setting 8 ~ The
reminding
The default value is 60.
the HUD will no longer remind shifting.
minimum speed for shift
If the speed is more than 60 M/ H,
Setting 9 ~ Fuel consumption setting
The setting value is 0.0, or 0.8 ~ 5.0. (Please set 0.0 if vehicle has air flow meters. If vehicle does not
have it, please set it according to the vehicle emission. EX, if vehicle emission is 1.8L, set the value to
1.8.)
volumetric efficiency
Setting 10 ~ Engine
Normally the vehicle
volumetric efficiency is about 80%.
If user has higher
standard for oil consumption
calculating, you can contact your vehicle manufacturer to know your vehicle's volumetric efficiency and
replace the 80 with it (In Setting 9, if the value is set to 0.0, this will be automatically set to 100, no need
to modify. If vehicle emission is set in Setting 9, this will be set to 80, normally you won't need to change
this.)
Setting 7
Default Value
Setting 8
Default Speed
Setting 9
Default Value
Setting 10
Volumetric Efficiency
Setting 11 ~ Clock adjustment
Used to adjust the clock time in order to match actual time.
Note: This HUD has an internal battery. If it’s unplugged for a long time, there is a chance the battery
may die.
Setting 12 ~ Clock correction
When the clock has deviation from
actual time every day, please use this setting to adjust. If the value is
set to 60, it means the time on HUD will be 60 seconds faster than actual time every day. The value will
be automatically assigned in every minute in 24 hours a day.
Setting 13 ~ Time setting for fatigue driving reminder
The default value is 4
range from 1 to 8
longer than set value,
hours. You are allowed to set the
hours. When the driving time is
the fatigue driving indicator will light.
Setting 11
Clock Time
Setting 12
Default Second
Setting 13
Default Hours
Notice
For your safety, and to use this product effectively, please read the following before use.
1. All the information in this manual is for reference only
2. Stop running your vehicle before operating or setting the HUD.
3. If user plans to park for a long time, please shut the power off to protect vehicle’s battery.
4. The warranty for this product is one year. Please use it correctly. The defects and damages caused
by manmade or natural disasters is not included in the warranty.
5. To avoid damage, please do not use chemicals to clean the front panel.
6. Case, data cable, reflective film and other attachments are not covered by the warranty.
7. The internal battery’s life may vary due to users usage.
8. This manual is subject to change without notice.
Product Specifications
Length: 112 MM
Width: 66 MM
Height: 15.5 MM
Operating voltage: 9 ~ 16V
Maximum operating current: 240 MA
Operating current: 90 MA
Sleeping mode current: <10MA
Operating temperature: -40 ℃ ~ 85 ℃
Accessories
1.
2.
3.
4.
5.
HUD device
Reflective film
OBDII cable
User manual
Velcro hook-and-loop fastener
x1
x2
x1
x1
x1
Simple troubleshooting
1.
2.
3.
4.
5.
6.
Unable to insert OBDII port ~ This product uses OBDII standard slot, if you can’t plug it in, that
means your car does not support OBDII standards.
Device is unable to turn on A. Make sure OBDII slot is plugged in correctly. B. Make sure data slot
is connected well. C. Make sure the power switch is on. D. This product doesn’t support public
transportation vehicles and trucks.
Protocol can not be detected A. Make sure HUD is turned on when engine is ignited. B. Make sure
the car supports OBDII standards. C. This product does not support JOBD and J1850 protocol.
Car speed display is incorrect ~ This product uses ECU to synchronize. Please read Setting 3 in
Settings Instruction.
The clock is incorrect. A. You need to set the correct time at the first time use. B. If the clock is
faster or slower than actual, please read Setting 11 in Settings Instruction and adjust it. C. If the
time remains as the last time after disconnected with the OBDII, it means the battery is dead and
needs to be replaced.
Device is unable to automatically turn on and off ~ If this happens, please read Setting 2 in
Settings Instruction and adjust to Parameter 2 or 3.