1
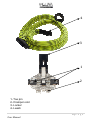
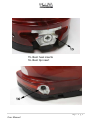
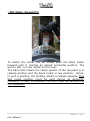
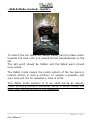
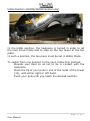
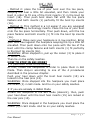
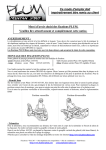
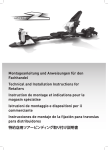
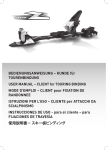
GUIDE BINDING
USER MANUAL
This user manual must be given to
the final customer.
Version 2013.04.04_v4
1|P a g e
User Manual
4
3
1
2
1- Toe pin
2- Crampon slot
3- Locker
4- Leash
2|P a g e
User Manual
13
14 5
6
10 11
7
8
12
5- Heel piece adjustment screw
6- Adjustment rail
7- Mz release adjustment screw
8- My release adjustment screw
10- Ski pole slot
11- Heel riser
12- Housing
13- Heel pins
14- Heel piece base plate
3|P a g e
User Manual
15- Boot heel inserts
16- Boot tip insert
4|P a g e
User Manual
PLUM thanks you for having chosen a GUIDE Binding. This
lightweight yet stiff binding will offer you accuracy, reliability
and pleasure in your alpine and touring skiing.
For optimum performance, carefully reading of this user
manual is very important before using the binding for the first
time.
It is very important to follow the instructions hereafter while
using GUIDE bindings.
Important notice: these bindings do not meet the
requirements of the ISO 13992 standards.
Releases values are provided for information only.
Designated to experienced skiers and warned to use
this specific product.
The GUIDE bindings have been designed in order to be used
with insert technology touring ski boots.
WARNING: the release values can be highly affected by
inserts and/or boot soles highly worn out.
Have your ski/boot/binding system adjusted by a specialized
dealer. .The GUIDE bindings are designed to be mounted only
on skis. They are not adapted to be mounted on anything
different such as snowboards, monoskis, etc.
5|P a g e
User Manual
Skier Instructions
Practicing skiing, ski touring, ski mountaineering and other
winter sports are hazardous activities, which involve risks of
injuries.
The ski and the off-piste skiing contain inevitable dangers for
every skier. Your binding PLUM is a part of the unity ski,
binding and shoe. It is not possible to plan in every situation
if the binding is going to release or not. It does not still
release and in all the circumstances, what can cause serious
injuries with unpredictable consequences. When you go
skiing, no guarantee of safety against any accident of the
skier can be given. It is true that bindings with releasing
system reduce considerably the risk of wounds at the level of
legs and feet, but do not cancel it completely. They do not
reduce the risk of wounds on other parts of the body.
For all of your mountain trips, ensure maximal safe conditions
and verify the following:
• Select a trip in accordance with your skills, always skiing
in a controlled fashion according to your skills and your
physical condition. Never overestimate your skills.
• Always check weather and snow conditions before leaving.
• Always follow information and signs in zone you are
skiing.
• Do not go touring or skiing if you feel tired or in poor
physical condition.
• Do not go touring or skiing if you are taking medication, or
under the effects of alcohol or any other addictive product.
• Always use the leashes provided with the bindings, by
fastening them around each leg. These leashes are meant to
hold the skis back in case of binding release, and let the ski
slide free, so as not to lose them or have them become an
uncontrolled danger for anybody else.
6|P a g e
User Manual
• Always protect your skis and bindings while travelling (in a
ski bag for example), in order to protect them from dust,
sand, road salt or any other abrasive substances.
• Always double-check your bindings and your equipment
before going skiing/touring. Make sure no foreign material
(dirt, gravel...) are found within the mechanism, both on toe
and heelpieces. Aforementioned foreign material can affect
the release mechanism of the binding if present in either toe
or heelpieces. If you have any doubt about the reliability of
your equipment, get it checked by a specialized dealer.
• Never make any modifications to your bindings by
yourself. Any inappropriate use or modification can interfere
with the release capacity of the bindings.
• The GUIDE binding should be mounted directly on the ski.
Nothing should be placed between the ski and the bindings,
except by using a subset developed and manufactured by
PLUM for this purpose (e.g.: wide base ...).
• Get your ski/boot/binding system serviced at least once a
year, more likely at the beginning of the season. (Global
functioning and release values)
Mounting and Setting
The performance of your ski/boot/binding system requires
proper mounting. We highly recommended to have the
bindings mounted by a specialized dealer equipped with a
drilling template.
A specialized Dealer will follow the ski and binding
manufacturer’s instructions in order to obtain the optimum
level of release/retention in the ski/boot/binding system.
The release setting must be done according your own
experience and your personal specificities (height, weight,
Skier Classification, age, sole length)
The setting done by a specialized dealer IS ONLY ACCURATE
WHEN DONE WITH THE EXACT SAME BOOT AS THE ONE
USED FOR ADJUSMTENT and usage cannot be directly
7|P a g e
User Manual
transferred to a different boot. If the boots are replaced, the
release setting should be recalibrated.
The fastening of the heel adjustment screws (5) must be
checked before the first use, and then routinely during the ski
season.
8|P a g e
User Manual
Using Instructions
LENGTH ADJUSTMENT:
To adjust the length of the heelpieces, the two screws must
be loosened (5) with the provided T25 tool.
Slide the heelpiece to desired length, using the marks on the
side of the rail (6), and then fasten the adjustment screws
tightly (5).
Gap between the heelpiece and the boot
A 4mm gap must be respected between the boot insert and
the heelpiece housing.
This 4mm gap is set with the spacer provided with the
bindings.
TOE PIECE
The GUIDE bindings are equipped with a locking system on
each toe piece.
This locker can be in two positions: either WALK (locked) or
SKI (Unlocked).
When the toe piece is stepped-into, it is automatically in ski
mode.
9|P a g e
User Manual
- SKI Mode (downhill):
To switch the locker into ski mode, push the black locker
forward until it reaches an almost horizontal position. The
word « SKI » is now visible on the lever.
The SKI mode means the clamp system of the toe piece is in
release position and the black locker in low position.. Hence,
in such a position, the binding retains a release capacity. This
SKI mode position must be kept during all descents.
Moreover, in such a situation, the boot must be latched into
the heelpiece.
10 | P a g e
User Manual
- WALK Mode (Locked - Uphill):
To switch the toe piece into WALK Mode; pull the black locker
towards the boot until it is placed almost perpendicular to the
ski.
The SKI word should be hidden and the WALK word should
now visible.
The WALK mode means the clamp system of the toe piece is
locked. Hence, in such a position, no release is possible, and
your boot will not be released in case of a fall.
This WALK mode position is to be used during an ascent,
never during a descent. Moreover, while in WALK mode, the
boot must not be latched in the heelpiece.
11 | P a g e
User Manual
HEEL PIECE
The heelpiece rotates into 4 different positions, 3 uphill
positions 1 downhill:
LOW position (uphill)
SKI mode (descent)
MEDIUM position (uphill)
HIGH position (uphill) – GUIDE/GUIDE rental only
LOWER position:
In the LOW position, the heelpiece is turned in order to let the
heel move freely and to step on the adjustment rail.
In such a position, the toe piece must be set in WALK Mode.
MEDIUM Position
In the MEDIUM position, the heelpiece is turned in order to let
the heel move freely and to step on the heelpiece top plate.
In such a position, the toe piece must be set in WALK Mode.
12 | P a g e
User Manual
HIGH Position (GUIDE/GUIDE Rental only)
In the HIGH position, the heelpiece is turned in order to let
the heel move freely and to step on the top tower of the top
plate.
In such a position, the toe piece must be set in WALK Mode.
To switch from one position to the next, follow this method:
Elevate your boot so as not to be in contact with the
heelpiece.
Place the tip of your pole in one of the holes of the tower
(10), with either right or left hand.
Twist your pole until you reach the desired position.
13 | P a g e
User Manual
SKI Position (descent)
In SKI Mode, the heelpiece is rotated in order to have the
pins facing towards the front of the ski. These pins are the
ones into which the boot steps.
In such a position, the toe piece must be in SKI Mode.
HOW TO STEP IN WALK MODE?
Make sure the toe piece clamp (1) is open. If closed, push the
locker (3) down, until the toe clamp opens.
Make sure the heelpieces are in one of the three uphill
positions.
Check nothing is present under the toe piece or the ski and
clean any foreign material from your boot sole.
Find out which out the four following methods suits you:
- Method 1: place the toe of your boot over toe piece, keeping
the heel a little bit elevated, pushing down until the two front
pins (1) fasten into the boot tip insert (16).
14 | P a g e
User Manual
- Method 2: place the toe of your boot over the toe piece,
keeping the heel a little bit elevated, and then rotate your
boot in order to fit one of the front inserts (1) in the boot tip
insert (16). Then push boot down flat until the toe piece
fastens and both inserts (1) perfectly fit the boot tip inserts
(16).
- Method 3: This method is a lot easier if you are equipped
with Quick-Step technology inserts. Place the toe of your boot
onto the toe piece horizontally. Then push down, until the toe
piece fastens and both inserts (1) fit into the boot tip inserts
(16).
- Method 4: Make sure your heelpiece is in low position. Bring
your boot heel against the heelpiece keeping the tip a little bit
elevated. Then push down onto toe piece with the toe of the
boot until the clamp fastens and both inserts (1) fit perfectly
in the boot tip inserts (16).
WARNING: When stepped in, pull up the locker (3) to place it
in WALK mode.
Then tie on the safety leashes.
HOW TO STEP IN SKI MODE?
# If your boot is out of the binding
At first, rotate the heelpieces in order to place them in SKI
Mode. Then step-in according to one of the 4 procedures
described in the previous chapter.
Push your heel down until the boot heel inserts (15) are
locked in the heel pins (13).
WARNING: Once stepped into the heelpiece you must place
the locker (3) in SKI mode. And tie on your safety leashes.
# If you are already in WALK Mode
Rotate the heelpiece to the SKI mode (descent), then, push
your heel down until the boot heel inserts (15) are locked in
the rear pins (13).
WARNING: Once stepped in the heelpiece you must place the
locker (3) in SKI mode. And tie on your safety leashes.
15 | P a g e
User Manual
HOW TO STEP OUT THE BINDINGS:
# From the WALK Mode, push down with either your hand or
your ski pole on the locker (3), until the toe piece opens. The
front pins (1) will then retract from the boot tip inserts (16).
# From the SKI Mode, push down with either your hand or
your ski pole on the locker (3), until the toe piece opens. The
front pins (1) will then retract from the boot tip inserts (16).
It is now possible to elevate the toe of your boot and rotate to
the right and left in order to remove the boot from the heel
pins.
# After a fall: Falling might place you in a situation where
higher stress is placed on the bindings. Push hard on the
locker (3) towards the ski until the toe piece opens. The front
pins (1) will then retract from the boot tip inserts (16).
It is now possible to elevate the toe of your boot and rotate it
right and the left in order to remove the boot from the heel
pins
HOW TO USE A SKI CRAMPON
To mount a ski crampon, place them perpendicularly to the
ski, slide the crampon axis into the toe piece crampon slot
(2), until it clicks in. Make sure the crampon can rotate freely
in the slot.
For removal, rotate crampon to a 90° angle then slide to
either side out of the slot (2).
Stepping out of your bindings is not required to either put on
or take off your crampons. Putting on the crampons or taking
them off is possible in the uphill position. Kneeling down is
required to slide the crampon under the boot, which should be
heel-up during the procedure.
The crampon slot (2) on the toe piece is compatible with any
crampons for the brands Dynafit or ATK.
16 | P a g e
User Manual
Make sure your crampons are the appropriate width for your
skis. A little room must be left between the interior of the
crampon and the ski edge.
Contact between crampons and the ski edge must be avoided
to prevent ski damage.
Crampons can be used on hard/iced snow, though not on rock
and/or dense, thick ice, nor on any hard surface.
WARNING:
Use of these bindings should only be undertaken after reading
and understanding of this user manual.
Please ask a specialized dealer before using.
Any inappropriate use may increase the risk of an accident
and/or severe injuries.
17 | P a g e
User Manual
LIMITED WARRANTY:
GUIDE bindings carry a LIMITED WARRANTY free of any
material and manufacture defects for a period of two years
from the date of purchase with a valid proof of purchase.
This warranty does not extend to damage caused by improper
mounting, misuse, abuse or neglect (e.g. unprotected
transportation/storage, not following the user manual).
Regular wear, an accident, a product modification or for any
aspect/colour modification are also not covered by a limited
warranty.
PLUM shall not be liable or responsible for incidental or
consequential damages. A number of countries or states do
not agree on warranty restriction or responsibility, hence
some of the aforementioned restrictions may not apply in
some cases.
For any inquiries, please bring the product and proof of
purchase to the closest specialized dealer.
18 | P a g e
User Manual
FELISAZ SAS
FIXATIONS PLUM
RCS ANNECY 381 823 509
ZI DES MARVAYS
21 RUE DES CYPRES BP 22
74311 THYEZ CEDEX
FRANCE
TEL: +33 (0) 450 345 859
FAX: +33 (0) 450 345 714
[email protected]
www.fixation-plum.com
19 | P a g e
User Manual