1
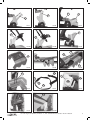
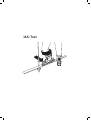
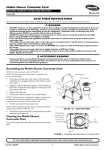
BEDIENUNGSANWEISUNG – KUNDE für
TOURENBINDUNG
User Manual – Client for Touring Binding
MODE D’EMPLOI – CLIENT pour FIXATION DE
RANDONNEE
ISTRUZIONI PER L’USO – CLIENTE per ATTACCHI DA
SCIALPINISMO
INSTRUCCIONES DE USO - para el cliente – para
FIJACIONES DE TRAVESÍA
使用説明書- スキー板ビンディング
User Manual – Client for Touring
Binding
hagan Z
Thank you for choosing the hagan Z. For
your interest and due to safety reasons we
ask you to read the following references
considerately and to act accordingly.
ENGLISH
HAZARD NOTE
•
• hagan Z bindings may exclusively be
used with alpine ski boots according to
ISO 5355 and touring ski boots according to ISO 9523!
• hagan ski bindings comply with applicable national and international standards
(ISO, DIN) and were tested according to
these guidelines by independent testing
institutes (TÜV-Süd Product Service
Munich).
• An adjusting range of more than Z 10
is not standardized. The setting in this
range is at one’s peril.
• Nevertheless a safety binding cannot
release absolutely without fail under
any circumstance and is not supposed
to prevent knee injury.
• As a skier you should be aware of the
dangers of this sport. Always adopt your
skiing and your intended routes to your
individual skill level and your skiing
ability.
• Comply with the warnings and guidelines in the ski areas.
• Choose your touring routes carefully,
do not overestimate your capability and
never tour alone.
• Always use avalanche safety equipment
if you are touring (avalanche transceiver,
probe, shovel)
• Always consider the weather and
avalanche forecast strictly.
• Freeride skiers are supposed to use protective gear like helmet and protectors.
• We recommend to use ski leashes or a
powder band if skiing in deep powder.
• Since an incorrect mounting or setting
of the binding could result in serious
injuries, we strongly recommend to let
both be done by qualified ski retailers.
• To ensure the intended safety functions
of the binding, we recommend not to
modify the settings implemented by the
qualified ski retailer.
• Due to staining, longer or incorrect storage or non-usage, the release setting
of your binding can change. We strongly
recommend to let your bindings be
re-adjusted with a convenient measurement device by a qualified ski retailer,
before every season.
• Non-standard ski boots or heavily worn
ski boot soles can negatively affect the
release of your binding. Make sure a
qualified ski retailer is checking the
proper function of your equipment on a
regular basis.
• Since ski bindings which are carried
on a roof rack are exposed to salt, dirt
•
•
•
•
and other contamination, which can
negatively affect the proper function,
we strongly recommend the use of a
binding cover, a ski bag or a ski box.
Every improper use of the binding for
example on a mono ski, changes to
binding components and the ski stopper
increase the risk of non-releases or
unintended releases.
The attachment of non-brand accessories and/or components can negatively
affect the proper function of the binding
and the stopper and should therefore
only be taken out by a qualified ski retailer.
Never ski under the influence of alcohol
and drugs.
Please store the receipt, adjusting verification and the user manual.
If you have purchased this binding via
the internet it has be to adjusted and
checked by an authorized hagan retailer
according to your personal data and
skiing abilities.
Hagan does not assume liability for any
kind of self adjustment or mounting and
its results.
OPERATION AND SETTINGS
Since the settings of the binding not only
depend on the binding model, but mainly
on the ski boot and the skier type, they
should be carried out exclusively by qualified ski retailers and double checked with
suited measuring devices. You can read off
the adjusted Z-settings of the retailer on
the release value indicator at the toe piece
(4) and the heel piece (5). Z-settings above
Z 10 are not according to the norm and are
at one’s own risk! ill. (A/B)
Adjustment of the sole height
The position of the toe sole holder (2) can
be adjusted with the sole height adjusting
screw (18) to the specific sole height.
By turning the screw the sole holder is
moving up or down. You can test the proper
adjustment with a paper stripe (17) fitted
between sole and glide AFT (18). It should
be possible to be pulled out without being
ruptured ill. (C), while the boot is pulled
upward. To check: the gap between sole
and glide AFT (14) should have a maximum
height of 0,5 mm.
Attention: the toe sole holders may only
be adjusted by hand! If the sole does not fit
into the toe sole holders (2) it is not according to the norm. The rubber sole has to be
sanded down as far as the above mentioned paper stripe test can be carried out
Adjustment of the sole length
The whole heel part has to be screwed
against the boot sole using the length
adjustment screw (10) until the head of the
adjustment screw is flush with the heel
unit ill. (D/E).
Step in (also step in after a release)
Clean your sole from snow, ice and dirt.
If the heel part (7) is locked, open it by
pushing on the opening lever (8). Place the
toe of your boot between the wings (2) of
the toe piece (1) and lock the heel piece by
pushing down the heel of your boot.
Step out (also after a crash and in a
plight)
Use your ski pole to push down the opening lever (8) via the hutch (9) and raise
your heel out of the binding at the same
time ill. (F)
Advice: There is a risk of injury if fingers or
the whole hand get stuck between opening
lever (8) and heel parts. Make sure you
always open the binding by pushing down
the opening lever with a pole, a boot or
with the ball of your hand ill. (G)
Switching from downhill into touring
mode
To shift from “downhill” into “touring”
mode the locking device (11) has to be
switched into the position downhill or touring using the lever of the climbing aid (12).
Therefore the tip of the ski pole has to be
placed into the intended notch and then the
ski pole has to be pushed forward ill. (I)
Switching from touring into downhill
mode
In order to ski downhill with the binding
the climbing aid lever (12) has to be pushed flat backward with the help of a pole,
a boot or the ball of your hand until it rests
on the ski.
Advice: Before switching from touring into
downhill mode the binding has to be cleaned from snow, ice and dirt! The locking
mechanism has to lock easily!
Using the climbing aid
In touring mode the climbing aid can be
adjusted into three different positions
– angle of the biding frame either 10° or
15° ill. (J/K) The third position (5°) ill. (L)
results from the climbing aid lever being
positioned flat on the ski (locking device
engaged) and the binding frame (13) is
positioned on the locking device (11) ill. (G).
Pull the climbing aid forward into the two
higher positions ill. (M) or push it backward
for the lower positions ill. (N).
Caution: Never start skiing downhill with
the binding being unlocked!
If the Z-setting of the binding is between
DIN/ISO 8-10 the required opening and
locking forces tend to be higher. Get used
to this circumstances before starting a tour
or skiing out of boundaries and use only
settings which you are able to handle even
in a tight spot!
06/10 © Hagan Ski GesmbH, Andiesen 11, 4774 St.Marienkirchen, Austria / Art. Nr. TU055-K
How to carry the skis
Place one ski on the ground, then slide
the other one along the base from top to
bottom until the ski brakes (16) latch.
Accessories
The following accessories are available at
your ski retailer:
Crampons for skis with a waist width of:
max. 85mm, max. 100mm, max. 115mm
max. 100mm, max. 115mm
Ski leashes
Using the crampons
Pivot the crampon (30) onto the binding
frame from the bottom up and slide it forward until the cut-outs within the crampon
adapter (31) connect with the crampon
mounting points (19) of the binding frame
(13). Now push the crampon locking lever
(33) upward until it locks. Dismount in the
reverse order ill. (P,Q,R,S)
Caution: Use the crampon only on crud
snow or ice and only with a climbing aid
setting in stage 1 or 2! In stage 3 the crampon teeth are too short and in stage 0 (flat
on the ski), they are too long. If you decide
to use the crampons in stage 0 on soft
spring snow, there is the chance of snow
build up between crampon and the surface
of the ski. This may lead to a strong charge
of the binding parts. Please try to avoid and
wax both the ski surface and the inside of
the crampon, if necessary.
Ski leashes
Also ski leashes can be used instead of ski
stoppers.
The ill. (T,U,V,W) indicate the mounting of
the leash to the heel piece (7). The lug (28)
has to be threaded through the slit according to ill. (V), whereas the loose end of the
lug (28) has to point backwards.
Caution: Check whether the leash is securely engaged! If attaching the ring band to
the ski boot, make sure that the hook (27)
is securely linked with the ring (26).
The leash avoids loosing the ski in case of
a binding release, but definitely increases
the danger of injuries.
Worn or damaged leashes have to be
replaced.
1
2
3
4
5
6
7
8
9
10
DESCRIPTION OF THE
BINDING PARTS
12
13
14
15
16
17
18
19
20
21 22
23
24
Toe piece
Toe sole holder
Adjusting screw lateral release
Adjusting scale lateral release
Adjusting scale front release
Adjusting screw front release
Heel cup
Opening lever
Pole hutch of the opening lever
Adjusting screw for forward pressure
and sole length
Lock for downhill mode and climbing
aid stage 1
Climbing aid lever
Main Frame
Gliding AFD
Ski brake pedal
Ski brake lever
Paper test stripe
Adjusting screw sole height (front)
Crampon mounting points
Pivot shaft
Binding screws
Rear standing platform
Rear side of the main frame
Base plate
25
26
27
28
29
Ski leashes
Ring
Hook
Lug
Slit
11
30 Crampon
31 Crampon adapter
32 Crampon lock
Care and maintenance
The warranted guarantee by hagan
presumes that the owners manual as well
as the warning notices have been followed
and taken care of. Make sure to get the
binding checked according to its function
and correct adjustment regularly or at
least before starting a new ski season.
Always store your skis with the binding
locked in a dry and cool, but frost-protected place.
Caution: Only use hagan approved lubricants. Otherwise friction values could alter,
leading to unintended releases.
Warranty
The hagan warranty has to be conducted
by an authorized ski retailer. A case of
warranty takes place if the product or a
part of it does not function properly according to defects in material or production.
The final decision about an objected defect
in production can only be taken by a person
which is assigned by hagan. hagan decides
whether a defective binding is going to be
replaced or repaired within a time range
of two years ex purchase date (rental- and
demo bindings: one year).
Warranty disclaimer
Exempted from warranty are damages
caused by improper use, non professional mounting, disregard of the owners
manual, incorrect adjustment, insufficient
maintenance and care, skiing accidents,
wrong use of the product or normal wear.
All wear parts like mounting plates, levers
and prints are exempted from the warranty. Furthermore hagan is not liable for
causal or consequential damages of any
kind, unless such a limitation of liability is
distinctly prohibited by the legislator. Any
kind of warranty claim deduced from this
circumstance is distinctly rejected, unless
such an rejection is prohibited by the law.
In this case the awarded warranty claim is
only given in the above mentioned term of
guarantee.
According to DIN/ISO 13992 (Tour) and
DIN/ISO 9462. Tested and approved by the
TÜV-Süd Product Service GmbH, München
Made in Germany
All operating and mounting instructions
are available as a PDF data base at
www.hagan-ski.com
Hagan Ski Ges.m.b.H.,
Andiesen 11,
4774 St.Marienkirchen, Austria,
+43 7711 33133-0
Mail: [email protected]
Artikel No. TU055K / issue 06.2010
06/10 © Hagan Ski GesmbH, Andiesen 11, 4774 St.Marienkirchen, Austria / Art. Nr. TU055-K
ENGLISH
Ski stoppers for skis with a waist width of:
max. 85mm, max. 90mm,
hagan Z
9
8
6
7
18
2
1
22
15
14
5
12
10
19
21
16
3
11
23
24
13
20
14
18
4
5
2
Abb. A
10
Abb. C
Abb. B
NO
17
OK
8
7
Abb. D
14
9
Abb. E
Abb. F
Abb. H
Abb. I
12
NO
Abb. G
06/10 © Hagan Ski GesmbH, Andiesen 11, 4774 St.Marienkirchen, Austria / Art. Nr. TU055-K
10°
15°
5°
13
12
12
12
Abb. J
Abb. K
Abb. L
12
12
12
Abb. M
Abb. N
Abb. O
13
19
30
31
Abb. P
Abb. Q
Abb. R
28
33
7
27
29
26
25
Abb. S
Abb. T
Abb. U
25
Abb. V
Abb. W
06/10 © Hagan Ski GesmbH, Andiesen 11, 4774 St.Marienkirchen, Austria / Art. Nr. TU055-K
IAS-Test