1
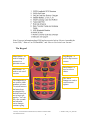
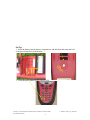
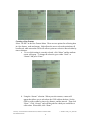
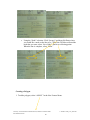
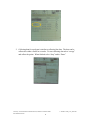
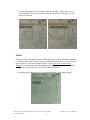
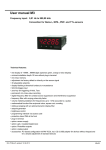
Leica GS20 Tutorial
Leica Geosystems
Created by: Jennifer Rollman and Brent Runnells, UH Hawaii- EPSCoR-ITER
Last Modified 02/18/06
1
\\…\sdal\How-to\ht_Leica_GS20.doc
Note: For more information about GS20 and accessories look at “How to Assemble the
Leica GS20,” “How to Use GIS DataPRO,” and “How to Use Leica Laser Locater.”
The Keypad
Menu Button – us
used to bring up
options for a
particular screen.
Page Button – is
used to flip between
screens
Enter Button - is
used to select a
choice.
ESC Button – is
used to exit out of
a screen.
The Arrow
Buttons are used to
scroll between
options.
The Number Keys
are used for either
numbers or letters.
To switch between
the letters keep
pressing the key
until the letter you
are trying to get
appears. Let it sit
for a few seconds
and when the
curser changes
continue typing.
Created by: Jennifer Rollman and Brent Runnells, UH Hawaii- EPSCoR-ITER
Last Modified 02/18/06
2
\\…\sdal\How-to\ht_Leica_GS20.doc
Set Up
1. Insert the battery into the battery compartment, and then shut and rotate the lock
90 degrees clockwise to lock the door.
2. Press the power button to turn on the GS20.
Created by: Jennifer Rollman and Brent Runnells, UH Hawaii- EPSCoR-ITER
Last Modified 02/18/06
3
\\…\sdal\How-to\ht_Leica_GS20.doc
3. Let the GS20 acquire the satellites. This may take a minute. As the satellites are
acquired, they will show up bellow the satellite icon.
Note that if the GS20 has not been used in a while, the GS20 will have to create a new
almanac. This can take up to 30 minutes. The default setting for the GS20 must have
acquired at least 4 satellites to start collecting data.
Job Management
1. Job Management allows you to select another job after a job has been opened to
create a new job. To get to Management, return to the Main Menu and select “Job
Management.”
2. To change jobs just scroll to the job that you would like to open and select it.
Created by: Jennifer Rollman and Brent Runnells, UH Hawaii- EPSCoR-ITER
Last Modified 02/18/06
4
\\…\sdal\How-to\ht_Leica_GS20.doc
3. To create a new job press the Menu button and select Create New Job. Then just
fill in the information as described in the Collecting Data section that follows.
Collecting Data
1. To start collecting data use the arrow buttons to scroll to “Data Collection” and
press the Enter key.
2. If there are no current jobs open, then a message shows up saying “To continue, a
job must be open.” If you are adding to an existing job select “Open,” if not
select “New.”
Created by: Jennifer Rollman and Brent Runnells, UH Hawaii- EPSCoR-ITER
Last Modified 02/18/06
5
\\…\sdal\How-to\ht_Leica_GS20.doc
a. If you selected “Open”, select the job that you want to add to, press
Enter and the job will open.
b. If you selected “New”
I.
Give the job a name, creator, and keep WGS84 as the
coordinate system.
II.
Then press the Menu button and select “Save”. Give
the Leica GS20 a minute to process your request.
Created by: Jennifer Rollman and Brent Runnells, UH Hawaii- EPSCoR-ITER
Last Modified 02/18/06
6
\\…\sdal\How-to\ht_Leica_GS20.doc
III.
Next, it will ask you to select a codelist. Select “Open”
in the options. Select “GENERIC”, unless you have
created a codelist (for more information about creating
a codelist, please look in the “DataPRO Tutorial”).
IV.
An error message saying that the job does not contain
any data shows up; select “Ok”. The GS20 will
automatically open the new feature window to start
collecting data.
Created by: Jennifer Rollman and Brent Runnells, UH Hawaii- EPSCoR-ITER
Last Modified 02/18/06
7
\\…\sdal\How-to\ht_Leica_GS20.doc
3. To start colleting data press Enter and then select the type of feature that you want
to add. To get back to the “New Feature Menu” at anytime in the Data Collection
section press Enter.
Creating a Point Feature
Select “APOINT” in the New Feature Menu. Name the point, then select “Occupy”
and the GS20 will start collecting the data for the point. Hold the GS20 as still as
possible. When the GS20 finishes collecting the data the “Occupy” button will
change to the “Save Feature” button. To make a comment about the point, go to the
comment section under “Attribute Name”, press Enter, and then type your comment.
Created by: Jennifer Rollman and Brent Runnells, UH Hawaii- EPSCoR-ITER
Last Modified 02/18/06
8
\\…\sdal\How-to\ht_Leica_GS20.doc
Creating a Line Feature
Select “ALINE” in the New Feature Menu. There are two options for collecting data
in a line feature: node and stream. Node allows the user to select the point that will
becollected, while stream the GS20 will collect a point at a selective interval either by
time or distance.
a. To see which setting is currently selected, click “Menu” and the attribute
screen will popup. To change the selection, go to either “Node” or
“Stream” and press “Enter.”
b. Using the “Stream” selection: When you select stream, a menu will
appear that allows you to select how the GS20 collects the data. Set the
GS20 to collect either by time or by distance, and the interval. Then click
“Done.” Click “Occupy” and walk the path for which you would like to
collect data. When done, click “Done.”
Created by: Jennifer Rollman and Brent Runnells, UH Hawaii- EPSCoR-ITER
Last Modified 02/18/06
9
\\…\sdal\How-to\ht_Leica_GS20.doc
c. Using the “Node” selection: Click “Occupy” and then click Enter where
you would like a node on the line to be. When the GS20 has collected the
node that you want, select “Save Node”, similar to collecting points.
When the line is complete, select “Done.”
Creating a Polygon
1. To add a polygon, select “APOLY” in the New Feature Menu.
Created by: Jennifer Rollman and Brent Runnells, UH Hawaii- EPSCoR-ITER
Last Modified 02/18/06
10
\\…\sdal\How-to\ht_Leica_GS20.doc
2. Collecting data for a polygon is similar to collecting line data. The data can be
collected as either a stream or as nodes. To start collecting data select “occupy”
and collect the points. When finished select “Stop” and/or “Done.”
Created by: Jennifer Rollman and Brent Runnells, UH Hawaii- EPSCoR-ITER
Last Modified 02/18/06
11
\\…\sdal\How-to\ht_Leica_GS20.doc
Navigating
1. To get to the navigation screen go back to the Main Menu and select “Navigation”
2. The navigation screen will show up with a compass, current location, and any
features that you have collected.
Created by: Jennifer Rollman and Brent Runnells, UH Hawaii- EPSCoR-ITER
Last Modified 02/18/06
12
\\…\sdal\How-to\ht_Leica_GS20.doc
3. To change the map view click “Menu” then select “Map.” Then select if you
want to zoom in, zoom out, center on a feature, the extent for the map, or if you
want it to Auto Pan.
Offsets
An offset can be used with any type of data collection. It can be done either manually
or with the Leica Laser Locator. For more information about the Leica Laser Locator
refer to either “Leica Laser Locator Tutorial” or the Leica Laser Locator User
Manual. For information on connecting the Leica Laser Locator to the Leica GS20
refer to “How to Assemble the Leica GS20 with WoRCS Belt.”
1. First select the feature you will be collecting from the “New Feature Menu.”
Created by: Jennifer Rollman and Brent Runnells, UH Hawaii- EPSCoR-ITER
Last Modified 02/18/06
13
\\…\sdal\How-to\ht_Leica_GS20.doc
2. When the “Feature Occupation” menu comes up, press the menu button , scroll
down, and select “Offset”
then select the type of offset you will be using. To
view the types of offsets and how to collect them, look at “Leica Laser Locator
Tutorial.”
3. Collecting the data
A. Next, if you are using the Lecia Laser Locator, press the buttons that are
required for the offset you plan on using and then select “Occupy.”
Note: The Leica GS20 and the Leica Laser Locator do not always like to
communicate. If this happens just manually input the offsets.
Created by: Jennifer Rollman and Brent Runnells, UH Hawaii- EPSCoR-ITER
Last Modified 02/18/06
14
\\…\sdal\How-to\ht_Leica_GS20.doc
B. Next, if you are manually inputting the offset enter the amount you are
offsetting and select “Occupy.”
4. Next save feature and continue collecting data.
Enjoy using the Leica GS20. For more information about the Leica GS20, please refer to
the GS20 Field Guide or GS20 User Manual. For more information about the Leica
Laser Locator, please refer to the Leica Laser Locator Tutorial or Leica Laser Locator
User Guide.
References
Leica Geosystems GS20 User Manual, Leica Geosystems.
Created by: Jennifer Rollman and Brent Runnells, UH Hawaii- EPSCoR-ITER
Last Modified 02/18/06
15
\\…\sdal\How-to\ht_Leica_GS20.doc