1
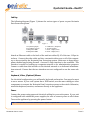
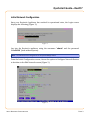
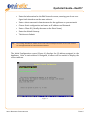
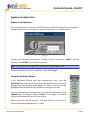
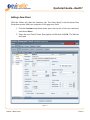
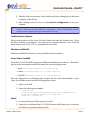
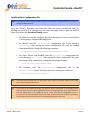
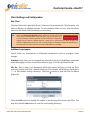
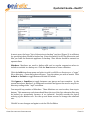
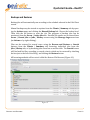
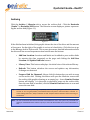
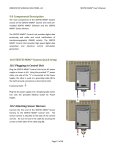
Quickstart Guide—RevOS® This guide provides an overview for installing and configuring your Revinetix data protection appliance. In this guide, you'll find simple instructions for adding clients and running backups and archives. Tips for general usage, best practices and recommendations from Revinetix Support are also included. Table of Contents Hardware Installation ........................................................................ 1 Initial Network Configuration ............................................................ 3 Appliance Configuration .................................................................... 5 Adding a New Client .......................................................................... 6 Client Settings and Configuration ....................................................... 9 Backups and Restores ...................................................................... 12 Scheduling ....................................................................................... 13 Archiving ......................................................................................... 14 Contact Information ........................................................................ 15 Hardware Warranty ......................................................................... 16 Software License ............................................................................. 17 Hardware Installation Unpacking The Appliance Carefully unpack the contents of the package onto a level surface. Larger Sentio™ units can be very heavy, so use caution when lifting. 3U and larger units should be unpacked and handled by two people. Check the packing slip to verify all contents are present. The Revinetix Sentio™ Appliance can be installed on a standard rack system. Rails and other hardware included are standard for most rack systems. Please refer to the mounting instructions for your rack system for any additional information. We recommend you insert the hard drives after mounting the appliance to make lifting it easier. Note that each drive is labeled with a number. These numbers should correspond to the numbers as shown in the Drive Insertion Map. Once the appliance has been set in its permanent location, insert the drives. HARDWARE INSTALLATION PAGE 1 Quickstart Guide—RevOS® Cabling The following diagram (Figure 1) shows the various types of ports on your Revinetix Data Protection system. Figure 1 1. Keyboard (purple) 2. PS/2 Mouse (green) 3. Backpanel USB 1 4. Backpanel USB 2 5. COM Port 1 (turquoise) 6. VGA Port (blue) 7. RJ-45 1-Gbps (Nic0) 8. RJ-45 1-Gbps (Nic1) Attach an Ethernet cable to the back of the unit into either RJ-45 of the two 1-Gbps interfaces. Connect the other cable end into a network with access to all of the computers to be serviced by the Revinetix Data Protection system. Make sure to keep the appliance behind any existing firewall. A second 1-Gbps interface is also available. This interface is useful for backing up a separate network or for administration purposes. Connect a cable from this interface to the desired network or a dedicated administration network. Ensure that the two interfaces are not configured to use the same subnet. Keyboard, Video, (Optional) Mouse For the initial configuration, you will need a keyboard and monitor. You may also want to use a mouse. If your rack system has a KVM switch, use the same cabling as other components to connect the Revinetix Data Protection system to the switch. Otherwise, attach the keyboard, monitor, and mouse directly to the appliance. Power Connect the power using approved electrical cabling for your rack system. If your unit is configured with redundant power supplies, be sure to connect power to all of them. Turn on the appliance by pressing the power button. Tip: When possible, connect the redundant power supplies to separate UPSs. HARDWARE INSTALLATION PAGE 2 Quickstart Guide—RevOS® Initial Network Configuration Once your Revinetix Appliance has reached its operational state, the Login screen displays the following (Figure 2): Figure 2 Log into the Revinetix appliance using the username "admin" and the password "rvxd2d2d" (both without quotes). Note: The Password can be changed later in the System Settings section. From the Initial Configuration screen, choose the option to Configure Network Devices to be taken to the Edit Network screen (Figure 3). Figure 3 INITIAL NETWORK CONFIGURATION PAGE 3 Quickstart Guide—RevOS® Enter the information for the Edit Network screen, ensuring you do not configure both interfaces on the same sub-net. Tip: Enter a short name and a domain name for the appliance on your network. Choose Static configuration and enter an IP address and Netmask. Enter a Client ID. (Usually the same as the Short Name) Enter the default Gateway. Tab down to Submit. Do not assign both NICs an address on the same network. Multiple interfaces on the same network are not supported and can cause intermittent failures. The Initial Configuration screen (Figure 4) displays the IP address assigned to the Appliance. After a static address is assigned, a reboot will be needed to display the correct address. Figure 4 INITIAL NETWORK CONFIGURATION PAGE 4 Quickstart Guide—RevOS® Appliance Configuration Browse to the Appliance Use a web browser to connect to the IP address or Client ID assigned to the Appliance during installation. You should see a login screen (Figure 5) as shown below. Figure 5 Log into the Revinetix Management Console with the username "admin" and the password "rvxd2d2d" (both without quotes). Note: The Password can be changed later in the Quickstart or System Settings section. Read and understand the user agreement, and click Accept. Using the Quickstart Wizard If the Quickstart Wizard does not automatically start, click the Quickstart link in the main menu. Enter the initial settings and work through the customization steps (Figure 6). The current step will be highlighted and completed steps will have a solid green border. As you go through each step and enter or update the information, click Submit when a change is made or Skip if no changes are needed. Confirm information and reboot, if necessary. Reboot may take several minutes. You may need to log back in to access the Revinetix Management Console. APPLIANCE CONFIGURATION Figure 6 PAGE 5 Quickstart Guide—RevOS® Adding a New Client Click the Clients tab, then the Summary tab. The client Myself is the Revinetix Data Protection system. Add your computer to this page as a client. 1. Click the Actions drop-down menu (near the top left of the user interface) and choose New… 2. Enter the new Client’s Name, Description and OS then click OK. The Edit tab will open. Figure 7 ADDING A NEW CLIENT PAGE 6 Quickstart Guide—RevOS® 3. Edit the client as necessary. More details and client editing tips can be found on page 9 of this Guide. 4. After editing a client, be sure to click Activate Configuration to save your changes. Note: Clients added while backups are running will fail to backup until the backup system has been idle long enough to restart with the newly added client configurations. However, existing clients may be edited, and other configurations changed, while backups are running Installing Client Software Using a web browser on the client, click the Clients tab, then the Software tab. Select the client software to download. You may need to copy the software to the client by other means, such as SCP, FTP, or command-line web tools. Windows and MacOS Windows and MacOS X clients use an executable software installer. Linux, Solaris, FreeBSD Linux, Solaris, and FreeBSD systems use different installation procedures. The following list shows an example installer file name for each operating system: ● Linux: rvx-backup-client-3.0.0.1.i386.Linux.tar ● Solaris: rvx-backup-client-3.0.0.1.sparc.SunOS.tar ● FreeBSD: rvx-backup-client-1.4.0.i386.FreeBSD.tar Once the appropriate rvx-backup-client installer file has been downloaded to your client, the software can be installed following these steps: 1. Open a root shell. 2. Enter the following commands: root# root# root# root# cd /tmp tar xf /path/to/rvx-backup-client-3.0.0.1.XXXX.YYYY.tar cd rvx-backup-client-3.0.0.1.XXXX.YYYY bash ./install.sh Novell 1. Create the directory SYS:/system/revinetix. 2. Unzip the rvx-backup-client-1.5.3.i386.Netware.zip file and copy its contents into the new /system/revinetix folder. ADDING A NEW CLIENT PAGE 7 Quickstart Guide—RevOS® Installing Client Configuration File Note: If the Windows client software installer prompts you to install the configuration file, you may have already completed this step. Go to the Clients / Summary tab. Select the client you want to download from (by clicking the check box or anywhere on the row) and right click or open the Actions menu and choose the Download Config option. For Windows, use the Configure Revinetix Backup tool found in Start Menu > All Programs > Revinetix Backup Agent For MacOS, save the bacula-fd.conf configuration file in the directory /usr/rvx/etc/. After saving the client configuration file, start the backup client manually by issuing the following command: root# /Library/StartupItems/Revinetix/Revinetix start For Linux, Solaris, and FreeBSD, save the bacula-fd.conf configuration file in the directory /usr/rvx/etc. After saving the client configuration file, start the backup client manually by issuing the following command: root# /etc/init.d/rvx-backup start For Netware, save the bacula-fd.conf configuration file in /system/revinetix folder. Start the service by running the command: the SYS:/system/revinetix/revinetix Tip: If the Client Summary page does not show a green check mark for your client, make sure the config file is in place and restart the service. Tip: If your client is not remotely accessible, and does not have a web-browser or command-line web tools, you may need to use FTP to download the client and configuration files. If so, simply download both and upload them to an available FTP server. Please note that the configuration file has a password that will allow privileged access to the client, should not be made available unprotected, and should be removed immediately after successfully downloading to the client. ADDING A NEW CLIENT PAGE 8 Quickstart Guide—RevOS® Client Settings and Configuration Edit Client Click the Clients tab, then the Edit tab. Clients are listed on the left. Click the name of a client to display its editable options. To edit multiple clients at once, click the check boxes for the clients. Edit the client(s) as necessary. Tip: Notice the Activate Configuration button located at the top right of the screen. Always click this button after making any changes. Failure to do so will cause subsequent backup operations to use the previous configuration. Changes may be made to multiple clients at a time, but it is good practice to Apply changes and Activate Configuration frequently in order to avoid losing work. Unapplied changes are indicated by a blue delta icon next to the client names and the fields which have changed. Additional Information Listed below are descriptions of additional information used to configure client settings. Schedule: Each client can be assigned any schedule in the list. Scheduling is explained more thoroughly in a later section that starts on page 13 of this Quickstart Guide. File Set: This is where you determine which directories and files to back up. Each operating system will have a default directory. For example, all Windows clients have C:/ as the default backup directory. Click the button to view the File Set Editor (Figure 8). Figure 8 Click the Edit button to modify the values of the Starting Directories and Files. You may also click the New button to create a new Starting Directory. CLIENT SETTINGS AND CONFIGURATION PAGE 9 Quickstart Guide—RevOS® Figure 9 In most cases, the large “List of directories to backup” text box (Figure 9) is sufficient for specifying what should be backed up. Enter the path(s) for all the directories and files you want the Revinetix appliance to backup. New entries should be entered on separate lines. Matchers: Matchers are used to define wild card or regular expression values to include or exclude in a backup set. Click the New button to create a Matcher. Click the Add drop-down menu and select to add a wild file or directory or a “regex” file or directory. A new dialog box will open. Type the values you wish to match. Click Include or Exclude to toggle between Include or Exclude. Click Ignore or Sensitive to toggle between case ignore and case sensitive. In the screen shot above, Matcher1 is configured to exclude and ignore the case for any file or directory ending with a “.mp3” extension. You may add any number of Matchers. These Matchers are run in order, from top to bottom. This means any exclusions should be at the top of the list; otherwise files may be backed up erroneously because of an inclusion. Carefully consider the logical ordering of your Matcher sets. Use the up and down arrows to arrange the advanced sets. Click OK to save changes and again to exit the File Set Editor. CLIENT SETTINGS AND CONFIGURATION PAGE 10 Quickstart Guide—RevOS® Appliance Networking: Use a drop-down menu to select which interface to use for this client. The default is Auto, which is appropriate for clients on the same network as one of the interfaces. However, if a router is between the appliance and client, be sure to specify the correct interface to use. If NAT is used in your network, select NAT and enter the Appliance NAT Address in the text box. Archiving: Click the Local archive check box to have the backup appliance automatically archive each backup job run on this client. If this option is selected, every backup job will be copied to the archive disk shortly after completion. If this option is not selected, no jobs will be copied to the archive disk, and any archiving must be manually completed. Remote archive is used only when multiple Revinetix backup appliances are available on the network and configured as remote repositories. One appliance may act as a remote mirror of another for further safeguarding of data. Job Recycling: This section can be vital to keeping your backup appliance in an operational state while unattended. Check the boxes to enable Job Recycling to maintain available disk space on the RAID. If jobs are not automatically purged or recycled, the disk space will fill up and all backup jobs will cease. At that point, you will need to manually purge old jobs to allow space for new backups. Here is an example of a data retention policy: If you had a Sentio™ HD 4T-10000 with 10 TB of space and a full backup of all your clients was about 3.0 TB, you could only keep three full backups in the space available. You’ll also need to consider how large any incremental or differential jobs may be, and think about how much you can fit onto the available space. One possible solution for this example might be to use a monthly schedule and set the Full Job Retention to two months and Incremental Job Retention to one month. Another solution might be to use a weekly schedule and keep full jobs for three weeks and incremental jobs for two weeks. Retention policies may need to be adjusted from time to time, depending on data amounts or other needs. Error Recovery: You can schedule the system to automatically retry failed backup jobs. One or two retries at a one- or two-hour interval is usually sufficient. CLIENT SETTINGS AND CONFIGURATION PAGE 11 Quickstart Guide—RevOS® Backups and Restores Backup jobs will automatically run according to the schedule selected in the Edit Client screen. Manual backups may be started at anytime from the Clients / Summary tab by opening the Actions menu and clicking the Manual Backup link. Choose the backup level. Then click the OK button to start the job. The progress of backup jobs can be monitored from the Server / Active Jobs tab. Detailed job results can be viewed from Server / Recent Jobs or Jobs / History screens using the Message Logs menu item (in Actions or by right-clicking). Files can be restored in several ways: using the Browse and Restore or Search features from the Clients / Summary tab; browsing individual jobs from the Jobs / History tab; or by browsing jobs stored on an archive disk. The Search feature will find and list files, according to search criteria, which can be restored by checking the box just to the left of the file(s), and clicking the Restore button. All browsing methods will use a tool called the Restore File Browser (Figure 10). Figure 10 BACKUPS AND RESTORES PAGE 12 Quickstart Guide—RevOS® From the Clients / Summary tab or the Jobs / History tab, use the Actions menu or right-click to select the Browse and Restore icon for the client and select an option. Click the Submit button. Once the Restore File Browser page opens, click the Directory names link to browse to the file(s) or directories you want to restore. Check the box just to the left of the file or directory, and click the Restore button at either the top or the bottom of the page. Use the Apply button if you select files or directories and wish to browse to another directory to select other files or directories. That is, click the Apply button before moving to a new directory or the current selections will be lost. Once a restore job has been submitted, view the Server / Active Jobs page to monitor its progress. As with backup jobs, after completion, detailed restore job results can be viewed from Server / Recent Jobs or Jobs / History screens using the Message Logs menu item (in Actions or by right-clicking). Scheduling Open the Clients / Schedules tab. The tab displays all available schedules. Any schedule in this list can be assigned to any number of clients. The default schedules are Quarterly, Monthly, Weekly and Daily. A look at the Monthly schedule will help you understand all the schedules. The Monthly schedule has three schedule clauses. The first clause schedules a full backup to run at 1:00 AM on the first Sunday of the month. The second clause schedules a differential backup to run at 1:30 AM on subsequent Sundays. The last clause schedules incremental backups to run every weekday including Saturday at 2:00 AM. Note: Full, differential, and incremental backup levels work as follows: A full backup will backup every file available in a backup directory/file set. A differential backup will backup every file available in the set that has been modified since the last full backup. An incremental backup will backup every file available in the set that has been modified since the most recent backup of any level. Existing schedules can be modified by clicking the Edit menu item for the schedule or by double-clicking the schedule’s row. New schedules can be created by clicking the New button. Assign a name and give a description for the new schedule, and add at least one schedule clause. After saving the schedule information, your new schedule can now be assigned to any client. SCHEDULING PAGE 13 Quickstart Guide—RevOS® Archiving Click the Archive / Libraries tab to access the archive disk. Click the Revinetix /Sentio™ or Revinetix/USB button. The Libraries screen displays a picture representing the archive disk (Figure 11). Figure 11 If the disk has been initialized, this graphic shows the size of the drive and the amount of free space. On the right of the graphic is an icon of a hard drive. Click this icon to go to the Manage Archive Disk screen. This screen gives more detailed information about the drive and has several important action buttons near the bottom. Tip: Add New Location: Locations and labels can be added to your archive disks by entering the data requested on the page and clicking the Add New Location and Update Disk Info buttons. Library View: This button redisplays the initial view of the selected library. Refresh: This button refreshes the screen and updates any information, if changes are detected. Prepare Disk for Removal: Always click this button when you wish to swap out the archive disk. Clicking this button will open the Libraries screen with the archive disk graphic showing as an empty bay. A new Scan for Devices button will display. It is then safe to physically swap out the archive disk. Once the new disk is installed, click the Scan for Devices button to scan and access the new disk. If the archive disk is not performing as expected, reset it by clicking the green check mark, then click the red “X”. This is a good practice, and should be done every time a new archive disk is inserted. To avoid creating disk errors, always remember to click “Prepare Disk for Removal” before removing an archive disk. Note: All new archive disks will need to be tested and formatted for use in the system. Any new disks will display an Uninitialized status and the only way to use it will be to follow the on-screen instructions to test. ARCHIVING PAGE 14 Quickstart Guide—RevOS® Format Disk: Click this button to format a disk. You will be prompted to format the disk in the archive bay. Formatting will wipe the disk clean and prepare it for reuse. View Archived Jobs: Click this button to view a list of all jobs stored on the archive disk. This list is similar to the Job History list. The list can be sorted and filtered to help you find a specific job(s). The list also has the same icons for browsing and restoring data. Notice once this button is clicked, the text changes to Hide Archived Jobs. The Archive / Libraries tab also has an Archive Jobs button. Use this button to manually send a job to the archive disk. After clicking the Archive Jobs button, a list of completed jobs is displayed. Select the job(s) you want to archive by clicking the check box just to the left of the job(s). Click the Archive selected jobs to button. Verify the selected archive jobs, then click the Confirm button. In addition, the Archive Clients button allows for quickly selecting specific clients’ most recent full, differential, and subsequent incremental backup jobs for archiving. When an archive is in progress, the Archive Libraries page will display progress bars indicating progress for the current operation and total overall progress. When the total progress bar is at 100%, the archive job is finished. At any time, you may click the Cancel button to cancel the archive or Clear Archive Process button to clear the progress of a completed or canceled archive. Contact Information Please feel free to call or email with any questions or comments. Support Telephone: 888-264-5116 option 2 Support Email: [email protected] Sales Telephone: 888-264-5116 option 1 Sales Email: [email protected] Website: www.revinetix.com We appreciate having you as a customer! 2010-0301 CONTACT INFORMATION PAGE 15 Quickstart Guide—RevOS® Hardware Warranty Revinetix Sentio™ and Volo™ data protection appliances include a one (1) year Return to Depot hardware warranty that commences at date of invoice. Onsite support is available as a purchased upgrade. An extended three (3) year warranty of up to three (3) years may be purchased within thirty (30) days from the date of invoice. After thirty (30) days from invoice date, one (1) year warranty extensions may be purchased prior to the expiration of the warranty period. Extensions may not be purchased after the hardware warranty expires. Hardware warranties on Revinetix data protection appliances may be transferred if the current owner transfers ownership of the system and records the transfer with Revinetix. The Revinetix hardware warranty covers defects in materials and workmanship of Revinetix data protection appliances and its components. The warranty does not cover problems that are caused by (a) accident; abuse; neglect; shock; electrostatic discharge; heat or humidity beyond product specifications; improper installation, operation, maintenance or modification; or operation in harsh or extraordinary environmental conditions which may include, but are not limited to dust, dirt, moisture, salt, pressure, temperature, etc.; or (b) any misuse contrary to the instructions in the user manual; or (c) lost passwords; or (d) malfunctions caused by other equipment. The warranty may be void if a product is returned with removed, damaged or tampered labels or any alterations (including removal of any component or external cover unless instructed by Revinetix). Consequential damages related to loss of data; incidental damages; and costs related to data recovery, removal and installation are not recoverable under the warranty. If an item covered under warranty requires attention, please contact Revinetix Support (801-263-5116) or your reseller. Please be prepared to supply them with your appliance serial number and/or MAC address. The process for resolving your warranty incident is as follows: RETURN TO DEPOT SUPPORT: Revinetix diagnoses the problem and the customer sends the unit to Revinetix for service. Revinetix will make best effort to obtain replacement parts and return ship via Ground Service in a reasonable amount of time. Shipping is paid by Revinetix for standard response time. If the customer requires expedited shipping, they may be responsible for shipping charges. ONSITE SUPPORT: Revinetix performs preliminary diagnosis and dispatches an engineer to diagnose and fix the problem. Response time is usually next business day. Repair is subject to the reasonable amount of time required to obtain replacement parts. If replacement parts need to be shipped, Ground Service shipping is paid by Revinetix for standard response time. If the customer requires expedited shipping, they may be responsible for shipping charges. During the warranty period, Revinetix or its authorized representative will repair Revinetix hardware products or components returned that prove to be defective in materials or workmanship. If Revinetix or its authorized representative is not able to repair the product, it will be replaced with a comparable product that is new or refurbished. When you contact Revinetix via phone or web, Revinetix will issue a Return Material Authorization Number (RMA number) along with shipping instructions. You must return the product to Revinetix in its original or equivalent packaging and insure the shipment or accept the risk if the product is lost or damaged in shipment. Please reference the RMA number with your shipment. Otherwise, Revinetix will refuse receipt. Revinetix will return the repaired or replacement products via Ground freight prepaid if the return ship address is a United States address (excluding Puerto Rico and U.S. possessions and territories). Otherwise, Revinetix will ship the product freight collect. If Revinetix sends a replacement part before receiving the warranty item, you agree to return ship the original part within 30 days of receipt of the new part or Revinetix will charge the credit card you provide for the new part. If Revinetix determines that the problem is not covered under this warranty, you will be notified and informed of service alternatives that are available on a fee basis. NOTE: Before you ship the product or parts to Revinetix, make sure to copy your data to removable media or another Revinetix appliance. Remove hard drives from the appliance before shipping (except for the Volo™; ship the Volo™ complete). Remove any confidential, proprietary, or personal information and removable media. Revinetix will not be responsible for any of your confidential, proprietary, or personal information; lost or corrupted data; or damaged or lost removable media. Revinetix uses new and refurbished parts made by various manufacturers in performing warranty repairs and in building replacement parts and systems. Refurbished parts and systems are parts or systems that have been returned to Revinetix, some of which were never used by a customer. All parts and systems are inspected and tested for quality. Replacement parts and systems are covered for the remaining period of the hardware warranty for the product you bought. Revinetix owns all parts removed from repaired products. HARDWARE W ARRANTY PAGE 16 Quickstart Guide—RevOS® Software License The End User License Agreement for Revinetix® Data Backup Appliance Software and Documentation is included here for reference. END-USER LICENSE AGREEMENT FOR RevOS® AND ASSOCIATED SOFTWARE. IMPORTANT, PLEASE READ THE TERMS AND CONDITIONS OF THIS LICENSE AGREEMENT CAREFULLY. This is a legal agreement by and between Revinetix, Inc., a Utah corporation (the “Licensor”), and you (either an individual or a single entity, the “Licensee”), for the software and related products identified below. This license agreement (the “Agreement”) represents the entire agreement concerning the software between the Licensor and the Licensee, and it supersedes any prior proposal, representation, or understanding between the parties. If Licensee does not agree to be bound by the terms of this end-user license agreement, do not install or use the software. This software is licensed, not sold. 1 LICENSE GRANT: Subject to the terms and conditions contained herein, Licensor grants to Licensee a non-exclusive, nonassignable license to use Revinetix Data Backup Appliance client software and associated RevOS operating system software (the "Software") and associated documentation (the "Documentation") on Licensee’s servers and computers. This license is granted only to Licensee if Licensee has installed the Revinetix Data Backup Appliance (the “Hardware”), distributed by Revinetix, Inc., and the Software is used in conjunction with the Hardware. 2 COPYRIGHT: Copyright in the Software and Documentation is owned by Licensor and is protected by United States Copyright Laws and international treaty provisions. 3 TITLE TO SOFTWARE: The licensed Software is proprietary to and constitutes trade secret information of the Licensor. The Licensee agrees to maintain the confidential nature of Software and related materials provided for the Licensee’s own internal use under this Agreement. The license granted herein does not include the right to sublicense to others, and may not be assigned to others, in whole or in part, without the prior written consent of the Licensor. 4 SCOPE OF LICENSE: Licensee may use the Software on its servers and computers only. This license is non-transferable. Licensee may not: copy the Software or Documentation for use by another; rent, lease or lend the Software or Documentation to another; alter, modify, adapt, prepare a derivative work, de-compile or reverse-engineer the Software; create standardized accessories for sale or use with the Software; alter, remove or obscure any notices of copyright, patent, trademark or other proprietary rights placed by Licensor in the Software and Documentation, without the express, written permission of Licensor. 5 TERMINATION: Without prejudice to any other rights, Licensor may terminate this license agreement if Licensee fails to comply with the terms and conditions of this agreement as solely determined by Licensor. In such event, Licensee must uninstall and destroy all copies of the Software in Licensee’s possession. If the Licensee decommissions, returns, or in any other way discontinues use of the Hardware, this Agreement shall automatically terminate, and Licensee must uninstall and destroy all copies of the Software in Licensee’s possession. 6 LIMITED WARRANTY: Licensor does not warrant that the functions contained in the Software will meet Licensee’s requirements or that the operation of the Software will be uninterrupted or error free. The Software is warranted to be free from defects in materials and workmanship and that the Software will perform substantially in accordance with the Documentation for a period of ninety (90) days from the date of receipt. Any implied warranties on the Software are limited to ninety (90) days. Some jurisdictions do not allow limitations on duration of an implied warranty, so the above limitation may not apply to you. 7 CUSTOMER REMEDIES: Licensor and its suppliers entire liability and Licensee’s exclusive remedy shall be, at the option of Licensor, either (a) return of the price paid, or (b) repair or replacement of the Software that does not meet Licensor's limited warranty and which is returned to Licensor with a copy of receipt. This Limited Warranty is void if failure of the Software has resulted from accident, abuse, or misapplication. Any replacement Software will be warranted for the remainder of the original warranty period or thirty (30) days, whichever is longer. 8 DISCLAIMER OF ALL OTHER WARRANTIES: REVINETIX, INC. AND ITS SUPPLIERS DISCLAIM ALL OTHER WARRANTIES IN THE SOFTWARE AND DOCUMENTATION, EITHER EXPRESS OR IMPLIED, INCLUDING BUT NOT LIMITED TO, IMPLIED WARRANTIES OF MERCHANTABILITY OR FITNESS FOR A PARTICULAR PURPOSE. SOFTWARE LICENSE PAGE 17 Quickstart Guide—RevOS® Software License (continued) 9 NO LIABILITY FOR CONSEQUENTIAL DAMAGES: In no event shall Licensor or its suppliers be liable for any damages whatsoever (including, without limitation, damages for loss of business profits, business interruption, loss of business information, or any other pecuniary loss arising out of the use of or inability to use Licensor’s product, even if Licensor has been advised of the possibility of such damages. Because some jurisdictions do not allow the exclusion or limitation for consequential or incidental damages, the above limitation may not apply. 10 U.S. GOVERNMENT RESTRICTED RIGHTS: The Software and Documentation are provided with RESTRICTED RIGHTS. Use, duplication, or disclosure by the Government is subject to restriction as set forth in subparagraph (c) (1) (ii) of the Rights in Technical Data and Computer Software clauses at DFARS 252.227 - 7018 or subparagraphs (c) (1) and (2) of the Commercial Computer Software - Restricted Rights clause at 48 CFR 52.227-18, as applicable. Copyright Owner and Licensor is Revinetix, Inc., 308 East 4500 South, Suite 100, Salt Lake City, Utah 84107-4057. 11 JURISDICTION: This agreement is governed by the laws of the State of Utah. Any action to enforce this agreement must be brought in Salt Lake County, Utah. If you have any questions concerning this agreement, please write to Revinetix, Inc., 308 East 4500 South, Suite 100, Salt Lake City, Utah 84107-4057. (c) Revinetix, Inc. 2004, 2005, 2006,2007, 2008, 2009, 2010, 2011. Revinetix, RevOS, Disk2Disk2Disk and D2D2D are registered trademarks of Revinetix, Inc. Sentio and Volo are trademarks of Revinetix, Inc. SOFTWARE LICENSE PAGE 18