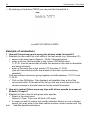
1
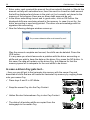
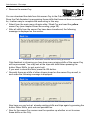
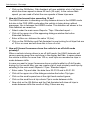
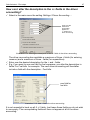
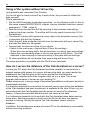
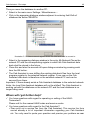
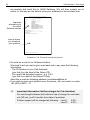
HALE Cab Assistant
First Steps
Tips and tricks to work with HALE Cab Assistant
2
Cab Assistant - First Steps
HALE Cab Assistant - First steps
Version 2.6.2 / 25.05.2011
Author: 81/55 / Translator: TG
© by HALE electronic GmbH, Eugen-Müller-Straße 18, 5020 Salzburg, Austria.
Tel: +43 (662) 439011 - 0, Fax: +43 (662) 439011 - 9
Cab Assistant - First steps
3
Content
1 - General
4
What the Cab Assistant can do for you
Multi user possibility of the program
Do you have a suitable computer?
4
4
4
2 - How you start...
5
Scope of supply
How to install Cab Assistant to your PC
Important for installing updates
The first Start of Cab Assistant
Checking of Cab Assistant adjustments
Enter owner data
Enter driver data
Enter vehicle data
The Owner-Cey
A driver-Cey for each driver
5
5
7
8
10
12
13
14
14
16
3 - The first test in the vehicle
18
Report yourself to the taximeter by using the driver-Cey
What is recorded by the HALE-taximeter?
To end the shift with the driver-Cey
18
19
22
4 - The first driver accounting in the office
24
Driver-Accounting
In case a driver-Cey gets lost...
Open driver accounting
Evaluations
Example of evaluations
24
26
28
29
32
5 - Further Information
35
User-Administration (pass word function)
To whom belongs this HALE-Cey?
Deleting stored shifts and trips
Can shift data be exported to other programs?
Free available fields in the master data
How can I alter the description in the +/- fields in the driver accounting?
Using of the system without driver-Cey
How do I secure the database of the Cab Assistant on a server?
Where will I get further help?
Important information for the installation in Euro-Countries
35
41
41
42
45
47
48
48
49
51
4
Cab Assistant - First Steps
1 - General
What the Cab Assistant can do for you
Administer the important data of driver and vehicle.
Format and analyse HALE-Ceys.
Read and store shifts and trips from the HALE-Ceys.
Execute the driver accounting.
Show or print shift and trip lists
(Analysis of stored data, e.g. monthly revenue lists).
Export data (to take over into other programs).
Correct wrongly processed trips and shifts (only possible with the optional
module EDIT).
Multi user possibility of the program
A limited multi use of the Cab Assistant is possible. Reading of data is possible
from several workstations, read and write access is not possible at the same time.
Only if the reading is finished, the other workstations have access to the data.
Do you have a suitable computer?
Before you take Cab Assistant into operation, please check upon your computer
(PC) is suitable for the installation of Cab Assistant.
Your PC must meet the following features:
IBM and Microsoft Windows compatible.
Intel Pentium processor: from 200 MHz
Hard disk: from 540 MB (depending on the number of vehicles and drivers,
the bigger and faster the PC is, the better).
Graphic card: Windows conform graphic card with at least 800 × 600 pixel at no
less then 75 Hz refresh rate, recommended 1024 x 768 pixel resolution at 80 to
90 Hz).
A vacant parallel interface or USB connection for the printer.
A vacant serial RS 232 interface or USB interface for the HALE CeyContact CMC-02.
A flawless operating system: Windows 2000, XP, Vista, 7 (32 Bit and 64 Bit).
When using a Cey-Contact PC with USB connection: at least Windows XP
service pack 2 (or higher).
Cab Assistant - First steps
5
2 - How you start...
We will explain in this chapter only those steps that are absolutely essential for a
successful start of Cab Assistant. When you made your first experience with the
Cab Assistant, then you can adapt the Cab Assistant with the aid of chapter 5 step by step to your requirements.
Scope of supply
•
•
•
•
Setup-CD Cab Assistant
Cab Assistant Dongle-Cey
User registration card with mailing envelope
User manual
Furthermore you need one of the following Cey-Contacts for PC:
•
•
•
CMC-05-USB (2 slots, USB connection)
CMC-02-USB (3 slots, USB connection)
CMC-02 (3 slots, serial connection)
How to install Cab Assistant to your PC
1. Place the Cab Assistant Setup-CD in the CD-ROM or DVD-drive of your PC.
2. Providing your auto start function is not turned off, the installation of Cab
Assistant will start automatically after only a few seconds (Setup).
Should it yet be that the setup does not start by itself, click on the START button
at the lower left and select RUN. Click on the button BROWSE and select the
CD/DVD DRIVE where you placed the Cab Assistant CD. Change to the sub file
CabAss of the CD and click on the file setup.exe. Close all open dialogue
windows before you start the set-up.
Follow the instruction given on the screen.
If you up-date from a previous Cab Assistant version, please observe also the
instructions of this package.
3. Plug the Cab Assistant Dongle-Cey (4) in the socket of the Cey-Contact (1),
which is near the protection cover (2).
4. Put the SUB-D plug (3) of the Cey-Contact in a vacant interface socket of your
PC.
5. Providing the set-up was good and without error, you can now start Cab
Assistant. Click for this on the START button and select in the start menu
PROGRAMS / Cab Assistant (under Windows XP you may have to open the file
ALL PROGRAMS in order to see the input of Cab Assistant).
6. Necessary modifications under Windows Vista and Windows 7
With Windows Vista and Windows 7 please change the following settings
before the first use of the program:
6
Cab Assistant - First Steps
Move the database to a public folder, e.g. to Libraries/Documents/My
Documents.
Please choose Settings / miscellaneous in the main menu:
Please choose the path for the export of the database:
Illustration 2-1: Path for export of the database.
Illustration 2-2: Export of the database.
Or change in the properties of the program, under Compatibility, the point Privilege
Level to Run this program as an administrator.
Cab Assistant - First steps
Illustration 2-3: Run this program as an administrator.
Please note, that the HALE hotline is only available
during the HALE business hours.
Important for installing updates
•
The old version of the Cab Assistant must be uninstalled before installing the
update (maybe the database must be saved).
•
When uninstalling the program and using a USB Cey-Contact, the CeyContact must be disconnected.
7
8
Cab Assistant - First Steps
The first Start of Cab Assistant
When starting the program the first time, you will see a greeting screen, a page
from the help program with information to the actual Cab Assistant Version that
can be read:
click here
to close
Illustration 2-4: The first start of Cab Assistant.
Close the HELP window by clicking on X at the upper right corner.
The necessary program for the Windows help files is not
automatically delivered with the operating systems for Windows
Vista and Windows 7.
The program for Windows Vista can be downloaded under
http://www.microsoft.com/downloads/details.aspx?displaylang=en
&FamilyID=6ebcfad9-d3f5-4365-8070-334cd175d4bb
For Windows 7 the program can be found under:
http://www.microsoft.com/downloads/details.aspx?displaylang=en
&FamilyID=258aa5ec-e3d9-4228-8844-008e02b32a2c
Further information can be found under
http://support.microsoft.com/kb/917607
Click on the OK button of the Cab Assistant dialogue window.
You are now in the main menu of the program.
You may now flip open and select the individual menus and functions from the top
edge of your screen.
Cab Assistant - First steps
9
Under the menu bar you find a tool bar with several direct access buttons that can
be reached with a single mouse click to start the particular function instead of
going via the main menu:
call up for help on
Cab Assistant
start driver accounting
analyse HALE-Cey
establish standard
list for trips
establish standard list
for shifts
Illustration 2-5: Tool Bar of Cab Assistant.
At the lower rim of screen you find a status line that is indicating continuously
information concerning the very selected function:
Illustration 2-6: Status Line with indication of locked in user at Cab Assistant.
At the right hand side of the status line is a small window, that is indicating the
current user (see chapter User Administration, page 35). By this you can recognize
anytime who is currently working with Cab Assistant. In case when the user
administration of Cab Assistant is not active, it shows here the user ADMIN.
10
Cab Assistant - First Steps
Checking of Cab Assistant adjustments
Please check decently the following settings, to ensure the later correct functional
working of Cab Assistant:
Select in the main menu Settings / Cey-System.
Illustration 2-7: Cey-System settings.
Check if the PC interface setting is made and upon the Cey-Contact has been
plugged. In case not, select correct interface and click on OK-Button.
Select in the main menu Settings / miscellaneous:
Illustration 2-8: Cab Assistant miscellaneous settings / Setting of currency.
Please select your currency, in which the Cab Assistant shall show
respectively print the money values.
Cab Assistant - First steps
11
This should, but must not be necessarily the currency that presently used with
the taximeter. During a currency conversion (e.g. to the Euro), it is possible
that you change about your national and the Euro also after the Euro
conversion took place. This does not affect the currency values in the Cab
Assistant database. Only the indication is adapted.
In case you operate Cab Assistant in a non Euro country, this selection will
not be possible. The Cab Assistant is using automatically the currency you
selected under the Windows control panel.
Please set the correct number of decimal places of what is used in the
taximeter.
You can read off the setting from the taximeter when e.g. in the HIRED mode.
Enter the number of decimal places at Number of decimal places (ndp)
For normal taxi trips enter under sales tax what the tax percentage for this is.
In case of a further tax percentage for e.g. extreme long trips, this percentage
can be entered in the second tax percentage field.
12
Cab Assistant - First Steps
Enter owner data
Select under the main menu the menu point File / Company...:
Illustration 2-9: Enter of all essential company information data.
Answer in this dialogue window the following question fields regarding your
company:
company name (the official name of your company).
description (what is your company doing).
street
country, postal code and place of your company address.
telephone 1 (main phone number, under which the company can be reached).
When everything has been filled in correctly, click with the mouse on the OK
button.
In case you want to stop and wish not to store the already entered data, click on
the CANCEL button.
Cab Assistant - First steps
13
Enter driver data
Select in the main menu the menu point File / Drivers...:
Illustration 2-10: entering of the essential driver data.
Answer in this dialogue window the following question fields regarding each driver:
first name and last name.
No. (driver number in the Cey-System).
Every driver must have a distinct number in the Cey-System. The number is
required for the clear allocation of the taximeter shifts.
You may chose numbers as you desire.
The only restriction is, the numbers must lay within the range of 1 to 65534.
Change the proposed date of entry to the correct date or cancel it with the
Delete-Button.
In case you want to register further drivers, click on the New-Button. The just
entered driver data is stored and a new driver master data sheet comes up.
You may now enter the data of the next driver.
Hint: Store at the beginning only those drivers with whom you want to carry out
the first test. In case of wrong inputs, you save yourself extra work of changing
of all driver data already entered. You can add any time later more drivers.
When all driver data has been entered, click with the mouse on the OK-Button.
Now also the last data inputs for the driver are being stored.
14
Cab Assistant - First Steps
Enter vehicle data
Select in the main menu the menu point File / Vehicles...:
Illustration 2-11: Entering of all essential vehicle data.
Answer in this dialogue window the following question fields regarding each
vehicle:
vehicle registration number.
Vehicle no. (vehicle number in the Cey-System).
In the Cey-System every vehicle must have a distinct number. This is required
for the clear allocation taximeter shifts.
You may choose numbers as you desire (this number has nothing to do with
vehicle registration number).
This number must also be entered in the owner parameter F272 of the
taximeter.
The only restriction is, the numbers must lay within the range of 1 to 65534.
In case you want enter further vehicles, click on the New-Button. The just
entered vehicle data is stored and a new vehicle master data sheet comes up.
You may now enter the data of the next vehicle.
Hint: store at the beginning only those vehicles that you want to use to carry out
in the first test. In case of wrong inputs, you save yourself extra work of
changing of all vehicle data already entered. You can add any time later more
vehicles.
When all vehicle data has been entered, click with the mouse on the OK-Button.
Now also the last data inputs for vehicles are being stored.
The Owner-Cey
In case you have a yellow owner-Cey, you should now format this Cey. By this,
the Cey will get the owner-number of your company embedded. For what yet is the
owner number necessary?
Cab Assistant - First steps
15
The owner number was issued by HALE for your company and is different to
for each other company (individual owner number).
This number is firmly written into the Cab Assistant and will be embedded in all
HALE-Ceys that are formatted with the Cab Assistant.
The Cab Assistant will accept only such HALE-Ceys that have embedded your
own owner number.
Plug one of your HALE-Ceys into the Cey-Contact of a new HALE taximeter
taken in operation, this taximeter will register the number and from then on
accept only HALE-Ceys assigned to your company.
This rule is preventing that other drivers from a foreign company can work with
your taximeters. Furthermore, it is only possible to data communicate with the Cab
Assistant within the company’s own system.
After having formatted the owner-Cey you can:
Change certain settings inside the taximeter (owner data). This may be e.g. the
indication of the shift control counters, the design of the receipt voucher and
more.
These taximeter settings are protected against unauthorised access and can
only be altered by use of the owner-Cey.
All shifts that are still in the trip memory of the taximeter can be transferred to
the owner-Cey and thereafter to Cab Assistant.
In this way you are able to collect the trip data also in case of the driver-Cey got
lost.
This is how you format the yellow HALE-Cey to become an owner-Cey:
Plug the yellow HALE-Cey in Cey-Contact. Except for this Cey and the dongleCey, no other Cey must be in the Cey-Contact.
Select in Cab Assistant main menu format HALE-Cey / owner-Cey
The following window will appear:
yellow symbol for
operator-Cey
Illustration 2-12: Hint for formatting owner Cey
Click with the mouse on the button Create Cey or press the ENTER button.
The yellow HALE-Cey is now being formatted as an owner-Cey. After the
formatting is completed, the following message appears:
16
Cab Assistant - First Steps
Illustration 2-13: Information about the successful formatting of the owner-Cey
Now you can use the owner-Cey for the taximeters of your company.
A driver-Cey for each driver
As a last preparation, you have to format at least one green driver-Cey for each
driver. Only with such a driver-Cey, the driver can operate the HALE-taximeter.
Furthermore, each trip of a shift is recorded by the taximeter and stored on the
driver-Cey. When the driver then comes to you for accounting, you can read the
data from his Cey into the Cab Assistant.
This is how you format a driver-Cey:
Plug the green HALE-Cey in to the Cey-Contact. Except for this Cey and the
dongle-Cey, no other Cey must be in the Cey-Contact.
Select in Cab Assistant main menu format driver-Cey...
The following window will appear:
green symbol for
driver-Cey
Illustration 2-14: Formatting driver-Cey.
Click with the mouse on the arrow symbol at the right of the list box and select
the driver for whom you wish to format a driver-Cey.
If the number of shifts should be limited, please enter the corresponding
number.
Click on the button Format Cey or press the ENTER button. The green HALECey is now being formatted to become a driver-Cey. After the formatting is
completed, the following message appears:
Cab Assistant - First steps
Illustration 2-15: Information about the successful formatting of the driver-Cey.
Now you can remove the Cey from the Cey-Contact and make a first test trip…
17
18
Cab Assistant - First Steps
3 - The first test in the vehicle
Spare yourself a little time and drive with a vehicle and the just created new driverCey (see chapter 2- ) for test shift:
Report yourself to the taximeter by using the driver-Cey
At first you will have to check if the taximeter has been set to work with the CeySystem (in MODE BETWEEN SHIFTS (please refer to the owner manual of the
taximeter) the taximeter should show in the display CEY InP). In case it does not,
you will need to set this operating mode in the owner control mode (UC-mode).
The actual value for the parameter F285 would need to be increased by 4.
With MCT-05 with program EU11.1 resp. EU12 you have to activate the tachograph: set F299 to value 0. The tachograph is deleted at the same time (FSP Ini).
If the taximeter does not work with Cey-System operation (the last entered driver
number is displayed in MODE BETWEEN SHIFTS, e.g. 000000 dnr), the
turnovers can only be stored onto a owner-Cey (please refer to page 45).
Further information on this can be found in owner manual for the MICROTAX-05,
under chapter other taximeter functions, respectively in the owner manual for the
mirror taximeter.
In order to drive a shift, the driver must report at the beginning of the shift to the
taximeter by using his driver-Cey:
Hold the green driver-Cey on to the Cey-Contact in
mode between shifts (Cey Inp).
F1
F2
F3
F4
FARE
TARIFF
N/F
km
£
EXTRAS
12345/03
MICROTAX-05
HALE
electroni
Modular Taxi
Computer System
Made in Austria by HALE Salzburg
FC
The taximeter display will show the percentage
amount of data already stored on the Cey.
2 Per(cent) FULL means, the driver-Cey is empty
(only formatted as HALE-Cey).
Remove driver-Cey from the Cey-Contact.
The taximeter display is now showing the driver
number of the owner of the Cey, (the driver for whom
this Cey was formatted).
Press first T2 and keep it that way, then press T3 as
well. Let both buttons go again. If the number of shifts
is limited on the driver-Cey, the Cey has to be
contacted again in order to update the number of
started shifts. A new shift has been started. Now you
can do metered taxi trips.
F1
F2
F3
F4
FARE
TARIFF
N/F
km
£
EXTRAS
12345/03
MICROTAX-05
HALE
electroni
Modular Taxi
Computer System
Made in Austria by HALE Salzburg
FC
F1
F2
F3
F4
FARE
TARIFF
N/F
km
£
EXTRAS
12345/03
MICROTAX-05
HALE
electroni
F1
F2
F3
F4
Modular Taxi
Computer System
Made in Austria by HALE Salzburg
FARE
TARIFF
N/F
km
£
EXTRAS
12345/03
MICROTAX-05
HALE
electroni
Modular Taxi
Computer System
Made in Austria by HALE Salzburg
Cab Assistant - First steps
19
Now drive a bit with this vehicle and make at least one taxi trip by which the
taximeter is switched on and off again (with T1 to HIRED and again to FOR HIRE).
The trip will be stored in the trip memory of the taximeter and can be later
analysed in the Cab Assistant.
What is recorded by the HALE-taximeter?
The following events will be recorded by the HALE-taximeter and stored in the trip
memory:
Start of shift (SS)
The driver has to report to the taximeter by either his driver-Cey (with CeySystem operation) or entering his driver number via the buttons (depending
upon the setting of the taximeter by the owner).
Normal trip (NT)
In case of no seat contacts are fitted:
The driver must turn the taximeter on at the begin of the trip and after the trip
back to FOR HIRE.
In case seat contacts are fitted:
At least one passenger was seated in the vehicle, when the taximeter was in
HIRED. The taximeter was automatically switched to HIRED.
(an automatic switching can be activated by the owner and should always be
functioning when at least one passenger is seated).
Courier trip (CoT, only possible with seat sensors)
The driver has switched the taximeter to HIRED at the begin of the trip and
after the trip back to FOR HIRE with key 1. No passenger was seated during
the trip.
Special trip (ST, only possible with seat sensors)
The vehicle was driven with the taximeter in FOR HIRE with at least one
passenger.
“Package” trip (PT, with MCT-05 only from taximeter program EU 11)
Was there a passenger seated for more than 32 meters, this becomes a lump
sum trip with passenger, this is being stored in the memory as such.
Credit trip (CT)
At the end of a trip (STOPPED), the driver has either entered a customer’s
credit number or put a credit card through a swipe card reader, if connected
(swipe card reader only possible with MCT-05). Thereafter he switched the
taximeter to FOR HIRE.
Credit card payment is possible at standard, messenger and lump sum trips.
Cancelled trip (CaT)
The taximeter has been switched to HIRED. The customer credit number
000000 was entered whilst in the mode STOPPED, thereafter switched to FOR
HIRE. By this you book a missed trip for which the driver could not get paid –
e.g. the customer to be did not turn up.
20
Cab Assistant - First Steps
End of shift (SE)
The driver ended the shift by using a driver-Cey or only by pressing the
buttons 2+3 (depending upon the taximeter setting by the owner).
Trip in mode between shifts (MBS)
The vehicle was driven while the taximeter was in mode between shifts
(Cey InP), for more than 100 meters. The taximeter confirms this by a
whistling sound and the taximeter display changes to PrIVAt, which refers to
private use of the vehicle.
The end of such a trip in mode between shifts is ended when the vehicle is
stopping for more than 150 seconds or the driver reports a new shift to the
taximeter.
Was there a passenger in the vehicle for a longer distance, the trip becomes a
special trip with passenger and is stored in the memory as such.
Empty trip (ET)
Is giving the distance the vehicle was driven between two trips in HIRED or
since the last recorded trip until the end of the shift (without passenger).
An empty trip between two trips in HIRED or until the end of the shift is only
printed or transferred via Cey-System, if the vehicle has stopped for more than
2-3 minutes after this trip (not with MCT-05). If the next trip in HIRED starts
before this time, the empty driven kilometers are only displayed in the column
„Non-rev.-km“ (left of the “Occ.-km“) of this occupied trip.
As the taximeter does not transfer start and end times from the last trip until
end of shift, no start and end times are displayed (except if the vehicle is not
driving for more than 150 seconds after that (not for MCT-05)).
Illustration 3-1: Trip list with empty trips.
Cab Assistant - First steps
21
Empty trip until end of shift (LFSE)
Is giving the distance the vehicle was driven after the last registered trip until
the end of the shift (without passenger).
This information is only transferred, if the shift has been ended within 150
seconds after this trip.
Illustration 3-2: Trip list with empty trips until end of shift.
Power failure (PF)
The taximeter was for at least two to three minutes off power, separated from
the car battery.
V-Info failure (VF)
The taximeter has not received any speed signal from the vehicle for at least
150 seconds (only with SPT MB with taxi equipment).
RAM-Init (RI)
It was ascertained the taximeter memory has an error. The taximeter memory
had to be initialised whereby the clock of the taximeter was set back.
The RAM-initialising can be triggered off by an empty buffer battery.
Further information regarding the various kinds of trips can be found in the driver
and owner manuals for HALE taximeters.
22
Cab Assistant - First Steps
To end the shift with the driver-Cey
At the end of each shift the driver must use his driver-Cey in order to end the shift
on the HALE-taximeter. Hereby the data of his shift is copied onto the driver-Cey.
Is the driver coming next time for his accounting to your office, this data can be
downloaded into the Cab Assistant program.
Should one driver forget to end his shift on the taximeter, the next driver can end
the shift of the predecessor with his driver-Cey. The data of the previous driven is
then on the “wrong” driver-Cey, but when the Cey comes for the accounting, it will
be recognized by Cab Assistant and is allocating this data to the correct driver.
(the shift goes into an interim memory and is waiting for the concerned driver-Cey
to come and store the data to this accounting).
Cab Assistant - First steps
This is how you end the shift on the HALE-taximeter:
Press at first T2 and hold it, then additionally press T3
while you are in the FOR HIRE mode.
Let both buttons go.
The taximeter is asking you now to place the driverCey on to the Cey-Contact.
23
F1
F2
F3
F4
FARE
TARIFF
N/F
km
£
EXTRAS
12345/03
MICROTAX-05
HALE
electroni
F1
F2
F3
F4
Modular Taxi
Computer System
Made in Austria by HALE Salzburg
FARE
TARIFF
N/F
km
£
EXTRAS
12345/03
MICROTAX-05
HALE
electroni
Modular Taxi
Computer System
Made in Austria by HALE Salzburg
Hold the driver-Cey on to the Cey-Contact.
FC
The taximeter is copying the data of shift no. 1 on to
the driver-Cey.
F1
F2
F3
F4
FARE
TARIFF
N/F
km
£
EXTRAS
12345/03
MICROTAX-05
HALE
electroni
Hold the driver-Cey as long on the Cey-Contact until
the taximeter display shows CEY OUt.
F1
F2
F3
F4
Modular Taxi
Computer System
Made in Austria by HALE Salzburg
FARE
TARIFF
N/F
km
£
EXTRAS
12345/03
MICROTAX-05
HALE
electroni
Modular Taxi
Computer System
Made in Austria by HALE Salzburg
Remove the driver-Cey from the Cey-Contact.
The taximeter is now in mode between shifts, ready
for the next driver to do his shift.
FC
F1
F2
F3
F4
FARE
TARIFF
N/F
km
£
EXTRAS
12345/03
MICROTAX-05
HALE
electroni
Modular Taxi
Computer System
Made in Austria by HALE Salzburg
Now is the data of the first test shift on your driver-Cey. The next step is to
download this data at your office PC into the Cab Assistant program for analysis.
24
Cab Assistant - First Steps
4 - The first driver accounting in the office
You will now learn in this chapter how to read the driver-Cey into the program, how
you execute a driver accounting and the evaluation.
Driver-Accounting
Select in the main menu Acquire Data / Read Cey.
In case of no Cey has been put in the Cey-Contact (except for the dongle-Cey),
the following message will appear:
Illustration 4-1: Request to plug a HALE-Cey into the Cey-Contact socket (driver-accounting).
Plug the driver-Cey with test shift into the Cey-Contact. The shift(s) of the
plugged HALE-Cey are now being read. During this time, the arrow of the
mouse becomes an hour glass.
If there are significant events stored on the Cey, they are displayed as following:
Cab Assistant - First steps
25
When all shifts have been read, the driver accounting appears on the screen:
driver number
free available
entry fields
is showing shifts
and trips that are
not included in
the accounting
is showing information
with regard to important
events, (e.g. power
failure, special trips, ….)
Illustration 4-2: Example of driver accounting.
The shown driver accounting is including all shifts that can be accounted for.
In the left side of the dialogue window you see various evaluations, that can
give clues for the assessment of the accounted shifts. E.g. you can see at a
glance the HIRED performance and the maximum speed driven.
On the right hand side of the dialogue window you see the actual accounting.
Possible credit trips respectively missed trips are perhaps to be deducted from
the total revenue. During these trips, the driver received no cash payment.
The following +/- fields are offering the possibility to enter further takings that
were not accounted by the taximeter, these can be included afterwards into the
accounting. Thus it is possible to include fuel bills or wages in this accounting.
Such entered amounts are shown on the print out of the driver accounting.
These amounts are currently not stored in memory of the program, can
therefore not be evaluated later on!
You may adapt these +/- fields to your own requirements (for this refer to the
chapter free available fields in the master data, page 41)
At the bottom of the dialogue window is the payable amount, derived from the
deductions and extras.
26
Cab Assistant - First Steps
Enter under cash received the amount the driver actually handed in. Should this
amount not tally with calculated one, then this result in a credit or debit amount
that will be displayed and shown in the print out, but currently not stored in the
memory of the program (there are no driver debit accounts as yet).
Is the driver accounting correct and in good order, click on OK-button. the
displayed shifts are now being stored in the memory. In case it is set for, the
driver accounting is now being printed. The driver can acknowledge with his
signature this accounting.
Now the following dialogue window comes up:
Illustration 4-3: erase shift data in a HALE-Cey
Was the account complete and correct, the shifts can be deleted. Press the
YES button.
If in any case you should encounter a problem with the driver accounting or
shifts and you wish to keep the data on the driver-Cey, press the NO button. In
this case, the data will remain on the driver-Cey, but observe for that the
memory space left is adequate for the next shifts to be driven.
In case a driver-Cey gets lost...
...then you can still get to the taximeter trip memory with the owner-Cey and
download all shifts that are still inside the taximeter trip memory by copying these
onto your owner-Cey.
Press keys 2 and 3 in UC-Mode.
T1
T2
T3
T4
FARE
K TARIFF
N/F
km
DM
EXTRAS
12345/96
MICROTAX-05
HALE
electronic
Snap the owner-Cey into the Cey-Contact.
T1
T2
T3
T4
Modular Taxi
Computer System
Made in A ustria by HAL E S alzb urg
k 500 - 65. 535 I mp / km
FARE
K TARIFF
N/F
km
DM
EXTRAS
12345/96
MICROTAX-05
HALE
electronic
Modular Taxi
Computer System
Made in A ustria by HAL E S alzb urg
k 500 - 65. 535 I mp / km
Halten Sie den Unternehmer-Cey in den Cey-Contact.
FC
The data of all existing shifts are copied from the
tachograph to the owner-Cey.
T1
T2
T3
T4
FAHRPREIS
K
N/F
km
DM
TAXE
ZUSCHLAG
12345/96
MICROTAX-05
HALE
electronic
Modular Taxi
Computer System
Made in A ustria by HAL E S alzb urg
k 500 - 65. 535 I mp / km
Cab Assistant - First steps
Remove the owner-Cey.
27
T1
T2
T3
T4
FARE
K TARIFF
N/F
km
DM
EXTRAS
12345/96
MICROTAX-05
HALE
electronic
Modular Taxi
Computer System
Made in A ustria by HAL E S alzb urg
k 500 - 65. 535 I mp / km
You can download the data from this owner-Cey to the Cab Assistant program.
Since the Cab Assistant is recognizing those shifts that have not been accounted
for, it rather easy to complete the accounting in this way.
Select from the main menu Acquire data / Read Cey and read the yellow
owner-Cey (see chapter Driver-Accounting, page 24).
After all shifts from the owner-Cey have been transferred, the following
message is displayed on the screen:
Illustration 4-4: information on shifts that are being processed
Cab Assistant is informing you here how many missing shifts of the owner-Cey
will be processed. You may look at the trips and shifts when pressing the
button Show Shifts, (or get a print out).
If you want to store this data, press the OK-button.
Normally there are shifts of other drivers stored on the owner-Cey as well, in
such case the following message is displayed:
Illustration 4-5: information on shifts that have been already accounted
Also here you can look at already existing shifts and trips again by pressing the
button Show Shifts, print outs are possible too.
Also for the owner-Cey comes now the question up whether or not to erase
these shifts on the Cey.
28
Cab Assistant - First Steps
When you encountered no problems while reading the shifts, you may now
erase the shifts stored on the Cey by pressing the OK-Button.
The missing shifts are now sub stored by the Cab Assistant.
During this sub storing (they have not been accounted), they will not appear in
any evaluation!
Now you have two possibilities:
you wait for the driver to show up the next accounting before those sub stored
shifts are processed. When his driver-Cey is then read, those sub stored
shifts will be included automatically. You can recognize this in the dialogue
window by Old Shifts:
This accounting includes
9 sub stored shifts (that
do not originate from this
HALE-Cey)
Illustration 4-6: Sub stored shifts in the driver accounting.
You process these sub stored shift manually (meaning without the driver-Cey
of the concerned driver).
For this please read the following chapter…
Open driver accounting
There are two possibilities for open driver accountings to develop:
you have read an owner-Cey that had still shifts (missing) which have not been
stored. Since the driver is normally not present when the owner-Cey is read,
Cab Assistant will store such shifts in a special sub memory pot.
you have read a driver Cey with one or more shifts of other drivers (e.g. driver
A is not reporting end of shift at the taximeter, the following driver B is ending
the shift at the taximeter and is therefore getting the shift of driver A stored onto
his Cey as well).
Also in this case, the foreign shifts will be stored in the sub memory and are not
accounted, the other driver is normally not present.
The sub stored driver shifts are in both cases open accountings.
You may finish off these open accountings anytime:
Select for this in the main menu the menu point Acquire data / Driver
accountings…
You see a list of all drivers who have shifts stored in the sub memory:
Cab Assistant - First steps
29
Illustration 4-7: List of drivers with open accountings
As you can see in the above illustration, has the driver Müller at least one shift
that has been sub stored. If you want to account this (these) sub stored shift(s),
you mark the name with mouse pointer and press the die OK-Button (double
clicking the name has the same effect). In case of more drivers, you may mark
these as well.
Now appears the usual dialogue window of driver accounting. Proceed now for
the accounting as prescribed under chapter Driver Accounting from page 24
onwards.
In case you had selected more drivers to be accounted, the moment the first
accounting is completed, the one for the next selected driver will appear
automatically.
When the accounting of the sub stored shifts are successful completed, these
shifts are being transferred to the normal shift file and can be seen in the shift
evaluation.
Evaluations
As soon as shifts from a HALE-Cey have been successfully read, processed and
stored, it will be possible to evaluate these shifts and trips. You may want to know
e.g. what the revenue of a driver over a certain period is, or you want a list of all
trips over any period of time where the driven speed was in excess of 130km/h.
Before making such an analysis you should yet decide if you want establish a trip
or shift related evaluation.
E.g. do you wish to ascertain the revenue of a driver over a certain period of
time, then you should use a shift list (because in this case you are only
interested in the revenue of the individual shifts).
Select for this from the main menu Reports / Shifts / Standard report...
30
Cab Assistant - First Steps
But if you want a list of all trips with speeds exceeding 130km/h, you will have
to establish a trip report.
Select therefore in the main menu Reports / Trips / Standard report...
Illustration 4-8: Establish shift and trip reports.
You may enter in these dialogue windows now the condition for the search of the
desired shifts respectively trips.
You can enter only one condition or combine many conditions.
As soon as you have entered a value in one of these fields, Cab Assistant is
checking (with the following search) every shift respectively trip upon the given
minimum or maximum value.
When you leave an entry field empty, this condition will then not be checked.
When you leave all entry fields empty, all shifts respectively trips will be shown.
This principle is enabling very comprehensive possibilities for the creation of shift
and trip reports. We wish to show you therefore in the following chapter some
examples of common evaluations.
Have you entered the desired criteria, press the OK-Button.
Now Cab Assistant is starting to search for suitable shifts respectively trips.
Depending on how much data is on the hard disk already and how fast the
computer is, this search takes more or less time. If Cab Assistant is not finding
any suitable shifts respectively trips, then you will see a message in the
dialogue window, telling you the search was unsuccessful. If Cab Assistant was
yet able to find a suitable shift respectively trip, it will be shown in a list:
Cab Assistant - First steps
31
Here you can change the
width of the columns
found shifts
sums line
Here you can print the
shown list straight away
Illustration 4-9: shift list on the screen
You may enlarge or reduce the size of this dialogue window any time by using
the mouse pointer.
Furthermore is it possible to change the width of the individual columns. For
this you place the mouse pointer directly on the line between table columns in
the top. The mouse pointer is changing to a horizontal line with arrow point in
either direction. Press now the left hand mouse button and keep it pressed,
moving to the left or right will alter the width of the column. Once the column
has the desired width, let go of the left hand mouse button. The so altered
column width will remain so also when this list is called up later again, she will
remain last time adjusted.
You can show in a shift list by double click any shift respectively by pressing the
button Trips the trips of that selected shift.
32
Cab Assistant - First Steps
By clicking on the button PRINT you can print this list and file it:
Illustration 4-10: print out of shift list
Example of evaluations
? How will I know how much money the drivers made last month?
! Establish for this a shift list of all shifts of the last month (e.g. November 01):
select in the main menu Reports / Shifts / Standard report ...
enter in the line Shift end date in the column FROM the value
11.01.01 (this will cause that all shifts that ended on this date or thereafter
are being selected).
enter in the same line in the column TO the value 11.30.01
(this will cause that all shifts that ended on this date or prior are being
selected).
This two entered criteria are giving together all shifts between 11.01.01 and
11.30.01.
Click on the OK-Button. Cab Assistant will establish then a list of the
concerned shifts. At the end of the list you will see a sum line and in the
column revenue is the total revenue for the month November.
? How do I control if there were any trips with driven speeds in excess of
60 km/h (35 mph)?
! Establish for this a trip list with given max. speeds:
Select in the main menu
Reports / Trips / Trips over 60 km/h (>35 mph)
In case you wish to control only certain vehicles, drivers or over a certain
period, you may enter in the lines vehicle number, driver number and Trip
end
date the desired restrictions.
Cab Assistant - First steps
33
Click on the OK-Button. Cab Assistant will now establish a list of all trips of
which the driven speed is above 60 km/h (35 mph). In the column Max.
speed you can read off what the max speeds of these trips were.
? How do I find vacant trips exceeding 15 km?
The HALE-taximeter is recording not only distance driven in the HIRED mode
but also in the FOR HIRE mode when the vehicle in being driven without
passenger, like in between the HIRED modes. This distance will shown in the
Cab Assistant as vacant-km.
Select under the main menu Reports / Trips / Standard report ...
Click at the upper rim of the appearing dialogue window the button
Extended Selection.
Enter at Non-rev. distance the value 15 (km).
Click on the OK-Button and Cab Assistant is now looking for all trips that are
of 15 km or more and will show this in form of a list.
? How will I know if someone drove the vehicle in an off shift mode
privately?
When a vehicle is being driven in an off shift mode, the HALE-taximeter will
cause a warning peep tone and show in the display PrIVAt. In cases where
the vehicle is driven for more than 100 m, such trips are recorded as trips in
mode between shifts.
In case you want to know if someone drove a vehicle whilst in off shift mode
during e.g. the month May, you can create a list of such privately used trips by
selecting in the main menu Reports / Trips / Standard report...
Enter under Trip end date the date from 05.01.02 and to 05.31.02.
Click at the upper rim of the dialogue window the button Trip type...
Click on the small square box at the right hand marked ignore.
Click on the small box at trip criteria Trip in mode between shifts.
Now click on the OK-Button and the Cab Assistant will show all trips in
mode between shifts the month of May, if there are any.
34
Cab Assistant - First Steps
? How do I control if all shifts of vehicle no. 204 have been accounted?
Establish for this a shift list with shift numbers:
Select Reports / Shifts / Standard report in the main menu.
Enter under the line vehicle number / car number in the columns FROM and
TO the vehicle no. 204.
In case you wish to control a certain time frame, you may enter under Shift
end date FROM and TO the desired time frame.
Now click on the OK-Button. The Cab Assistant will now establish a list of all
existing shifts of vehicle no. 204. At the right side of this list you find the
column heading Shift no. (=shift number - every shift will have a consecutive
number).
Check now upon any missing shifts. In case yes, verify if there are any shifts
still on a HALE-Cey and have not been accounted. Refer also to the chapter
open driver accounting, page 24.
Cab Assistant - First steps
35
5 - Further Information
In case that you are already experienced with the Cab Assistant, you will find here
further information and tips to frequently asked questions.
User-Administration (pass word function)
You do not wish that everyone has access to Cab Assistant? With the useradministration you can block the access completely or partially.
This can be done as follows:
Activate the Cab Assistant User Administration.
Therefore click on the menu Settings / User.
Click on Every user must enter user name and password before starting
program.
By this you open a dialogue window in which every user must enter his user
name and password. Without entering the correct user name and password
Cab Assistant will not start.
Illustration 5-1: User-administration of Cab Assistant.
After installing Cab Assistant the default user is “admin”, and the password is
“cey“. This user exists always and can use all Cab Assistant functions.
Normally is Admin the chief or the EDP-electronic data processing
administrator of the company. Change now this password into your own. Click
for this on the button Properties.
36
Cab Assistant - First Steps
A window will pop up and show the actual features of the user admin that may be
partially altered:
Illustration 5-2: Properties of a Cab Assistant user
Go to the entry field Password and delete all three asterisks and enter your
desired password, for every entered letter one asterisk appears again. Enter
your new password again under Password verify and press thereafter the OKButton. By this, you have now changed the user admin. This new Password will
need to be used at the next start of Cab Assistant. It goes without saying; you
will need to memorize this new password well, because only the admin is often
the only one who can make any alterations.
In case yet you are the only one who is working with the Cab Assistant, the above
described changes are fully adequate to protect the Cab Assistant against use of
others.
Should yet other people be allowed to work the Cab Assistant as well, it will be
essential to file these in the user admin too.
Cab Assistant - First steps
37
Go to the user admin and click on the button New User ... You will now see the
already known field with user features.
Illustration 5-3: Here you make the setting for a new Cab Assistant user
Enter now the desired user name, abbreviated to a short name of only 4 - 8
letters that one can memorize well.
In the field Full name comes the full first and surname of the staff member.
In the fields, Password and Password verify you enter in each the password of
the staff member. The password must comprise of at least three digits, these
may be letters and/or numbers. Please observe that capital and small letters
are being distinguished.
You have now to decide to which Cab Assistant functions the staff member
should have access and which not. Mark those small squares, you think are
appropriate and should be accessible by this staff member, under Users rights.
Important: think well for which employee you will release the right User
management. This will enable that member to alter and release passwords!
When you have made all adjustments, press the OK-Button. You will see
thereafter in the user list the new registered name. At the next start of Cab
Assistant, this new user will have access to those areas that have been
released for him/her.
In case such a user has forgotten what his password was, the user admin or
one who has the release of User management can change this into a new
password (existing password cannot be read off anywhere).
38
Cab Assistant - First Steps
Print out of drivers and vehicles
There are two possibilities to print out this data:
If you want a summary of all drivers or vehicles, you print a short list. Select for
this in the main menu Data / Print / Driver list resp. Data / Print / Vehicle list.
Your Windows connected printer is producing the requested list:
Illustration 5-4: Print out of driver list (extraction)
Illustration 5-5: Print out of vehicle list (extraction)
Cab Assistant - First steps
39
If you want to know yet all data of a certain driver or vehicle, print out a register
of these.
Select for this in the main menu File / Drivers.... respect. File / Vehicles…:
select with these buttons
the desired driver...
...and with this
button you can print
the driver register
Illustration 5-6: Print out of driver register
40
Cab Assistant - First Steps
Use the arrow buttons to select for a driver respectively a vehicle of which you
wish to print out the register data and press the print button:
Illustration 5-7: Print out of a driver register record (extraction)
Cab Assistant - First steps
41
To whom belongs this HALE-Cey?
Do you have a HALE-Cey and you do not really know to whom this Cey belongs or
if there are still some shifts stored on this Cey?
In such case select in the main menu Ceys / Analyse Cey and plug the HALE-Cey
in the Cey-Contact. After only short analysing time you will see the results in the
dialogue window:
Illustration 5-8: Result of a HALE-Cey analysis
Depending upon type of Cey, different values will be shown. You can read for how
long the Cey has been used, what memory capacity in percent is already used up
and more.
In case you are analysing more Ceys, you can pull this one off now and plug the
next one in place.
This method will enable you also to read foreign Ceys (Ceys with other companies
number).
Deleting stored shifts and trips
You can (you may want to) delete all trips that are older than two months and all
shifts which are older than six months independently from each other from the
record:
42
Cab Assistant - First Steps
Select in the main menu File / Purge data...:
Illustration 5-9: Delete Data
In case you wish to delete old trip data click on the small box marked Purge trip
data base. Enter the day to which you want to delete the data register of tips.
In case you wish to delete old shift data click on the small box marked Purge
shift data base. Enter the day to which you want to delete the data register of
shifts.
When all input is correct, press the OK-Button. Now all data to the date you
entered will be erased.
In exceptional cases it will be possible to restore deleted data with the use of
additional programs.
Can shift data be exported to other programs?
Yes, you can export data from shifts, trips and also master data (of drivers,
vehicles, company) to other programs. Cab Assistant is establishing for this new
text files which are copied when exporting the desired shifts, trips.....from the
internal Cab Assistant data base. These text files should be acceptable by every
Windows program import function.
Cab Assistant - First steps
43
This is how you export the data from Cab Assistant:
Select in main menu File / Export...:
A list of various possibilities will be shown:
Combine your own
exports
Pre-determined export
possibilities
Illustration 5-10: Possible ways of export
We recommend for the beginning to try the pre-determined exports, from the
second line down. Start e.g. with the simple export (all data) and take a look at
the established text files respectively load these to the desired program (e.g.
Microsoft Excel).
With Windows Vista or 7 the exported data should not be stored
under Computer\C:\Programs\Cab Assistant.
44
Cab Assistant - First Steps
Select for this the corresponding export form the above shown list and press
the button Start export. The export will be executed. You see at the end of the
export task, which text files have been established new:
Illustration 5-11: Result report of an accomplished export of data
As you will note, every exported data file type (shifts, trips....) had its own file
established. Since the text files are being created in the Cab Assistant, it will
overwrite already existing old text files of the previous export of data.
Load now for example the established text file of the shift data (shift.txt) in
Microsoft Excel. Use for this the menu point File / Open…and enter in the
dialogue window the file type text (*.txt). After loading the text file, Excel is
starting an assistant who is helping you importing the text file.
Please observe that you only import table columns as number values
(standard) ,which are really numbers. If in doubt, convert in the excel-assistant
questionable table to the text format before finishing the assistant.
Further information is available in the Windows help program of Cab Assistant
menu Help / Contents - How do I export Cab Assistant data to another
program?
I case you found no suitable pre-determined export possibility, you can create
with the help of Export-Assistant you own exports.
Select for this the first line of the list (Export-Assistant) and press button Start
export. The Export-Assistant will guide you step by step through the
adjustments of an individual export:
Cab Assistant - First steps
45
Illustration 5-12: Assistant to establish individual exports
Answer each question of the assistant and press the button Continue.
By this you can precisely quote which data you want to export in the text file. At
the end of this assistant, you can execute the combined exports and create the
text files.
Furthermore, you may save this combined export for later use under a name of
your choice. This name will thereafter appear in the listing. In future, you can
then just call up this name and export without the Export-Assistant.
In case you have problems when loading text files that have established by the
Cab Assistant, please check upon the following rules being accepted by the
program:
the text files have been written in the ANSI sign set (standard Windows sign
set).
the individual data fields are separated by a semicolon (;).
alphanumeric fields (could have letters and numbers) are bound by quotation
marks (“).
every data line is closed by sign sequence CR / LF (carriage return / line feed).
the first line of an export file contains the names of the file fields to be exported.
Free available fields in the master data
The Cab Assistant offers you the possibility to add two further entering fields,
additionally to the already existing entering fields (operator, driver, vehicle master
data sheets). These entering fields may be used for additional information that you
may require.
If you wish to add to the driver master data e.g. the e-mail address of the driver,
you just have to add the description e-mail:
46
Cab Assistant - First Steps
Select in the main menu Settings / Database...
Enter in the group Driver-Addresses in the still vacant field User definable the
word e-mail:
vacant fields for additional
purposes in the master data
register
vacant fields for additional
purposes in the master data
register
vacant fields for additional
purposes in the master data
register
Illustration 5-13: Using of the user definable data fields in the master data
The Cab Assistant creates hereby in the driver master data an additional field
with the description e-mail:
Newly added
entering field
Illustration 5-14: Driver master data (address) with new e-mail entering field
Please observe, the new entering fields will appear at present only when the
master data is being set new. Already set master data will not be altered!
Cab Assistant - First steps
47
How can I alter the description in the +/- fields in the driver
accounting?
Select in the main menu the setting Settings / Driver Accounting...:
enter here the
words that
should later
appear as
+/- fields in the
driver accounting
Illustration 5-15: Altering the description of the +/- fields in the driver accounting
The driver accounting has available a maximum of three + fields (for entering
revenue) and a maximum of three - fields (for expenditure).
Enter now the desired description for the + and - fields.
E.g. if you want to use one field for fuel expenses, you alter the description in
fields 3 in Fuel bills for example. The next driver accounting will thereafter
include a field with the description - Fuel bills.
new field for
fuel bills
Illustration 5-16: New - field in the driver accounting.
It is not essential to book up all 6 +/- fields. Just leave those fields you do not wish
to use empty. The corresponding fields will then not appear at all in the driver
accounting.
48
Cab Assistant - First Steps
Using of the system without driver-Cey
(only possible with connected Cey-Contact)
You do not want to hand a driver-Cey to each driver, but you want to collect the
data yourself?
This is possible too:
Set the HALE-taximeter to standard operation - no Cey-System (refer for this to
the owner manual MICROTAX-05, chapter Various taximeter-functions: ownerparameter 2 - F285 - value 4)
Now the driver can start his shift by reporting to the taximeter manually by
entering his driver number. To end the shift he only needs to press key 2+3 of
the taximeter.
The data of a driven shift remains for many days in the taximeter memory (like
in operation with the Cey-System).
Fetch the shift data at regular intervals from the taximeter with your owner-Cey
and read this data into the system.
Account with the driver at a time of your choice:
Select in the main menu Acquire data / Driver Accountings...
When there are existing shifts, this will be shown in a list of open accountings.
Select the corresponding driver in the list and press the OK button. The Cab
Assistant is now carrying out the accounting of the open shift accountings.
All other operations do not deviate from accounting with driver-Ceys.
The same procedure is possible with the HALE mirror taximeter.
How do I secure the database of the Cab Assistant on a server?
In case your PC where the Cab Assistant has been installed, is connected to a
network system with access to a server with securing data, you may transfer the
database of the Cab Assistant to this server and secure the data there
automatically (together with other program data) on e.g. a tape. The actual
program data remains of course on your working PC.
Please observe yet, a wrong usage of described possibilities could result quickly in
unexpected surprises.
It is therefore essential to ensure that the network server upon which the database
of the Cab Assistant has been transferred, is available all the time. When e.g. you
are working with the Cab Assistant and the server is turned off for whatever
reason, it cannot be excluded that this action can cause a lost data.
It is furthermore essential not to work with the Cab Assistant when data securing
takes place. Backup programs normally lock the file for the time, the backup
process is running. During this period, the Cab Assistant cannot reach its
database.
In addition, the simultaneous access of several PC to the database is not possible
without occurring problems.
Cab Assistant - First steps
49
Thus you move the database to another PC:
Select in the main menu Settings / Miscellaneous...:
Click in the appearing dialogue window adjacent to entering field Path of
database the button SEARCH:
Illustration 5-17: Select network register where the data bank shall be moved to
Select in the appearing dialogue window in the entry My Network Places the
network PC and the corresponding register in which the Cab Assistant data
bank shall be stored in the future.
Close this and also the second still open dialogue window by pressing each
time the OK button.
The Cab Assistant is now shifting the existing data bank files from the local
program register to the selected network register. From now on the Cab
Assistant data bank is therefore on the selected network PC and can be
secured from there.
Important: If there already exists a Cab Assistant database in the selected network
folder, the local Cab Assistant database will not be shifted! The Cab Assistant is
working yet with the database on the network PC and the local database is no
longer being used.
Where will I get further help?
You have questions with regard to operating or setting of the HALETaximeters?
Please call for the nearest HALE sales and service centre.
You have questions with regard to the Cab Assistant?
• Then print out a service fax from the Cab Assistant. This service fax form
carries already a lot of important information regarding your Cab Assistant
etc. You only need to quote your question and precise your problem as near
50
Cab Assistant - First Steps
as possible and send this to HALE Salzburg. We will then contact you in
return. In this way we are able to solve your problems in the shortest time:
Important
information for
the HALE
Software-Hotline
Here is where
you formulate
your problem
Illustration 5-18: Format of service fax print out
Or send an e-mail to our Software-Hotline.
We need to ask you yet to give us at least and in any case the following
information:
- The ID-Number of your Cab Assistant
(you find it on the label of the Setup-CD).
- The used Cab Assistant version - e.g. 2.4.0
(you find it on label of the Setup-CD too).
Send this e-mail the following address: [email protected]
If you wish to solve your problem over the phone, you can reach us under:
+43 (662) 439011 - 0.
Important information: Hotline charges for Cab Assistant
For new bought software the hotline is free of charge for one basic
unit (20 min.) until 6 months from date of purchase.
Further support will be charged as following: Level 1
€ 25,Level 2
€ 30,-
Cab Assistant - First steps
51
Important information for the installation in Euro-Countries
Please check in any case before THE FIRST START of the new installed Cab
Assistant what the currency setting in the Window system control is!
Should it happen that the wrong currency is set, the Cab Assistant will show wrong
amounts.
Click for this with the mouse on
the START-Button in the lower left
corner of the screen and select
Settings then Control Panel
thereafter double click on the
symbol Regional Options. Select
thereafter your currency.
Confirm your currency setting with the OK-button and close the Windows system
control again.