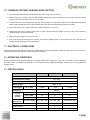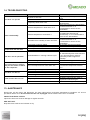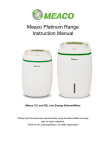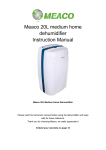
1
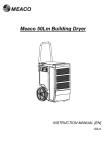
Platinum Range Building Dryers INSTRUCTION MANUAL [EN] 38Lm 54Lm 96Lm 2 [EN] CONTENTS PAGE 1. SAFETY INFORMATION .............................................................................................................................................. 4 2. GENERAL ADVICES ..................................................................................................................................................... 6 3. DEHUMIDIFIER PRINCIPLES ....................................................................................................................................... 6 4. INSTALLATION AND TRANSPORTATION .................................................................................................................. 6 5. OPERATING INSTRUCTIONS ..................................................................................................................................... 7 6. ELECTRONIC CONTROLS ........................................................................................................................................... 7 7. CONDENSATE OUTLET .............................................................................................................................................. 8 8. AUTOMATIC DEFROSTING SYSTEM .......................................................................................................................... 8 9. REMOTE HYGROSTAT WORKING MODE (OPTION) ................................................................................................ 8 10. CONDENSATES PUMP WORKING MODE (OPTION) ............................................................................................... 9 11. ELECTRICAL CONNECTIONS ................................................................................................................................... 9 12. OPERATING CONDITIONS ....................................................................................................................................... 9 13. SPECIFICATIONS ...................................................................................................................................................... 9 14. TROUBLESHOOTING .............................................................................................................................................. 10 15. MAINTENANCE ....................................................................................................................................................... 10 16. ELECTRIC DIAGRAMS............................................................................................................................................. 11 17. WARRANTY AND CUSTOMER SERVICE ................................................................................................................ 12 3 [EN] 1. SAFETY INFORMATION ATTENTION This dehumidifier must not be used in rooms under the following conditions: - Potentially explosive atmosphere - Aggressive atmospheres - Featuring a high concentration of solvents - An extremely high ratio of dust Keep Children Away: Do not allow children to play with or around this unit, which could result in injury. Be sure the unit is inaccessible to children when not attended. Keep Unit Grounded: Always operate the unit with a grounding plug and a grounded electrical outlet. A grounding plug is an essential safety feature that helps reduce the risk of shock or fire. Protect Power Cord from Damage: Never operate a unit with a damaged power cord, as this may lead to electrical or fire hazards. If the power supply cord is damaged, it must be replaced by a cord of the same type and amperage rating. Extension Cords: Extension cords must be grounded and able to deliver the appropriate voltage to the unit. Handle with Care: Do not drop, throw or crash the dehumidifier. Rough treatment can damage the components or wiring and create a hazardous condition. Run on Stable Surface: Always operate the unit on a stable, level surface, for example the floor or a strong counter, so that the dehumidifier cannot fall and cause injury. Keep Out of Water: Never operate the unit in pooled or standing water, as this may create a risk of injury from electrical shock. Do not store or operate outdoors. If electrical wiring or components become wet, thoroughly dry them before using the unit. If in doubt do not use the dehumidifier and consult a qualified electrician or a Meaco approved engineer. Keep Air Intakes Clear: Do not clog or block the air intakes by placing the dehumidifier too close to curtains, walls or anything that will restrict the air inlet. This may cause the unit to overheat and result in a fire or electrical hazard. Keep Filter Clean: Always use a clean air filter. Do not allow any material to clog the filter, as this may cause the dehumidifier to overheat. Never use without a filter. Always check, and if necessary, clean the filter before switching the dehumidifier on. Do not allow oil, grease, or other contaminants to be drawn into the dehumidifier. Keep Electrical Components Dry: Never allow water inside the dehumidifier's electrical components. If these areas become wet for any reason, thoroughly dry them before using the dehumidifier. If in doubt do not use the dehumidifier and consult a qualified electrician or a Meaco approved engineer. The operator must make the operating instruction available for the user and make sure that the user does understand the manual. Wiring Instructions: Should it be necessary to change the plug please note the wires in the mains lead are coloured in accordance with the following code: 4 [EN] BLUE - NEUTRAL BROWN - LIVE GREEN AND YELLOW – EARTH As the colours of the wires in the mains lead of this appliance may not correspond with the coloured markings identifying the terminals in your plug, proceed as follows: 1. The BLUE wire is the NEUTRAL and must be connected to the terminal which is marked with the letter N or coloured BLACK. 2. The BROWN wire is the LIVE and must be connected to the terminal which is marked with the letter L or coloured RED. 3. The GREEN/YELLOW is the EARTH and must be connected to the terminal which is marked with the letter E or coloured GREEN OR GREEN/YELLOW. 4. Always ensure that the cord grip is positioned and fastened correctly. If a 13A (BS1363) fused plug is used it must be fitted with a 13A fuse. If in doubt consult a qualified electrician. Wiring for a 13Amp Plug (BS1363) Please note. The Earth Terminal is marked with the letter E or Earth Symbol . Earth – E (Green / Yellow) 13 amp Fuse Neutral – N (Blue) Live – L (Brown) 5 [EN] 2. GENERAL ADVICE Before putting your dehumidifier into operation for the first time, the instructions manual should be studied carefully. After receiving the unit, you should check your dehumidifier for any transport damage. In case of damage, you should inform the sender immediately. Transport damages should be stated after unpacking the equipment. The respective seller or specialised reseller should be contacted immediately. Keep the packaging for the dehumidifier in a safe place in order to be able to despatch the dehumidifier safely if it requires a service. In order to save space, you can simply cut through the adhesive tape using a knife and fold up the cardboard box. 3. DEHUMIDIFIER PRINCIPLES This dehumidifier is designed to reduce humidity from the air in a building or part of a building. The purpose is to prevent humidity damage, and to dry out wet materials such as carpet, floors, walls, furniture, contents, timber, and structural materials. This dehumidifier can prevent the formation of condensation, reduce air humidity and keep constant a desired relative humidity value. The time necessary for the dehumidifier to dry a room and reach the desired relative humidity depends on the environmental conditions prevailing within the room. For example the number of air changes with outside, any sources of moisture and the room temperature can all either speed up or slow down the dehumidification process. The dehumidifier functions according to the condensation principle with heat recovery. The fan takes the humid air from the room in and across a filter and then through an evaporator. Here the air is cooled below dew point so that the water vapour of the air forms a condensate on the coils which flows into the water collecting tank. The cooled and dried air is heated again by a condenser. By recycling the room air through the dehumidifier over and over again the moisture content and relative humidity of the air is reduced. 4. INSTALLATION AND TRANSPORTATION For installation and transportation, the following instructions must be considered: The air inlet and the air outlet must not be covered whilst the dehumidifier is in operation. Before any moving the dehumidifier it must be switched off by its ON-OFF switch. The mains plug is to be removed from the socket and the water tank should be emptied. For transportation the dehumidifier should be secured on a level base only and must be prevented from rolling around. The dehumidifier must always be transported vertically. This dehumidifier must be used exclusively for air dry. If the dehumidifier has been in a horizontal position for any time over a few minutes, you must let it stand in the upright position for at least 30 minutes before operating. This allows the oil to drain back into the compressor. 6 [EN] 5. OPERATING INSTRUCTIONS ATTENTION - Operate the dehumidifier only in the upright position. - Plug in to a standard outlet with the correct voltage and amperage for the unit. - Allow five minutes before restarting after the unit shuts off for any reason. This will avoid damaging the compressor. - Check dehumidifier daily for correct operation. - Protect floor surfaces from water. Please proceed as follows to start using this dehumidifier: After transported, the dehumidifier should be allowed to stand for 30 minutes. This procedure is recommended to extend the compressor’s operating lifetime. Put the plug into the socket. Check that the water tank is in position. If working with a remote hygrostat set the required humidity value on it (see point 9). Switch on the I/0-switch and check if time counter is running. Both I/0 switch and the time counter are located in the upper right side of the dehumidifier, along with the leds (see point 6). The control panel must be illuminated after switching on the I/0 switch. Check for the proper operation of both the fan and compressor before leaving the unit unattended. 6. ELECTRONIC CONTROLS This unit is equipped with an electronic control board. The meaning of each led and correspondent symbol on the control panel is the following: 1 On/Off switch 2 Hour counter – Counts the compressor’s working time. 3 3 Run Mode – The dehumidifier is running. 4 4 Error - If there is any damaged electronic sensor; high temperature, low temperature or level switch. Contact a Meaco approved engineer. 1 5 6 5 Low temperature –The unit is in automatic defrost mode, this is not an error or a fault. See page 8. 6 Internal high temperature – The air filter is blocked. Check and clean the air filter. 7 2 8 7 Water tank – The water tank is full and must be emptied. See page 8. 9 8 Set point – The relative humidity set point has been reached. See above. 9 Ambient temperature – Turns off the dehumidifier when limit temperatures are reached. Img. 1 – Control panel label 7 [EN] 7. CONDENSATE OUTLET This dehumidifier is equipped with water collecting tank and with fittings for 9/16” (14mm) hose. If working with a water collecting tank, the appliance will automatically switch off when full and the red light at the control panel (see page 6) will light up. To use the hose for the draining the condensate, you should proceed as follows: Remove the plug from the bottom of the water tank; Fasten the 9/16” (14mm) fitting in the bottom of the water tank; Attach the hose supplied with the dehumidifier to the 9/16” (14mm) fitting; The end of the hose must always be at a lower plane than the top of the water tank and headed to a larger vessel or directly to a drain. The hose must be going downhill as it uses gravity to drain. 8. AUTOMATIC DEFROSTING SYSTEM During normal dehumidifying operation, ice may form on the evaporator. This dehumidifier is equipped with an automatic hot-gas defrosting system and if ice is detected by the temperature sensor, it will defrost automatically according to the following principle: A temperature sensor measures the condition existing in the critical area of the evaporator; It transmits an electrical signal to the main electronic board. It has been designed to avoid frequent defrost cycles and consequent loss of efficiency; The relay switches off the fan and simultaneously opens the solenoid valve; Hot gas is guided into the evaporator until the latter is completely free of ice; Subsequently, the dehumidifier will operate again in its normal mode when the temperature sensor measures +7°C; The time between defrost cycles is 20min after; 9. REMOTE HYGROSTAT WORKING MODE (OPTION) If no remote hygrostat is connected the dehumidifier will operate continuously. If you decide to operate the dehumidifier with a remote hygrostat you will be able to have a more efficient control over the surrounding environment within the room where the dehumidifier is installed, you just need to: Connect the jack type plug it to the socket located near the mains cable gland in the rear of the dehumidifier; Adjust the rotary knob to set the desired humidity ratio; When the set humidity ratio is reached the dehumidifier stops operating and the set point green led lights up; The dehumidifier will restart operation whether humidity ratio rises again, or if you set a lower humidity value 8 [EN] 10. CONDENSATES PUMP WORKING MODE (OPTION) Switch off the dehumidifier and disconnect the mains plug from the socket; Remove the water bucket from the dehumidifier and empty it and then disconnect the shunt from the pump socket located beneath the water pan in the right; Fit in an 8mm hose (inner diameter) with the desired length onto the water outlet of the submersible pump and make it pass through the hole in the left side panel and then install the pump inside the bucket; Plug in the pump to the pump socket and return the bucket to its room; Extend the hose to an existing drain point or sewer always below 4m height from the pump level (elevation depends always on the pump used); Plug in the dehumidifier and switch it on; Test if the pump is working and is draining out water by adding water to the bucket until you check that the water is being pumped out from the bucket; 11. ELECTRICAL CONNECTIONS This dehumidifier was designed to operate in a 230V~50Hz electrical installation. Make sure that the electric sockets are connected to earth and that all safety precautions are taken. 12. OPERATING CONDITIONS This dehumidifier can be operated within an ambient temperature range from +3 to +35°C and with a relative humidity from 35% to 90%. It is suitable for application on construction sites, residential buildings, museums, archives, garages and storage rooms. 13. SPECIFICATIONS Model 38Lm Temperature Range 96Lm +5 °C / +35°C Relative Humidity Range 35% - 90% Defrosting System Rated Voltage Power Consumption 54Lm Hot gas 230 V~50 Hz 32°C – 80% 0,9 kW Refrigerant 1,3 kW 1,9 kW R407C 20ºC – 60% 17 27 44 27ºC – 80% 35 51 90 32ºC – 80% 39 57 100 W x D x H [mm] 550 x 550 x 790 580 x 550 x 855 650 x 590 x 955 45 kg 50 kg 55 kg Time Counter Electronic Control Drying Capacity (L/24H) Dehumidifier Dimensions Weight 9 [EN] 14. TROUBLESHOOTING Trouble Cause No power to the unit Unit does not operate Switch not turned ON Completely filled water tank Ambient temperature is lower than +5°C Ambient temperature exceeds 35°C Doesn’t dehumidify The ambient air humidity is lower than 50 % Compressor will not start The fan is out of operation The air filter is strongly soiled Not enough time to dry Overload protector is defective Running capacitor is defective The dehumidifier is running a defrost cycle Fan not running Defective control assembly Unit continuously in defrost and you can see an ice block on the evaporator The room temperature is lower than +5ºC Unit does not defrost Defective bypass relay valve Defective temperature sensor Defective control assembly Defective bypass relay valve Switch not turned ON Time counter does not run Completely filled water collecting tank Defective time counter Solution Plug in the unit; check power at outlet Turn ON the switch Water tank must be emptied and installed again Under this condition the dehumidifier becomes inefficient. It is recommended to switch off the dehumidifier Under this condition the compressor is overloaded and switches off automatically. It is recommended to switch off the dehumidifier. Under this condition the dehumidifier becomes inefficient. It is recommended to switch off the dehumidifier The air filter must be exchanged Allow more time to dry Contact a specialized workshop Contact a specialized workshop The dehumidifier will switch on the fan automatically after some minutes. If not, the malfunction must be repaired by a Meaco approved workshop. Contact a Meaco approved workshop. Contact a Meaco approved workshop. Assure that the device is only set up in rooms with temperatures above +5°C. Contact a Meaco approved workshop. Contact a Meaco approved workshop. Contact a Meaco approved workshop. Contact a Meaco approved workshop. Turn ON the switch. The water collecting tank must be emptied and installed again. Contact a Meaco approved workshop. 15. MAINTENANCE Always turn off the power and disconnect the main cable before performing maintenance procedures. All service procedures below are to be executed with the unit unplugged. Perform before each use or as needed. INSPECT ELECTRICAL SYSTEM Inspect the electrical cord for damage at regular intervals. KEEP OUT DUST Keep dust from surfaces and volumes to dry 10 [EN] 16. ELECTRIC DIAGRAMS DEHUMIDIFIER ELECTRIC WIRING PUMP CONNECTION WIRING (OPTION) 11 [EN] 17. WARRANTY AND CUSTOMER SERVICE There is a two year warranty on your dehumidifier from the date of purchase. All material or manufacturing defects will be repaired free of charge. The following applies: Any repairs or replacement of components during the warranty period will not result in an extension of the warranty period. The warranty will expire if any alterations have been made, not genuine components have been fitted or if the dehumidifier has been repaired by a third party. Components subject to normal wear and tear, such as the air filter, are not covered by the warranty. The warranty is only valid on presentation of the original, unaltered, and date-stamped purchase receipt. The warranty does not cover damage caused by actions that deviate from those as described in the user’s manual or by neglect. All claims for compensation, including consequential damage, will not be entertained. To prevent unnecessary expenses, we recommend that you always carefully read the user’s manual first. If this does not provide a solution, call Meaco and we will be happy to help. This appliance is not intended for use by person (including children) with reduced physical, sensory or mental capabilities, or lack of experience and knowledge, unless they have been given supervision or instruction concerning use of the appliance by a person responsible for their safety. Children should be supervised to ensure that they do not play with the appliance. This dehumidifier has been imported into the U.K. by; Meaco (U.K.) Limited Meaco House Parklands Railton Road Guildford GU2 9JX Telephone: Email: Website: Fax: Please record, for future reference, your date of purchase and where you bought the dehumidifier from here. Date of purchase…………………..………….. Purchased from www.meaco.com (if not then please record the supplier’s name below). 01483 234900 [email protected] www.meaco.com 01483 232700 …………………………………………………….. Meaco are specialists in dehumidifiers and would welcome your comments and questions on this dehumidifier. If you do develop a fault within the first year then please do call us and if we cannot fix the problem over the phone we will be happy to collect the dehumidifier from you at our expense and repair or replace as appropriate. Please save the box just in case this happens. Meaco 02/14 – version 1.0 12 [EN]