1
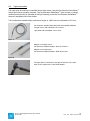
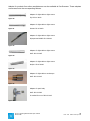
Operating Manual MICROPERC® - ALL SEEING NEEDLE – 10,000 pixel, semi-rigid optic PD-PN-0080 Modular, semi-rigid endoscopy system for: Micro PCNL 0483 PH 01.2 Operating Manual PCNL Optic modular PD-PN-0080 1 Rev.: 004 Date: June 06, 2012 All rights reserved. This operating manual contains information that is protected by the manufacturer. It is prohibited to copy this operating manual and to take sections of the text or duplicates without prior written permission by POLYDIAGNOST GmbH. The manufacturer reserves the right to make changes and updates to the manual. Due to the continued development of our products, it is possible that technical specifications or images in this operating manual do not correspond to the current state of production. As manufacturer of the endoscopes, POLYDIAGNOST GmbH assumes no responsibility whatsoever for any damages to the devices, nor for damages caused by the faulty use of the endoscope and by not adhering to this operating manual. Service and repair work on the devices may only be carried out by the manufacturer or by a maintenance company authorized and appointed by POLYDIAGNOST GmbH. Opening the instruments or having repairs carried out by non-authorized persons will void all safety and warranty claims. POLYDIAGNOST GmbH POLYDIAGNOST Entwicklungs-, Produktions-, Vertriebs- und Servicegesellschaft für medizinelektronische Diagnostik- und Therapiegeräte mbH Schäfflerstr. 13 D-85276 Pfaffenhofen / Ilm www.polydiagnost.com [email protected] PH 01.2 Operating Manual PCNL Optic modular PD-PN-0080 Tel.: Fax: +49 84 41 / 80 60 – 0 +49 84 41 / 80 60 – 60 2 Rev.: 004 Date: June 06, 2012 Table of Contents Page 1 Safety...................................................................................................................... 5 1.1 Intended application .................................................................................................. 5 1.2 Operating manual ...................................................................................................... 5 1.3 Compatibility with other devices .................................................................................. 5 1.4 Important information ................................................................................................ 5 1.5 On receiving the modular PCNL optic ........................................................................... 5 1.6 Reconditioning and storage......................................................................................... 6 1.7 Sterile packaged products ........................................................................................... 6 1.8 Repair / exchange ...................................................................................................... 6 1.9 Compatibility ............................................................................................................. 6 2 Specifications ......................................................................................................... 7 3 Product description ................................................................................................ 8 4 Technic ................................................................................................................. 10 4.1 Camera system ........................................................................................................ 10 4.2 Irrigation pump ....................................................................................................... 11 4.3 Labeling .................................................................................................................. 12 5 Set up of the system ............................................................................................ 13 5.1 Preparation of the MICROPERC® system – All Seeing Needle - ....................................... 13 5.2 Laser stone management through the working shaft of the All Seeing Needle ............... 16 5.3 Shock wave Lithotripsy ............................................................................................. 18 5.4 How to proceed with the 8 F or 10.5 F working shaft .................................................. 20 5.5 1 LithoClast® Probe.................................................................................................... 21 5.6 1 LithoClast® Master Probe ......................................................................................... 22 6 Preparation for the use of the endoscopy system .............................................. 24 6.1 3-joint arm .............................................................................................................. 24 6.2 Exchangeable ocular ................................................................................................ 25 6.3 Connection of ocular and camera .............................................................................. 26 6.4 Ligth connection ...................................................................................................... 27 6.5 The complete installed image transmission system ..................................................... 29 7 Operation of the endoscopy system ........................................................................... 30 7.1 Preparation of the modular endoscope....................................................................... 30 7.2 Inspection of the modular endoscope ........................................................................ 30 7.3 Basic equipment ...................................................................................................... 30 7.4 Checking the endoscopic image................................................................................. 30 8 Troubleshooting ................................................................................................... 31 8.1 Occurrence of an error ............................................................................................. 31 8.2 Sending endoscope / instrument in for repair ............................................................. 31 PH 01.2 Operating Manual PCNL Optic modular PD-PN-0080 3 Rev.: 004 Date: June 06, 2012 9 Instructions for reconditioning ........................................................................... 32 9.1 General statement ................................................................................................... 32 9.2 Safety information ................................................................................................... 32 9.2.1 Basics ..................................................................................................................... 32 9.2.2 Terminology ............................................................................................................ 33 9.2.3 Causes of a faulty reconditioning ............................................................................... 33 9.3 Cleaning, disinfection and sterilization........................................................................ 33 9.3.1 Basics ..................................................................................................................... 33 9.3.2 Precautionary measures ........................................................................................... 34 9.3.3 Reconditioning overview ........................................................................................... 35 9.3.4 Pre-cleaning immediately after the examination .......................................................... 35 9.3.5. Manual cleaning and disinfection ............................................................................... 36 9.3.6. Machine cleaning and disinfection (disinfector) ........................................................... 38 9.3.7 Sterilization ............................................................................................................. 40 9.3.8 Material compatibility ............................................................................................... 41 9.4 Storage of modular optic and accessories................................................................... 43 9.5 Service life .............................................................................................................. 44 10 Transporting the endoscope ................................................................................ 44 10.1 Transport inside the hospital ..................................................................................... 44 10.2 Transport outside the hospital ................................................................................... 44 10.3 Transporting the endoscope by using a shipping company / transport company ............ 44 11 Certificates ........................................................................................................... 45 PH 01.2 Operating Manual PCNL Optic modular PD-PN-0080 4 Rev.: 004 Date: June 06, 2012 1 Safety 1.1 Intended application For endoscopic therapy of kidney stones. 1.2 Operating manual Before using the endoscope, please thoroughly read the operating manual as well as the operating manuals of all other necessary devices that are to be used during the examination. The different endoscopic procedures and the medical aspects of endoscopy are not a part of these instructions. Keep the operating manual in a safe, easily accessible place. If you have questions or suggestions about the content of this operating manual, please contact the company POLYDIAGNOST or its distribution partners. 1.3 Compatibility with other devices The safe operation of endoscopy devices depends in large part on the correct selection of other devices. The combination with any devices other than the recommended ones can lead to an impairment of safety and performance. 1.4 Important information The user has to check and decide whether the endoscope is the right model for the intended examination. A prerequisite for the safety of patients is the proper handling of the endoscope by the doctor and the medical personnel. Examples of improper behavior: Using insufficiently prepared or wrongly stored devices increases the risk of infection of the patient and personnel. Forcing the endoscope forwards or backwards without a clear endoscopic view can lead to injury to the patient. The insertion and / or use of endoscopic accessories without a clear endoscopic view can lead to injury to the patient. 1.5 On receiving the modular PCNL optic Check the modular endoscope for damages and for proper functionality. Do not use the modular endoscope if there are any visible damages and / or if the functionality is not guaranteed. If you notice any irregularities, please contact your POLYDIAGNOST customer representative. WARNING: The endoscope was not sterilized or disinfected before delivery. It must be cleaned and disinfected / sterilized before every use, as described in the corresponding chapter of the manual. PH 01.2 Operating Manual PCNL Optic modular PD-PN-0080 5 Rev.: 004 Date: June 06, 2012 1.6 Reconditioning and storage After use, recondition the endoscope and store it according to the general guidelines. (See chapter “Instructions for reconditioning”.) Insufficient reconditioning can create an infection risk and cause damage to the device. Attention: The optic is not autoclavable. Autoclaving will damage the optic. 1.7 Sterile packaged products When using sterile packaged products, make sure that the sterile packaging is undamaged. If the packaging is damaged, the products may not be used. 1.8 Repair / exchange This endoscope contains no parts to be serviced by the user. Do not make any changes to the endoscope or attempt to repair it, as this can lead to putting the patient at risk or can damage the device. (See chapter “Troubleshooting”.) 1.9 Compatibility Our products may contain nickel and / or latex. Care must be taken in case of relevant allergies. In such cases, the use of the device is up to the doctor’s judgment. PH 01.2 Operating Manual PCNL Optic modular PD-PN-0080 6 Rev.: 004 Date: June 06, 2012 2 Specifications Figure 1 - PCNL optic with protective tube for optic 10,000 pixel optic, 120° Article number: PD-PN-0080 Exterior diameter: 0.9 mm Image control system: 10,000 pixel Viewing direction: 0°, direct view Field of vision: 120° Optic length: Standard light connection: 272 mm ACMI adapter Integrated fiber-optic lighting Reinforced nitinol optic Operating conditions Room temperature Rel. humidity Air pressure PH 01.2 Operating Manual PCNL Optic modular PD-PN-0080 10 – 40 C (50 – 104 F) 30 – 85% 700 – 1060 mbar 7 Rev.: 004 Date: June 06, 2012 3 Product description 3.1 The needed parts The system consists out of 13 parts, which all have to be placed at the table before examination. 10,000 pixel Optic (PD-PN-0080) reusable Figure 2 Shifter 26 mm (PD-DS-1210) autoclavable Figure 3 All Seeing Needle 5 F (PD-PN-0015) exterior diameter: 1.65 mm sterile (single-use) Figure 4 T-Piece 3-port (PD-CA-0205) for All Seeing Needle sterile (single-use) Figure 5 3–way Stopcock sterile (single-use) Figure 6 Perfusion Tube (PD-CA-0201) sterile (single-use) Figure 7 PH 01.2 Operating Manual PCNL Optic modular PD-PN-0080 8 Rev.: 004 Date: June 06, 2012 3-port LuerLock (PD-CA-0607) for the shaft of All Seeing Needle and 8 F working shaft sterile (single-use) Figure 8 Touhy Borst Adapter (PD-CA-0112) for fixation of the laser fiber sterile (single-use) Figure 9 8 F Working Shaft (PD-PN-0005) exterior diameter: 2.65 mm autoclavable Figure 10 10.5 F Working Shaft (PD-PN-0020) exterior diameter: 3.47 mm autoclavable Figure 11 2-port Adapter for 10.5 F working shaft (PD-PN-0030) autoclavable Figure 12 Lunderquist Guide Wire (PD-PN-0010) sterile (single-use) Figure 13 PH 01.2 Operating Manual PCNL Optic modular PD-PN-0080 9 Rev.: 004 Date: June 06, 2012 4 Technic 4.1 Camera system EndoGnost RA 100 The compact version of the POLYDIAGNOST endoscopy tower includes: Camera Xenon Ligthsource 15” Monitor Digital USB-Stick Recorder (video and pictures) Figure 14 POLYDIAGNOST 3-Joint-Arm It holds the camera outside the sterile area. Figure 15 The ocular fix-focus (PD-FS-4001) has to be fixed on the upper side of the 3-Joint-Arm. Figure 16 PH 01.2 Operating Manual PCNL Optic modular PD-PN-0080 10 Rev.: 004 Date: June 06, 2012 4.2 Irrigation pump POLYDIAGNOST Irrigation Pump IP 200 (PD-IP-0100 / 230 V) (PD-IP-0110 / 110 V) Figure 17 Irrigation Tube for IP 200 (PD-IP-0120) sterile (single-use) Figure 18 Spike for the Irrigation Solution Bag (PD-IP-0121) sterile (single-use) Figure 19 PH 01.2 Operating Manual PCNL Optic modular PD-PN-0080 11 Rev.: 004 Date: June 06, 2012 4.3 Labeling The respective serial number, manufacturer and CE-label are indicated on the body of the optic and the exchangeable oculars. Serial number Manufacturer CE-label Figure 20 Serial number and CE-label Figure 21 Manufacturer Figure 22 PH 01.2 Operating Manual PCNL Optic modular PD-PN-0080 12 Rev.: 004 Date: June 06, 2012 5 Set up of the system 5.1 Preparation of the MICROPERC® system – All Seeing Needle – remove protection tube from the optic Figure 23 provide the shifter Figure 24 and move it with open screw over the optic Figure 25 The needle has to be placed in the shaft (cone-shaped connection) Figure 26 and connected with slight twisting. Figure 27 connect T-piece (a) a Figure 28 PH 01.2 Operating Manual PCNL Optic modular PD-PN-0080 13 Rev.: 004 Date: June 06, 2012 adapt stopcock (b) on T-piece b Figure 29 now insert the optic into the needle Figure 30 connect shifter with T-piece with gentle twisting Figure 31 adapt irrigation tube at the stopcock Figure 32 Finally adjust the distal end of the optic to the cone end of the needle by using the shifter. Figure 33a optic Figure 33b PH 01.2 Operating Manual PCNL Optic modular PD-PN-0080 14 Rev.: 004 Date: June 06, 2012 the stopcock allows irrigation Figure 34 and injection of contrast medium Figure 35 Important: a) Adjust „up – down” position of the endoscopic picture on screen through rotating the camera head at the ocular. b) Irrigate the All Seeing Needle completely before placing into the patient. Figure 36 - Insertion of the All Seeing Needle under US-Control PH 01.2 Operating Manual PCNL Optic modular PD-PN-0080 15 Rev.: 004 Date: June 06, 2012 5.2 Laser stone management through the working shaft of the All Seeing Needle remove stilett including optic out of the working shaft (The working shaft remains inside the patient.) Figure 37 remove the optic out of the stilett Figure 38 now move the optic through the middle port of the 3-port adapter Figure 39 Very, very important: a move finally the optic as far as possible out of the shifter and fix the optic with the screw (a). Figure 40 place the optic with the 3-port adapter in the working shaft and connect it with the rotating LuerLock Figure 41 PH 01.2 Operating Manual PCNL Optic modular PD-PN-0080 16 Rev.: 004 Date: June 06, 2012 the stopcock for irrigation has to be connected at one sideport Touhy Borst adapter has to be connected with the other sideport Figure 42 Insert the laser fiber in the Touhy Borst adapter and keep the adapter so much closed that no irrigation solution flows out of it and the laser fiber can still become shiftet smoothly. Figure 43 Laser fibers up to an outer diameter of 350µm can be used. PH 01.2 Operating Manual PCNL Optic modular PD-PN-0080 17 Rev.: 004 Date: June 06, 2012 5.3 Shock wave Lithotripsy If the use of 1LithoClast® or a similar product is scheduled the 8 F working shaft must be used: LithoClast® Probe exterior diameter: 1 mm Figure 44 8 F Working Shaft (PD-PN-0005) exterior diameter: 2.65 mm Figure 45 Stopcock Figure 46 3-port LuerLock (PD-CA-0607) for the shaft of All Seeing Needle and 8 F working shaft Figure 47 Touhy Borst Adapter (PD-CA-0112) for fixation of the LithoClast® Probe Figure 48 PH 01.2 Operating Manual PCNL Optic modular PD-PN-0080 18 Rev.: 004 Date: June 06, 2012 If the use of 1LithoClast® Master or a similar product is scheduled the 10.5 F working shaft must be used: LithoClast® Master Probe exterior diameter: 1.9 mm Figure 49 10.5 F Working Shaft (PD-PN-0020) exterior diameter: 3.47 mm Figure 50 2-port Adapter for PCNL 10.5 F working shaft (PD-PN-0030) Figure 51 T-Piece 3-port (PD-CA-0205) for All Seeing Needle Figure 52 Touhy Borst Adapter (PD-CA-0112) for fixation of the LithoClast® Master Probe Figure 53 1 LithoClast® and LithoClast® Master are registered tradenames of EMS Switzerland. PH 01.2 Operating Manual PCNL Optic modular PD-PN-0080 19 Rev.: 004 Date: June 06, 2012 5.4 How to proceed with the 8 F or 10.5 F working shaft Take the Lunderquist Guide Wire and move it under X-ray control into the working shaft of the All Seeing Needle which is placed inside the patient. Figure 54 move then the needle out Figure 55 and move careful the 8 F or 10.5 F working shaft over the guide wire Figure 56 remove finally the obturator and guide wire Figure 57a Figure 57b PH 01.2 Operating Manual PCNL Optic modular PD-PN-0080 20 Rev.: 004 Date: June 06, 2012 5.5 1 LithoClast® Probe Move the optic incl. shifter through the side-port of the 3-port adapter. A And take care that the optic is moved as far as possible backwards (A). Figure 58 adapt stopcock and perfusion tube Figure 59 now move the system inside the 8 F working shaft Figure 60 finally adapt the closed Touhy Borst adapter on the middle-port Figure 61 PH 01.2 Operating Manual PCNL Optic modular PD-PN-0080 21 Rev.: 004 Date: June 06, 2012 Control the correct length of the optic (distal end of the shaft) on the screen. After having a good view insert the LithoClast ® Probe. Figure 62 5.6 1 LithoClast® Master Probe If the use of 1LithoClast® Master is scheduled the use of the 10.5 F working shaft is required: Insert this like descriped under 5.4 on page 19 from the manual. Figure 63a Figure 63b Figure 63c insert the optic incl. shifter through the side-port Figure 64 PH 01.2 Operating Manual PCNL Optic modular PD-PN-0080 22 Rev.: 004 Date: June 06, 2012 adapt the T-piece with stopcock and Touhy Borst adapter at the straight channel Figure 65 now move the system inside the 10.5 F working shaft Figure 66a Figure 66b finally insert the 1LithoClast® Master Probe through the Touhy Borst adapter Figure 67 PH 01.2 Operating Manual PCNL Optic modular PD-PN-0080 23 Rev.: 004 Date: June 06, 2012 6 Preparation for the use of the endoscopy system Carefully read the operating manual for every accessory device and prepare the device according to the respective specifications. 6.1 3-joint arm 3-joint arm: PD-AC-0096 D B consisting of: C A Table clamp: PD-AC-0101 B Vario arm: PD-AC-0102 C Camera support: PD-AC-0103 with mounting for ocular and mounting mechanism for light adapter (POLYSCOPE) D Ocular mounting: PD-AC-0114 A Figure 68 Assembly: 1 1 2 A 2 A 3 Turn lever A counter-clockwise to attach the clamp to the device rack. Turn lever A clockwise to tighten the clamp. Loosen screw B. Push button C and slide the Vario arm into opening D. Tighten screw B again. 3 C D The position of the 3-joint arm can be fixed with the help of the lever on the Vario arm. B Figure 69 Important: Check the safe assembly of the 3-joint arm on the device rack or another safe location selected and checked by clinic personnel. PH 01.2 Operating Manual PCNL Optic modular PD-PN-0080 24 Rev.: 004 Date: June 06, 2012 6.2 Exchangeable ocular The endoscope is supplied without an ocular. Following exchangeable ocular is available: Fix-focus ocular black: PD-FS-4001 Figure 70 Fastening of the exchangeable ocular on the 3-joint arm: Ocular mounting fixed on camera support. Figure 71 Exchangeable ocular fixed in ocular mounting. Figure 72 Important: Make sure that both screws are fastened tightly. Always mount the exchangeable ocular on the top of the camera support. This reduces the danger of the ocular falling if the screws are not properly fixed. PH 01.2 Operating Manual PCNL Optic modular PD-PN-0080 25 Rev.: 004 Date: June 06, 2012 6.3 Connection of ocular and camera The exchangeable oculars are connected to the TV adapter (PD-VC-1002) of the POLYDIAGNOST camera ENDOGNOST® CS 207 (PD-VC-0210) (or other medically permitted cameras). The oculars have a standard ocular cup of 32 mm diameter and are connected to the CCD camera via the TV-adapter with a 35 mm focal length as follows. Connect the TV adapter including camera head to the exchangeable ocular. Open the snap fixture. Figure 73 Mounted TV adapter including camera head. Figure 74 Adapting the ocular with the optic body: Turn the opening ring of the ocular towards “unlock”. Hold the ring in this position and push the optic body into the ocular. Figure 75 Now turn the spring-controlled ring of the ocular back towards “lock”. Figure 76 PH 01.2 Operating Manual PCNL Optic modular PD-PN-0080 26 Rev.: 004 Date: June 06, 2012 6.4 Light connection The optic must be used with a certified Xenon light source (see also POLYDIAGNOST ENDOGNOST® Xenon light source operating manual). The POLYDIAGNOST ENDOGNOST® light sources (or similar certified products) can be operated at full light intensity, since the POLYDIAGNOST ENDOGNOST® camera is equipped with a fast shutter. THE POLYDIAGNOST standard light cable has a length of 1,800 mm and a diameter of 4.9 mm. POLYDIAGNOST standard light cable with exchangeable adapters for light source and endoscope: PD-LC-3001 Light cable without adapter: PD-LC-2001 Figure 77 Adapter to the light source: POLYDIAGNOST standard adapter: Storz PD-LC-9001 Adapter to the endoscope: POLYDIAGNOST standard adapter: ACMI PD-LC-9101 Figure 78 The light cable is connected to the light connection of the optic body via the snap fixture of the ACMI adapter. Figure 79 PH 01.2 Operating Manual PCNL Optic modular PD-PN-0080 27 Rev.: 004 Date: June 06, 2012 Adapter for products from other manufacturers are also available at POLYDIAGNOST. These adapters are screwed onto the corresponding fixtures. Adapter for light cable to light source Figure 80 Fuji: PD-LC-9002 Adapter for light cable to light source Figure 81 Pentax: PD-LC-9003 Adapter for light cable to light source Olympus and ACMI: PD-LC-9004 Figure 82 Adapter for light cable to light source Wolf: PD-LC-9005 Figure 83 Adapter for light cable to light source Stryker: PD-LC-9006 Figure 84 Adapter for light cable to endoscope Wolf: PD-LC-9103 Figure 85 Adapter for optic body Wolf: PD-LC-9502 Is needed for use of PD-LC-9103 Figure 86 PH 01.2 Operating Manual PCNL Optic modular PD-PN-0080 28 Rev.: 004 Date: June 06, 2012 Adapter for light cable to endoscope Storz: PD-LC-9104 Figure 87 Adapter for optic body Storz: PD-LC-9503 Is needed for use of PD-LC-9104 Figure 88 Example: Storz adapter set Consists of PD-LC-9503 and PD-LC-9104 Figure 89 6.5 The complete installed image transmission system A B C A B C D E Camera head with TV adapter Exchangeable ocular Optic Light cable 3-joint arm D E Figure 90 Attention: The TV adapter can be placed in disinfectant solution. The camera head can not be placed in disinfectant solution. It is held by the 3-joint arm and is thus outside of the possibly prescribed sterile area. PH 01.2 Operating Manual PCNL Optic modular PD-PN-0080 29 Rev.: 004 Date: June 06, 2012 7 Operation of the endoscopy system → Endoscopic procedures and the medical aspects of endoscopy are not a part of this operating manual. 7.1 Preparation of the modular endoscope Make sure that the endoscope was cleaned, disinfected and sterilized before use, as described in the chapter “Instructions for reconditioning”. 7.2 Inspection of the modular endoscope Before every use, check the endoscope for recognizable damages and functionality. Examine the device visually to make sure it is in perfect condition and check the image quality of the ocular, together with the endoscope. Do not use the endoscope if you notice irregularities, if there are any visible damages and / or if the functionality is not guaranteed. WARNING The use of a defective or imperfectly functioning endoscope can form a hazard to the safety of the patient. 7.3 Basic equipment X Monitor X Video camera X Xenon light source X USB-Stick recorder EndoGnost RA 100 POLYDIAGNOST compact video tower Figure 91 X 3-joint arm Carefully read the operating manual for every accessory device and prepare the device according to the respective specifications. 7.4 Checking the endoscopic image Switch on the video camera, light source and monitor and check the endoscopic image. After switching on the entire system (camera / light source / monitor), switch the light source to the highest intensity. Hold the distal end of the PCNL optic approx. 5 cm above a white surface and adjust the white balance with the help of the corresponding switch on the camera. Then hold the distal end of the optic at the same distance above a “colorful graphic” and adjust the focus with the adjustable ring on the TV adapter. At the same time, check the color fidelity. PH 01.2 Operating Manual PCNL Optic modular PD-PN-0080 30 Rev.: 004 Date: June 06, 2012 If the image is cloudy, clean the lens of the ocular with a cotton swab soaked in 70% alcohol (ethanol or isopropanol). If the endoscopic image disappears on the monitor during the examination, there are three possible causes: 1) The camera is defective – or there is an operating error 2) The light source is defective – or there is an operating error 3) If the diagnostic image disappears and instead a “crystal-structured image” appears on the monitor, this indicates a defect in the fiber-optic system. This does not pose a risk to the patient. Remove the endoscope by slowly pulling it out. Conclude the examination and inform the POLYDIAGNOST service. 8 Troubleshooting 8.1 Occurrence of an error If the endoscope does not work perfectly, check the endoscope, as described in the chapter “Operation of the endoscopy system”. If the problem can not be eliminated, please consult your technician or your POLYDIAGNOST customer representative. If the endoscope is obviously damaged, please consult your POLYDIAGNOST customer representative. ATTENTION: Repairs or changes that were not carried out by PolyDiagnost lead to the voiding of all warranty claims. POLYDIAGNOST assumes no warranty for the functionality of endoscopes, devices or instruments whose repair was not carried out by POLYDIAGNOST. POLYDIAGNOST assumes no liability for injuries or damages that occur after repair attempts that were not carried out by POLYDIAGNOST. 8.2 Sending endoscope / instrument in for repair Before sending in the endoscope or instrument, please request a repair authorization number from our POLYDIAGNOST customer representative. You can send the endoscope / instrument in for repairs using this repair authorization number. Please include a description of the error and the phone number of the contact person with the shipment. Important: Endoscopes, instruments and devices must be thoroughly cleaned and disinfected / sterilized before they are sent in for repair. Include a written confirmation. Insufficiently reconditioned devices represent an infection risk for anyone who comes into contact with them. That is why we reserve the right not to accept contaminated endoscopes, instruments and devices. PH 01.2 Operating Manual PCNL Optic modular PD-PN-0080 31 Rev.: 004 Date: June 06, 2012 9 Instructions for reconditioning 9.1 General statement With regard to decontamination, different requirements apply in different parts of the world. One also has to be aware that in some countries the law requires that all used endoscopes and instruments must be guaranteed to be free of prions. RKI guidelines: The Robert-Koch-Institute (RKI) has published guidelines for the preparation of applied medical products. All instructions for reconditioning published by the company POLYDIAGNOST are subject to the guidelines of the RKI. First, a brief overview of the required processing steps from the RKI guidelines: Proper preparation (gathering, possibly disassembling, pre-treating and pre-cleaning) of the used medical products and their transport to the location of the preparation, safely enclosed and in a way that avoids damages, Cleaning, disinfection, irrigation and drying, Checking for cleanliness and sound condition of the surfaces (e. g. corrosion, material quality) and possibly identification for the purpose of making a decision about a reconditioning, Care and maintenance, Verification of the technical/functional safety, Labeling, Packaging and sterilization, Storage. 9.2 Safety information 9.2.1 Basics This operating manual contains information that is necessary and unavoidable for the safe and effective reconditioning of the endoscope and its accessories. Read this operating manual carefully and follow the instructions. Keep all operating manuals in a safe, easily accessible place. All persons responsible for the reconditioning must be trained thoroughly in: - the the the the the the reconditioning procedures that are used work safety regulations national and local hospital guidelines operating manual function of the endoscopy equipment labeling of disinfectants PH 01.2 Operating Manual PCNL Optic modular PD-PN-0080 32 Rev.: 004 Date: June 06, 2012 9.2.2 Terminology Microorganisms Bacteria, yeasts, fungi and viruses Microorganisms may not be found on surgical instruments and endoscopes (infection risk) Cleaning Physical/chemical elimination of impurities (including organic substances) Disinfection Reduction of the number of microorganisms with the objective of having as few microorganisms as possible survive (“low-germ” = product of low microbiological contamination) Sterilization Reduction of the number of microorganisms with the objective of having no microorganisms survive (sterile product) Sterile Absence of viable microorganisms (very high certainty that less than one microorganism will survive on a million products) 9.2.3 Causes of a faulty reconditioning Medical literature reports about patients’ infection and contamination with the following causes: Rushing the reconditioning procedure or aborting it altogether Not adhering to mandatory prescribed concentrations and application times Use of unsuitable chemicals Incompatible cleaning and disinfectant solution Misjudging the consequences that may occur as a result of improper reconditioning Insufficiently reconditioned and prepared devices and/or cleaning, disinfectant solutions (pay attention to holding times!) 9.3 Cleaning, disinfection and sterilization 9.3.1 Basics Effective pre-cleaning, cleaning and disinfection are an indispensable prerequisite for an effective sterilization of POLYDIAGNOST endoscopes and accessories. Make sure that only cleaning, disinfection and sterilization procedures that are sufficiently validated with regard to devices and products are used, and that the validated parameters are adhered to in every cycle. Also make sure that the regulations of the hospital and the manufacturer of the cleaning products and disinfectants, the disinfectors and the sterilizers, as well as the statutory provisions applicable in your country are adhered to. This applies in particular for the different specifications with regard to an effective prion inactivation. PH 01.2 Operating Manual PCNL Optic modular PD-PN-0080 33 Rev.: 004 Date: June 06, 2012 WARNING: The endoscope was not sterilized or disinfected before delivery. It must be cleaned and disinfected / sterilized before every use. ATTENTION: In case of thermostable devices and instruments, the autoclaving of gas sterilization is to be preferred. 9.3.2 Precautionary measures ATTENTION If the endoscopic devices are not cleaned and disinfected or sterilized according to regulations, then this can pose a risk to the safety of the patient. During application, the endoscope comes into contact with mucous membranes. To contain the risk of a transfer of diseases as much as possible, the endoscope must always be subjected to a thorough cleaning after every examination, followed by a disinfection and/or sterilization. If the cleaning is omitted, then this undermines the effectiveness of disinfection and sterilization. Endoscopes and accessories must be cleaned as thoroughly as possible before disinfection or sterilization. Thorough cleaning reduces the number of microorganisms present, eliminates organic materials and thus supports the effectiveness of the disinfection or sterilization procedure. For the mechanical cleaning of openings and channels, POLYDIAGNOST makes corresponding cleaning brushes available for the different channel diameters. Contact your POLYDIAGNOST representative. The contact with secretions of the patient and reconditioning chemicals can pose a danger to your health. During reconditioning, always wear the prescribed protection gear, as specified in the hospital or national regulations. Suitable protection gear is: protective goggles, face guard, moisture-resistant protective clothing or lab coat (note: soiled lab coats must be taken off before leaving the reconditioning area), chemical-resistant, water-proof gloves that are the right size and sufficiently long. Gloves must be exchanged and disposed of on a regular basis. Irrigate the channels thoroughly and carefully. To be free of disinfectants, all internal channels of the working shafts, 2-port adapter for PCNL shafts and the shifter must be irrigated thoroughly with sterile or low-germ distilled or de-ionized water. This prevents the next patient from being exposed to residues of disinfectants. Make sure that the reconditioning area is sufficiently ventilated, as specified in the hospital or national work safety regulations. Sufficient ventilation (at least eight to ten air changes per hour) reduces chemical fumes. For the drying or irrigation of the channels with air or liquid, do not use pressures greater than 50 kPa, otherwise the channels can be damaged. PH 01.2 Operating Manual PCNL Optic modular PD-PN-0080 34 Rev.: 004 Date: June 06, 2012 9.3.3 Reconditioning overview after examination pre-cleaning in examination room cleaning / disinfection in preparation room manual cleaning / disinfection machine cleaning / disinfection testing / maintenance packaging sterilization storage 9.3.4 Pre-cleaning immediately after the examination A pre-cleaning has to take place immediately after the examination, while the device is still in the examination room. This is the only way to prevent the depositing of organic material can be prevented and to guarantee successful sterilization. 1. Remove all instruments, valves and caps from the working channels. 2. Dispose all of the disposables. 3. Clean the exterior surfaces of the endoscopy system with a soft cloth or sponge soaked in disinfectant. 4. Disassemble the modular endoscopy system into its individual parts: optic, shifter, working shafts and adapter. 5. Irrigate all internal channels of the working shafts, 2-port adapter for PCNL shafts and of the shifter with disinfectants. 6. Clean the lens (distal end) of the PCNL optic by lightly rubbing it with a damp swab. PH 01.2 Operating Manual PCNL Optic modular PD-PN-0080 35 Rev.: 004 Date: June 06, 2012 7. Place the optic protection tube onto the modular PCNL optic. 8. Then irrigate with disinfectant solution, see figure 92. Figure 92 The cleaning and disinfection must take place immediately after the application and the precleaning. This is where different procedures can be used: - Machine procedure (disinfector) or - Manual procedure (placing device in cleaning products and disinfectants). Note: Due to the low reproducibility and effectiveness a manual cleaning and disinfecting should only take place if no disinfector is available. 9.3.5. Manual cleaning and disinfection When selecting the cleaning products and disinfectants, care must be taken that - the disinfectant has a verified effectiveness (e. g. DGHM/ÖGHMP or FDA certification or CE-label) - the cleaning product is compatible with the used disinfectant - the used chemicals are compatible with the POLYDIAGNOST endoscopy devices and accessories Important: The concentrations and application times indicated by the manufacturer of the cleaning product or disinfectant must be absolutely adhered to. When irrigating after disinfection only use sterile or low-germ (max. 10 germs/ml) distilled or deionized water. PCNL optic, endoscopy accessories and other parts should not be placed in physiological saline solution and should not be cleaned in ultrasonic bath. This immediately leads to damages on the endoscope and its accessories. Only freshly produced cleaning, disinfection and irrigation solutions may be used, and they may not be used more than once. To clean the surfaces and internal channels, do not use brushes or sponges made of metal, as this can cause damages. PH 01.2 Operating Manual PCNL Optic modular PD-PN-0080 36 Rev.: 004 Date: June 06, 2012 Cleaning: 1. Fill a basin with the cleaning solution. 2. Place the disassembled POLYDIAGNOST endoscopy system into the cleaning solution. The endoscope must be completely submerged. Place PCNL optic with protective tube in place (as depicted) into cleaning solution. A syringe filled with cleaning products or disinfectants is placed on the Luer Lock of the protective tube and the tube with optic inside is irrigated multiple times. Figure 93 3. Clean the exterior surfaces of the endoscopy system with a soft cloth or sponge. 4. Clean the internal channels of the working shafts, 2-port adapter for PCNL shafts and shifter multiple times with the respectively suitable cleaning brushes inside the cleaning basin. Always brush from the proximal end to the distal end. 5. Make sure that the cleaning solution does not foam too much (reduced cleaning effectiveness). 6. Irrigate all channels forcefully and thoroughly with cleaning solution at least five times (singleuse syringe). 7. Take the endoscopy system out of the cleaning bath as soon as the application time recommended by the manufacturer of the cleaning product has passed. 8. Next, irrigate all channels at least five times using sterile or low-germ distilled or de-ionized water (single-use syringe). Duration per irrigation cycle at least 1 minute. 9. Next, dry all channels by blowing medically clean compressed air through. Disinfection: 1. Fill a basin with the disinfectant solution. 2. Place the disassembled POLYDIAGNOST endoscopy system into the disinfectant solution. The endoscope must be completely submerged. (see also figure 93) 3. Disinfect the exterior surfaces of the endoscopy system with a soft cloth or sponge. 4. Irrigate all channels thoroughly with disinfectant solution at least five times (single-use syringe). 5. Take the endoscopy system out of the disinfection bath as soon as the application time recommended by the manufacturer of the disinfection product has passed. 6. Next, irrigate all channels at least five times using sterile or low-germ distilled or de-ionized water (single-use syringe). Duration per irrigation cycle at least 1 minute. 7. Next, dry all channels by blowing medically clean compressed air through. PH 01.2 Operating Manual PCNL Optic modular PD-PN-0080 37 Rev.: 004 Date: June 06, 2012 The fundamental suitability of the POLYDIAGNOST endoscopy devices for an effective manual cleaning and disinfection was verified by an independent test lab, using the cleaning product CIDEZYME1 (application concentration 1.6 %, application time 5 min) and the disinfectant CIDEX1 (undiluted, activated solution, application time 30 min). The procedure described above was taken into account during this. 1 Johnson & Johnson Medical GmbH, Norderstedt 9.3.6. Machine cleaning and disinfection (disinfector) When selecting the disinfector, care should be taken that - the disinfector has a verified effectiveness (e.g. DGHM/ÖGHMP or FDA certification or CElabel) - the disinfector has connections for the operating and irrigation channels of the POLYDIAGNOST endoscopy system - only sterile or low-germ (max. 10 germs/ml) distilled or de-ionized water is used for irrigation. - that the disinfector is maintained and inspected on a regular basis. When selecting the disinfection program, care should be taken that - for thermolabile products, the corresponding program is selected - the irrigation pressures used for the operating and irrigation channels are not too high (see 9.3.2 Precautionary measures: do not use pressures greater than 50 kPa) - the program contains sufficient irrigation cycles. When selecting the used cleaning products and disinfectants, care must be taken that - the disinfectant has a verified effectiveness (e. g. DGHM/ÖGHMP or FDA certification or CElabel) - the cleaning product is compatible with the used disinfectant, and - the used chemicals are compatible with the POLYDIAGNOST endoscopy devices and accessories. Important: The concentrations and application times indicated by the manufacturer of the cleaning product or disinfectant must be absolutely adhered to. When irrigation after the disinfection only use sterile or low-germ (max. 10 germs/ml) distilled or de-ionized water. PH 01.2 Operating Manual PCNL Optic modular PD-PN-0080 38 Rev.: 004 Date: June 06, 2012 Important: Even when using machine cleaning and disinfection, a manual pre-cleaning must endoscope and endoscopic accessories must take place according to RKI guidelines. For this, follow steps 1 to 9 of the “Cleaning” section in chapter “9.3.5 Manual cleaning and disinfection”. Only once this is done should you proceed as follows: 1. Place the disassembled POLYDIAGNOST endoscopy system into the disinfector using the sterilization tray. Make sure that the devices are not damaged during this. Sort instruments and accessories properly on machine-suitable instrument screens. 2. Connect the operating and irrigation channels to the connecting tubes on the disinfection basket. 3. Start the program. Note the indications by the manufacturer. 4. Remove the endoscopy system once the program has finished. 5. If necessary allow the endoscopy system to continue to dry. The fundamental suitability of the POLYDIAGNOST endoscopy devices for effective machine cleaning and disinfection was verified by an independent test lab, using the disinfector Hamo LS-20001 (program no. 89, 50 °C), the cleaning product Korsolex Endo-Cleaner2 (concentration 150 ml /30 l, application time 5 min) and the disinfectant Korsolex Endo-Disinfectant2 (concentration 300 ml/30 l, application time 10 min). The procedure described above was taken into account during this. 1 2 Hamo AG, Switzerland Bode Chemie GmbH, Hamburg After cleaning, disinfection, rinsing and drying: Check for cleanliness and sound condition of the surfaces (e. g. corrosion, material quality) and permeability of the interior channels, possibly identification for the purpose of making a decision about a repeated reconditioning or disposal, Maintenance, Verification of the technical/functional safety. PH 01.2 Operating Manual PCNL Optic modular PD-PN-0080 39 Rev.: 004 Date: June 06, 2012 9.3.7 Sterilization Only previously cleaned, disinfected and completely dried POLYDIAGNOST endoscopy devices and accessories may be sterilized. The products must be placed in the sterilization tray before sterilization. Care must be taken during this that the products are not bent or damaged. The sterilization tray is then to be packaged in a suitable sterilization packaging (single-use sterilization packaging for the intended sterilization procedure) according to DIN EN 868-2 or DIN EN ISO 11607-1. The original -sterilization tray of the POLYDIAGNOST features holding brackets to avoid mechanical damage to unfixed devices. For sterilization, only the sterilization procedure listed below are to be used; other sterilization procedures are not permissible: PCNL optic, semi-rigid (in the sterilization tray) Ethylene oxide gas sterilization (55 °C to max. 60 °C) and formaldehyde gas sterilization Shifter (PD-DS-1210); 8 F Shaft (PD-PN-0005); 10.5 F Shaft (PD-PN-0020; 2-port Adapter for PCNL Shaft (PD-PN-0030) X X with protective tube ®1 STERRAD (low-temperature plasma sterilization) with protective tube Autoclave (steam sterilization) 121 °C, 20 minutes (max. 124 °C) Autoclave (steam sterilization) 132 / 134 °C, 5 minutes (max. 137 °C) 1 registered trademarks of the corresponding manufacturers X X X X (X = permissible) ATTENTION: In case of thermostable devices and instruments, autoclaving is to be preferred to gas sterilization. Ethylene oxide (EO) – gas sterilization Only use an ethylene oxide sterilizer that meets the specifications of DIN EN 1422 and a sterilization procedure that was validated according to DIN EN ISO 11135-1. The principal proof of the suitability of the endoscopes for an effective ethylene oxide sterilization was provided by an independent test lab using the Sterivit procedure by the company DMB Apparatebau GmbH, Wiesbaden. The procedure indicated above was taken into account during this. When determining the post-run ventilation times, you must follow the specifications of DIN EN ISO 10993-7. PH 01.2 Operating Manual PCNL Optic modular PD-PN-0080 40 Rev.: 004 Date: June 06, 2012 The principal proof of a relatively low ethylene oxide residue of the used materials directly after the ethylene oxide sterilization was provided by an independent test lab using the Sterivitprocedure of the company DMB Apparatebau GmbH, Wiesbaden. The procedure indicated above was taken into account during this. Attention: Repeated ethylene oxide sterilization can reduce the service life of the endoscope. An effective and certified sterile packaging and suitable storage can prevent unnecessary repeated sterilizations. Autoclaving (steam sterilization) Only use a steam sterilizer that meets the specifications of DIN EN 285 or DIN EN 13060 and a sterilization procedure (fractionated vacuum procedure) that was validated according to DIN EN ISO 17664-1. 9.3.8 Material compatibility Due to continued advances in technical development, it is not possible to guarantee that this list is complete. That is why we recommend the tested and approved disinfectants (type 1) and cleaning products (type 2) in the following list: Manual cleaning and disinfection / sterilization: Product name Manufacturer Type ® Advanced Sterilization Products c/o Johnson & Johnson Medical GmbH 2 Cidex OPA Advanced Sterilization Products c/o Johnson & Johnson Medical GmbH 1 ® Bode Chemie GmbH 1 ® Bode Chemie GmbH 1 ® Bode Chemie GmbH 1 Sekusept Extra N ® Ecolab GmbH 1, 2 ® Ecolab GmbH 1 Sekusept Plus ® Ecolab GmbH 1, 2 Instru Plus Laboratorium Dr. rer. nat. Deppe 1 Instru Star Laboratorium Dr. rer. nat. Deppe 1, 2 Instru Zym Laboratorium Dr. rer. nat. Deppe 2 ® Schülke & Mayr GmbH 1 ® Schülke & Mayr GmbH 1 CIDEZYME ® Aseptisol Korsolex AF Korsolex Plus Sekusept Forte gigasept gigasept FF PH 01.2 Operating Manual PCNL Optic modular PD-PN-0080 41 Rev.: 004 Date: June 06, 2012 Machine cleaning and disinfection / sterilization: Product name Manufacturer Type BHT Scope Cleaner BHT Hygienetechnik GmbH 2 BHT Scope Disinfectant BHT Hygienetechnik GmbH 1 ® Bode Chemie GmbH 2 Korsolex Endo-Cleaner ® Bode Chemie GmbH 2 ® Bode Chemie GmbH 1 neodisher Septo DN ® Dr. Weigert GmbH & Co. KG 1 ® Dr. Weigert GmbH & Co. KG 1 Sekumatic FD Ecolab GmbH 1 Endomat Plus Laboratorium Dr. rer. nat. Deppe 1 3E-Zyme Dismoclean 24 Vario Korsolex Endo-Disinfectant neodisher Septo DA ® Medisafe UK, Ltd. 2 ® Schülke & Mayr GmbH 1 ® Schülke & Mayr GmbH 2 ® Schülke & Mayr GmbH 2 thermosept ED thermosept ER thermosept RKN-zym Attention: When selecting the cleaning products and disinfectants, please take care that they do not contain the chemicals listed here: - Aromatic hydrocarbons - Hydroxylamin - Weak and strong mineral acids - Isobutanol - Weak and strong organic acids - Isopropanol - Oxidizing acids - Iodine and iodine tincture - Strong lye - Iodine starch solution - Acetone - Lime potash - Ethanol - Potassium bifluoride - Ethyl acetate - Potassium hypochlorite - Ethylene glycol - Calcium hypochlorite - Battery acid 10% - Nitrohydrochloric acid (aqua regia) - Formic acid - Copper-II-chloride - Longer-chain alcohols from 3C atoms - Methanol - Aluminum chloride - Methylene chloride - Ammonium concentrates - Methyl ethyl ketone - Ammonium bifluoride - Mineral lubricants - Aniline hydrochloride - Monochloroacetic acid - Antimony chloride - Sodium hydroxide (10%) and conc. - Benzine - Sodium hypochlorite - Benzoic acid - Nicotinic acid - Benzene - Nitrobenzene PH 01.2 Operating Manual PCNL Optic modular PD-PN-0080 42 Rev.: 004 Date: June 06, 2012 - Bromine - Perchloroethylene - Bromine water > 1% - Perchloric acid - Hydrogen bromide - Phenol solution - Butanol - Phosphoric acid (10%) - Chlorine - Mercury-II-chloride - Chlorinated lime - Nitric acid (10%) - Chloric acid - Hydrochloric acid (10%) - Chlorosulfonic acid - Sulfuric acid (10%) and conc. - Chloroform - Styrol - Chromic acid - Terpentine - Chromosulfuric acid - Hydrogen tetrachloride - Dimethylformamide - Toluol - Iron-III-chloride - Trichlorethane - Acetic acid 10% and conc. - Trichlorethylene - Hydrogen fluoride - Hydrogen peroxide (30%) - Hydrofluoric acid - Xylol - Formaline (30%) - Tin ammonium hexachloride - Glycol und glycolic acid - Citric acid 9.4 Storage of modular optic and accessories - The storage space must be low-germ, low on dust, dry and well ventilated. Temperature fluctuations should be avoided. - Do not store the PCNL optic in the transport case. - Store the optic in the supplied protective tube and properly in the sterilization tray or a suitable storage tray. The same goes for the accessories. This reduces the risk of damages. - Before putting them away for storage, thoroughly dry all parts of the modular PCNL optic and the accessories. - The workings shafts, the 2-port adapter for PCNL shafts, shifter and accessories are to be stored separately from the PCNL optic. - Storage in direct sunlight, at high temperatures or where they are affected by X-rays can damage the POLYDIAGNOST optic or accessories or pose an infection risk. PH 01.2 Operating Manual PCNL Optic modular PD-PN-0080 43 Rev.: 004 Date: June 06, 2012 9.5 Service life The service life of the products is not unlimited. It is determined by the frequency of use and the quality of storage. In case of proper storage, usage, cleaning, disinfection and sterilization, a service life of 3 years can be assumed. Important note: POLYDIAGNOST has made every effort to manufacture an endoscope with a maximum service life. Still, an unlimited durability can not be guaranteed. The quality and service life of the device in large part depends on the careful handling and proper maintenance by a well-trained team. 10 Transporting the endoscope 10.1 Transport inside the hospital Transport the modular PCNL optic properly in the sterilization tray or a suitable storage tray. The same goes for the accessories. This reduces the risk of damages. If you need to transport the device without a suitable tray, hold the optic body and the optic in the protective tube in one hand and make sure that the light cable has a large radius to avoid kinks. 10.2 Transport outside the hospital Transport the endoscope in the transport case. Make sure that the endoscope is placed carefully in the cut-outs in the case that are intended for this purpose and that this is not closed if the light cable juts out over the edge of the case. ATTENTION: The transport case can not be cleaned or disinfected. Clean and disinfect or sterilize the endoscope before placing it in the transport case. Before using the endoscope, it must be disinfected or sterilized again. 10.3 Transporting the endoscope by using a shipping company / transport company Important: In case of any damage incurred during transport, please pay careful attention to the following directions, since the insurance company covering the transport is not obligated to pay for any claims if these formal requirements are not adhered to. If there are damages during transport, it is in your interest to secure compensation claims by involving representatives of the shipping company / transport company in a timely manner to determine the damages in the context of their relevant rules and regulations. This means that if a loss or damage of the product is externally recognizable, then the recipient has to demonstrate the loss or damage to the freight carrier no later than at the time the goods are delivered. In case of transport by rail, the railroad company must be asked for a statement of the facts. In case of a parcel shipment, any damaged parcels must be recorded in writing by the shipping company before they are accepted. PH 01.2 Operating Manual PCNL Optic modular PD-PN-0080 44 Rev.: 004 Date: June 06, 2012 In case of damages that are not immediately recognizable, i.e. that are only discovered when unpacking the goods, the shipping company or freight carrier must be notified in writing immediately. The use of the following text is recommended for the required correspondence to the transportation company: To the dispatch office in......................................................................... (or to the post office, the shipping company, the transportation company, the parcel service) The shipment.............................................. (indication of letter of consignment, package, signature) from...................................... (sender) to......................................., received on........................., was accepted here without complaint since no externally recognizable damages were evident. On opening the package, however, it turned out that the content was damaged and / or lost during transport. We hold you responsible for the damage that was incurred. If you think it is necessary, you can inspect the extent of the damage in our company premises / our storage facilities ..............................................................................................................(address). Please also contact the department in our company that sent you the shipment, specifying the letter of consignment and the invoice number, and please enclose the mentioned documents with your complaint. 11 Certificates Certification: 0483 CE: This device meets the requirements of the Council Directive 93/42/EEC regarding medical products. This device is a product of class IIa. PH 01.2 Operating Manual PCNL Optic modular PD-PN-0080 45 Rev.: 004 Date: June 06, 2012