1
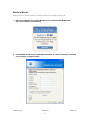
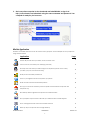
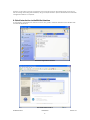
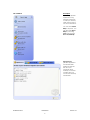
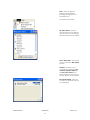
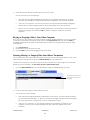
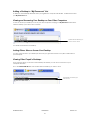
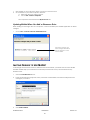
Using MioNet™ Copyright © 2006 by Senvid, Inc. All rights reserved. 2445 Faber Place, Suite 200, Palo Alto, CA 94303 Voice: (650) 354-3613 Fax: (650) 354-8890 © 2006 Senvid Inc. User Manual 1 Version 1.07 COPYRIGHT NOTICE No part of this publication may be reproduced, transmitted, transcribed, stored in a retrieval system, or translated into any human or computer language, in any form by any means, without the express written permission of Senvid, Inc., 2445 Faber Place, Suite 200, Palo Alto, CA 94303, U.S.A. TRADEMARK Senvid and MioNet are trademarks of Senvid, Inc. All rights reserved. PATENTS Senvid is covered by U.S. Patent Nos. 6,732,158 and 6,499,054 and other filings. CONTACT INFORMATION For more information, visit our web site at www.senvid.com or www.mionet.com. TECHNICAL SUPPORT Visit our site at www.mionet.com. © 2006 Senvid Inc. User Manual 2 Version 1.07 CONTENTS Copyright Notice ................................................................................................................................................................. 2 Trademark ............................................................................................................................................................................ 2 Patents .................................................................................................................................................................................. 2 Contact Information ............................................................................................................................................................ 2 Technical Support................................................................................................................................................................ 2 Contents ............................................................................................................................................................................... 3 Getting Started..................................................................................................................................................................... 5 Welcome to MioNet ...........................................................................................................................................................5 MioNet Overview ................................................................................................................................................................5 MioNet in Minutes................................................................................................................................................................6 MioNet Application ............................................................................................................................................................7 A Quick Introduction to the MioNet Interface ...............................................................................................................8 Setting Up Your first mionet Computer ............................................................................................................................ 15 Setting Up multiple Computers on one account for integrated file access ............................................................... 15 Setting Up Your Computers for MioNet Sharing.............................................................................................................. 16 Quick Reference: How Do I…? ........................................................................................................................................ 16 How Do I Access a File on My Other Computer? ........................................................................................................16 How Do I Access a File on Someone Else’s Computer? .............................................................................................17 How Do I Access the Desktop on My Other Computers? ..........................................................................................17 How Do I Listen to My Music Files on Another Computer? .........................................................................................18 How Do I View My Home Webcam from Work?..........................................................................................................18 How Do I Search for Files on All of My Computers?.....................................................................................................19 How Do I Set-up a Home Network? ...............................................................................................................................19 How Do I Share a File, Folder, Desktop, Webcam, or Pictures with Someone?......................................................20 How Do I Backup All My Computers at Once?............................................................................................................22 How Do I Manage My Photos on Multiple Computers? .............................................................................................22 Giving Others Access to Resources On Your Computer............................................................................................... 22 Giving Access to Other MioNet Users ............................................................................................................................22 Giving Access to People Who Are Not MioNet Users..................................................................................................23 Understanding and Specifying Permission Levels ........................................................................................................25 Choosing Permission Levels........................................................................................................................................25 Changing Permission Levels.......................................................................................................................................25 Finding Out What Permissions You Have .......................................................................................................................26 Receiving Access to Other People’s Files (Alerts) ......................................................................................................... 26 Accessing or Exchanging Files with Other Computers ................................................................................................. 27 Opening, Moving, or Copying Files from Your Other Computer...............................................................................27 Moving or Copying a File to Your Other Computer ....................................................................................................28 Opening, Moving, or Copying Files from Others’ Computers....................................................................................28 Moving or Copying Files to Someone Else’s Computer ..............................................................................................29 Sharing and Viewing Webcams ...................................................................................................................................... 29 Adding a Webcam to “My Resources” List ..................................................................................................................29 Viewing Your Webcam on Your Other Computers .....................................................................................................29 Letting Others View Your Webcam................................................................................................................................30 Viewing Other People’s Webcams ................................................................................................................................30 Saving a Webcam Snapshot ..........................................................................................................................................30 Sharing and Viewing Desktops ........................................................................................................................................ 30 Adding a Desktop to “My Resources” List.....................................................................................................................31 Viewing and Accessing Your Desktop on Your Other Computers............................................................................31 Letting Others View or Access Your Desktop................................................................................................................31 Viewing Other People’s Desktops ..................................................................................................................................31 Remote Desktop Settings.................................................................................................................................................32 Giving Someone Access to Everything on Your Drive................................................................................................... 32 Searching ........................................................................................................................................................................... 33 Starting, Stopping, and Signing Out of MioNet ............................................................................................................... 33 Making MioNet Start Up Manually Instead of Automatically.....................................................................................33 Starting or Restarting MioNet .........................................................................................................................................33 Stopping MioNet ...............................................................................................................................................................33 Signing Out of MioNet ......................................................................................................................................................33 Managing Your Shared Resources .................................................................................................................................. 34 How to Stop Sharing a Resource with Someone .........................................................................................................34 How to Stop Making Specific Resources Accessible...................................................................................................34 Removing a Resource from Share with Others .......................................................................................................34 © 2006 Senvid Inc. User Manual 3 Version 1.07 Removing a Webcam from My Resources .............................................................................................................34 Removing a Computer from MioNet Access..........................................................................................................34 Updating MioNet When You Add or Remove a Drive ................................................................................................35 Inviting Friends to Use MioNet .......................................................................................................................................... 35 MioNet Web........................................................................................................................................................................ 36 Opening MioNet Web ......................................................................................................................................................36 Billing and Payments ......................................................................................................................................................... 38 Payments............................................................................................................................................................................38 Limited Accounts ..............................................................................................................................................................38 Managing Your MioNet Accounts ................................................................................................................................... 38 Retrieving a Forgotten Password....................................................................................................................................38 Changing a Password ......................................................................................................................................................38 Updating Your Email Address..........................................................................................................................................38 Uninstalling the MioNet Application...............................................................................................................................39 Upgrading the MioNet Application ...............................................................................................................................39 Limited version of MioNet ................................................................................................................................................39 Security Tips........................................................................................................................................................................ 41 Windows Power Saving Modes ........................................................................................................................................ 42 Standby Mode...................................................................................................................................................................42 Hibernate Mode................................................................................................................................................................42 Configuring Windows Power Saving Modes .................................................................................................................42 Power Saving Mode Setup ..............................................................................................................................................42 Customer Support and Online Help................................................................................................................................. 45 Accessing MioNet Help on the Web..............................................................................................................................45 Contacting Customer Support .......................................................................................................................................45 © 2006 Senvid Inc. User Manual 4 Version 1.07 GETTING STARTED Welcome to MioNet MioNet is about simplifying your digital world by transparently connecting computers and people so that you have instant access to all of your digital world and you can selectively share with others. With MioNet, you can create your own secure “personal private network” of your computers and trusted friends, family, and business colleagues. Simply, all your resources are available on the computer you are sitting at. MioNet Overview MioNet gives you the freedom to share and work with all your digital files anywhere you want. You will have easy secure access to what you need, and when you need it. Anywhere you go, you can access all of the folders, drives, desktops, and even webcams on your other computers. You can let other people you trust have secure access to the files, folders, desktops, or webcams of your choosing. And, you can use MioNet to open and exchange files on other people’s computers, with their permission. MioNet provides secure and simple access through most firewalls and antivirus programs. Example MioNet features include: • • • • • • Remote access to files – access, view, edit any file from any of your computers Remote Desktop – remotely control any of your PCs to run applications, check e-mail, etc. Share files and folders – share files with friends and family or business colleagues effortlessly Web conference – share the desktop screen of your PC for remote presentations and collaborative editing Remote access to webcams – view your home or business webcam from anywhere Let others see your webcam – open one or multiple windows to see webcams of trusted people anywhere in the world MioNet has two different versions: MioNet Application and MioNet Web. With MioNet Application installed, you can both share and access to your computer resources by using either MioNet Application or MioNet Web. Without MioNet Application, you can only access to the shared resources by logging in to the MioNet Web browser and share resources on your other computers with MioNet Application installed. However, this access can be reached from any computer in the world with an Internet connection. © 2006 Senvid Inc. User Manual 5 Version 1.07 MioNet in Minutes Getting access to your files, webcam, or desktop is easy and only takes a few minutes: 1. Go to the computer you want the MioNet access and download MioNet from http://www.mionet.com/download 2. Install MioNet and fill out the registration information to create a username, password, and to register a computer name. © 2006 Senvid Inc. User Manual 6 Version 1.07 3. Go to any other computer to also download and install MioNet, or sign in at http://www.mionet.com/mionetweb using the same username and password. Your computer is ready for you to access. MioNet Application MioNet is a versatile solution that can be used for many purposes. Some examples of how people are using MioNet include: Application Page Access all your files from your office, home, and the road 14 Control, access, and share your desktop(s) remotely 15 Securely view and share your webcam(s) from anywhere (check on the nanny, your kids, your pets, and home security) 16 17 Share photos with family and friends Listen to your digital music from anywhere you please 15 Share work documents with business partners 18 Set up your own home network (connect upstairs and downstairs computers and the printer too) 17 Run Desktop Search against all computers and shared folders 16 Set up simple 2-way free video calls with your webcam with tools like Skype™ 16 Photo management that works with tools like Picasa™ 19 Back-up all your computers from a single desktop 19 © 2006 Senvid Inc. User Manual 7 Version 1.07 All of the content that you share is encrypted, and it is never stored on the MioNet server. Anyone can start accessing and sharing with MioNet by using one simple interface. System administration and firewall configuration skills are not required. A Quick Introduction to the MioNet Interface As you begin to use MioNet, this section can serve as a guide to the basic elements of the MioNet Web and MioNet Application. The MioNet Application Interface The MioNet Web Interface © 2006 Senvid Inc. User Manual 8 Version 1.07 Description Tab or Window Quick Help: (MioNet Application Only) Provides quick steps to assist you with key tasks. Click a topic to see more information. You can close Quick Help at anytime. You can also hide Quick Help by choosing View and uncheck Show “Quick Help.” My Resources: (MioNet Application and MioNet Web Interfaces) This tab lists all of your computer drives, desktops, and video cameras that you can access remotely with MioNet. © 2006 Senvid Inc. User Manual 9 Version 1.07 Shared with Me: (MioNet Application and MioNet Web Interfaces) This tab provides a list of resources to which you have been given access by others. Double-click a resource name to open it. Note: A resource can be a computer drive, desktop, webcam, or folder. (You can put any files or pictures you want to provide access to into a folder, then share the folder). Share with Others: (MioNet Application and MioNet Web Interfaces) This tab provides a list of any folders, drives, desktops, or webcams that you are currently sharing. It also lists anyone else’s resources to which you have been granted administrative privileges. This is where you add the resources that you want to share and specify who gets access to them. © 2006 Senvid Inc. User Manual 10 Version 1.07 The MioNet Toolbar MioNet Toolbar (MioNet Application Only) Toolbar Button Description Invite: Click to invite a non-MioNet user to use the software. Alerts: Click to see new notifications you have received regarding access rights to resources. In the dialog that appears, you can view and accept new access rights. When you see an exclamation point on this button, it means you have a new notification. This button is grayed out when you have no alerts. My Computer (optional button): Click to open a window showing the resources on your computer. Explorer (optional button): Click to display the full hierarchical structure of files, folders, and drives on your computer. It also shows any network drives that your computer has access to. Active Shares (optional button): Click to quickly see what resources you are sharing. Profile: Click to check your Full name, User name, and E-Mail. A list of computers you have registered will be displayed along with a button to edit your profile. Help: Click to open the MioNet Support page MioNet Menus (MioNet Application Only) Description Menu The File menu includes: Invite New User: Lets you invite a non-MioNet user to use the software. Return to Tray: Minimizes the application window to the icon tray. To restore, click the MioNet icon in the icon tray. © 2006 Senvid Inc. User Manual 11 Version 1.07 Preferences: Opens the following dialog that lets you select: (1) Show Welcome dialog at launch – check if you want to always see the dialog box (2) Sign out when screen saver activates – check if you want MioNet to sign out when your screen saver activates (3) Show file transfer notification – check if you want to see the details of file transfers (4) Allow “Share with Other” list to fold – check if you do not want to compress all the details relating to shared resources (5) Edit User Profile – click button to modify your First Name, Last Name, and/or email address. Scan for Cameras and New Devices...: Opens a dialog that lets you scan for newly connected devices for MioNet to recognize. Remove Selected Computer: Allows you to remove a selected computer from My Resources. To use this command, first stop MioNet on the computer you want to remove, and then go to MioNet on another of your computers. Select the computer you want to remove, and click OK. (In order to Stop MioNet, you must go to Start>AllPrograms>MioNet>Stop MioNet). Sign Out: Signs you out of the application. © 2006 Senvid Inc. User Manual 12 Version 1.07 Note: When you Sign Out, MioNet is still running and providing sharing services to authorized users. The View menu includes: My Active Shares: Opens a window that lets you quickly see what resources you are sharing and with whom they are shared. Show “Quick Help”: Choose this to show or hide the “Quick Help” window. Toolbars: This allows you to customize your toolbar with My Computer, Windows Explorer, and My Active Shares icons. Simply check the icons that you want to appear on your Toolbar. File Transfer Details: This shows you status of all the files that you are transferring. © 2006 Senvid Inc. User Manual 13 Version 1.07 The Help menu includes: Online Help: Opens the MioNet Support Web page, which lists FAQs, a KnowledgeBase, User Manual, several tutorials on how to use MioNet, and information on how to contact Customer Support. About: Displays a window with the version number of MioNet. © 2006 Senvid Inc. User Manual 14 Version 1.07 SETTING UP YOUR FIRST MIONET COMPUTER Setting up a computer for MioNet sharing and access involves two simple steps: You just need to make sure that MioNet is installed and registered on the first computer, and to make sure that the computer is on and connected to the Internet when you want the shared resources and access to be available. 1. Install and register your MioNet account on your first computer. To install and register on the first computer, load MioNet from a CD or other media you have received, or go to http://www.mionet.com, click the Download Now button, and follow the instructions. Once you have registered with MioNet, you will not need to re-register for another user name and password when installing MioNet on your other computers. You only have to register for the new computer name. 2. If you want your resources on a computer to be accessible, the computer must be powered on (and not in standby or hibernation mode), and connected to the Internet. MioNet will operate over a dial-up connection; however, MioNet performs best when used with a broadband Internet connection. • 3. When your computers go into Hibernation or Standby mode, MioNet will not work properly. However, you can still lock your computer. Please see chapter on Windows Power Saving Modes. To access your computer remotely from another computer, you can install MioNet on that computer by following the steps in Setting Up Multiple Computers on One Account for Integrated File Access, or you can go to any PC with a web browser and Internet connection. If you choose to access to your computer by using web browser, type in the web page http://www.mionet.com/mionetweb or go to http://www.mionet.com and select MioNet Web Sign-In. Enter your username and password when prompted, and you will have secure access to your PC. SETTING UP MULTIPLE COMPUTERS ON ONE ACCOUNT FOR INTEGRATED FILE ACCESS By setting up multiple computers on one account (using one username and password), you will have multiple accesses to your computers from any other MioNet computer. With MioNet installed, each computer will be listed as another drive in “My Computer” window, and now any application can use the data from any of your computers as if it were local. Using the File>Open command from any application will allow you to open a file from any of your MioNet registered computers more easily than any other software in the world. Setting up MioNet on a second computer involves two simple steps: You just need to make sure that MioNet is installed and registered on the computer, and to make sure that the computer is on and connected to the Internet when you want the shared resources and access to be available. 1. Install MioNet on each of your computers and use the same username and password you used for the first computer. MioNet will automatically make each computer available to all of your other computers. You can use one MioNet account on up to five of your own computers. (Each computer must have a unique computer name registered with MioNet.) Install MioNet directly from a CD that has been supplied to you, or go to http://www.mionet.com, click the Download Now button, and launch the installer. Once you have registered with MioNet, you will not need to re-register for another username and password when installing MioNet on your other computers. You only have to register for the new computer name. 2. If you want your resources on a computer to be accessible, the computer must be always powered on (and not in standby or hibernation mode), and connected to the Internet. MioNet will operate over a dial-up connection; however, MioNet performs best when used with a broadband Internet connection. © 2006 Senvid Inc. User Manual 15 Version 1.07 • When your computers go into Hibernation or Standby mode, MioNet will not work properly. However, you can still lock your computer. Please see the chapter on Windows Power Saving Modes for more details. SETTING UP YOUR COMPUTERS FOR MIONET SHARING Setting up a computer for MioNet sharing involves two simple steps: You just need to make sure that MioNet is installed and registered on the computer, and to make sure that the computer is on and connected to the Internet when you want the shared resources to be available. 1. Install and register your MioNet account on each of your computers. You can use one MioNet account on up to five of your own computers (each computer must have a unique name). To install and register the other computers, go to http://www.mionet.com, click the Download Now button, and follow the instructions. Once you have registered with MioNet, you will not need to re-register for another user name and password when installing MioNet on your other computers. You only have to register for the new computer name. 2. If you would like your resources on a computer to be accessible, the computer must be powered on (not in standby or hibernation mode), and connected to the Internet. MioNet will operate over a dial-up connection; however, MioNet performs best when used with a broadband Internet connection. • When your computers go into Hibernation or Standby mode, MioNet will not work properly. However, you can still lock your computer. Please see Windows Power Saving Modes for more details. QUICK REFERENCE: HOW DO I…? This section provides quick answers to common “How Do I…?” questions that MioNet users may have. This quick reference assumes that your computers are already set up as described in Setting Up Your Computers for MioNet Sharing. You also can find more details about these kinds of tasks, and others, in later sections in this manual. How Do I Access a File on My Other Computer? MioNet Application and MioNet Web: To access the file, go to the My Resources tab, and then doubleclick the computer drive that contains the file. Double-click to see and access files on your other computer. In the new window that appears, locate the file you want to access. Now you can do any of the following: • View and edit the original folder/file: Double-click or click the Open button to open the file. You can then make changes to it. When you save these changes, they are saved in the original file on © 2006 Senvid Inc. User Manual 16 Version 1.07 the other computer (you are not working with a copy). You can also save it to any other computer in My Resources or in any other folder which others have shared with you (you must have “Read & Write” rights). • Copy it to your computer: You can copy the file to your local computer simply by dragging it. • Move it to your computer (does not apply to MioNet Web): To move the file to the local computer instead of copying it, hold down the Shift key while you drag the file to a place on your local computer. Note: For more detailed steps, see Accessing or Exchanging Files with Other Computers. How Do I Access a File on Someone Else’s Computer? MioNet Application and MioNet Web: You can access files on someone else’s computer in the same way you would access files on your other computer (described in the previous section), except that you go to the Shared With Me tab to locate the file. Double-click the folder you want to access on the other person’s computer. Once you locate the file in the shared folder, you can do any of the followings: • View and edit the original folder/file: In MioNet Application, double-click or click the Open button to open the file. If you have been given the Write access, you can then make changes to it. If not, you can only read the data. Permissions can only be changed by the owner of the file (See Changing Permission Levels for more details). When you save these changes, they are saved in place of the original file on the other person’s computer (you are not working with a copy). In MioNet Web, double-click to open the file and Save As… to save it locally. You may then Drag and Drop files into the folder. • Copy it to your computer: For both MioNet Application and MioNet Web, to copy the file, just drag it to your desktop or a folder on your computer. • Move it to your computer: In MioNet Application, if you have been given the Write access to a file, you can move it to your own computer by holding down the Shift key while you drag it to a place on your local computer. This function does not apply to MioNet Web. How Do I Access the Desktop on My Other Computers? MioNet Application and MioNet Web: To access the Desktop on your other computer(s), go to the My Resources tab, and then double-click the desktop you want to access remotely. © 2006 Senvid Inc. User Manual 17 Version 1.07 Double-click the desktop you want to access The selected Desktop will be connected. Now you can do any of the followings: Have the flexibility of working from home Help troubleshoot IT issues for family and friends Perform web presentations remotely Demo software applications without having to travel or install the product Check your office email and schedules from an airport kiosk Note: For more detailed steps, see Accessing or Exchanging Files with Other Computers. How Do I Listen to My Music Files on Another Computer? Listening to your MP3s from another computer is easy by using the MioNet Application. 1. Go to My Resources and double-click the computer that has the desired MP3s. Double-click the computer that has the MP3s. 2. Find the file that you want to listen to and double-click it. Your default media player will play the song. You can also expand your Media Player’s library by adding songs from your other computers to your listings. Click on the Add to Library button on the lower left corner of the Windows Media Player, and select the folder, file, play list, URL, or drive from which you want to add music files to your library. The songs will only be played if the computer hosting the songs is turned on and MioNet is running. Note: For more detailed steps, see Accessing or Exchanging Files with Other Computers. How Do I View My Home Webcam from Work? You may want to keep an eye on your home while you are at work. To view your webcam with MioNet, go to My Resources and double-click your home webcam. © 2006 Senvid Inc. User Manual 18 Version 1.07 Double-click the webcam you want to view. A webcam view window will display the live video. Tips: • • By setting up webcams, you can set up a two-way video conference call with an Internet telephone service, like Skype™. Curious about your pet’s daily activities? Want to make sure your kids are doing their homework? Check on your pets and children while you’re at work or on the road Note: For more information, see Sharing and Viewing Webcams. How Do I Search for Files on All of My Computers? Sometimes you need a file, but you aren’t quite sure which computer it’s on, or you want to locate all the copies of the file on all of your drives. When your other computers are accessible to you through the MioNet Application, you can search all of your drives at once simply by using your system’s standard search tool or programs like Microsoft’s MSN Desktop Search or Copernic™. By default, when you search in My Computer, it searches all of your MioNet-accessible drives. Keep in mind that searching all drives at once, including those on other computers, takes some time. If you want to use the Microsoft search program: 1. 2. Double-click the My Computer icon on your desktop. Click the Search button, select and enter the criteria you are looking for, and then click Search. Other desktop search programs enable this extended search as well. Copernic™: if you install Copernic™ on your computer, select Options, Files, and Add to include MioNet drives to the search index. By expanding the listing for My Computer, you can view all the drives to which you have access. Note: Searching is also described in details in Searching. How Do I Set-up a Home Network? By installing MioNet on all of your home computers, you can easily create a home network so that you can access information from any computer in your home. By installing the MioNet Application on all home computers, you can easily access the upstairs computer from downstairs and vice versa. If you have a wireless network at home, using MioNet will improve security on the shared data as it will be strongly encrypted, which is generally not used on most home wireless networks. © 2006 Senvid Inc. User Manual 19 Version 1.07 Lastly, when you are sitting at the computer with the printer, but the file is on a different computer, you can now access that file and print it on your locally connected printer. Extending your home network is also easy, so you can access your home data files even when you’re at work or on the road. To set up a computer, simply follow the instructions under Setting Up Your Computers for MioNet Sharing. How Do I Share a File, Folder, Desktop, Webcam, or Pictures with Someone? Whether you need to share a project file with a colleague or want to make a set of digital photos, desktop, or a webcam view available to your friends and family, the sharing process is the same in every case. In MioNet, any items you share are called resources. A resource can be a folder, webcam, desktop or computer drive (You put any files or pictures you want to provide access to into a folder, then share the folder). 1. Go to the Share with Others tab and do one of the following: • If you have shared this resource before: a. Select it from the list. b. • 2. Then, click the Share With button. If you have not shared this resource before, click the Folder, Camera, or Desktop button, then choose what you wish to share. In the dialog that appears, select the person with whom you want to share, then click OK. © 2006 Senvid Inc. User Manual 20 Version 1.07 If the person is listed, select their name. If they are not a MioNet user, click Invite new person. If a MioNet user is not listed, click Find MioNet user. 3. • If the person is not on the list, but is a MioNet user, you can click Find MioNet user to locate them. You will need to have his or her username or email address. • Hold down the control (Ctrl) key to select multiple people. • If the person is not a MioNet user, you can invite him or her to download MioNet for free so that they can access your shared resources. However, he/she can also access your shared resources through MioNet Web by clicking on the link provided in your invitation email. In order to invite a new user, click Invite new users, then simply enter an email address and click Send Invitation. To invite multiple people, just list all the email addresses and separate them with a semicolon (;). And, if you want to, you can customize the message. You are asked to choose the permission level (See Understanding and Specifying Permission Levels). Check the desired permission, and then click OK. Once the person installs MioNet and accepts the Alert, he/she will have access to your file, folder, desktop, or webcam. However, if the person chooses to click on the link from your email to access your shared resources, he/she can only access those resources, but cannot share his/her resources with the other people. Note: For a more detailed breakdown of the above steps, see the next section, © 2006 Senvid Inc. User Manual 21 Version 1.07 How Do I Backup All My Computers at Once? You can easily back up all of your data (and data that is shared with you) on any drive you wish. With the MioNet Application, you can use the Microsoft™ back up wizard to select the resources you want to back up and where you want to back up the resources. To start Backup, click Start, point to All Programs, point to Accessories, point to System Tools, and then click Backup. 1) 2) 3) In the wizard, select Back up files and settings and click Next Select Let Me Choose What I Want to Back Up and click Next Expand the My Computer listing and select the resources you want to back up and follow the remaining instructions on the back up wizard. You will see all your MioNet connected computers and folders shared with you. How Do I Manage My Photos on Multiple Computers? Managing your photos over multiple computers can be simplified with tools such as Picasa™ and the MioNet Application. To see all the photos that on your computers and those shared with you, simply: 1) 2) 3) Download Picasa™ and launch the program Click Tools and then select Folder Manager Click on the drives that you want to scan and choose the Scan Once or Watch for Changes radio button in the section to the right. The drive will be added to the Watched Folders section and Picasa will routinely scan through all of these drives to display thumbnails of your extended photo collection. GIVING OTHERS ACCESS TO RESOURCES ON YOUR COMPUTER You can let other people have access to specific files in your computer by placing the files in a folder to which you will grant the access permissions. Once they have the access privileges, they can open the folder on their computer from the Shared with Me tab in MioNet. You can also give them access to your webcam and/or desktop so they can view these resources on their computer. Giving Access to Other MioNet Users 1. Go to the Share with Others tab and do one of the following: • If you have shared this resource before: a. Select it from the list. b. Then, click the Share With button. © 2006 Senvid Inc. User Manual 22 Version 1.07 • 2. If you have not shared this resource before, click the Folder, Camera, or Desktop button, then choose what you wish to share. In the dialog that appears, select the person with whom you want to share, then click OK. Select the person you want to share with, then click OK. If the person is not on the list, but is a MioNet user, you can click Find MioNet user to locate them. You need to have his or her username or email address to enter in the dialog. Hold down the control (Ctrl) key to select multiple MioNet users. 3. You are asked to choose the permission level (See Understanding and Specifying Permission Levels for more details). Check the desired permission, then click OK. Once the person accepts the Alert that tells them you want to share a computer resource with them, they will have access to your folders, desktop, or webcam. Giving Access to People Who Are Not MioNet Users MioNet lets you assign access to people who are not yet MioNet users. This process includes sending them an automatically generated email with a link to download MioNet for free so that they can open © 2006 Senvid Inc. User Manual 23 Version 1.07 what you have shared with them, or they can also click on another link provided in the email to access to the shared resources by using MioNet Web without the installation of MioNet Application. 1. 2. Go to the Share with Others tab and do one of the followings: • If you have shared this item before, select it from the list, then click the Share With button. • Or, if you have not shared this item before, click the Folder, Camera, or Desktop button, then select what you wish to share. In the dialog that appears, click Invite new person. Click Invite new person. 3. In the Invite new person dialog, enter the email address of the person you wish to invite (or addresses if you are sending to multiple people). You can customize the message if you want. Click Send Invitation. 4. You will be asked to choose the permission level (See Understanding and Specifying Permission Levels below). Check the desired permission, then click OK. © 2006 Senvid Inc. User Manual 24 Version 1.07 Once the person installs MioNet and accepts the Alert, he or she will have access to the item you shared with them. Understanding and Specifying Permission Levels Permissions define the nature of access given to use a resource. When you share with someone in MioNet, the Select Permissions dialog appears and gives you the choice of three different levels of access for them. Choosing Permission Levels The Select Permissions dialog gives you the following three levels of permission to choose from for resources you share: • Read: Lets someone read or copy files you are sharing with them. • Read & Write: Lets someone read, copy, move, and edit files to which you have given them the access. Also lets them copy and move files to the folder to which they have Write access. It’s important to realize that unless someone copies a file and edits only the copy, they are working on the original file on your computer. This means any changes they save will be saved to your file on your computer. • Administrative: Lets someone read, copy, move, and edit files, as well as manage the permissions and access of the resource. This means they can give others access to your resource. (Make sure that you want to allow this.) To assign administrative permission to someone you need to click the Advanced button in the Select Permissions dialog. These icons show you the item and person for which you are assigning permissions. If you want to give someone administrative privileges, click Advanced to open the Advanced Permissions dialog. Changing Permission Levels Once something is shared with someone, you can always go back and change the level of permission you originally assigned. 1. 2. Go to Share with Others tab. Double-click the resource to see the names of those who have access to it. © 2006 Senvid Inc. User Manual 25 Version 1.07 3. Highlight the person’s name and click the Permissions button. 4. In the Select Permissions dialog that appears, change the permission level, then click OK. To verify the change, wait briefly and you will see the updated permissions in Share with Others. Finding Out What Permissions You Have To see what permissions you have been given for a resource: • In the Shared with Me tab, select the resource you want to know about and let the cursor pause there for a few seconds. A text box appears that tells you the type of permission you have for the resource. RECEIVING ACCESS TO OTHER PEOPLE’S FILES (ALERTS) When someone uses MioNet to share a resource with you, MioNet sends you a notice (an “Alert”). The Alerts button in the MioNet toolbar will then have an exclamation point on it. If the Alerts button is grayed out, there are no notices. If there is an exclamation point on the Alerts button, you have new notices. There are several kinds of Alerts you can receive. An Alert can tell you: • Someone gave you access to a resource. • Someone modified your permissions to a resource. • Someone removed your access to a resource. • Someone accepted access to a resource. • Someone accepted permissions for a resource. • Someone declined the access to a resource. • Someone declined permissions for a resource. • Someone is trying to access a resource on your limited account (see Billing and Payments: Limited Accounts for more details). © 2006 Senvid Inc. User Manual 26 Version 1.07 Many of these Alerts can also include an optional personal message for you. With the exception of an alert that someone has granted you access to a resource, the notices will not require an action from you. Once you have read them you can select them and click Dismiss to remove them from the Alerts window. If someone gave you access to a resource, you are required to accept or decline the access: 1. 2. Click the Alerts button. In the Alerts dialog, select the notice, then click Accept. You can now open this resource by double-clicking it in your Shared with Me tab. The Alerts dialog keeps the list of Alerts you accept or decline. To remove an alert from the list after the user has accepted or declined it, just select it and click Dismiss. ACCESSING OR EXCHANGING FILES WITH OTHER COMPUTERS You can use MioNet to open and exchange supported files (such as pictures, music, and project files) on other computers. Whether you are opening and exchanging files between your own computers or with someone else’s computer, the process is very similar. Note: These steps assume that all the computers are already set up with MioNet, as described in Setting Up Your Computers for MioNet Sharing on page 16. Opening, Moving, or Copying Files from Your Other Computer To access a file on one of your other computers: 1. Go to the My Resources tab, and then double-click the drive or folder that contains the file. Double-click to view and access files on your other computer. © 2006 Senvid Inc. User Manual 27 Version 1.07 2. In the window that appears, locate the file you want to access. Now you can do any of the followings: • View and edit the original file/folder: Double-click to open the file, and make any changes you’d like. The changes you make will be saved in the original file on the remote computer. • Copy it to your computer: You can copy the file to your local computer simply by dragging it. This way you can make changes that don’t affect the original on the other computer. • Move it to your computer: Using the MioNet Application to move the file to your local computer instead of copying it. Hold down the Shift key while you drag it to a place on your local computer. Moving or Copying a File to Your Other Computer Once you move or copy a file to your local computer using the MioNet Application, you can put it back on the other computer by opening the other drive from the My Resources tab, then hold the Shift key and drag the file back to the drive, as described below. However, the moving function does not apply to MioNet Web. 1. 2. 3. Go to My Resources. Double-click to open the drive you want. Hold the Shift key down while dragging the file to the drive. Opening, Moving, or Copying Files from Others’ Computers You can access files on someone else’s computer in the same way you would access files on one of your other computers, except that you go to the Shared with Me tab to locate the file. In order to have access to a resource on someone else’s computer, they must first give you access with MioNet. (For more information, see Receiving Access to Other People’s Files). 1. Go to the Shared with Me tab, then double-click the folder containing any files you need. Double-click the folder you want on the other person’s computer. 2. In the window that appears, locate the file you want. You can do any of the following: • View and edit the original file/folder: Double-click to open the file. If you have Write permission, you can then make changes to it. When you save these changes, they are saved in the original file on the other person’s computer (You are not working with a copy). • Copy it to your computer: To copy the file, just drag it to the desktop or a folder on your computer. This way you can make changes that don’t affect the original on the other computer. © 2006 Senvid Inc. User Manual 28 Version 1.07 • Move it to your computer: If you are using MioNet Application and been given Write access to a file, you can move it to your own computer by holding down the Shift key while you drag it to a place on your local computer. Moving or Copying Files to Someone Else’s Computer Once you move or copy a file to your local computer using MioNet Application, you can put it back on the other drive by opening the folder on the other drive from the Shared with Me tab, then Shift-dragging the file back to the drive, as described below. Assuming you have been given access and Write permission with MioNet to another person’s resource, you can move any file to their computer using this method. 1. 2. 3. Go to the Shared with Me tab. Double-click to open the folder where you want to place the file. Hold the Shift key down while dragging the file to the remote folder. SHARING AND VIEWING WEBCAMS What if you want to share live video on your webcam securely with other people or on your other computers? MioNet makes it possible. You can also view other people’s webcams with their permission. Note: These steps assume that all the computers are already set up with MioNet, as described in: Setting Up Your First MioNet Computer on page 15. Setting Up Multiple Computers on One Account for Integrated File Access on page 15. Setting Up Your Computers for MioNet Sharing on page 16. Adding a Webcam to “My Resources” List To share a webcam remotely with other computers, you must first add it to your My Resources: • If the webcam is connected to your local computer, but not shown in the My Resources window, close the window and choose File > Scan for Cameras and New Devices... Note: Please make sure you have installed the most recent webcam driver. Viewing Your Webcam on Your Other Computers To view live video from a webcam that is connected to one of your other computers, simply go to My Resources and double-click the webcam. © 2006 Senvid Inc. User Manual 29 Version 1.07 Double-click the webcam you want to view. A webcam window opens on your computer, displaying the live video. The webcam view stops after 20 minutes. To start it again, click the Play button in the webcam window. Letting Others View Your Webcam You give others access to your webcam in the same way you give them access to any files on your computer. Viewing Other People’s Webcams Once someone gives you access to their webcam via MioNet, you can view it on your computer with ease. Go to the Shared with Me tab, then double-click the webcam you want to view. Double-click the webcam you want to view. A webcam window will open on your computer, displaying the live video. The webcam view will stop after 20 minutes. To start it again, click the Play button in the webcam window. Saving a Webcam Snapshot You can capture a snapshot from your webcam by clicking Save Snapshot and saving it to any of your computers that are online. SHARING AND VIEWING DESKTOPS What if you want to share a PowerPoint presentation on your desktop securely with other people or on your other computers? MioNet makes it possible. You can also view other people’s desktops with their permission. Note: These steps assume that all the computers are already set up with MioNet, as described in Setting Up Your Computers for MioNet Sharing. © 2006 Senvid Inc. User Manual 30 Version 1.07 Adding a Desktop to “My Resources” List A desktop is automatically detected when you registered a computer with MioNet. It will be listed under your My Resources tab. Viewing and Accessing Your Desktop on Your Other Computers To view or access your desktop on one of your other computers, simply go to My Resources and doubleclick the desktop you want to view or access. Double-click the desktop you want to view or access You will be connected to the desktop. Letting Others View or Access Your Desktop You give others access to your desktop in same way you give them access to any files or webcams on your computer. Viewing Other People’s Desktops Once someone gives you access to their desktop via MioNet, you can view or access it on your computer with ease. Go to the Shared with Me tab, then double-click the desktop you want to view. Double-click the desktop you want to view. © 2006 Senvid Inc. User Manual 31 Version 1.07 Remote Desktop Settings MioNet allows you to change the settings when viewing and/or sharing remote desktops. With the remote desktop Control Panel, you can change the controlling user, the scaling, and color quality of any desktop you are viewing. If you want to take a snapshot of the screen, you can simply click the Snapshot button under Actions. In case you want a full screen viewing of the desktop without the remote desktop control panel, simply click on the MioNet icon. To restore the Control Panel, just click the icon again. GIVING SOMEONE ACCESS TO EVERYTHING ON YOUR DRIVE If you need to share all or most of the content on your computer with someone else remotely, you can share your whole drive with that person. This lets the other person access everything on your computer, without you having to setup access to each item individually. 1. 2. 3. Go to the My Resources tab. Select the drive you want to share. Right-click and choose Share with from the pop-up menu. 4. In the dialog that appears, select the person you want to share the drive with, then click OK. 5. o If the person is not listed, but is a MioNet user, you can click Find MioNet user to locate him/her. You will need to have his/her username or email address. o If the person is not a MioNet user, you can invite him/her to share your file, by clicking Invite new person. Simply provide an email address and click Send Invitation. If you would like to, you can also customize the message. In the dialog that appears, select the desired permission level, and then click OK. Important: Keep in mind that this person has access to your entire drive, so if you give them the Write permission it means that you are not the only one who can change and delete anything on your drive. © 2006 Senvid Inc. User Manual 32 Version 1.07 SEARCHING When content on other computers is accessible to you through the MioNet Application, you can search all of the shared resources at once by using the Windows search tool. This includes folders that other people have shared with you on their computers. By default, when you search in My Computer, it searches all of your MioNet-accessible content. Keep in mind that searching through whole and multiple drives takes some time. 1. Double-click the My Computer icon on your desktop. Notice that anyone else’s drives that contain resources to which you have been granted MioNet access are listed under Network Drives. 2. Click the Search button, select and enter the criteria you are looking for, and then click Search. STARTING, STOPPING, AND SIGNING OUT OF MIONET If you want to close the application on your desktop, but still have the MioNet Application running so that your resources are still available remotely, you can Sign Out. To shutdown the MioNet software so that resources are not available remotely, you will need to stop MioNet. Making MioNet Start Up Manually Instead of Automatically If you do not want MioNet to start automatically when you start your computer, you can change the Startup Type to Manual: • Windows XP Users: o From the Start menu, choose Control Panel > Administrative Tools > Services. o Scroll down to MioNet Server and select it. Then, right-click Properties and change the Startup Type to Manual. • Windows 2000 Users: o From the Start menu, choose Control Panel > Administrative Tools > Services. o Scroll down to MioNet Server and select it. Then, right-click Properties and change the Startup Type to Manual. Starting or Restarting MioNet To restart MioNet: • From the Start menu choose Programs > MioNet > Start MioNet. Stopping MioNet To stop MioNet: • From the Start menu choose Programs > MioNet > Stop MioNet. Once MioNet is stopped, none of the shared resources will be accessible to others remotely until you start MioNet again, or restart your computer. Signing Out of MioNet To sign out of MioNet, choose File > Sign Out or right-click on the tray icon and click Sign Out. To restore the window to the desktop, double-click the MioNet Logo in the icon tray, and input your username and password. © 2006 Senvid Inc. User Manual 33 Version 1.07 MANAGING YOUR SHARED RESOURCES How to Stop Sharing a Resource with Someone When you no longer want to share a resource with someone, you can select his or her name under the resource and click Remove. 1. 2. Go to the Share with Others tab. Locate the resource and double-click it if necessary to see the names of people that have access to it. 3. Select the name of the person with whom you want to stop sharing and click the Remove button. How to Stop Making Specific Resources Accessible If you no longer want a resource to be accessible to other MioNet users, you can remove it from the Share with Other tab. You can also stop your own webcams and drives from being accessible on your other computers. Removing a Resource from Share with Others To remove resources that you have shared with others: • Go to the Share with Others tab, select the folder, desktop, drive, or webcam, and then click the Remove button. Removing a Webcam from My Resources If you no longer want a webcam to be accessible on your other computers: 1. Disconnect the webcam from your computer. 2. Choose File > Preferences. 3. In the Preferences dialog, click Scan for Cameras and New Devices... The webcam will no longer appear on the My Resources and Share with Others tabs. Removing a Computer from MioNet Access If you no longer want a computer to be accessible with MioNet, uninstall MioNet on that computer: • From the Start menu, choose Programs > MioNet > Uninstall MioNet. Alternatively, if you want to keep MioNet installed but remove access to it from another one of your own computers, you can use the Remove Selected Computer command instead: © 2006 Senvid Inc. User Manual 34 Version 1.07 1. 2. Stop MioNet on the computer to which you want to remove access. Go to MioNet on your other computer, and then: a. Select the drive you want to remove. b. Choose File > Remove Computer. The computer is removed from the My Resources tab. Updating MioNet When You Add or Remove a Drive When adding or removing a drive on a computer, a scan is needed by the MioNet Application to detect changes: 1. Choose File > Scan for Cameras and New Devices... After scan is complete, any device changes will be listed. This is an example of a new camera added. INVITING FRIENDS TO USE MIONET To exchange secure remote access to shared resources with friends, your friends need to have MioNet installed. MioNet helps you send them an email that provides a link so they can download and try MioNet for free. 1. Click the Invite New User button. 2. In the email window that appears, enter your friend’s email address, and edit the subject line and message if you’d like to. 3. Click Send Invitation. © 2006 Senvid Inc. User Manual 35 Version 1.07 MIONET WEB MioNet Application provides the most advanced set of features and file integration when our client software is installed on each computer. In addition, MioNet Web provides remote access through a web browser. Remote access, remote desktop, and shared files can be accessed from any computer with web browser and Internet connection. MioNet Web is the solution to allow users to gain access to all of their MioNet resources from anywhere. Opening MioNet Web To access the MioNet Web, go to http://www.mionet.com and click on MioNet Web Sign-In or go to http://www.mionet.com/mionetweb and Sign-In: After you sign in, MioNet Web will use required plug-ins. Please answer Yes for any security warnings about allowing MioNet plug-ins. © 2006 Senvid Inc. User Manual 36 Version 1.07 Once you have finished, MioNet Web will be opened in the web browser window. Using MioNet Web is the same as MioNet application, except it is in a web browser window. © 2006 Senvid Inc. User Manual 37 Version 1.07 BILLING AND PAYMENTS As the end of the introductory Trial period approaches, you will receive several messages inviting you to sign-up for a MioNet subscription. Payments To ensure customer security, MioNet uses Element5, a professional service specializing in secure online financial transactions, to process payment information. The purchase page can be accessed by either clicking on an alert or Signing In to the My Account web page and clicking Proceed to Purchase link. The purchase area will contain the necessary information to process your MioNet order. After the transaction has been completed, an e-mail will be sent to you in confirmation of the purchase. The My Account web page details will be updated to display the membership date and subscription type. Payment for the MioNet subscription can be made at any time within the Trial period but the subscription will begin on the day of payment. Limited Accounts If no subscription has been purchased by the time the Trial period has ended, the MioNet service will be limited to the functionality in the MioNet free version. The free version of MioNet allows users to access their resources across their Local Area Network (LAN) and view content others are sharing with them. However, sharing resources over the Internet will no longer be allowed. Once a MioNet account becomes limited we will provide reminders throughout the application with links to the Purchase web page. Attempting to use premium functions now will display a message with a link to purchase. If a customer chooses not to renew the account, the account will become a MioNet Basic account. This is similar to an expired Trial User’s account. MANAGING YOUR MIONET ACCOUNTS Retrieving a Forgotten Password 1. 2. 3. Go to www.mionet.com and click on My Account in the Support menu. Click Forgot password? Enter your username or email address and click Email my password. Your password will be emailed to you. Changing a Password 1. 2. 3. 4. Go to www.mionet.com and click on My Account in the Support menu. Sign In with your user information. Click Change Password under Registered Users. Input your old and new passwords, then click Submit. Updating Your Email Address To change your registered email address: 1. 2. 3. 4. Go to www.mionet.com and click on My Account in the Support menu. Sign In with your user information. Click Edit Profile. Enter your new email address and click Submit. © 2006 Senvid Inc. User Manual 38 Version 1.07 Uninstalling the MioNet Application From the Start menu, choose Programs > MioNet > Uninstall MioNet. Follow the onscreen instructions to complete the uninstalling process. Upgrading the MioNet Application MioNet will automatically update itself as long as you are connected to the Internet. If you are not connected, it will be updated once you are back online. To find your MioNet Application version number, choose Help > About. The version number is displayed in the window that appears. Limited version of MioNet There are two versions of MioNet: Full and Limited. The full functionality version is available during the free trial. Subscribe to MioNet to continue to use the full version after your trial period. If you do not subscribe, the limited version of MioNet will be available. You can upgrade to the full version by clicking on the upgrade now link in the MioNet interface. The following table lists the resources that can be accessed using the free limited version of MioNet. Limited Version of MioNet Receive Remote Desktop from Others Receive Files System from Others Receive Webcam from Others Use Own Remote Desktop Use Own Files System Use Own Webcam Share Remote Desktop with Others Share Files System with Others Share Webcam with Others Wide Area Network Yes Yes Yes No No No No No No Local Area Network Yes Yes Yes Yes Yes Yes No No No MioNet interface will reflect the limited status. "Upgrade Now" link will also be available in the limited version MioNet interface. Resources unavailable in the limited version of MioNet will be displayed in blue color. © 2006 Senvid Inc. User Manual 39 Version 1.07 Menu items that are unavailable with the limited version will be displayed in blue color. An option to subscribe to MioNet will also be available in this menu. When a user tries to access function unavailable in the limited version of MioNet , an upgrade MioNet message will be displayed. In the event a trial or full version MioNet user attempts to access a limited user's share, the limited user will receive an alert. © 2006 Senvid Inc. User Manual 40 Version 1.07 Resources for users with limited version of MioNet will appear with blue text to indicate they will be unavailable with the limited version. When you attempt to access a limited user’s resources, a suitable message will be shown: SECURITY TIPS MioNet provides secure features enabling you to share your digital files safely. We also suggest that you do the following: 1. Keep your Password secure! And choose your password wisely. MioNet requires that passwords have at least 8 characters. When selecting your password, try not to use your name or other words that appear obvious. We also strongly recommend that your username and password be different. 2. Make sure you are granting the right permissions to the right people. Be cautious in giving someone administrative permission to a resource because it allows that person to control others’ access to your resource. 3. Lock your computer when you are away. Remember that because you have access to others’ computers, leaving your computer unattended will also leave those external systems vulnerable. 4. When sending Invitations or finding MioNet users, make sure the e-mail and/or username is accurate. 5. Sharing computers drives with others is a very powerful feature. Make sure you want to share the entire drive rather than a few folders. 6. Do not accept MioNet Alert notices from people you do not know. 7. Make backups of your data. If you provide “write” permissions to others, they have the ability to make changes to the data. They also have the ability to make copies of the files and distribute them. © 2006 Senvid Inc. User Manual 41 Version 1.07 WINDOWS POWER SAVING MODES The MioNet Application is incompatible with some Windows power saving modes. Additionally, the MioNet Application is best used with an always-on Internet connection and certain Windows power settings will interfere with that connection. In situations where a power saving mode is required we recommend stopping and staring MioNet upon recovery. Most power saving modes are pre-set in laptop computers. Standby Mode Standby is a Windows power saving mode designed to place a computer into the lowest possible power consumption. The hard drives are turned off, as is the monitor, the processor operates at minimal levels, and most peripheral components (modem and network adapter) are turned off. Many laptops will enter Standby when the lid is closed. Hibernate Mode Windows Hibernate is a deeper power saving mode. Hibernate will use part of the hard drive to write information about the current running state of Windows and then shut down the computer. Upon recovery, Windows will return to the state before Hibernation. This differs from a shut down because Windows will save and then reopen all documents and programs without user intervention. Configuring Windows Power Saving Modes Understanding that power saving modes are necessary for laptops under certain conditions to prevent data loss, we recommend the following settings: (The following information should be considered MioNet guidelines and be adjusted for individual) If you want your computers accessible, you need to set the power settings to “Never” for “System standby” and “System hibernate”. Power Saving Mode Setup Windows XP To access the settings to the power savings modes, go to the Start menu, choose Programs (or Program Files) > Settings > Control Panel, then click the Display icon and choose the Screen Saver tab. Click the Power… button at the bottom of Display Properties to bring up Power Options Properties. © 2006 Senvid Inc. User Manual 42 Version 1.07 The Power Schemes tab controls the majority of Windows power saving modes while the Hibernate tab contains the settings to enable or disable the Hibernate mode. Windows 2000 To access the settings to the power savings modes, go to the Start menu, choose Program Files > Settings > Control Panel, then click the Display icon and choose the Screen Saver tab. © 2006 Senvid Inc. User Manual 43 Version 1.07 Click the Power… button at the bottom of Display Properties to bring up Power Options Properties. The Power Schemes tab controls the majority of Windows power saving modes while the Hibernate tab contains the settings to enable or disable the Hibernate mode. Users should note Windows 2000 does not as many options as Windows XP in configuring laptops. © 2006 Senvid Inc. User Manual 44 Version 1.07 CUSTOMER SUPPORT AND ONLINE HELP Accessing MioNet Help on the Web The Online Help command in the MioNet Application takes you to the MioNet Support page, which provides frequently asked questions and answers (FAQs), a KnowledgeBase, and information on how to contact Customer Support. To open this help, choose Help > Online Help. Contacting Customer Support If you need to get in touch with Customer Support, you can: 1. Go to www.mionet.com and click on Knowledgebase in the Support menu. Choose Submit support request and fill in the form on the page provided. 2. Contact customer support by emailing [email protected]. © 2006 Senvid Inc. User Manual 45 Version 1.07