1
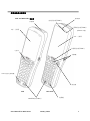
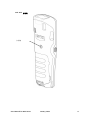
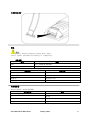
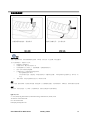
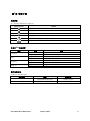
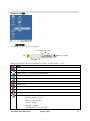
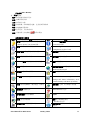
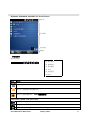
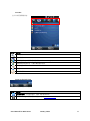
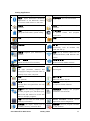
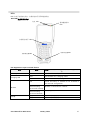
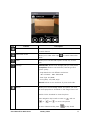
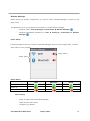
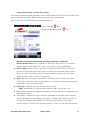
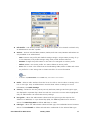
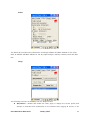
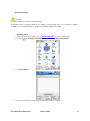
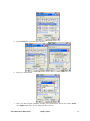
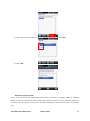
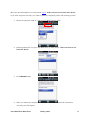
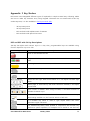
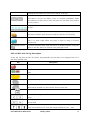
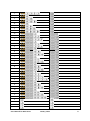
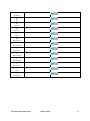
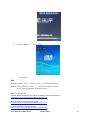
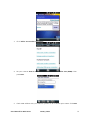
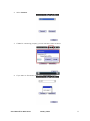
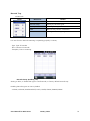
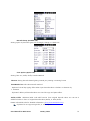
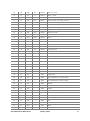
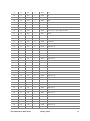
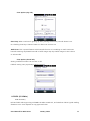
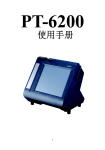
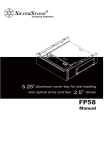
DS5 系类 使用手册 Windows CE6.0 and Windows Embedded Handheld 6.5 (Classic & Professional) 2014.09.16 ISO 9001 Certified Quality Management System C 2013 DSIC Co., Ltd. ○ All Rights Reserved. 前言 关于本使用手册说明如何安装,操作和维护DS5手持式数据采集器。 本文件包含的专属资讯受到版权法所保护。 未经大信情报通信(株)书面同意,本出版物的内容不能以任何方式,经由任何电子或机械方式复制或使 用。 电子或机械方式包括,例如影印,录像或信息存储和检索系统。 本手册资料如何更改,怒不另行通知。 DS5 is a trademark of DSIC Co., Ltd. Mobile Base is a brand name of DSIC rugged mobile computer.. R and the Windows Logo are trademarks or registered trademarks of Microsoft Corporation Windows○ The Bluetooth word mark and logos are owned by Bluetooth SIG, Inc. All trademarks and trade names are the property of their respective owners. User Manual for DS5 Series January 2014 2 Contents 安全须知........................................................................................................................................................................................... 6 第1章 : 介绍DS5系列 ................................................................................................................................................................ 7 数据采集器功能概述 .......................................................................................................................................................... 8 DS5 and DS5 wide 前视图 ................................................................................................................................. 8 DS5 后视图 .................................................................................................................................................................. 9 DS5 wide 后视图 ................................................................................................................................................... 10 手带折卸及更换 ....................................................................................................................................................... 11 电池 ........................................................................................................................................................................................ 11 电池电源 ..................................................................................................................................................................... 11 电源适配器 .......................................................................................................................................................................... 11 第2章 : 开始 ............................................................................................................................................................................... 12 安装micro SD卡 ................................................................................................................................................................ 13 电池安装及操作................................................................................................................................................................. 14 连接电源 .............................................................................................................................................................................. 15 利用mini USB充电 ................................................................................................................................................. 15 利用座充 ..................................................................................................................................................................... 16 终端电源操作 ..................................................................................................................................................................... 16 电源开关 ..................................................................................................................................................................... 16 暂停和回复 ................................................................................................................................................................ 16 复位 .............................................................................................................................................................................. 16 第3章 详细了解.......................................................................................................................................................................... 17 电池状态 .............................................................................................................................................................................. 17 充电中LED状态表示......................................................................................................................................................... 17 额外电池充电 ..................................................................................................................................................................... 17 Clean Boot .......................................................................................................................................................................... 18 Backup Manager(备份管理者) ............................................................................................................................. 18 Windows CE 6.0 ...................................................................................................................................................... 18 WEH 6.5 ...................................................................................................................................................................... 18 Windows CE 画面 ........................................................................................................................................................... 19 在任务栏图标 ............................................................................................................................................................ 19 开始按键(Start Button) ....................................................................................................................................... 20 在控制面板上的图标 .............................................................................................................................................. 20 Windows Embedded Handheld 6.5 Home Screen .......................................................................................... 21 状态栏图标 ................................................................................................................................................................ 21 Icon Bar ..................................................................................................................................................................... 23 Icons in the Task Tray ....................................................................................................................................... 23 Programs in Start Screen ................................................................................................................................ 24 User Manual for DS5 Series January 2014 3 Setting Applications ........................................................................................................................................... 25 LEDs ....................................................................................................................................................................................... 27 LED Appearance upon terminal feature ................................................................................................. 27 Keypad键盘 ........................................................................................................................................................................ 28 数字键说明 ................................................................................................................................................................ 29 用54键来输入 ........................................................................................................................................................... 30 使用SIP (Soft Input Panel、虚拟输入键盘) .............................................................................................. 30 调整画面背光亮度................................................................................................................................................... 31 调节音量 ..................................................................................................................................................................... 31 条码扫描器 .......................................................................................................................................................................... 31 在Windows CE上执行Barcode Tray ............................................................................................................ 31 在 Windows Embedded Handheld 6.5上执行Barcode Tray........................................................ 31 1维扫描来校准 ......................................................................................................................................................... 32 2维扫描校准 .............................................................................................................................................................. 32 提醒读到标签 ............................................................................................................................................................ 33 摄像头Camera ................................................................................................................................................................... 34 Using Camera ......................................................................................................................................................... 34 Camera Options .................................................................................................................................................... 34 Wireless Manager ........................................................................................................................................................... 36 Wi-Fi Setting ........................................................................................................................................................... 36 Bluetooth Setting ................................................................................................................................................. 50 Bluetooth setting trouble ................................................................................................................................ 55 Appendix Ⅰ Key Strokes.................................................................................................................................................... 58 DS5 and DS5 wide 34 Key Descriptions .............................................................................................................. 58 DS5 and DS5 wide 54 Key Description ................................................................................................................ 59 DS5 and DS5 wide Alphanumeric Characters ................................................................................................... 60 DS5 and DS5 wide Special Functions .................................................................................................................... 62 Chapter 4: 管理手册 .............................................................................................................................................................. 64 OS升级.................................................................................................................................................................................. 64 Windows CE6.0/ WEH6.5/DS5/DS5 Wide ................................................................................................... 64 SDK ........................................................................................................................................................................................ 65 Wi-Fi connection through SCU (Summit Client Utility) ................................................................................. 66 Microsoft Zero Config is not in active when you use SCU............................................................. 68 Remote Desktop Connection .................................................................................................................................... 69 Windows CE6.0 ....................................................................................................................................................... 69 WEH6.5 ....................................................................................................................................................................... 71 GPRS Connection ............................................................................................................................................................ 74 Setting APN (Access Point Name) ................................................................................................................. 74 Using Connection Manager Sample ............................................................................................................. 76 User Manual for DS5 Series January 2014 4 Barcode Tray ...................................................................................................................................................................... 78 1D Barcode ............................................................................................................................................................... 78 2D Imager Barcode ............................................................................................................................................... 81 HF RFID (13.56Mhz) ....................................................................................................................................................... 88 RFID Summary ........................................................................................................................................................ 88 Supporting HF RFID tags ................................................................................................................................... 89 Related Source & Files ........................................................................................................................................ 89 RFID Control ............................................................................................................................................................. 90 User Manual for DS5 Series January 2014 5 安全须知 详细阅读本手册,以保持自己的安全,避免财产损失。 确保电池端子(铁的部分)不应于任何导电材料,如一条项链和硬币等。 还要确保电池不应 该有牙齿或指甲损坏。 要不然影响可能导致电池爆炸。 必须使用专用电池,不使用电池以外的任何用途。如使用非正品,减缩产品寿命期,引起爆炸 等 充电时必须通过专用座充或 USB 充电线。如使用本司提供配件以外的配件来充电,引起爆炸 或缩短设备寿命期。 注意激光线 Caution in relation with Laser Scanner 切勿直视激光线,否则会损伤眼睛。 注意有关电池 破损电池或冲击加热,浸水和锥子来折卸,引起爆炸的危险。 切勿让孩子或宠物来使用。 使用时注意须知 本产品在爆发危险地区,乘坐飞机时,或医院里,切勿使用。. 设备浸水后,切勿使用,开电源等,引起触电。 切勿使用者随意改造,折卸或维修,需要时请联系相关负责人或客服中心。 必须设备上的信息,保存其他记录工具上,维修或升级过程中出现信息删除等情况,重要的信 息一定备份。 切勿使用高温高湿地方, 引起故障原因。 信用卡,电话卡,存折等有磁性产品,切勿放在设备附近,设备上的信息,磁性引起毁损 User Manual for DS5 Series January 2014 6 第1章 : 介绍DS5系列 DS5系列在零售,仓库及其他领域行业应用于数据采集和自动化的工业级数据采集器。 DS5系列提供方便的特点和能力在你的手上,包括扫描条码,读写RFID标签,内置摄像头采集 图像,并通过广域网和局域网来实时传达数据。 本章描述DS5前/后视图,电池和电源适配器。并非所有功能在本章中描述,可能对你的设备是 可用的。 并非所有的功能在本指南中描述可能对您的设备是可用的,若你发现某个躬耕不可用,请及时 联系贵司系统负责人。 User Manual for DS5 Series January 2014 7 数据采集器功能概述 DS5 and DS5 wide 前视图 接收器 充电状态表示LED灯 扫描窗 网络状态表示LED灯 3,5” 寸屏幕 (Phone only) 4.3” 寸屏幕 扫描状态表示LED灯 马克风 扫描键 LCD 背光灯控制键 复位键 DS5 DS5 wide Modifier表示LED灯 User Manual for DS5 Series January 2014 电源键 8 DS5 后视图 闪光灯 扩展电源连 摄像头 扬声器 手写笔 Mini USB扣 手带 DS5 wide DS5 User Manual for DS5 Series January 2014 9 DS5 wide 后视图 扫描键 User Manual for DS5 Series January 2014 10 手带折卸及更换 电池 警告 万一出现设备湿濡,切勿设备进入加热机器里 (如加热器,微波炉,烤箱等.). 电池加热,引起爆炸,变形或故障等 (类似水的液体进入后,内部颜色可变色) . 电池电源 型号 描述 DS5 3.7V, 5200mAh (14.8Wh) DS5 wide 3.7V, 5200mAh (14.8Wh) 第一次使用时必须充满电后使用,电池充电配件一下如何 充电配件 mini USB线 大约4个半小时 座充和适配器r 大约4个半小时 Snap on 大约4个半小时 4 连座充 大约4个半小时 充电时间 电源适配器 充电时必须使用厂家提供的适配器. 电源适配器 规格 mini USB 线 5V, 3A 座充 5V, 3A Snap on 5V, 3A 4 连座充 5V, 12A User Manual for DS5 Series January 2014 11 第2章 : 开始 本页描述电池安装及更换方式,安装Micro SD卡和终端开启 l 启动终端l: 安装Micro SD卡 安装电池 连接电源 操作终端电源 User Manual for DS5 Series January 2014 12 安装micro SD卡 插入micro SD卡时,仔细如下面的插图显示. 插入SD卡之前,先准备micro SD卡. 插入SD卡固定到最后。 提醒 插入micro SD开时,注意一下,若强制插入,引起卡损坏。 micro SD放入位置不准确,引起损坏或功能不良。 设备里卡槽部分保持清洁 micro SD卡寿命到期,保存不了信息,那时采购新的micro SD卡来使用。 User Manual for DS5 Series January 2014 13 电池安装及操作 安装和折卸电池时,轻松放下 先推上扣部分后,左右拿出来 插入电池 折卸电池 提醒 电池保养方式 锂离子电池寿命有限,各种因素影响到电池寿命(如环境,保管方式,充电次数,或充电量等) 为了电池寿命延长,请使用以下方式 避免高热、高湿的地方 若设备不常用,最小每个月充满一次 切勿设备放3天以上在座充上。(适配器连接,电源连接的情况下) 使用厂家认可的座充和适配器 若设备3个月以上不使用或者仓库里保管时, - 最合适保管温度 0~25°C 长时间不使用电池,引起放电,放电恶化到电芯,用量或充电功能, 所以建议保管之前重新充电,每3个月一次 充电 系统升级时,可提供电池寿命优化方式,那时及时升级 运输 锂离子电池,按照法律讲,无限制公路运输,但通过第三方空运或委托运输方,需要各种条件,详细内容,请顾问相关专业机构。 处理l 按照法律,可充电的电池,为了环保,分类到回收类,若使用完成电池可寄到下面地址 DSIC Co., Ltd. 2nd Floor, Daeryung Technotown 3, 448 Gasan-Dong, Guemchun-Gu, Seoul, Korea Tel. Service: +82-2-2107-5152 Fax: +82-2-2107-5178 Email:[email protected] User Manual for DS5 Series January 2014 14 Subject to change without notice 连接电源 连接电源时,利用如下方式. 警告 电源连接时,请注意确认放入电池,若没放电池时,连到适配器,出现反复开关情况。而不能正常使用 提醒 适配器或者充电 USB 线断线之前折卸电池,可影响到设备寿命,或故障。 利用mini USB充电 1. 按照照片插入USB线。先插USB扣后,适配器插到电源 2. 充电完成后,先拔出来USB线部分 User Manual for DS5 Series January 2014 15 利用座充 设备放在座充后,座充和适配器连接,然后连接电源 终端电源操作 电源开关 在设备上有电源键 ,开关时长按。 若确认信息时选OK也是用 ,但长时间按就设备关机。 暂停和回复 电源键按一次进入暂停模式,再按回复 复位 若终端停止, 按复位键,停止正在运行的应用程序。终端重启也按复位(Reset)键。 若你没保存是按复位键,不能保证信息存档,可会丢失数据。 User Manual for DS5 Series January 2014 16 第3章 详细了解 电池状态 以下电池表示图案来表示电池状态. Battery Icon Status 充满 电量较大 电量中间 电量较低 电量不足,需要充电,出现自动关机 充电中 充电中LED状态表示 区分 颜色 状态 红色 绿色 红色 绿色 红色 绿色 红色(终端) 绿色(终端) 手持终端 座充 4 连座充 Snap on 充电中 充满电 座充上额外电池充电中 座充上额外电池充满电 座充上额外电池充电中 座充上额外电池充满电 充电中 充满电 额外电池充电 2个配件可充电额外电池 配件名称 座充 描述 充电时间 1台终端和1节额外电池 大约4个半小时 4 连座充 4台终端和4节额外电池 大约4个半小时 User Manual for DS5 Series January 2014 17 Clean Boot 冷启也可以停止正在运行中的所有程序. 然而, 他会删除所有数据和 RAM 上存储的数据。 终端改成出厂默认设置。 万一终端没反应测试复位。. 警告 Clean boot 造成终端出厂默认设置。 所有程序和保存的数据删除,需要 clean boot 一定 IT 负责人的允许上操作。. 提醒 Booting 方式 方式 按键 出厂设置 + Clean , reset + , reset 冷启 Registry Nand空间 RAM (不含 Nand) 删除 删除 删除 删除 维持 删除 维持 维持 删除 维持 维持 维持 + Reset, (back up battery fully discharged) 热启 reset Backup Manager(备份管理者) Windows CE 6.0 数据, Windows CE 6.0 注册表通过 Clean boot 后删除。 若保持数据,请使用 Backup manager(备份管理者) 开始 ▶ 程序 ▶ Backup Manager(备份管理者) 或 我的设备 ▶ Windows ▶ 查看 ▶ 选项. ▶ 文件夹选项里高级设置都不选 ▶ Backup_manager.Ink WEH 6.5 WEH 6.5 数据保存到 Nand 空间, Clean boot 后不能删除数据。 User Manual for DS5 Series January 2014 18 Windows CE 画面 在任务栏图标 在桌面底部,任务栏上表示正在运行的程序 开启程序和状态表示图标 开始 Desktop Display Window 节目 图标被设置在终端显示指示的特征的选择状态 在终端上显示图标的功能一下如何 图标 描述 开始 界面 虚拟输入键盘 : 打开SIP (Soft Input Panel)键盘 连接PC同步状态 连接适配器Connected with external power LAN连接状态 LAN断线状态 充电中 电量低(电量10%~14%状态) 电量超低,需要更换(电量9%一下) 网络管理者: - Wireless: WLAN及蓝牙开关 - Battery: 表示电池用量% - Volume: 调整声音 - Backlight: 调整背光 - Task Manager: 打开任务管理器 User Manual for DS5 Series January 2014 19 开始按键(Start Button) 按“开始”图标 - 程序: 表示能使用的整个程序 - 收藏: 收藏常用的文档 - 文档: 表示整个文档 - 设置: 控制面板,网络和拨号连接,任务栏和开始菜单 - 帮助: 控制键盘设置帮助 - 运行: 打开程序,文件夹或文件 - 挂起: 设备停顿. 按电源键 来开启设备 在控制面板上的图标 图标 描述 图标 背光: 设置背光时间及屏幕背光(按照 Battery Power及AC Power调整) 描述 Bluetooth设置属性: Bluetooth管理器 CPU Settings: Select Power 证书: 表示相关DS5系类证书 management mode of CPU 日期/时间: 设定日期/时间和时区 正在拨号: 拨号属性 显示: 更换背景和外观 输入面板: 输入法选项 Internet选项: 关于连接安全性等设置 键盘: 设置重复 鼠标: 设置双击 网络和拨号连接: 设置连接,如Dial up, WLAN and Bluetooth 所有者: 更改所有者属性 密码: 设置终端密码 PC连接:电脑直接连接 Pocket Controller: Configure General Settings and status information, such as Mani battery and Back up battery 电源: 表示电源属性,剩余电量,关机等 区域设置: 区域,语言和输入法设置 删除程序: 删除程序 SCU: WLAN网卡程序 存储管理器:表示存储属性 Stylus: 系统: 表示系统属性 版本:关于终端配置信息 硬件软件程序等 音量和声音: 设置音量和声音 无线管理者:开关WLAN和Bluetooth电 源程序 User Manual for DS5 Series January 2014 20 Windows Embedded Handheld 6.5 Home Screen 状态栏 今日屏幕 任务托盘 标题栏 状态栏图标 表示设备状态 1 ○ 2 ○ 3 ○ 4 ○ 5 ○ 6 ○ 1 输入模式 ○ 2 连接状态 ○ 3 信号感度 ○ 4 声音 ○ 5 电池用量 ○ 6 时间 ○ 图标 描述 输入模式 输入数字 输入小写(切换键中橙色键按两次) 输入大写(橙色键按两次,SHIFT键再按两次) Connectivity (WLAN, and Active Sync) 连接(SCU已连接) 未连接(In case SCU activated) 开启WLAN, 但未连接(In case MS Zero Config) User Manual for DS5 Series January 2014 21 数据网络未连接. (MS Zero Config) 通过微软零配置服务使用时,出现图标(WZC : Wireless Zero Config) 通过微软零配置服务连接状态(WZC : Wireless Zero Config) 同步连接中(WZC : Wireless Zero Config) 连接网络,正寻找另外网络(WZC : Wireless Zero Config) 连接网络,查到另外网络(WZC : Wireless Zero Config) 可连接网络信息(WZC : Wireless Zero Config) 信号强度 (Cellular, GSM/GPRS, HSPA, UMTS) 数据通信信号强 数据通信无信号 数据通信关闭 数据通信无服务 寻找数据通信信号 正在传达数据 SIM卡无法找到 选择1列 选择2列 声音 振动模式 声音开启 声音关闭 电池 充满 电量大 电量中 电量小 电量较低 充电中 无电 User Manual for DS5 Series January 2014 22 Icon Bar 拉下来可看到图标状态 图标 描述 画面扩大 输入模式 网络连接状态. 可操作无线管理者(Wireless Manager) D数据通信连接状态. 可操作数据通信电源 声音调整 电量 时间和闹钟 Icons in the Task Tray 表示在终端上启动的应用程序 图标 描述 无线管理者: 开关数据通信,WiFi and Bluetooth Barcode Tray: 关于扫描应用程序,参考Barcode Scanner User Manual for DS5 Series January 2014 23 Programs in Start Screen 图标 描述 图标 描述 条码: 扫描应用程序 主屏幕: 返回主屏幕 Version: 终端版本信息(硬件,软件) Backlight: LCD背光 数据通信 短信: : 操作数据通信 联 系 人 : Input, edit, search Contact 电子邮件: lists Internet Explorer: Access Internet 日 历 : Explorer Mobile. Press scheduler. Press key to View calendar and Set key to return return Start menu Start menu 设置: Set, or access Bluetooth, Clock 入 门 : Manual to operate Windows & Alarms, Home screen, Lock, Power, Embedded Handheld 6.5 features Sounds & Notifications, Network Connections, System Information 闹钟: Set time zone and alarm 图 片 和 视 频 : Access Camera application and view Album Windows Media: Access music, Marketplace: Purchase applications video, TV, playlists and now playing from the Marketplace Messenger: MSN Weather: Set your regional Activate Messenger program weather information Windows Live: Access Windows Live MSN Money: Set Stock market mobile game Synchronize your information 计算器: Calculator feature 游 戏 : Microsoft’s application 便笔: Note pad program. Add, edit, Active Sync: save a note terminal to desktop PC 任务: Write your work task and Notes 任 务 管 理 器 : Enables viewing of memory and CPU allocations and stops running processes. Internet共享: Connect to your PC by 帮 助 : You can find help document Bluetooth, or USB from online Help Site 搜素手机: Search contacts, data, and 远程桌面Mobile: Log onto Windows other information on the terminal NT server type computers and use all of the programs that are available on that computer from your terminal User Manual for DS5 Series January 2014 24 Setting Applications Icon Description Icon 蓝 牙 : Open Microsoft’s Bluetooth Description 时钟和闹钟: Set Time and Alarms application to set Bluetooth feature to connect other device in the area 主屏幕: Select Home theme for your 锁 定 : Set password to lock your terminal terminal 电 源 : Displays Main battery power 声音和通知: Set sound and vibration gauge and set battery power saving in specific events, and program notification 个人: Included personal settings 系统: Included system settings 连接文件夹 无线收发 连 接 : Set up your network connection, such as modem, ISP, VPN and dial up 域 注 册 : Register your terminal in a 网卡: Set up network cards such as domain WLAN, Bluetooth, USB Ethernet and others 由 USB 连 接 到 PC: enable, or disable 无 线 管 理 器 : Power control to advanced network functionality Bluetooth and WWAN modem 系统文件夹 关 于 : Terminal information such as Backlight: Control backlight of LCD OS type, processor, memory and Keypad and Copyrights. Assigns terminal name to identify from other computer 证书: Certificate Information using on 客 户 反 馈 : Send feed back to the terminal Microsoft about the OS 加 密 : Make encryption all your 错误报告: Reporting error to Microsft storage files. Encrypted files are only to improve better software readable 外部GPS: GPS setting program such 托 管 程 序 : Displays the program as GPS program port, hardware port, installed in the terminal Baud rate and method to check GPS data in multiple programs 内存: Terminal RAM and ROM (Nand) Pocket Controller: Terminal control memory information application and management 区域设置: Set region, display type of 删除程序: Remove program installed number, currency, time and data in the terminal User Manual for DS5 Series January 2014 25 屏幕: Control display orientation type, Summit: Access align screen, font setting to Clear WLAN settings SCU to control Type and change text size, 任务 管理器 : Stop running programs and processes 个人文件夹 按键: Setting Hot key and customize 主机信息: Input the terminal owner Up/Down control. This function needs information to set up with registry Phone: Turning on phone User Manual for DS5 Series January 2014 26 LEDs LED 灯表示电源充电状态,扫描状态表示及网络连接状态 DS5 LEDs位置和表示状态 充电 LED 通讯链接标识 LED 扫描状态表示 LED 切换绿色键LED 切换橙色键LED LED Appearance upon terminal feature 区分 Data capture status LED Charging LED 颜色 描述图标被设置在终端显示指示的特征的选择的状 态 Blue Good read barcode, or RFID Red The terminal is in charging status Green The terminal has fully charged Off Phone off status, or modem is not included in the terminal configuration Modem Green blinking Modem is connected to network (3 seconds interval) 模块无连接网络 Green blinking (1 second interval) 切换键 蓝色 橙色 User Manual for DS5 Series 切换后可使用蓝色键 切换后可使用橙色键 January 2014 27 Keypad键盘 DS5 系列有含10个功能键的数字键盘和全键盘两种 数字键盘 全键盘 User Manual for DS5 Series January 2014 28 数字键说明 说明按键字符输入发. 单字符输入,请按键 需要橙色表示键时,请按橙色键来切换 ,也是切换蓝色,按蓝色键 连续输入小写 - 按两次 - 按照英文字母来输入4次 - 按 橙色键 橙色键一次回复到数字键 连续输入大写 - 按两次橙色键 - 键按两次后,在下右侧出现 按照英文字母位子来输入. - 键按一次回复到小写键盘 - 橙色键按后,回复到数字键 例如 - 输入DEF - 按橙色键两次 后, 键两次, , , 提醒 若需要找特殊文字和符号,通过下面虚拟键盘输入 按照 键按次数,输入效果不同 状态 备注 Shift 次数 默认 回复到默认 一次使用后,回复到原来状态 两次按后,固定Shift键,需要Shift效果的文字连续输入 User Manual for DS5 Series January 2014 29 用54键来输入 下面说明连续输入方式,若需要一般输入法,请看键盘 Key Strokes. 输入数字 - 先找要求的数字找一下按. - 更换键来可选F1到F20. - 按蓝色键 - 按橙色键 , 按数据键可选输入F1 ~ F10. ,能输入 F11 ~ F20 输入英文字母 - 默认为小写 - 大写输入一次,请按 - 大写连续输入,请按 - 输入 A1a2 - 按 键一次后输入 键两次 例如 , , , , 提醒 键按一次,只有效一次,表示状态 若需要连续输入大写,请按 - 例如ACDZY - 按 后, 键两次,表示 , , , , 使用SIP (Soft Input Panel、虚拟输入键盘) 图标(Windows CE),或 在任务栏上看到 (Windows Embedded Handheld 6.5),点击后打开SI P, 再点后消失SIP Windows CE Windows Embedded Handheld 6.5 照片: 虚拟输入键盘 User Manual for DS5 Series January 2014 30 调整画面背光亮度 在设备上可以调节画面亮度. 增加 ( 后,通过 按两次 )和 减小 ( ),亮度减小后,可省电。 键功能为关闭背光,按一次暗下去,再按亮起来 调节音量 后, 按两次 提高 ( )和 下降 ( ) 条码扫描器 DS5的条码性能强,识别率高. - 执行Barcode Tray - 校准扫描光线 - 按扫描键 1. 为了读条吗, 如下一样执行Barcode Tray: 在Windows CE上执行Barcode Tray 开始 ▶ 程序▶ Barcode 启动后Barcode Tray图标在任务栏上出现 在 Windows Embedded Handheld 6.5上执行Barcode Tray 开始 ▶ Barcode Barcode Tray图标在命令表示栏出现 User Manual for DS5 Series January 2014 31 2. 校准扫描光线 1维扫描来校准 1D 扫描头 : SE955, SE965, SE1524 提醒 按照模块来不同的读到宽度和距离,而角度斜着也读不到,所以为了准确度到,请距离和角度调整 2维扫描校准 [5100 SR/ N5600 SR/ N5600 HD] Good Wrong User Manual for DS5 Series January 2014 32 [5300 SR/ 5300 HD] Good Wrong 3. 按扫描键后,确认是否出来光线,读成功后提醒方式为铃声,振动或者亮LED灯 提醒读到标签 表示提醒方式 区分 表示方式 White(白色) 未完成 Amber blue(蓝色) 扫描完成 备注 通过耳机,车上或者杂音较多的地 方 铃声 “Bib”声音 读到”Bib”声音 在 barcode tray 上可设置 振动 振动 读到振动 在 barcode tray 上可设置 LED User Manual for DS5 Series 表示状态 January 2014 33 摄像头Camera This section explains how to use the camera on your terminal. You can take photographs and shoot video by using the built-in camera functionality. Your 5 megapixel camera products photos in JPG and BMP format, and videos in ASF format. Note DS5 series may vary upon your order configuration. Please check your terminal configuration has included camera in your device. If not, please consult with your sales agent Using Camera Taking Photos Taking picture with your terminal’s built-in camera is as simple as choosing a subject, then press at keyboard, or touch at screen Note When taking a photo in direct sunlight or in bright conditions, shadows may appear on the photo. 1. From the main Desktop, Start ▶ Program ▶ Camera Note If your terminal has camera configuration, the Program initially contains the Camera icon. If you delete it, or if you want to access the camera at the Program, you must activate Camera once, My Device ▶ Nand ▶ MBApp ▶ DS_Camera 2. Use your main display as viewfinder. 3. Before you take a picture, use the and key to zoom in or out. You can magnify up to x4 (400 percent) 4. If desired, before taking the photo, you can tap on-the screen icons to access various camera options and settings. 5. Press icon , or press key until the shutter sounds. (The picture is automatically stored within your designated storage location. If no microSD is installed, all pictures are stored on the Nand\Album. For more information, refer to “Camera Options”. 6. While viewing a picture, after you have taken it, press key to zoom in or to zoom out. You can magnify the picture up to x4. 7. Press key to return to the viewfinder. Camera Options Options are represented as below User Manual for DS5 Series January 2014 34 Icon Feature Camera mode Description Allow you to take a photo in various modes. Tap the icon to switch feature Camcorder mode Allows you to take video. Tap to switch Camcorder mode Flash Allows you to set the flash options to Off, On, or Auto flash Settings · Album Path: allows to set storage path you took photo · Snap Shot: allows to set resolution, format type and photo quality. - Snap Resolution: 10 different resolutions Min: 176x144 ~ Max: 2592x1944 - Save Type: JPG, BMP - JPG Quality: Low, Mid, High · Record: allows to set resolution of photo and video Album Allows you to access Image viewer. The photo you took, will be displayed as a thumbnail in the image viewer icon. Double click a thumbnail to view the photo. Press navigation key board to zoom in ( ( ), or and to move next photos To return Camera mode, press User Manual for DS5 Series January 2014 ) and out at key board 35 Wireless Manager Before setting up wireless configuration, you need to access Wireless Manager to switch on the radio power. This application is to set up wireless functionality. To access wireless manager, - Windows CE 6.0: Start ▶Setting ▶ Control Panel ▶ Wireless Manager - Windows Embedded Handheld 6.5: Start ▶ Setting ▶ Connections ▶ Wireless Manager Power Switch Following image shows user interface of Wireless Manager. Upon module configuration, it shows radio status of your terminal. Power Switch Radio Types Switch Status WiFi Bluetooth Phone Not Supported Power on Power off Wi-Fi Setting - Power on WiFi power at Wireless Manager - Open Summit Client Utility - Configure your WLAN User Manual for DS5 Series January 2014 36 When you power on WiFi, following WiFi signal will be displayed at your task tray and task bar. Windows CE6.0 Windows Embedded Handheld 6.5 Radio Signal Strength The radio is not associated/authenticated to an AP The signal strength (RSSI) for the current AP (to which the radio is associated) is -90 dBm or weaker, which means that a Summit 802.11b/g radio will operate at 802.11b data rates only The RSSI for the current AP is stronger than -90 dBm but not stronger than -70 dBm, which means that a Summit radio will operate at 802.11g or 802.11a data rates that are less than 54 Mbps The RSSI for the current AP is stronger than -70 dBm but not stronger than -50 dBm, which means that a Summit radio should operate consistently at 54 Mbps The RSSI for the current AP is stronger than -50 dBm User Manual for DS5 Series January 2014 37 Configuration WLAN – Summit Client Utility This section describes the steps required to set up Summit Client Utility. It shows review about the options within the SCU tabs – Main, Profile, Status, Diags and Global Settings. After turn on WiFi Power Switch from Wireless Manager, tab Windows CE6.0: Start ▶ Setting ▶ Control Panel ▶ SCU Windows Embedded Handheld 6.5: Start ▶ Setting ▶ System ▶ SCU Main Tab Windows CE6.0 Main Tab Windows Embedded Handheld 6.5 Main Tab Enable/ Disable Radio: this is toggle button when your WiFi radio is on, the button displays Disable Radio. When your radio is off, the button shows Enable Radio. Active Profile: Lists the name of the active configuration profiles. When you select a profile from the chosen drop down menu, the settings for the profile become active. When you select Third Party Config, the terminal goes through a power cycle, WZC (Windows Zero Config) is used for configuration.. Status: Indicates if the radio is associated to an AP and, if not, indicates the radio’s current status. Potential values include: Down (not recognized), Disabled, Not Associated, Associated, or EAP type authenticated. Radio Type- Indicates the terminal’s radio type including: - BGN : Summit 802.11 g radio (supports 802.11 b, 802. 11g and 802. 11 n) Reg. Domain: Indicates the regulatory domain(s) for which the radio is configured by an administrator of user. Auto Profile – Enables the user to activate or deactivate an automatic profile selection facility. Tab List and use the dialog box to select a created profile. When the facility is active and the Summit radio makes its first attempt to associate to an AP (after a terminal startup or resume), SCU tries each profile, in order, until the radio associates to User Manual for DS5 Series January 2014 38 an AP. That profile becomes the active profile and remains the active profile until one of the following occurs: - The device is suspended and resumed, power-cycled, or restarted, which causes the automatic profile selection facility to restart the selection process. - The user turns off the automatic profile selection facility and manually selects a different profile on the SCU Main window. Note The profile list should not include any profiles with an Ad Hoc Radio Mode setting. Driver- Indicates the current version of the device driver. SCU- Indicates the SCU version currently running on the device. Displays only if space permits. Import/ Export – Displays only if the radio is programmed to allow import/ export functions and if you are logged in as an administrator. Click Import/ Export and use the dialog box to do one of the following: - Export global settings, all standard SC profiles, and the special Third Party Config profile from the SCU area of a device’s registry to a file that can be transferred to another terminal. - Import global settings, all standard SCU profiles, and the special Third Party Config profile from a file (created using the Export facility) to the SCU area of a device’s registry to enable SCU to use the information. Note - When importing information, select Add to existing to merge new information with current registry information. Select Replace to overwrite the current registry information with the newly-imported information. Profile The profile settings are radio and security settings that are stored in the registry as part of configuration profile. When a profile is selected as the Active Profile on the Main tab, the setting for that profile become active. You can define up to 20 profiles. Profile changes are not saved to the profile until you click Commit User Manual for DS5 Series January 2014 39 Edit Profile – Use the drop-down menu to select the profile to be viewed or edited. Only an administrator can edit a profile Actions – Actions included New, Rename, Delete, and Scan. New, Rename and Delete are only available to an administrator. - New: Create a new profile with default settings. Assign a unique name (a string of up to 32 characters). Edit profile settings using other profile window selections. - Rename: Change the profile name to one that is not assigned to another profile - Delete: Delete a non-active profile. You cannot delete an active profile. - Scan: Click to view a list of APs that are broadcasting SSIDs; select an SSID and create an profile for it. See “Using Scan to Create a Profile” for more information Note If WLAN is off (Enabled Radio status at Main tab), Scan button is not activated. Radio – Select a radio attribute from the list on the left to view its value or setting in the box on the right. Only an administrator can edit these values or settings. For more information, see Radio Settings Security – Values for the two primary security attributes, EAP type and encryption type, are displayed in separate drop-down lists with the current the current values highlighted. Only an administrator can edit these security settings. Encryption – When the administrator selects and encryption type that requires the definition of WEP keys or a pre-shared key (PSK), the WEB keys/PSKs button become active. Click WEP keys/PSKs to define WEP keys or a PSK. EAP Type – When the administrator selects an EAP type, the Credentials button becomes active. Click Credentials to define authentication credentials for the selected EAP type. User Manual for DS5 Series January 2014 40 Save Changes – To save changes for the selected profile, you must click Commit. If you make changes without clicking Commit and attempt to move to a different SCU windows, a warning message displays and provides the option of saving your changes before you leave the Profile window. Radio Settings SSID – Service set identifier for the WLAN to which the radio connects. - Value: A string of up to 32 characters - Default: None (Warning! This setting allows association to the strongest unsecured detected network.) Client Name - The name assigned to the Summit radio and the client device that uses it. - Value: A string of up to 16 characters - Default – None Power Save – Indicates the radio’s power save mode. - Value: · CAM – Constantly Awake Mode · Maximum – Maximum power savings · Fast – Fast power save mode - Default – Fast Tx Power – Indicates transmit power. Transmit power can be overridden by a Cisco AP if the CCX support global setting is set to Full and the AP defines maximum transmit power for the client as a lower value. - Value: · Maximum – Maximum defined for current regulatory domain · One of the following values in milliwatts (mW): 50, 30, 20, 10, 5, 1 - Default: Maximum Bit Rate – Indicates the bit rate used by a radio when interacting with a WLAN AP. - Value: Auto (rate negotiated automatically with AP) or one of the following rates in megabits per second (Mbps): 1, 2, 5.5, 6, 9, 11, 12, 18, 24, 36, 48, 54. - Default: Auto Radio Mode – Use of 802.11 a, 802.11g, 802.11b, and 802.11n frequencies and data rates when interacting with AP, or use of ad hoc mode to associate to a client radio instead of an AP. When SCU operates with a Summit 802.11g radio, an administrator can select from among the following Radio Mode values: - Value: · B rates only – 1, 2, 5.5, and 11 Mbps · G rates only – 6, 9, 12, 18, 24, 26, 48, and 54Mbps · BG rates optimized – 1, 2, 5.5, 6, 11, 24, 36, and 54 Mbps. This should only be used User Manual for DS5 Series January 2014 41 with Cisco APs running IOS in autonomous mode (without controllers, For Cisco APs that are tied to controllers and for non-Cisco APs, Summit recommends BG rates full.) Security Settings EAP type – Extensible Authentication Protocol type used for 802.1x authentication to AP. - Value: None, LEAP, EAP-FAST, PEAP-MSCHAP, PEAP-ETC, PEAP-TLS, EAP-TLS, EAP-TTLS - Default: None Credentials – Authentication credentials for the selected EAP type. Encryption – Type of encryption (and decryption) used to protect transmitted data. - Value · None: No encryption · WEP: WEP with up to four static keys (40 bit or 128 bit in ASCII or hex) defined under WEP/ PSK Keys. · WEP EAP – WEP with key generated during EAP authentication · WPA-PSK (WPA Personal) – TKIP with PSK (ASCII passphrase or hex PSK) defined under WEP/PSL Keys. · WPA-TKIP (WPA Enterprise) – TKIP with key generated during EAP authentication · WPA CCKM (WPA Enterprise) – TKIP with key generated during EAP authentication and with Cisco key management protocol for fast re-authentication · WPA2-PSK (WPA2 Personal) – AES with PSK (ASCII passphrase or hex PSK) defined under WEP/PSK Keys. · WPA2-AES (WPA2 Enterprise) – AES with key generated during EAP authentication. · WPA2-CCKM (WPA2 Enterprise) – TKIP with key generated during EAP authentication and with Cisco key management protocol for fast re-authentication. Third Party Config If you choose to configure ThirdPartyConfig, the SCU will work with the operating system’sWindows Zero Config (WZC) to configure radio and security settings for the radio installed in the unit. Choosing this profile means that WZC must be used to define the following radio and security options: SSID, Auth Type, EAP Type and Encryption. The SCU settings for ThirdPartyConfig include: Client Name, Power Save, Tx Power, Bit Rate and Radio Mode. User Manual for DS5 Series January 2014 42 Status The Status tab provides status information including IP address and MAC address for the client radio, IP address and MAC address for the AP, signal strength, channel, transmit power and data rate. Diags The following functions are available from the Diags window: (Re)connect – Disable and enable the radio, apply or reapply the current profile, and attempt to associate and authenticate to the wireless LAN, logging all activity in the User Manual for DS5 Series January 2014 43 output area at the bottom. Release/ Renew – Obtain a new IP address through DHCP release/renew and log all activity in the output area at the bottom. Start Ping – Start a continuous ping to the address in the edit box next to the button. Once the button is clicked, its name and function change to Stop Ping. Pings continue until you click Stop Ping, move to an SCU window other than Diags or Status, exit SCU, or remove the radio. Diagnostics – Attempt to (re) connect to an AP and provide a more thorough dump of data than is obtained with (Re)connect. The dump includes radio state, profile settings, global settings, and a BSSID list of APs in the area. Save to… - Save the diagnostics output to a file. Global The Global settings tab allows you to define radio and security settings that apply to all profiles, along with settings that apply specifically to the SCU. Global Setting Roaming Trigger Description Value If RSSI from AP is less than roam -50, -55, -60, -65, -70, trigger value, radio performs roam scan -75, -80, -85, -90, or or probes for an AP with stronger Custom Default -70 dBm signal. Roam Delta When Roam Trigger is met, a second 5, 10, 15, 20, 25, 30, AP’s signal strength (RSSI) must be 35, or Custom 15 dBm Roam Delta dBm stronger than moving average RSSI for current AP before User Manual for DS5 Series January 2014 44 radio will attempt to roam to the second AP Roam Period After association or roam scan (with no 5, 10, 15, 20, 25, 30, roam), radio will collect RSSI scan data 35, 40, 45, 50, 55, 60, for Roam Period seconds before or Custom 10 sec considering roaming BG Channel Set Defines the 2.4GHz channels to be Full; 1,6,11 (the most scanned when the radio is commonly used 2.4 contemplating a roam and needs to GHz channels); determine what APs are available. 1,7,13 (for ETSI and Full TELEC radios only); or Custom DFS Channels Support for 5GHz (802.11a) channels On, Off, Optimized Off Because passive scanning consumes a A number between 120 longer period of time, this feature 20~500 milliseconds enables you to determine the dwell (ms). where support for dynamic frequency selection (DFS) is required. Supported in v2.0 and later DFS Scan Time time when passively scanning on a DFS Recommending 1.5 channel. times dwell time that of beacon period. For example, DFS scan time is set to 30ms, the beacon period should be adjusted to 20ms Ad Hoc Channel The channel to be used for an ad hoc One of the 2.4GHz connection if the active profile has an channels (1~14), or Ad Hoc radio mode value. UNII-1 channels (36, 1 40, 44, 48). If you select a channel that is not supported by your radio, the SCU uses the default value for this setting Aggressive Scan When this setting is On and the current On, or Off On connection to an AP becomes tenuous, the radio scans for available APs more aggressively. Aggressive scanning complements and works in conjunction with the standard scanning that is configured through the Roam Delta, User Manual for DS5 Series January 2014 45 and Roam Period settings. Summit recommends that the Aggressive Scan global setting be On unless there is significant co-channel interference because of overlapping coverage from APs that are on the same channel CCX features Use of Cisco information element (IE) Full: Use Cisco IE and and CCX version number; support for CCX version number CCX features. which is supporting all Optimized CCX features Optimized: Use Cisco IE and CCX version number which is supporting all CCX features except APassisted roaming, APspecified maximum transmit power, and radio management. Off: Do not use Cisco IE and CCX version number WMM Use of Wi-Fi Multimedia Extensions, On or Off N/A Type of authentication server being Type 1 – Cisco Secure Type 1 used for EAP authentication ACS or another server also known as WMM. Auth Server that uses PEAPv1 for PEAP with EAPMSCHAPV2 (PEAPMSCHAP) Type 2 – A different authentication server, such as Juniper Networks Steel RADIUS, that uses PEAPv0 for PEAPMSCHAP TTLS Inner Method Authentication method used within Auto-EAP – Any secure tunnel created by EAP-TTLS available EAP method User Manual for DS5 Series January 2014 Auto-EAP 46 MSCHAPV2 MSCHAP PAP CHAP EAP-MSCHAPV2 PMK Caching When WPA2 is in use, type of Pairwise Standard or OPMK Standard Master Key (PMK) caching to use When switching from Standard to OPMK, you must initiate a suspend resume of the device. Only tapping Commit does not cause the change to take effect. TX Diversity How to handle antenna diversity when Main only: Use main transmitting data to AP antenna only On Aux only: Use auxiliary antenna only Summit does not support the AUX antenna as a single antenna solution On: Use diversity RX Diversity How to handle antenna diversity when On-Start on Main: On On-Start on receiving data from AP. startup use main Main antenna On-Start on Aux: On startup, use auxiliary antenna Main only: Use main antenna only Aux only: Use auxiliary antenna only Summit does not support the AUX antenna as a single antenna solution User Manual for DS5 Series January 2014 47 Frag Thresh RTS Thresh LED If packet size (in bytes) exceeds An integer from 256 to 2346 threshold, then packet is fragmented. 2346 Packet size above which RTS/CTS is An integer from o to required on link. 2347 Use of LED; DS5 is not supporting this On, Off Off 2347 feature Tray Icon Enabling of System Tray Icon. On, Off On Hide Password If this is On, then SCU as well as EAP On, Off Off Password that must be specified when A sting of up to 64 SUMMIT Admin Login button pressed. characters Specifies the number of seconds that An integer from 3 to Summit software waits for an EAP 60 authentication dialog boxes mask passwords and other sensitive information, such as WEP keys. Admin Password Auth Timeout 8 authentication request to succeed of fail. If authentication credentials are specified in the active profile and the authentication times out, the association fails. If authentication credentials are not specified in the active profile and the authentication times out, then the user is prompted to re-enter authentication credentials. Certs Path Ping Payload Ping Timeout Directory where certificate(s) for EAP A valid directory path Depends on authentication are stored. of up to 64 characters device Amount of data in bytes to be 32,64, 128, 256, 512, 32 bytes transmitted on a ping 1024 Amount of time in milliseconds that An integer from 1 to transpires without a response before 30000 5000 ping request is consider a failure Ping Delay ms Amount of time in milliseconds An integer from 0 to between successive ping requests 7200000 1000 When global settings are changed on the window and Commit is clicked, the changes take effect immediately. Two exceptions include the WMM and DFS Channels settings. If you change either of these settings, you must do a power cycle or suspend/resume on the device to cause the change to take effect. To cause global settings changes to take effect without a power cycle, Summit software may have to reset and re-establish the WLAN connection between the Summit radio and the access point. If you make changes without clicking Commit and attempt to move to a different SCU window, SCU displays a warning message and gives you the option of saving your User Manual for DS5 Series January 2014 48 changes before you leave the Global window. Wi-Fi Roaming Summit provides two complementary sets of roaming algorithms to provide for more reliable connectivity. Those sets of algorithms are; - Standard: which manages roaming behavior under typical conditions. Users can adjust Standard Roaming parameters to customize roaming behavior for a particular environment. - Aggressive: which manages roaming behavior when the station device is in areas of particularly low coverage and is in imminent jeopardy of losing its connection to the network infrastructure. Users may not adjust Aggressive Roaming parameters but may disable this feature. User Manual for DS5 Series January 2014 49 Bluetooth Setting Caution The open COM port at DS5 is COM6, COM9 At Windows CE6.0, it assigns COM6 first. If COM6 is pre-assigned, then it try to assign to COM9. At WEH 6.5, it is selectable one of COM port between COM6 and COM9 Windows CE6.0 1. Power on Bluetooth module. (Go to Wireless Manager to turn on Bluetooth) 2. Click Start 3. Click Scan Device 4. Select your Bluetooth device and double click the device name ▶ Settings ▶Control Panel ▶ Bluetooth Device Properties User Manual for DS5 Series January 2014 50 5. Select Trusted to open PIN input window 6. Enter your PIN number 7. After your PIN number validation, double click the Bluetooth name. then select Active Your COM information will be displayed after success User Manual for DS5 Series January 2014 51 WEH6.5 1. Power on Bluetooth module. (Go to Wireless Manager to turn on Bluetooth) 2. Click Menu at bottom of display and select Bluetooth Settings 3. Select Add new device to scan Bluetooth around the terminal User Manual for DS5 Series January 2014 52 4. Select your Bluetooth device. Then press next at bottom of display menu 5. Enter Passcode to secure your connection 6. When your device added, press Done at bottom of display menu 7. Assign a COMPORT. Click your Bluetooth device name User Manual for DS5 Series January 2014 53 8. Select Serial Port as picture, and select Save at bottom of display menu Caution In case you don’t select Serial Port at this stage, you will have error when you delete the Bluetooth profile. 9. Select COM Ports at top menu, then click New Outgoing Port 10. Select Next at bottom of display menu User Manual for DS5 Series January 2014 54 11. Select appropriate COM Port, which is not assigned. Then select Finish 12. Select OK Bluetooth setting trouble In any case you delete the assigned Bluetooth device and have to reassign SAME, or different Bluetooth device, please follow below delete and reassign comport process. Windows Mobile 6.5 is keeping the last registry record, and it interferes reassigning the Bluetooth device to the same port. User Manual for DS5 Series January 2014 55 Microsoft Windows Mobile 6.5 recommends step 8 “Select services to use from this device” If you have forgotten this step, you need to delete the assigned profile, and resetting process. 1. Delete the assigned COM. Or cold boot to delete registry value. 2. Resetting Bluetooth in proper way. Make sure to check Step 8 “Select services to use from this device” 3. Set COMPORT again. 4. When you delete the assigned COMPORT, then it shall be deleted all information including recorded registry. User Manual for DS5 Series January 2014 56 User Manual for DS5 Series January 2014 57 Appendix Ⅰ Key Strokes DS5 series inter-changeable different types of keyboards in simple manual way. Following tables are how to make key character entry using keypads. Characters are not mentioned at this key stroke sequence, it is also available in Soft Input Panel (SIP) - 38-key Descriptions - 54-key Descriptions - DS5 and DS5 wide Alphanumeric Characters - DS5 and DS5 wide Special Functions DS5 and DS5 wide 34 Key Descriptions 34K-key has Alpha and numeric input in a key. Also, programmable keys are available using function keys from up to F1~F10 Key Description Power Turns on the terminal and off. Green/ Red Programmable keys. Blue-bar key is used when Cold boot and Factory reset Scan Trigger Scanning button barcode scanner, or RFID ESC Escape the current operation Enter Execute selected item or function Move Left/Right Moves left and right. With blue modifier on. it can adjust LCD back light levels Move Up/Down Moves page, or items lists up and down. With blue modifier, it can adjust volume level Alphanumeric Input numeric in default. With orange modifier, it can switch numeric to alphabet character input Tab/Back Tab Tabulator key which is used to advance the cursor to the next tab stop. With Orange modifier on, the function switch to back tab. Shift It is modifier key which is used to type capital letters and other alternative upper characters. Control It is modifier key which, when pressed in conjunction with another key, performs a special operation, for example Ctrl+C. similar to the Shift key. User Manual for DS5 Series January 2014 58 Pressing Blue modifier key, the function change to Alt key Space/ Back Space Space: its main purpose is to conveniently enter a space. Back Space: it moves the display cursor one position backwards, delete the character at that position. And shift back the text after that position by one position. Function Programmable key buttons. Default F1~F5, press blue modifier key for F6~F10 Orange Modifier Function key to input Alphabet. Pressing 1 time is to apply single effect and back to default. Press 2 times to keep the function continuously. Blue Modifier Function key to execute special function, or special characters. Press 1 time is to apply single effect and press 2 times to keep its function continuously. LCD lighting Control It controls LCD back light. Press the button to display brightest, and press again to the dim status you had set using left/right button DS5 and DS5 wide 54 Key Description 54 key has full alpha-numeric key board. Programmable keys are able to be assigned from F1 to F20 using modifier keys. Key Description Power Turns on the terminal and off. Green/ Red Programmable keys. Blue-bar key is used when Cold boot and Factory reset Scan Trigger Scanning button barcode scanner, or RFID ESC Exit the current operation Tab Tabulator key which is used to advance the cursor to the next tab stop. With Orange modifier on, the function switch to back tab. Enter Execute selected item or function Move Left/Right Moves left and right. With blue modifier on. it can adjust LCD back light levels Page Up/Down Moves page, or items lists up and down. With blue modifier, it can adjust volume level Numeric Input numeric. Execute preset function, or application by your IT desk, press blue modifier for F1~F10 and orange modifier for F11 ~ F20 User Manual for DS5 Series January 2014 59 Alphabet Input alphabet. Default is lower characters. Press SHIFT to input upper characters. Shift It is modifier key which is used to type capital letters and other alternative upper characters. Control It is modifier key which, when pressed in conjunction with another key, performs a special operation, for example Ctrl+C. similar to the Shift key. Pressing Blue modifier key, the function change to Alt key Back Space It moves the display cursor one position backwards, delete the character at that position. And shift back the text after that position by one position. Press Blue modifier for Space function. Modifier (Orange) Function key to access F11 ~F20 Modifier (Blue) Function key to access F1~F10 and special characters and features LCD lighting Control It controls LCD back light. Press the button to display brightest, and press again to the dim status you had set using left/right button DS5 and DS5 wide Alphanumeric Characters Character Numeric Keypad Full Alpha Numeric Keypad a b c d e f g h i j k l m n o p q r User Manual for DS5 Series January 2014 60 s t u v w x y z A B C D E F G H I J K L M N O P Q R S T U V W X Y Z 0 1 2 3 User Manual for DS5 Series January 2014 61 4 5 6 7 8 9 DS5 and DS5 wide Special Functions Character Numeric Keypad Full Alpha Numeric Keypad · Decimal/Full stop OK OK + Plus Hyphen/Minus * Asterisk / Slash(Punctuatio n) # Number Sign Start Menu = Equals < Less-than > Greater-than : Colon ; Semicolon , Comma User Manual for DS5 Series January 2014 62 ? Question @ @ $ Dollar % Percent ^ Caret & Ampersand ‘ Apostrophe “ Quotation ( Parentheses ) Parentheses | Vertical bar ~ Tilde ! Exclamation User Manual for DS5 Series January 2014 63 Chapter 4: 管理手册 OS升级 Windows CE6.0/ WEH6.5/DS5/DS5 Wide 提醒 OS升级时通过micro SD卡来操作,请你先SD卡格式化和电池充满电。 1. 升级的系统版本复制到SD卡里 2. micro SD卡插到设备里的卡槽 3. 同时按 后,按复位键(RESET),过几秒后出现以下画面 image.bin文档复制同时安装完成后,出来下面画面 User Manual for DS5 Series January 2014 64 4. 按复位键(RESET)后,出来下面画面 设备自动重启 SDK Windows CE6.0: 需要时,请联系相关负责人,申请DS5_SDK.msi档案 WEH6.5: DS5使用微软提供的SDK. ,为了使用DTK (Developer Tool Kit), 请你先安装SDK (Software Development Kits) 。 WEH 6.5 SDK & DTK Windows Mobile 6 Professional and Standard Software Development Kits Refresh http://www.microsoft.com/download/en/details.aspx?id=6135 Windows Mobile 6 Localized Emulator Images http://www.microsoft.com/download/en/details.aspx?id=7974 Windows Mobile 6.5.3 Developer Tool Kit http://www.microsoft.com/download/en/details.aspx?id=5389 User Manual for DS5 Series January 2014 65 Wi-Fi connection through SCU (Summit Client Utility) 1. Power on Wi-Fi module. (Go to Wireless Manager to turn on Wi-Fi module) 2. Click Wi-Fi signal icon as below image 3. Click Profile tab to set your Wi-Fi 4. Click Scan to search Wi-Fi SSID around your device. If your AP’s SSID is in hidden mode, you are not able to see and you need to input manually. 5. Select your SSID, and click Configure User Manual for DS5 Series January 2014 66 6. Select Yes to save your SSID. This process to save your SSID to the device not to reinput the SSID on your device. 7. Input your network password. Then OK. 8. Press Commit. Go to Main tab to select your saved profile. User Manual for DS5 Series January 2014 67 9. Select your profile at Active Profile Microsoft Zero Config is not in active when you use SCU On Windows CE6.0 or WEH6.5, Summit software includes a service that displays an icon in the Windows System Tray. This icon provides a visual status for the Summit radio in the device and it provides access to the SCU application. User Manual for DS5 Series January 2014 68 Note: Tap the icon to launch the SCU application. The service is active and displays an icon in the System Tray only when all of the following conditions are met: A Summit radio is installed in the device or inserted in an external slot in the device. The device is active. Windows Zero Config (WZC) is not active. The SCU Tray Icon global setting is On (the default setting). When the service is active, it queries the radio every three seconds for connection status. Based on the radio's response to the query, the service displays one of the following icons: Table: SCU Tray Icons The radio is not associated/authenticated to an AP. The signal strength (RSSI) for the current AP (to which the radio is associated) is -90 dBm or weaker, which means that a Summit 802.11b/g radio will operate at 802.11b data rates only. The RSSI for the current AP is stronger than -90 dBm but not stronger than -70 dBm, which means that a Summit radio will operate at 802.11g or 802.11a data rates that are less than 54 Mbps The RSSI for the current AP is stronger than -70 dBm but not stronger than -50 dBm, which means that a Summit radio should operate consistently at 54 Mbps The RSSI for the current AP is stronger than -50 dBm. On most CE devices, the System Tray icon is not visible while SCU is running, but the service remains active. Remote Desktop Connection Caution Make sure your device has been connected to your network Windows CE6.0 1. Click Remote Desktop Connection on idle screen User Manual for DS5 Series January 2014 69 2. Input your IP address of your server computer, then click Options>> 3. Select Local Resources tab. and select On the local computer at Keyboard menu. Then press key. Caution Enter key must be used in PDA keypad 4. Input your credentials to connect the local computer, then click OK User Manual for DS5 Series January 2014 70 5. Your device will be connected to the local computer WEH6.5 1. Click Start , scroll down screen and click Remote Desktop Mobile User Manual for DS5 Series January 2014 71 2. Input your local computer information Caution In case you don’t input necessary information, you will see below log in screen to require information. User Manual for DS5 Series January 2014 72 3. Your local screen will be displayed at the device User Manual for DS5 Series January 2014 73 GPRS Connection Before you programming GPRS, you may need following 2 files. - cmsample.zip : Reference project to make sample - ConnectionManager_Sample_CSharp.zip: A sample referred from above file Please check with your regional sales for the files. Caution Before use the program, Beside the phone modem, turn off all your wireless radios Disconnect Active Sync with PC Setting APN (Access Point Name) 1. Select Phone icon at Icon Bar 2. Click Settings User Manual for DS5 Series January 2014 74 3. Click “Add a new modem connection” 4. Set your name at Enter a name for the connection. Select Cellular Line (GPRS). Then press Next 5. Check APN address with your Telecom operator to fill in Access point name. Click Next User Manual for DS5 Series January 2014 75 6. Click Finish Using Connection Manager Sample 1. Select MY ISP at combo box User Manual for DS5 Series January 2014 76 2. Select Connect 3. If GPRS is connecting properly, you will see the screen as below 4. If you want to disconnect GPRS, press Disconnect button User Manual for DS5 Series January 2014 77 Barcode Tray 1D Barcode Image Menu lists Details Scan Detail View to detailed barcodes Barcode Setup Setting by barcode types Scan Option Scanning setting INFO Barcode Tray version information End Closing barcode tray program Scan Detail It is test function barcode scanning is operating properly. It shows; - Type: Type of barcode - Info: Contents in barcode - Time(Sec): Time to scanning Barcode Setup (Enabling tab) Setting to able, or disable bar type to read barcode, or factory default barcode tray Enabling barcode types on Factory default - Code39, Code128, Interleaved2of5, UPCA, UPCE0, EAN13, EAN128, EAN8 User Manual for DS5 Series January 2014 78 Barcode Setup (Detailed tab) Setting option by barcode types such as length, change, or check sum Scan Option (Option tab) Setting Time out, Prefix/ Suffix, Transfer Method Timeout: Setting barcode beam lighting interval per pressing a scanning button TransMethod: Barcode value transfer method. - Keyboard: virtual key typing effect when input barcode value. It delivers 1 character by 1 character - Clipboard: delivery all barcode value at 1 time like copy and paste effect. Prefix/ Suffix: additional ASCI code add function from original barcode value. You can set 2 additional value in front of original barcode value (Prefix), or after (Suffix) Please refer ASCII code for detailed information. (http://www.asciitable.com/) Clipboard is not supporting Prefix, or suffix option. User Manual for DS5 Series January 2014 79 DS3 Barcode Tray Default Value Time out: 3.0S, TransMethod: Keyboard, Prefix 1: Null (0X00), Prefix 2: Null (0X00), Suffix 1: LF (0X0A), Suffix 2: Null (0X00) Scan Option (Key tab) Scan Stop: When scan button getting up after pressing the button, barcode beam is out. Un-checking Scan Stop: Scanner beam out after user set time out Scan Option (Sound tab) Setting notification when scan success or fail. FileFind: setting user proprietary scanning sound User Manual for DS5 Series January 2014 80 2D Imager Barcode Image Memu lists Details Scan Detail View to detailed barcodes Barcode Setup Setting by barcode types Scan Option Scanning setting Image Capture Imaging Capture INFO Barcode Tray version information End Closing barcode tray program Scan Detail It is test function barcode scanning is operating properly. It shows; - Type: Type of barcode - Info: Contents in barcode - Time(Sec): Time to scanning User Manual for DS5 Series January 2014 81 Barcode Setup (Enabling tab) Setting to able, or disable bar type to read barcode, or factory default barcode tray Special: Setting for non barcode types such as OCR Factory Default Barcode Types 1D : ChinaPost, Codabar, Code39, CODE93, Code128, CouponCode, EAN13, IATA25, INT25, Mx25, PLESSEY, Posicode, Strt25, Telepen, UPCA 2D : AusPost, Aztec, Code16k, Code49, IDTag, KoreaPost, MicroPDF, PDF417, QR, USPS4CB Barcode Setup (Detail tab) Setting option by barcode types such as length, change, or check sum Caution: Barcode option change may change result value, or barcode type in some case Scan Option (Option tab) Setting Time out, Prefix/ Suffix, Transfer Method DS3 Barcode Tray Default Value Time out: 3.0S, TransMethod: Keyboard, Prefix 1: Null (0X00), Prefix 2: Null (0X00), Suffix 1: LF (0X0A), Suffix 2: Null (0X00) User Manual for DS5 Series January 2014 82 Timeout: Setting barcode beam lighting interval per pressing a scanning button TransMethod: Barcode value transfer method. - Keyboard: virtual key typing effect when input barcode value. It delivers 1 character by 1 character - Clipboard: delivery all barcode value at 1 time like copy and paste effect. Prefix/ Suffix: additional ASCII code add function from original barcode value. You can set 2 additional char in front of original barcode value (Prefix), or after (Suffix) Caution Transmethod “Clipboard” is not supporting Prefix, or suffix option. Required Prefix/ Suffix enabling application version from OS Scanner Type Windows CE 1D Tray Version DLL version Windows Mobile 2D 1D 1.0.0.11 2.0.1.9 2D 3.0.2.5 2.0.0.19 3.0.2.5 3.0.0.14 Example) Applying “Ctrl+F” in prefix 1. Check your Barcode Tray and Scanner DLL is higher than Required Prefix/ Suffix enabling application version described above User Manual for DS5 Series January 2014 83 2. Select “DC1” at 1st Char, and “F” at 2nd Char in Prefix 3. ASCII Table HTML DEC HEX OCT Char 0 0 000 NUL � Null char 1 1 001 SOH  Start of Heading 2 2 002 STX  Start of Text 3 3 003 ETX  End of Text 4 4 004 EOT  End of Transmission 5 5 005 ENQ  Enquiry 6 6 006 ACK  Acknowledgment 7 7 007 BEL  Bell 8 8 010 BS  Back Space 9 9 011 HT 	 Horizontal Tab 10 0A 012 LF 
 Line Feed 11 0B 013 VT  Vertical Tab 12 0C 014 FF  Form Feed 13 0D 015 CR 
 Carriage Return User Manual for DS5 Series Number Description January 2014 84 14 0E 016 SO  Shift Out / X-On 15 0F 017 SI  Shift In / X-Off 16 10 020 DLE  Data Line Escape, Shift 17 11 021 DC1  Device Control 1 (oft. XON), Control 18 12 022 DC2  Device Control 2, VK_MENU, ALT 19 13 023 DC3  Device Control 3 (oft. XOFF), VK_PAUSE 20 14 024 DC4  Device Control 4, VK_CAPITAL 21 15 025 NAK  Negative Acknowledgement 22 16 026 SYN  Synchronous Idle 23 17 027 ETB  End of Transmit Block 24 18 030 CAN  Cancel 25 19 031 EM  End of Medium 26 1A 032 SUB  Substitute 27 1B 033 ESC  Escape 28 1C 034 FS  File Separator 29 1D 035 GS  Group Separator 30 1E 036 RS  Record Separator 31 1F 037 US  Unit Separator 32 20 040   Space 33 21 041 ! ! Exclamation mark 34 22 042 " " Double quotes (or speech marks) 35 23 043 # # Number 36 24 044 $ $ Dollar 37 25 045 % % Procenttecken 38 26 046 & & Ampersand 39 27 047 ' ' Single quote 40 28 050 ( ( Open parenthesis (or open bracket) 41 29 051 ) ) Close parenthesis (or close bracket) 42 2A 052 * * Asterisk 43 2B 053 + + Plus 44 2C 054 , , Comma 45 2D 055 - - Hyphen 46 2E 056 . . Period, dot or full stop 47 2F 057 / / Slash or divide 48 30 060 0 0 Zero 49 31 061 1 1 One 50 32 062 2 2 Two 51 33 063 3 3 Three 52 34 064 4 4 Four User Manual for DS5 Series January 2014 85 53 35 065 5 5 Five 54 36 066 6 6 Six 55 37 067 7 7 Seven 56 38 070 8 8 Eight 57 39 071 9 9 Nine 58 3A 072 : : Colon 59 3B 073 ; ; Semicolon 60 3C 074 < < Less than (or open angled bracket) 61 3D 075 = = Equals 62 3E 076 > > Greater than (or close angled bracket) 63 3F 077 ? ? Question mark 64 40 100 @ @ At symbol 65 41 101 A A Uppercase A 66 42 102 B B Uppercase B 67 43 103 C C Uppercase C 68 44 104 D D Uppercase D 69 45 105 E E Uppercase E 70 46 106 F F Uppercase F 71 47 107 G G Uppercase G 72 48 110 H H Uppercase H 73 49 111 I I Uppercase I 74 4A 112 J J Uppercase J 75 4B 113 K K Uppercase K 76 4C 114 L L Uppercase L 77 4D 115 M M Uppercase M 78 4E 116 N N Uppercase N 79 4F 117 O O Uppercase O 80 50 120 P P Uppercase P 81 51 121 Q Q Uppercase Q 82 52 122 R R Uppercase R 83 53 123 S S Uppercase S 84 54 124 T T Uppercase T 85 55 125 U U Uppercase U 86 56 126 V V Uppercase V 87 57 127 W W Uppercase W 88 58 130 X X Uppercase X 89 59 131 Y Y Uppercase Y 90 5A 132 Z Z Uppercase Z 91 5B 133 [ [ Opening bracket User Manual for DS5 Series January 2014 86 92 5C 134 \ \ Backslash 93 5D 135 ] ] Closing bracket 94 5E 136 ^ ^ Caret - circumflex 95 5F 137 _ _ Underscore 96 60 140 ` ` Grave accent 97 61 141 a a Lowercase a 98 62 142 b b Lowercase b 99 63 143 c c Lowercase c 100 64 144 d d Lowercase d 101 65 145 e e Lowercase e 102 66 146 f f Lowercase f 103 67 147 g g Lowercase g 104 68 150 h h Lowercase h 105 69 151 i i Lowercase i 106 6A 152 j j Lowercase j 107 6B 153 k k Lowercase k 108 6C 154 l l Lowercase l 109 6D 155 m m Lowercase m 110 6E 156 n n Lowercase n 111 6F 157 o o Lowercase o 112 70 160 p p Lowercase p 113 71 161 q q Lowercase q 114 72 162 r r Lowercase r 115 73 163 s s Lowercase s 116 74 164 t t Lowercase t 117 75 165 u u Lowercase u 118 76 166 v v Lowercase v 119 77 167 w w Lowercase w 120 78 170 x x Lowercase x 121 79 171 y y Lowercase y 122 7A 172 z z Lowercase z 123 7B 173 { { Opening brace 124 7C 174 | | Vertical bar 125 7D 175 } } Closing brace 126 7E 176 ~ ~ Equivalency sign - tilde 127 7F 177 DEL  Delete User Manual for DS5 Series January 2014 87 Scan Option (Key tab) Scan Stop: When scan button getting up after pressing the button, barcode beam is out. Un-checking Scan Stop: Scanner beam out after user set time out Multi Scan: This is special feature at 2D barcode function. It is enabling to read continuous barcode scanning. Duplicated barcode in buffer range may skip. Buffer ranges in 2D is about 8~10 barcodes. Scan Option (Sound tab) Setting notification when scan success or fail. FileFind: setting user proprietary scanning sound HF RFID (13.56Mhz) RFID Summary DS5 and DS5 wide supporting 13.56Mhz HF RFID at WEH 6.5, and Windows CE6.0. Typical reading distances are 3~9cm depends on tag types and sizes. User Manual for DS5 Series January 2014 88 Development Tools Windows Mobile 6.5: Microsoft Visual Studio 2008 C#, VS2005 C++ Supporting HF RFID tags Contents Description Standards ISO 14443A, ISO 14443B, ISO 15693, ISO 18000-3, NFC enabled, ICODE Tag-IC MIFARE Standard, MIFARE 4K, MIFARE Plus, MIFARE Pro, MIFARE Ultralight, MIFARE DESFire, MIFARE DESFire EV1, MIFARE SmartMX, ICODE SLI (SL2 ICS 20), I-CODE EPC (SL2 ICS 10), I-CODE UID, (SL2 ICS11), I-CODE, NFC (Reader to Tag Mode) SLE 55Rxx, SRF55VxxP +S, SLE 66CL160S, SLE 66CLX320P, SR176, SRIX 4K, LRI 64, LRI 512,EM4135, KSW Temp Sens’ Tag-it™ HF-I Pro, Jewel Tag, Sharp B, ISO 14443A Tags, ISO 14443B Tags, ISO 15693B Tags, ISO 18000-3 Tags, Master Card PayPass, and Visa paywave compliant tags Reading Distances Up to 9cm depending on tag and its size Approvals/ Compliance RoHS compliant, EMVCo 2.01 MTBF (RFID Core) 3,000,000h Related Source & Files Folder Dlls\ Include\ Lib\ Samples\ Utilities\ Files Description CFReader.dll HID RF Reader Control Dll DS_CommonAPI.dll [\Net] HidGlobal.MultiIso.CFReader.dll DS_CommonAPIDll.h DS3 Common API Dll ReaderDll.h DS3 Common API Header File CFReader.lib HID RF Reader Control Library DS_CommonAPI.lib [\NET\CSharp] HID_Demo [VC\ MFC\] CFReaderDll_Demo_MFC [\VC\ WIN32\] CFreader_demo_win32 DS3 Common API Library HID RF Reader Control Header File VS 2008 C# Sample Project VS 2005 VC++ MFC Sample Project VS 2005 VC++ Win32 Sample Project [\CFReaderUtility] CFReaderUtility.exe CFReader.dll DS_CommonAPI.dll DS_RFIDPower.exe User Manual for DS5 Series HID RF Reader Control .Net Version Dll HID RF Reader Utility & RF Power Control App January 2014 89 RFID Control - Port and Baud Rate by OS Windows CE6.0 Port COM9 Baud Rate - 9600 WEH 6.5 Port COM3 Baud Rate 9600 RFID Control DLL DLL Types DS_CommonAPI.DLL Description · DSIC DS Common API Library · DSAPISetRFPower · DSAPIGetRFPower · DSAPISetVibrator · DSAPIKeyReMapping · DSAPIKeyMapAllRecovery CFReader.DLL ·HID RF Reader API Library ·RDR_OpenReader ·RDR_CloseReader ·RDR_OpenComm ·RDR_OpenSingle ·RDR_CloseComm ·RDR_SendCommand ·RDR_SetReaderConfig - RFID Control Flow DS_CommonAPI.DLL DSIC_RFSetPower(TRUE) presetSettings psSettings; psSettings.baudRate = 9600; psSettings.protocol = 0; RDR_OpenSingle("COM3",0,0,&psSettings) CFReader.DLL RDR_EmptyCommRcvBuffer(); RDR_SendCommandGetData("pon","", buffer); RDR_SendCommandGetDataTimeout("s","", buffer, 2000); RDR_SendCommandGetData("poff","", buffer); RDR_CloseReader(); RDR_CloseComm(); DS_CommonAPI.DLL User Manual for DS5 Series DSIC_RFSetPower(FALSE); January 2014 90