1
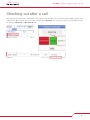
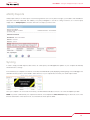
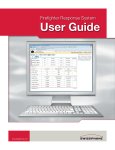
Firefighter Response System
User Guide
www.swissphone.com
User Guide – Using the Firefighter Response System
Table of contents
Programing Your Speed Dial
3
Caller ID blocking - removal
3
Utilizing Reports
16
4
Creating a Report
16
Away from the station
4
Report Printing
17
At the Station
4
Report Exporting
17
5
Report Groups
18
Using response data to make informed decisions
5
Database Export
19
Supported Internet Browsers
5
Creating a FFRS desktop shortcut
5
Department Reports
20
Checking out after a call
6
Station Reports 20
On-Duty Status
7
Group Reports 20
Firefighter Reports
20
Registering Your Response
Using Response Data
Adding and Removing members on the On-Duty Grid 7
Available/Unavailable Status
8
Adding members to Available or Unavailable Grids
8
Change members Status from a Computer
8
Registering your availability via the phone
8
Scheduling your availability via the Scheduler
8
Primary Schedule
9
Temporary Schedule
10
Using On-Duty and Available/Unavailable Data
11
eNotify Module
Reports16
Types of Reports Mutual Aid
12
Sending a Message
12
Scheduling Messages
13
eNotify Groups
14
eNotify Reports
15
Support Resources: (resources located in
the FFRS application; “Support” link)
•• User Guides
•• Training Tutorials
•• Frequently Asked Questions
•• FFRS Standard Operating Guidelines (SOGs)
Syncing15
U.S. Patent No. 7,898,410
Last updated: 02/2011
20
21
User Guide – Using the Firefighter Response System
Programing Your Speed Dial
Each of your FFRS tabs (stations, etc) has been provisioned with a unique virtual toll free phone number. These unique toll free numbers
need to be programmed in your mobile phone. This will enable you to push just one button on your cell phone to call the FFRS application. Your station numbers should coincide with your mobile phone buttons if possible (i.e. Station 1 = Button 1, Station 2 = Button 2,
etc). If your department allows you to respond directly to the incident, a virtual toll free number will be provisioned for this as well. This
number should also be added to your speed dial.
If your agency has given you access to sign into the FFRS app, you will find your FFRS tab numbers by clicking on “My Profile” link
If you do not have access to log into the FFRS app, contact your agencies FFRS administrator for your toll free numbers.
If you have problems programming your phone’s speed dial, consult your phone’s user manual.
Caller ID blocking - removal
The FFRS application uses two pieces of information when registering a member’s response; the members phone number and the number the member called (the virtual station number). If members have caller ID blocking on their phones, they will have to remove it for the
virtual station numbers so the FFRS knows who is calling.
3
User Guide – Using the Firefighter Response System
Registering Your Response
When dispatch taps out a call and you are able to respond, you should register your response by pressing one button (the button that
you’ve programmed in your speed dial for FFRS station number) on your cell phone as you walk to your vehicle. The phone call takes
about 5 seconds and will automatically disconnect. For members who are at the station when they are alerted of a dispatch, you can
easily change your status from the User Interface. Here are the directions for you to change your status:
Away from the station
To register your response when you are not at the station:
1. Dispatch taps out the call
2. If you are able to respond, immediately call into the FFRS by pressing your speed dial button that coordinates with the station you are responding to. (i.e. if you are responding to station 1 then you
would press 1, if you are responding to station 2 then you would press 2, etc.)
3. Travel to the station or location
At the Station
To register your response when you are at the station:
4. You are alerted of an incident while at the station
5. Click on the “add new” button in the responding grid, select your name along with any other members who
are at the station with you, and select responding under status, then select “Add Member(s)”.
4
User Guide – Using the Firefighter Response System
Using Response Data
Using response data to make informed decisions
The Firefighter Response System (FFRS) helps you and your agency make informed decisions by providing response data in real-time.
This information can be used both at the station and/or in the field. For use at the station, personnel who are already at the station and
first arriving members should review their FFRS display screen so they know who is still responding. You should base your decisions on
responding member resources and the equipment requested by dispatch. For example, if an engine and a tender are requested, two
members are at the station, and the FFRS shows a third member on the way. In this scenario, the two volunteers who are at the station
would respond with the engine and leave the tender for the third member. In another example, if only an engine is requested, two members are at the station, and the FFRS shows a third member on the way, the two members could wait for the third so they can respond
with a three man engine crew.
Commanders who are either en route to or on scene can make operational strategies well in advanced of volunteers arriving at the
station. Your commanders can view available resources from a MDT (mobile data terminal) placed in emergency apparatus (command
vehicles, engines, etc) or from a smart phone using the mobile web application. The mobile web app can be accessed here:
www.advancedfrs.com/FFRS/Mobile
Supported Internet Browsers
•• Internet Explorer, version 7 or 8 – IE 8 recommended
•• Firefox 3.5 or above
Creating a FFRS desktop shortcut
Creating a FFRS shortcut on your desktop enables your users to easily launch the FFRS. To create a FFRS desktop shortcut, follow
these steps:
1. Log into your FFRS application
2. Click and hold the small icon in the upper left hand corner next to the URL address.
3. Drag this icon out to the desktop and then release it. This will create your desktop shortcut to the FFRS application.
5
User Guide – Using the Firefighter Response System
Checking out after a call
After returning to the station from a call and when you are ready to leave the station, remove yourself from the FFRS by checking off the
FFRS response grid. To log off, click on your name, and then select “Checkout”. You can check out more then one member at a time
by clicking the “Check out” or “Check out all” links.
6
User Guide – Using the Firefighter Response System
On-Duty Status
This feature enables your agency the ability to know who is On-Duty, either at the station or some other location. This allows your agency
to not only keep track of who is responding to a call when its toned out, but also who is On-Duty at the station or other location, and
what the members position or event is. An example would be that a member is On-Duty at Station 1 and on Engine 335. Your agency
can create it’s own unique locations and position/event fields.
Adding and Removing members on the On-Duty Grid
To add a member to the On-Duty grid, click on the “add new” link
Then select which members you want to add, and select the Location and Position/Event and click “Add Member(s)” button
To remove a member from the On-Duty grid, click on the members name and select “Yes” to remove them.
NOTE: When a member is removed from the On-Duty grid,
the member will automatically go back to either the available or unavailable grid.
7
User Guide – Using the Firefighter Response System
Available/Unavailable Status
This feature enables your agency the ability to know who is available and who is unavailable to respond to incidents, should your agency
be toned out. For example, if you are out of town, sick, or for some reason could not respond to a call if you were to get dispatched, you
would be listed as unavailable. To change your status, simply call the toll free number associated with your agencies Availability Status,
this number should be programmed into your phone’s speed dial. How often you change your status is dependent upon your agencies
protocol. For example, do you change your status if you will be unavailable for 30 minutes, or do you only change your status if your
status will stay changed for more than 2 hours. How often you change your status is ultimately up to your agency.
Adding members to Available or Unavailable Grids
To add members to either the Available or Unavailable grids, click the “add new” link with the respective grid and select the member to
add, then click “Add Member(s)”.
Change members Status from a Computer
To change a member’s status from a computer on the home page, simply click on the members name and select “Yes” when prompted.
Registering your availability via the phone
To change your status to “available”, call your toll free number and press option “4”.
To change your status to “unavailable”, call your toll free number and press option “5”.
Scheduling your availability via the Scheduler
The scheduler is designed to enable you to enter in the times you will be unavailable to respond, whether it’s because of work, sickness,
vacation, or any other scheduled time. There are two parts to the Scheduler, the Primary Schedule and the Temporary Schedule.
8
User Guide – Using the Firefighter Response System
Primary Schedule
The primary schedule is used to keep track of your week-to-week schedule. Data that you put in this schedule will automatically be used
for each consecutive week. This schedule can be edited at any time. Each day of the week can have up to four “unavailable” schedules.
If at any time during the week your schedule changes, and you are not able to change your status on the scheduler, you can simply call
into your toll free number and enter your status. Calling into the toll free number will override whatever your schedule says until the next
scheduled event. For example, if your schedule shows you as “unavailable” today from 8am to 5pm, and then “unavailable” tomorrow
from 8am to 5pm, but your become “available” today at 2pm, you can call into your PAS toll free number and press “4” and you will be
moved to “available”. And tomorrow morning at 8am, your schedule will pick back up, and move you over to “unavailable”.
To add or edit your primary schedule, click on the “My Profile” link, and then click on “Primary Schedule”.
Next, enter what you will be doing during the time you’re unavailable in the “Label” form. Then enter “from” and “to” times you will be
unavailable.
Each day can have up to four unavailable schedules, to add another one simply click on the “add another unavailable period”.
Complete the above-mentioned steps for each day of the week. Please note, any day(s) of the week can be empty and do not need
to have a schedule if it is not needed. To clear a schedule for any given day, simply click the “clear settings” link next to the schedule.
To save the schedule, click the “Save” button at the bottom of the page.
9
User Guide – Using the Firefighter Response System
Temporary Schedule
The temporary schedule is used to keep track of your vacations, illness, and other times that are unexpected and outside of your regular
routine.
Data that you put in this schedule will override your primary schedule. And if at any time during the week your schedule changes, and
you are not able to change your status on the scheduler, you can simply call into your toll free number and enter your status. Calling into
the PAS toll free number will override whatever your schedule says until the next scheduled event. For example, if your schedule shows
you as “unavailable” today from 8am to 5pm, and then “unavailable” tomorrow from 8am to 5pm, but your become “available” today
at 2pm, you can call into your PAS toll free number and press “4” and you will be moved to “available”. And tomorrow morning at 8am,
your schedule will pick back up, and move you over to “unavailable”.
To add or edit your temporary schedule, click on the “My Profile” link, and then click on “Temporary Schedule”.
Next, enter what you will be doing during the time you’re unavailable in the “Label” form. Then, enter the “from” and “to” date and time.
To edit or delete an existing schedule, click “edit” or “delete” next to the schedule
Click “Save this schedule” to save the schedule and enter another one, or click “Save” to save the schedule and go back to your
profile page.
10
User Guide – Using the Firefighter Response System
Using On-Duty and Available/Unavailable Data
The FFRS “Home” page displays your agencies On-Duty and Available/Unavailable data. There are multiple ways you can manipulate
this data to fit your needs. Using the “Filter Data” link allows you to filter out data by stations, ranks, etc. On the FFRS home page, you
are also able to minimize the grids, which will show you just the grand totals.
11
User Guide – Using the Firefighter Response System
eNotify Module
The eNotify module is a mass notification system that allows messages to be sent to members by simply typing a message and clicking
send. The eNotify module will send out voice messages to phones, as well as email and SMS text messages. The benefit to sending
out a voice message via a phone call is being able to poll your personnel. For example, if a message was sent out reminding firefighters
of a burn-to-learn coming up, you could ask the firefighters to press 1 if they will be able to attend the burn-to-learn, press 2 if they are
unsure, and press 3 if they will not be able to make it. You will then be able to view a report on that message and know who is attending
the burn-to-learn, who is unsure, and those who can’t make it.
Sending a Message
1. To send a message, click on “Modules”, then “eNotify Module”, and then “Create Message”
2. Type a name for the message; this is used for reporting purposes
3. Select message type; either Phone, Email, SMS Text, Phone & Email, or Email & SMS Text
4. Select recipients by selecting either “Group” or “Individual Firefighter(s)” next to the “Sent To”
and then select which group or firefighters should receive the message
5. Click “Send Message” to send the message. The message will be initiated and sent within seconds.
12
User Guide – Using the Firefighter Response System
Scheduling Messages
1. To create a message that will be sent in the future, click on “Modules”, then “eNotify Module”, and then “Schedule Message”
2. Type a name for the message; this is used for reporting purposes.
3. Select message type; either Phone, Email, SMS Text, Phone & Email, or Email & SMS Text
4. Select a date and time you want the message to be sent
5. Select recipients by selecting either “Group” or “Individual Firefighter(s)” next to the “Sent To”
and then select which group or firefighters should receive the message
6. Click “Save Schedule” to save the message
To view scheduled messages, click “View Scheduled Messages”. Messages that
have not been sent and are still scheduled to be sent can be edited.
13
User Guide – Using the Firefighter Response System
eNotify Groups
eNotify groups are designed to group department personnel so you can send a message quickly by selecting that group when creating
a message.
To create or edit a eNotify group, click on “eNotify Groups”
Click either “Create New Group” or “edit” next to an existing groups.
Check the box for each member that you want to receive the message for the selected group and uncheck the box for those who should
not be a part of the group.
Click “Save” to save your changes.
14
User Guide – Using the Firefighter Response System
eNotify Reports
eNotify reports allow you to view a report on each message that was sent out. For phone messages, you are able to view what button
each person that was call pushed. This enables you to poll your firefighters to see who is coming to functions, etc. To view a report,
simply click on “eNotify Reports” and select view next to the report you wish to view.
Syncing
In order to keep your FFRS response data current, our servers push your FFRS application updates to your computer automatically
whenever there is a change.
In the event that your computer loses Internet connectivity, the FFRS will alert you by displaying a warning image on the FFRS page. This
alert will insure that you don’t use the FFRS to make decisions, as your computer does not have your current response data.
Once your computer is re-connected to the Internet, your FFRS will automatically reconnect to our servers and update your data.
NOTE: If you have confirmed that your computer has Internet connectivity but the “Disconnected” image is still shown, click on the
browser refresh button. If that doesn’t work, close the browser and re-open the FFRS.
15
User Guide – Using the Firefighter Response System
Reports
Utilizing Reports
FFRS reports can be used to track your members’ responses and man-hours. This can be useful for OSHA 300 reporting, as well as
point systems used for paying members’ for the incidents they respond on.
Creating a Report
To create a report, log into your FFRS:
1. Click on the “Reports” button
2. Select a date range from the drop-down menu or create a custom time frame by entering a start date and an end date
3. Select a Report; either Department, Station, Group, or Firefighter
4. Select a Type; either Overview, Station List, Firefigher List, or Call Log
5. If you have selected a Station, Group, or Firefighter report, select a station number, or a group or member name from the dropdown menu or by manually entering the name
16
User Guide – Using the Firefighter Response System
6. To run the report, simply click on the “Run Report” button
Report Printing
To print a report after you have created it:
1. Click the “Printable View” image on the bottom of the report
2. By clicking the “Printable View” button, your report will open in a new window.
You can now print the report by choosing “Print” from your browser controls.
Report Exporting
To export a report after you have created it:
1. Click one of the “Export” buttons on the bottom of the report. Your export choices are: Excel, Word, and PDF
2. Click “Save”, enter a location where you want it to be saved, and click “Save” again.
17
User Guide – Using the Firefighter Response System
Report Groups
To create reports for a select number of personnel, you can add them to a group. You can add or remove personnel to the group as
needed anytime. To create a group:
1. Click on the “Reports” button
2. Click on the “Report Groups” button
3. Click on the “Create New Group” button
4. Add a Group Name and Group Description, check the box to activate the group, and then select the firefighters who belong to
the group. Click the “Save” button to create the group.
5. To edit a group, simply click the “edit” button next to the group name.
18
User Guide – Using the Firefighter Response System
Database Export
The Database Export feature allows you to export your agency’s member list and responses. The firefighter list will include all of the members who are in your department, their ranks, phone numbers, FFRS pin numbers, etc. The response export will export all calls placed
into your agency’s FFRS. To export your Database:
1. Click on the “Reports” button
2. Click on the “Database Export” button
3. Select an export type, either Firefighter or Response from the drop-down menu
4. Click on the “Export Now” button to export the report from the FFRS Database
5. Click on one of the “Export” buttons on the bottom of the report to save your report.
Your export choices are: Excel, CSV, Word, and PDF
6. Click “Save”, enter a location where you want it to be saved, and click “Save” again.
19
User Guide – Using the Firefighter Response System
Types of Reports
Department Reports
•• Overview Report
•• Station List Report
•• Firefighter List Report
•• Call Log Report
Station Reports
•• Overview Report
•• Firefighter List Report
•• Call Log Report
Group Reports
•• Overview Report
•• Firefighter List Report
•• Call Log Report
Firefighter Reports
•• Overview Report
•• Call Log Report
20
User Guide – Using the Firefighter Response System
Mutual Aid
The Mutual Aid link takes you to a list of your neighboring agencies if they are using the FFRS application and have agreed to share their
member response data with your agency. By clicking a neighboring agency link, you will be able to view that agency’s response data.
This data is view-only and cannot be edited or changed in any way. If you have a neighboring agency that you think might benefit from
using the FFRS application, feel free to pass on the FFRS information to them.
To view your neighboring agencies information, log into your FFRS:
1. Click on the “Mutual Aid” button
2. Click on the neighboring agency name you would like to view
21