1
Open-E DSS V7 MANUAL Open-E Data Storage Software V7 Manual (Ver. 7.00 up12) January 20, 2014 1 www.open-e.com Open-E DSS V7 MANUAL Contents 1 BEFORE YOU GET STARTED .................................................................................... 5 1.1 1.2 1.3 1.4 1.5 1.6 2 1.6.1 Personal safety .......................................................................................................... 6 1.6.2 Safety for your data ................................................................................................... 6 1.6.3 ESD precautions ........................................................................................................ 6 FEATURES ................................................................................................................... 6 2.1 2.2 2.3 2.4 3 What is Open-E Data Storage Software V7 ...................................................................... 6 Open-E Data Storage Software V7 functionality................................................................ 7 Why Open-E Data Storage Software V7? ......................................................................... 8 RAID types ....................................................................................................................... 8 OPEN-E DSS V7 INSTALLATION INSTRUCTIONS .................................................. 10 3.1 3.2 3.3 4 System requirements ........................................................................................................ 5 Supported clients .............................................................................................................. 5 Supported network protocols ............................................................................................ 5 Supported network file protocols ....................................................................................... 5 Required tools................................................................................................................... 6 Safety precautions ............................................................................................................ 6 Preparing a USB flash drive as the boot media/installer with a ZIP file ........................... 10 Preparing a CD as the boot media/installer with the ISO File .......................................... 10 Booting DSS V7 Installer ................................................................................................ 11 CONFIGURATION DATA STORAGE SERVER ......................................................... 12 4.1 4.2 4.3 4.4 4.5 4.6 First-time operation of Open-E Data Storage Software V7 .............................................. 12 Entering product key and logging into Open-E Data Storage Software V7 ...................... 14 Initial Setup Wizard ......................................................................................................... 16 Create Disk Array ........................................................................................................... 20 Adding Disk Array ........................................................................................................... 20 Creating Open-E Data Storage Software V7 shares ....................................................... 22 4.6.1 Access to Windows Shares ..................................................................................... 22 4.6.2 Accessing Open-E Data Storage Software V7 shares under Linux .......................... 26 4.7 Creating Open-E Data Storage Software V7 iSCSI targets volume ................................. 27 4.7.1 5 Configuring end user workstation ............................................................................. 28 FUNCTIONS ............................................................................................................... 29 5.1 5.2 Console display functions ............................................................................................... 29 Functions of Open-E Data Storage Software V7 via browser access .............................. 31 5.2.1 SETUP .................................................................................................................... 31 5.2.1.1 Administrator settings .........................................................................................................................................31 5.2.1.2 Network Interfaces ..............................................................................................................................................38 5.2.1.3 Failover ................................................................................................................................................................44 5.2.1.3.1 Active/Passive Failover Configuration.............................................................................................................50 5.2.1.3.2 Active/Active Failover Configuration ..............................................................................................................52 5.2.1.4 Hardware RAID ....................................................................................................................................................55 5.2.1.5 Software RAID .....................................................................................................................................................55 2 www.open-e.com Open-E DSS V7 5.2.1.6 5.2.1.7 5.2.1.8 5.2.1.9 5.2.2 MANUAL Fibre Channel .......................................................................................................................................................61 iSCSI Initiator .......................................................................................................................................................62 Hardware .............................................................................................................................................................64 GUI .......................................................................................................................................................................68 CONFIGURATION................................................................................................... 69 5.2.2.1 Volume manager .................................................................................................................................................69 5.2.2.1.1 Volume groups ................................................................................................................................................69 5.2.2.1.2 Volume replication ..........................................................................................................................................75 5.2.2.2 NAS settings .........................................................................................................................................................79 5.2.2.3 NAS resources ....................................................................................................................................................109 5.2.2.3.1 Shares ...........................................................................................................................................................109 5.2.2.3.2 Users .............................................................................................................................................................119 5.2.2.3.3 Groups ..........................................................................................................................................................123 5.2.2.4 iSCSI target manager..........................................................................................................................................127 5.2.2.5 FC target manager .............................................................................................................................................132 5.2.2.5.1 Groups ..........................................................................................................................................................132 5.2.2.5.2 WWN Aliases.................................................................................................................................................135 5.2.3 5.2.3.1 5.2.3.2 5.2.3.3 5.2.3.4 5.2.3.5 5.2.3.6 5.2.3.7 5.2.4 5.2.4.1 5.2.4.2 5.2.4.3 5.2.4.4 5.2.4.5 5.2.4.6 5.2.4.7 5.2.4.8 5.2.5 5.2.5.1 5.2.5.2 5.2.5.3 MAINTENANCE..................................................................................................... 137 Shutdown...........................................................................................................................................................137 Connections .......................................................................................................................................................139 Snapshot ............................................................................................................................................................140 Data (file) Replication ........................................................................................................................................143 Antivirus .............................................................................................................................................................146 Miscellaneous ....................................................................................................................................................148 Software update ................................................................................................................................................149 STATUS ................................................................................................................ 150 Network .............................................................................................................................................................150 Logical volume ...................................................................................................................................................152 Connections .......................................................................................................................................................153 System ...............................................................................................................................................................155 Hardware settings ..............................................................................................................................................156 Tasks ..................................................................................................................................................................161 S.M.A.R.T. ..........................................................................................................................................................162 Statistic ..............................................................................................................................................................165 HELP ..................................................................................................................... 168 Data Storage Software V7 help ..........................................................................................................................168 About Data Storage Software V7 .......................................................................................................................169 Software License ................................................................................................................................................170 6 TROUBLESHOOTING GUIDE ................................................................................. 172 7 SOFTWARE LICENSES ........................................................................................... 175 7.1 7.2 Open-E Software License agreement ........................................................................... 175 Other applicable licenses .............................................................................................. 177 3 www.open-e.com Open-E DSS V7 MANUAL Copyright (c) 2004 - 2012 Open-E, Inc. All rights reserved. No part of this publication may be reproduced, stored in a retrieval system, or transmitted in any form, by any means, electronic, mechanical, photocopying, recording or otherwise, without the prior written consent of Open-E, Inc. Trademarks Open-E and Open-E Data Storage Software V7 (DSS V7) logos are all registered trademarks of Open-E, Inc. Windows ((R)), Microsoft ((R)) and Apple ((R)) are registered trademarks in the United States and other countries. Pentium ((R)) and Intel ((R)) are registered trademarks in the United States and other countries. All other trademarks herein are property of their respective owners. Disclaimer Open-E, Inc. assumes no responsibility for errors or omissions in this document, and Open-E, Inc. does not make any commitment to update the information contained herein. 4 www.open-e.com Open-E DSS V7 MANUAL 1 Before you get started Congratulations on purchasing Open-E Data Storage Software V7, the ideal solution for network-based storage management. This manual will assist you as you install and configure the hardware. In order to reach the desired configuration as quickly as possible, please read the following pages thoroughly. After all, you have purchased this solution for your invaluable data. 1.1 System requirements x86_64 compatible system, 64bit CPU CPU 1,6 GHz, 2 GB RAM, USB port, One or several suitable hard drives (SATA, SAS), Optionally a hardware RAID controller, Fibre Channel or iSCSI Storage. Open-E Data Storage Software V7 contains its own operating system and no additional software is required. NOTE In order to achieve maximum performance, we recommend using a 1Gbit network interface controller (multicards 1GBit recommended for bonding), as well as a processor with at least 2 GHz. If several computers are accessing the DSS V7 system, we recommend to use 4 GB RAM. 1.2 Supported clients Microsoft Windows (all versions) Linux Unix Mac OS 8.0, 9.0 and OS X 1.3 Supported network protocols TCP, UDP HTTP FTP SNMP 1.4 Supported network file protocols SMB / CIFS / Samba NFS Apple Talk FTP/sFTP 5 www.open-e.com Open-E DSS V7 MANUAL 1.5 Required tools Grounding strap or mat, in order to avoid electrostatic discharge (ESD), Tools for opening the computer’s chassis (typically, a screwdriver). 1.6 Safety precautions 1.6.1 Personal safety CAUTION High voltages may occur inside the computer equipment. Before removing the chassis, please turn off the power switch and disconnect the power cords. 1.6.2 Safety for your data If you are not using new hard drives for operating the Open-E Data Storage Software V7, please backup all important data prior to installation. Adding a hard drive to Open-E Data Storage Software V7 will result in a complete format of the hard drive, possibly deleting your existing data. 1.6.3 ESD precautions In order to avoid damage to your computer or to the Open-E Data Storage Software V7, please ensure you are grounded before opening the PC or the ESD package that contains Open-E Data Storage Software V7. The best way to ensure this safety is by using grounding straps or mats. If you do not have any grounding equipment handy, please make sure you are grounded (e.g. by touching the heater before working with Open-E’s Data Storage Software V7). Avoid touching the components inside the PC unless necessary, Please hold Open-E Data Storage Software V7 only on the edges. 2 Features Open-E Data Storage Software V7 is an all-in-one IP-Storage Operating System offering NAS and iSCSI (target and initiator) functionality in a single application with excellent enhanced management and superior reliability for organizations of all sizes. 2.1 What is Open-E Data Storage Software V7 NAS (Network Attached Storage) solutions are defined as storage systems that are directly hooked to a network infrastructure. They operate independently and do not have to be connected to a server via a controller or host adapter. In this case, the term “storage” refers to all systems that both provide data storage or actually store and organize data. Currently, data storage is the most common and most widespread type of NAS systems. 6 www.open-e.com Open-E DSS V7 MANUAL NAS solutions are based on a separate operating system (often on special hardware), which operates independently from the servers on the network. Typically, this operating system is a software that is optimized for providing data (file server). NAS solutions allow users to quickly, easily, and cost-efficiently add additional storage to existing networks. iSCSI (internet SCSI) is a protocol that encapsulates SCSI (Small Computer System Interface) commands and data in TCP/IP packets for linking storage devices with servers over common IP infrastructures. By using iSCSI, you can supply high performance SANs (Storage Area Networks) using standard IP networks like LAN, WAN or the Internet. iSCSI solutions are based on a separate operating system and often are on special hardware. Typically, this operating system allows operating in iSCSI technology. iSCSI solutions allow users to quickly add additional disk devices to existing networks. iSCSI has a client-server architecture. Clients of an iSCSI interface are called "initiators". Initiators give iSCSI "commands" to request services from components or logical units of a server, known as a "target". The "device server" on the logical unit accepts iSCSI commands and processes them. Open-E Data Storage Software V7 provides a fast, reliable, and scalable platform for IPStorage and combines the power of NAS & iSCSI in a single operating system. No matter if you need file sharing, storage consolidation, virtualization or replication. Open-E Data Storage Software V7 offers excellent price-to-performance ratio, enhanced manageability, and increased productivity. The flexible design of Open-E Data Storage Software V7 enables organizations of all sizes to create effective NAS and/or IP-SAN/iSCSI solutions that can adapt to and meet the simplest or the most complex storage needs. Open-E Data Storage Software V7 is built on the proven Open-E DSS V5 and V6, with all of its superior security, stability and management advantages. The software is Open-E’s seventh generation of IP-storage platform. Open-E Data Storage Software V7 brings you extensibility, simplified setup and storage management, and is specially tuned to provide optimal data-throughput and data protection for centralized storage. Open-E DSS V7 increases iSCSI target efficiency by supporting multiple iSCSI initiators on different volumes, without sacrificing NAS performance. 2.2 Open-E Data Storage Software V7 functionality Open-E Data Storage Software V7 is converting any commodity server into an enterprise data storage appliance. In other words, it is a standalone bootable Storage Operating System. DSS V7 supports NAS and SAN functionality, enabling data access for heterogeneous clients. DSS V7 NAS supports SMB/CIFS, NFS, FTP, sFTP, AFP, HTTPs and Rsync, and more. The SAN supports iSCSI, Fibre Channel. DSS V7 works with a wide range of 1GB and 10GB Ethernet adapters and also works with Infiniband adapters in IPoIB mode. DSS V7 can manage locally built-in hardware RAID arrays or SATA, SAS and SSD disks with its software RAID. Also, DSS V7 can manage externally connected SAN arrays via iSCSI or Fibre Channel. Thanks to the built-in Logical Volume Manager, DSS V7 provides simple and reliable ways to virtualize storage. Data Redundancy can be achieved with synchronous volume replication or with snapshot based asynchronous data (files) replication. Two node clusters can be configured easy with High Availability - Active-Active or Active-Passive iSCSI Failover. 7 www.open-e.com Open-E DSS V7 MANUAL Storage systems powered by DSS V7 assure quality that is confirmed not only with Open-E's QA team (constantly performing tests), but by 3rd party vendor certifications and interoperability tests, including VMware ESXi, Citrix XenServer, Microsoft Windows, Microsoft Hyper-V and Linux. Open-E’s Data Storage Software is an ideal storage solution for a wide range of applications, such as Virtual Infrastructure and Cloud Computing. 2.3 Why Open-E Data Storage Software V7? Often, storage in network environments is expanded the following way: file servers have to be shut down in order to install additional drives. Next, they need to be reconfigured. This tedious task often includes copying data manually onto larger drives - consuming a lot of time and money. With Open-E Data Storage Software V7, you can: add storage to your existing network; which is quick, easy and most important cost-effective, use consolidated storage and backups for multiple servers, improve data availability and efficiency, lower costs by centralizing storage management, simplify the installation and management of a SAN by using iSCSI versus Fibre Channel. Therefore, expensive hardware is no longer necessary. Take any computer – a new rack server or an old desktop PC with USB ports (internal or external) – and exchange the system drive for the Open-E Data Storage Software V7 USB flash module or a CD drive (as the boot media/installer). To store data, Open-E Data Storage Software V7 uses SATA hard drives, connected to ports on your mainboard or hardware RAID controller. Additionally, Open-E Data Storage Software V7 supports software RAID, so you can create software RAID over single hard drives or over existing hardware RAIDs. For example, for very high reliability you can create a software mirror over two hardware RAID5s. Within a few minutes, you will have up to several hundred gigabytes available on your network – without much effort and no downtime. 2.4 RAID types This manual is not intended to replace your RAID controller manual. But we want to provide you with an overview of common RAID types, so that you can make an informed decision on which type to choose. Depending on whom you ask, RAID means either Redundant Array of Independent Disks or Redundant Array of Inexpensive Disks. Both are correct. In essence, you combine the capacity, speed and security of several disks into one. RAID 0 forms one large hard disk by concatenating stripes from each member drive. Stripe size is configurable roughly between 64 KB and 1 MB. The result is a lightning-fast RAID, but with no added security. One failing drive may ruin the entire RAID. RAID 1 mirrors hard drives. Security is enhanced by writing identical data onto more than one drive. A completely defective drive does not cause any loss of data. The drawback is reduced performance and capacity. RAID 5 combines data striping from RAID 0 with parity checking, therefore combining speed and improved security. The loss of one drive is tolerable. 8 www.open-e.com Open-E DSS V7 MANUAL RAID 6 extends RAID 5 by adding an additional parity block, thus it uses block-level striping with two parity blocks distributed across all member disks. RAID 6 was not one of the original RAID levels. The user capacity of a RAID 6 array is N-2, where N is the total number of drives in the array. RAID 6 does not have a performance penalty on read operations, but it does have a performance penalty on write operations, due to the overhead associated with the additional parity calculations. RAID 10 is a combination of RAID 1 and 0, hence the name. Data is written in a striped and mirrored configuration, providing high performance and robust security. 9 www.open-e.com Open-E DSS V7 MANUAL 3 Open-E DSS V7 installation instructions IMPORTANT NOTE DSS V7 is a standalone bootable storage OS. The software for the Lite version and the regular version of DSS V7 is the same; however the Lite version has a limited feature set. After installation and boot, DSS V7 works as the full version in trial mode. Later, you can convert the trial mode to the full or Lite version by entering the appropriate software license key. NOTE Starting with both the zip and ISO file you can boot DSS V7 or install it onto the storage server hardware. We recommend installing the software onto a hard drive, SSD, or a small Logical Unit (volume) in your RAID. The following RAID controllers are supported as bootable media: MegaRAID, Smart Array, 3ware, Adaptec and Areca. Only 2GB is needed for the DSS V7 software and this drive or Logical Unit cannot be used for your storage volumes. USB flash drives are not recommended for long term use due to reliability issues. As mentioned above, the DSS V7 software has a boot option to install DSS V7 on a writable FAT or FAT32 partition, or on a RAID Logical Unit. The Installer automatically creates a 2GB partition on the selected media and copies the DSS software image onto it. The entire space of a destination media will be reserved for Open-E DSS V7. You will NOT be able to use the remaining space for storage purposes. Please use the lowest capacity device as you can, but not less than 2GB. 3.1 Preparing a USB flash drive as the boot media/installer with a ZIP file Please uncompress the downloaded zip file onto an empty FAT or FAT32 formatted USBflash drive in Windows, Linux or another OS. If you encounter trouble, use FAT for the USB drive and put your system BIOS into legacy mode on the USB port. After uncompressing the zip file on the USB-stick, the root directory must ONLY contain the following directories: bxxxx, boot and files: QuickStart.html and mmenu_upd.sh where: xxxx is the software build number. To make the USB-stick bootable, enter the directory called “boot” and run the bootinst.exe (in Windows) or bootinst.sh (in Linux). In Windows, please use the "safe hardware remove" function and sync it in Linux before removing the USB flash drive from the system. Continue to boot your storage server with your media. 3.2 Preparing a CD as the boot media/installer with the ISO File The ISO-File must be burned onto a CD with your favorite burning software. (For example: Nero Burning ROM - option: “Burn Image”, or ISORecorder, etc.) Please set the BIOS to boot from your CD/DVD-ROM drive. A USB CD/DVD-ROM can be used as well if your system supports it for booting. . NOTE When you run DSS V7 from a CD it is not able to save some configuration data, such as the DSS V7 network settings and the product key, so booting and running from a writable media is preferable. The ISO image can be used with a CD creation utility to burn a bootable CD which can be loaded into the storage server CD drive. Then you can boot from this CD to run DSS V7 or select to use the installer to install the DSS V7 software on a drive or a Logical Unit in the system. 10 www.open-e.com Open-E DSS V7 MANUAL 3.3 Booting DSS V7 Installer First, plug your media into the destination environment. The first boot menu will show the software version. You may press enter or it will skip automatically within 5 seconds. The second menu allows you to select the 64 bit architecture to boot DSS V7 or to install DSS V7 on a writable media in your system by using the interactive DSS V7 installer utility. Next, select “Run software installer” to install DSS V7 on a writable media in your system. . 64bit system (2.6.35) Run software installer When you run the installer, please follow the instructions. Finally, reboot your storage server from the new media (set your BIOS boot options back from CD/DVD/USB to the media where you installed the software). NOTE The software defaults to the trial version. DSS V7 can be used for evaluation up to 60 days with the default trial product key. When you decide to purchase the full version or switch to the Lite version, you can continue to use the software and all your data and settings will remain intact. You will see an option to run the memory test on the system by choosing “Run Memtest utility” in the first menu. In order to convert the trial version into Lite or the full version, please enter your DSS V7 license product key in the WEB GUI from menu: HELP-> about Data Storage Software V7 -> Extensions keys loader. 11 www.open-e.com Open-E DSS V7 MANUAL 4 Configuration Data Storage Server 4.1 First-time operation of Open-E Data Storage Software V7 Now start your system. After booting is complete, Open-E Data Storage Software V7 will provide you with information on the current software version and the network settings: Welcome to Data Storage Software V7 (Press F1 for Help) -----------------------------------------Model: Data Storage Software V7 Version: 7.0up12.9101.7968 64 bit Release date: 2014-01-20 S/N: TRL00022 Licensed storage capacity: unlimited Network settings: Interface 1: eth0 IP: 192.168.0.220/255.255.255.0 Interface 2: eth1 IP: 192.168.1.220/255.255.255.0 To change IP address(es) press Left Ctrl + Left Alt + N HTTPS settings: port: allow from: 443 all This is TRIAL version. 60 day(s) left for evaluation Selftest O.K. If your network has a DHCP server, Open-E Data Storage Software V7 should configure the IP settings automatically. If that is the case, you can proceed to 4.2. If your network does not have a DHCP server, Open-E Data Storage Software V7 will start with the default settings: IP address 192.168.0.220 and subnet mask 255.255.255.0. 12 www.open-e.com Open-E DSS V7 MANUAL You can change these values manually by pressing the following combination key: left CTRL, left ALT and N. You can now select a different IP address. Other available console functions will appear after pressing the F1 key (see below). Help You can use below key sequences (C-means ‘Left Ctrl’,A-‘Left Alt’): C-A-N – to edit static IP addresses C-A-P – to restore default factory administrator settings C-A-I – to restore default network settings (IP, BONDING) C-A-T – to run Console Tools C-A-X – to run Extended Tools C-A-W – to run Hardware Configuration C-A-R - to run RAID Tools C-A-F - to run Fibre Channel Tools C-A-H – to display hardware and drivers info F2 - to display all network interface F5 – to refresh console info C-A-S – to shutdown the system C-A-K – shutdown / restart menu EXIT After a connection has been established, all settings can be changed remotely via the web browser. If your network requires it, the address of the standard gateway and the broadcast address can be changed. NOTE For additional information, please read the chapter “Console display functions” 13 www.open-e.com Open-E DSS V7 MANUAL 4.2 Entering product key and logging into Open-E Data Storage Software V7 You can establish a connection to Open-E’s Data Storage Software V7 from every network computer. To establish this connection, use a browser (e.g. Microsoft Internet Explorer) and enter the IP address or the name of the computer hosting the Data Storage Software V7 into the URL entry line: https://192.168.0.220 (standard address) or https://dss (this name can be changed in the installation settings Open-E’s Data Storage Software V7). NOTE For security reasons, Open-E Data Storage Software V7 uses the encrypted SSL protocol (https). You will now be asked to verify the encryption certification. Since Open-E Data Storage Software V7 only allows creating shares on the Intranet, there is no need for global certification by an authorized body. You can accept the certificate for a single session or for all future sessions. Next, the window for entering the product key will appear. If you already have one, please enter and click the apply button. After restarting, open the WEB GUI with your browser again. NOTE If you don’t have a product key yet you can use one of the three links on the right (60 day trial version, FREE 2TB Lite version or buy the full version of the product). NOTE In order to convert the trial version into the Lite or full version, please enter your DSS V7 product key in the WEB GUI from the menu: HELP-> about Data Storage Software V7 -> Extensions keys loader. NOTE After you first launch the Open-E Data Storage Software V7, you will see a page with the software agreement and available language options. Later you can change the language used by modifying language settings, which are located in the Server tree and are accessible through “Setup”. 14 www.open-e.com Open-E DSS V7 MANUAL After accepting the license agreement you can log into Open-E Data Storage Software V7 using the standard password “admin” (this can be changed later). In order to start working, you will need to set all the necessary parameters. NOTE The password is case-sensitive. If you cannot log into your Open-E Data Storage Software V7, please make sure the Shift and Caps Lock keys are not pressed. NOTE If your web browser shows something different than expected, please delete the cache and cookies in the menu settings of your web browser. 15 www.open-e.com Open-E DSS V7 MANUAL 4.3 Initial Setup Wizard After logging to the Open-E DSS V7 an Initial Setup Wizard will appear. The six steps Wizard will allow for an initial configuration of your DSS V7 Language settings In the first step you can choose the language you want to use for www administration. Password In the following step you can set the passwords for the server administration accounts. 16 www.open-e.com Open-E DSS V7 MANUAL IP address These are the settings of your network interface you are connected to at the moment. The gateway and DNS will be needed for NTP server which will be set (if you wish) in the next steps. If it's possible, the discovered values of these parameters are proposed to you in this form. Time zone settings This function allows you to adjust the time and date settings. Select a time zone suitable for your location. 17 www.open-e.com Open-E DSS V7 MANUAL Set time This function allows you to adjust NTP server settings. You can define an NTP server (host name or an IP address). Select time zone suitable for your location. With the Continuous adjusting using NTP option enabled your system time will be monitored and corrected if the difference between the local time and the server time changes. Enabling this option is especially recommended when using domains. Server name Please provide a server name to clearly identify your server on the network. Comment is optional, but it's nice to have one. 18 www.open-e.com Open-E DSS V7 MANUAL Summary All steps required to complete the initial configuration are done. Now you can click finish to start using your software. If you don't want to display quickstart wizard at logon please click the checkbox with “Do not show me the wizard at logon”. If you end Initial Setup Wizard, click the finish button and confirm this action by clicking the OK button. In case you would like to run quickstart wizard again in the future, you can do this by entering 'Help -> help index' position in menu and click “Run Initial Setup Wizard”. 19 www.open-e.com Open-E DSS V7 MANUAL 4.4 Create Disk Array If your system has a hardware RAID, please create a RAID array in the RAID controller setup. Please refer to the RAID controller manual. You do not have to install drivers or RAID array monitoring and maintenance software. If your system has motherboard RAID functionality, please do not use it as it is not supported. In case you want to use software RAID with single drives or even with installed hardware RAIDs, please first go to the “S/W RAID” tree in the “Setup” menu. You will find a list of available units. A unit can be a single hard disk or disk arrays if you have a hardware RAID in the system. Software RAID can be created for a single hard disk or hardware disk arrays. To create a software RAID, please select relevant units, choose the RAID level and click on the “create” button. After clicking the “create” button, the status will change to “in use” and additional information describing the kind of disk array (e.g. MD0 is RAID 0) will be displayed. 4.5 Adding Disk Array In the menu, please select “CONFIGURATION” ”volume manager” and “Unit manager”. You will find a list of available drives/arrays (units) that can be used. When creating a new volume group, the system adds selected units only. You can use the default volume group name or change it. After creation is complete, the page is reloaded and the “Status” field shows your drives/arrays as "in use”. 20 www.open-e.com Open-E DSS V7 MANUAL It is possible to combine two (or more) units into one volume group by clicking on the righthand side of the tree diagram on the volume group name (e.g. “vg00”) and using the “Volume Manager” function where you can create a new NAS volume and/or a new iSCSI volume. If you want to use the snapshot feature you should create a snapshot volume. Next, using the “Volume Manager” function you can add a disk volume to a new LV or increase the size of existing LVs (you cannot decrease LV size). To set the needed LV size, just use the scrollbar. On the right side of the scrollbar you will find a counter of available 21 www.open-e.com Open-E DSS V7 MANUAL space. This function can be also used to reserve disk space for swap, snapshots, system and replication. 4.6 Creating Open-E Data Storage Software V7 shares In the upper menu, please select “CONFIGURATION” followed by “NAS settings.” Here, you can select the authentication type. In smaller networks, authentication should be done via the used workgroup name and has to correspond to the workgroup name of the client PC. Go to “CONFIGURATION” “NAS Resources” and select “Shares” in the menu on the righthand side of the tree diagram. Now create the first share. NOTE The workgroup/domain name that was configured in Open-E Data Storage Software V7 has to match the network settings. Otherwise, the configured shares will not be visible in the network environment. NOTE If you made changes to the workgroup and server name in Open-E’s Data Storage Software V7 configuration, it can take some time until each workstation computer in the Windows network recognizes the new name. 4.6.1 Access to Windows Shares Access to newly created shares is possible via Windows Explorer. All visible shares should be available immediately after entering the IP address of your Open-E Data Storage Software V7 (in this example \\192.168.0.240). Please keep in mind that sometimes it takes a few minutes until new shares or changes become accessible. When accessing invisible shares, you need to know the corresponding share name beforehand and attach it to the IP address with a backslash (\\): Open-E supports Windows ACL (Access Control List) for read, write, and execute options; based on the POSIX standard written by SGI. 22 www.open-e.com Open-E DSS V7 MANUAL Some examples on how to use ACL (with ADS or PDC authentication): 1. Deny access to a directory for every user (group): a. create a new folder or select one of your existing folders (you must be the owner of the folder or a superuser to set ACL permissions)* b. go to “directory properties” and click the right mouse button on the directory, then choose "Properties". c. select the “Security” tab d. choose the group "Everyone" e. click the "Remove" button – only you and your group will have access to the selected directory ** f. click the "Apply" button Now only you have permissions to access this directory. 2. Allow full access to this directory for a group called "WORK": a. make sure that the group WORK is created b. in the security window click the "Add" button c. click the "Remove" button (point 1) d. select the group "WORK" (Advanced Find Now will show you all users and groups) and then click OK e. enable Full Control in the “Allow” column f. next, click the "Apply" button. 3. Set “read only” permissions to the file for everyone: a. create a new file (you must be its owner or a superuser to set permissions)* b. go to the permissions window, c. select the group “Everyone”, d. leave only ”read” permissions in the "Allow" column, e. click the "Apply" button, f. do the same for your group and yourself. Now the group “Everyone” has "read only" permissions to this file. 4. Changing the directory owner: a. in the Open-E web interface go to Resources shares b. within the "Set Superuser" function select your user and restart the connection (Maintenance Shutdown Function Connections reset) or wait about 15 minutes, c. go to the file properties for the directory in question (right mouse click on the directory and click the "Security" tab) d. click the "Advanced" button e. select the Owner tab f. click the "Other Users or Groups" button and select the user that will be the new owner (Advanced Find Now will show all users and groups), click OK*** g. select the user from the list and click OK and the "Apply" button h. click OK and re-open this window to refresh owner information 5. Allow full access to this directory for the user "BIG BOSS": a. make sure that the "BIG BOSS" exists, b. in the security window click the "Add" button c. select the user "BIG BOSS" (Advanced Find Now will show you all users and groups) and click OK d. enable Full Control in the Allow column e. click the "Apply" button 6. Allow “read” access to this directory for a group called "COMPANY": a. make sure that the group "COMPANY" exists 23 www.open-e.com Open-E DSS V7 MANUAL b. in the security window click the "Add" button c. select the group "COMPANY" (Advanced Find Now will show you all users and groups) and click OK d. enable "Read & Execute" in the Allow column e. click the "Apply" button 7. Create a “read only” directory with full access subdirectories for the group “ALL” (using inheriting permissions): a. create a folder called "ROOT", b. go to the security window, c. remove both “Everyone” and your group, d. click the “Advanced” button and then the “Add” button, e. select the group “ALL” and click OK, f. change “Apply onto” to “This folder only”, g. within permissions leave only “Traverse Folder / Execute File” and “List Folder / Read Data” Click OK, h. click the “Add” button once again and add “ALL” group, i. This time change “Apply onto” to “Subfolders and files only” (this step will put any inherited permissions into effect), j. select “Full Control” and click OK k. click “Apply” to save the permissions. With these settings users from the group “ALL” cannot remove the “ROOT” folder or make any changes to its contents. All new files/folders will be based on the access given by inherited permissions. Example: file /ROOT/some_file.txt can be changed but cannot be removed, directory /ROOT/directory cannot be removed but users from the group ALL can create folders and files in this directory, file /ROOT/directory/my_file.txt can be removed or changed by the group ALL (provided the inherited permissions have not been changed). 8. Inherited permissions If the file or directory has inherited permissions, all newly created subfolders will inherit the main folder permissions. All permissions can be changed. Please keep in mind that changing permissions in the main folder will trigger the same changes to the inherited permissions of any subfolder within. 9. UNIX Rights in Windows: Folder permissions Permissions Traverse Folder / Execute File List Folder / Read Data Read Attributes Read Extended Attributes Create Files / Write Data Create Folders / Append Data Write Attributes Write Extended Attributes Delete Subfolders and Files Delete --x r-- -w- r-x rw- -wx rwx 24 www.open-e.com Open-E DSS V7 Read Permissions Change Permissions Take Ownership MANUAL Example: application of ACL permission in a small company. The company has 10 users Name Group Position Chris Company Director Robert Company Manager Jennifer Company Secretary Clint Company Developers Main Developer Brad Company Developers Company Developers Company Developers Company Graphics Company Graphics Company Developer Johnny Tom John Ben Bill Developer Developer Graphic Designer Graphic Designer Cleaner Rights All rights to everything All rights to everything besides the Director’s home directory Read access to the "DOCUMENTS" directory Read and write to the “DEVELOPERS” directory read and write to the “CHANGES” directory Read to „DEVELOPERS“ Read and write to „Changes“ Read to „DEVELOPERS“ Read and write to „Changes“ Read to „DEVELOPERS“ Read and write to „Changes“ Read to „GRAPHICS“ Read and write to „Changes“ Read to „GRAPHICS“ Read and write to „Changes“ Only access to his home directory First create users and groups in your domain: a. run Start menu Programs Administrative Tools Active Directory Users and Computers, b. click the right mouse button on your domain name and select New User c. fill out all necessary fields to create user Chris, d. create all remaining users (back to point 2). e. click the right mouse button on your domain name and select New Group f. create the following groups: Developers, Graphics, and Company, g. add users to groups - right mouse click on the Developers group. On the Members tab click Add. Next, add users to groups (groups Company, Developers, Graphics). Connection to a Windows domain: a. go to the Open-E DSS V7 Web interface and select “Configuration” “NAS settings” b. select ADS or PDC; depends on your system - if you have an NT4 Domain or Windows 2003 (with no Kerberos**** fix) then select PDC, else select ADS, c. enter your domain name - in PDC this will be the IP address and administrator password in ADS; enter the full domain name (for example COMPANY.COM.DE), d. enter your domain/Kerberos server IP address, e. enter the name and password of an Administrator user account existing on your domain, f. click the “Apply” button to connect to the domain. 25 www.open-e.com Open-E DSS V7 MANUAL Creation of shares and set permissions: a. Create a Company share (go to the Open-E DSS V7 web interface Configuration NAS resources Shares), b. set permissions for all users or select only company groups, c. go to the share \\YOUR_NAS_SERVER_NAME\\Company, d. create folders "WORK", "HOME" and "FORALL", e. set permissions for the folder WORK - right mouse click properties security. f. deny access for everyone (point 1), change the owner to the user Chris (point 4) with full access and add Robert with full access, g. create folders DEVELOPER, GRAPHIC, DOCUMENTS and CHANGES in the folder WORK, h. change the owner of the DEVELOPER directory to Clint (with full rights). Add “read only” access for the group Developers, i. add full access to the directory GRAPHIC for the group Graphics, j. change the owner of the CHANGES directory to Clint (with full rights). Add full rights to the groups Graphics and Developers, k. give Jennifer “read-only access” to the DOCUMENTS directory, l. in the HOME directory, create a separate private directory for each user, change user ( the owner and the directory names should be the same). Remove access for the Company group (point 1). m. add full access to the directory "FOR ALL" for the group Company. * ** If you are a superuser, all files and directories will be created as a local ROOT user. New directories with no inherited permissions do not have ACL permissions at the beginning - they have only standard UNIX permissions 0777 (Windows 2003 shows every special permission in the normal view in the security window. Windows 2000 does not show any permissions in the normal view - only in the advanced view). To enable ACL for this directory, first select “Full Access” for everyone and click the “Apply” button. Subsequently do the same for your group and your user. Subdirectories created in this directory should have ACL permissions inherited from their parent. If permissions are inherited then the “ALLOW” column is grey. To disable permissions just use the “Deny” column. If you change ACL permissions always check that a new set of permissions for one group does not interfere with permissions for other user/groups or with any connections between these accounts. Windows 2003 handles such changes much better than Windows 2000. *** This function is available in Windows 2003 - in other Windows versions only your user can be selected. **** Kerberos is a server for distributing security keys. Normally it resides only on the domain but it also can be located on an external server. In Windows 2003 this server ignores specified key types and authorization works only when entering the IP address, not the DSS V7 name. . 4.6.2 Accessing Open-E Data Storage Software V7 shares under Linux Please use the following command to mount an NFS share: mount -t nfs 192.168.0.220: /share_name /local_mount_point where: 192.168.0.220 is the Open-E Data Storage Software V7 IP address IMPORTANT NOTE: On some versions of DSS V5 and older the path must be: /share/share_name Please use the following command to mount an SMB share: In a shell: mount -t smbfs -o username=root,password=12345 //192.168.0.220/test /mnt-smb where ‘test’ is the share name In X-Windows: 26 www.open-e.com Open-E DSS V7 MANUAL Smb://[email protected]/ 4.7 Creating Open-E Data Storage Software V7 iSCSI targets volume After creating an iSCSI volume (see 4.5), please choose “CONFIGURATION” ” iSCSI target manager” ”Targets” and within the “Create new target” function click the “Apply” button to create a new iSCSI target. Next, in the “Targets” diagram click on the name of a target you have created (e.g. “iqn.201304:dss1.target0”) and within the “Target volume manager” function click “attach” button located under Action. Using the “Target volume manager” function you can add “target volumes” only within the scope of one volume group. 27 www.open-e.com Open-E DSS V7 NOTE MANUAL You can create as many logical volumes and as many separate iSCSI volumes (LUNs) are required (see 4.5). If you create 5 logical volumes, you may create one target with 5 LUNs or 5 targets with 1 LUN each, or 2 targets where e.g. 3 LUNs belong to the first target and the remaining 2 LUNs belong to the second one. By clicking on “CHAP users” in the left side panel, you can manage secure access to logical volumes by inputting a CHAP user name and password (password must consist from 12 to 16 characters if you use Microsoft iSCSI Initiator). Next, in “Discovery CHAP user access” you can grant access to this target to specified CHAP users. NOTE If you enable CHAP user access authentication but do not select any users, nobody will have access to the target. 4.7.1 Configuring end user workstation In order for the iSCSI technology to work correctly on end-user computers, you need to install the iSCSI Initiator software (if it is not provided with the operating system). For Microsoft Windows 2000/XP/2003 systems, the Microsoft iSCSI Initiator is available for download from the web. Correct software configuration consists of installing individual target volumes by adding new disk letters in the system (in Windows XP and 2003) or subfolders as with folders in the UNIX system. All these functions are available via “administrative tools” disks management. How to connect iSCSI in Windows 2008/XP/WIN7: a. b. c. d. e. f. g. h. first, you have to install the iSCSI Initiator package. You must be logged in as an administrator to install the Microsoft iSCSI Software Initiator package, next, launch the iSCSI Initiator software, if you have Chap Users for Targets, click on the “Discovery” tab, click the “Add” button, then enter your Open-E Data Storage Software V7 IP address, next click the “Advanced…” button, check “CHAP logon information,” and put in the User name and the Target secret which was given earlier in “Discovery CHAP user access” ( in webgui DSS V7) and then click the “OK” button twice, on the “Targets” tab you will see the name of available iSCSI targets, e.g. “iqn.2010.09:dss.target0”, click the “Log On” button and if you have entered a password, you need to repeat the steps outlined in point “e,” then press the “OK” button. The status for the chosen target will now change to “Connected,” next choose Settings control panel administrative tools computer management disk management, now all available iSCSI target drives will be displayed. In order to use them you have to format and mount them in the system under a new disk letter. NOTE Microsoft iSCSI Initiator ver. 2.08 does not support dynamic disks. Target password must consist of minimum 12 and maximum 16 alphanumeric characters. Please read the manual and release notes for the Microsoft iSCSI Initiator for more details, which you can also find on the Microsoft website. NOTE Please do not ignore the time settings on the Open-E DSS V7 iSCSI target and the client stations. Those settings must be identical. Time can be synchronized using the “Set time function in the Web interface menu Setup. 28 www.open-e.com Open-E DSS V7 MANUAL 5 Functions 5.1 Console display functions While Open-E Data Storage Software V7 can be fully administered remotely through a secure Web interface, some of its functions can be accessed via the console. Open-E Data Storage Software V7 constantly displays the following basic parameters: IP address Https settings CTRL+ALT+n If you press the left CTRL key + the left ALT key + n, you will be asked for a new IP address and a subnet mask. The DHCP server will be shut down. CTRL+ALT+p If you press the left CTRL key + the left ALT key + p, all access restrictions will be lifted after entering the administrator password (in addition, there is a reset to the standard https port 443). CTRL+ALT+i By pressing a combination of the left CTRL key, left ALT key and i, you can reset the original IP address (192.168.0.220) and bonding. During this process, the DHCP server support is turned off. CTRL+ALT+t By pressing a combination of the left CTRL key, left ALT key and t, you can run the Console Tools. A menu with the following functions will appear: Ping, DHCP Ping, Hardware info, Memory info, Time configuration, Language settings, Modify driver options, Console lock/unlock, and Boot options. CTRL+ALT+x After pressing the left CTRL key, left ALT key and x, the console will display the Extended Tools. CTRL+ALT+w After pressing the left CTRL key, left ALT key and w, the console will display the hardware configuration. CTRL+ALT+r After pressing the left CTRL key, left ALT key and r, the console will display the RAID Tools CTRL+ALT+f After pressing the left CTRL key, left ALT key and f, the console will display the Fibre Channel Tools. CTRL+ALT+h After pressing the left CTRL key, left ALT key and h, the console will display hardware and driver information. 29 www.open-e.com Open-E DSS V7 MANUAL F1, F2 and F5 The function key F1 displays help information while F5 resets the console display to default. If you press the F2 key all network interface will be displayed. Shutting down and restarting With Ctrl + ALT + K the Open-E Data Storage Software V7 host computer will be restarted, while CTRL + ALT + S will shut it down. Please be careful with this option when users are connected. 30 www.open-e.com Open-E DSS V7 MANUAL 5.2 Functions of Open-E Data Storage Software V7 via browser access The following pages will thoroughly describe every function of Open-E Data Storage Software V7. The functions are divided according to menu options, which are located at the top of the screen. 5.2.1 SETUP Within this tab you can manage administrator settings, network interfaces, failover, hardware RAID, create disk arrays using software RAID, as well as find Fibre Channel, iSCSI initiator, hardware and Web GUI settings. 5.2.1.1 Administrator settings Function: Administrator access Use this function to restrict access to server administration. HTTPS port You can change the https port here (the default setting is 443). Allow access IP Here you can assign IP addresses (separated by a semicolon) that are allowed to access the server administration webpage. If left blank, the field indicates no restrictions. Lock console without password Disables access to the console (and LCD keys). Lock console with password To get access to the console (and LCD keys) you need to type in the password. Note that this password should be exactly 8 characters long and include only digits from 1 to 4. Unlock console Unrestricted access to the console. NOTE Please exercise caution with this function if all computers in the network receive IP addresses via DHCP: current IP can be replaced by a new one after the lease ends. Please pay special attention when using the Lock console feature - you will not be able to reset to default administrator access from the console if you make a mistake while setting the IP address. If you need to restore the default settings, please access the console, press CTRL+ALT+X to enter the Extended Tools view and select Restore default administrator settings. Function: Administrator password Using this function you can change the passwords for server administration accounts. Enter password Please enter your new password. Confirm password Please retype your new password. Passwords cannot contain: special characters such as ' " ` spaces The default password for each account is admin. NOTE Passwords are case-sensitive. For security reasons, the password you enter will not be displayed. Please make sure the Shift and Caps Lock keys are not pressed. 31 www.open-e.com Open-E DSS V7 MANUAL Function: E-mail notification The server can send an e-mail notification to the administrator in case of any significant events, critical errors, warnings, etc. To enable this feature check the Send errors box. E-mail E-mail address from which notifications will be sent. Account name Account name for the e-mail address from which notifications will be sent. Password Password for the account provided above. SMTP SMTP server name. Destination e-mail Administrator e-mail address to which notifications will be sent. Port Port number for the SMTP server. If you want to send a test message, please check the Send test message option. If you want to encrypt e-mail notifications, check the Encrypted option. E-mail notifications are encrypted with the TLS protocol 32 www.open-e.com Open-E DSS V7 MANUAL Function: Remote log server configuration This option is used to send log events from this server on the remote log server. Linux based operating system with installed syslog-ng software is required on the remote side. To configure this function it is necessary to set the IP address of the remote log server and Port that will be used for the communication. The Protocol used for communication is set by default to TCP but it is also possible to use UDP. Please note that that a rule to allow the IP address from this server to communicate with the remote server using the defined protocol needs to be added to the firewall on the remote side. An example of a simple syslog-ng.conf configuration on the server side: source server {tcp();}; destination serverlogs {file("/var/log/server.log");}; log {source(server); destination(serverlogs);}; 33 www.open-e.com Open-E DSS V7 MANUAL Function: HTTPS security protocol To ensure the identity of your web administration tool (WebGUI), the web browser automatically verifies it every time you connect to the tool. At this point, you may receive warnings that the site's certificate is not trusted. In order to make your browser trust your SSL certificate, click the SSLCert.crt link to download and install it into the certificate management system of your web browser. If your browser does not recognize this file as a CA (Certification Authority) certificate, please save this certificate on your hard disk and follow one of these tutorials to install it manually: Tutorial for Google Chrome Tutorial for Microsoft Internet Explorer Tutorial for Mozilla Firefox Tutorial for Opera As for the security protocol, there are three options to choose from: Automatic - the most secure protocol (TLSv1 or SSLv3), supported by the server and the web browser, will be used through the automatic protocol negotiation, SSLv3 - forces the use of SSLv3 protocol, supported by all known web browsers, TLSv1 - forces the use of TLSv1 protocol, successor to SSLv3, supported by most of the modern web browsers. 34 www.open-e.com Open-E DSS V7 MANUAL Function: SNMP settings This function enables you to configure access over the SNMP protocol in versions 2 or 3. With SNMP enabled, you receive a wealth of information (CPU usage, system load, memory info, Ethernet traffic, running processes). System location and system contact are only for your information. For example, when you connect from an SNMP client, you will see your location and name. SNMP, version 3 has an encrypted transmission feature as well as authentication by username and password. SNMP, version 2 does not have encrypted transmission, and authentication is done only via the community string. The community string you set can contain up to 20 characters, while the password needs to have at least 8 characters. Links to SNMP clients: http://www.muonics.com http://www.mg-soft.com http://www.manageengine.com NOTE Our storage system supports SNMP protocol in MIB-II standard. List of MIBs: mib-2.host mib-2.ip mib-2.tcp mib-2.udp mib-2.interfaces mib-2.at system Function: UPnP settings This function enables UPnP protocol for device notification. NOTE UPnP only works over a network card which has the default gateway set up. 35 www.open-e.com Open-E DSS V7 MANUAL Function: Remote console access By using this function you can manage console tools remotely via the SSH protocol (secure shell). The default user is called cli and cannot be altered. However, the password can be changed. Allow IP Here you can assign IP addresses (separated by a semicolon) which are granted remote access to the server. If left blank, the field indicates no restrictions. Set port The default port is 22222 for security reasons, seeing as high-number ports are invisible to port scanners. You can change the setting only to a port within the 102465535 range. You cannot indicate ports already in use. Password Password length is minimum 8 characters. Be sure to use strong passwords. Confirm password Please retype your new password. Password cannot contain: special characters such as ' " ` ^ & $ # [ ] \/ | *, spaces To connect to the server from Linux/MacOSX systems use: ssh -2 -p 22222 -l cli address_ip where: option: -2 indicates the SSH protocol version used for connection, option: -p indicates the remote access port, option: -l indicates the user (the user needs to be cli), option: address_ip indicates the address of the server you want to connect to. You will be asked for the remote access password you have entered on the server. To connect to the server from Microsoft Windows, download the free SSH client (Putty): in the Host Name (or IP address) field please enter the IP address of the server, in the Port field please enter the same port as in the server GUI (default 22222), in the Protocol field please select SSH, 36 www.open-e.com Open-E DSS V7 MANUAL in the category: Connection -> Data -> Auto-login-username please enter: cli, in Terminal -> Keyboard -> The Function Keys and keypad please select VT100+, go back to the Session category, enter the session name in the Saved Sessions field and click on the Save button, next, click on the newly saved session, then click Open and enter the password. (If you have not entered the Auto-login-username, Putty will prompt you for a username, so please enter cli). Function: CLI/API configuration Using this function you can administer the system remotely with the SSH (Secure SHell) protocol. Default user is 'api' and cannot be changed - however, you can change the password. Allow IP You can assign IP addresses (separated by a semicolon) which are granted access to the server configuration. Empty field means no restriction. Set port Default port is 22223 for security reasons, because high ports are invisible to port scanners. You can change it to any port within the 1024-65535 range, except for the ports which are already used. Password Minimum password length is 5 characters. Be sure to use strong passwords. Confirm password Please retype your new password. Passwords cannot contain: special characters: ' " ` ^ & $ # [ ] \/ | *, spaces Example syntax of an SSH command: ssh -2 -p 22223 -l api ip_address command option: -2 sets the version of the ssh protocol used for the connection, option: -p sets the connection port, option: -l sets the user (the user must be api), option: ip_address sets the address of the server you want to connect to, option: command; use help to display all available commands. You will be asked for the password you entered in the API configuration menu. It is also possible to authenticate without a password by using the key generated after clicking generate and download, or downloading a previously generated key by clicking download. On GNU/Linux systems make sure that the key file has read only rights for the owner (400). Example syntax of an SSH command using a key: ssh /-i path_to_the_downloaded_key -2 -p 22223 -l api ip_address command option: -i sets the path to the downloaded key file, option: -2 sets the version of the SSH protocol used for the connection, option: -p sets the connection port (default: 22223), option: -l sets the user (the user must be api), option: ip_address sets the IP address of the storage server you want to connect to, option: command; use 'help' to show all available commands. NOTE Every time the “generate and download” button is pressed, it generates a new key and the old key expires. 37 www.open-e.com Open-E DSS V7 5.2.1.2 MANUAL Network Interfaces Here you can find a tree containing network interfaces. Click on the name of an interface to see more information about it. Function: Server name Server Name Please enter a server name to clearly identify your server. This name is used primarily for NAS protocols, which makes it different from the hostname, which is primarily used internally (for failover and volume replication functions). Comment Here you can enter a short description of your server. Server name and comment rules: please make sure the server name is unique in your network, select a server name that clearly identifies your new server, please do not use spaces and special characters such as ~!@#$^&()+[]{}*;:'".,%|<>?/\=`_, server name cannot consist of digits only, comments are not displayed on some systems. Function: Hostname Hostname is one of the names used to identify this machine. It is primarily used for internal processes (most importantly, Failover and volume replication). It is different from the server name; usually server name is primarily used for NAS protocols. Hostname needs to start with a lowercase letter; the other characters may consist of lowercase letters, digits, minus signs and dots. NOTE It is not possible to change the hostname while the failover service is running. NOTE Changing hostname requires a reboot. 38 www.open-e.com Open-E DSS V7 MANUAL Function: DNS settings This function enables you to enter DNS addresses. Please use semicolons to separate addresses. Function: Default gateway This function allows you to set a default gateway for the storage system. Only one default gateway can be set up at any given time. NOTE The default gateway will become inactive if any of the following conditions are met: the interface with the default gateway has become part of a bonding interface, the interface with the default gateway has been removed or deactivated (concerns both physical and bonding interfaces). NOTE It is possible to set the default gateway on an inactive interface. In such a case, the gateway will remain inactive until that interface is activated. NOTE If the interface you are setting the default gateway on does not have any gateway defined (i.e. the Gateway field says Undefined), you will need to define a gateway first (under the text console, please press CTRL+ALT+N and select the interface followed by Gateway). Function: Static routing manager This function allows you to set up routes to subnetworks or hosts. NOTE You can change the order in which the routing rules are applied by changing their positions on the list. NOTE Setting up static routing may be necessary if you have several network interfaces in the same subnetwork. Please see the following document for more information: CONFIGURATION SEVERAL NETWORK ADAPTERS IN THE SAME SUBNETWORK 39 www.open-e.com Open-E DSS V7 MANUAL Function: Create new bond interface Bonding allows for load-balancing or fail-over for incoming and outgoing connections. Here you can create or edit bonding network interfaces. In order to create a bonding interface: select the network interfaces you want to create a new bonding interface for, select the preferred bonding mode from the Create drop-down menu, select dynamic (DHCP) or static configuration for the network interface, if you want to get a DNS address dynamically, select get DNS, when using static configuration for a network interface, enter the IP address, netmask, broadcast and gateway. Afterwards, click the Create button and a new bonding interface will be created. NOTE In order to take advantage of bonding more than one ethernet NIC needs to be plugged into the box. Please note that MAC addresses need to have a 02 prefix, for example: 02:xx:yy:zz:vv:nn Each network interface is characterized by the following fields: Primary A string (eth0, eth2, etc), specifying which slave is the primary device. The specified device will always be the active slave while it is available. Only when the primary is off-line, alternate devices will be used. This is useful when one slave is preferred over another, e.g., when one slave has higher throughput than another. The primary option is only valid for the active-backup mode. Interface Network interface name. Cable Shows if a cable is connected to the NIC. 40 www.open-e.com Open-E DSS V7 MANUAL State Characterizes the state of the network interface. NIC can be in a bonding or single state. Bonding modes: balance-rr Transmissions are received and sent out sequentially on each bonded slave interface. This mode provides fault tolerance and load balancing. active-backup Only one slave in the bond is active. Another bonded slave interface is only used if the active bonded slave interface fails. This mode provides fault tolerance. balance-xor Transmission is based on the following equation: [(the source MAC address XOR'd with the destination MAC address) modulo (slave count)]. This selects the same slave for each destination MAC address. This mode provides fault tolerance and load balancing. broadcast Transmits everything on all slave interfaces. This mode provides fault tolerance. 802.3ad IEEE 802.3ad Dynamic link aggregation. Creates aggregation groups that share the same speed and duplex settings. Utilizes all slaves in the active aggregator according to the 802.3ad specification. Requires a switch that supports IEEE 802.3ad Dynamic link aggregation. balance-tlb Channel bonding that does not require any special switch support. The outgoing traffic is distributed according to the current load (computed relative to speed) on each slave. Incoming traffic is received by the current slave. If the receiving slave fails, another slave takes over the MAC address of the failed receiving slave. This mode provides fault tolerance and load balancing. WARNING Using cards from different manufacturers or cards based on different chipsets in one bond team may cause low performance or unstable behavior. Function: HTTP proxy With this function you can enable or disable an HTTP proxy. 41 www.open-e.com Open-E DSS V7 MANUAL To enable an HTTP proxy: select "Use HTTP proxy" enter server name, port, username and password click the "Apply" button NOTE Proxy server name should not contain the http://prefix, port and the password. An example of a correct proxy server name: www.server.com. Function: Interface Info Here you can view network interface info. Function: IP address Here you can set TCP/IP parameters for the selected NIC. Activate You can activate or deactivate a network interface by setting this checkbox. DHCP / Static You can use static or dynamic (DHCP) network interface configuration. Get DNS If you want to dynamically get a DNS address, select Get DNS. When using static configuration of network interface, enter: IP address, netmask, broadcast, gateway. If you set a new IP address, you will lose your connection with the server during activation and you will have to log in again. In the URL entry line of your browser, please enter the new IP address. 42 www.open-e.com Open-E DSS V7 MANUAL If you do not get access, please use the console to set a new IP address. In order to access servers in another subnet, you need to enter the address of the router as the gateway. NOTE If you use an NTP server to maintain proper time and date, please make sure you have appropriate gateway and DNS settings. When creating a bonding interface, a new branch called “bond0” will appear on the left hand side of the screen. By clicking on it you can modify bonding settings (see below). Function: Bond interface settings Here you can configure bond interface settings. To remove a network interface from bonding, click the Remove field next to it, followed by Apply. By unchecking the Active checkbox you can deactivate the bonding. Below, you can change the network configuration (static or dynamic [DHCP]) for the bonding interface. Each network interface which belongs to a bonding interface is characterized by the following fields: Primary: A string (eth0, eth2, etc) specifying which slave is the primary device. The specified device will always be the active slave while it is available. Only when the primary is off-line, alternate devices will be used. This is useful when one slave is preferred over another, e.g., when one slave has higher throughput than another. The primary option is only valid for the active-backup mode. Interface: Network interface name. State: Shows if NIC is connected. 43 www.open-e.com Open-E DSS V7 NOTE MANUAL Interfaces which have Virtual IP configured are disabled. WARNING Using cards from different manufacturers or cards based on different chipsets in one bond team may cause low performance or unstable behavior. Function: Remove bonding Here you can remove a bonding interface. 5.2.1.3 Failover Function: Failover Manager The failover manager provides an overview of the cluster configuration and allows starting and stopping the cluster. start Start button is shown when the failover hasn't been started. Use it to start the failover process. When the configuration verification mechanism is finished without any errors and the failover is started, the virtual IP addresses are activated and the resources are available through the virtual IP address. After failover is started this button is replaced by the "stop" button. stop Stop button is shown when the failover is running. By clicking this button you can stop the failover process on both nodes. As a result the virtual IPs will deactivated. When the failover is stopped resources will be only available using physical IP addresses of the node where the resources are located. Failover contains three sections: Resource pool, Configuration statuses and the Remote node status. Each of the section provides a general overview of the cluster configuration and the current state of services which are obligatory for the failover process. Each section contains a link to the part of the DSS V7 Web GUI where the services can be configured. Resource pool Displays the status of resources that are on the local and the remote node. It also shows the volume replication task state. The quick link forwards you to the resource pool manager. 44 www.open-e.com Open-E DSS V7 MANUAL Configuration statuses Displays information about the amount of configured and available ping nodes and configured auxiliary paths. The quick links will forward you to the ping node configuration and to the auxiliary path configuration. Remote node status Displays the host name and the IP address of the remote node as well as information if the connection between the local and the remote node has been established. The quick link will forward you to "Host binding" in "Configuration -> Volume manager -> Volume replication" on the local nodes. Function: Auxiliary paths This option is used to configure the interfaces on which the failover sends UDP unicast traffic. You need to point out to which interface on the remote node the UDP unicast traffic will be send. The auxiliary path will be used to send periodic "heartbeat" packages to the remote node with the interval equal to keep alive time, which is set in Failover trigger policy section. add new auxiliary path This button will expand the window and show two drop down menus to specify a local and remote network interface that will be used for the auxiliary connection. Use "add" button to save the settings or "cancel" button to minimize the auxiliary path configuration window. trash bin icon ("delete" button) Expands the window and shows the key to remove the particular auxiliary path from the list. NOTE At least two auxiliary paths needs to be specified. Function: Ping nodes A ping node is a pseudo-member of a failover. It is located outside of the failover and serves to answer ICMP requests from failover members. (This means the ping node 45 www.open-e.com Open-E DSS V7 MANUAL cannot be either the primary or the secondary node). It is there to make sure the outside connection for the failover members remains online. For instance, if the ICMP request from the active node to the ping node fails, a similar request is performed by the remote node. If this one succeeds, resources are moved from the active node to the remote note. Automatic failover will only take place if all ping nodes become unavailable for one of the active nodes (e.g. the server does not take action when at least one ping node is reachable). The ping node needs to be able to receive and reply to ICMP echo requests. add new ping node pressing this button will expand the window and show an empty area to enter an IP address of a ping node. Pressing the button for the second time will add the enter IP address to the ping node list. When a new IP address of a ping node is entered, the status for the ping nodes is automatically being verified on both nodes. As a result, the status is shown for both the local node and for the remote node. trash bin icon ("delete" button) Expands the window and shows the key to remove the particular ping node from the list. cancel Is used to hide the expanded view. NOTE You can indicate up to 10 ping nodes but only one ping node can be entered at once. 46 www.open-e.com Open-E DSS V7 MANUAL Function: Failover triggering In this section you can choose how the system reacts when I/O errors are detected. There are three modes available: Ignore I/O errors Using this mode, DSS V7 will ignore any I/O errors; as a result no action will be taken when such errors are detected. Trigger failover on I/O errors (any volumes) If I/O errors are detected on any of the hard drives or bootable medium, the failover will be triggered and will automatically move the resources to the remote note to ensure data availability and safety. Trigger failover on I/O errors (only volumes configured in failover) Resources will be moved to the remote node when I/O errors will be detected on hard drives; where logical volumes that are included in failover configuration are located. If I/O errors appear on other hard drives or on the bootable medium, the failover won't be automatically triggered. Show advanced options Expands the view and allows adjusting the following failover timers: Warn time Specifies how much time (in seconds) should elapse until the failover functionality issues a warning. Dead time Sets the failure (death) detection time. The dead time directive is used to specify how quickly the system should decide if a node in a failover is dead. Dead time must be smaller or equal to Init time. Init time Sets the initial dead time detection interval. The Init time parameter is used to set the time which elapses until a failover node is declared dead and the other node becomes the only active node. If the node becomes available again before the init time runs out, the state of the failover nodes will not change. Keep alive time Sets the failover keep-alive interval, i.e. the frequency at which failover state packets are sent between nodes. Apply Press to save the new settings Reset timings to default Reset timers to the initial values Hide advanced options Minimize the view to hide the failover timer settings. 1. In case of 'service packets not delivered on time' error notification, please follow this guideline: Set Dead time to 60 seconds or higher. Set Warn time to 1/4 to 1/2 of Dead time value. If the notification does not appear in future it means Dead time value is set in an acceptable range. 2. In case error message appears again please: Double your Dead time value. Set Warn time to doubled Keep alive time value. 47 www.open-e.com Open-E DSS V7 MANUAL 3. If notifications are persistent after those changes, the next steps of troubleshooting could be: Verifying network configuration and topology. Limiting workload on the machine. Upgrading CPU and/or adding RAM. Function: Resource groups manager This section contains the virtual IP address iSCSI resources configuration. Resource pool manager gives you the ability to complete the configuration for both nodes without the need to go to the remote node webgui. The section is horizontally divided in two groups, where the first half of the section is used to configure the local node and the second section is used to configure the remote node. In the first section you can also see the status of the resources and the information about the replication task state. Status Shows information about the iSCSI target that was configured on the node which you ID you can see above. This tells us if the resources are currently available on the node on which it was configured or on the remote node. Synchronization status Provides the details about the replication task state. move to local mode This button is shown when the resources are active on the remote node. Use this button to move the resources from the remote node to the local node. move to remote node This button is shown when the resources are active on the local node. Use this button to move the resources from the local node to the remote node. synch between nodes This button is used to manually initialize a synchronization process between nodes. Virtual IP address This sub-menu lists the virtual IP address that has been configured. It also gives the detailed information on which interface on the local and the remote node the virtual IP address has been configured. Add virtuall IP Pressing this button will expand the window and show an empty area to enter the virtual IP address, netmask and broadcast address. It's also needed to specify on which local and remote the virtual IP address will be configured. Use "add" button to confirm the configuration or "cancel" button to minimize the virtual IP configuration window. 48 www.open-e.com Open-E DSS V7 MANUAL trash bin icon ("delete" button) Expands the window and shows the key to remove the particular virtual IP address from the list. gear icon ("update" button) Allows modifying a previously configured virtual IP address, netmask, broadcast address or the local interface or remote interface on which the IP address is configured. NOTE Only one virtual IP address can be configured per network interface iSCSI resources This sub-menu lists the iSCSI targets and the associated volume replication tasks that have been included in the failover configuration. By using the yellow arrow pointing down details are shown about a replication task. trash bin icon ("delete" button) Expands the window and shows the key to remove the particular iSCSI target from cluster configuration. Add or remove targets Pressing this button will expand the window and show a list of available iSCSI targets on the left side and a list of iSCSI targets included in the cluster configuration on the right. The targets can be added or removed from the cluster configuration using the arrows located between the left and the right list of iSCSI targets. Use the "apply" button to save the changes. 49 www.open-e.com Open-E DSS V7 MANUAL 5.2.1.3.1 Active/Passive Failover Configuration First, go to SETUP -> Network Interfaces. In the Hostname box only replace the "dss" letters in front of the numbers with node-a server (Example: node-a10693737). Perform the same task on the second server as well - this will require a reboot. (Example: node-b54545653). The reboot can take a few minutes. Please refresh the Web GUI every minute until the server reboot process is complete. Next, on the node-a server go to Configuration -> Volume Manager -> Volume Replication. You will have to define your remote node IP address in the Host Binding box. Please note that the host binding path will be used for volume replication. It is recommended to use the fastest available NIC in the system for the volume replication and remain dedicated for the volume replication traffic only. If redundant paths are required, it is recommended to configure the active-backup bonding mode, and then apply the bonding IP address. You will need to enter in the remote server's IP address and the password to Web GUI. After applying all the changes, the status should be: Reachable. NOTE The factory default password is: admin The next step is to set up the volume replication on the node-a server; set the iSCSI volume as source and set the node-b server’s iSCSI volume as destination. Please note that all volume replication restrictions apply here (volumes cannot be larger than 16TB, they need to be exactly of the same size and need to have the block I/O mode selected. Next, create the replication task on the node-a server. Once the task has been created, click the corresponding play button below. You will know the task is complete when you see a date and time. You can verify the replication task status in Status -> Tasks. Next, go to Configuration –> iSCSI Target Manager –> Create New Target: Create exactly the same setup on both systems node-a and node-b: Target Name (Example: iqn.2012-07:mirror01) SCSI ID (Example: dF5NU3iE8ZAcK2XQ) LUN# (Example: 0) In order to create the target name different than the default, you need to un-check the Target Default Name option and edit the target name. Optionally you can re-name the created target name in Configuration -> iSCSI target manager -> Targets and then select the desired target alias in the left panel and then go to the function Rename Target. In case one of the above values are not identical on both nodes, the system will prompt you with an error while starting the cluster service. This will have to be corrected in order to start the cluster service. After that, assign the failover volume to the LUN by clicking on the "+" (plus) button to enable the LUN. 50 www.open-e.com Open-E DSS V7 NOTE MANUAL Every time you disconnect a LUN from its target (clicking on "-" button) the SCSI ID and LUN# will be reset to the original default values. So, before clicking the "+" button again, please copy & paste the SCSI ID and LUN# from the node-a to the node-b system. Make sure that the node-a and node-b servers have identical settings. On the node-a server go to SETUP -> Failover. In the Auxiliary Paths box click add new auxiliary path and choose on which interface you want to configure the auxiliary path (remote and local). It is required to use one from the volume replication interface and each interface from the virtual IP interface that is the storage access. Next, go to the Ping Nodes box and define at least 1 ping node. You will be prompted to put in the ping node IP address. It is recommended to have at least 2 ping nodes that are on the same physical subnet of the interface that you will use for your virtual IP address. Next, click add new Ping Node. You should receive a message that the ping nodes have been created successfully. If you wish, you may configure Failover Trigger Policy. However, it is recommended that you set it to Trigger Failover on I/O errors (any volume). The next step is to go to the Resources Pool Manager. NOTE The Active-Passive option allows configuring a resource pool only on one of the nodes. In such a case, all volumes are active on a single node only. The Active-Active option allows configuring resource pools on both nodes and makes it possible to run some active volumes on node-a and on other active volumes on node-b. The Active-Active option is enabled with the TRIAL mode for 60 days or when purchasing the Active-Active Failover Feature Pack. In the Virtual IP address tab, in the node-a resources area click Add Virtual IP. You will have to choose a network interface for both nodes. This will make the changes automatically on the remote server. Make sure to match the corresponding NICs for their associated network. Important note on setting virtual IP addresses Please note that at least one of the interfaces in each system needs to hold the virtual IP. Set the virtual IP address in a different sub-network than the physical IP address. If you wish to have more than one pair of iSCSI failover systems, please set each pair in a different sub-network. The virtual IP address will be activated only when the cluster service is started and it will be deactivated when the cluster service has been stopped. When you are finished with setting the virtual IP address, go to the iSCSI Resources tab (still in primary resources pool) and click Add or remove targets. After moving the target iqn.2012-07:mirror01 from available targets to targets already in cluster click the Apply button. Next, scroll to the top in the Failover manager and click the Start button. The Cluster Status should state RUNNING - OK and the Replication State of Resources pool should state SYNCED. Finally, on the storage client connect to the iqn.2012-07:mirror01 target with an iSCSI initiator using the virtual IP that was previously assigned. Create a partition and format the iSCSI disk. Test the failover function by clicking the Move to remote node button in the Resource Pool Manager. In order to test failback click the Move to local node button in the Resource Pool Manager. Next, check the synchronization status in the Resource Pool Manager. It must state SYNCED. NOTE Please note that in order to receive failover email notifications you need to set up email service in: SETUP -> Administrator -> E-mail notification. 51 www.open-e.com Open-E DSS V7 MANUAL 5.2.1.3.2 Active/Active Failover Configuration First, go to SETUP -> Network Interfaces. In the Hostname box only replace the "dss" letters in front of the numbers with node-a server (Example: node-a10693737). Perform the same task on the second server as well - this will require a reboot. (Example: node-b54545653). The reboot can take a few minutes. Please refresh the Web GUI every minute until the server reboot process is complete. Next, on the node-a server go to Configuration -> Volume Manager -> Volume Replication. You will have to define your remote node IP address in the Host Binding box. Please note that the host binding path will be used for volume replication. It is recommended to use the fastest available NIC in the system for the volume replication and remain dedicated for the volume replication traffic only. If redundant paths are required, it is recommended to configure the active-backup bonding mode and then apply the bonding IP address. You will need to enter in the remote server's IP address and the password to Web GUI. After applying the changes, the status should be: Reachable. NOTE The factory default password is: admin The Active-Active option allows configuring resource pools on both nodes and makes it possible to run some active volumes on node-a and other active volumes on node-b. This is why we need to create at least the iSCSI logical volumes. The Quick Start describes 2 logical volume setups. Please set the volume replication for your 2 iSCSI volumes on the node-a server. Set the 1st iSCSI volume as source and set the 2nd iSCSI volume as destination. Configuration -> Volume Manager -> Volume Replication Perform the same procedure on the node-b server where the 1st iSCSI volume is in the destination mode and the 2nd iSCSI Volume is set to the source model (see the example below). Please note that all volume replication restrictions apply here (volumes cannot be larger than 16TB, they need to be exactly of the same size and need to have the block I/O mode selected). node-a: lv0000 lv0001 is set to source is set to destination node-b: lv0000 lv0001 is set to destination is set to source Next on node-a create your Volume Replication Task, so that lv0000 is the source volume and lv0000 is the destination volume. Once the task has been created, click the corresponding play button below. You will know the task is complete when you see a date and time. You can verify the replication task status in Status -> Tasks. 52 www.open-e.com Open-E DSS V7 MANUAL Go to node-b and create the new volume replication task where lv0001 is the source and lv0001 is the destination. Once the task has been created, click the corresponding play button below. You will know the task is complete when you see a date and time. Next go to Configuration –> iSCSI Target Manager –> Create New Target: On both systems (node-a and node-b), create two targets with exactly the same settings. See the example below. Target 1 Target 2 Target SCSI LUN# Name (Example: iqn.2012-07:mirror01) ID (Example: dF5NU3iE8ZAcK2XQ) (Example: 0) Target SCSI LUN# Name (Example: iqn.2012-07:mirror02) ID (Example: aeuSBsANvBZQtSaE) (Example: 0) In order to create the target name different than the default, you need to un-check the Target Default Name option and edit the target name. Optionally you can re-name the created target name in Configuration -> iSCSI target manager -> Targets and then select the desired target alias in the left panel and then go to the function Rename Target. In case one of the above values are not identical on both nodes, the system will prompt you with an error while starting the cluster service. This will have to be corrected in order to start the cluster service. After that, assign the failover volumes to the LUNs by clicking on the "+" (plus) button. Add lv0000 as LUN to iqn.2012-07:mirror01 on both servers and add lv0001 as LUN to iqn.2012-07:mirror02 NOTE Every time you disconnect a LUN from its target (clicking on "-" button), the SCSI ID and LUN# will be reset to the original default values. Before clicking the "+" button again, please copy & paste the SCSI ID and LUN# from the primary to the secondary systems. Make sure the primary and secondary system have identical settings. On the node-a server go to SETUP -> Failover. In the Auxiliary Paths box click add new Auxiliary Path and choose which interface you want to configure the auxiliary path (node-a and node-b). At first, the Auxiliary Path is set up automatically while binding nodes and it is recommended to leave this setting. It is also recommended to set up the Auxiliary Path between all interfaces on which the Virtual IP will be set up. Next, go to the Ping Nodes box and define at least 1 ping node. You will be prompted to input the ping node IP address. It is recommended to have at least 2 ping nodes that are on the same physical subnet of the interface that you will use for your virtual IP address. Next, click add new Ping Node. You should receive a message that the ping nodes have been created successfully. If you wish, you can configure the Failover Trigger Policy. However, it is recommended that you set it to Trigger Failover on I/O errors (any volume). The next step is to go to the Resources Pool Manager. 53 www.open-e.com Open-E DSS V7 MANUAL Set the Virtual IP address tab located in the local node-a resources section and click the Add Virtual IP. You will have to choose which network interface you want to assign to the node-a and node-b servers, this will make the changes automatically on the node-b server. Make sure to match the corresponding NICs for their associated network. Important note on setting virtual IP addresses: Please note that in the Active-Active mode at least two of the interfaces in each system needs to hold the virtual IP. Set the virtual IP address in a different subnetwork than the physical IP address. If you wish to have more than one pair of iSCSI failover systems, please set each pair in a different subnetwork. The virtual IP address will be activated only when the cluster service is started and it will be deactivated when cluster service has been stopped. When you are finished with setting the virtual IP address, go to the iSCSI Resources tab (remaining in the in node-a resources pool) and click Add or remove targets. After moving the target iqn.2012-07:mirror01 from available targets to targets already in cluster click the Apply button. Next in node-a, setup the Virtual IP address of node-b resources, while being in the remote node section below node-a area, and click Add Virtual IP. You will have to choose which network you want to assign to the node-a and node-b servers. This will make the changes automatically on the remote server. When you are with finished setting the virtual IP address (please remember the important note about the virtual IP addresses), go to the iSCSI Resources tab, still in node-b resources area, and click Add or remove targets. After moving the target iqn.2012-07:mirror02 from available targets to targets already in cluster click the Apply button. Next, scroll to the top in the Failover manager and click the Start button. (if the start button is not red, the setup has not been completed) The Cluster Status should state Running - OK and the Replication State of the Resources pool should state synced in node-a (local node) resources pool and in node-b (remote node) resources pool. Status of the resource pools activities should state the following: active on node-a (local host) for node-a (local node) resources pool and active on node-b (remote host) for node-b (remote node) resources pool Finally, on the storage client connect to the iqn.2012-07:mirror01 and iqn.201207:mirror02 targets with an iSCSI initiator using the virtual IPs that was previously assigned. Create the partitions and format the iSCSI disks. Test the failover function by clicking the Move to remote node button in the Resources Pool Manager box for node-a resources and confirm this action by clicking the Move button. After performing this, the status for node-a resources should state active on node-b (remote node) and the Synchronization status should state synced. In order to test failback, click the Move to local node button in the Resources Pool Manager box for node-a resources and confirm this action by clicking the Move button. After completing this, the status for node-a resources should state active on node-a (local node) and the Synchronization status should state synced. 54 www.open-e.com Open-E DSS V7 MANUAL Next, you can apply the same actions for node-b resources. 5.2.1.4 NOTE Please note that in order to receive failover email notifications, you need to set up the email service in SETUP -> Administrator -> E-mail notification. NOTE The Active-Active option is enabled with the TRIAL mode for 60 days or when purchasing the Active-Active Feature Pack. Hardware RAID Please note that your RAID controller must be supported by the Open-E Data Storage Software V7 in order to function properly. Function: Intel / ICP vortex configuration In order to maintain this RAID controller you can use the console tools (press F1 in the console to list keyboard shortcuts) or use the INTEL/ICP Vortex tool over ethernet. In this menu you can select users who will be allowed to configure the INTEL / ICP Vortex RAID controller. Default password for raid-admin(full) is admin. Default password for raid(read-only) is raid. 5.2.1.5 Software RAID Function: Unit rescan This function rescans your system for new units. 55 www.open-e.com Open-E DSS V7 MANUAL Function: Create new S/W RAID unit With this function you can create software RAIDs out of free (unused) units. If you want to create RAIDs from used units which have already been in use, you first need to delete the contents of these units in the console, however please be aware this will ERASE all data from the units. To create a RAID select corresponding units, then use the RAID type and Chunk size menus to configure the new RAID. After setting all required parameters press the Create button. Allow to create degraded mode This option allows you to create a RAID1 with one unit, a RAID5 with two units or a RAID6 with three units; even if the minimal number of units is not met. NOTE Chunk size – the minimal portion of data that is written at one time. Available RAIDS: RAID 0: a stripe array; requires [minimum] 2 units. In RAID 0 you can set a chunk size from within 4k ÷ 256k. The destination size of the RAID array will be the sum of the size of each drive in the array RAID 1: a mirror array; requires 2 units. Destination size will be equal to: (SINGLE) UNIT_SIZE, where (SINGLE) UNIT_SIZE is the size of the smallest unit in the array. RAID 5: a stripe + parity algorithm array; requires [minimum] 3 units with the same capacity. You can choose the following from the drop-down menus: (layout) parity algorithm [left/right] [symmetric/asymmetric]. DESTINATION SIZE: (NR_OF_UNITS-1)*(SINGLE)UNIT_SIZE, where (SINGLE) UNIT_SIZE is the size of the smallest unit in the array The (layout) parity-algorithm in RAID 5 is described below. RAID 5 (layout) parity-algorithm It is possible to set one of four algorithms for placing data and parity blocks in the matrix. The default option is left-symmetric, which is the best algorithm for large reads. Another recommended value is left-asymmetric. 56 www.open-e.com Open-E DSS V7 NOTE MANUAL Software RAID 5 is not a good choice for writing a lot of very small files! Left-Asymmetric Algorithm Unit S0 Unit S1 Unit S2 Unit S3 0 1 2 Parity 3 4 Parity 5 6 Parity 7 8 Parity 9 10 11 12 13 14 Parity Right-Asymmetric Algorithm Unit S0 Unit S1 Unit S2 Unit S3 Parity 0 1 2 3 Parity 4 5 6 7 Parity 8 9 10 11 Parity Parity 12 13 14 Left-Symmetric Algorithm Unit S0 Unit S1 Unit S2 Unit S3 0 1 2 Parity 4 5 Parity 3 8 Parity 6 7 Parity 9 10 11 12 13 14 Parity Right-Symmetric Algorithm Unit S0 Unit S1 Unit S2 Unit S3 Parity 0 1 2 5 Parity 3 4 7 8 Parity 6 9 10 11 Parity Parity 12 13 14 RAID6: a stripe + parity algorithm array; requires minimum 4 units with the same capacity. You can choose the following from the drop-down menus: (layout)parity algorithm [left/right] [symmetric/asymmetric]. DESTINATION SIZE: (NR_OF_UNITS-2)*(SINGLE)UNIT_SIZE, where (SINGLE) UNIT_SIZE is the size of the smallest unit in the array The (layout) parity-algorithm in RAID 6 is described below. RAID 6 (layout) parity-algorithm It is possible to set one of four algorithms for placing data blocks and parity blocks in the matrix. The default option is left-symmetric, which is the best algorithm for large reads. Another recommended value is left-asymmetric. Left-Asymmetric Algorithm Unit S0 Unit S1 Unit S2 Unit S3 0 1 Parity Parity 2 Parity Parity 3 Parity Parity 4 5 Parity 6 7 Parity 8 9 Parity Parity Left-Symmetric Algorithm Unit S0 Unit S1 Unit S2 Unit S3 0 1 Parity Parity 3 Parity Parity 2 Parity Parity 4 5 Parity 6 7 Parity 8 9 Parity Parity Right-Asymmetric Algorithm Unit S0 Unit S1 Unit S2 Unit S3 Parity Parity 0 1 2 Parity Parity 3 4 5 Parity Parity Parity 6 7 Parity 8 9 Parity Parity Right-Symmetric Algorithm Unit S0 Unit S1 Unit S2 Unit S3 Parity Parity 0 1 3 Parity Parity 2 4 5 Parity Parity Parity 6 7 Parity Parity Parity 8 9 To remove a RAID which has been previously added to a volume group, please enter the Extended Tools in the console (press F1 in the console to list keyboard shortcuts) and first delete the volume group for the RAID in question (the respective function is Delete content of units in the Extended Tools menu). This will enable the Remove button. Otherwise, simply press the Remove button. 57 www.open-e.com Open-E DSS V7 MANUAL NOTE You can add spare units to RAID1, RAID5 and RAID6 arrays. Please remember that after creating a RAID, the Info function will show the synchronization progress. Until this process is finished, all actions performed on this array will be slower. TIP If units come from the same storage (Fibre Channel or iSCSI), efficiency will drop when using software RAID with them. To achieve optimal performance, you should use units that come from at least two different storages (for Fibre Channel or iSCSI connections). Function: S/W RAID e-mail notification It is possible to send notification via e-mail about events on software RAID arrays (e.g. rebuild started, rebuild finished, RAID degraded). In order to do so, please check the Send array events box. NOTE In order to be able to send array events via e-mail you must first enable “E-mail notification” in “SETUP” “Administrator”. Include resyncing/recovering progress This enables information about resync/rebuild progress to be sent via e-mail, providing info that processes are taking place. E-mail will be sent for every 20% done. Include array status Information about the status of event-related array will be added every event. Function: Drive identifier This function has been designated to assist you in finding disks in your NAS server cage. If you have a hardware RAID installed, the whole RAID array is shown as a single drive, so you may not be able to determine which drive unit represents which disk when using the S.M.A.R.T. tool or a hardware RAID management tool (depending on the manufacturer of the RAID controller). When you click on the Apply button, the appropriate disk will start reading and you can determine which disk it is by watching the disk-activity LEDs. For this function to operate properly there should be no other activity in progress on the hard drives in question. 58 www.open-e.com Open-E DSS V7 NOTE MANUAL Identification will stop automatically after one minute if you do not stop it beforehand (by unchecking the appropriate option and clicking Apply). Using this function during normal operation is not recommended and will cause your server to slow down. After clicking on “MD0” in the left hand panel a tree with the available software RAID units will be displayed. Function: Manager In this function you can manage the RAID array. Available operations: RAID 0: The design of this RAID does not permit management of it. No units can have failed status. If any of them fail, the whole array will be disabled. RAID 1: To mark a unit as Faulty check the appropriate option (in the F column) and click Apply. To delete any unit from an array, check the appropriate option (in the R column) and click on Remove RAID 5: To set unit as a Faulty one, mark proper checkbox (in the column F) and click on Apply button. To delete any unit from an array, mark the proper checkbox (in the column R) and click on the Remove button. 59 www.open-e.com Open-E DSS V7 MANUAL RAID 6: To mark a unit as Faulty check the appropriate option (in the F column) and click Apply, To delete any unit from an array, check the appropriate option (in the R column) and click Remove, RAID notation: PR - priority in array - represents the priority of a spare unit which will be added to the array if another unit is marked as Faulty. The higher the priority, the sooner this unit will be used, F - faulty - unit can be removed from the array, R - hot remove - unit can be removed from the array without shutting down the system, ST - characterizes the state of a unit in the array, which can be: A - active, * - unit number within the array, S - spare or spare rebuilding - this means that the unit is free and can be added to an array or is free and currently rebuilding. Limitations: It is not possible to set any unit as Faulty, if the matrix is degraded or during resync/rebuild. When using RAID 1 and RAID 5, it is possible to mark only one disk from among the active disks as faulty. This regulation is not valid for spare units in an array. NOTE Only one disk from within the active group in an array can be marked as Faulty or Removed Function: Info By using function you can obtain the following information: Creation Time, RAID Level, Array and Device Size, Update Time and State. NOTE It is recommended to perform as few disk operations as possible during array syncing or rebuilding. Syncing/rebuilding status will be shown on the fly – there is no need to refresh the page manually. Function: Remove software RAID unit This function allows you to remove a software RAID unit (MD[x]). NOTE This function is available only when no volume group are created on the corresponding MD[x]. If you want to remove a software RAID unit along with a volume group, please use the Extended Tools in the console and remove the volume group first. Ctl-Alt-X Select Delete content of units 60 www.open-e.com Open-E DSS V7 5.2.1.6 MANUAL Fibre Channel When a Fibre channel controller is detected you will find information about utilities and options specific to the hardware. Function: QLOGIC administration If you have a Qlogic 2, 4 or 8Gbit controller installed, you can use the command line tool in the Console Tools (press F1 in the console to list keyboard shortcuts). Please note the command line interface will only work in initiator mode. The above-mentioned controllers enable remote administration. This works only in initiator mode as well. To access the configuration daemon, download the client application SANsurfer from the QLOGIC homepage. Install it on your system and configure it to access the server. Follow the online instructions to configure correctly. If in doubt, consult the documentation. Make sure you have the essential information handy, i.e., the IP address of your server, username, and password. Function: QLOGIC Target/Initiator Here you view a list of all connected QLOGIC HBA's. I/T This column informs you if the HBAs are working in initiator or target mode. 61 www.open-e.com Open-E DSS V7 5.2.1.7 MANUAL iSCSI Initiator Here you can view a list of all connected iSCSI server portals. Click on the portal IP to manage portal targets or to remove a portal. Function: Add new portal server With this function you can connect to a remote iSCSI server and add it as a new portal server. It will be visible in the iSCSI Initiator on the left. Following options are available: Portal IP: Please enter the IP address of the iSCSI server. Portal Port Enter the Port on which the iSCSI server runs (the default setting is 3260) CHAP enable If you want to enable CHAP user authentication, please check the CHAP enable box and enter the CHAP username and its secret. Function: Initiator iSCSI name Here you can change the name and the alias for iSCSI initiator name. Name iSCSI initiator name may contain alphanumeric characters: ' . ' ' : ' ' - ' and is considered case-insensitive. Every character entered will be converted to lower case. No spaces and no underscores are permitted. Function: Portal manager This function displays available targets for the selected iSCSI portal server. In order to connect to an iSCSI target, select its name and click the Connect button. If target authentication is enabled, then enter the CHAP username and its secret. Connected targets will be available in CONFIGURATION -> Volume manager as units. You can manage them as you would local units. NOTE In order to disconnect from a target, select its name in the iSCSI Initiator tree and click the Disconnect button. Before removing an iSCSI portal server, you need to disconnect all targets from it. 62 www.open-e.com Open-E DSS V7 MANUAL Function: Remove portal Here you can remove the selected portal server. NOTE You can only remove a portal server if all its targets are disconnected from it. In order to disconnect a target from a portal server, please select it from the iSCSI initiator tree and click on the Disconnect button. Function: Target manager Here you can view the connected target's name as well as its size. You can also disconnect the target from the portal server using the Disconnect function. Function: Disconnect Here you can disconnect the selected target from the portal server. 63 www.open-e.com Open-E DSS V7 NOTE 5.2.1.8 MANUAL You can only disconnect a target from a portal server if the target in question does not belong to any volume group or software RAID unit. Otherwise, please first remove the volume group or software RAID unit in the console tools (press F1 in the console to list keyboard shortcuts). Hardware Function: UPS settings Here you can configure your UPS device (Uninterrupted Power Supply). In order to use the UPS device, please select the option Use UPS. Set UPS vendor Select the UPS vendor for your UPS device. Vendors APC and MGE are available. UPS Mode: Single This option determines that the server is the only system attached to this UPS and that there are no necessary actions to do a remote shutdown for other systems in the network. Server This option determines that the server is connected to the UPS and sends a signal through the network to shut down other systems in the network. Client This option determines that the server reacts to a power down-signal from the UPS server. When using an APC-originated device with the Server UPS mode enabled, the following fields are available: Server Net port TCP port on which the UPS server is connecting to the UPS client. When using an APC-originated device with the Client UPS mode enabled, the following fields are available: Server Net port TCP port on which the UPS client is connecting to the UPS server. Server IP IP address of the master APC UPS. When using an MGE-originated device with the Master UPS mode, enabled the following fields are available: User name User name allowed to connect from the slave UPS. Password Password for the user name above. Slave IP IP address of the slave MGE UPS. When using an MGE-originated device with the Slave UPS mode, the following fields are available: User name User name which will connect to the master UPS. It needs to be the same as the one on the master UPS. Password Password for the user name above. Master IP IP address of the master MGE UPS. 64 www.open-e.com Open-E DSS V7 MANUAL UPS model The model of your UPS device. Port Port to which the UPS is connected. Cable type Cable type for your APC UPS. Timeout The timeout defines the time between a power failure and the moment the system shuts down. Timeout - Battery Limit This option enables you to sustain the system as long as the battery holds. The system will shut down when the battery charge drops to 5% or when there are 3 minutes left to total battery discharge. Turn off UPS after system shutdown This will turn off the UPS device after the time period set in the Shutdown grace delay (SLEEP) parameter in the UPS EEPROM expires. NOTE When using slave and master UPS modes, all UPS devices need to come from the same vendor. Function: Time zone settings This function allows you to adjust NTP server settings. Please select an NTP server (Network Time Protocol: for more info please see: www.ntp.org). You may provide a fully qualified host name or an IP address. Next, select the time zone suitable for your location. With the Continuous adjusting using NTP option enabled, your system time will be monitored and corrected if the difference between the local time and the server time changes. Enabling this option is especially recommended when using domains. 65 www.open-e.com Open-E DSS V7 NOTE MANUAL Time setting is very important for proper functioning of the server. The gateway and (with host names) DNS network settings must be configured beforehand. Function: Set time With this function you can set the time and date: Manual Type in the time and date using the following format: hh:mm:ss yyyy-mm-dd. Use military format, i.e., 00:00 to 23:59. Use this PC time The time and date on the PC on which you have your web browser will be used. NTP server This will pick up the time and date from an NTP server. In this case, please make sure that you have Internet access and proper network setup, especially the gateway and DNS. You can check proper Internet access by using ping from the console tools. At the console, press Ctl-Alt-T. Select 'Ping'. To use this option you must set the correct NTP server in the Time zone settings function. NOTE Time setting is very important for proper functioning of the server. 66 www.open-e.com Open-E DSS V7 MANUAL Function: Power button settings In this section you specify what action will be performed when the power button is pressed. Options: None No action. Halt Power off computer. Reboot Restart computer. Embedded When you select this option, it activates the following power button behavior: I - shutdown (1) I_I - restart (2) I_I_I_I_I - network settings reset (5) I_I_I_I_I_I_I_I_I_I - administrator settings reset (10) Key: I - single power button press _ - maximum time period in which a press will increase the press counter NOTE After the _ period expires, each subsequent press will reset the press counter (unless the previous count meets one of the schemes outlined above). Function: S.M.A.R.T. e-mail notification This function allows you to check hard disk status via S.M.A.R.T. and send the results to an e-mail address. S.M.A.R.T. (Self-Monitoring, Analysis, and Reporting Technology) is a monitoring system for computer hard disks whose function is to detect and report various reliability indicators in hope of anticipating failures. 67 www.open-e.com Open-E DSS V7 5.2.1.9 MANUAL In order to enable S.M.A.R.T. e-mail notification, you need to: first enable the E-mail notification function in the “Setup” “Administrator” menu, enable S.M.A.R.T. in the Hardware configuration tool in the console (press F1 in the console to list keyboard shortcuts), when S.M.A.R.T. is enabled you will see all the detected hard drives with information on the unit number, size and serial number, check the box next to the unit for which you want to receive S.M.A.R.T. status and press “Apply” button, if everything is OK the unit status will report as PASSED, otherwise it will show up as FAILED. GUI Function: Language settings Select your preferred language and click Apply. Function: Tips settings In this function you can enable additional tips which will be shown in the error, warning and info messages. Those tips are actually links to other places in the administration panel. This way you can perform some operations faster. 68 www.open-e.com Open-E DSS V7 MANUAL 5.2.2 CONFIGURATION 5.2.2.1 Volume manager In this section you can view units assigned to that volume, manage the volume within the Volume manager function or assign snapshots to it. 5.2.2.1.1 Volume groups Function: Unit rescan This function rescans your system for new units. Function: Unit manager This function allows you to manage physical storage devices - units (hard drives or RAID arrays). Units that report as Available can be used to create a new volume group, a new dynamic volume, or to expand existing volume groups. It is possible to combine two (or more) units into one volume group: when creating a new volume group the system adds selected units only. You can use the default volume group name or change it, by selecting “New dynamic volume”, if you want to expand an existing volume group select the “Add to ...” and enter the name of the volume group in question. After the creation process the page is reloaded and the Status field should show your drives/arrays as being In use. For further volume group management, e.g. logical volume setup, please click on the volume group name in the tree diagram in the left-hand pane. With the Volume Manager function you can create a new NAS volume (N) and/or a new iSCSI volume (I). Disk notations: S0,S1, ..., S[x] - every disk with the S notation is part of a SATA / JBOD / RAID unit, H0,H1, ..., H[x] - units with the H letter are IDE units, MD0,MD1, ..., MD[x] - this denotes software RAIDs. NOTE Units already being used in a volume group can be made available again by using the Delete content of units function in the console. Please be aware that this will remove all data from the unit!!! You can only use units with capacities greater than 5 GB; smaller units are not supported. 69 www.open-e.com Open-E DSS V7 MANUAL Function: Drive identifier This function has been designated to assist you in finding disks in your NAS server cage. If you have a hardware RAID installed, the whole RAID array is shown as a single drive. So, you may not be able to determine which drive unit represents which disk when using the S.M.A.R.T. tool or a hardware RAID management tool (depending on the manufacturer of the RAID controller). When you click on the “Apply” button, the appropriate disk will start reading and you can determine which disk is it by watching the disk-activity LEDs. For this function to operate properly there should be no other activity in progress on the hard drives in question. NOTE Identification will stop automatically after one minute unless you do not stop it before (by unchecking the appropriate option and clicking “Apply”). Using this function during normal operation is not recommended and will cause your server to slow down. Function: Units assigned With this function you can view physical units attached to this volume group. 70 www.open-e.com Open-E DSS V7 MANUAL Function: Volume manager This function allows you to: modify existing and create new NAS (N), iSCSI (I) or Fibre Channel (FC) volumes, reserve disk space for Reserved Pool, create, modify and delete snapshots. In order to add storage space to an existing NAS, iSCSI or FC volume, select modify [volume_name] from the drop-down menu. Use the scroll bar to indicate the size. The Options drop-down menu is available for iSCSI volumes only. It allows you to add a new iSCSI volume to an existing target or to create a new target for the volume. The menu items are as follows: Create new target automatically - this creates a new target and adds the newly created iSCSI volume to it, Add to existing target alias [target_alias] - the newly created iSCSI volume will be added to the selected target, Just create volume - the newly created iSCSI volume will not be added to any target. In order to add it to a target, go to CONFIGURATION -> iSCSI target manager, select the target from the left-hand panel and add the volume with the green plus ('+') sign. Differences between File I/O and Block I/O iSCSI or Fibre Channel target is delivering a block device for the iSCSI or Fibre Channel initiator. The block device can be a raw Logical Volume or a file working on formatted Logical Volume. The Block I/O is exactly a raw Logical Volume which is formatted only by the initiator side. I/O performance should be faster because there is no delay made by the filesystem layer. 71 www.open-e.com Open-E DSS V7 MANUAL The File I/O is delivering file working on formatted Logical Volume. This gives additional benefits of filesystem like caching part of the data. Not initialized, File I/O provides even another benefit "organized writing", which is optimized for current usage. In most cases File I/O provides better performance because of the caching - but in case of multiple hardware initiators Block I/O gives the highest read/write speed. File I/O no initialization: Filesystem uses first free block for saving the data - no need to use "SEEK" command. High performance while "random write", low performance while sequential read. File I/O with initialization: System must perform a real SEEK in order to read/write the data. Filesystem table has to be read and updated. More stable than "not initialized" volume. Block I/O: System must perform real SEEK operation on disk in order to save/write the data. Data is stored directly on the hard drive (no memory writes required). Use volume replication Selecting this option, when creating a new volume or modifying an existing one (NAS (N), iSCSI (I) or Fibre Channel (FC)), will enable volume replication for that volume. For tips on setting up replication over WAN, please see the help text for the Mirror server IP box. In order to remove replication functionality from a volume: select the modify option from the Action combo box, e.g. modify lv0001, uncheck the option Use replication, leave the volume size unchanged, click the Apply button. NOTE The initial synchronization required by volume replication is much quicker with uninitialized volumes (block I/O iSCSI, uninitialized file I/O iSCSI and FC, NAS) since the synchronization process does not have to cover the entire volume. Please note, this is only valid if volume replication is activated while creating a volume - if you initialize volume replication after the volume has been created, the synchronization will take longer. WORM Write Once Read Many - this option is available for NAS volumes only; WORMenabled volumes can be read multiple times, but only once written to. Enabling WORM for a NAS volume is only possible after selecting new NAS volume from the drop-down menu. Once WORM is enabled it cannot be undone. It is not possible to remove WORM from an existing volume. NOTE NOTE WORM volumes are subject to the following limitations: they cannot be used for volume replication, a share created on a WORM volume cannot be used as a destination share in a data (file) replication process, a share created on a WORM volume cannot be published via NFS and cannot be accessed via HTTP (HTTP share access function), a share created on a WORM volume cannot be used as an antivirus quarantine share. Maximal NAS (N), iSCSI (I) and Fibre Channel (FC) volume size (with replication) is limited to 16TB (terabytes). For each 4TB there is 128MB reserved for metadata. 72 www.open-e.com Open-E DSS V7 MANUAL Volume size (TB) 0÷4 Metadata size (MB) 4÷8 256 8-12 384 12-16 512 128 Initialize This option is available when creating an iSCSI (I) or Fibre Channel (FC) volume. The goal of the process is to provide better stability. The volume will be initialized immediately after it has been created. There can be only one volume being initialized at any one time. If there are more volumes to be initialized, a Waiting indicator will appear next to the queued volume(s). Using the button next to the indicator you can send the initializing volume to the back of the initialization queue. Every queued volume can also be sent to the back of the queue. You can set initialization to be slow, medium or fast. The faster the initialization, the more CPUintensive it will be. Blocksize This option is available when creating a Fibre Channel volume (FC). Blocksize indicates the nominal size of a block of data, expressed in bytes. Possible values: 512 bytes (default) 1024 bytes 2048 bytes 4096 bytes Blocksize has an influence on performance and space management. The greater the value the better the performance; but data might take up more space. This option is unavailable when modifying an FC volume and for FC snapshots. NOTE When adding each new unit there will be 4 GB space reserved for Reserved Pool (if a Reserved Pool has not been already created).Additionally, 4 GB of space is reserved for internal system use. Reserved Pool creates a small amount of storage capacity from the Volume and is used for system features. This prevents users from accidentally using all of the available free space that would inhibit the use of certain features regarding Replication that is needed to draw upon to perform properly. A technical recommendation to any storage solution is to reserve a small amount free space from the Volume, unless you are fully aware that you will not be needed utilizing this feature in the future or for testing reasons. 73 www.open-e.com Open-E DSS V7 MANUAL Function: Snapshot definition Here you can set the logical volume to which the snapshot will be assigned. Name Snapshot name. LV Select Logical volume to which snapshot will be assigned. If Logical volume has no snapshot assigned yet, then in LV field will be "unassigned". Status Snapshot status. Can be one of the following: Active Snapshot is active. Inactive Snapshot is inactive, probable reason: overflow. Unused Snapshot is currently unused. The snapshot function enables the system administrator to freeze the data content of the volume at a certain time. From this moment on, the users work on a virtual data volume; all changes to the volume are stored in a different partition. The storage of all changes is independent of the file system - it takes place on the block level. Snapshots can be created (active state) and removed (unused state) manually or automatically. NOTE Please be reasonable when you are calculating the space reserved for snapshots. Please set as much space for snapshots as you expect to change during snapshot activity, e.g. when you are performing a backup from a snapshot which takes one hour, please set the size of this snapshot to space that will be changed during one hour. The snapshot will become inactive if the contents (data changed on logical volume) exceed the snapshot capacity. You do not lose data in that case. However, the old dataset, which has been frozen with the snapshot, is not available any longer. When you define a schedule, use only as many snapshots at the same time as actually needed. A large count of active snapshots can slow down the system considerably. Manual creation and removal of snapshots can be done via the following path: CONFIGURATION Volume manager vg[nr] Function: Volume Manager. How to access NAS snapshot After a snapshot has been created and activated, you can access it by following these steps: Go to menu CONFIGURATION NAS settings menu and select the network protocol on which the snapshots will be accessible; exactly like all other shares. This needs to be done only once. This action is not necessary when establishing access to a snapshot for the second time. You can activate access to snapshots on the following protocols: NFS, SMB (Network neighborhood), FTP, AFP. create a new share that will be assigned to the activated snapshot, go to the CONFIGURATION NAS resources menu, within the Create new share function: enter share name, use the Specified path option and select the snapshot that you want to have access to, click Apply to create a share, 74 www.open-e.com Open-E DSS V7 MANUAL now you can start to explore your share(snapshot) using the specified network protocol. How to access iSCSI target snapshot After a snapshot for an iSCSI target has been created and activated, you can access it by following these steps: Go to menu CONFIGURATION iSCSI target manager Targets [target_name] menu, enter the Target volume manager function and click the Add button on the right side of the snapshot you would like to have access to. A new LUN will be added to the target, now you can connect with your iSCSI initiator and use your snapshot target, here is an example (Microsoft Windows environment): please download Microsoft iSCSI Initiator and follow its instructions, start the software and add targets, access the Target Portals menu and enter the IP address of the iSCSI server and the socket (default 3260), in the Available targets menu please log into a previously added target, now your snapshot target will show up in your system and you can use it. 5.2.2.1.2 Volume replication Function: Volume replication mode Here you can set the replication mode for every logical volume (with replication functionality available). A volume can be in a source (S) or a destination (D) replication mode. You can also clear the metadata (CM) of a volume. Metadata describes the replication data. Clearing metadata is required when you want to start the replication process from the beginning. Another usage example is when the data on the source volume is inconsistent and you want to restore it from the destination volume. In this situation you need to switch replication modes between the volumes (i.e. the destination volume should now be in source mode, while the previous source should be switched to destination mode). Before starting a replication for a new source and destination please clear the metadata from the previous destination volume. When replication is complete the data on the previous source volume will be consistent. If a volume is set to the destination replication mode then it will not be visible in the iSCSI initiator. NOTE In case any problems occur while switching the replication mode, please tick both boxes (mode choosing and clear metadata) at the same time. 75 www.open-e.com Open-E DSS V7 MANUAL Function: Hosts binding Hosts binding allows to combine two servers. After servers have been bound, they can be used for volume replication functionality and for other services (e.g. clustering). In order to bind to another server you need an IP address and the GUI (administrator) password of the server. NOTE Binding and unbinding is controlled by an Administrator on one node. NOTE In the current version you can bind to only one host. NOTE It is not possible to bind to a server which is bound with another node. NOTE Removing binding on host works both: locally and remotely. If remote host is unavailable while removing the host, changes are being done only to local host. Function: Create new volume replication task Using this function you can create a volume replication task. This creates a mirror copy of data from the source volume to the destination volume in real time. For example, this means that if you create a file on the source volume the same file will be created on the destination volume. Destination and source volumes need to be the same size in order to successfully perform the replication. Replication can be performed only between two mirror replication servers. Please note, this function only allows you to create replication tasks. In order to enable them, use the Replication Task Manager function. Please enter the task name, select the source volume and the destination volume. Click Create in order to create a replication task. NOTE Volume replication process runs on randomly selected ports from 12000- 13999.These ports have to be open in firewalls for both incoming and outgoing traffic. 76 www.open-e.com Open-E DSS V7 MANUAL Function: Replication tasks manager Here you can run, stop and delete existing replication volume tasks. When a replication task is running you cannot change the replication mode for the logical volume, delete the metadata or change the mirror server IP address. First, you need to stop the replication process. Function: Create schedule for volume replication task Here you can create a schedule for the selected volume replication task. Comment You can enter a comment for the replication schedule. Time select You can start the volume replication immediately by selecting Now from the Time select drop-down list or schedule it for later. Interval Select the interval at which the replication will be executed. Function: Replication task manager Here you can run, stop, and delete existing volume replication tasks. When a replication task is running, you cannot change the replication mode for the logical volume, delete the metadata or change the mirror server IP address. You need to stop the replication task first. 77 www.open-e.com Open-E DSS V7 MANUAL Function: Create schedule for volume replication task Here you can create a schedule for the selected volume replication task. Comment You can enter a comment for the replication schedule. Time select You can start the volume replication immediately by selecting Now from the Time select drop-down list or schedule it for later. Interval Select the interval to which the replication will be executed. 78 www.open-e.com Open-E DSS V7 5.2.2.2 MANUAL NAS settings Function: Authentication method The server administrator can choose one of the following authentication methods for the users: Workgroup (internal LDAP) With this method you need to create all user/group accounts in the NAS Resources menu. In the Workgroup field please enter your network workgroup name. New users are assigned to the default group called Users. Workgroup (external LDAP) In the case of external LDAP (Lightweight Directory Access Protocol) the NAS server imports users/groups from an external LDAP server. Please fill in all fields accordingly. In the Show advanced list you can set the Base DN, and the LDAP administrator DN (Distinguished Name) and password. Base DN should look like this: "dc=server,dc=nas" (DC - Domain Component), where "server" and "nas" can be set exactly as they are set on the remote LDAP server. In the LDAP administrator DN field you should enter the base DN (as above) with an additional prefix such as "cn=admin," (CN - Common Name). Users should be stored in the Organization Unit (ou) "People," groups in "Groups" and computers in "Computers." See sample organization tree below: 79 www.open-e.com Open-E DSS V7 MANUAL Windows (PDC) In this case the NAS server will use the Windows Primary Domain Controller user database for user authentication. This method can be used with NT4/2000/2003 servers. If a Windows 2000/2003 server runs the ADS native mode, please use the Widows (ADS) method. NOTE If you encounter problems getting connected to a PDC server running under NT4, please follow the instructions below: 1. run the Server Manager program from the Start menu Programs Administrative Tools (Common) Server Manager. 2. in the Server Manager menu select Computer->Add to Domain. WARNING: If a NAS resource has already been added, you must remove it, 3. in the Computer Name field, enter the NAS server name (NetBIOS name), 4. click Add, 5. next, access the NAS server web administration and go to CONFIGURATION NAS settings, 6. choose Windows (PDC) as the authentication method, 7. in the Server IP field enter the NT server IP address, 8. in the Name and Password fields enter the NT4 administrator account name and password, 9. click Apply. WARNING: If the connection fails, you will need to restart the process (go back to point 1). Windows (ADS) This option can be used for Windows (2000 and later) ADS servers: Please choose Identity Mapping (IDMAP) backend which is used to map between Windows user and group names and their corresponding local system user identifiers (UIDs) and group identifiers (GIDs): TDB (trivial database) - doesn't include a feature to ensure that Windows user/group is assigned the same UID / GID on different hosts. This limitation can lead to inconsistencies (e.g. ACL settings) because different hosts can map different UIDs / GIDs. RID (relative identifier) - generates unique UIDs and GIDs based on the Relative Identifier (RID) part of a Windows SID. Provides the same mapping of UIDs and GIDs on different hosts. Please enter the realm name of your Windows server. It can be found in the Windows system by clicking the right mouse button on My Computer and selecting Properties, then clicking the Computer name tab. Realm name is the same as the domain name, The server IP address must be taken from the same system as the realm name, Enter the administrator login and password, Choose if you want to keep all existing users (UIDs) and groups (GIDs) information or erase them and replace with new ones. 80 www.open-e.com Open-E DSS V7 MANUAL Please note that when using TDB backend and Access Control Lists (ACL) cleaning operation may change users identifiers and in results their file system rights. Changing backend from TDB to RID or from RID to TDB always requires cleaning database. All operations resulting in changing users identifiers should be followed by reset and new configuration of Access Control Lists (ACL). Click Apply to connect to the Windows (ADS) domain. NOTE Windows (ADS) password cannot contain the following special characters ~!@#$^&()+[]{}*;:'".,;%|<>?/\=` In order to connect to a NAS share via AFP (AppleTalk Filing Protocol), while user authentication is set to ADS (Active Directory Services) and the Mac workstation prompts for username and password, please enter the username as follows: User Name: DOMAIN_NAME+USER_NAME (the "+" character belongs to the syntax!) DNS server IP should be the same as the domain controller IP! Workgroup (NIS server) Please choose this option if you want to use a user/group database from a Network Information Service server. NOTE 1. 2. 3. Workgroup name cannot begin/end with space and cannot contain special characters such as: ~!@#$^&()+[]{}*;:'".,%|<>?/\=` When changing the authentication method you run the risk of losing ACLs (Access Control Lists). In this case please set user/group access rights for every share and reset ACLs. If SMB authentication is enabled, please edit the Windows registry: HKEY_LOCAL_MACHINE\SYSTEM\CurrentControlSet\Services\la nmanworkstation\parameters\ and change the value of the DWORD 'enableplaintextpassword' key to '1' hexadecimally. Function: NFS settings Click Use NFS to enable access to shares and/or snapshots via NFS. Network File System (NFS) is a protocol for distributed file system which allows a computer to access files over a network as easily as if they were on its local disks. NOTE If the hosts file has an entry in the DNS field but does not have the reverse DNS entry, then the connection to NFS will not work. 81 www.open-e.com Open-E DSS V7 MANUAL Function: FTP settings To enable FTP services check Use FTP. FTP port Determines the port the FTP service is listening to. Max clients Limits the total number of concurrent FTP connections. Max clients per host Limits the total number of connections originating from a single host. Min. port Minimal port number for the FTP passive mode; needs to be smaller than the maximum port number. Max. port Maximal port number for the FTP passive mode; needs to be greater than 1024. Encryption settings FTPS (FTP over SSL/TLS) Data transfer will be encrypted with the SSL protocol. Following FTP clients have been tested with this mode: CoreFTP(Windows) FileZilla (Windows) IgloFTP (Windows and Linux) SSLFTP (Linux console client) SFTP (FTP over SSH) Data transfer will be encrypted with the SSH protocol. Only version 3 of the protocol is supported. Following FTP clients have been tested with this mode: psftp (Linux) FileZilla (Linux, Windows) 82 www.open-e.com Open-E DSS V7 MANUAL WinSCP (Windows) - Make sure to change the protocol version to 3. In order to perform this, please check the /"Advanced options/" in WinSCP Login. Next, proceed to the menu: Environment -> SFTP -> Protocol options -> Preferred SFTP protocol version: select 3. Additionally, it is recommended to force the binary file transfer under menu: Options -> Preferences -> Transfer -> Transfer mode -> Binary. If you encounter a problem with a temporary file called filepart, then disable the resume support under menu: Options -> Preferences-> Transfer -> Endurance -> Enable transfer/resume to temporary -> disable NOTE If the NAS server uses Windows domain authorization (ADS), the short domain name along with a plus sign must precede the username, e.g. Realm: DOMAIN.LOCAL user: Administrator WinSCP User Name: DOMAIN+Administrator NOTE Most of the SFTP clients use 22 TCP port as a default. In case of any connection issues, please try to change the port to 22 in FTP settings. NOTE After accessing the server with the SFTP option enabled, you will see two folders: pub and share. The pub folder will be empty. After you access share, you will see all the FTP-enabled shares on the server. However, your user does not have access to those shares and the folder will be empty. This behavior will be fixed in an upcoming release. None If None is selected, then data will be sent without any encryption. Advanced settings Idle timeout This option allows you to set a timeout (in seconds) for an idle connected client. An idle client does not receive any data on the control or the data connection. Inputting 0 equals no timeout. No transfer This option allows you to set a timeout (in seconds) for a connected client whose data connection is idle (e.g. it is not sending or receiving data). Control connection is not a subject to this timeout. Inputting 0 equals no timeout. Passive port range Range of port addresses when FTP service is connected in passive mode. FXP support Enables support for the File eXchange Protocol. Delay engine on Enables runtime delay. It is recommended to keep this option on for security purposes. NOTE The possibility to access the server via FTP (File Transfer Protocol) offers additional flexibility, as users can access storage either from the Intranet or Internet. An FTP client (e.g. SmartFTP) is ideal but Internet Explorer or a similar browser is also suitable. To establish a connection, the FTP client needs several pieces of data: IP address: 192.168.0.220 (this is the standard address) Port: 21 User: anonymous Password: 123 83 www.open-e.com Open-E DSS V7 MANUAL Access rights allocation is done via the IP address of the PC currently in the process of accessing. Read access is therefore granted on the basis of these usually typical and anonymous login data. As a standard, the FTP server uses port 21, but that can be changed via the FTP port setting. If you use Internet Explorer when accessing, you need to enter the following data into the address line: ftp://192.168.0.220. You will not be prompted to enter the username and password, as Internet Explorer first establishes an anonymous connection. If you have changed the FTP port, add this information to the address line the following way: ftp://192.168.0.220:4711 (in this example, 4711 represents the new port number). How to enter IP address In order to allow specific computers access, enter the privileged IP addresses separated by semicolons. For example: 192.168.0.1; 192.168.0.2; 192.168.0.222; etc. In order to assign writing privileges to the entire address area between 192.168.0.1 and 192.168.0.254 enter: 192.168.0.0/24 In order to assign writing privileges to the entire address area between 192.168.0.1 and 192.168.255.254 enter: 192.168.0.0/16 There are many more combinations possible. You can find additional information about IP calculation on the Internet. Just search for ipcalc. For example, 192.168.0.1/28 will set the range from 192.168.0.1 to 192.168.0.14; 192.168.0.100/29 will set the range from 192.168.0.97 to 192.168.0.102 etc. You can easily calculate the network IP range using an IP address calculator, like the one available here: http://www.subnet-calculator.com/ Function: AppleTalk (AFP) Settings Here you can activate the AppleTalk protocol in the network to access shares on the NAS Server. 84 www.open-e.com Open-E DSS V7 MANUAL Function: SMB settings This function allows you to edit SMB’s protocol specific parameters. There are several options you can change: Wins server IP If you have a WINS server on your network you should indicate the WINS server IP here. Superuser Superuser is a user who has the permission to take ownership of folders and files belonging to other users. These rights can be useful when an administrator wants to change access rights (ACL) for folders or files created by other users. To give superuser privileges to a user, select them in the menu. Superuser privileges allow modifying, removing and adding new files to the share. This includes all files and directories, even those the superuser does not have ownership of. Simple and protected negotiation Simple and Protected Negotiation (SPNEGO) is a negotiation protocol. If you use a PDA device to access shares on NAS please uncheck it. NOTE To connect to your PDA device use netbiosname, not IP address. Store DOS attributes (uses xattrs) This option enables you to preserve all MS-DOS attributes using Linux xattrs attributes. It cannot be set when you are using the options Preserve hidden file attributes or Preserve system file attributes. 85 www.open-e.com Open-E DSS V7 MANUAL Preserve hidden file attributes and Preserve system file attributes (uses ACLs) These options enable you to preserve the following MS-DOS attributes: hidden and system. These attributes are mapped to x (EXECUTE) attributes for group and others in the Linux POSIX ACL. Windows ACL permissions are also mapped to Linux attributes. In order to avoid attribute mismatch, it is strongly recommended to disable these options. These cannot be set when you are using the Store DOS attributes option. Hide special folders This option hides special folders that are created by MAC OS/OSX systems. With that option enabled, users cannot see MAC OS/OSX system files via the SMB protocol. Please note: This also prevents users from creating files and folders with the same names (e.g., it will be impossible to create a file called "Network Trash Folder"). MAC OS/OSX system files: 1. . .DS_Store(:2eDS_Store), 2. .AppleDouble, 3. Temporary Items, 4. Network Trash Folder, 5. TheFindByContentFolder, 6. TheVolumeSettingsFolder, 7. .AppleDesktop, 8. .AppleDB, 9. Icon? 10. .VolumeIcon.icns(:2eVolumeIcon.icns), 11. .FBCIndex(:2eFBCIndex), 12. .FBCLockFolder(:2eFBCLockFolder), 13. desktop.ini, 14. RECYCLER. Unix extensions This option controls whether Samba implements the CIFS UNIX extensions, as defined by HP. These extensions enable Samba to better serve UNIX CIFS clients by supporting features such as symbolic links, hard links, etc... These extensions require a similarly enabled client and are of no current use to Windows clients. NOTE Changes to the ACLs and/or xattrs settings need to be confirmed, as these changes can make files invisible to users. It is not recommended to change these settings on servers that already have some data stored. If after changing the Preserve hidden file attributes (uses ACLs) and/or Preserve system file attributes (uses ACLs) settings and no files are visible, users can use the following command which will remove the hidden attribute from the files: attrib -S -H x:\*.* /s /d ,where: x - network drive. Any change to SMB settings will disconnect users that are currently connected. This also needs to be accepted by users; the acceptance prompt will only appear if users are connected to SMB. If the user clicks the Cancel button, the settings will be saved but the connection to SMB will not be reset. 86 www.open-e.com Open-E DSS V7 MANUAL Function: UID & GID synchronization Synchronize UID and GID database with NIS server Enable this option if you want to synchronize the user id and group id database with the NIS server. NIS server domainname NIS server domainname without http prefix. NIS server IP IP address of your NIS server. Synchronize interval Time period when synchronization will run. Function: Http share access setup Here you can set up a http access to shares. Turning this option on will enable the http share browser. Access to shares will be available via a Web browser. You can browse and download your files when you enter the following in the address line: https://SERVER_IP_ADDR:PORT https://SERVER_NAME:PORT For example: https://192.168.0.220:444 Port Port on which the http share browser will be available, the default port is 444. 87 www.open-e.com Open-E DSS V7 MANUAL Allow access IP List of IP addresses which will have access to the http share browser You can set up one of the following access modes for the shares: Public access When this option is set, everybody will have access to the shares over http. Password protected access When this option is set, access to the shares will be password protected. User name Please enter a username that will have access to the shares over http. Password User password. Retype password User password confirmation. NOTE In order to access your share via a Web browser, you need to enable Use http share access option for the share in question. You can do this via the Http share access function in the CONFIGURATION NAS resources [share_name] menu Function: Backup agent settings With this function you can enable one of the pre-installed backup agents (clients). Currently, Dantz - Retroclient and CA - BrightStor agents are supported. If you enable the backup agent, your backup server will find the agent running on the NAS server and will use it for backup. Alternatively, you can find and back the NAS shares up over the network neighborhood. But using a backup agent will be significantly faster. BrightStor: Allow IP or Network IP Please enter the appropriate backup server's IP address in order to grant it access to the NAS server. If you leave this field empty, all BrightStor backup servers in the network will have access to the NAS server. User 88 www.open-e.com Open-E DSS V7 MANUAL After providing a username, only this BrightStor user will have access to the NAS server. If left empty, all users will be able to access the NAS server. Before you start to back your data up you need to configure the device the backup will be stored on and add your NAS server as the source. Please follow these steps in order to perform this: 1. from the menu bar select Configuration, followed by Device configuration. The Device configuration wizard will appear. It will assist you in configuring backup devices on your server, 2. select Windows Server and click Next, 3. within the options select File System Device and click Next, 4. click Add, which will cause a file system device to be added to the list, 5. click on the Location field in the newly created entry and select the path that will be mapped to the file system device, 6. click the Finish button to complete the Device configuration wizard, 7. click Exit to quit device configuration, 8. the last thing to do is to format your newly created file system device. In order to do this, choose Device from the Quick start menu and select your newly created filesystem device, 9. click on the Format button and the format form will appear, 10. enter the media name and click OK to format the media. 1. 2. 3. 4. 5. 6. NAS server configuration: select Backup from the Quick start menu, right-click on Unix/Linux Systems in the Source branch, select Add Machine/Object and the Add client form will appear, enter the host name and the IP address of your NAS server, click Add in order to add your NAS server to the list, click Close to quit the Add Machine/Object form. Backup: select Backup from the Quick start menu, in the Source branch, select the NAS server volumes you want to back up, click the Start button and the Security and agent information form will appear, click the Agent button if you want to modify NAS server information, click OK and the Submit job form will appear, if you want to start the backup process later make sure that the job execution time is properly set, 7. enter the job description and click OK to start the backup process. 1. 2. 3. 4. 5. 6. Restore: select Restore from the Quick start menu, from the Source branch, select the NAS server volumes you want to restore, click Start followed by OK, and the Submit job form will appear, if you want to start the restore process later make sure that the job execution time is properly set, 5. enter the job description and click OK to start the restore process. 1. 2. 3. 4. Retroclient: NAS server configuration: 1. select Configure from the menu, then click on Clients and the Backup Clients form will appear, 2. click Add and the Add backup client form will appear, 3. enter the IP address of your NAS server and click on Add. The Connection form will appear, 89 www.open-e.com Open-E DSS V7 MANUAL 4. enter the password to connect to the NAS server and click OK. The password for Dantz Retroclient is set to admin. The NAS server is now properly configured to work with Dantz Retroclient. Backup set creation: 1. from the menu, select Configure followed by Backup sets and the Backup sets form will appear, 2. click on the Create New button and the Backup sets creation wizard will appear. Click on Next, 3. from the backup media options, select File and click on Next, 4. enter the name and the location where the backup will be stored. Click on Next, 5. select backup set security and click Next, 6. click on Finish, which will conclude the backup set creation process. Backup: 1. select Backup from the menu, then click on the Backup button and the source selection form will appear, 2. select the NAS server volumes which you would like to back up. Click OK, 3. the Backup process form will appear, click on Backup to start the backup process. 1. 2. 3. 4. Restore: select Restore from the menu, then click on the Entire volume button, select the source backup set from which you want to perform the restore process, select the destination NAS server volume, click OK followed by Replace to begin the restore process. The password for Dantz Retroclient is set to admin. Backup Exec NOTE This option is valid only for Symantec BackupExec 12.5 and higher. There is no possibility to change the username, it must always be ralus. The minimal password length is 4 characters. After connection has been established, at the server level you will be presented with a list of folders to be backed up. Please note that only the shares folder is a valid backup source or destination - it contains all your shares. NOTE The built-in Symantec Backup Exec Agent for Linux requires you to purchase the product activation key which must be installed on your Backup Exec server. Please contact your vendor in order to purchase the Symantec product. Without the product activation key, the agent will be fully functional for 30 days as a TRIAL. NOTE In Windows, the full computer name can be found via the following path: My computer -> Preferences -> Computer Name -> Full Computer Name. How to configure NDMP in NetBackup Configuration of storage devices. 1. To start configuring storage devices in the NetBackup Administration Console, select Device Management Devices NDMP Hosts to view detailed information about the NDMP servers that are referenced in your Media Manager configuration. 90 www.open-e.com Open-E DSS V7 MANUAL 2. To add an NDMP host, select Actions New New NDMP Host. Specify the NDMP host name. After that, the new NDMP Host dialog appears. Specify the following: Use global NDMP credentials for this NDMP host. Select this option to enable all NetBackup media servers under the master server to access this NDMP host using a pre-defined global NDMP login. This login is created under Properties Master Server Properties NDMP, on the NDMP Global Credentials dialog. Use the following credentials for this NDMP host on all media servers. Select this option to enable all NetBackup media servers connected to the NDMP host to access the NDMP host by using the login and password you specify on this dialog. Use different credentials for this NDMP host on each media server. Select this option to specify NDMP logins for particular NetBackup servers and then click Configuration. The Advanced NDMP Credentials dialog appears. 91 www.open-e.com Open-E DSS V7 MANUAL Press Add to add one or more servers and specify each server credential, as in the previous case. To perform three-way backups, you must authorize access to the desired NDMP host as described in the previous section. Three-way backups: for the hostname, specify the NDMP host that has no attached tape drive. NDMP to Media Manager backups: for the NDMP host name, specify the NDMP host that will be backed up to the media manager storage unit defined on the NetBackup server. 3. To start configuring robots in the NetBackup Administration Console, select Media and Device Management Devices Robots. To add a robot, select Actions New New robot. After that, the new Robot dialog appears. The properties that appear in this dialog vary, depends on the server platform type and robot type. 92 www.open-e.com Open-E DSS V7 MANUAL Specify the properties for the robotic library. Media Manager Robot Types Robot Type Description ACS Automated Cartridge System ODL Optical Disk Library TL4 Tape Library 4MM TL8 Tape Library 8MM TLD Tape Library DLT TLH Tape Library Half-inch TLM Tape Library Multimedia TSH Tape Stacker Half-inch Robot Type of Robot Control Control Configuration Local Media Manager Robot Type ODL Supported Media Server Local TL4 Local Windows Local TL4, TL8, and TLD TL8 UNIX Robot device or Port, Bus, Target and LUN Robotic device file Local TLD UNIX Robotic device file AIX, Solaris, and HP-UX (except HPIA64) UNIX Overview Platform Information Required for Configuration Robotic device file Robotic device file 93 www.open-e.com Open-E DSS V7 MANUAL Type of Robot Control Local Media Manager Robot Type TLH Supported Media Server Local TLH Local TSH AIX, Solaris, Linux, and Linux64 Robotic device file Remote ACS All except HPIA64 and Linux64 ACSLS host Remote TL8 All Robot control host Remote TLD All Robot control host Remote TLH All (except Linux64) Robot control host Remote TLM All (except Linux64) DAS/SDLC server NDMP ACS, TL8, TLD, and TLH Windows, AIX, Solaris, HP-UX, and Linux (except Linux64) NDMP host name and Robot device Local UNIX (except HPIA64, AIX, Linux and Linux64) and Windows AIX Platform Information Required for Configuration Library name LMCP device file For robot control attached to an NDMP host, you must specify Robot Device path, NDMP Host name and SCSI coordinates (only for windows hosts). After pressing OK, a prompt appears asking whether you want to stop and restart the NetBackup Device Manager Service; (this also stops and restarts any robotic processes). If your changes are complete, answer yes to this prompt. 4. To add a drive in the NetBackup Administration Console, select Media and Device Management Devices. Select Actions New New Tape Drive. The properties that appear in this dialog vary slightly, depending on the type of host platform and the robot type. 94 www.open-e.com Open-E DSS V7 MANUAL Drive Name This name is used to identify the drive. It is important to note that each drive name must be unique. Descriptive names are recommended. Drive names are limited to 48 characters. Drive Name Rule Select the Use Drive Name Rules checkbox to automatically create drive names based on the rules you specify. You can use drive name rules when a drive is first added to your configuration. The default drive name rule creates names in the format VendorID.ProductID.INDEX. For example, the default name for a Quantum DLT8000 drive is QUANTUM.DLT8000.000. You can update the global drive name rule or create a local drive name rule. A global rule is stored in the EMM database and used on all connected device hosts. The global rule is used for the drive name unless a host-specific or local rule is specified. Use any of the following drive attributes as part of a drive name rule. Host name Robot number Robot type Drive position Drive position information varies depending on the robot type. Drive position information can be ACS coordinates, TLM/TLH vendor drive name, or simply the robot drive number. Drive type Serial number Vendor ID Product ID Index A Custom Text field is also available which accepts any of the allowable Media Manager characters. Press Configure to use the name configuration wizard. 95 www.open-e.com Open-E DSS V7 MANUAL Host and Path Information Specify the device host and path for the drive by pressing Add. You can specify multiple paths to the same physical device. Adding multiple paths may cause the drive to become shared. Drive Type Specifies the type of drive that you are adding Media Manager media types Media Type Description QCART 1/4 inch cartridge tape HCART 1/2 inch cartridge tape HCART2 1/2 inch cartridge tape 2 HCART3 1/2 inch cartridge tape 3 4MM 4MM cartridge tape 8MM 8MM cartridge tape 8MM2 8MM cartridge tape 2 8MM3 8MM cartridge tape 3 DLT DLT cartridge tape DLT2 DLT cartridge tape 2 DLT3 DLT cartridge tape 3 DTF DTF cartridge tape Tape drive specification examples Manufacturer Media type NetBackup default drive type Certance LTO HCART VXA-2 8MM2 Ultrium 230 (LTO) HCART Ultrium 460 (LTO2) HCART2 Ultrium 960 (LTO3) HCART3 Exabyte HP Manufacturer Media type NetBackup default drive type IBM 3580 Ultrium (LTO) HCART 3580 Ultrium 2 (LTO2) HCART2 3580 Ultrium 3 (LTO3) HCART3 3590B HCART 3590E HCART 3590H HCART 96 www.open-e.com Open-E DSS V7 Manufacturer MANUAL Media type NetBackup default drive type 3592J HCART2 DLT 4000 DLT2 DLT 7000 DLT DLT 8000 DLT2 SDLT 220 DLT3 SDLT 320 DLT2 SDLT 600 DLT SLT1 DLT DLT VS80 DLT DLT VS160 DLT DLT-V4 DLT LTO-2 HCART2 LTO-3 HCART3 AIT-1 8MM AIT-2 8MM AIT-3 8MM2 AIT-4 8MM3 S-AIT HCART DTF-1 DTF DTF-2 DTF T9840A HCART T9840B HCART T9840C HCART3 T9940A HCART2 T9940B HCART2 LTO HCART LTO2 HCART2 LTO3 HCART3 VXA-172 8MM3 VXA-320 8MM3 SLR7 QSCSI SLR75 QSCSI SLR100 QSCSI SLR140 QSCSI Quantum Sony STK (Sun StorageTek) Tandberg Cleaning Frequency. NetBackup does not support cleaning drives in some robot types. If you want to set up a frequency-based cleaning schedule for the drive, set the number of mount hours 97 www.open-e.com Open-E DSS V7 MANUAL between each drive cleaning. When you add a drive or reset the mount time to zero, Media Manager starts recording the amount of time that volumes have been mounted in that drive. If the drive is in a robotic library that supports drive cleaning and a cleaning cartridge is defined in that robotic library, cleaning occurs when the accumulated mount time exceeds the time you specify for cleaning frequency. The mount time is reset when the drive is cleaned. If you do not specify a cleaning frequency (the default frequency is zero), you can still use automated drive cleaning with the TapeAlert feature, provided the following conditions have been met: The drive supports TapeAlert. A cleaning volume has been defined in the Media Manager. The host platform, robot type, and drive support drive cleaning. If a drive is in the robotic library, specify option Drive is in robotic library and specify library parameters. Robotic Library This dialog box allows you to select any currently configured robotic library that can control the drive. Robot Drive Number Robot drive number specifies the physical location in the robot of the drive that you are adding. When adding more than one drive to a robot, you can add the physical drives in any order. For example, in a TL8 robot you can add drive 2 before drive 1. If you assign the wrong number Media Manager does not detect it initially, but an error will occur when the robotic control attempts to mount media on the wrong drive. Configuration of drives using the correct Robot Drive Number is important to the proper mounting and utilization of media. The Robot Drive Number (commonly placed on the corner of the drive serial number and the drive serial number information from the robotic library), should be determined and validated before the device configuration is considered complete. Configuration of media used. Media Manager volumes are logical units of data storage or cleaning capability on media that have been assigned media IDs and other attributes, which are recorded in the EMM database. The attributes in the database include information to show the robotic location. This residence information for volume includes: the robot host, robot type, robot number, and slot location. In the NetBackup Administration Console, select Media and Device Management Media. A media management window similar to the following appears. To add a volume, the Volume Configuration wizard can be used. To use robot inventory to add robotic volumes, perform the Update Volume Configuration procedure. During the update, Media Manager assigns the media IDs and other attributes. You can also configure volumes automatically by inserting the media into a standalone drive. For an unused volume, NetBackup assigns a media ID, labels 98 www.open-e.com Open-E DSS V7 MANUAL the volume, and uses it (if it needs a volume of that type for a backup). Media Manager adds the media ID (designated by NetBackup) and other attributes for the volume. To add volume manually, use Action New New Volumes. Configuration of NDMP storage units 1. On the NetBackup master server, add an NDMP-type storage unit for the devices that will contain the backup data. In the NetBackup Administration Console, select NetBackup Management Storage Units. 2. To create a new Storage Unit, use Actions New Storage Unit. The New Storage Unit dialog appears. 99 www.open-e.com Open-E DSS V7 MANUAL For Storage unit name, enter a unique name for the storage unit. For Storage unit type, select NDMP. For On demand only: This specifies whether the storage unit is available only when a policy or schedule specifically requests it. If this option is not used, the storage unit is available to any NDMP policy or schedule. For Storage device, select the type of device for this storage unit. For NDMP host, specify the NDMP host where the tape drive is physically attached. Configuration of NDMP polices. Backup policies define the rules that NetBackup follows when backing up clients. A backup policy can apply to one or more clients. Every client must be covered by at least one backup policy. The best approach in configuring backup policies is to divide clients into groups according to any backup and archiving requirements, then create a policy for each group. To display information about all policies on the current master server, click Summary of All Policies. A summary of all polices appears in the Details pane, subdivided into panes displaying Polices, Schedules, Clients, and Selections. To display the general attributes for a specific policy, select that policy in the left pane. The Details pane shows the general attributes for that policy only. Double-click on a policy to display the attributes in tabs, available for editing. The easiest way to set up a backup policy is to use the Backup Policy Configuration Wizard. This wizard guides you through the setup process, simplifying the process by automatically choosing default values that are good for most configurations. In the NetBackup Administration Console, select Master Server or NetBackup Management. From the list of wizards in the Details pane, click Create a Backup Policy. To create a policy rules without wizard. 1. In the NetBackup Administration Console, expand NetBackup Management Policies. Select Actions New New Policy. 2. Type a unique name for the new policy in the dialog. Than a new dialog “Add New Policy – policy name” appears: 100 www.open-e.com Open-E DSS V7 MANUAL It is necessary to specify the following policy attributes: a. Policy Type: NDMP b. Policy Storage Unit: If the NDMP host has more than one storage unit and you want to direct backups for this policy to a specific storage unit, specify the name of that storage unit. For a three-way backup, specify a storage unit that was defined for the target NDMP host with attached tape. For NDMP backup to Media Manager devices, specify a Media Manager storage unit defined for a device connected to a NetBackup media server. Specify the following parameters for every client in NDMP policy: Hostname: Name of the NDMP host Hardware and operating system: NDMP NDMP Files: The Backup Selections list must specify directories from the perspective of the NDMP host. Two examples: /home/dir1/ /vol1 The following Backup Selections capabilities are NOT supported for an NDMP policy: Wildcards in pathnames. For example, /home/* is an invalid entry. Individual file names. Only directory or volume names are allowed. Exclude list (because client software is not installed on the NDMP host). You can specify any of the following backup types in a schedule for an NDMP policy: Full Cumulative Incremental Differential Incremental 101 www.open-e.com Open-E DSS V7 MANUAL Specify Override policy storage unit only if this client of NetBackup (the NDMP host) has more than one storage unit and you want to use a specific storage unit for this schedule. In this case, the client must be the only client in this NDMP policy. Customize server preferences. By default NetBackup for NDMP is configured to use Direct Access Recovery (DAR). For each restore, NetBackup automatically determines if the use of DAR will speed up the restore. NetBackup uses DAR only when it will result in a faster restore. If desired, DAR can be turned off. This may be necessary if you are having problems with DAR and your NDMP host is an older machine or is not running on the latest NAS OS version. NetBackup restricts maximum files with DAR to 1024. To change DAR setting in the NetBackup Administration Console, expand Host Properties and click on Master Servers or Media Servers. Right-click on the name of the server and select Properties. Click on the “General Server”. Uncheck the Use direct access recovery for NDMP restores box, and click Apply. This disables DAR on all NDMP restores. 102 www.open-e.com Open-E DSS V7 MANUAL Backup process Automatic Backup of an NDMP Policy Use this item with properly configured NDMP policy scheduling. Manual Backup of an NDMP Policy Click on Policies. Right click on the NDMP policy name and select Manual Backup from the pop-up menu. This opens the Manual Backup dialog. In the Manual Backup dialog select a schedule, then select the clients (NDMP hosts) that you want to back up. If you do not select any schedules, NetBackup uses the schedule with the highest retention level. If you do not select any clients, NetBackup backs up all configured ones. NDMP hosts. Click OK to start the backup. Restoration process The administrator can use the Backup, Archive, and Restore interface on a NetBackup server (master or media server) to restore files to the NDMP host from which they were backed up, or to a different NDMP host. On the File menu, click Select Files and Folders to Restore, then click either from Normal Backup or from Archived Backup (depending on whether you are restoring from a normal backup or an archive). There may be a delay while NetBackup reads information about the backups and builds the list of files you can restore. The title bar of the window displays the names of the server and client used for the operation. 103 www.open-e.com Open-E DSS V7 MANUAL To select an item, click in the check box that is left of the item. A check mark indicates an item is selected; a diagonal slash mark indicates that only some items within a folder are selected. You can select items in the All Folders pane or the Contents pane. To preview a list of the media required to restore, select Actions Preview Media. If the backup images required restoring the data on storage disk units, rather than removable media such as tape, no media will be listed if you try to preview media. On the Actions menu, click Start Restore of Marked Files. The Restore Marked Files dialog appears. The items marked for restoration are listed in the dialog window. 104 www.open-e.com Open-E DSS V7 MANUAL Specify restore parameters and press Start Restore. A dialog appears, indicating that the restore began successfully and asks if you want to view the progress of the operation. To view the status of the restore, click Yes in the dialog. The View Status dialog appears, from which you can view the progress of the restore. The restore may take a few minutes to complete. After starting a restore operation, you can close Backup, Archive, and Restore and perform other tasks on your computer. NetBackup will continue the restoration operation in the background. Using NetBackup to backup and restore special device files through NDMPD As described before in this guide, NetBackup does not allow you to add files in the Policies backup selection path. But to perform a backup of a single file (or group of files), you can add the path with a file name. Backup id: Treat it as a directory, but NDMPD handles this case properly and creates a correct backup image. Next, in order to restore these files in the Backup, Archive, and Restore application, you need to select the image and check the desired file. Because NetBackup treats all as directories, you must have a folder which consists of a path and the name of a file. All parts of this path must be checked with a slash, not a check, as shown in the picture. 105 www.open-e.com Open-E DSS V7 MANUAL On this picture, we can see the backup of a special file /dev/sdb1. This image looks like we’re doing a backup of the directory /dev/sdb1/. After selecting Start Restore, the Restore Marked Files dialog appears. You can see that NetBackup tries to restore to the /dev/sdb1 file sdb1 – but this is ok. NDMPD handles this case and restores the file /dev/sdb1. 106 www.open-e.com Open-E DSS V7 MANUAL Function: Data (file) replication agent This function enables the data (file) replication agent. NOTE It is mandatory to enable this function in order to replicate the destination share. NOTE Data (file) replication is performed by the rsync application. NOTE In order to perform rsync over WAN please follow a schema for topology: |server 1|----|internet|----|router/firewall|---|server 2| Description: server 1 - server with internet IP router/firewall - forwarding port 873 from server 2 to local IP server 2 - machine with local IP behind the NAT Rsync works both ways. Function: Antivirus setup This function provides antivirus protection for your data. Antivirus scans the following file types: Archives and compressed files:, Zip, RAR (2.0), Tar, Gzip, Bzip2, MS OLE2, MS Cabinet Files, MS CHM (Compiled HTML), MS SZDD compression format, UPX (all versions), FSG (1.3, 1.31, 1.33, 2.0), Petite (2.x). mail files, MS Office document files, executable files. 107 www.open-e.com Open-E DSS V7 MANUAL The Use quarantine feature allows you to choose whether you want to move infected files to the default folder (quarantine_dir), which is automatically created on shares, or manually choose the quarantine directory on a previously created share. To get to know more about the infected files, examine the logs (you can download them in MAINTENANCE -> Hardware). The relevant logs are the following: scan_shares_ANTIVIRUS_[antivirus_task_name].log for regular antivirus scanning, clamd.log for SMB online scanning. NOTE If the Use quarantine option is disabled you will only be informed about the infected file. Please note that antivirus scanning may decrease overall system performance. 108 www.open-e.com Open-E DSS V7 5.2.2.3 MANUAL NAS resources Here you can configure NAS resource operations. All you need to do is use the tree diagrams on the left hand pane, which will allow you to manage all shares, users and user groups in a structured manner. 5.2.2.3.1 Shares Here you can find a list of all your Open-E Data Storage Software V7 shares. After clicking on “Shares,” the “Create new share” function allows you to define a new share, set up a comment for it (optional) or set its path. You will find all existing shares organized below. You can edit them with a simple click. All parameters except the name are modifiable. If you need change the name, delete it and assign a new name. Windows users will see the name of the share in their network environment folders when they click on the icon for the Open-E DSS server. Comments are only visible if the users take a look at the share properties, or if shares are listed in detail. The path represents the physical location of data on the Open-E Data Storage Software V7 share volume. The user does not have access to this information. In order to simplify the navigation through the directories, you can use the browser function. Function: Create new share To create a share, enter the share name, a comment (optional) and set its path. To use the default share path, leave the Default path box checked. If you want to use a specific path, please check the Specified path box and select path to the share. 109 www.open-e.com Open-E DSS V7 MANUAL NOTE Please do not use spaces and special characters such as: ~!@#$^&()+[]{}*;:'".,%|<>?/\=`, NOTE The workgroup/domain name configured in the NAS settings tab has to match the network settings. Otherwise, the configured shares will not be visible in the network environment. If you have made changes to the workgroup and server name in the NAS configuration, it can take some time before each workstation computer in the Windows network detects the new name. Function: ACL (Access control list) With this function you can assign ACL permissions to your folders or files. Browser Filter Allows to show only folders or files with a given name. Selection Shows where you are in the browser directory. Users & Groups Available Users & Groups List of available users and groups which have access to permissions assigned to them. Selected Users & Groups List of selected users and groups that have access permissions assigned to them. Access Permissions Recursive If this option is checked the ACL permissions will be assigned to all folders and files within the selected folder. Set owner If this option is selected the designated user(s) or group(s) will be owner(s) of the selected folders or files. Access Permissions: read, write, execute (for folders this means the permission to open, while for files and the permission to execute). In order to assign ACL permissions: select a folder or file, click tab Users & Groups, select which users or groups will be available to assigned access permissions, click the access permissions, select user ([U]) or group ([G]) or User(owner) or Group(owner), check the appropriate boxes under Access Permissions, click Apply. Examples: Example 1. This example presents a situation in which User1 has read access permissions for only directory A and does not have access permissions for subdirectory B at all. A User1 r-x B User1 --- 110 www.open-e.com Open-E DSS V7 MANUAL Example 2. User1 has access permission only for reading directory A. Can enter subdirectory B, but no files will be visible. A User1 r-x B User1 --x Example 3. User1 can enter the subdirectory C and can read and write files within that subdirectory. A User1 r-x B User1 –x C User1 rwx NOTE Designating the user as a superuser within the SMB settings function will automatically assign all access permissions to that user. Assigned access permissions will be available under sFTP, FTP and SMB network protocols. User (owner) or Group (owner) can also have access permissions assigned. These permissions may be different from the ones assigned to the same user in the Users/Groups list. After clicking the “Create” button on the left pane, the name of an earlier established share will appear, in this case “Projects”. By clicking on that name, you will see all available options for setting up the share: Function: Edit share Here you can edit the share path and add or delete directories by clicking on the button. 111 www.open-e.com Open-E DSS V7 MANUAL Function “SMB Settings” This function allows you to change the SMB protocol settings for this share. To restrict access to read-only, make sure the Read-only box is checked. Uncheck the Visible box to hide the share from the browse list. Select Guest to allow anonymous access to the share. Select Users with password to enforce user authentication. Handling large directories This option allows you to significantly speed up file listing. The prerequisite is to convert all file and directory names to lower or upper case exclusively. Please select your preferred option below. NOTE You will need to convert your existing file and directory names to lower or upper case before selecting this option, otherwise they will become inaccessible. NOTE Please note that due to case sensitivity issues the operations above may have negative impact on Unix-like systems. Please prepare accordingly beforehand. Windows is not affected. Inherit owner The ownership of new files and directories is normally governed by effective uid of the connected user. If this option is checked, the ownership for new files and directories is taken from the ownership of the parent directory. A common scenario where this behavior is useful is in implementing drop-boxes, where users can create and edit files but not delete them. Inherit ACL's This option when checked, ensures that if default acls exist on parent directories they are always honored when creating a new file or subdirectory (in these parent directories). Inherit permissions If this option is checked, new directories inherit the mode of the parent directory and new files inherit their read/write permissions from the parent directory. This option can be particularly useful on large systems with many users to allow a single [homes] share to be flexibly used by each user. Map ACL inherit This option controls whether SAMBA will attempt to map the 'inherit' and 'protected' access control entry flags stored in Windows ACLs into an extended attribute. This option allows the Windows ACL editor to correctly use inheritance with the Samba POSIX ACL mapping code. Locking This option controls whether or not locking will be performed by the server in response to lock requests from the client. NOTE Be careful about disabling locking as lack of locking may result in data corruption. You should never need to disable this option. 112 www.open-e.com Open-E DSS V7 MANUAL Function: AppleTalk (AFP) Settings With this function you can activate the AppleTalk protocol in the network to access shares on the NAS Server. How to use AppleTalk with the NAS server: enable AppleTalk in the CONFIGURATION NAS settings menu, select the share to be made accessible via AppleTalk in the CONFIGURATION NAS resources menu, enable AppleTalk for this share. How to connect to the NAS AppleTalk server:'' In MAC OS 9: open the Chooser (APPLE MENU Chooser), click on AppleShare, if the NAS server does not appear on the fileserver list, click on Server IP address and enter the NAS server IP, click OK and choose the login type. Enter a username and password if you want to log in as a specified user, from the available options select the shares you would like to mount, the icons of the mounted shares will appear on the desktop, to open the share click on its icon, to unmount the share, drop its icon into the trash bin. In MAC OSX 10.3: click on the MAC HD, then Applications followed by Utilities, check if AppleTalk is active from the Directory Access; if not, activate it, 113 www.open-e.com Open-E DSS V7 MANUAL if the NAS server does not appear on the Network list, open a Web browser and enter the IP address of the AppleTalk server. afp://192.168.1.3 ("afp://" is crucial here), choose the login type. Enter a username and password if you want to log in as a specific user, if you cannot log in, click on Directory Access/Authentication and change the searching path for authentication information, from the list of available shares, select all those you want to mount, the icons of the mounted shares will appear on the desktop. Alternative method: click on Connect to server from the Finder (GO submenu), enter: afp://ip_address, you can add a link to the AFP server by clicking on the + sign. This adds a link in the Favorite Servers field, choose the login type and enter a password if you want to log in as a specific user, from the list of available shares select all you want to mount, the icons of the mounted shares will appear on the desktop. Function: “FTP Settings” You can enable FTP services for each share separately. Your choices here include: Anonymous mode, Users with password (with optional encryption to be set up under CONFIGURATION -> NAS settings -> FTP settings). Selecting the Anonymous mode will enable FTP sharing with anonymous users. The access is set to READ+WRITE by default for all IPs. To change that, activate the Allow access IP and Write access IP options. Clicking Apply will make the share available over FTP. To connect to this share FTP client software is required – e.g. Internet Explorer has FTP support. To connect with IE when using the Anonymous mode, please enter the following in the address line: ftp://<Server IP>/pub/ (e.g. ftp://192.168.0.220/pub/). When using an SFTP client, please type in the following: ftp://<Server IP>/share/ (e.g. ftp://192.168.0.220/share/). Share is a keyword. Many FTP client programs need a username and a password to establish a connection. In the Anonymous mode the username is anonymous and there is no password (i.e. the password field should remain empty). All anonymous shares are in the folder called share. Any user connecting from an IP which has not been granted full access will see all the shares but will be unable to see any restricted directories. It is good practice to use an email address for the anonymous login password. Only a few FTP clients support SFTP(SSL/TLS). NOTE An anonymous user will only see files and directories owned by them. When the Users with password option is enabled, users will have access to the share after inputting the authorized username and password. NOTE If the NAS server uses Windows domain authorization, the short domain name along with a plus sign must precede the username, e.g. DOMAIN+Administrator. To connect to a share via the Users with password mode, switch the encryption type in your SFTP client to SSL or TLS. All Users with password shares are in the shares folder. Users see only the authorized shares. 114 www.open-e.com Open-E DSS V7 MANUAL NOTE If you are unable to see any directories when connected to the FTP server please make sure that you have the rights to access any shares over FTP. If you still cannot see any directories please switch your FTP client to passive mode. NOTE Most FTP clients have bookmarks which allow to set up the IP, a port home folder, etc. Suggested home folder for the Anonymous mode users is pub, while for the Password mode users it is shares. In functions “Users share access (SMB/FTP/AFP)” and “Groups share access (SMB/FTP/ASP)” you can grant access to the shares to available users and/or groups. Function: Users share access (SMB/FTP/AFP) Add the users access to the shares by selecting the users and clicking the button . To remove access for users to the specified shares, select the users and click the appropriate arrow button to remove them from the Granted access users list. NOTE You can use the following keyboard keys in the lists (you need to first set the focus on the preferred list): Home: jump to the first, End: jump to the last, Shift + arrow key: multi-select, Letter key: jump to the first entry starting with the pressed key. 115 www.open-e.com Open-E DSS V7 MANUAL Function: Groups share access (SMB/FTP/AFP) Here you can add groups which are granted access to this share. NOTE You can use the following keyboard keys in the lists (you need to first set the focus on the preferred list): Home: jump to the first, End: jump to the last, Shift + arrow key: multi-select, letter key: jump to the first entry starting with the pressed key. Function: Force user and group This function allows you to force the selected user/group to be the owner(s) of all objects created from this point on. Also, all users logging in will receive the same permissions as the selected user and group. Please note that this means they will lose their rights to objects for which the forced user and group does not have similar rights to. This option applies only to the SMB protocol. 116 www.open-e.com Open-E DSS V7 MANUAL Function: “NFS share access” Please click Use NFS to activate access to this share via NFS. NOTE In order to mount this share via NFS, please use the following syntax: mount -t nfs IP_addr:/share_name /local_mount_point. In order to mount a share in synchronous mode please use: mount -t nfs IP_addr:/share_name /local_mount_point -o sync In order to mount a share in asynchronous mode please use: mount -t nfs IP_addr:/share_name /local_mount_point -o async When using synchronous mode, data is not stored in a buffer but transferred at once. In asynchronous mode, the data is first stored in a buffer and then transferred. The name of the share is case sensitive in the mount syntax. It is important to exercise caution in this respect, as otherwise you might not be able to access the share. You can use the following NFS option fields: Allow access IP Please enter an IP address or an address range which should be allowed to access NFS. You can enter a single IP, multiple IPs separated by a semicolon, or an IP address range. IP addresses that were not added to the Allow write IP list will have read only access. Allow write IP Please enter an IP address or an address range which should be allowed to write to NFS. You can enter a single IP, multiple IPs separated by a semicolon, or an IP address range. Insecure Allows incoming connections to originate from ports greater than 1024. Synchronous When this option is enabled, the local file system will wait for the data to be written to the NAS server. NFS performance will be lowered. However, this will ensure that the data will be written directly to the NAS server and will not be stored in the system cache. Insecure locks Disables authorization of locking requests. Some NFS clients do not send credentials with lock requests; therefore they will work incorrectly with secure locks. In this case, you can only lock world-readable files. If you have such clients, use the Insecure locks option. All squash Maps all user IDs to the user nobody and all group IDs to the group nogroup. No root squash Select this option to grant the client machine's root user the root access level to the files on the NAS server. Otherwise the client root will be mapped to the user nobody on the NAS server. NOTE When you leave the Allow access IP and Allow write IP fields blank, all computers in the subnet will have write access to NFS. When you set the Allow access IP field and leave the Allow write IP field blank, specified computers will have read only access and none will have write access. When you set the Allow write IP field without setting the Allow access IP field, specified IPs will have write access and all computers in the subnet will have only read access. xxx.xxx.xxx.xxx, xxx.xxx.xxx.xxx;xxx.xxx.xxx.xxx; ...., xxx.xxx.xxx.xxx/network_prefix_length. NOTE Some Linux distributions have UDP as the default protocol for NFS. In case of problems, it is recommended to switch to TCP by using the following syntax: mount -t nfs -o tcp 117 www.open-e.com Open-E DSS V7 MANUAL ip_address:/share_name /mnt/point. If the host has an entry in the DNS field but does not have a reverse DNS entry, the connection to NFS will fail. Function: Http share access With this option you can enable http access for a selected share. In order to access https-enabled shares via Web browser, please enter the following in the address line of your browser: https://SERVER_IP_ADDR:PORT https://SERVER_NAME:PORT For example: https://192.168.0.220:444 NOTE In order to access your share via a Web browser, you need to turn on the Enable http share browser option in the CONFIGURATION NAS settings Http share access setup function. Function: Data (file) replication agent settings This function allows you to configure data (file) replication for a share. In order to enable it, check the Use data (file) replication box. NOTE It is recommended to set a login name, a password and an Allow access IPs list, otherwise everyone will have access to the share. Function: NDMP data server access This option enables NDMP for this share. Please make sure you have checked the Enable NDMP data server in CONFIGURATION NAS Settings NDMP data server beforehand. Function: Remove share Click the Remove button to remove the share. 118 www.open-e.com Open-E DSS V7 NOTE MANUAL No data (directories or files) will be deleted on the logical volume. You can recreate a deleted share at any time. Just go to the NAS resources menu, click on Shares (as if you were creating a new share), scroll down to the ACL window and browse the directory structure to find the folder you want to assign to the share. Finally, scroll back up to the Function: Create new share, and in the Name field, please enter your share name and then click Apply. Now you can find the deleted share again in your network neighborhood. 5.2.2.3.2 Users In the mode “Workgroup internal LDAP” the category “Users” serves as a data entry mask for user accounts. In principal, the process is the same to when you create shares. Function: Create new user To create a user, enter their username and password, retype the password and press Create. NOTE User name cannot: contain characters: ~ ! @ # $ ^ & ( ) + [ ] { } * ; : ' " ., ; % | < > ? / \ = `, begin or end with a space. Password cannot: contain the following special characters: ' " `, contain spaces. If users forget their password, there is no way to retrieve it. You can only set a new password. Function: UID mappings (upload/download) This function allows you to upload and download UIDs (user IDs). You will be able to modify multiple user IDs at the same time. 119 www.open-e.com Open-E DSS V7 MANUAL To upload UID: locate the configuration file uid_mappings.csv (format: user_name;uid) by clicking the Browse button. This file should be encoded in UTF-8, press the Upload button to import UID mappings, If there are any errors while importing UIDs please examine the uid_mappings_import.log file in the log package. NOTE Warning: current UID mappings will be overwritten. Press the Download button to download uid_mappings.csv. Function: Quota for users (upload/download) This function allows you to import and export user quota mappings. To upload quota: locate the configuration file quota_users.csv (enconding: UTF-8; format:user_name; hard_quota-in kbytes) by pressing Browse, press the button to upload quota configurations for users, if you encounter errors while uploading the quota please examine the quota_users_import.log file in the log package (available via STATUS Hardware Function: Logs). NOTE Warning: current settings will be overwritten. Press Export to download quota_users.csv Next, by clicking on the name e.g. “john”, you will see all available functions helpful for setting the user: Function: Edit user To change the password for a user enter and confirm the new password and click Apply. NOTE Password cannot contain: special characters such as: ' " `, spaces. 120 www.open-e.com Open-E DSS V7 MANUAL Function: Users share access Add user access to shares by selecting shares and clicking on the button. To remove user access to specified shares, select the users and then click the appropriate arrow button to remove them from the Granted access users list. NOTE You can use following keyboard keys in the lists (first set focus to desired list): Home: jump to the first, End: jump to the last, Shift + arrow key: multi-select, letter key: jump to the first position starting with pressed key. Function: Users group membership This function allows you to view and change user group memberships when connected to the local LDAP users and groups database. To assign this user to a group, select its name from the Available groups list and click on button. To remove group membership, select the group from the Member of the groups list and click on button. NOTE You can use following keyboard keys in the lists (first set focus to desired list): Home: jump to the first, End: jump to the last, Shift + arrow key: for multi-select, letter key: jump to the first position starting with pressed key. 121 www.open-e.com Open-E DSS V7 MANUAL Function: Quota You can assign a quota (a limit) on the amount of space a user is allowed to allocate on the shares to which they have access. To remove any limitations for a user, you need to set their quota to 0. NOTE Max quota value per user/group is 2TB. All greater values will be limited to 2TB Function: User rename This option allows you to rename an existing user. 122 www.open-e.com Open-E DSS V7 MANUAL Function: Remove user Click the Remove button to remove the user from the system. All the files the user has ownership of will be preserved. 5.2.2.3.3 Groups In the mode “Workgroup internal LDAP,” you can define entire groups consisting of different users. In addition, you can assign these groups certain access rights. By clicking on “Groups,” a data entry mask opens up, allowing you to create a new group. Assigning the access rights is done the same way as for users (see 5.2.2.3.2). In the modes “Workgroup (external LDAP)” and “Windows (PDC)” and “Windows (ADS)” the groups are automatically synchronized with the external server. Function: Create new group To create a group, enter its name and press Create. NOTE Group name cannot: contain special characters such as: ~ ! @ # $ ^ & ( ) + [ ] { } * ; : ' " . , % | < > ? / \ = `, begin or end with a space. Function: GID mappings (upload/download) This function allows you to upload and download GIDs (group IDs). Using this function you will be able to modify multiple group IDs at the same time. To upload GIDs: 1. find the configuration file gid_mappings.csv (format:group_name;gid) by pressing the Browse button. This file should be encoded in UTF-8,, 2. press the Upload button to upload GID mappings,, 3. if you encounter errors while importing GIDs please examine the gid_mappings_import.log file in the log package (available via STATUS Hardware Function: Logs). NOTE Warning: current GID mappings will be overwritten. Press "download" button to download gid_mappings.csv. 123 www.open-e.com Open-E DSS V7 MANUAL Then by clicking on group name e.g. “administrators”, you will see all available functions helpful for setting the groups: Function: Quota for groups (upload/download) This function allows you to import and export group quota mappings. To upload a quota: locate the configuration file quota_groups.csv (encoding: UTF-8; format: group;quota - in kbytes) by pressing Browse press the button to upload quota configurations for groups if you encounter errors while uploading the quota, please examine the quota_groups_import.log file in the log package (available via STATUS -> Hardware -> Function: Logs). NOTE Warning: Current settings will be overwritten. Press Export to download quota_groups_import.log. Function: Group shares access Here you can add the shares for this group, that has access to, by selecting the shares and clicking the button To remove the access from this group, that has the specified shares, select the shares and click the button . NOTE You can use following keyboard keys in the lists (first set focus to desired list): “Home”: jump to the first, “End”: jump to the last, “Shift” + arrow key: for multi-select, “letter key”: jump to the first position starting with pressed key. 124 www.open-e.com Open-E DSS V7 MANUAL Function: Users group membership This function allows you to view and change user group membership when connected to the local LDAP users and groups database To assign users to this group, select the users from the Available users list and click on . To remove user membership, select users from the Members list and click on . When connected to an external users and groups database you can check which users are members of this group. NOTE You can use the following keyboard keys in the lists (you need to set the focus on the preferred list first): Home: jump to the first entry, End: jump to the last entry, Shift + arrow key: multi-select, letter key: jump to the first entry starting with the pressed key. Function: Quota You can assign a quota (a limit) on the amount of space a user is allowed to allocate on the shares to which they have access. To remove any limitations for a user, you need to set their quota to 0. NOTE Max quota value per user/group is 2TB. All greater values will be limited to 2TB. 125 www.open-e.com Open-E DSS V7 MANUAL Function: Quota for member of the group You can assign a quota (limit) on the amount of space the members of a group are allowed to allocate on the shares to which they have access. You can also make the quota relevant only to those users for whom the given group is the primary, or only for those users who do not have individual quotas set up. To remove any limits, set the quota to 0. NOTE Max quota value per user is 2TB. All greater values will be limited to 2TB. 126 www.open-e.com Open-E DSS V7 MANUAL Function: Group rename This option allows renaming an existing group. Function: Group remove Click the "remove" button to remove the group. 5.2.2.4 iSCSI target manager Function: Create new target To create a target, assign a name or leave the "Target Default Name" option checked. Name Target name can contain alphanumeric characters: ' . ' ' : ' ' - '. A target name is considered case-insensitive. Every character entered will be converted to low-case. No spaces and no underscores are permitted. Alias Alias is a name under which targets will be visible in the Target tree. The same naming rules apply for alias as for name. NOTE The server name will be used as a part of the default target name. IMPORTANT NOTE Please note that before using the target you need to add at least one LUN to it by clicking the target alias in the left hand pane and selecting LUNs in the Target volume manager box Function: Discovery CHAP user access Allows access to this target to specified CHAP users. NOTE You can use the following keyboard keys in the lists (you need to set the focus on the preferred list first): “Home”: jump to the first, 127 www.open-e.com Open-E DSS V7 MANUAL “End”: jump to the last, “Shift” + arrow key: for multi-select, “letter key”: jump to the first position starting with pressed key. If you enable CHAP user access authentication but do not select any users, nobody will have access to the target. Function: Target volume manager This function allows you to manage both available and assigned target and snapshot volumes. To attach a volume to a target click the attach button associated with that volume. Similarly, to detach an already attached volume from a target click detach button. In certain circumstances you may need to adjust the LUN of the volume you are about to attach. Usually, the LUN attachment is taken care of automatically. The list of targets is shown as a table consisting of following columns: SCSI ID In the SCSI ID field you can edit the SCSI identifier for a logical volume (logical unit). Every logical unit must have a unique SCSI ID. In case when logical units are configured for failover, their SCSI ID must be identical on the primary and secondary node. Access mode Write-through cache. This means that data is not stored in cache. Instead, all data is considered written after it is committed to disk. Write-back cache. This functionality improves data writing performance. Writing is considered complete as soon as the data is stored in the disk cache. Later the disk cache commits the data to a disk. 128 www.open-e.com Open-E DSS V7 NOTE NOTE MANUAL Please note enabling write-back cache may cause data corruption in case of a system crash (e.g. after power failure). Corruption may also appear during failover processing. We strongly recommend using write-through cache if you are transmitting very important data. Read only. If this is turned on, the LUN will be visible as a write protected disk. To change the access mode after a volume has been added to a group, you must first remove the volume from that group and then add it again with the preferred mode. Function: CHAP user access authentication Allows access to this target to specified CHAP users. CHAP (target authenticates host) This function enables uni-directional authentication. It enables the target to validate the initiator. Mutual CHAP (host authenticates target) This function enables bi-directional authentication. It additionally enables the initiator to authenticate the target. NOTE You can only select a CHAP user that has not been added to the granted access CHAP users list and is available in CHAP users’ pool. NOTE Please make sure that the secret of CHAP user selected for mutual target-initiator user authentication is different than the secrets of any other CHAP users selected on the list above. . NOTE You can use the following keyboard keys in the lists (you need to set the focus on the preferred list first): “Home”: jump to the first, “End”: jump to the last, “Shift” + arrow key: for multi-select, “letter key”: jump to the first position starting with pressed key. If you enable CHAP user access authentication but do not select any users, nobody will have access to the target 129 www.open-e.com Open-E DSS V7 MANUAL Function: Target IP access You can assign network classes or specify individual IP addresses that are permitted or denied to access the target. Entries should be delimited by semicolons. When no entries are present in the Deny access or Allow access fields everyone is permitted to access the target. Specifying at least one entry in the Allow access field excludes all the clients that do not match it from accessing the target. When you specify at least one entry in the Deny access field, every CHAP user or CHAP users from this network class address are denied access to the target. When you specify any IP address in the Allow access field, CHAP users from that address are allowed to access the target even if the same address has been specified in the Deny access field. If you enter IPs only in the Allow access field then the Deny access field will be automatically entered with a 0.0.0.0/0 entry. NOTE Please note, already active sessions to the target will persist regardless of the newly applied settings. You can ensure that the settings are forced immediately after you apply them by going to MAINTENANCE shutdown iSCSI connection reset and resetting the connections manually. Keep in mind that all the unsaved client data might be lost. When you enter a network class address in normal form, it will be automatically converted to a short form. Examples: Deny access: 0.0.0.0/0 Allow access: 192.168.2.30/0;192.168.3.45 These settings deny access from every IP address or network class address, only addresses in the Allow access field are granted access to the target. 130 www.open-e.com Open-E DSS V7 MANUAL Deny access: 192.168.0.0/16 Allow access: 192.168.2.30;192.168.10.230;192.168.30.0/24 These settings deny access to any IP addresses from the network 192.168.0.0/16, grant access for IP addresses 192.168.2.30, 192.168.10.230, all IP addresses from network 192.168.30.0/24 and all IP addresses that have not been denied in the Deny access field. Function: Rename target Provide a new target name. A target name is considered case-insensitive and every character entered will be converted to low-case. Function: Remove target This function removes all volumes from the target. NOTE Please note that the data stored on the volumes are not automatically removed. You can assign the volumes to different targets and still see the data. Please remove the data prior to removing the target in order to prevent leakage of sensitive or classified information. Function: Create new CHAP user To create a CHAP user enter name, password, retype password and press the create button. NOTE CHAP usernames cannot: contain special characters such as: ~ ! @ # $ ^ & ( ) + [ ] { } * ; : ' " ., % | < > ? / \ = `, begin or end with a space. Password cannot contain: special characters such as: ' " `, spaces, less than 12 and more than 16 characters. If a CHAP users forget their password, there is no way to retrieving it. You can only set a new password. 131 www.open-e.com Open-E DSS V7 MANUAL Function: Edit CHAP user In order to change the password for a CHAP user, enter and confirm the new password and then click Apply. NOTE Password cannot contain: special characters such as ' " ` ^ & $ # ~ [ ] \ / | * spaces, less than 12 and more than 16 characters. Function: Remove CHAP user Click Delete to remove the CHAP user from the system. 5.2.2.5 FC target manager 5.2.2.5.1 Groups Here you can view a list of all Fibre Channel Groups. NOTE Group Default is a public group. If some WWN belongs to a different group than public, then this WWN will not be accessible to the public group and only will have access to the group where it's assigned to. 132 www.open-e.com Open-E DSS V7 MANUAL Function: Create new group To create a group, enter its name and click the button apply. Name A group name is considered case-insensitive. Every character entered will be converted to low-case. Only a-z 0-9 . - and : characters are allowed. 133 www.open-e.com Open-E DSS V7 MANUAL Function: Add group volumes This function lets you manage free and already assigned FC logical volumes. To assign a volume to the group click the “Add” button associated with that volume. Similarly, to remove already assigned volume from the group click "Remove". In certain circumstances you may need to adjust the LUN of the volume you are about to add. However, normally the LUN assignment is taken care of for you automatically. You should leave the default values. RO Read Only, if it is turned on the LUN it will be visible as a write protected disk. To switch the RO option when it's disabled, you must first remove the volume from the group and then add it again and set the flag as desired. FC logical volumes are not read only (RO -unchecked) by default. WT Write-through cache. Data is written to logical volume at the same time it is cached. This type of caching provides the advantage of internal consistency, because the cache is never out of sync with the logical volume. If RO and WT are disabled (RO and WT - unchecked) then Write-back cache is used by default. This means that write is acknowledged as completed as soon as the data is stored in the disk cache. Later, the disk cache commits the write to disk. If RO and WT are disabled, (RO and WT are unchecked), Write-back cache is used by default. This means that writing is considered completed as soon as the data is stored in the disk cache. The disk cache commits the data to disk at a later time. Blocksize This field shows the current FC volume blocksize. Function: WWN alias access Here you can add WWN aliases which are granted access to this group. WWN Worldwide name, it's a unique identifier in a Fibre Channel storage network. Each WWN is has a fixed 64-bit name assigned by the manufacturer and registered with the IEEE to ensure it is globally unique. It can include only chars from A to F, a to f, digits from 0 to 9 and a : char. You can find it in manual of your HBA card, bios or directly on label of your HBA card. Example of WWN: 1A:FF:AC:4D:00:1F:99:F3. HBA Host Bus Adapter. HBA connects a host system to network and storage devices. In this case it's referring to devices responsible for connecting Fibre Channel. NOTE You can use the following keyboard keys in the lists (first, you need to set the focus on the preferred list): Home: jump to the first entry, End: jump to the last entry, Shift + arrow key: multi-select, letter key: jump to the first entry starting with the pressed key. 134 www.open-e.com Open-E DSS V7 MANUAL Function: Rename group Provide a new group name. A group name is considered case-insensitive. Every character entered will be converted to low-case. Only a-z 0-9 . - and : characters are allowed. 5.2.2.5.2 WWN Aliases Here you can view list of all Fibre Channel WWN Aliases. 135 www.open-e.com Open-E DSS V7 MANUAL Function: Create new WWN HBA alias To create new WWN (Worldwide name) alias for HBA (Host Bus Adapter): enter the alias and WWN to which its referring, press create. WWN Worldwide name, this is a unique identifier in a Fibre Channel storage network. Each WWN has a fixed 64-bit name assigned by the manufacturer and registered with the IEEE to ensure that it is globally unique. It may only include characters from A to F, a to f, digits from 0 to 9 and the : character. You can find the WWN in your HBA card manual, BIOS or directly on the HBA card label. Example of WWN: 1A:FF:AC:4D:00:1F:99:F3 Alias Short text name for a WWN. May only include characters from A to Z, a to z and digits from 0 to 9. HBA Host Bus Adapter. HBA connects a host system to other network and storage devices. In this case HBA refers to devices responsible for connecting Fibre Channel. Function: WWN Alias info Here you can view the WWN and the alias of the FC HBA. Function: Remove WWN HBA alias Here you can remove the selected WWN HBA alias. WWN Worldwide name: This is a unique identifier in a Fibre Channel storage network. Each WWN is a fixed 64-bit name assigned by the manufacturer and registered with the IEEE to ensure it is globally unique. It can only include characters from A to F, a to f, digits from 0 to 9 and the : character. You can find 136 www.open-e.com Open-E DSS V7 MANUAL it in the manual of your HBA card, Bios or directly on the label of your HBA card. An example of a WWN: 1A:FF:AC:4D:00:1F:99:F3. HBA Host Bus Adapter. HBA connects a host system to other network and storage devices. In this case it's referring to devices for connecting Fibre Channel. Fibre Channel Configuration In order to assign traffic from a FC initiator over your wanted FC port on the target side, please: 1. In menu: CONFIGURATION-> FC target manager -> WWN Aliases, create an alias for every FC Initiator WWN. If the FC Initiator show 2 WWN number starting with 20:xx:xx:xx:xx:xx:xx:xx and 10:xx:xx:xx:xx:xx:xx:xx, please select the one starting with 10. 2. In menu CONFIGURATION-> FC target manager -> Groups, please create a group. For every group you can assign LUNs clicking on the “+” button and you can assign the alias of the initiator which will be allowed to access selected LUNs in this group. In order to do it, please move the alias from the left panel to the right and click on apply button. 3. Please create a group for every FC target port present in the system. If you want to reassign the FC access from one group to the other one, please click on the “-” button of the selected LUN and move the alias from the right panel to the left and click on the apply button. Then accordingly to the selected group, please click on the “+” button and move the alias from the left side to the right and click on the apply button. 5.2.3 MAINTENANCE This page accessed with the Maintenance tab contains settings and functions pertaining to general management operations. 5.2.3.1 Shutdown Function: System restart This function allows you to restart your system. Function: Create schedule for restart Here you can create new schedule tasks for system restart. Comment You can enter a comment for the system restart. Time select Selects what time you want the restart task to be started. 137 www.open-e.com Open-E DSS V7 MANUAL Function: Schedules for restart Here you can see all schedules created for a restarted task. Function „System shutdown“ Using this function, you can shut down the server. Function: Create schedule for shutdown Here you can create a new schedule task for a system shutdown. Comment You can enter a comment for the system shutdown. Time select Select a time when the shutdown task will be started. Function: Schedules for shutdown Here you can see all schedules created for a shutdown task. 138 www.open-e.com Open-E DSS V7 5.2.3.2 MANUAL Connections Function: NAS connections reset This function resets existing connections to force the connecting users to follow the changes you have made to share access rights. The function is dedicated to SMB and FTP connections. You can check or uncheck the corresponding boxes. CAUTION This function disconnects all users connected to the shares on a specified protocol, which may lead to data loss, if any files are open. Function: iSCSI session manager This function displays current connections to iSCSI targets. You can find the following information here: target name, IP address, CID (connection ID) and SID (session ID). NOTE You can cancel connections to iSCSI targets, but the initiator may automatically reestablish a connection if this is enabled on the initiator side. In order to block an initiator from reconnecting to the target, you need to block the corresponding IP address in SETUP -> iSCSI target manager > Targets -> target[nr] -> Function: Target IP access. 139 www.open-e.com Open-E DSS V7 MANUAL Function: iSCSI Connection reset It may be necessary to restart the iSCSI daemon to send information on specific setting changes, e.g. volume resize, to the client. CAUTION All current connections with iSCSI initiators will be terminated immediately. This may cause unsaved data loss. NOTE 5.2.3.3 If your client does not reestablish the connection automatically you may have to do it manually from the client side. Snapshot In this side you can view a list of all snapshot tasks and volume groups to which snapshots are assigned. Click twice on a volume group, then on the snapshot to manage it. Function: Snapshot tasks With this function you can manually activate (start) or deactivate (stop) snapshots. In order to define a time schedule to activate the snapshot, click on the snapshot alias in the left-side pane. To view snapshot details, click on the down arrow button: LV Logical volume the snapshot is assigned to. Size Space reserved for the snapshot (point-in-time) data in GB. 140 www.open-e.com Open-E DSS V7 MANUAL Status Snapshot status; contains the following combinations: In use Snapshot is: currently used by an active backup or replication task, created manually or via a time schedule. Unused Snapshot is available for backup or replication tasks as well as for time schedules or manual start. Active Snapshot has been activated by a backup task, a replication task, a time schedule or has been created manually. If the snapshot has been created by a backup or a replication task, the point-in-time data is available for that task. If the snapshot has been created via a time schedule or manually, the point-in-time data can be accessed through: NAS share (if the snapshot has been assigned to an NAS volume), iSCSI target (if the snapshot has been assigned to an iSCSI volume), FC group (if the snapshot has been assigned to an FC volume). Inactive Snapshot becomes inactive when the reserved space usage reaches 100%. Be aware that this will prevent access to the point-in-time data! Please click on the Stop button in order to set the status back to Unused. Usage Shows the usage of reserved space in percentages. The usage percentage is equal to the amount of user data changes on the volume. Once this reaches 100%, the snapshot status switches to In use/Inactive and the point-in-time data cannot be accessed any more. In this situation, click on the Stop button to remove the inactive snapshot. NOTE Please do not manually start or create a time schedule for a snapshot which is already assigned to backups or replication tasks. This will block the backup or replication tasks as they are specifically assigned to activate the snapshot during the process. The snapshot utilizes copy-on-write technology. The more active snapshots you have, the lower write performance of the volume will be. It is recommended to have no more than 2-3 active snapshots per volume. Maximum number of active snapshots per volume is 10 and for the whole 20. Snapshots cannot be activated on an inconsistent volume. Volumes become inconsistent when volume replication is initializing. Once initialization is complete, the inconsistent volume will be consistent again and snapshots can be activated. . 141 www.open-e.com Open-E DSS V7 MANUAL Function: Snapshot info Here you can see information for a selected snapshot. Name Snapshot’s name. LV Logical volume to which the snapshot is assigned to. Status Status snapshot. Can be one of the following: Active 142 www.open-e.com Open-E DSS V7 MANUAL Snapshot is active. Inactive Snapshot is inactive, probable reason: overflow. Unused Snapshot is currently unused. Size Snapshot’s size. Function: Create schedule for snapshot task Here you can create a schedule for the selected snapshot task. Comment You can enter a comment for the snapshot schedule. Time select Click Every even week or Every odd week if you would like the snapshot to only run on even or odd weeks. Please note that Monday is considered as the first day of the week. Function: Schedules for snapshot task Here you can see all schedules created for a snapshot task. 5.2.3.4 Data (file) Replication Here you can view a list of all data (file) replication tasks. Function: Create new data (file) replication task This function allows you to create a new data (file) replication task. Data can be at the same time replicated as a source or destination. Task name Please enter a task name. Source share In order to set a share as the source, select it from the drop-down list and enter the destination IP, i.e. where the share will be replicated. Snapshot Snapshot assigned for data (file) replication. Destination share Select the destination share from the drop-down list and enter the destination agent login and password. Dest. agent login Enter the destination agent login. Dest. agent password Destination agent password. Log replication errors Turn this on to log replication errors. Use ACL Turn it on to have files replicated with Access Control List permissions. Don't delete files If this option is disabled, all destination files not found on the source will be deleted. If you want to keep these files you need to enable this option. 143 www.open-e.com Open-E DSS V7 MANUAL NOTE In order to set a share as a destination share, you should enable the data (file) replication agent in the Configuration -> NAS settings menu, next enable the Replication option for each share. There is no need to enable the data (file) replication agent if replication is set as a source only. It is not possible to perform data (file) replication and backup at the same time. Backup has higher priority than data (file) replication. When scheduled concurrently with backup and using snapshots from the same logical volume, data (file) replication will be stopped. You will see a snapshot error in the data (file) replication status field; snapshots cannot be used twice at the same time if they are set to the same logical volume. In order to perform data (file) replication over the Internet you have to configure the firewall port to 873. Function: Data (file) replication task Here you can run, stop and delete existing data (file) replication tasks. You can view the following details for each task: destination IP, source share, snapshot, destination share, destination agent login, information on whether replication errors are being logged. 144 www.open-e.com Open-E DSS V7 MANUAL Function: Create schedule for data (file) replication task Here you can create a schedule for the selected data (file) replication task. Comment You can enter a comment for the replication schedule. Time select You can start the replication immediately by selecting Now from the Time select drop-down list or schedule it for a later date. Interval Select the interval to which the replication will be executed to. 145 www.open-e.com Open-E DSS V7 MANUAL Function: Schedule for data (file) replication task Here you can manage all schedules created for selected data (file) replication task. Function: Remove schedule for data (file) replication task Here you can remove the data (file) replication task 5.2.3.5 Antivirus Function: Create new antivirus task Here you can create a new antivirus scan task. Enter a task name, Select shares to scan, Click "apply" to create the task. NOTE Antivirus does not scan password protected archives. Function: Antivirus tasks Here you can run, stop or delete the desired antivirus task. All previously created tasks will be visible here. Function: Update virus definitions With this function you can update virus definitions. Select the mirror from which the definitions will be downloaded. Select when update should be made. If you select Now, the update will be made instantly. Otherwise the update will be made now and then cyclically according to the interval value. 146 www.open-e.com Open-E DSS V7 MANUAL Function: Update local virus definitions With this function you can upload a virus database. In order to do this: Click on the Browse button and select a database file, downloaded from http://clamav.net/, Click the Upload button Two types of database file are supported: "daily" and "main". Database files should have a "cvd" extension. 147 www.open-e.com Open-E DSS V7 MANUAL Function: Create new schedule for antivirus task Here you can create a new schedule for the selected antivirus task. Comment You can enter a comment for the antivirus schedule. Time select You can start an antivirus task immediately by selecting Now from the Time select drop-down list or schedule it for a later date. Interval Scan will be performed cyclically, according to the interval value, e.g. if you select an interval of 1h, the share will be scanned every hour. Function: Schedules for antivirus task Here you can manage all schedules created for the selected antivirus task. 5.2.3.6 Miscellaneous Function: Save settings With this function you can store configuration settings. Select the settings you want to store and then click Apply. Settings can be saved locally on the server (they will be visible in the Restore settings function) and/or as a downloadable file. Each time you save the settings locally, a new entry will be created and you will be able to select which settings to restore during the restoration process. You can restore settings using the Restore settings function. NOTE Settings will be saved automatically every time the server is restarted or shut down. They are stored in files following the naming convention auto_save_X / auto_save_last. 148 www.open-e.com Open-E DSS V7 MANUAL Function: Restore settings With this function, you can restore configuration settings, (provided they have been previously saved). You can restore settings from files saved locally, or upload a configuration settings file, (provided one has been previously downloaded). For each entry, you can view the configuration file name, the creation date, and applicable actions. By clicking the appropriate checkboxes you can select which settings to restore. To restore settings, click on the Restore action button. You can delete a configuration settings file by clicking the Delete action button. You can download a configuration settings file by clicking its name. In order to upload a configuration settings file, (provided one has been previously saved), browse for its filename and click the Upload button. You can save settings using the Save settings function. NOTE 5.2.3.7 Settings will be saved automatically every time the server is restarted or shut down. They are stored in files following the naming convention auto_save_X / auto_save_last. You will be able to view and access these files in the Restore settings box. Software update This function allows you to update the system software. There are two ways to update the Open-E DSS V7 software. Function: Update downloader With this function you can check if there is a new update available and download it. Please remember to set up correct DNS and gateway addresses in the SETUP -> Network menu beforehand. Function: System software update This function allows you to update the system software. Two types of updates are available: 149 www.open-e.com Open-E DSS V7 MANUAL full product version update small update The function allows you to: have several product versions delete updates (full and small) (the X button) default setting of product version activated (button V) having a constant insight into release notes (full and small updates) when unrolling a scrollbar with a particular product version Description of a product version: first three digits are related to the product version number next two digits are related to "up" with a number product release date name of a directory with a product size of a directory with a product version While performing each update file upload, release notes are introduced and update accepting or rejecting is possible. After accepting, please click the reboot button so changes could take effect. The option for the default product version ("Boot" unit) means that the version marked with it will be booted automatically, without the need of choosing a version in the menu while the system is starting. NOTE Small updates are only performed for currently activated product versions 5.2.4 STATUS This function provides a quick overview of the most important system parameters of your Open-E Data Storage Software V7. The corresponding sub-functions are network, logical volume, connections, hardware, tasks and S.M.A.R.T. 5.2.4.1 Network Function: Interfaces Here you can view the network interfaces info. In a table you can see the network interface name and IP address, DHCP information, cable status. Function: DNS info Here you can view the network interfaces DNS information. 150 www.open-e.com Open-E DSS V7 MANUAL Function: HTTP proxy info With this function you can view HTTP proxy information. You can see if proxy is enabled and which HTTP proxy IP address is assigned to it. Function: Interfaces info This function displays the following information on the selected network interface: MAC address, state, DHCP status, IP address, mask, broadcast address, gateway address. 151 www.open-e.com Open-E DSS V7 5.2.4.2 MANUAL Logical volume Function: Logical volume statistics This function contains statistical data on the logical volume. Name Name of the logical volume Size Size of the logical volume Used Amount of space currently being used by data on the logical volume Free Space available on the logical volume Usage Amount of space (in percent) currently being used by data on the logical volume Function: Logical volume statistic This function contains statistical data on the dynamic volume. Name Name of the logical volume Size Size of the logical volume Used Amount of space currently being used by data on the logical volume Free Space available on the logical volume Usage Amount of space currently being used by data on the logical volume, in percent Function: Logical volume statistics Here you can see information on selected volume share. This function provides the following information: Name Name of the logical volume. Type Type of logical volume, can be NAS or iSCSI. Size Size of the share volume. Used Current date usage of space on share volume. 152 www.open-e.com Open-E DSS V7 MANUAL Free Available space on share volume. Snapshots Number of all snapshots assigned to the logical volume / number of all snapshots in use. 5.2.4.3 Connections This function displays what user connections are currently active. Function: Active SMB users connections With this function you can view which users and IP addresses are currently connected to specific SMB shares. After clicking on a specific username in the left box, you will see a list of shares to which that user is connected to in the right box. Under the boxes you will see the username, computer name and IP address for this user. Function: Active FTP users connections With this function you can view which users and IP addresses are currently connected to specific FTP shares Function: Active NFS users connections With this function you can view which users and IP addresses are currently connected to specific NFS shares. Function: Active Appletalk users connections With this function you can view which users and IP addresses are currently connected to specific Appletalk shares. Function: iSCSI status Here you can check who is currently using iSCSI targets. Here you can get: target name, end-user IP address, CID (connection ID) and SID (session ID). 153 www.open-e.com Open-E DSS V7 MANUAL 154 www.open-e.com Open-E DSS V7 5.2.4.4 MANUAL System Function: Services Here you can view service statistics. Service Service name. State Indicates the state of the service, can be either On or Off. Status Indicates if the service is currently running (Active) or not running (Inactive). After clicking the Details button next to the service name, the following information on the selected service will be displayed: Name Name of the process which belongs to the service. Description Information about the process. Count Count of processes. Function: Added license keys With this function you can view all added license keys. Key License key. Type License key type (either storage limit or MRCP). Amount Detailed amount for the license key type. 155 www.open-e.com Open-E DSS V7 5.2.4.5 MANUAL Hardware settings The “Hardware settings” option provides you with information on UPS, network controllers and the drivers (e.g. network driver and RAID driver). In addition, you may also download the latest Open-E Data Storage Software V7 log files and view specified or all log files without downloading them in a compressed form. Also, you can check the usage of memory (RAM) and (SWAP) and hardware monitoring. Function: UPS status The UPS status presents the current status of the ups device. Function: Controllers info This table lists the components installed in your server. Function: Drivers info This table shows active drivers loaded for the hardware that were detected during the boot-up process. 156 www.open-e.com Open-E DSS V7 MANUAL Function: Logs This function allows you to download or remove the logs gathered during server operation. In the logs, you can find all system information relevant to troubleshooting. Click on the 'Download' button and when the Download Logs window appears, you can open the file or save it to your hard disk. NOTE Recovery information for the Logical Volume Manager is also stored in the logs. It is recommended to download the logs after creating logical volumes in case of a critical hardware 157 www.open-e.com Open-E DSS V7 MANUAL failure and to store them in a safe place as a source for the logical volume and volume group recovery. NOTE During log generation, a simple speed test of the disks is performed. When a software RAID is used with a lot of single disks, this may take up to several minutes. Function: Logs viewer This function allows you to view one specific log file without downloading all the log files in compressed form. To view a log file, just click on the name of the file. Depending on which Web browser you use, you may be asked to select an appropriate application to view the file. To view the contents of a folder, just click on its name. Function: Memory (RAM) info This function presents the current memory usage. NOTE Memory allocated by the system cache will be released when an application requires additional memory. If there is almost no free memory, you can install more memory modules. Function: Date & Time This function displays the current date and time on your server. 158 www.open-e.com Open-E DSS V7 MANUAL Function: Hardware monitoring This function monitors hardware. To enable it, you need to access the Hardware Configuration tool in the console followed by Hardware options (press F1 in the console to list keyboard shortcuts). When using the LmSensors hardware mode, information can be found on the following parameters: motherboard temperature, CPU temperature, chipset temperature, Vcore, fan rotation speed. After initializing, a chipset selection window appears, followed by a sensor selection. The sensor selection screen comprises of three columns. The first column displays the sensor name as indicated by lmsensors; the second displays the sensor name as indicated by the user; the third displays the ideal value for the given sensor. After a sensor has been selected you will be presented with its configuration window. The state of the sensor is indicated at the top. Configurable values are divided between two columns. Label - the user-modifiable sensor name. Ideal value. Minimal value - if the current value is smaller than the minimal value it will be marked in red on the server GUI. Maximum value - if the current value is larger than the maximum value it will be marked in red on the server GUI. Multiplex - the actual current value will be multiplied by the multiplex value, the result is shown as the current value. Addition - the addition value will be added to the actual current value, the result is shown as the current value. Ignore - when this option is enabled, the sensor in question will not be displayed in the server GUI. When using the mbmon (motherboard monitor) hardware mode you can find information on the following parameters: motherboard temperature, 159 www.open-e.com Open-E DSS V7 MANUAL CPU temperature, chipset temperature, Vcore. Supported chipset family winbond LM78/LM79, W83781D, W83782D, W83783S, W83627HF, W83697HF, AS99127F, ASB100 wl784 W83L784R, W83L785R, W83L785TS-S via686 VT82C686A/B it87 IT8705F, IT8712F gl52 GL518SM, GL520SM lm85 LM85, ADM1024, ADM1025, ADM1027, ADT7463, EMC6D10X lm80 LM80 lm90 LM90, ADM1020, ADM1021, ADM1023 lm75 LM75 When using the xyratex hardware mode you can find information on the following parameters: disks status, fan speed, fan PWM, power status, fan status, temperature. When using the IPMI (sensors) mode, the information displayed depends on your motherboard. To enable this mode you need to have a motherboard with a sensor management component which supports access via IPMI. When using the Intel SSR212 2U mode you can find information on the following parameters: power status, memory voltage, voltage levels, box Temperature, CPU Temperature, fan speed. disk status. When using the Intel SR2500ALLX mode you can find information on the following parameters: power status, memory voltage, voltage levels, box temperature, CPU temperature, fan speed, disk status. When using the AOC-SAT2-MV8 mode you can find information on the following parameters: Unit - displays the unit name, Bay - number of the bay into which the unit is inserted, Serial Number - unit serial number. 160 www.open-e.com Open-E DSS V7 MANUAL When using the Intel SSR212MC2 mode you can find information on the following parameters: Disc status - displays disk status, BBU status - displays backup battery unit status, BBU Capacity Info - displays backup battery unit capacity stats, BBU Properties - displays backup battery unit properties, BBU Design Info - displays backup battery unit design parameters, IPMI Sensors - IPMI Sensors stats. Function: Intel I/O AT Here you can view the status of Intel I/O AT. The primary benefit of Intel I/O AT is its ability to significantly reduce CPU overhead by freeing resources for more critical tasks. Intel I/O AT uses the server’s processors more efficiently by leveraging architectural improvements within the CPU, chipset, network controller, and firmware to minimize performance-limiting bottlenecks. Intel I/O AT accelerates TCP/IP processing, delivers data-movement efficiencies across the entire server platform and minimizes system overhead. Intel I/O AT provides network acceleration that scales seamlessly across multiple Gigabit Ethernet (GbE) ports. DMA status In this section you can view which of the four DMA channels are used. Bytes transferred Shows a count of bytes transferred through each DMA channel. 5.2.4.6 Tasks Here you can view statistical information on tasks from backup, data (file0 replication, volume replication, antivirus and snapshots. Function: Running tasks This function displays information about all currently running tasks. You can view the follow tasks: volume replication, snapshots. Every running task is characterized by the following fields: name, type, start time, details. In order to view the details of a running task, click on the Show details button. More information can be found by clicking on the relevant task type in the Tasks tree and by clicking ? (Help) within the Running tasks function. 161 www.open-e.com Open-E DSS V7 MANUAL Function: Tasks log Every task log is supplemented with the following fields: Time Task start time. Name Task name. Type Task type; can be one of following: backup, data (file) replication, volume replication, antivirus, snapshots. Status If an action has been successful, its status will be OK, otherwise its will be FAILED. Action Displays the following states: Started, Stopped, Finished. Details Task log details. In order to view task log details, click on the Show details button. More information on task logs can be found by selecting the relevant task type in the Tasks tree and by clicking ? (Help) within the Tasks log function. 5.2.4.7 S.M.A.R.T. 162 www.open-e.com Open-E DSS V7 MANUAL Through the S.M.A.R.T. (Self-Monitoring, Analysis, and Reporting Technology) system, modern hard disk drives incorporate a suite of advanced diagnostics that monitor internal operations of a drive and provide an early warning for many types of potential problems. When a potential problem is detected, the drive can be repaired or replaced before any data is lost or damaged. Here you can find a tree with hard drives for which you can view the S.M.A.R.T. information. It is possible to view information about a separate hard drive or a summary for all drives in the system. To view S.M.A.R.T. information for a hard drive, please click on appropriate drive name. To view the summary, please click on "all units" Function: S.M.A.R.T. units health status This function allows you to check the S.M.A.R.T. status of hard disks. S.M.A.R.T. (SelfMonitoring, Analysis, and Reporting Technology) is a monitoring system for computer hard disks. It detects and reports on various indicators of reliability, in the hope of anticipating failures. To enable S.M.A.R.T. checks, do the following steps: Go to the Console Ctl-Alt-W Select Functionality Options Use the spacebar to select 'use S.M.A.R.T. and then hit 'Apply'. 163 www.open-e.com Open-E DSS V7 MANUAL Function: S.M.A.R.T. info This function allows you to view S.M.A.R.T. parameters which the particular disk is capable of reporting. The first part of the S.M.A.R.T. info window provides elementary hard drive parameters, such as the device model or serial number. Below, you can find a table with S.M.A.R.T. attributes. The first column displays the attribute name, the second - the minimum threshold value of this parameter, the third - the current value, the fourth - the worst value and the last displays the status. NOTE If an attribute value ever exceeds the worst value, the status will switch to Failed. If an attribute value is nears the worst value, the status will switch to Pre-failed. With certain hard drives, some of the attributes may be displayed as Unknown_Attribute - this indicates that the hard drive producer has introduced S.M.A.R.T. modifications which are not yet supported by our software. NOTE The View errors button allows you to view an automatically generated S.M.A.R.T. error log for the specific drive The button "view errors" provides you with the ability to view the S.M.A.R.T. log of that drive and is generated automatically. 164 www.open-e.com Open-E DSS V7 MANUAL Function: S.M.A.R.T. test This function allows you to perform short and long tests of hard drives. You will be informed about the progress of the test. After the test has finished, please click on the Results button to view the test log. Performing a test is not recommended during normal (daily) hard drive usage. NOTE 5.2.4.8 S.M.A.R.T. tests may not work on some motherboards and controllers. Statistic Here is a list of categories available for server statistics. Clicking on any of them will display graphs for the selected category. Function: Date & time This function displays the current date and time on your server. Function: SNMP Sensors Statistics This window contains server statistics. The following statistics are available: 165 www.open-e.com Open-E DSS V7 MANUAL system load filesystems misc network memory Load File systems 166 www.open-e.com Open-E DSS V7 MANUAL Miscellaneous Network 167 www.open-e.com Open-E DSS V7 MANUAL Memory 5.2.5 HELP 5.2.5.1 Data Storage Software V7 help Here you can search through all available help topics in the product. 168 www.open-e.com Open-E DSS V7 5.2.5.2 MANUAL About Data Storage Software V7 Function: Extensions keys loader You can enter a license key to expand the functionality of your server. For example, you can add a license key for greater storage capacity. Function: Register Here you can find a link to our registration form. Note that registration is required to receive updates and new versions and gives you an opportunity to receive e-mail notifications on software news. 169 www.open-e.com Open-E DSS V7 MANUAL Function: Manual You can download the manual in a PDF format here and print it for quick reference. NOTE In order to read the manual, you need a PDF viewer such as Acrobat Reader (http://www.adobe.com). Function: Technical Support Please have the following information available before contacting the technical support team: logs, which you can download via Status -> Hardware -> Logs your software version, which you can find in Help -> About Function: Product activation This function allows you to activate your product. Please note that if you have restricted Internet access set up for this server on your firewall or router, you will need to allow TCP connections to activation-key.com. Please open the outgoing port 25 or 10444 for this domain to continue with the activation process. After activation, the product becomes linked to your hardware (the system drive and the mainboard). Should you remove or exchange the mainboard or the system drive on the server, you will need to activate the product again. 5.2.5.3 Software License When accessing Help - “software License”, you can read the license for software included in the Open-E Data Storage Software V7. 170 www.open-e.com Open-E DSS V7 MANUAL You log out by closing the browser window or by clicking button. 171 www.open-e.com Open-E DSS V7 MANUAL 6 Troubleshooting Guide Here is a list of common error messages with their significances and corresponding tips on how to resolve the underlying problems. If your error message is not listed here, please contact the Open-E support and service team (see the “help” section above). Our staff will help you to find a solution. Error: user already exists There cannot be more than one user with the same name and you cannot create a user twice. Remember, usernames are not case-sensitive. Check your spelling. You can check existing usernames by collapsing the tree diagram on the left. Error: values are not valid You have entered an invalid parameter. IP addresses have the following format: aaa.bbb.ccc.ddd. All four parameters range between 0 and 255 and are always separated by periods. Error: resource already exists You cannot create more than one resource with the same name. You cannot create a resource twice. Check your spelling. Remember that resource names are not case-sensitive. You can check existing resource names by collapsing the tree diagram on the left. Error: passwords do not match Make sure that you type the same password in each entry field. For safety reasons, the passwords are not displayed. Type slowly. Check that the Shift, Caps Lock, Control, and Alt keys are not pressed. Error: Open-E Data Storage Software V7 cannot import the user database from a Windows Server 2003 domain. In this case, the following setting within the local security guideline may solve this problem: 172 www.open-e.com Open-E DSS V7 MANUAL Error: Update file not found You instructed Open-E DSS to perform a systems update, but did not supply a valid Open-E DSS update file. Download the latest Open-E DSS update file from the www.open-e.com Web site. Next, copy the upgrade file into your "update" folder (please spell upgrade in lower case). Finally, select "update" from the menu. Error: No share volume You must create a volume for file sharing before you can create any resource shares or search for shares. Consult this manual's “Getting Started” section for instructions on creating a share volume. Error: No share volume to browse You must create a volume for file sharing before you can create any resource shares or search for shares. Consult this manual's “Getting Started” section for instructions on creating a share volume Error: Invalid user name Usernames cannot: (1) Contain characters such as ~ ! @ # $ ^ & ( ) + [ ] { } * ; : ' " . , % | < > ? / \ = ` (2) Begin or end with a space The use of Windows SMB (Server Message Block) protocol, also known as CIFS or Samba, places some restrictions on the use of special characters. These restrictions have historical reasons but are still binding today. Usernames can not contain any of the above mentioned characters. Error: invalid user password A user password cannot begin or end with a space. Spaces are not legitimate characters at the beginning and end of a password. Maybe you inadvertently hit the space bar during password entry. Please reenter your password. Error: invalid administrator password Administrator password cannot begin or end with a space. Spaces are not legitimate characters at the beginning and end of a password. Maybe you inadvertently hit the space bar during password entry. Reenter your password. Error: invalid resource name Resource name cannot: (1) Contain characters such as * : " | < > ? / \ ` # $ & ( ) + ; ' . (2) Begin or end with a space. The use of Windows SMB (Server Message Block) protocol, also known as CIFS or Samba, places some restrictions on the use of special characters. These restrictions have historical reasons but are still binding today. Resource names cannot contain any of the above mentioned characters. Note that the list of invalid characters is slightly different than the ones for other name fields. Error: invalid workgroup name (1) Contain characters such as ~ ! @ # $ ^ & ( ) + [ ] { } * ; : ' " . , % | < > ? / \ = ` (2) Begin or end with a space The use of the Windows SMB (Server Message Block) protocol, also known as CIFS or Samba, places some restrictions on the use of special characters. These restrictions have historical reasons but are still binding today. Workgroup names cannot contain any of the characters listed above. Note that the list of invalid characters is slightly different than the ones for other name fields. NOTE Invalid characters for workgroup names are different than the ones for other fields. 173 www.open-e.com Open-E DSS V7 MANUAL . Error: invalid server name Server name cannot contain: (1) Characters: ~ ! @ # $ ^ & ( ) + [ ] { } * ; : ' " . , % | < > ? / \ = ` (2) Spaces (3) Digits only The use of the Windows SMB (Server Message Block) protocol, also known as CIFS or Samba, places some restrictions on the use of special characters. These restrictions have historical reasons but are still binding today. Server names cannot contain any of the above mentioned characters. Note that the list of invalid characters is slightly different than the ones for other name fields. In addition, server names cannot be constructed from numbers only, they must contain alpha characters. Error: invalid resource comment Resource comment cannot be longer than 256 characters, Resource comments have a limit of 256 characters which cannot be exceeded, Use a shorter comment. Error: invalid directory name Directory name cannot: (1) Contain characters such as: * : " | < > ? / \ ` # $ & ( ) + ; ' . (2) Begin or end with a space The Open-E DSS V7 internal operating system does not allow certain characters to be used for directories. The above mentioned characters are invalid, just as trailing or leading spaces. Choose a different name. 174 www.open-e.com Open-E DSS V7 MANUAL 7 Software Licenses 7.1 Open-E Software License agreement IMPORTANT: PLEASE READ THE TERMS AND CONDITIONS OF THIS LICENSE AGREEMENT CAREFULLY BEFORE USING THE SOFTWARE. OPEN-E GMBH AND/OR ITS SUBSIDIARIES ("OPEN-E") IS WILLING TO LICENSE THE SOFTWARE TO YOU AS THE INDIVIDUAL, THE COMPANY, OR THE LEGAL ENTITY THAT WILL BE UTILIZING THE SOFTWARE (REFERENCED BELOW AS "YOU OR YOUR") ONLY ON THE CONDITION THAT YOU ACCEPT ALL OF THE TERMS OF THIS LICENSE AGREEMENT. THIS IS A LEGAL AND ENFORCEABLE CONTRACT BETWEEN YOU AND Open-E. BY OPENING THIS PACKAGE, BREAKING THE SEAL, CLICKING ON THE "AGREE" OR "YES" BUTTON OR OTHERWISE INDICATING ASSENT ELECTRONICALLY, OR LOADING THE SOFTWARE, YOU AGREE TO THE TERMS AND CONDITIONS OF THIS AGREEMENT. IF YOU DO NOT AGREE TO THESE TERMS AND CONDITIONS, CLICK ON THE "I DO NOT AGREE", "NO" BUTTON, OR OTHERWISE INDICATE REFUSAL, MAKE NO FURTHER USE OF THE SOFTWARE, AND RETURN THE FULL PRODUCT WITH PROOF OF PURCHASE TO THE DEALER FROM WHOM IT WAS ACQUIRED WITHIN NINETY (90) DAYS OF PURCHASE, AND YOUR MONEY WILL BE REFUNDED. THE TERMS OF THIS SOFTWARE LICENSE AGREEMENT, DO NOT APPLY TO THE FREE SOFTWARE PROGRAMS DISTRIBUTED WITH Open-E SOFTWARE. INSTEAD, THOSE PROGRAMS ARE COVERED BY OTHER LICENSES, INCLUDING THE GNU GENERAL PUBLIC LICENSE. A COPY OF THE GPL ALONG WITH THE OTHER APPLICABLE FREE SOFTWARE LICENSES, CAN BE FOUND IN POINT 6.2. Ownership and Copyright The Open-E software is non-exclusive licensed and sold to you for use only as permitted by this License Agreement. Open-E reserves any rights not expressly granted to you. Copying of the software is prohibited by law unless specifically authorized in writing by Open-E . You may not use copy, modify, sell, lease, sublease or otherwise transfer Open-E software in whole or in part. Intellectual Property Rights The Open-E software contains intellectual property rights, and in order to protect them, you may not decompile, reverse engineer, disassemble or otherwise reduce the Open-E software to a human perceivable form. Termination This license will be automatically terminated without notice from Open-E if you fail to comply with any term or condition of this agreement. If you do not agree to be bound by these terms and conditions, you may not use the Open-E or any of its software components. Disclaimer of Warranties Open-E software are licensed "as is" without warrantee of any kind. Open-E hereby disclaims all warranties express and implied, relating to Open-E software, the installation utilities and the embedded software including, without limitation, any implied warrantee of merchantability, fitness for a particular purpose or non-infringement. Limitation of Liability In no event will Open-E liability under this agreement exceed the price that you paid for your Open-E software. Furthermore, in no event will Open-E be liable for any lost profits, lost data, 175 www.open-e.com Open-E DSS V7 MANUAL cost of procurement of substitute goods or services, or any special consequential, incidental, indirect or punitive damages arising out of or under this agreement. The limitation of liability set forth in this paragraph will apply, whether or not Open-E was advised of the possibility of the loss, liability or damages and notwithstanding any failure of essential purpose of any limited remedy. Waiver No delay or failure of Open-E to exercise any right under neither this agreement nor any partial exercise thereof shall be deemed to constitute a waiver or any rights granted hereunder or under law. Unlawful Provisions If any provision of the agreement is held to be unenforceable for any reason, all other provisions of this agreement shall nevertheless be deemed valid and enforceable to the fullest extent possible. Entire Agreement This agreement constitutes the sole and exclusive agreement between the parties concerning the subject matter hereof. LIMITED WARRANTY Open-E warrants that the media on which the software is distributed will be free from defects for a period of ninety (90) days from the date of delivery of the software to you. Your sole remedy in the event of a breach of this warranty is that Open-E will, at its option, replace any defective media returned to Open-E within the warranty period, or refund the money you paid for the software. Open-E does not warrant that the software will meet your requirements, that operation of the software will be uninterrupted, or that the software will be error-free. Authorized Service Only an authorized service representative can service Open-E software. Failure to comply with this requirement will void the warranty. Applicable Law This agreement shall be governed by German law. You agree to jurisdiction and venue in the courts located in Munich, Germany for all claims, disputes and litigation arising under or related to this agreement . 176 www.open-e.com Open-E DSS V7 MANUAL 7.2 Other applicable licenses GNU GENERAL PUBLIC LICENSE Version 2, June 1991 Copyright (C) 1989, 1991 Free Software Foundation, Inc. 59 Temple Place - Suite 330, Boston, MA 02111-1307, USA Everyone is permitted to copy and distribute verbatim copies of this license document, but changing it is not allowed. Preamble The licenses for most software are designed to take away your freedom to share and change it. By contrast, the GNU General Public License is intended to guarantee your freedom to share and change free software--to make sure the software is free for all its users. This General Public License applies to most of the Free Software Foundation's software and to any other program whose authors commit to using it. (Some other Free Software Foundation software is covered by the GNU Library General Public License instead.) You can apply it to your programs, too. When we speak of free software, we are referring to freedom, not price. Our General Public Licenses are designed to make sure that you have the freedom to distribute copies of free software (and charge for this service if you wish), that you receive source code or can get it if you want it, that you can change the software or use pieces of it in new free programs; and that you know you can do these things. To protect your rights, we need to make restrictions that forbid anyone to deny you these rights or to ask you to surrender the rights. These restrictions translate to certain responsibilities for you if you distribute copies of the software, or if you modify it. For example, if you distribute copies of such a program, whether gratis or for a fee, you must give the recipients all the rights that you have. You must make sure that they, too, receive or can get the source code. And you must show them these terms so they know their rights. We protect your rights with two steps: (1) copyright the software, and (2) offer you this license which gives you legal permission to copy, distribute and/or modify the software. Also, for each author's protection and ours, we want to make certain that everyone understands that there is no warranty for this free software. If the software is modified by someone else and passed on, we want its recipients to know that what they have is not the original, so that any problems introduced by others will not reflect on the original authors' reputations. Finally, any free program is threatened constantly by software patents. We wish to avoid the danger that redistributors of a free program will individually obtain patent licenses, in effect making the program proprietary. To prevent this, we have made it clear that any patent must be licensed for everyone's free use or not licensed at all. The precise terms and conditions for copying, distribution and modification follow. TERMS AND CONDITIONS FOR COPYING, DISTRIBUTION AND MODIFICATION 0. This License applies to any program or other work which contains a notice placed by the copyright holder saying it may be distributed under the terms of this General Public 177 www.open-e.com Open-E DSS V7 MANUAL License. The "Program", below, refers to any such program or work, and a "work based on the Program" means either the Program or any derivative work under copyright law: that is to say, a work containing the Program or a portion of it, either verbatim or with modifications and/or translated into another language. (Hereinafter, translation is included without limitation in the term "modification".) Each licensee is addressed as "you". Activities other than copying, distribution and modification are not covered by this License; they are outside its scope. The act of running the Program is not restricted, and the output from the Program is covered only if its contents constitute a work based on the Program (independent of having been made by running the Program). Whether that is true depends on what the Program does. 1. You may copy and distribute verbatim copies of the Program's source code as you receive it, in any medium, provided that you conspicuously and appropriately publish on each copy an appropriate copyright notice and disclaimer of warranty; keep intact all the notices that refer to this License and to the absence of any warranty; and give any other recipients of the Program a copy of this License along with the Program. You may charge a fee for the physical act of transferring a copy, and you may at your option offer warranty protection in exchange for a fee. 2. You may modify your copy or copies of the Program or any portion of it, thus forming a work based on the Program, and copy and distribute such modifications or work under the terms of Section 1 above, provided that you also meet all of these conditions: a) You must cause the modified files to carry prominent notices stating that you changed the files and the date of any change. b) You must cause any work that you distribute or publish, that in whole or in part contains or is derived from the Program or any part thereof, to be licensed as a whole at no charge to all third parties under the terms of this License. c) If the modified program normally reads commands interactively when run, you must cause it, when started running for such interactive use in the most ordinary way, to print or display an announcement including an appropriate copyright notice and a notice that there is no warranty (or else, saying that you provide a warranty) and that users may redistribute the program under these conditions, and telling the user how to view a copy of this License. (Exception: if the Program itself is interactive but does not normally print such an announcement, your work based on the Program is not required to print an announcement.) These requirements apply to the modified work as a whole. If identifiable sections of that work are not derived from the Program, and can be reasonably considered independent and separate works in themselves, then this License, and its terms, do not apply to those sections when you distribute them as separate works. But when you distribute the same sections as part of a whole which is a work based on the Program, the distribution of the whole must be on the terms of this License, whose permissions for other licensees extend to the entire whole, and thus to each and every part regardless of who wrote it. Thus, it is not the intent of this section to claim rights or contest your rights to work written entirely by you; rather, the intent is to exercise the right to control the distribution of derivative or collective works based on the Program. In addition, mere aggregation of another work not based on the Program with the Program (or with a work based on the Program) on a volume of a storage or distribution medium does not bring the other work under the scope of this License. 178 www.open-e.com Open-E DSS V7 MANUAL 3. You may copy and distribute the Program (or a work based on it, under Section 2) in object code or executable form under the terms of Sections 1 and 2 above provided that you also do one of the following: a) Accompany it with the complete corresponding machine-readable source code, which must be distributed under the terms of Sections 1 and 2 above on a medium customarily used for software interchange; or, b) Accompany it with a written offer, valid for at least three years, to give any third party, for a charge no more than your cost of physically performing source distribution, a complete machine-readable copy of the corresponding source code, to be distributed under the terms of Sections 1 and 2 above on a medium customarily used for software interchange; or, c) Accompany it with the information you received as to the offer to distribute corresponding source code. (This alternative is allowed only for noncommercial distribution and only if you received the program in object code or executable form with such an offer, in accord with Subsection b above.) The source code for a work means the preferred form of the work for making modifications to it. For an executable work, complete source code means all the source code for all modules it contains, plus any associated interface definition files, plus the scripts used to control compilation and installation of the executable. However, as a special exception, the source code distributed need not include anything that is normally distributed (in either source or binary form) with the major components (compiler, kernel, and so on) of the operating system on which the executable runs, unless that component itself accompanies the executable. If distribution of executable or object code is made by offering access to copy from a designated place, then offering equivalent access to copy the source code from the same place counts as distribution of the source code, even though third parties are not compelled to copy the source along with the object code. 4. You may not copy, modify, sublicense, or distribute the Program except as expressly provided under this License. Any attempt otherwise to copy, modify, sublicense or distribute the Program is void, and will automatically terminate your rights under this License. However, parties who have received copies, or rights, from you under this License will not have their licenses terminated so long as such parties remain in full compliance. 5. You are not required to accept this License, since you have not signed it. However, nothing else grants you permission to modify or distribute the Program or its derivative works. These actions are prohibited by law if you do not accept this License. Therefore, by modifying or distributing the Program (or any work based on the Program), you indicate your acceptance of this License to do so, and all its terms and conditions for copying, distributing or modifying the Program or works based on it. 6. Each time you redistribute the Program (or any work based on the Program), the recipient automatically receives a license from the original licensor to copy, distribute or modify the Program subject to these terms and conditions. You may not impose any further restrictions on the recipients' exercise of the rights granted herein. You are not responsible for enforcing compliance by third parties to this License. 7. If, as a consequence of a court judgment or allegation of patent infringement or for any other reason (not limited to patent issues), conditions are imposed on you (whether by court order, agreement or otherwise) that contradict the conditions of this License, they do not excuse you from the conditions of this License. If you cannot distribute so as to satisfy simultaneously your obligations under this License and any other pertinent obligations, then as a consequence you may not distribute the Program at all. For example, if a patent 179 www.open-e.com Open-E DSS V7 MANUAL license would not permit royalty-free redistribution of the Program by all those who receive copies directly or indirectly through you, then the only way you could satisfy both it and this License would be to refrain entirely from distribution of the Program. If any portion of this section is held invalid or unenforceable under any particular circumstance, the balance of the section is intended to apply and the section as a whole is intended to apply in other circumstances. It is not the purpose of this section to induce you to infringe any patents or other property right claims or to contest validity of any such claims; this section has the sole purpose of protecting the integrity of the free software distribution system, which is implemented by public license practices. Many people have made generous contributions to the wide range of software distributed through that system in reliance on consistent application of that system; it is up to the author/donor to decide if he or she is willing to distribute software through any other system and a licensee cannot impose that choice. This section is intended to make thoroughly clear what is believed to be a consequence of the rest of this License. 8. If the distribution and/or use of the Program is restricted in certain countries either by patents or by copyrighted interfaces, the original copyright holder who places the Program under this License may add an explicit geographical distribution limitation excluding those countries, so that distribution is permitted only in or among countries not thus excluded. In such case, this License incorporates the limitation as if written in the body of this License. 9. The Free Software Foundation may publish revised and/or new versions of the General Public License from time to time. Such new versions will be similar in spirit to the present version, but may differ in detail to address new problems or concerns. Each version is given a distinguishing version number. If the Program specifies a version number of this License which applies to it and "any later version", you have the option of following the terms and conditions either of that version or of any later version published by the Free Software Foundation. If the Program does not specify a version number of this License, you may choose any version ever published by the Free Software Foundation. 10. 10. If you wish to incorporate parts of the Program into other free programs whose distribution conditions are different, write to the author to ask for permission. For software which is copyrighted by the Free Software Foundation, write to the Free Software Foundation; we sometimes make exceptions for this. Our decision will be guided by the two goals of preserving the free status of all derivatives of our free software and of promoting the sharing and reuse of software generally. NO WARRANTY 11. BECAUSE THE PROGRAM IS LICENSED FREE OF CHARGE, THERE IS NO WARRANTY FOR THE PROGRAM, TO THE EXTENT PERMITTED BY APPLICABLE LAW. EXCEPT WHEN OTHERWISE STATED IN WRITING THE COPYRIGHT HOLDERS AND/OR OTHER PARTIES PROVIDE THE PROGRAM "AS IS" WITHOUT WARRANTY OF ANY KIND, EITHER EXPRESSED OR IMPLIED, INCLUDING, BUT NOT LIMITED TO, THE IMPLIED WARRANTIES OF MERCHANTABILITY AND FITNESS FOR A PARTICULAR PURPOSE. THE ENTIRE RISK AS TO THE QUALITY AND PERFORMANCE OF THE PROGRAM IS WITH YOU. SHOULD THE PROGRAM PROVE DEFECTIVE, YOU ASSUME THE COST OF ALL NECESSARY SERVICING, REPAIR OR CORRECTION. 180 www.open-e.com Open-E DSS V7 MANUAL 12. IN NO EVENT UNLESS REQUIRED BY APPLICABLE LAW OR AGREED TO IN WRITING WILL ANY COPYRIGHT HOLDER, OR ANY OTHER PARTY WHO MAY MODIFY AND/OR REDISTRIBUTE THE PROGRAM AS PERMITTED ABOVE, BE LIABLE TO YOU FOR DAMAGES, INCLUDING ANY GENERAL, SPECIAL, INCIDENTAL OR CONSEQUENTIAL DAMAGES ARISING OUT OF THE USE OR INABILITY TO USE THE PROGRAM (INCLUDING BUT NOT LIMITED TO LOSS OF DATA OR DATA BEING RENDERED INACCURATE OR LOSSES SUSTAINED BY YOU OR THIRD PARTIES OR A FAILURE OF THE PROGRAM TO OPERATE WITH ANY OTHER PROGRAMS), EVEN IF SUCH HOLDER OR OTHER PARTY HAS BEEN ADVISED OF THE POSSIBILITY OF SUCH DAMAGES. END OF TERMS AND CONDITIONS How to Apply These Terms to Your New Programs If you develop a new program, and you want it to be of the greatest possible use to the public, the best way to achieve this is to make it free software which everyone can redistribute and change under these terms. To do so, attach the following notices to the program. It is safest to attach them to the start of each source file to most effectively convey the exclusion of warranty; and each file should have at least the "copyright" line and a pointer to where the full notice is found. one line to give the program's name and an idea of what it does. Copyright (C) yyyy name of author This program is free software; you can redistribute it and/or modify it under the terms of the GNU General Public License as published by the Free Software Foundation; either version 2 of the License, or (at your option) any later version. This program is distributed in the hope that it will be useful, but WITHOUT ANY WARRANTY; without even the implied warranty of MERCHANTABILITY or FITNESS FOR A PARTICULAR PURPOSE. See the GNU General Public License for more details. You should have received a copy of the GNU General Public License along with this program; if not, write to the Free Software Foundation, Inc., 59 Temple Place - Suite 330, Boston, MA 02111-1307, USA. Also add information on how to contact you by electronic and paper mail. If the program is interactive, make it output a short notice like this when it starts in an interactive mode: Gnomovision version 69, Copyright (C) year name of author Gnomovision comes with ABSOLUTELY NO WARRANTY; for details type `show w'. This is free software, and you are welcome to redistribute it under certain conditions; type `show c' for details. The hypothetical commands `show w' and `show c' should show the appropriate parts of the General Public License. Of course, the commands you use may be called something other than `show w' and `show c'; they could even be mouse-clicks or menu items--whatever suits your program. You should also get your employer (if you work as a programmer) or your school, if any, to sign a "copyright disclaimer" for the program, if necessary. Here is a sample; alter the names: Yoyodyne, Inc., hereby disclaims all copyright interest in the program `Gnomovision' (which makes passes at compilers) written by James Hacker. signature of Ty Coon, 1 April 1989 Ty Coon, President of Vice 181 www.open-e.com Open-E DSS V7 MANUAL This General Public License does not permit incorporating your program into proprietary programs. If your program is a subroutine library, you may consider it more useful to permit linking proprietary applications with the library. If this is what you want to do, use the GNU Library General Public License instead of this License. GNU GENERAL PUBLIC LICENSE Version 3, 29 June 2007 Copyright (C) 2007 Free Software Foundation, Inc. <http://fsf.org/> Everyone is permitted to copy and distribute verbatim copies of this license document, but changing it is not allowed. Preamble The GNU General Public License is a free, copyleft license for software and other kinds of works. The licenses for most software and other practical works are designed to take away your freedom to share and change the works. By contrast, the GNU General Public License is intended to guarantee your freedom to share and change all versions of a program--to make sure it remains free software for all its users. We, the Free Software Foundation, use the GNU General Public License for most of our software; it applies also to any other work released this way by its authors. You can apply it to your programs, too. When we speak of free software, we are referring to freedom, not price. Our General Public Licenses are designed to make sure that you have the freedom to distribute copies of free software (and charge for them if you wish), that you receive source code or can get it if you want it, that you can change the software or use pieces of it in new free programs, and that you know you can do these things. To protect your rights, we need to prevent others from denying you these rights or asking you to surrender the rights. Therefore, you have certain responsibilities if you distribute copies of the software, or if you modify it: responsibilities to respect the freedom of others. For example, if you distribute copies of such a program, whether gratis or for a fee, you must pass on to the recipients the same freedoms that you received. You must make sure that they, too, receive or can get the source code. And you must show them these terms so they know their rights. Developers that use the GNU GPL protect your rights with two steps: (1) assert copyright on the software, and (2) offer you this License giving you legal permission to copy, distribute and/or modify it. For the developers' and authors' protection, the GPL clearly explains that there is no warranty for this free software. For both users' and authors' sake, the GPL requires that modified versions be marked as changed, so that their problems will not be attributed erroneously to authors of previous versions. Some devices are designed to deny users access to install or run modified versions of the software inside them, although the manufacturer can do so. This is fundamentally incompatible with the aim of protecting users' freedom to change the software. The systematic pattern of such abuse occurs in the area of products for individuals to use, which is precisely where it is most unacceptable. Therefore, we have designed this version of the GPL to prohibit the practice for those products. If such problems arise substantially in other domains, we stand ready to extend this provision to those domains in future versions of the GPL, as needed to protect the freedom of users. Finally, every program is threatened constantly by software patents. States should not allow patents to restrict development and use of software on general-purpose computers, but in 182 www.open-e.com Open-E DSS V7 MANUAL those that do, we wish to avoid the special danger that patents applied to a free program could make it effectively proprietary. To prevent this, the GPL assures that patents cannot be used to render the program non-free. The precise terms and conditions for copying, distribution and modification follow. TERMS AND CONDITIONS 0. Definitions. "This License" refers to version 3 of the GNU General Public License. "Copyright" also means copyright-like laws that apply to other kinds of works, such as semiconductor masks. "The Program" refers to any copyrightable work licensed under this License. Each licensee is addressed as "you". "Licensees" and "recipients" may be individuals or organizations. To "modify" a work means to copy from or adapt all or part of the work in a fashion requiring copyright permission, other than the making of an exact copy. The resulting work is called a "modified version" of the earlier work or a work "based on" the earlier work. A "covered work" means either the unmodified Program or a work based on the Program. To "propagate" a work means to do anything with it that, without permission, would make you directly or secondarily liable for infringement under applicable copyright law, except executing it on a computer or modifying a private copy. Propagation includes copying, distribution (with or without modification), making available to the public, and in some countries other activities as well. To "convey" a work means any kind of propagation that enables other parties to make or receive copies. Mere interaction with a user through a computer network, with no transfer of a copy, is not conveying. An interactive user interface displays "Appropriate Legal Notices" to the extent that it includes a convenient and prominently visible feature that (1) displays an appropriate copyright notice, and (2) tells the user that there is no warranty for the work (except to the extent that warranties are provided), that licensees may convey the work under this License, and how to view a copy of this License. If the interface presents a list of user commands or options, such as a menu, a prominent item in the list meets this criterion. 1. Source Code. The "source code" for a work means the preferred form of the work for making modifications to it. "Object code" means any non-source form of a work. A "Standard Interface" means an interface that either is an official standard defined by a recognized standards body, or, in the case of interfaces specified for a particular programming language, one that is widely used among developers working in that language. The "System Libraries" of an executable work include anything, other than the work as a whole, that (a) is included in the normal form of packaging a Major Component, but which is not part of that Major Component, and (b) serves only to enable use of the work with that Major Component, or to implement a Standard Interface for which an implementation is available to the public in source code form. A "Major Component", in this context, means a major essential component (kernel, window system, and so on) of the specific operating system (if any) on which the executable work runs, or a compiler used to produce the work, or an object code interpreter used to run it. The "Corresponding Source" for a work in object code form means all the source code needed to generate, install, and (for an executable work) run the object code and to modify the work, including scripts to control those activities. However, it does not include the work's System Libraries, or general-purpose tools or generally available free programs which are used unmodified in performing those activities but which are not part of the work. For example, Corresponding Source includes interface definition files associated with source files for the work, and the source code for shared libraries and dynamically linked subprograms that the work is specifically designed to require, such as by intimate data communication or control flow between those subprograms and other parts of the work. 183 www.open-e.com Open-E DSS V7 MANUAL The Corresponding Source need not include anything that users can regenerate automatically from other parts of the Corresponding Source. The Corresponding Source for a work in source code form is that same work. 2. Basic Permissions. All rights granted under this License are granted for the term of copyright on the Program, and are irrevocable provided the stated conditions are met. This License explicitly affirms your unlimited permission to run the unmodified Program. The output from running a covered work is covered by this License only if the output, given its content, constitutes a covered work. This License acknowledges your rights of fair use or other equivalent, as provided by copyright law. You may make, run and propagate covered works that you do not convey, without conditions so long as your license otherwise remains in force. You may convey covered works to others for the sole purpose of having them make modifications exclusively for you, or provide you with facilities for running those works, provided that you comply with the terms of this License in conveying all material for which you do not control copyright. Those thus making or running the covered works for you must do so exclusively on your behalf, under your direction and control, on terms that prohibit them from making any copies of your copyrighted material outside their relationship with you. Conveying under any other circumstances is permitted solely under the conditions stated below. Sublicensing is not allowed; section 10 makes it unnecessary. 3. Protecting Users' Legal Rights From Anti-Circumvention Law. No covered work shall be deemed part of an effective technological measure under any applicable law fulfilling obligations under article 11 of the WIPO copyright treaty adopted on 20 December 1996, or similar laws prohibiting or restricting circumvention of such measures. When you convey a covered work, you waive any legal power to forbid circumvention of technological measures to the extent such circumvention is effected by exercising rights under this License with respect to the covered work, and you disclaim any intention to limit operation or modification of the work as a means of enforcing, against the work's users, your or third parties' legal rights to forbid circumvention of technological measures. 4. Conveying Verbatim Copies. You may convey verbatim copies of the Program's source code as you receive it, in any medium, provided that you conspicuously and appropriately publish on each copy an appropriate copyright notice; keep intact all notices stating that this License and any non-permissive terms added in accord with section 7 apply to the code; keep intact all notices of the absence of any warranty; and give all recipients a copy of this License along with the Program. You may charge any price or no price for each copy that you convey, and you may offer support or warranty protection for a fee. 5. Conveying Modified Source Versions. You may convey a work based on the Program, or the modifications to produce it from the Program, in the form of source code under the terms of section 4, provided that you also meet all of these conditions: a) The work must carry prominent notices stating that you modified it, and giving a relevant date. b) The work must carry prominent notices stating that it is released under this License and any conditions added under section 7. This requirement modifies the requirement in section 4 to "keep intact all notices". c) You must license the entire work, as a whole, under this License to anyone who comes into possession of a copy. This License will therefore apply, along with any applicable section 7 additional terms, to the whole of the work, and all its parts, regardless of how they are packaged. This License gives no permission to license the work in any other way, but it does not invalidate such permission if you have separately received it. d) If the work has interactive user interfaces, each must display Appropriate Legal 184 www.open-e.com Open-E DSS V7 MANUAL Notices; however, if the Program has interactive interfaces that do not display Appropriate Legal Notices, your work need not make them do so. A compilation of a covered work with other separate and independent works, which are not by their nature extensions of the covered work, and which are not combined with it such as to form a larger program, in or on a volume of a storage or distribution medium, is called an "aggregate" if the compilation and its resulting copyright are not used to limit the access or legal rights of the compilation's users beyond what the individual works permit. Inclusion of a covered work in an aggregate does not cause this License to apply to the other parts of the aggregate. 6. Conveying Non-Source Forms. You may convey a covered work in object code form under the terms of sections 4 and 5, provided that you also convey the machine-readable Corresponding Source under the terms of this License, in one of these ways: a) Convey the object code in, or embodied in, a physical product (including a physical distribution medium), accompanied by the Corresponding Source fixed on a durable physical medium customarily used for software interchange. b) Convey the object code in, or embodied in, a physical product (including a physical distribution medium), accompanied by a written offer, valid for at least three years and valid for as long as you offer spare parts or customer support for that product model, to give anyone who possesses the object code either (1) a copy of the Corresponding Source for all the software in the product that is covered by this License, on a durable physical medium customarily used for software interchange, for a price no more than your reasonable cost of physically performing this conveying of source, or (2) access to copy the Corresponding Source from a network server at no charge. c) Convey individual copies of the object code with a copy of the written offer to provide the Corresponding Source. This alternative is allowed only occasionally and noncommercially, and only if you received the object code with such an offer, in accord with subsection 6b. d) Convey the object code by offering access from a designated place (gratis or for a charge), and offer equivalent access to the Corresponding Source in the same way through the same place at no further charge. You need not require recipients to copy the Corresponding Source along with the object code. If the place to copy the object code is a network server, the Corresponding Source may be on a different server (operated by you or a third party) that supports equivalent copying facilities, provided you maintain clear directions next to the object code saying where to find the Corresponding Source. Regardless of what server hosts the Corresponding Source, you remain obligated to ensure that it is available for as long as needed to satisfy these requirements. e) Convey the object code using peer-to-peer transmission, provided you inform other peers where the object code and Corresponding Source of the work are being offered to the general public at no charge under subsection 6d. A separable portion of the object code, whose source code is excluded from the Corresponding Source as a System Library, need not be included in conveying the object code work. A "User Product" is either (1) a "consumer product", which means any tangible personal property which is normally used for personal, family, or household purposes, or (2) anything designed or sold for incorporation into a dwelling. In determining whether a product is a consumer product, doubtful cases shall be resolved in favor of coverage. For a particular product received by a particular user, "normally used" refers to a typical or common use of that class of product, regardless of the status of the particular user or of the way in which the particular user actually uses, or expects or is expected to use, the product. A product is a consumer product regardless of whether the product has substantial commercial, industrial or non-consumer uses, unless such uses represent the only significant mode of use of the product. "Installation Information" for a User Product means any methods, procedures, authorization keys, or other information required to install and execute modified versions of a covered 185 www.open-e.com Open-E DSS V7 MANUAL work in that User Product from a modified version of its Corresponding Source. The information must suffice to ensure that the continued functioning of the modified object code is in no case prevented or interfered with solely because modification has been made. If you convey an object code work under this section in, or with, or specifically for use in, a User Product, and the conveying occurs as part of a transaction in which the right of possession and use of the User Product is transferred to the recipient in perpetuity or for a fixed term (regardless of how the transaction is characterized), the Corresponding Source conveyed under this section must be accompanied by the Installation Information. But this requirement does not apply if neither you nor any third party retains the ability to install modified object code on the User Product (for example, the work has been installed in ROM). The requirement to provide Installation Information does not include a requirement to continue to provide support service, warranty, or updates for a work that has been modified or installed by the recipient, or for the User Product in which it has been modified or installed. Access to a network may be denied when the modification itself materially and adversely affects the operation of the network or violates the rules and protocols for communication across the network. Corresponding Source conveyed, and Installation Information provided, in accord with this section must be in a format that is publicly documented (and with an implementation available to the public in source code form), and must require no special password or key for unpacking, reading or copying. 7. Additional Terms. "Additional permissions" are terms that supplement the terms of this License by making exceptions from one or more of its conditions. Additional permissions that are applicable to the entire Program shall be treated as though they were included in this License, to the extent that they are valid under applicable law. If additional permissions apply only to part of the Program, that part may be used separately under those permissions, but the entire Program remains governed by this License without regard to the additional permissions. When you convey a copy of a covered work, you may at your option remove any additional permissions from that copy, or from any part of it. (Additional permissions may be written to require their own removal in certain cases when you modify the work.) You may place additional permissions on material, added by you to a covered work, for which you have or can give appropriate copyright permission. Notwithstanding any other provision of this License, for material you add to a covered work, you may (if authorized by the copyright holders of that material) supplement the terms of this License with terms: a) Disclaiming warranty or limiting liability differently from the terms of sections 15 and 16 of this License; or b) Requiring preservation of specified reasonable legal notices or author attributions in that material or in the Appropriate Legal Notices displayed by works containing it; or c) Prohibiting misrepresentation of the origin of that material, or requiring that modified versions of such material be marked in reasonable ways as different from the original version; or d) Limiting the use for publicity purposes of names of licensors or authors of the material; or e) Declining to grant rights under trademark law for use of some trade names, trademarks, or service marks; or f) Requiring indemnification of licensors and authors of that material by anyone who conveys the material (or modified versions of it) with contractual assumptions of liability to the recipient, for any liability that these contractual assumptions directly impose on those licensors and authors. All other non-permissive additional terms are considered "further restrictions" within the meaning of section 10. If the Program as you received it, or any part of it, contains a notice stating that it is governed by this License along with a term that is a further restriction, you may remove that term. If a license document contains a further restriction but permits 186 www.open-e.com Open-E DSS V7 MANUAL relicensing or conveying under this License, you may add to a covered work material governed by the terms of that license document, provided that the further restriction does not survive such relicensing or conveying. If you add terms to a covered work in accord with this section, you must place, in the relevant source files, a statement of the additional terms that apply to those files, or a notice indicating where to find the applicable terms. Additional terms, permissive or non-permissive, may be stated in the form of a separately written license, or stated as exceptions; the above requirements apply either way. 8. Termination. You may not propagate or modify a covered work except as expressly provided under this License. Any attempt otherwise to propagate or modify it is void, and will automatically terminate your rights under this License (including any patent licenses granted under the third paragraph of section 11). However, if you cease all violation of this License, then your license from a particular copyright holder is reinstated (a) provisionally, unless and until the copyright holder explicitly and finally terminates your license, and (b) permanently, if the copyright holder fails to notify you of the violation by some reasonable means prior to 60 days after the cessation. Moreover, your license from a particular copyright holder is reinstated permanently if the copyright holder notifies you of the violation by some reasonable means, this is the first time you have received notice of violation of this License (for any work) from that copyright holder, and you cure the violation prior to 30 days after your receipt of the notice. Termination of your rights under this section does not terminate the licenses of parties who have received copies or rights from you under this License. If your rights have been terminated and not permanently reinstated, you do not qualify to receive new licenses for the same material under section 10. 9. Acceptance Not Required for Having Copies. You are not required to accept this License in order to receive or run a copy of the Program. Ancillary propagation of a covered work occurring solely as a consequence of using peer-to-peer transmission to receive a copy likewise does not require acceptance. However, nothing other than this License grants you permission to propagate or modify any covered work. These actions infringe copyright if you do not accept this License. Therefore, by modifying or propagating a covered work, you indicate your acceptance of this License to do so. 10. Automatic Licensing of Downstream Recipients. Each time you convey a covered work, the recipient automatically receives a license from the original licensors, to run, modify and propagate that work, subject to this License. You are not responsible for enforcing compliance by third parties with this License. An "entity transaction" is a transaction transferring control of an organization, or substantially all assets of one, or subdividing an organization, or merging organizations. If propagation of a covered work results from an entity transaction, each party to that transaction who receives a copy of the work also receives whatever licenses to the work the party's predecessor in interest had or could give under the previous paragraph, plus a right to possession of the Corresponding Source of the work from the predecessor in interest, if the predecessor has it or can get it with reasonable efforts. You may not impose any further restrictions on the exercise of the rights granted or affirmed under this License. For example, you may not impose a license fee, royalty, or other charge for exercise of rights granted under this License, and you may not initiate 187 www.open-e.com Open-E DSS V7 MANUAL litigation (including a cross-claim or counterclaim in a lawsuit) alleging that any patent claim is infringed by making, using, selling, offering for sale, or importing the Program or any portion of it. 11. Patents. A "contributor" is a copyright holder who authorizes use under this License of the Program or a work on which the Program is based. The work thus licensed is called the contributor's "contributor version". A contributor's "essential patent claims" are all patent claims owned or controlled by the contributor, whether already acquired or hereafter acquired, that would be infringed by some manner, permitted by this License, of making, using, or selling its contributor version, but do not include claims that would be infringed only as a consequence of further modification of the contributor version. For purposes of this definition, "control" includes the right to grant patent sublicenses in a manner consistent with the requirements of this License. Each contributor grants you a non-exclusive, worldwide, royalty-free patent license under the contributor's essential patent claims, to make, use, sell, offer for sale, import and otherwise run, modify and propagate the contents of its contributor version. In the following three paragraphs, a "patent license" is any express agreement or commitment, however denominated, not to enforce a patent (such as an express permission to practice a patent or covenant not to sue for patent infringement). To "grant" such a patent license to a party means to make such an agreement or commitment not to enforce a patent against the party. If you convey a covered work, knowingly relying on a patent license, and the Corresponding Source of the work is not available for anyone to copy, free of charge and under the terms of this License, through a publicly available network server or other readily accessible means, then you must either (1) cause the Corresponding Source to be so available, or (2) arrange to deprive yourself of the benefit of the patent license for this particular work, or (3) arrange, in a manner consistent with the requirements of this License, to extend the patent license to downstream recipients. "Knowingly relying" means you have actual knowledge that, but for the patent license, your conveying the covered work in a country, or your recipient's use of the covered work in a country, would infringe one or more identifiable patents in that country that you have reason to believe are valid. If, pursuant to or in connection with a single transaction or arrangement, you convey, or propagate by procuring conveyance of, a covered work, and grant a patent license to some of the parties receiving the covered work authorizing them to use, propagate, modify or convey a specific copy of the covered work, then the patent license you grant is automatically extended to all recipients of the covered work and works based on it. A patent license is "discriminatory" if it does not include within the scope of its coverage, prohibits the exercise of, or is conditioned on the non-exercise of one or more of the rights that are specifically granted under this License. You may not convey a covered work if you are a party to an arrangement with a third party that is in the business of distributing software, under which you make payment to the third party based on the extent of your activity of conveying the work, and under which the third party grants, to any of the parties who would receive the covered work from you, a discriminatory patent license (a) in connection with copies of the covered work conveyed by you (or copies made from those copies), or (b) primarily for and in connection with specific products or compilations that contain the covered work, unless you entered into that arrangement, or that patent license was granted, prior to 28 March 2007. 188 www.open-e.com Open-E DSS V7 MANUAL Nothing in this License shall be construed as excluding or limiting any implied license or other defenses to infringement that may otherwise be available to you under applicable patent law. 12. No Surrender of Others' Freedom. If conditions are imposed on you (whether by court order, agreement or otherwise) that contradict the conditions of this License, they do not excuse you from the conditions of this License. If you cannot convey a covered work so as to satisfy simultaneously your obligations under this License and any other pertinent obligations, then as a consequence you may not convey it at all. For example, if you agree to terms that obligate you to collect a royalty for further conveying from those to whom you convey the Program, the only way you could satisfy both those terms and this License would be to refrain entirely from conveying the Program. 13. Use with the GNU Affero General Public License. Notwithstanding any other provision of this License, you have permission to link or combine any covered work with a work licensed under version 3 of the GNU Affero General Public License into a single combined work, and to convey the resulting work. The terms of this License will continue to apply to the part which is the covered work, but the special requirements of the GNU Affero General Public License, section 13, concerning interaction through a network will apply to the combination as such. 14. Revised Versions of this License. The Free Software Foundation may publish revised and/or new versions of the GNU General Public License from time to time. Such new versions will be similar in spirit to the present version, but may differ in detail to address new problems or concerns. Each version is given a distinguishing version number. If the Program specifies that a certain numbered version of the GNU General Public License "or any later version" applies to it, you have the option of following the terms and conditions either of that numbered version or of any later version published by the Free Software Foundation. If the Program does not specify a version number of the GNU General Public License, you may choose any version ever published by the Free Software Foundation. If the Program specifies that a proxy can decide which future versions of the GNU General Public License can be used, that proxy's public statement of acceptance of a version permanently authorizes you to choose that version for the Program. Later license versions may give you additional or different permissions. However, no additional obligations are imposed on any author or copyright holder as a result of your choosing to follow a later version. 15. Disclaimer of Warranty. THERE IS NO WARRANTY FOR THE PROGRAM, TO THE EXTENT PERMITTED BY APPLICABLE LAW. EXCEPT WHEN OTHERWISE STATED IN WRITING THE COPYRIGHT HOLDERS AND/OR OTHER PARTIES PROVIDE THE PROGRAM "AS IS" WITHOUT WARRANTY OF ANY KIND, EITHER EXPRESSED OR IMPLIED, INCLUDING, BUT NOT LIMITED TO, THE IMPLIED WARRANTIES OF MERCHANTABILITY AND FITNESS FOR A PARTICULAR PURPOSE. THE ENTIRE RISK AS TO THE QUALITY AND PERFORMANCE OF THE PROGRAM IS WITH YOU. SHOULD THE PROGRAM PROVE DEFECTIVE, YOU ASSUME THE COST OF ALL NECESSARY SERVICING, REPAIR OR CORRECTION. 16. Limitation of Liability. IN NO EVENT UNLESS REQUIRED BY APPLICABLE LAW OR AGREED TO IN WRITING WILL ANY COPYRIGHT HOLDER, OR ANY OTHER PARTY WHO MODIFIES AND/OR CONVEYS THE PROGRAM AS PERMITTED ABOVE, BE LIABLE TO YOU FOR DAMAGES, INCLUDING ANY GENERAL, SPECIAL, INCIDENTAL 189 www.open-e.com Open-E DSS V7 MANUAL OR CONSEQUENTIAL DAMAGES ARISING OUT OF THE USE OR INABILITY TO USE THE PROGRAM (INCLUDING BUT NOT LIMITED TO LOSS OF DATA OR DATA BEING RENDERED INACCURATE OR LOSSES SUSTAINED BY YOU OR THIRD PARTIES OR A FAILURE OF THE PROGRAM TO OPERATE WITH ANY OTHER PROGRAMS), EVEN IF SUCH HOLDER OR OTHER PARTY HAS BEEN ADVISED OF THE POSSIBILITY OF SUCH DAMAGES. 17. Interpretation of Sections 15 and 16. If the disclaimer of warranty and limitation of liability provided above cannot be given local legal effect according to their terms, reviewing courts shall apply local law that most closely approximates an absolute waiver of all civil liability in connection with the Program, unless a warranty or assumption of liability accompanies a copy of the Program in return for a fee. END OF TERMS AND CONDITIONS How to Apply These Terms to Your New Programs If you develop a new program, and you want it to be of the greatest possible use to the public, the best way to achieve this is to make it free software which everyone can redistribute and change under these terms. To do so, attach the following notices to the program. It is safest to attach them to the start of each source file to most effectively state the exclusion of warranty; and each file should have at least the "copyright" line and a pointer to where the full notice is found. <one line to give the program's name and a brief idea of what it does.> Copyright (C) <year> <name of author> This program is free software: you can redistribute it and/or modify it under the terms of the GNU General Public License as published by the Free Software Foundation, either version 3 of the License, or (at your option) any later version. This program is distributed in the hope that it will be useful, but WITHOUT ANY WARRANTY; without even the implied warranty of MERCHANTABILITY or FITNESS FOR A PARTICULAR PURPOSE. See the GNU General Public License for more details. You should have received a copy of the GNU General Public License along with this program. If not, see <http://www.gnu.org/licenses/>. Also add information on how to contact you by electronic and paper mail. If the program does terminal interaction, make it output a short notice like this when it starts in an interactive mode: <program> Copyright (C) <year> <name of author> This program comes with ABSOLUTELY NO WARRANTY; for details type `show w'. This is free software, and you are welcome to redistribute it under certain conditions; type `show c' for details. The hypothetical commands `show w' and `show c' should show the appropriate parts of the General Public License. Of course, your program's commands might be different; for a GUI interface, you would use an "about box". You should also get your employer (if you work as a programmer) or school, if any, to sign a "copyright disclaimer" for the program, if necessary. For more information on this, and how to apply and follow the GNU GPL, see <http://www.gnu.org/licenses/>. 190 www.open-e.com Open-E DSS V7 MANUAL The GNU General Public License does not permit incorporating your program into proprietary programs. If your program is a subroutine library, you may consider it more useful to permit linking proprietary applications with the library. If this is what you want to do, use the GNU Lesser General Public License instead of this License. But first, please read <http://www.gnu.org/philosophy/why-not-lgpl.html>. The PHP License, version 3.01 Copyright (c) 1999 - 2006 The PHP Group. All rights reserved. Redistribution and use in source and binary forms, with or without modification, is permitted provided that the following conditions are met: 1. Redistributions of source code must retain the above copyright notice, this list of conditions and the following disclaimer. 2. Redistributions in binary form must reproduce the above copyright notice, this list of conditions and the following disclaimer in the documentation and/or other materials provided with the distribution. 3. The name "PHP" must not be used to endorse or promote products derived from this software without prior written permission. For written permission, please contact [email protected]. 4. Products derived from this software may not be called "PHP", nor may "PHP" appear in their name, without prior written permission from [email protected]. You may indicate that your software works in conjunction with PHP by saying "Foo for PHP" instead of calling it "PHP Foo" or "phpfoo" 5. The PHP Group may publish revised and/or new versions of the license from time to time. Each version will be given a distinguishing version number. Once covered code has been published under a particular version of the license, you may always continue to use it under the terms of that version. You may also choose to use such covered code under the terms of any subsequent version of the license published by the PHP Group. No one other than the PHP Group has the right to modify the terms applicable to covered code created under this License. 6. Redistributions of any form whatsoever must retain the following acknowledgment: "This product includes PHP software, freely available from ". THIS SOFTWARE IS PROVIDED BY THE PHP DEVELOPMENT TEAM ``AS IS'' AND ANY EXPRESSED OR IMPLIED WARRANTIES, INCLUDING, BUT NOT LIMITED TO, THE IMPLIED WARRANTIES OF MERCHANTABILITY AND FITNESS FOR A PARTICULAR PURPOSE ARE DISCLAIMED. IN NO EVENT SHALL THE PHP DEVELOPMENT TEAM OR ITS CONTRIBUTORS BE LIABLE FOR ANY DIRECT, INDIRECT, INCIDENTAL, SPECIAL, EXEMPLARY, OR CONSEQUENTIAL DAMAGES (INCLUDING, BUT NOT LIMITED TO, PROCUREMENT OF SUBSTITUTE GOODS OR SERVICES; LOSS OF USE, DATA, OR PROFITS; OR BUSINESS INTERRUPTION) HOWEVER CAUSED AND ON ANY THEORY OF LIABILITY, WHETHER IN CONTRACT, STRICT LIABILITY, OR TORT (INCLUDING NEGLIGENCE OR OTHERWISE) ARISING IN ANY WAY OUT OF THE USE OF THIS SOFTWARE, EVEN IF ADVISED OF THE POSSIBILITY OF SUCH DAMAGE. --------------------------------------- 191 www.open-e.com Open-E DSS V7 MANUAL This software consists of voluntary contributions made by many individuals on behalf of the PHP Group. The PHP Group can be contacted via Email at [email protected]. For more information on the PHP Group and the PHP project, please see . PHP includes the Zend Engine, freely available at. GNU LESSER GENERAL PUBLIC LICENSE Version 2.1, February 1999 Copyright (C) 1991, 1999 Free Software Foundation, Inc. 59 Temple Place, Suite 330, Boston, MA 02111-1307 USA Everyone is permitted to copy and distribute verbatim copies of this license document, but changing it is not allowed. [This is the first released version of the Lesser GPL. It also counts as the successor of the GNU Library Public License, version 2, hence the version number 2.1.] Preamble The licenses for most software are designed to take away your freedom to share and change it. By contrast, the GNU General Public Licenses are intended to guarantee your freedom to share and change free software--to make sure the software is free for all its users. This license, the Lesser General Public License, applies to some specially designated software packages--typically libraries--of the Free Software Foundation and other authors who decide to use it. You can use it too, but we suggest you first think carefully about whether this license or the ordinary General Public License is the better strategy to use in any particular case, based on the explanations below. When we speak of free software, we are referring to freedom of use, not price. Our General Public Licenses are designed to make sure that you have the freedom to distribute copies of free software (and charge for this service if you wish); that you receive source code or can get it if you want it; that you can change the software and use pieces of it in new free programs; and that you are informed that you can do these things. To protect your rights, we need to make restrictions that forbid distributors to deny you these rights or to ask you to surrender these rights. These restrictions translate to certain responsibilities for you if you distribute copies of the library or if you modify it. For example, if you distribute copies of the library, whether gratis or for a fee, you must give the recipients all the rights that we gave you. You must make sure that they, too, receive or can get the source code. If you link other code with the library, you must provide complete object files to the recipients, so that they can relink them with the library after making changes to the library and recompiling it. And you must show them these terms so they know their rights. We protect your rights with a two-step method: (1) we copyright the library, and (2) we offer you this license, which gives you legal permission to copy, distribute and/or modify the library. To protect each distributor, we want to make it very clear that there is no warranty for the free library. Also, if the library is modified by someone else and passed on, the recipients should know that what they have is not the original version, so that the original author's reputation will not be affected by problems that might be introduced by others. 192 www.open-e.com Open-E DSS V7 MANUAL Finally, software patents pose a constant threat to the existence of any free program. We wish to make sure that a company cannot effectively restrict the users of a free program by obtaining a restrictive license from a patent holder. Therefore, we insist that any patent license obtained for a version of the library must be consistent with the full freedom of use specified in this license. Most GNU software, including some libraries, is covered by the ordinary GNU General Public License. This license, the GNU Lesser General Public License, applies to certain designated libraries, and is quite different from the ordinary General Public License. We use this license for certain libraries in order to permit linking those libraries into non-free programs. When a program is linked with a library, whether statically or using a shared library, the combination of the two is legally speaking a combined work, a derivative of the original library. The ordinary General Public License therefore permits such linking only if the entire combination fits its criteria of freedom. The Lesser General Public License permits more lax criteria for linking other code with the library. We call this license the "Lesser" General Public License because it does Less to protect the user's freedom than the ordinary General Public License. It also provides other free software developers Less of an advantage over competing non-free programs. These disadvantages are the reason we use the ordinary General Public License for many libraries. However, the Lesser license provides advantages in certain special circumstances. For example, on rare occasions, there may be a special need to encourage the widest possible use of a certain library, so that it becomes a de-facto standard. To achieve this, non-free programs must be allowed to use the library. A more frequent case is that a free library does the same job as widely used non-free libraries. In this case, there is little to gain by limiting the free library to free software only, so we use the Lesser General Public License. In other cases, permission to use a particular library in non-free programs enables a greater number of people to use a large body of free software. For example, permission to use the GNU C Library in non-free programs enables many more people to use the whole GNU operating system, as well as its variant, the GNU/Linux operating system. Although the Lesser General Public License is Less protective of the users' freedom, it does ensure that the user of a program that is linked with the Library has the freedom and the wherewithal to run that program using a modified version of the Library. The precise terms and conditions for copying, distribution and modification follow. Pay close attention to the difference between a "work based on the library" and a "work that uses the library". The former contains code derived from the library, whereas the latter must be combined with the library in order to run. TERMS AND CONDITIONS FOR COPYING, DISTRIBUTION AND MODIFICATION 0. This License Agreement applies to any software library or other program which contains a notice placed by the copyright holder or other authorized party saying it may be distributed under the terms of this Lesser General Public License (also called "this License"). Each licensee is addressed as "you". A "library" means a collection of software functions and/or data prepared so as to be conveniently linked with application programs (which use some of those functions and data) to form executables. The "Library", below, refers to any such software library or work which has been distributed under these terms. A "work based on the Library" means either the Library or any derivative work under copyright law: that is to say, a work containing the Library or a portion of it, 193 www.open-e.com Open-E DSS V7 MANUAL either verbatim or with modifications and/or translated straightforwardly into another language. (Hereinafter, translation is included without limitation in the term "modification".) "Source code" for a work means the preferred form of the work for making modifications to it. For a library, complete source code means all the source code for all modules it contains, plus any associated interface definition files, plus the scripts used to control compilation and installation of the library. Activities other than copying, distribution and modification are not covered by this License; they are outside its scope. The act of running a program using the Library is not restricted, and output from such a program is covered only if its contents constitute a work based on the Library (independent of the use of the Library in a tool for writing it). Whether that is true depends on what the Library does and what the program that uses the Library does. 1. You may copy and distribute verbatim copies of the Library's complete source code as you receive it, in any medium, provided that you conspicuously and appropriately publish on each copy an appropriate copyright notice and disclaimer of warranty; keep intact all the notices that refer to this License and to the absence of any warranty; and distribute a copy of this License along with the Library. You may charge a fee for the physical act of transferring a copy, and you may at your option offer warranty protection in exchange for a fee. 2. You may modify your copy or copies of the Library or any portion of it, thus forming a work based on the Library, and copy and distribute such modifications or work under the terms of Section 1 above, provided that you also meet all of these conditions: a) The modified work must itself be a software library. b) You must cause the files modified to carry prominent notices stating that you changed the files and the date of any change. c) You must cause the whole of the work to be licensed at no charge to all third parties under the terms of this License. d) If a facility in the modified Library refers to a function or a table of data to be supplied by an application program that uses the facility, other than as an argument passed when the facility is invoked, then you must make a good faith effort to ensure that, in the event an application does not supply such function or table, the facility still operates, and performs whatever part of its purpose remains meaningful. (For example, a function in a library to compute square roots has a purpose that is entirely well-defined independent of the application. Therefore, Subsection 2d requires that any application-supplied function or table used by this function must be optional: if the application does not supply it, the square root function must still compute square roots.) These requirements apply to the modified work as a whole. If identifiable sections of that work are not derived from the Library, and can be reasonably considered independent and separate works in themselves, then this License, and its terms, do not apply to those sections when you distribute them as separate works. But when you distribute the same sections as part of a whole which is a work based on the Library, the distribution of the whole must be on the terms of this License, whose permissions for other licensees extend to the entire whole, and thus to each and every part regardless of who wrote it. 194 www.open-e.com Open-E DSS V7 MANUAL Thus, it is not the intent of this section to claim rights or contest your rights to work written entirely by you; rather, the intent is to exercise the right to control the distribution of derivative or collective works based on the Library. In addition, mere aggregation of another work not based on the Library with the Library (or with a work based on the Library) on a volume of a storage or distribution medium does not bring the other work under the scope of this License. 3. You may opt to apply the terms of the ordinary GNU General Public License instead of this License to a given copy of the Library. To do this, you must alter all the notices that refer to this License, so that they refer to the ordinary GNU General Public License, version 2, instead of to this License. (If a newer version than version 2 of the ordinary GNU General Public License has appeared, then you can specify that version instead if you wish.) Do not make any other change in these notices. Once this change is made in a given copy, it is irreversible for that copy, so the ordinary GNU General Public License applies to all subsequent copies and derivative works made from that copy. This option is useful when you wish to copy part of the code of the Library into a program that is not a library. 4. You may copy and distribute the Library (or a portion or derivative of it, under Section 2) in object code or executable form under the terms of Sections 1 and 2 above provided that you accompany it with the complete corresponding machine-readable source code, which must be distributed under the terms of Sections 1 and 2 above on a medium customarily used for software interchange. If distribution of object code is made by offering access to copy from a designated place, then offering equivalent access to copy the source code from the same place satisfies the requirement to distribute the source code, even though third parties are not compelled to copy the source along with the object code. 5. A program that contains no derivative of any portion of the Library, but is designed to work with the Library by being compiled or linked with it, is called a "work that uses the Library". Such a work, in isolation, is not a derivative work of the Library, and therefore falls outside the scope of this License. However, linking a "work that uses the Library" with the Library creates an executable that is a derivative of the Library (because it contains portions of the Library), rather than a "work that uses the library". The executable is therefore covered by this License. Section 6 states terms for distribution of such executables. When a "work that uses the Library" uses material from a header file that is part of the Library, the object code for the work may be a derivative work of the Library even though the source code is not. Whether this is true is especially significant if the work can be linked without the Library, or if the work is itself a library. The threshold for this to be true is not precisely defined by law. If such an object file uses only numerical parameters, data structure layouts and accessors, and small macros and small inline functions (ten lines or less in length), then the use of the object file is unrestricted, regardless of whether it is legally a derivative work. (Executables containing this object code plus portions of the Library will still fall under Section 6.) 195 www.open-e.com Open-E DSS V7 MANUAL Otherwise, if the work is a derivative of the Library, you may distribute the object code for the work under the terms of Section 6. Any executables containing that work also fall under Section 6, whether or not they are linked directly with the Library itself. 6. As an exception to the Sections above, you may also combine or link a "work that uses the Library" with the Library to produce a work containing portions of the Library, and distribute that work under terms of your choice, provided that the terms permit modification of the work for the customer's own use and reverse engineering for debugging such modifications. You must give prominent notice with each copy of the work that the Library is used in it and that the Library and its use are covered by this License. You must supply a copy of this License. If the work during execution displays copyright notices, you must include the copyright notice for the Library among them, as well as a reference directing the user to the copy of this License. Also, you must do one of these things: a) Accompany the work with the complete corresponding machine-readable source code for the Library including whatever changes were used in the work (which must be distributed under Sections 1 and 2 above); and, if the work is an executable linked with the Library, with the complete machine-readable "work that uses the Library", as object code and/or source code, so that the user can modify the Library and then relink to produce a modified executable containing the modified Library. (It is understood that the user who changes the contents of definitions files in the Library will not necessarily be able to recompile the application to use the modified definitions.) b) Use a suitable shared library mechanism for linking with the Library. A suitable mechanism is one that (1) uses at run time a copy of the library already present on the user's computer system, rather than copying library functions into the executable, and (2) will operate properly with a modified version of the library, if the user installs one, as long as the modified version is interface-compatible with the version that the work was made with. c) Accompany the work with a written offer, valid for at least three years, to give the same user the materials specified in Subsection 6a, above, for a charge no more than the cost of performing this distribution. d) If distribution of the work is made by offering access to copy from a designated place, offer equivalent access to copy the above specified materials from the same place. e) Verify that the user has already received a copy of these materials or that you have already sent this user a copy. For an executable, the required form of the "work that uses the Library" must include any data and utility programs needed for reproducing the executable from it. However, as a special exception, the materials to be distributed need not include anything that is normally distributed (in either source or binary form) with the major components (compiler, kernel, and so on) of the operating system on which the executable runs, unless that component itself accompanies the executable. It may happen that this requirement contradicts the license restrictions of other proprietary libraries that do not normally accompany the operating system. Such a contradiction means you cannot use both them and the Library together in an executable that you distribute. 7. You may place library facilities that are a work based on the Library side-by-side in a single library together with other library facilities not covered by this License, and distribute such a combined library, provided that the separate distribution of the work based on the Library 196 www.open-e.com Open-E DSS V7 MANUAL and of the other library facilities is otherwise permitted, and provided that you do these two things: a) Accompany the combined library with a copy of the same work based on the Library, uncombined with any other library facilities. This must be distributed under the terms of the Sections above. b) Give prominent notice with the combined library of the fact that part of it is a work based on the Library, and explaining where to find the accompanying uncombined form of the same work. 8. You may not copy, modify, sublicense, link with, or distribute the Library except as expressly provided under this License. Any attempt otherwise to copy, modify, sublicense, link with, or distribute the Library is void, and will automatically terminate your rights under this License. However, parties who have received copies, or rights, from you under this License will not have their licenses terminated so long as such parties remain in full compliance. 9. You are not required to accept this License, since you have not signed it. However, nothing else grants you permission to modify or distribute the Library or its derivative works. These actions are prohibited by law if you do not accept this License. Therefore, by modifying or distributing the Library (or any work based on the Library), you indicate your acceptance of this License to do so, and all its terms and conditions for copying, distributing or modifying the Library or works based on it. 10. Each time you redistribute the Library (or any work based on the Library), the recipient automatically receives a license from the original licensor to copy, distribute, link with or modify the Library subject to these terms and conditions. You may not impose any further restrictions on the recipients' exercise of the rights granted herein. You are not responsible for enforcing compliance by third parties with this License. 11. If, as a consequence of a court judgment or allegation of patent infringement or for any other reason (not limited to patent issues), conditions are imposed on you (whether by court order, agreement or otherwise) that contradict the conditions of this License, they do not excuse you from the conditions of this License. If you cannot distribute so as to satisfy simultaneously your obligations under this License and any other pertinent obligations, then as a consequence you may not distribute the Library at all. For example, if a patent license would not permit royalty-free redistribution of the Library by all those who receive copies directly or indirectly through you, then the only way you could satisfy both it and this License would be to refrain entirely from distribution of the Library. If any portion of this section is held invalid or unenforceable under any particular circumstance, the balance of the section is intended to apply, and the section as a whole is intended to apply in other circumstances. It is not the purpose of this section to induce you to infringe any patents or other property right claims or to contest validity of any such claims; this section has the sole purpose of protecting the integrity of the free software distribution system which is implemented by public license practices. Many people have made generous contributions to the wide range of software distributed through that system in reliance on consistent application of that system; it is up to the author/donor to decide if he or she is willing to distribute software through any other system and a licensee cannot impose that choice. This section is intended to make thoroughly clear what is believed to be a consequence of the rest of this License. 197 www.open-e.com Open-E DSS V7 MANUAL 12. If the distribution and/or use of the Library is restricted in certain countries either by patents or by copyrighted interfaces, the original copyright holder who places the Library under this License may add an explicit geographical distribution limitation excluding those countries, so that distribution is permitted only in or among countries not thus excluded. In such case, this License incorporates the limitation as if written in the body of this License. 13. The Free Software Foundation may publish revised and/or new versions of the Lesser General Public License from time to time. Such new versions will be similar in spirit to the present version, but may differ in detail to address new problems or concerns. Each version is given a distinguishing version number. If the Library specifies a version number of this License which applies to it and "any later version", you have the option of following the terms and conditions either of that version or of any later version published by the Free Software Foundation. If the Library does not specify a license version number, you may choose any version ever published by the Free Software Foundation. 14. If you wish to incorporate parts of the Library into other free programs whose distribution conditions are incompatible with these, write to the author to ask for permission. For software which is copyrighted by the Free Software Foundation, write to the Free Software Foundation; we sometimes make exceptions for this. Our decision will be guided by the two goals of preserving the free status of all derivatives of our free software and of promoting the sharing and reuse of software generally. NO WARRANTY 15. BECAUSE THE LIBRARY IS LICENSED FREE OF CHARGE, THERE IS NO WARRANTY FOR THE LIBRARY, TO THE EXTENT PERMITTED BY APPLICABLE LAW. EXCEPT WHEN OTHERWISE STATED IN WRITING THE COPYRIGHT HOLDERS AND/OR OTHER PARTIES PROVIDE THE LIBRARY "AS IS" WITHOUT WARRANTY OF ANY KIND, EITHER EXPRESSED OR IMPLIED, INCLUDING, BUT NOT LIMITED TO, THE IMPLIED WARRANTIES OF MERCHANTABILITY AND FITNESS FOR A PARTICULAR PURPOSE. THE ENTIRE RISK AS TO THE QUALITY AND PERFORMANCE OF THE LIBRARY IS WITH YOU. SHOULD THE LIBRARY PROVE DEFECTIVE, YOU ASSUME THE COST OF ALL NECESSARY SERVICING, REPAIR OR CORRECTION. 16. IN NO EVENT UNLESS REQUIRED BY APPLICABLE LAW OR AGREED TO IN WRITING WILL ANY COPYRIGHT HOLDER, OR ANY OTHER PARTY WHO MAY MODIFY AND/OR REDISTRIBUTE THE LIBRARY AS PERMITTED ABOVE, BE LIABLE TO YOU FOR DAMAGES, INCLUDING ANY GENERAL, SPECIAL, INCIDENTAL OR CONSEQUENTIAL DAMAGES ARISING OUT OF THE USE OR INABILITY TO USE THE LIBRARY (INCLUDING BUT NOT LIMITED TO LOSS OF DATA OR DATA BEING RENDERED INACCURATE OR LOSSES SUSTAINED BY YOU OR THIRD PARTIES OR A FAILURE OF THE LIBRARY TO OPERATE WITH ANY OTHER SOFTWARE), EVEN IF SUCH HOLDER OR OTHER PARTY HAS BEEN ADVISED OF THE POSSIBILITY OF SUCH DAMAGES. END OF TERMS AND CONDITIONS How to Apply These Terms to Your New Libraries If you develop a new library, and you want it to be of the greatest possible use to the public, we recommend making it free software that everyone can redistribute and change. You can do so by permitting redistribution under these terms (or, alternatively, under the terms of the ordinary General Public License). 198 www.open-e.com Open-E DSS V7 MANUAL To apply these terms, attach the following notices to the library. It is safest to attach them to the start of each source file to most effectively convey the exclusion of warranty; and each file should have at least the "copyright" line and a pointer to where the full notice is found. one line to give the library's name and an idea of what it does. Copyright (C) year name of author This library is free software; you can redistribute it and/or modify it under the terms of the GNU Lesser General Public License as published by the Free Software Foundation; either version 2.1 of the License, or (at your option) any later version. This library is distributed in the hope that it will be useful, but WITHOUT ANY WARRANTY; without even the implied warranty of MERCHANTABILITY or FITNESS FOR A PARTICULAR PURPOSE. See the GNU Lesser General Public License for more details. You should have received a copy of the GNU Lesser General Public License along with this library; if not, write to the Free Software Foundation, Inc., 59 Temple Place, Suite 330, Boston, MA 02111-1307 USA Also add information on how to contact you by electronic and paper mail. You should also get your employer (if you work as a programmer) or your school, if any, to sign a "copyright disclaimer" for the library, if necessary. Here is a sample; alter the names: Yoyodyne, Inc., hereby disclaims all copyright interest in the library `Frob' (a library for tweaking knobs) written by James Random Hacker. signature of Ty Coon, 1 April 1990 Ty Coon, President of Vice That's all there is to it! Apache License, Version 2.0 Apache License Version 2.0, January 2004 http://www.apache.org/licenses/ TERMS AND CONDITIONS FOR USE, REPRODUCTION, AND DISTRIBUTION 1. Definitions. "License" shall mean the terms and conditions for use, reproduction, and distribution as defined by Sections 1 through 9 of this document. "Licensor" shall mean the copyright owner or entity authorized by the copyright owner that is granting the License. "Legal Entity" shall mean the union of the acting entity and all other entities that control, are controlled by, or are under common control with that entity. For the purposes of this definition, "control" means (i) the power, direct or indirect, to cause the direction or management of such entity, whether by contract or otherwise, or (ii) ownership of fifty percent (50%) or more of the outstanding shares, or (iii) beneficial ownership of such entity. "You" (or "Your") shall mean an individual or Legal Entity exercising permissions granted by this License. "Source" form shall mean the preferred form for making modifications, including but not limited to software source code, documentation source, and configuration files. 199 www.open-e.com Open-E DSS V7 MANUAL "Object" form shall mean any form resulting from mechanical transformation or translation of a Source form, including but not limited to compiled object code, generated documentation, and conversions to other media types. "Work" shall mean the work of authorship, whether in Source or Object form, made available under the License, as indicated by a copyright notice that is included in or attached to the work (an example is provided in the Appendix below). "Derivative Works" shall mean any work, whether in Source or Object form, that is based on (or derived from) the Work and for which the editorial revisions, annotations, elaborations, or other modifications represent, as a whole, an original work of authorship. For the purposes of this License, Derivative Works shall not include works that remain separable from, or merely link (or bind by name) to the interfaces of, the Work and Derivative Works thereof. "Contribution" shall mean any work of authorship, including the original version of the Work and any modifications or additions to that Work or Derivative Works thereof, that is intentionally submitted to Licensor for inclusion in the Work by the copyright owner or by an individual or Legal Entity authorized to submit on behalf of the copyright owner. For the purposes of this definition, "submitted" means any form of electronic, verbal, or written communication sent to the Licensor or its representatives, including but not limited to communication on electronic mailing lists, source code control systems, and issue tracking systems that are managed by, or on behalf of, the Licensor for the purpose of discussing and improving the Work, but excluding communication that is conspicuously marked or otherwise designated in writing by the copyright owner as "Not a Contribution." "Contributor" shall mean Licensor and any individual or Legal Entity on behalf of whom a Contribution has been received by Licensor and subsequently incorporated within the Work. 2. Grant of Copyright License. Subject to the terms and conditions of this License, each Contributor hereby grants to You a perpetual, worldwide, non-exclusive, no-charge, royaltyfree, irrevocable copyright license to reproduce, prepare Derivative Works of, publicly display, publicly perform, sublicense, and distribute the Work and such Derivative Works in Source or Object form. 3. Grant of Patent License. Subject to the terms and conditions of this License, each Contributor hereby grants to You a perpetual, worldwide, non-exclusive, no-charge, royaltyfree, irrevocable (except as stated in this section) patent license to make, have made, use, offer to sell, sell, import, and otherwise transfer the Work, where such license applies only to those patent claims licensable by such Contributor that are necessarily infringed by their Contribution(s) alone or by combination of their Contribution(s) with the Work to which such Contribution(s) was submitted. If You institute patent litigation against any entity (including a cross-claim or counterclaim in a lawsuit) alleging that the Work or a Contribution incorporated within the Work constitutes direct or contributory patent infringement, then any patent licenses granted to You under this License for that Work shall terminate as of the date such litigation is filed. 4. Redistribution. You may reproduce and distribute copies of the Work or Derivative Works thereof in any medium, with or without modifications, and in Source or Object form, provided that You meet the following conditions: a. You must give any other recipients of the Work or Derivative Works a copy of this License; and 200 www.open-e.com Open-E DSS V7 MANUAL b. You must cause any modified files to carry prominent notices stating that You changed the files; and c. You must retain, in the Source form of any Derivative Works that You distribute, all copyright, patent, trademark, and attribution notices from the Source form of the Work, excluding those notices that do not pertain to any part of the Derivative Works; and d. If the Work includes a "NOTICE" text file as part of its distribution, then any Derivative Works that You distribute must include a readable copy of the attribution notices contained within such NOTICE file, excluding those notices that do not pertain to any part of the Derivative Works, in at least one of the following places: within a NOTICE text file distributed as part of the Derivative Works; within the Source form or documentation, if provided along with the Derivative Works; or, within a display generated by the Derivative Works, if and wherever such third-party notices normally appear. The contents of the NOTICE file are for informational purposes only and do not modify the License. You may add Your own attribution notices within Derivative Works that You distribute, alongside or as an addendum to the NOTICE text from the Work, provided that such additional attribution notices cannot be construed as modifying the License. You may add Your own copyright statement to Your modifications and may provide additional or different license terms and conditions for use, reproduction, or distribution of Your modifications, or for any such Derivative Works as a whole, provided Your use, reproduction, and distribution of the Work otherwise complies with the conditions stated in this License. 5. Submission of Contributions. Unless You explicitly state otherwise, any Contribution intentionally submitted for inclusion in the Work by You to the Licensor shall be under the terms and conditions of this License, without any additional terms or conditions. Notwithstanding the above, nothing herein shall supersede or modify the terms of any separate license agreement you may have executed with Licensor regarding such Contributions. 6. Trademarks. This License does not grant permission to use the trade names, trademarks, service marks, or product names of the Licensor, except as required for reasonable and customary use in describing the origin of the Work and reproducing the content of the NOTICE file. 7. Disclaimer of Warranty. Unless required by applicable law or agreed to in writing, Licensor provides the Work (and each Contributor provides its Contributions) on an "AS IS" BASIS, WITHOUT WARRANTIES OR CONDITIONS OF ANY KIND, either express or implied, including, without limitation, any warranties or conditions of TITLE, NONINFRINGEMENT, MERCHANTABILITY, or FITNESS FOR A PARTICULAR PURPOSE. You are solely responsible for determining the appropriateness of using or redistributing the Work and assume any risks associated with Your exercise of permissions under this License. 8. Limitation of Liability. In no event and under no legal theory, whether in tort (including negligence), contract, or otherwise, unless required by applicable law (such as deliberate and grossly negligent acts) or agreed to in writing, shall any Contributor be liable to You for damages, including any direct, indirect, special, incidental, or consequential damages of any character arising as a result of this License or out of the use or inability to use the Work (including but not limited to damages for loss of goodwill, work stoppage, computer failure or malfunction, or any and all other commercial damages or losses), even if such Contributor has been advised of the possibility of such damages. 201 www.open-e.com Open-E DSS V7 MANUAL 9. Accepting Warranty or Additional Liability. While redistributing the Work or Derivative Works thereof, You may choose to offer, and charge a fee for, acceptance of support, warranty, indemnity, or other liability obligations and/or rights consistent with this License. However, in accepting such obligations, You may act only on Your own behalf and on Your sole responsibility, not on behalf of any other Contributor, and only if You agree to indemnify, defend, and hold each Contributor harmless for any liability incurred by, or claims asserted against, such Contributor by reason of your accepting any such warranty or additional liability. END OF TERMS AND CONDITIONS APPENDIX: How to apply the Apache License to your work To apply the Apache License to your work, attach the following boilerplate notice, with the fields enclosed by brackets "[]" replaced with your own identifying information. (Don't include the brackets!) The text should be enclosed in the appropriate comment syntax for the file format. We also recommend that a file or class name and description of purpose be included on the same "printed page" as the copyright notice for easier identification within third-party archives. Copyright [yyyy] [name of copyright owner] Licensed under the Apache License, Version 2.0 (the "License"); you may not use this file except in compliance with the License. You may obtain a copy of the License at http://www.apache.org/licenses/LICENSE-2.0 Unless required by applicable law or agreed to in writing, software distributed under the License is distributed on an "AS IS" BASIS, WITHOUT WARRANTIES OR CONDITIONS OF ANY KIND, either express or implied. See the License for the specific language governing permissions and limitations under the License. 202 www.open-e.com


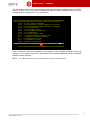
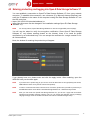

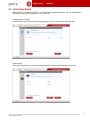
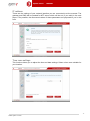
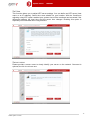
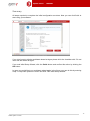
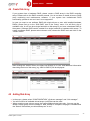
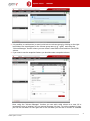
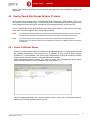
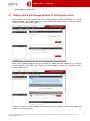


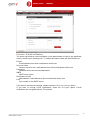
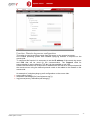
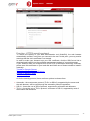
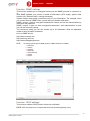
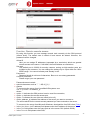
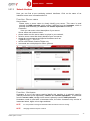
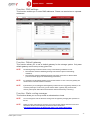
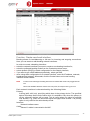
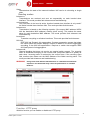
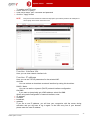

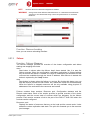

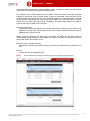


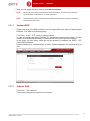

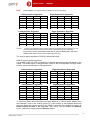
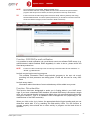
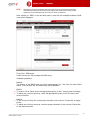
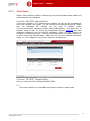
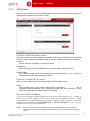
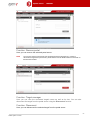
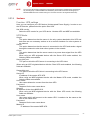
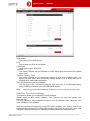
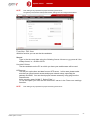
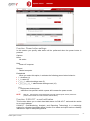
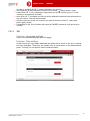
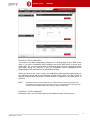
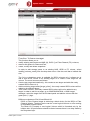
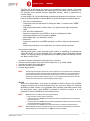
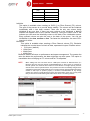

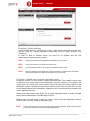
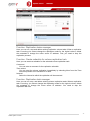
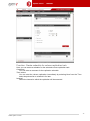
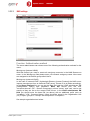
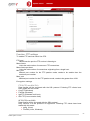
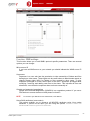
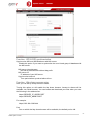
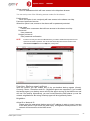
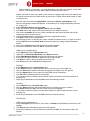

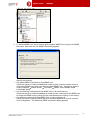
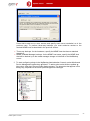
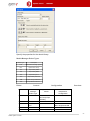
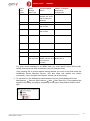


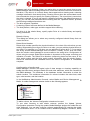
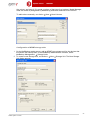
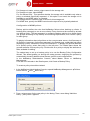
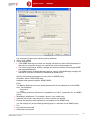
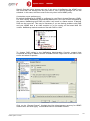
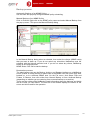
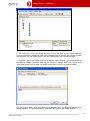

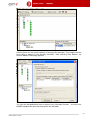
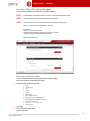

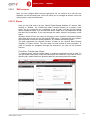
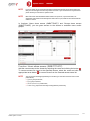
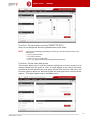
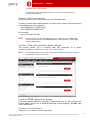
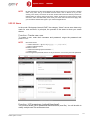
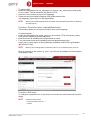
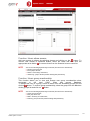
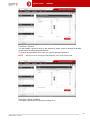
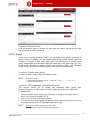
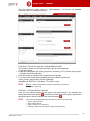
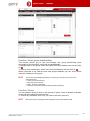
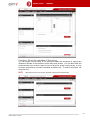
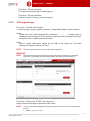
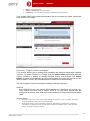
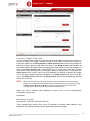
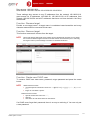
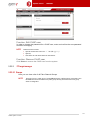
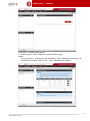
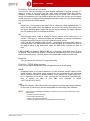
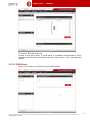
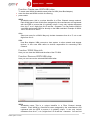

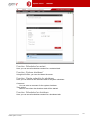
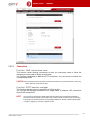
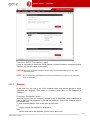
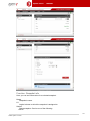
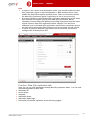
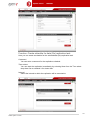
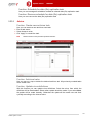
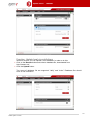
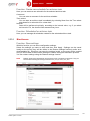
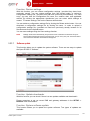
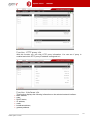
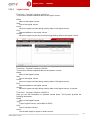
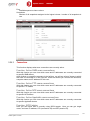
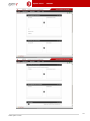

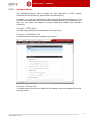
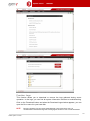
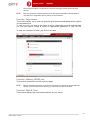
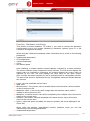
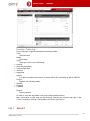
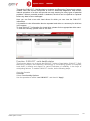

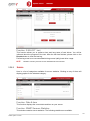
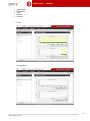
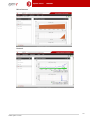
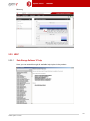
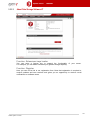
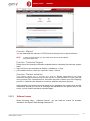

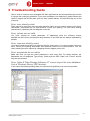


![[User-Manual]](http://vs1.manualzilla.com/store/data/005694860_1-a110ecd9b75056c42b066f9fe48fba59-150x150.png)