1
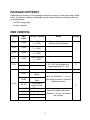
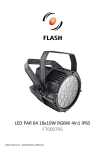
612720 USER’S MANUAL SAFETY WARNINGS AND GUIDELINES Prior to operation, check the unit and power cord for physical damage. Do not use if physical damage has occurred. Before plugging the unit into a power outlet, ensure that the outlet provides the same type and level of power required by the device. This device uses a grounded power cord and requires a ground connection for safe operation. Ensure that the power source has a proper ground connection. Do not modify the plug or use a "cheater" plug to bypass the ground connection. Do not expose this device to rain, water, or moisture of any kind. Do not use in extremely dusty environments. Do not touch the device with wet hands. This device has no user serviceable parts. Do not attempt to open, service, or modify this device. Do not look directly into the light source. Keep the original packaging material for use when transporting the device. If the device will not be used for any lengthy period of time, it should be unplugged from the wall. When installing this device, ensure that the mount is sufficiently robust to support the weight of the unit and to prevent unwanted movement. INTRODUCTION Thank you for purchasing this stage light from Monoprice! This light features an aluminum shell and 177 RGB LEDs. Each color can be independently dimmed, faded, and mixed. The light features built-in programs for dimming and strobe effect. Additionally, it supports standard DMX-512 control signals for use as part of a larger light production. CUSTOMER SERVICE The Monoprice Customer Service department is dedicated to ensuring that your ordering, purchasing, and delivery experience is second to none. If you have any problem with your order, please give us an opportunity to make it right. You can contact a Monoprice Customer Service representative through the Live Chat link on our website www.monoprice.com during normal business hours (Mon-Fri: 5am-7pm PT, Sat-Sun: 9am-6pm PT) or via email at [email protected] 2 PACKAGE CONTENTS Please take an inventory of the package contents to ensure you have all the items listed below. If anything is missing or damaged, please contact Monoprice Customer Service for a replacement. 1x PAR-64 stage light 1x User's manual DMX CONTROL Channel DMX Value Control Function Notes 1 CH 0-255 General Dimming 0 ~ 100% Must use this channel or dimming will not function 2 CH 0-255 Red Dimming 0 ~ 100% 3 CH 0-255 Green Dimming 0 ~ 100% 4 CH 0-255 Blue Dimming 0 ~ 100% 0-14 Dimming 15-255 Strobe Speed 0-31 Invalid 32-63 From Dark to Bright 64-95 From Bright to Dark 96-127 From Dark to Bright to Dark 128-159 RGB Gradient 160-191 3 Color Cycling 192-223 7 Color Cycling 224-255 Sound Activated 5 CH 6 CH Priority 1 When Channel 6 is set between 32 ~ 255, this changes to a speed adjustment 0 ~ 255 2 Must use Channels 1 ~ 4 or no light will be produced. Channel 5 adjusts the speed. 3 Channel 5 adjusts the speed. Channels 1-4, and 7 and above are ignored. 3 CONTROLS The buttons on the control panel have the following functions: MENU: Pressing the MENU button cycles through the various menu options. UP: Increases the displayed value. DOWN: Decreases the displayed value. ENTER: Press ENTER to set the displayed value. Menu Options The menu contains the following options: d###: DMX mode (d001-d512) So##/Au##: Built-in program selection (Su01-Su02, Au01-Au10, 12 programs in all) St##: Strobe mode (St00-St16, St00 is strobe off, St16 is fastest) SP##: Built-in program speed adjustment (SP01-SP16, SP16 is the fastest) r###: Red color brightness adjustment mode (r000-r255, r255 is the brightest) g###: Green color brightness adjustment mode (g000- g255, g255 is the brightest) b###: Blue color brightness adjustment mode (b000- b255, b255 is the brightest) Note that when in DMX mode, the d in the display will flash when no DMX signal is present. The twelve built-in programs are: So01 Sound activated mode without strobe Au05 Blue + Green Su02 Sound activate mode with strobe Au06 Red + Blue Au01 Red Au07 Red + Green + Blue Au02 Green Au08 Red then Blue Au03 Blue Au09 7-color cycling Au04 Red + Green Au10 Gradual color change 4 Menu Operation To illustrate the methods used to manipulate the menu options, we will take as an example selecting 7-color cycling mode program to execute: 1. Press the MENU button repeatedly until either Au## or So## is displayed. 2. Press the ENTER button to select entry for editing. 3. Use the UP or DOWN buttons to increment or decrement the value until the display shows Au09. 4. Press the ENTER button to set the Program. The light will now operate in 7-color cycling mode. Master/Slave Operation Multiple lights can be daisy chained together, with one serving as the master and the others configured as slaves to perform whatever actions are performed by the master unit. The master light can be in any mode except DMX mode, while all the slaves must be set to DMX mode, using the address d001. Note: If the daisy chain is longer than 60 meters or if it contains 20 or more light fixtures, a DMX signal amplifier should be used to ensure that all devices get valid instruction signals. Note: The last device in any DMX chain must be terminated using a DMX Terminator. You can purchase a DMX terminator (PID 601600) from Monoprice or you can make a DMX terminator using a standard XLR male plug (PID 601651) by soldering a 120 ohm (1/4 watt) resistor between pins 2 and 3. 5 3-pin XLR to 5-pin DMX Conversion While most DMX compatible equipment uses 3-pin XLR connectors, some devices use the official 5-pin DMX connector. To make a 3-pin to 5-pin converter simply make a cable with a 3-pin XLR connector on one end and a 5-pin DMX connector on the other. Connect the pins as follows: 3-pin XLR to 5-pin DMX Adapter Signal 3-pin XLR 5-pin DMX Ground/Shield 1 1 Data Compliment (- signal) 2 2 Data True (+ signal) 3 3 Do Not Use 4 Do Not Use 5 TROUBLESHOOTING Following are some common problems and common solutions. Problem: The light will not turn on. Solutions: Check to ensure the power cord is connected to a power outlet. Check to ensure that the connected outlet has available power. Check to ensure the power switch is in the ON position. Check to see if the fuse has blown, replace as necessary. Problem: The light will not execute DMX instructions. Solutions: Check to ensure that the light is connected to the controller via a DMX cable. Check to ensure that the DMX chain is properly terminated. Check to ensure that the DMX cable is good, swap out a known good cable to test. Check to ensure the light is in DMX mode (d001). Check to ensure the DMX controller is operating properly. If you experience other problems with this light and cannot solve them on your own, please contact Monoprice Technical Support for assistance. 6 TECHNICAL SUPPORT Monoprice is pleased to provide free, live, online technical support to assist you with any questions you may have about installation, setup, troubleshooting or product recommendations. If you ever need assistance with your new product, please come online to talk to one of our friendly and knowledgeable Tech Support Associates. Technical support is available through the online chat button on our website www.monoprice.com during regular business hours, 7 days a week. You can also get assistance through email by sending a message to [email protected] SPECIFICATIONS Input Voltage: 100 ~ 264 VAC, 47 ~ 63 Hz Output Voltage: 12 VDC Maximum Power Consumption: 18 watts Lamp Type: 10mm High Brightness LED, Red x60, Green x60, Blue x57 Control Mode: Stand Alone, DMX-512, Master/Slave Channels: 6 Color Effect: RGB mixing Function Effects: Dimmer, Strobe, Gradual Change, Sound Activated Beam Angle: 25° Cooling Mode: Natural Convection Protection Rating: IP20 Dielectric Strength: 1.5kV Insulation Resistance: >2 megohm Dimensions: 12.2" x 9.1" x 9.1" (310 x 230 x 230 mm) Net Weight: 4.4 lbs. (2.0 kg) 7 REGULATORY COMPLIANCE Notice for FCC This device complies with Part 15 of the FCC rules. Operation is subject to the following two conditions: (1) this device may not cause harmful interference, and (2) this device must accept any interference received, including interference that may cause undesired operation. Modifying the equipment without Monoprice’s authorization may result in the equipment no longer complying with FCC requirements for Class A digital devices. In that event, your right to use the equipment may be limited by FCC regulations, and you may be required to correct any interference to radio or television communications at your own expense. This equipment has been tested and found to comply with the limits for a Class A digital device, pursuant to Part 15 of the FCC Rules. These limits are designed to provide reasonable protection against harmful interference in a commercial installation. This equipment generates, uses and can radiate radio frequency energy and, if not installed and used in accordance with the instructions, may cause harmful interference to radio communications. Operation of this equipment in a residential area is likely to cause harmful interference, in which case the user will be required to correct the interference at his own expense. Notice for Industry Canada This Class B digital apparatus complies with Canadian ICES-003. Cet appareil numérique de la classe B est conforme à la norme NMB-003 du Canada. EU Conformity with applicable directives This equipment complies with the essential requirements listed below: EMC Directive 2004/108/EC Low Voltage Directive 2006/95/EC RoHS Directive 2011/65/EU WEEE Directive 2011/65/EU Packaging & Packaging Waste Directive 94/62/EC 8