1
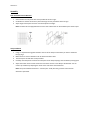
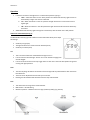
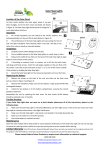
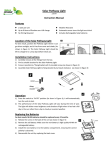
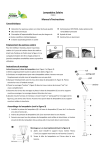
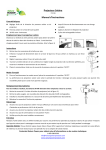
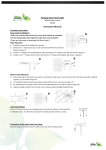
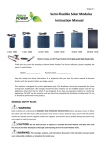
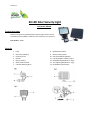
Version 1.1 60 LED Solar Security Light Instruction Manual Product Description Thank you for purchasing the 60 LED Solar Security Light. Please read this instruction manual carefully to obtain the best results from your purchase. Item Number: 22050 Parts List 1. 2. 3. 4. 5. 6. 7. Lamp Solar Panel (5M Wire) Expansion Screw 60 LEDs Battery Housing Motion Detector head U-Shaped Mounting Plate 8. 9. 10. 11. 12. 13. 14. ON/OFF/AUTO Switch Battery Housing Outlet Solar Panel Mounting Bracket LUX Adjusting Dial (Shown in Fig 7) SENS Adjusting Dial (Shown in Fig 7) Time Adjusting Dial (Shown in Fig 7) NI-HM Battery (Not Shown) Version 1.1 Assembly Solar Panel Wall or Deck Mounted 1. 2. 3. Secure bracket to solar panel with screw provided as shown in Fig 5. Set bracket on surface and secure in place with larger screws provided as shown in Fig 6. Adjust angle of solar panel to ensure it receives optimum sunlight. Note: The Solar Panel is equipped with a 5 meter cord so both units can be installed up to 5 meters apart. Lamp Installation 1. 2. 3. 4. 5. Using ‘U’ shaped mounting plate located to the rear of the lamp to mark where you want to install the lamp (7) Fig 1. Make sure this is clear of obstacles such as cables and electric lines. Secure lamp to the wall with screws provided. Carefully route the power cord from the solar panel to the lamp and plug it into the battery housing input. Adjust the motion sensor so that it faces the area where motion is most likely to be detected. You can move it up and down by adjusting the screw on the neck of the motion detector. Note: Lamp unit should be mounted 2 – 3 meters (6.5 – 9.8ft) from the ground to ensure motion detection is optimised. Version 1.1 Operation 1. 2. Located on the front of the light there is a switch with 3 positions. (8) Fig 4. a. ‘Auto’ – When the switch is in the ‘Auto’ position the 60 LED Solar Security Light will turn on automatically at night once motion is detected b. ‘On’ – When the switch is in the ‘On’ position the light will remain on and can be used as a regular light. c. ‘Off’ - When the switch is in the ‘Off’ position the light will remain off and will not detect any movement. Allow 60 LED Solar Security Light to charge for at least 3 days with the switch in the ‘Off’ position. How to use Control Dials (See Fig 7) The 60 LED Solar Security Light has 3 different control dials which allow you to adjust the settings. Sensitivity to Light (Lux) The lights duration once motion has been detected (Time) Sensitivity to motion (Sens) This is the level of darkness reached before the light turns on If set to maximum level the light will turn on in most situations ranging from dusk to daylight. If set to minimum the sensor will only trigger when it’s dark. This is the most ideal position for general evening and night operation. Lux Time The Time adjusting dial will set the duration of time the light will stay illuminated for after motion has been detected. The time can be adjusted from 8 seconds up to 2 minutes. Rotating the dial clockwise will extend the time the lamp is illuminated. Sens This determines the range of the motion detector Mid Position – Normal Setting Maximum position – Maximises sensors range (5 Meters [16.4ft]). (Fig 8 and 9) Version 1.1 Troubleshooting If 60 LED Solar Security Light does not illuminate when movement in front of the sensor is obvious please observe the following. Ensure the solar panel is in a location where it will receive maximum sunlight during daytime hours. Clean solar cells with a damp towel, Do not apply excessive pressure and avoid the use of any solvents or cleaning agents on the solar cells. Ensure switch is set to ‘Auto’. Check batteries are installed correctly. Allow Panel to charge in direct sunlight for 2 days to confirm the batteries are fully charged. Replace Batteries. Note: Rechargeable batteries may last up to 800 charges. For best performance replace batteries every 12 months Replacing Batteries 1. 2. 3. 4. Batteries are located in the battery housing located at the front of the lamp (5) Fig 3. Remove screws from front of the battery housing to access batteries. Replace batteries with rechargeable batteries of the same type and rating. Reassemble battery housing. Maintenance Ensuring the lamp is kept clean will optimise performance Clean Solar cell with a damp towel, Do not apply excessive pressure. Do not use any solvents or cleaning agents on the solar modules. Safety Information Do not install close to flames or flammable gasses Keep away from children Do not install on a unstable surfaces/position Do not stare directly at the lights while they are on To prevent the unit from falling, install the base unit tightly with expansion screw Solar Security light, cannot prevent crimes, its invented to alarm use of motion Do not install in close proximity to other light sources Limited Warranty Proof of purchase required Nature Power warrants to the original purchaser that this product is free from defects in materials and workmanship for a period of 1 year from date of purchase. For more information contact: Nature Power Products 1-800-588-0590 www.naturepowerproducts.com [email protected] Scan me for more information Version 1.1