1
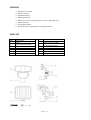
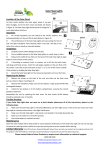
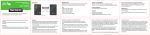
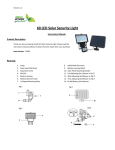
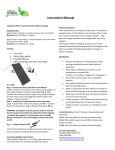
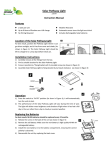
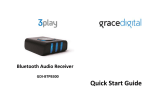
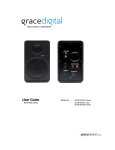
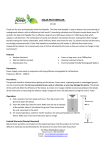
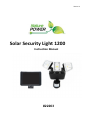
Version 1.0 Solar Security Light 1200 Instruction Manual #22263 Thank you very much for choosing a Nature Power Product! For future reference, please complete the owner’s record below: Model: _______________ Purchase Date: _______________ Save the receipt and these instructions. It is important that you read the entire manual to become familiar with this product before you begin using it. This machine is designed for certain applications only. The distributor cannot be responsible for issues arising from modification. We strongly recommend this machine not be modified and/or used for any application other than that for which it was designed. If you have any questions relative to a particular application, DO NOT use the machine until you have first contacted the distributor to determine if it can or should be performed on the product. For technical questions please call 1-‐800-‐588-‐0590. GENERAL SAFETY RULES WARNING: Read carefully and understand all ASSEMBLY AND OPERATION INSTRUCTIONS before operating. Failure to follow the safety rules and other basic safety precautions may result in serious personal injury. CAUTION: Do not allow persons to operate or assemble this product until they have read this manual and have developed a thorough understanding of how the product works. WARNING: The warnings, cautions, and instructions discussed in this instruction manual cannot cover all possible conditions or situations that could occur. It must be understood by the operator that common sense and caution are factors which cannot be built into this product, but must be supplied by the operator. SAVE THESE INSTRUCTIONS Page 2 of 7 FEATURES Ø Adjustable swivel head Ø Weather Resistant Ø Adjustable Settings Ø No Wiring Required Ø Microwave sensing technology, detects motion in 360 degree area Ø Motion Activated Ø Super Bright COB LED Ø Amorphous Solar Panel Charges In Low Light Conditions PARTS LIST Part 1 2 3 Description Lamp Solar Panel (5m wire) Expansion screw 4 5 6 7 LED Battery Housing Motion Detector Head ON/OFF/AUTO Switch Part 8 9 10 11 12 13 14 Description Battery Housing outlet Solar Panel Mounting Bracket LUX Adjusting Knob SENS Adjusting Knob TIME Adjusting Knob Quick-Clip Mounting Bracket Battery pack (no show) USE AND CARE Page 3 of 7 • Do not modify the product in any way. Unauthorized modification may impair the function and/or safety and could affect the life of the equipment. There are specific applications for which the product was designed. • Always check of damaged or worn out parts before using the product. Broken parts will affect the products operation. Replace or repair damaged or worn parts immediately. • Store idle product. When the product is not in use, store it in a secure place out of the reach of children. Inspect it for good working condition prior to storage and before re-‐use. 1. INSTALLATION 1) The “Solar Sensor Light” should be set up at a location where you desire to have extra lighting to detect persons or objects moving at night or in the dark. 2) Decide where you want to place the Lamp(1) and Solar panel(2). The Light is equipped with 5 meter connecting wire, so the Lamp(1) and Solar panel(2) can be installed up to 5 meters apart. 3) The Solar panel(2) must be set in a location that receives full, direct sunlight a minimum of 8 hours a day. So we advise putting it on a wall or roof. 4) Mount the Lamp(1) 2 to 3 meter above ground on a solid surface capable of supporting the Lamp(1) and secure enough so that it will not move when exposed to vibration or wind. The unit must be high enough to allow for motion detection and light distribution. 5) Using the Mounting Plate as a template, mark certain that the drilling path is clear of obstacles such as cable and electrical line. Place Mounting Bracket(13) on drilled holes and thread in the enclosed Mounting Screws to secure Mounting Bracket in position. 6) Install the Solar Panel(2) in the same way that you installed the Lamp(1) in steps 4 and 5. 7) Carefully route the power Cord of the Solar Panel(2) to the Lamp(1) and plug it into the battery housing outlet(8). 8) Adjust the Motion Detector Head(6) below the light by moving it left or right so that it faces the area where movement will occur. Move it up or down by using the screw located on the neck of motion Detector Head(6). OPERATION • Before the Solar Sensor Light can operate to its full capacity, the Solar Panel needs to be in sunlight for 3 days to fully charge the battery. Turn the Switch to the “OFF” position. After charge, turn the switch to “AUTO” or “ON” position. • Turn the switch to “AUTO” position, the light will turn on automatically at night when motion is detected by the Motion Detector Head(6). • Turn the switch to “ON” position, the light can be used as a standard light. Page 4 of 7 How to use Switch • You can choose 3 ways to use the switch under the battery housing of the Lamp(1). • OFF Middle position When you do not need lightening. • ON Left position Light can be used as a standard light. Camping, Fishing, Emergency and so on. • AUTO Right position Light turns on automatically. Entrance, Garage, porch, Eaves and so on. How to use Control Knobs • The Solar Sensor Light has 3 different Control Knobs which control the light’s duration, sensitivity to light and sensitivity to motion-‐see. LUX (Light level) 1) The LUX Adjusting Knob(10) tells the sensor the level of darkness that must be reached before the light turns on. 2) If set to the maximum level, the light will go on in most situation ranging from dark to daylight. Page 5 of 7 3) If set to the minimum setting the sensor will only trigger the light to turn on at dusk or when it is dark out. This is the ideal position for general evening and night operation. If the Solar Sensor Light is not operating at night due to interference from a street light or other interference, turn the LUX knob towards . TIME 1) The TIME Adjusting Knob(12) sets the duration of time that the Light should stay lit after motion is no longer detected in the field of vision. 2) The TIME is adjustable from 8 seconds to 2 minutes. Moving the knob clockwise will make it stay on longer. SENS (Sensitivity) Minimum position Ideal for hot summer conditions or when nuisance tripping is a problem. 1) Mid position Normal setting 2) Maximum position Ideal for cold winter conditions or to maximize range. Note: • The Motion Detector Head is most sensitive to movement across the detection the zone, rather than movement toward or away from the Motion Detector Head(6). • If the light is over-‐activated by small animals or rapid changes in Heat. • If the light is in operation in hot summer conditions, the sensitivity can be reduced by turning the knob counter clockwise towards the minimum setting (“-‐“). REPLACING BATTERY 1. 2. 3. 4. Battery is located in the battery compartment located at the rear of the light. Remove screws from the front of the battery case lid to access battery. Replace battery with rechargeable Li-‐ion battery of the same type and rating. Reassemble battery case lid. LOCATION OF PRODUCT For best results, please locate your product in a position where it can absorb direct sunlight on the solar panel, and generally free from cover and shade. Page 6 of 7 MAINTENANCE Maintain your product. It is recommended that the general condition of any product be examined before it is used. Clean the solar module with a damp towel to insure optimum performance of the product. Do not use any type of solvent for cleaning and be careful not to put too much pressure on the module while cleaning. LIMITED WARRANTY Nature Power warrants our products to the original purchaser that this product is free from defects in materials and workmanship for the period of 1 year from date of purchase. In the case of product defect, contact Nature Power customer service to receive troubleshooting. If defective part or unit should be returned, a Return Authorization Number must be issued by Nature Power and the defective part or unit should be returned to the authorized location at the purchasers’ expense. A dated proof of purchase is required to receive warranty service. Once received at authorized location and defect proves to be the result of defective material and workmanship, the defective part or unit will be replaced at warrantors’ option and returned to the original purchaser at warrantors’ expense. No refunds will be granted by the warrantor, in the event of buyer’s remorse please contact your point of purchase within and in adherence to their return policy. Refunds are granted at the retailers’ discretions. Dated Proof of Purchase is required. Please contact Nature Power Products to acquire more information: 1-‐800-‐588-‐0590 [email protected] www.naturepowerproducts.com Page 7 of 7