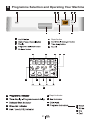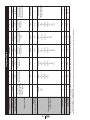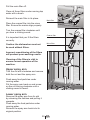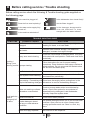
1
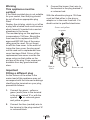
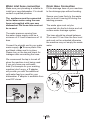
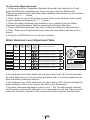
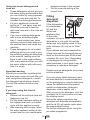
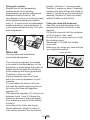
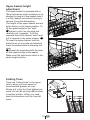
Dishwasher
Instruction Manual
GSN 9476 A
Welcome
Dear customer
Congratulations on your choice of a quality dishwasher which has been designed
to give you lasting service.
Please read these instructions before installing the dishwasher and using it for the
first time. The information contained herein is provided to avoid accidental risks
and/or damage to your appliance
Make sure you understand the controls prior to using your appliance. The
dishwasher must only be used for it’s intended purpose, i.e. the washing of dishes
in the home. Failure to observe these instructions may invalidate your right to free
service during the guarantee period.
Please keep these instructions in a safe place for your future reference
If you have any questions, or if you are not sure about any information contained
in this booklet please contact us - details are on the back cover.
Customer Service
Notes
Due to the quality control processes during production, there may be some
water left in your machine. This does not cause any damage.
Preparation before use
It is recommended that the dishwasher is operated on the Eco programme
with prewash before loading with dishes.
TABLE OF CONTENTS
1 Know your dishwasher
/ specification
3
2 Warning and safety
information
5
Electrical Safety
Children’s Safety
General
Recycling
Energy and water saving
What should not be washed in your
dishwasher
5
5
5
6
6
Electrical requirements
7
Warning This appliance must be earthed
Important
Fitting a different plug
Water inlet hose connection
Drain Hose Connection
8
8
8
8
9
9
6
3 Before first use
7
4 Installation
7
5 How to use
11
Water hardness & regeneration
settings
Water Hardness Level Adjustment
Table
Adding Dishwasher Salt
Detergent use
Filling detergent dispenser
Rinse aid
Loading the dishwasher
Folding plate support rods
Movable Cutlery Basket
Upper basket height adjustment Folding Tines
Basket insert with variable height
settings
11
12
13
13
15
16
17
18
18
19
19
20
6 Programme Selection and
Operating Your Machine
21
Button and Button Descriptions
22
Turbo fan heat drying system
23
Programme Selection
23
Adding Functions to the Programme23
Programme Steps Follow-up
24
Cancelling a Programme
24
Changing a Programme
24
Programming the Delayed Start
24
Usage of Child Lock
25
Salt Indicator
25
Rinse Aid Indicator
25
Rinse Aid Indicator Setting
25
Starting Your Machine
26
7 How to clean your
dishwasher
28
Stainless steel door cleaning
instructions Upper spray arm
Lower spray arm
28
29
29
8 Before calling service
/ Trouble shooting
30
9 Guarantee Details
32
1 Know your dishwasher / specification
���������
��������
���������
��������������
�������������
�����
���������
������������
������������������������
���������������
����������������
���������
�����
���������
�������������������
������������
��������������
�������
�������������������
�������������
���������
����������
���������
������������������
�����
Programme Selection Button
Half Load Button
On/Off Button
Rapid Button
Handle
LCD Display
Combi Tablet Detergent Button
Time Delay Button
Start / Pause / Cancel Button
3 GB
Specification
Load Capacity
Height
Width
Depth
Depth/Height (without worktop)
Net weight
Supply voltage
Fuse currrent
Total power
Heater power
Pump powers
Diameter of plates for :
Upper basket
Lower basket
: 13 Place settings
: 850 mm
: 598 mm
: 598 mm
: 570 mm / 820 mm
: 46 kg
: 220-240 V ~ 50 Hz
: 13 A
: 1900-2200 W
: 2000 W
: 90/30 W
: 25 cm max.
: 31 cm max.
Because we continually strive to improve our products, we may change our
specifications and designs without prior notice.
Note for Testing Institutes
The necessary information for performance testing will be provided upon request.
The request can be done by e-mail through:
[email protected]
Please do not forget to write the model code ,stock code and serial number
information of the appliance besides your contact information in the e-mail.
The model code, stock code and serial number information can be found on the
rating label, which is placed on the side of the door.
4 GB
2 Warning and safety information
Electrical Safety
The dishwasher should only be
operated on the voltage specified. For
electrical safety, only earthed plugs
and sockets should be used. Always
use the fused plug provided with the
appliance. The user is responsible
for meeting these basic safety
requirements. The life of your machine
and your safety depend on you using
an electrical installation compliant to
standards.
Do not use an extension cable.
When disconnecting your machine
from the mains supply, always pull from
the plug. Never pull the cord itself.
After unpacking your machine, keep the
packing material out of children’s reach.
Warning !
Long cutlery, such as ladles and
long knives, etc must be placed
horizontally on top of the full cutlery
basket or on the racks to prevent
accidental injury.
General
Children’s Safety
This dishwasher has been designed to
clean your dirty dishes at home.
Never allow your children to play with
your dishwasher.
This appliance is not intended for use
by persons (including children) with
reduced physical, sensory or mental
capabilities, or lack of experience
and knowledge, unless they have
been given supervision or instruction
concerning use of the appliance by a
person responsible for their safety.
Never use chemical solvents in your
machine; this may lead to explosion risk.
Never use materials other than specially
produced softening salts in the salt
dispenser of your machine.
Dishwasher detergents contain irritants
and abrasives. These ingredients might
have caustic effects in the eyes, mouth
and throat.
They can be extremely dangerous if
swallowed. Avoid contact with skin
and eyes. Check that the detergent
receptacle is empty after completion of
the wash cycle.
Keep detergents out of children’s
reach and do not put detergent in the
machine until right before you start the
washing programme.
The water in your dishwasher is not
suitable for drinking, for this reason
do not allow your children near your
machine when the front door is open.
Never allow your children to play on or
sit onto the front door when the front
door is open.
Never use materials other than specially
produced detergents and rinse-aids in
the detergent and rinse aid dispensers of
your machine.
Please dispose of the packaging material
and old appliances carefully. Please
ensure old machines do not become
a threat to child safety. It is known that
children lock themselves in unused
machines. To avoid such a problem it is
advised that you cut the mains cable off
and break the door latch so it does not
lock.
5 GB
The door of your machine is designed
to support the weight of a full basket
when the lower basket is pulled all the
way out. Never place any other load on
the door, otherwise the machine may tip
over.
After using the dishwasher always close
the door as an open door can be a
hazard.
Do not open the door whilst the
appliance is in operation.
Recycling
Please help us to protect our
environment. Packing materials and
some parts of your machine are
produced using recyclable materials.
These materials are marked up with
recycling symbol and material type
information (>PE<, >PS<, >POM< …).
These raw materials should not be
mixed with general refuse and should be
given to recycling centers.
We suggest you contact your local
authority for disposal information and
facilities available.
This product bears the
selective sorting symbol for
waste electrical and electronic
equipment (WEEE).
This means that this product
must be handled pursuant to European
Directive 2002/96/EC in order to be
recycled or dismantled to minimize its
impact on the environment. For further
information, please contact your local or
regional authorities.
Electronic products not included in the
selective sorting process are potentially
dangerous for the environment and
human health due to the presence of
hazardous substances.
6
Energy and water saving
Scrape excess food from the dishes
before loading. Start your dishwasher
after fully loading the machine. Do not
use the pre-wash programme unless
required. Make your programme
selection as per the programme chart
and quick reference guide supplied.
What should not be washed in
your dishwasher
Do not wash items soiled with cigarette
ash, candle, paint wax, dyes, chemicals
etc. since these may damage your
machine
Do not wash forks, knives and spoons
with wooden or bone handles, items
stuck together with adhesives, plastic
items not resistant to high temperatures.
Copper, tin items and aluminium ware in
your dishwasher.
As with hand washing, some “onglaze” decorated china, aluminum or
silver have a tendency to discolour or
fade. Also, certain types of glassware
and crystals may lose their shine and
become opaque in time.
A chemical reaction can occur between
silver cutlery and stainless steel cutlery.
As a precaution, do not wash together.
Iron and cast iron objects can rust and
stain other items.
Pay special attention to whether or not
the item you wash in the dishwasher is
dishwasher-proof.
If in doubt, contact the manufacturer of
the item.
Do not overload your dishwasher or
do not load items other than those
mentioned in this manual.
GB
3 Before first use
After unpacking your dishwasher,
check the machine against any
possible transportation damage. Never
install and use damaged machines. If
your machine is damaged contact your
retailer. Always have your machine
installed by qualified electrician/
plumber to ensure correct installation.
Any repairs and maintenance work
on this dishwasher should be carried
out by authorised service staff only.
Unauthorised repairs are not only
dangerous, but also lead to the
cancellation of your warranty.
If your dishwasher has an Internal
Lighting; incase of a defect broken
lamps can be changed by an
authorized service technican.
Make sure the electricity and water
connections of your dishwasher are
in compliance with the instructions for
assembly as stated in the relevant part
of this booklet.
Any water remaining in the dishwasher
after production should be carefully
removed due to reasons of hygiene.
Therefore, always select a pre-wash
programme before first use
(Pre-wash or Economy programme).
Before the first wash, add 1 lt of
water to the salt container of your
machine.
4 Installation
When deciding on where to install
your new dishwasher, ensure that the
position of your dishwasher makes it
easy and quick for you to place the
dishes in the dishwasher and also to
take them out and store away after the
dishwashing is completed.
Avoid placing the dishwasher where
the ambient temperature is likely to fall
below. 5 degrees C. (41° F)
When positioning your appliance, take
care not to damage your flooring, pipes
wall coverings etc. Do not move the
appliance by pulling by the door or
handle
Electrical requirements
Before you insert the plug into the wall
socket make sure that the voltage and
the frequency shown in the rating label
corresponds to your electricity supply.
We recommend that this appliance be
connected to the mains supply via a
suitable switched and fused socket in a
readily accessible position.
If the supply cord or the mains lead
is damaged please do not replace it
yourself. The supply cord or the mains
lead must be replaced by a Blomberg
Authorized Service Agent or a similarly
qualified person.
7 GB
Warning
This appliance must be
earthed
If the fitted moulded plug is not suitable
for your socket, then the plug should
be cut off and an appropriate plug
fitted.
Destroy the old plug, which is cut off as
a plug with a bared cord could cause a
shock hazard if inserted into a socket
elsewhere in the house.
The moulded plug on this appliance
incorporates a 13A fuse. Should the
fuse need to be replaced an ASTA
approved BS1362 fuse of the same
rating must be used. Do not forget
to refit the fuse cover. In the event of
losing the fuse cover, the plug must
not be used until a replacement fuse
cover has been fitted. Colour of the
replacement fuse cover must be the
same colour as that visible on the
pin face of the plug. Fuse covers are
available from any good electrical
store.
Important
Fitting a different plug
3. Connect the brown (live) wire to
the terminal in the plug marked ‘L’
or coloured red.
With the alternative plugs a 13A fuse
must be fitted either in the plug or
adaptor or in the main fuse box. If in
doubt contact a qualified electrician.
����������������
��������
�
�������
�����
As the colours of the wires in the
mains lead of this appliance may not
correspond with the coloured markings
identifying the terminals on your plug,
proceed as follows:
1. Connect the green - yellow or
green (earth) wire to the terminal
in the plug marked ‘E’ or with the
symbol
or coloured green
and yellow or green.
2. Connect the blue (neutral) wire to
the terminal in the plug marked ‘N’
or coloured black.
8 GB
�
������������
Water inlet hose connection
Drain Hose Connection
Make sure your plumbing is suitable to
install your new dishwasher. If in doubt
contact a qualified plumber.
Fit the drainage hose of your machine
to the drainage pipe without bending.
Secure your hose firmly to the waste
pipe to avoid it coming off during the
washing process.
The appliance must be connected
to the water mains using the new
hose set supplied with your new
dishwasher. Old hose sets must not
be re-used.
The waste pipe must only be
connected into the foul drains and not
surface water drainage system.
The water pressure coming from
the water mains supply must be a
minimum of 0.3 and a maximum of 10
bars.
���
���
��
��
��
��
��
���������
�
��
��
��
�������
��
����
����������
��
We recommend the tap is turned off
when the machine is not being used.
If you only have one cold water
feed (For example for your washing
machine) don’t worry, a Y adaptor
will provide you with the additional
cold water feed you need for your
dishwasher. Y adaptor is available from
most DIY stores.
��
Connect the straight end to your water
mains supply 1 Ensure plastic filter
and black rubber seal is in place.
Please turn on the tap and check for
leakages after connecting the hose.
����������
The hose should be placed between
50 cm and 110 cm from the floor level
and must not be extended otherwise
the machine may not empty the waste
water.
�
9 GB
���������
Installation of dishwasher
Remove all packaging before
positioning the machine.
See the following diagram. Ensure
there is a clearance each side of the
machine to allow slight side ways
movement for servicing.
Note:
If there is already enough space, you
don’t need to remove the worktop to
install it under the counter.
Position the machine next to a water
tap and a drain.
When inserting the machine, ensure
that the water inlet and drain hoses are
not linked or squashed.
Care must be taken to ensure that
the appliance does not stand on the
electrical supply cable.
Good levelling is essential for correct
closure and sealing of the door.
10 GB
Make sure your
dishwasher
is perfectly
level using the
adjustable feet.
When the
appliance is
correctly levelled,
the door will not
catch on the
inner liner on
either side of the
cabinet.
��
��
If the door
does not close
correctly, loosen or tighten the adjustable feet, until the machine is perfectly level.
5 How to use
Water hardness & regeneration settings
The dishwasher requires lime free water. Hard water leaves watermarks on your
dishes. Your dishwasher has a special water softening system to remove the
hardness of the tap water. Setting this system correctly will increase the washing
effectiveness.
To find out the water hardness level of water in your area, contact your local
Water Board or Determine water hardness level by the help of test strip provided.
If you move to a different location, the level of water hardness will possibly
be different. It is essential to reset the water hardness in order to obtain
optimum washing efficiency.
����������
�
�
�
��������
�
�
�
��������
����������
������������� ������������������ �������������������
��������������� �������������� ������������� ��������������������
������������ ����������������� ������������������
���������
����������������
�������
��������
���������
11 GB
�������
�������
�������
���������������������
�������
����������������
�������
�������������������
�������
�����������������
�������
����������������������
�����������������������������������������������
������������������������������������������������
To Adjust the Water Hardness;
1. Press and hold the Programme Selection Key when the machine is off and
press On/Off button simultaneously to turn on your machine. Release the
Programme Selection Key when the water hardness level stored on your machine
is displayed in “r…..” format.
2. Start / Stop icon will start flashing as soon as the water hardness level stored
on your machine is displayed in “r…..” format.
3. Select the water hardness level suitable to your machine from the Water
Hardness Level Adjustment Table by pressing the Delayed Start Key.
4. Press «Start/Pause/Cancel» key once to store the level you have selected.
5. Start / Stop icon will light continuously when the new water hardness level is
stored.
6. Press the On/Off button to turn off your machine.
Water Hardness Level Adjustment Table
Hardness
Level
1st Level
2nd Level
3rd Level
4th Level
5th Level
6th Level
English
Water
Hardness
°dE
German
Water
Hardness
°dH
French
Water
Hardness
°dF*
Position of
regeneration
adjustment
switch
0-6
0-5
0-9
Press the Delayed Start key to switch
the water hardness level to position 1.
7-14
6-11
10-20
Press the Delayed Start key to switch
the water hardness level to position 2.
15-21
12-17
21-30
Press the Delayed Start key to switch
the water hardness level to position 3.
22-28
18-22
31-40
Press the Delayed Start key to switch
the water hardness level to position 4.
29-42
23-34
41-60
Press the Delayed Start key to switch
the water hardness level to position 5.
43-75
35-60
61-107
Press the Delayed Start key to switch
the water hardness level to position 5.
Water Hardness Level Indicator
Regeneration Adjustment
Switch
6th Level
Very hard water
If the tap water is excessively (6th
degree) hard, set the water hardness
adjustment to level 5 and “Regeneration Adjustment Switch” to position 1.
If the hardness level of the water that you use is above 80 °dF (French standard
for water hardness) or if you are using well water, then it is recommended to use
filter and water purification devices.
If the hardness level of the water that you use is below 9°dF (French standard for
water hardness), there is no need to use salt in your dishwasher.
If the water hardness adjustment is set to level 1, the “No salt warning indicator”
will illuminate continuously although it is not necessary to use salt. If you use salt
under this condition, salt will not be consumed and the lamp will not illuminate.
12 GB
Adding Dishwasher Salt
Only use special pelletized dishwasher
salt in your machine to soften the hard
water. Never use other types of salts
including table salt, animal feeding salt,
sea salt, culinary salt. These types of
salt do not dissolve in water easily and
will damage your appliance beyond
repair.
������
� ��
�
��
�
� ���
When you run the dishwasher, the
Water softener will be full of water.
Therefore, adding softening salt
should always be done immediately
before you start the dishwasher.
���
Caution : Only fill with salt just before
starting one of the complete washing
programmes to prevent any grains of
salt causing corrosion. Ensure 1 Litre
of water has been added. You can put
approximately 2 kg softening salt in the
Water softener.
To fill the container with softening
salt, remove the lower rack first and
unscrew the cap of the water softener
turning anti clockwise.
Using the funnel provided will make
filling easier.
After you fill the container, screw cap
tightly back into place turning clockwise
until you hear a click sound.
Detergent use
Any brand of powder, gel and tablet
detergents that have been designed for
household dishwashers, may be used.
Keep detergents in a cool and dry
place and out of the reach of children.
Detergent must be added to the
container before each use.
Detergent overdose may cause
scratches on your dishes and there
may be traces of detergent left in your
machine.
Three types of detergent are available
• Phosphate and containing
chlorine.
• Phosphate containing no chlorine
• Neither containing phosphate nor
chlorine
New compact powders are generally
phosphate-free. As phosphates have
water softening properties, we suggest
you add salt to the salt container even
if the hardness of your water is as low
as a 6 clarke degrees.
In hard water areas if a phosphate free
detergent is used, white marks on the
dishes and glasses may be observed.
It may be prevented by increasing the
amount of detergent.
Detergents without chlorine have less
bleaching effect. Coloured stains may
not be completely removed. This may
be prevented by increasing the amount
of detergent, using a programme with
a higher wash temperature or using a
detergent with chlorine.
13 GB
Warning!
Two-in-one and three-in-one
detergents
You will obtain the best results from
your dishwasher if you use separate
detergent, rinse aid and watersoftening salt.
dishwasher. Always place the
tablets in the detergent dispenser
of the detergent holder.
Detergent manufacturers also produce
combined detergents known as ‘two-inone’ and ‘three-in-one’.
Three-in-one: These products contain
detergent, rinse aid and watersoftening salt.
Two-in-one: These products contain
detergent and either rinse aid or watersoftening salt.
In general, you will obtain satisfactory
results from combined detergents only
under specific usage conditions. These
detergents contain predetermined
amounts of rinse aid and/or softening
salt. This means that you cannot adjust
the amount of water-softening salt
and rinse aid required to suit the water
hardness level in your home.
You should bear the following points in
mind when using such detergents:
•
•
•
•
Be sure to check the specifications
of the product you are using and
whether it is a combined product
or not.
Follow the instructions on the
packet when using these products.
The use of these products at the
correct appliance settings will
ensure economical use of salt and/
or rinse aid.
If the detergent is in tablet form,
never place these in the internal
section or cutlery basket of the
Using three-in-one detergent,
softening salt and rinse aid.
• These detergents will not give you
the same drying performance that
you can obtain by using separate
detergent, salt and rinse aid. To
increase the drying performance:
• Put your appliance’s rinse aid
setting at “1” and apply rinse aid.
When the rinse aid is used up,
add more rinse aid to the rinse aid
dispenser.
• If you use combined detergents
with a rinse aid setting higher
than 1, hand contact may leave
rainbow-coloured water stains on
the washed items and inside the
machine.
• If you use combined detergents
without adding salt, lime scale may
form especially on glasses. To
avoid lime scale formation:
• Put your appliance’s water
softener setting at “1” and add salt.
When the salt is used up, add
more salt to the water softener.
Using two-in-one detergent:
detergent and softening salt
• These detergents do not contain
rinse aid so you need to use the
rinse aid setting as described
in the manual, making sure that
there is rinse aid in the rinse
aid dispenser with every wash
and that you refill the rinse aid
dispenser with rinse aid every time
it is empty.
14 GB
Using two-in-one detergent and
rinse aid
• These detergents will not give you
the same drying performance that
you can obtain by using separate
detergent, salt and rinse aid. To
increase the drying performance:
• Put your appliance’s rinse aid
setting at “1” and apply rinse aid.
When the rinse aid is used up,
add more rinse aid to the rinse aid
dispenser.
• If you use combined detergents
with a rinse aid setting higher
than 1, hand contact may leave
rainbow-coloured water stains on
the washed items and inside the
machine.
• These detergents do not contain
softening salt so you need to use
the softening setting as described
in the manual, making sure that
there is salt in the water softener
with every wash and that you refill
the water softener with salt every
time it is empty.
Important warning
Should you encounter a problem that
has previously never occured after you
start using these detergents, contact
the detergent manufacturer directly.
You will find contact details on the
packet.
If you stop using this kind of
detergent:
• Ensure that the salt and rinse aid
dispensers are full.
• Put the water hardness setting at
the highest level and run a wash
cycle with the appliance empty.
• After washing while empty, return
the water hardness setting to the
correct level for your mains water
•
hardness shown in the manual.
Put the rinse aid setting at the
correct level.
Filling
detergent
dispenser
If the dishwasher
is considerably
full and the
dishes are
relatively dirty,
fill the main
container (A) up to 25cm³ level. If the
dishwasher is not quite full and the
dishes are only slightly soiled, fill the
main container (A) only up to 15cm³
level.
If your dishes are kept unwashed for
a long time and the food particles are
stuck on the dishes also fill the small
container (B) up to 5cm³. Depending
on the degree of soiling and the
water hardness in your area it may be
necessary to add more detergent.
Powder and gel detergents are poured
into the dispenser.
If you are using tablet detergent read
the manufacturer’s recommendations
on the packaging in order to determine
where the tablets should be placed
inside the dishwasher (detergent
dispenser, cutlery basket, etc.)
After you put in the detergent, shut the
container lid (D) and ensure you hear
the clicking sound.
During the wash programme the
detergent will dispense automatically
and the lid (D) will remain open when
the programme finishes.
Do not use detergent when using the
pre-wash programme.
15 GB
Detergent residues
Regular use of low temperature
washes and/or short duration
programmes can lead to undissolved
detergent residue build up. We
recommend to carry out a service wash
at the highest temperature possible
every 3 - 4 months with the dishwasher
empty and without using detergent. It
is not recommended to carry it out with
auto programme.
Rinse aid
selector. (Position 1: minimum dose,
Position 6: maximum dose.) Gradually
increase the dose if there are drops of
water or lime spots on the dishes after
washing. Reduce it if there are sticky
whitish streaks on the dishes.
Filling the rinse aid dispenser
Open the rinse aid dispenser lid by
pressing the button as shown in the
diagram.
Fill up with rinse aid until the container
is full to level of ’max’ mark .
Put the lid (E) on and ensure you hear
the clicking sound.
Remember to CLOSE the lid after
every refill.
Make sure you clean any rinse aid that
you might have spilled.
����������������
Use only rinse aid intended for
household dishwashers.
The rinse aid is specially formulated
to be used in the dishwashers for the
prevention of watermarks and scale on
dishes and to increase the efficiency
of the washing and drying processes.
Therefore, make sure that
there is adequate amount of rinse
aid in the rinse aid dispenser of your
machine.
You can adjust the amount of rinse
aid used during the wash programme
by turning the rinse aid dispenser
regulator (C).
The dispenser regulator (C) may be set
between levels 1 and 6 (6 being the
maximum amount of rinse aid usage).
Your machine is pre-set at the factory
to level 4.
According to the finish and drying
results obtained, adjust the dose of
rinse aid by means of the six position
���������������������������
16 GB
���������������������
Loading the dishwasher
Loading the dishwasher correctly will
increase the washing, drying and
energy performance of your machine.
Examine the information given in this
section and the information stated
in the Programme chart and quick
reference card given with the manual.
Remove any large scraps of food
from the dishes before placing in the
dishwasher to avoid clogging the filters.
There are three separate baskets, in
which you can put your dishes.
Place large or heavily soiled items in
the lower basket, and small, light or
delicate articles in the upper basket.
Put forks, small and medium size
knives and spoons in the cutlery
basket.
Place tall, narrow items in the middle of
the racks.
Long-stemmed glasses should lean
against the basket, the racks, or the
supports not against the dishes.
����������������
The shelves on the rack are made
height adjustable to accommodate tall
items.
When loading your dishwasher please
ensure tall glasses (and/or wine
glasses) rest against the sides of the
upper basket. Do not allow tall glasses
to rest against each other since they
may be damaged during washing if not
properly supported.
Always arrange saucepans, cups and
glasses etc. upside down.
You can fold the racks in the upper
basket when you need more space for
larger items.
17 GB
�
�
�
Folding plate support rods
There are four separate “folding plate
support rods” in the lower basket of
your dishwasher designed to allow
you more space to accommodate
saucepans and large bowls in the
lower basket. You can either fold each
section (1,2,3,4) individually or, all at
once, to create a large empty space.
Simply press the handgrips (A) and
fold them down”
Movable Cutlery Basket
Designed to allow free placement of
the dishes according to their size, the
movable cutlery basket can slide over
the tines to the left (A) and right (B)
side.
�
�
�
18 GB
Upper basket height
adjustment
The upper basket is equipped with a
lifting mechanism which enables you to
change the height of the basket even if
it is fully loaded, and without having to
remove it from the dishwasher.
The height of the upper basket was set
at the factory to the lowest position. To
lift the upper basket to the “high”
A position, hold it on one side and
carefully pull it upwards. To lift the
opposite side of the basket, hold it and
pull it upwards in the same manner. A
To lower the upper basket, hold the
basket lever on one side and carefully
lower the basket without releasing the
lever.
B Repeat the procedure with the lever
on the opposite side of the basket.
Make sure that both levers catch in the
same height position.
�
�
Folding Tines
There are “folding tines” in the upper
rack to allow you more space to
accommodate glasses or cups.
Simply pull in the first front folding tine,
move it to left (A) and right (B) to place
in another positon. When you need,
take the tines down until the tines fall
down.
19 GB
�
�
Basket insert with variable
height settings
You can also use this insert in the
lower basket for glasses and longhandled cutlery / utensils.
If you do not need the insert, fold the
rack upwards at the angle shown (A).
Push the entire insert upwards (B).
Place the insert in the upright position
(C). Push the insert downwards and
lock it into place with the holder (D).
When you want to use the basket
again, reverse the procedure.
To set the height, push the rack
upwards and fold it open in position
(G).
�
�
�
When finished, check that the sprayer
arm can still move freely.
�
�
�
�
�
20 GB
�
6 Programme Selection and Operating Your Machine
Rapid button
10
15
11
16
17
12
18
13
19
20
10
16 Rapid indicator
11
18
13
19
14
20
15
21 GB
14
1.
2.
3.
4.
5.
6.
7.
8.
9.
10.
11.
12.
13.
14.
15.
16.
17.
18.
19.
20.
Start / Pause / Cancel Button (2)
It is used to start, pause or cancel the
selected programme or the delayed
start countdown. The selected
programme will start running when the
Start / Pause / Cancel button (2) is
pressed. When the button is pressed,
(12) lights up.
On / Off Button
Start/Pause/Cancel Button
Display
Programme Selection Button
Half Load Button
Rapid Button
Combi Tablet Detergent Button
Time Delay Button
Handle
Programme Indicator
Remaining Time Indicator/Time
Delay Active Indicator
Start Indicator
Delayed Start Indicator
Rinse Aid Indicator
Half Load “ ” Indicator
Rapid Indicator
Combi Tablet Indicator
Salt Indicator
Child Lock Indicator
Progress indicators
a Wash ” ”
b Rinse “ ”
c Dry “ ”
d End “ ”
Button and Button
Descriptions
Wait for two seconds to view the full
display on the screen after you turn
on the machine by pressing the On/
Off button (1) before you press Start /
Pause / Cancel (2) button.
On / Off Button (1)
When you press the On/Off button,
the display switches on with the last
programme used and it dims when you
turn the machine off.
If the Half Load (5), Rapid (6), Child
Lock (19) and Combi Tablet (7)
functions are enabled during the last
programme used, these functions will
remain active when the machine is
turned off and on again. If you would
like to disable these functions after
turning the machine off and on again,
you must press the relevant buttons.
Programme Selection Button (4)
You can select the washing programme
you want to use with the aid of the
“Programme Data and Table of Average
Consumption Values” after pressing
the programme selection button.
Number of the selected programme
appears in the programme indicator
(10) on the display (3) in the format of
....... Programme number
will increase by one each time you
press the programme selection button.
Number of the defined programmes can
change depending on the model you
have purchased.
Half Load Button (5)
If you want to run your machine without
loading it completely, place your dishes
into the machine as you desire. First,
press the On / Off Button (1). Select
the desired programme and press the
Half Load (5) button. You must see the
Half Load indicator (15)
appearing
on the screen. Start the programme
by pressing the Start / Pause / Cancel
button (2). Thanks to the Half Load
option, you can use both lower and
upper baskets of your machine and you
can save water and energy.
22 GB
Turbo fan heat drying system
pressing the On / Off button (1).
Switch to the programme you want
to operate by pressing programme
selection button (4). You can follow
up the programme you are in from
the programme indicator (10) on
the screen. Programme number will
increase by one each time you press
the programme selection button
(Number of the defined programmes
can change depending on the model
you have purchased). The selected
washing programme will start running
when the Start / Pause / Cancel button
(2) is pressed symbol (12) light up.
Time indicator (11) will start displaying
the estimated remaining time to the
end of programme.
Turbo Fan Heat Drying System
ensures your dishes are dried
efficiently.
! During operation you may hear fan
noise which is normal.
Rapid Button (6)
This option allows you to shorten the
selected programme; the dishwasher
then uses higher water pressure and
consumes less energy and water.
Combi Tablet Button (7)
To obtain a better drying performance
from the multi-purpose detergents
called as all in one detergents such
as 2in1, 3in1, 4in1, 5in1 and etc.,
depending on the hardness level
of the tap water. The programmes
in which the Combi Tablet function
can be enabled are indicated in the
Programme Data and Table of Average
Consumption Values. Combi Tablet
symbol (17) lights up when you select
the Combi Tablet function (7).
Time Delay Button (8)
You can delay the start of the selected
programme until 24 hours with
increments of 1 hour by means of the
Delayed Start Function.
Programme Selection
You can select the desired programme
after turning on the machine by
Total time can be different from
the time indicated at the beginning
since it can change while the
programme is running, depending
on the temperature of the room
where your machine is installed,
temperature of the water supply,
auto-cleaning of the water softening
system (regeneration) and amount
of the dishes.
Adding Functions to the
Programme
With the help of the add function
buttons, you can run the selected
programme together with the Half Load
(1/2) (5), Rapid (6), Combi Tablet (7)
and Delayed Start (8) functions.
You will obtain a better drying
performance if you select the Combi
Tablet function in cases where you
use a multi-purpose detergent.
To add a function to the programme:
23 GB
1. Select the programme by pressing
programme selection button (4).
2. Press the button of the function
that you want to enable and check
to see the indicator for the relevant
function on the display.
3. You can start the programme by
pressing the Start / Pause / Cancel
button (2).
Programme Steps Follow-up
You can follow up the step while
current programme is running from the
Programme Steps follow up indicator
(20)
a Washing Step Indicator (20 a)
b Rinsing Step Indicator (20 b)
c Drying Step Indicator (20 c)
d End of Programme Indicator (20 d)
The display shows the steps for
washing 20 a, rinsing 20 b and drying
20 c, respectively, while the selected
programme is running. Only the End
of Programme indicator 20 d lights
up when the programme is over.
Remaining Time Indicator (3) displays
“00:00”.
Cancelling a Programme
Press Start / Pause / Cancel button
(2) for three seconds to cancel a
programme that is already running.
Release the button when symbol
(12) start flashing in the display. For
a couple of minutes the machine
will fulfill the necessary operations
required for cancellation. Remaining
time indicator (11) displays “00:00”.
You may select and operate a new
programme following the programme
cancellation process. There might be
residues of detergent or rinse aid left
in the machine and/or on the pieces
being washed depending on the step the
previous programme was in at the time
of such cancellation.
Changing a Programme
If you want to change running
programme, first of all press Start /
Pause / Cancel button (2) to switch your
machine into pause mode. Second,
switch to the desired programme by
pressing Programme Selection button
(4). Third, Start the new programme
by pressing Start / Pause / Cancel
button (2) again. Your new selection will
resume operation from the step in the
previous programme (For example, if
the previous programme was in rinsing
step, the new one will also start from
the rinsing step). If you want to run
the newly selected programme from
the beginning, you have to apply the
programme cancellation process first
and then select a new programme.
Programming the Delayed Start
You can delay the start of the selected
programme until 24 hours. Delayed start
can not be set after the programme
starts. The selected programme must
not be started in order to be able to set
the delay time.
Delayed start indicator sand glass (13)
will start flashing when the Time Delay
Button (8) is pressed. You can set the
desired time by pressing the Time Delay
Button (8). Press the Start / Pause /
Cancel button (2) after setting the time.
The delayed start indicator sand glass
(13) and play icon (12) will remain lit
on the display during the delayed start
countdown and the Time Delay Active
Indicator (11) will display the remaining
time. Programme will start automatically
when the countdown is over.
24 GB
You can use the delayed start function
if you are utilizing the economic
electricity tariff.
If you want to change the programme
or functions while the delayed start
function is enabled, then pause the
machine by pressing the Start / Pause
/ Cancel button (2). You will see that
the countdown stops. The delayed start
indicator will start flashing. Select
the new programme and/or add the
functions as described in Programme
Selection and Table of Average
Consumption Values. Resume the
delayed start countdown by pressing
the Start / Pause / Cancel button (2).
If you want to cancel delayed start
countdown while it is in progress,
then press the Start / Pause / Cancel
button (2) for three seconds. Release
the button when symbols (12) start
flashing in the display. For a couple
of minutes the machine will fulfill the
necessary operations required for
cancellation. Remaining time indicator
(11) displays “00:00”. You may select
and operate a new programme
following the delayed start countdown
cancellation process.
Salt Indicator
Please check the salt indicator (18)
on the display to see whether there is
enough softening salt in your machine
or not. You need to refill the powder
dispenser whenever the salt warning
indicator light lights.
WARNING:
If the water hardness level is stored
as (r1), salt indicator will never come
on even if the salt container is empty.
(Adjusting the water hardness level is
explained in Water Softening System
section.)
Rinse Aid Indicator
If you want to select a new delayed
start time while the delayed start
countdown is in progress, then pause
the machine by pressing the Start /
Pause / Cancel button (2). Set the
desired time by pressing the Time
Delay Button (8). Start the countdown
for the new time by pressing the Start /
Pause / Cancel button (2) again.
Usage of Child Lock
order to activate the child lock. Child
lock indicator (19) will appear on the
screen. Repeat the same procedure to
disable the child lock. Child lock does
not lock the door of the machine but
it prevents the selected programme
or functions from being changed and
disables the Start / Pause / Cancel
button (2).
Check the rinse aid warning display
(14) on the screen to find out if there
is sufficient amount of rinse aid in your
machine. You must refill the rinse aid
container when the rinse aid indicator
comes on.
WARNING:
If the Rinse Aid Indicator is set to
(OFF), rinse aid indicator will never
come on even if the rinse aid container
is empty.
Rinse Aid Indicator Setting
• When your machine is switched
Press the Child Lock buttons (4) and
(5) simultaneously for three seconds in
25 GB
off, press Half Load (½) button
(5) and then On / Off button (1) to
switch it on.
• Half Load (½) button (5) pressed
•
•
•
and release On / Off button (1).
Keep Half Load (½) button (5)
pressed for three seconds more.
Rinse Aid Indicator (14) comes on
and the stored rinse aid indicator
status of your machine appears on
the display in the format of “ON” or
“OFF”.
You can change the status of the
indicator as “ON” or “OFF” with
Start / Pause / Cancel button (2).
If you switch off the machine with
“On/Off” button (1) when the status
is “ON”, then the rinse aid indicator
will come on when the rinse aid
level in your machine becomes
low while the machine is in use.
If you switch off the machine
with “On/Off” button (1) when the
status is “OFF”, then the rinse aid
indicator will never come on.
Starting Your Machine
• Plug the mains plug into the wall
•
•
•
•
•
•
•
•
socket.
Open the tap.
Open the door.
Place the dishes.
Check if the upper and lower spray
arms rotate freely.
Put sufficient amount of detergent
in the detergent dispenser and
close its lid.
Press On/Off button.
Check if the salt and rinse aid
warning indicators (18,14) are lit
and add salt and/or rinse aid if
needed.
Determine your washing
programme with the aid of the
Programme Data and Table of
Average Consumption Values.
• You can select the determined
•
•
•
washing programme by pressing
programme selection button (4).
You can see the programme time
in the Remaining Time Indicator
(3).
If necessary, you can change your
washing programme as you prefer
by means of the Add Function
Buttons (5,6,7,8).
Start the programme by pressing
the Start / Pause / Cancel button
(2).
WARNING:
Pay attention not to open the door of
the machine when it is running. Stop
the machine by pressing Start / Pause
/ Cancel button (2) if you have to open
the door. Then, open the door of your
machine. There may be a rush of
vapor when you open the door of your
machine; be careful. Close the door
and press Start/Pause/Cancel button
(2) again. Programme will resume
running.
• End of Programme indicator (20 d)
will light up.
• Turn off your machine by pressing
On / Off button (1).
• Close the tap.
• Unplug the mains plug from the
wall socket.
• Leave your dishes in the machine
26 GB
for about 15 minutes after they
are washed in order to have them
cooled down. Your dishes will dry
in a shorter time if you leave the
door of your machine ajar during
this period. This will increase
the drying effectiveness of your
machine.
27 GB
35 °C
-
4
-
Energy (kWh)
30
0,8
10,4
0,88
13,4
83
Pre-wash
▼
Wash
▼
Cold rinse
▼
Hot Rinse
▼
Dry
▼
End
A
Few
Delicate dishes and
glassware
40 °C
Delicate
3
1,02
10
179
Pre-wash
▼
Wash
▼
Cold rinse
▼
Hot Rinse
▼
Dry
▼
End
A+B
Medium
Most economic
programme for
normally soiled dishes
50 °C
Eco
4 Reference**
Programme Table
5
6
70 °C
Intensive
7
40-65 °C
Auto
1,32
10,2
58
Wash
▼
Cold rinse
▼
Hot Rinse
▼
Dry
▼
End
A+B
Medium
10,4-14,2
0,90-1,42
1,26
80-154
The programme
sequence is adjusted to
the amount of soiling
A
Medium to high
16,2
143
Pre-wash
▼
Wash
▼
Cold rinse
▼
Hot Rinse
▼
Dry
▼
End
A+B
High
Lightly soiled dishes, Heavily soiled dishes Automatically senses
A class cleaning in 58
requiring
water dirtiness level
minutes
Hot pre-wash
and washes until dishes
are completely cleaned
60 °C
A Express 58'
The consumption values shown in the table were determined under standard conditions. Differences may therefore occur under practical conditions.
** Reference programme for testing institutes
The tests in accordance with EN 50242 must be carried out with a full water softener salt dispenser and a full rinse aid reservoir, and using the test programme.
15
Wash
▼
Cold rinse
▼
Hot Rinse
▼
End
Pre-wash
▼
End
Water (I)
A
Few
-
-
Pre-wash to rinse
Lightly soiled dishes,
and loosen residue - 30 minute programme
awaiting full load - then
select a Programme
Mini 30'
2
Pre-wash
1
Duration (min)
Programme sequence
(without options)
Detergents
A=25 cm³/15 cm³ B=5 cm³
Degree of soiling
Cleaning temperature
Programme name
Programme number
7 How to clean your dishwasher
Cleaning your machine at regular
intervals ensures longer product life
and reduces the risk of recurring
problems. Clean spray arms and in
particular filters at least once a week
! Always unplug the appliance and turn
off the water supply before cleaning.
To clean the outside of the appliance
and the door seal, use a neutral
detergent and a damp cloth. To clean
the control panel, use only slightly
damp cloth.
! Do not use abrasive detergents.
If the appliance is not going to be used
for a long period of time, switch off,
turn off the water clean and leave the
door ajar.
Stainless steel door cleaning
instructions
(Only valid for stainless steel
models which have “x” suffix in the
model number)
Stainless steel surfaces of your
appliance require special cleaning
methods. In order to eliminate marks
on doors and to keep your appliance
doors clean, we recommend you
the following to clean and wipe the
stainless steel surfaces of doors:
1. You can purchase special
cleaning materials suitable for
stainless steel surfaces of kitchen
appliances from your local store.
Follow the instructions supplied by
the manufacturer of such cleaning
materials.
2. You can purchase a special
micro-fibre cleaning cloth pack
called “E-cloth” from your local
electrical or hardware store, which
is suitable to clean and wipe
stainless steel surfaces of kitchen
appliances without the need to use
any chemicals or other cleaning
materials. You just need warm
water. You need to follow the
instructions supplied inside the
packaging of E-cloth.
3. Never attempt to clean, wipe
or treat the stainless steel and
other surfaces of your appliance
with unsuitable material, do not
clean or wipe handles and plastic
surfaces using stainless steel
cleaning materials, otherwise, your
guarantee will be void.
How to clean the filters and spray
arms filters
For the efficient operation of your
dishwasher, check the filters and the
spray arms regularly.
There are three different filters in your
machine
Main filter
Coarse filter
Micro filter
To remove the coarse and micro
filter assembly to clean, turn it anti
clockwise as far as it goes and lift it up.
Then press the two tongues inwards
and pull out the coarse filter.
28 GB
Pull the main filter off.
Clean all three filters under running tap
water with a brush.
Reinsert the main filter in its place.
�����������
Place the coarse filter into the micro
filter. Ensure the marks align properly.
Turn the coarse filter clockwise until
you hear a clicking sound.
�������������
It is important that you fit the filters
correctly.
������������
Caution: the dishwasher must not
be used without filters.
Incorrect repositioning of the filters
will produce poor washing results.
Cleaning of the filters is vital to
ensure correct operation of the
machine.
Upper spray arm
Turn the nut anti clockwise and remove
both the nut and the spray arm.
Flush away food particles under
running water.
Put the spray arm back on and screw
on the nut turning clockwise until a
clicking sound is heard.
Lower spray arm
Remove the spray arm from its slot
by releasing the catches and pulling it
upwards.
Flush away the food particles under
running water.
Reinsert the spray arm back into its
original position.
29 GB
8 Before calling service / Trouble shooting
Before calling service check the following & Trouble shooting guide supplied on
the following page.
�
�
��������������������������
�������������������������������������
������������������������������
������������������������
�������������������������������
����������
��� ���� ���������� ������� ������
������ ���� ������������ ��� �����
����������������������������������
���������������������������
TROUBLE SHOOTING GUIDE
SYMPTOMS
POSSIBLE CAUSES
SOLUTIONS
Insufficient amount of
detergent
Increase the amount of detergent, especially when
washing full loads, or in hard water.
Hard water.
Increase water softener dosage. Use additional
detergent, increase rinse agent dosage.
Spray arms need cleaning
Check the nozzle holes in the spray arms. They may
be blocked with a soil particle. Check and clean them
periodically.
Spotting /
filming / poor
cleaning results Improper loading.
Follow instructions for use for proper loading
procedures. Place dishes so water spray reaches all
soiled surfaces. Do not overcrowd the baskets since
this will block the water spray.
Insufficient water fill.
Check mains water pressure
Filter system needs cleaning.
Remove any accumulated or deposited foods. Check
and clean them periodically.
Oversudsing - Prewashing with Rinse items thoroughly before putting them in the
a liquid dishwashing detergent. dishwasher to remove dishwashing detergent.
Water not reaching surfaces,
dishwasher overcrowded.
Small particles
Insufficient water fill.
(food or
detergent) left
Powder detergent stored
on items
too long or under adverse
conditions.
Rinse aid supply depleted.
Check to be sure water action is not blocked by
dishes. Check filter system for accumulated or
deposited food or detergent. Load dishwasher
correctly. Keep filter system clean.
Check mains water pressure
Use powder detergent within one to two months after
purchase. Open one box at a time. Always close
pouring spout after each use. Store in a cool, dry
place.
Add rinse aid to the dispenser.
30 GB
Pitting of
stainless steel
items
Prolonged contact with salty
or highly acidic foods or
with undissolved or highly
concentrated detergent.
Remove spots with silver polish. Rewash. Wash soon
after use, or pre-wash items if they will not be washed
right away. Do not overload cutlery basket. Avoid
spilling or pouring detergent directly on flatware. Make
sure dispenser cup is properly closed.
Improper loading.
Load so that all items are properly tilted for good
drainage. Avoid nesting of dishes and/or silverware.
Rinse aid supply depleted.
Add liquid rinse aid .
Dishes not dry
Scratches on
glassware
The condition may not always be preventable. To
A water or chemical reaction minimize the possibility of etching, use minimum
with some glassware. Usually amount of detergent.
caused by some combination
of soft or softened water and
alkaline washing solutions
Use of the appropriate programme.
reacting with the glassware.
Can be accelerated by poor
rinsing, overloading and
excessive temperature.
Use of a rinse aid may also help.
If using powder detergent,
Make sure dispenser is dry before adding powder
there may be dampness in the
detergent. Start dishwasher immediately.
dispenser.
Detergent
cakes in
detergent
dispenser.
If using gel detergent, the
detergent may be left in
dispenser too long before
using.
Start dishwasher soon after adding gel detergent. Do
not allow detergent to dry out in dispenser.
Faulty cover.
Do not overfill. Cover should close tightly. Check
cover for fit.
Improper loading.
Do not place large items in front of dispenser.
Old detergent.
Use detergent within one to two months of purchase.
To assure freshness, buy detergent as needed and
no more than one or two at a time. Store in a cool, dry
place.
Chipping and
breakage of
Improper loading.
dishes/glasses
Odour in
dishwasher
Load with care following the instructions for use.
Place glassware so it does not touch the other dishes.
Remove from dishwasher carefully.
Use the pre-wash cycle at least once a day until a
Dishes washed only every two
load accumulates, or hand rinse dishes before loading
or three days.
dishwasher.
A dirty filter system may
contribute to a bad odour.
Clean filter system.
31 GB
9 Guarantee Details
Your new BLOMBERG product is guaranteed against the cost of breakdown
repairs for three years from the date of the original purchase.
What is covered?
• Repairs necessary as a result of faulty materials, defective components or
manufacturing defect.
• The cost of functional replacement parts, but excluding consumable items.
• The labour costs of a BLOMBERG approved repairer to carry out the repair.
What is not covered?
• Transit, delivery or accidental damage or misuse and abuse.
• Cabinet or appearance parts, including knobs, flaps, handles or container lids.
• Accessories or consumable items including but not limited to, ice trays, scrapers,
cutlery baskets, filters and light bulbs.
• Repairs required as a result of unauthorised repair or inexpert installation that
fails to meet the requirements contained in the user instruction book.
• Repairs to products used on commercial or non-residential household premises.
• Loss of frozen food in freezers or fridge/freezers. (Food loss insurance is often
included within your household contents insurance policy, or may be available
separately from your retailer).
Important notes.
• Your BLOMBERG product is designed and built for domestic household use
only.
• The guarantee will be void if the product is installed or used in commercial or
nonresidential domestic household premises.
• The product must be correctly installed, located and operated in accordance with
the instructions contained in the User Instructions Booklet provided.
• Professional installation by a qualified Electrical Domestic Appliance Installer is
recommended for all Washing Machines, Dishwashers and Electric Cookers
• Gas Cookers must only be installed by a Gas Safe (or BORD GAIS) registered
Gas Installer.
• The guarantee is given only within the boundaries of the United Kingdom and
the Republic of Ireland.
• The guarantee is applicable only to new products and is not transferable if the
product is resold.
• BLOMBERG disclaims any liability for incidental or consequential damages.
The guarantee does not in anyway diminish your statutory or legal rights.
32 GB
33 GB
34 GB
17 9539 0100 Revision: AA-09/12
Blomberg, 36-38 Caxton Way, Watford, Hertfordshire, WD18 8UF
Tel: 0845 6048340 Fax: 0845 6004922
email: [email protected] www.blomberguk.com