1
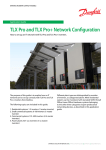
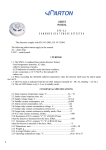
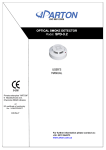
Agency Express 3.0 Quick Reference Guide For Food Bank of the Rockies Log-on to Agency Express Type the following web address into your Internet browser: http://www.foodbankrockies.org Place an Order This action will display a new window shown above. 1. Set your mouse on (hover over) “Agencies”. 2. Click on “Place an Order” 3. You can also click “Agency Log-In” at the very top of the page The following screen will be displayed. You will need the information from your “Agency Express” email: 1. Enter your UserName, Password and Program Code. If you do not remember your login information, please contact Agency Relations at [email protected] 2. Click “Login” 4. A successful login will bring you to the welcome screen. Shopping and Placing Your Order To begin shopping, follow these steps 1. Click the Order Options tab at the top of the screen. 2. Click on Shopping List. Order Options Shopping List Search Options Shopping List Shopping Cart Details Action Icons There are several ways to browse the shopping list and place an order: You will automatically see a complete list in alphabetical order. a. To print an alphabetical list of all the current products, click the print action icon in the “shopping cart” section. “Categories” allow you to search by specific categories such as beverages or snacks “Item Name/Description” allows you to type in a specific item number or product description “Handling req.” lets you search for refrigerated, frozen, or dry products “Food source” lets you search by where the food came from (purchased, donated, reclamation) “View favorites” allow you to search products that you’ve deemed your favorite To add an item to your Shopping Cart, follow these steps: 1. Enter the quantity desired in the box on the left of the screen. 2. Click the “Add to Cart” icon on the top or bottom of the page. o Note: If you do not click add to cart before clicking to the next page the items will not be added to your cart. A message will appear giving you a confirmation that your item(s) have been successfully added to your shopping cart. You can now move onto the next page of items. If there are any errors, a similar screen will appear with instructions for correction. Follow the above steps until you have added all of the items you want to your cart. Submit Orders from Your Shopping Cart When you are finished adding all the items to your cart, follow these directions 1. Click on the “check out” icon at either the top or the bottom of the screen or click on check out under the “order options” tab at the very top of the screen. Check Out Reference Number 1. You will see a reference number at the top of the header. Use this number to identify your order later on. Note: This number is generated as soon as you begin shopping and IS NOT a confirmation number Pickup Date & Time 1. From the drop down menu on the far left select either “pickup” or “delivery”. Note: you will not be able to select a pickup day or time until you select “pickup” in the drop down menu Note: Only rural agencies are approved for deliveries. Unless you have been instructed by FBR to choose delivery, choose pickup 2. Click on the calendar icon to select your preferred date for pickup. Please refer to your appropriate Branch Rules & Tips for ordering schedule. 3. Click on the clock icon and select the time you will be picking up your order. Note: if a certain time is not listed it has already been filled by other orders 4. The comment box should be left blank unless you have any special instructions for the order window. Pick Up/Delivery Field Clear Cart, Continue Shopping, & Update Cart Icons Calendar Icon Clock Icon Red X Review Items in Shopping Cart 1. The Items in your shopping cart will be listed line by line. Review these items for accuracy. If you have forgotten an item, you can continue to shop by clicking the “continue shopping” icon. Delete an Item 1. Click on the red ‘X’ next to the order quantity of the line item that you want to remove from the cart. Clear Cart 1. If you wish to start over with an empty cart. Click the “clear cart” icon. Change Quantities 1. Enter the new quantity in the box under the “order quantity” column. 2. Click the “update cart” icon to save your changes. 3. You will see a pop up message saying that particular item was successfully updated. Totals 1. At the top right side of the screen is the “Shopping Cart Summary” box. This box has the total price, total number of items, gross weight, delivery fee, and total cube size. At this time we do not have the capability to give a cube size measurement. Note: Your order must be at least $50 or it will be rejected. Submit an order 1. Once you have reviewed each section of your shopping cart, click on the “submit cart” icon 2. A pop up box will appear asking “Are you sure you want to submit your order?”, click YES Note: You must click this icon and say ok for your food order to be sent to us. Without doing so, these items will remain in your cart and your order will not be processed. Submit cart icon 1. An order is submitted successfully if you receive this image. a. This indicates that your order was placed and sent to FBR. b. You should receive a confirmation email within the hour confirming that we receive the order at FBR 2. If there was an issue with your order you will see an image like this showing the problems. a. The items with the word “success” next to them have been submitted. b. The items with the word “error” have an issue. i. YOU MUST adjust every item that has the word error listed next to it in this box, or your order will not go through. ii. Click “ok” and the items with an issue will be highlighted. You will need to delete (clicking on the red x next to the item) or adjust the quantity (change the number and click UPDATE of these items from your cart. 3. Once you’ve made and necessary changes to your order, click “submit order” again and you should receive the “submitted successfully” image. The system will then take you to the order management screen. Here you can review all of your previous orders and check their status. The most recent order you submitted will be at the top with the corresponding pick up date. The status of your most recent order will say “new order”. This status will change to “sent to food bank”, to “acknowledged”, and later to “released”. Released indicates it is being prepared for you to come and pick up your order on the pickup date you chose. Once the order is released, you will also receive an email notifying you of the status of your order. Order Management Screen NOTE: You should be receiving emails confirming your order and notifying you about any changes made to your order. If you are not receiving emails we may not have received your order or there is another problem so please contact Agency Relations