1
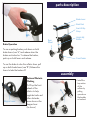
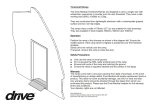
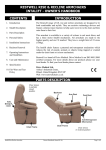
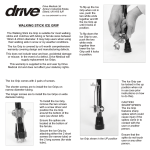
warranty details
Your Drive branded product is warranted to be free of
defects in materials and workmanship for one year
from date of purchase.
This device was built to exacting standards and
carefully inspected prior to shipment. This warranty is
an expression of our confidence in the materials and
workmanship of our products and our assurance to the
customer.
x-fold rollator
In the event of a defect covered by this warranty, we
will at our option supply parts or replace the device.
This warranty does not cover device failure due to
owner misuse or negligence, or normal wear and tear.
The warranty does not extend to non-durable
components, such as rubber accessories, castors and
grips, which are subject to normal wear and need
periodic replacement.
If you have any queries or require full warranty
conditions, please contact your Drive stockist.
It is recommended that the rollator is serviced on an
annual basis, if the rollator is used by a single user. If
the rollator is used in a multi-user environment (such
as in communal housing) servicing may be required
more frequently. Any servicing, maintenance or repairs
should be done by competent personnel such as a
Drive Medical dealer.
Drive Medical Ltd
Ainley’s Industrial Estate, Elland,
West Yorkshire, GB Hx5 9JP
www.drivemedical.co.uk
www.drivemedical.co.uk
Doc code: WA018_IFU (Iss 11/14)
safety procedures
Handle Height
Adjustment
1. Make sure the rollator is fully opened, the seat is
down and the frame is locked securely.
To adjust the handle
height, push the brass
button and raise or
lower the handle until
it is locked at the
desired height.
Ensure both handles
are set to the same
height.
2. Ensure that hand grips are at equal heights.
Test the rollator for stability before applying
full weight to hand grips.
3. Ensure that good health and safety practice is
used for carrying and lifting items, such as the
rollator.
4. Always lock the brakes before sitting and do not use
seat when on a gradient or uneven ground.
5. Replace the tyres when significantly worn or
damaged.
6. For your health and comfort, make sure that
you adopt a comfortable posture and that you
can operate the brakings with ease. Check the
brakes function correctly (i.e. Stop the rear wheels
from turning when the brakes are applied.)
7. Do not exceed the maximum weight limit of 135kg
(21 stone).
specification
Overall dimensions (cm): 68 (L) x 64 (W) x 81 - 94 (H)
Seat dimensions (cm) :
23 (L) x 46 (W) x 56 (H)
Overall dimensions (in):
27”(L) x 25”(W) x 32” - 37”(H)
Seat dimensions (in):
9” (L) x 18” (W) x 22” (H)
Weight:
7.5kg (17lb)
Weight Limit:
135kg (21 stone)
care and maintenance
'
Ensure the walker is used only as an aid for
mobility.
'
Ensure the walker is kept clean. Wipe down
the walker with a damp cloth on a regular
basis.
'
Check the moving parts (e.g. wheels and
height adjustment) regularly. All moving parts
should operate freely without excessive
movement or play.
'
Ensure that the hand operated cable brakes
are functioning correctly. When squeezed or
locked on, the two rear wheels should not be
able to turn.
'
All the fasteners (screws, nuts and bolts) are
to be checked regularly to ensure they are
securely tightened.
'
Check that the front castor wheel(s) swivels
freely.Withdraw the walker from use if it does
not.
parts description
Brake Lever
B
Back Rest
Seat Lift Up
Strap
A
Height Adj
Button
Rear
Wheel
Brake Operation
To use as parking brakes, push down on both
brake levers (see “A”) and release when the
brakes are locked on. To release the brakes,
push up on both levers and release.
Front Castor
To use the brake to slow the rollator down, pull
up on both brake levers (see “B”). Release the
levers to take the brakes off.
assembly
Kerb and Obstacle
Climbing
Stepper Lever
To lift up the front
wheels of the
rollator to help
negotiate kerbs and
other obstacles,
press down on the
stepper lever
(As shown)
1. Install the
top section
of the
rollator by
pulling
upwards on
the handles
or backrest
Cam lock
lever
2.Lock the
handle
tubing
upright by
flipping over
the camlock
lever
to fold the rollator
Reverse the previous procedure to fold the
rollator (as described below).
1. Remove the bag.
2. Fold the rollator up by pulling up on the
strap in the centre of the seat sling (as
shown).
3.Secure the camlock
lever by pushing the
lever in to the slot
(shown).
3. Release the camlock levers and flip over to
allow release handle tubing.
4. Slowly lower the handle tubing to fully
fold the rollator.
4.Push down on the
cross brace rails
until the rails are sat
in the plastic
receivers.
5.If the bag is
required, hook the
bag loop over the
receiver on both
ends of the cross
brace rails (as
shown)