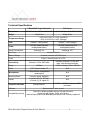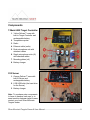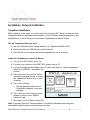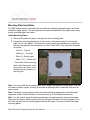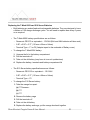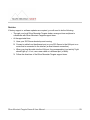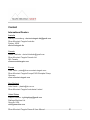
1
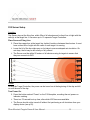
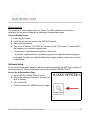
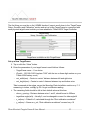
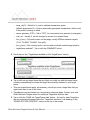
Silver Mountain Targets
Owner & User Manual
Contents
SMT System Overview
How It Works...........................................................................................................................3
What It Is and What It Is Not...................................................................................................3
Technical Specifications.........................................................................................................4
Components
T-Mark 600X Target Controller...............................................................................................5
S10 Server..............................................................................................................................5
Installation, Setup & Calibration
Targetface Installation.............................................................................................................6
Mounting Plate Installation......................................................................................................7
T-Mark 600X Target Controller Setup....................................................................................9
Location........................................................................................................................................ 9
Temperature Probe.................................................................................................................... 10
Radio.......................................................................................................................................... 10
Microphones............................................................................................................................... 11
S10 Server Setup..................................................................................................................14
Location...................................................................................................................................... 14
Power......................................................................................................................................... 14
Display Devices.......................................................................................................................... 15
Software Setup.....................................................................................................................15
Target Calibration.................................................................................................................19
Operation
Range Officer........................................................................................................................21
Start of Day................................................................................................................................. 21
End of Day.................................................................................................................................. 22
Shooter..................................................................................................................................24
Troubleshooting & Service
Troubleshooting....................................................................................................................25
Service..................................................................................................................................29
Contact
International Dealers.............................................................................................................30
Silver Mountain Targets Owner & User Manual
2
SMT System Overview
How It Works
The Silver Mountain Targets e-target system
uses microphones to triangulate the position
of shots on the target face. The microphones
are adjusted to pick up only the shockwaves
generated by supersonic bullets.
The computer in the Target Controller
detects the shockwave at each of the four,
corner-mounted microphones, as well as
separate velocity and temperature readings.
The Target Controller sends this information
via radio to the computer in the Server at the
firing line, which, in turn, calculates shot
positions and broadcasts this over WiFi,
viewable by anyone in the area with a
WiFi+browser device.
What It Is and What It Is Not
The SMT system is an open-sensor target system. It is self-powered, lightweight and
affordable (no wear items). The system is portable enough that it can easily be carried by one
person. The limitations of open-sensor systems are that only supersonic bullets can be
detected, and that measurement accuracy is affected by air motion.
The SMT system is not a chamber target system. Chamber systems have microphones
enclosed in a protected air space, which measure impact noise. Chamber targets are more
expensive, incur regular maintenance costs and require several people to set up.
System
Weight/target
Cost/target
Maintenance/Wear items
Easily portable
Bullet speed
Accuracy
Open (SMT)
~10 kg
~ $3,500
No
Yes
Supersonic only
Very high
Silver Mountain Targets Owner & User Manual
Chamber
~50 kg
~$10,000
Yes
No
All
Near perfect
3
Technical Specifications
T-Mark 600X Target Controller
Dimensions
Weight
Temperature Range
S10 Server
47x35.7x17.6cm/18.5"x14.06"x6.93" 41.6x22.1x33.4cm/16.4"x8.71"x13.15"
9.5kg/21 lbs
8.5kg/19 lbs
-10ºC to 45ºC/10ºF to 115ºF (operation)
-20ºC to 60ºC/0ºF to 140ºF (storage)
Case
Pelican™ 1500 (yellow)
Pelican™ 1430 (orange)
Power
12V7Ah sealed lead acid
rechargeable battery
12V12Ah sealed lead acid
rechargeable battery
350ma @ 12V
600ma @ 12V
Power Consumption
Run Time
At least 10 hours
Battery Charger
Included, universal 100-250V input
Fuses
3 Amp, 6.3mmx32mm/0.25”x1.25”
External 2.4 GHz WiFi radio
Internally mounted 2.4 GHz WiFi
radio, with directional antenna
Range
1,000m+
1,000m+ (targets), 50m+ (WLAN)
Cable
CAT5 ethernet cable, 15'
N/A
5 polyurethane encapsulated,
weatherproof
N/A
4 acrylic, keyed, magnetic
N/A
5 coaxial, RG-174, 50 Ohm;
14' lower (3), 20' upper (2)
N/A
Microprocessor
12 VDC, 1 GB RAM, dual core ARM
processor
Connectivity
Microphones
Mounting Plates
Cables
Computer Hardware
Software
Compatibility (device)
Browser-based, open-source
Most WiFi-capable portable devices with web browsers.
Works well with Firefox, Safari and Chrome.
Internet Explorer and most BlackBerry devices are not currently supported.
Silver Mountain Targets Owner & User Manual
4
Components
T-Mark 600X Target Controller
1. Yellow Pelican™ case with
built-in Target Controller and
rechargeable battery
2. Temperature probe
3. Radio
4. Ethernet cable (radio)
5. Dual-microphone unit with
attached cables
6. Single microphone units (x3)
with attached cables
7. Mounting plates (x4)
8. Battery charger
S10 Server
1. Orange Pelican™ case with
built-in Server and
rechargeable battery
2. 8 GB USB stick (the hard drive
for the Server)
3. Battery charger
Note: To purchase extra components
to have on hand as back-ups, or to
ease transition between target frames,
contact your local Silver Mountain
Targets dealer.
Silver Mountain Targets Owner & User Manual
5
Installation, Setup & Calibration
Targetface Installation
Before heading to the range, it is a good idea to boot up your S10 Server to make sure the
Targetfaces that you want have been installed. Your S10 Server ships programmed to your
specifications. If you find that you need further Targetfaces proceed as follows:
Get the Targetfaces that you need:
1. Ask your Silver Mountain Targets dealer for a “Targetface Definition File”.
2. Receive the file on a USB stick or over the internet.
3. Save the file on a computer with wireless capability (such as a laptop).
Install the Targetfaces on your S10 Server:
1. Turn on your S10 Server (see p.14).
2. Connect your computer to the SMT WiFi network (see p.15).
3. Log into the Administration Page (see p.15) and scroll down to “Upload targetfaces”
field of the “SPECIAL – shutdown, etc”
section.
4. Tap or click the “Choose File” button
and use the browse function to locate
the Targetface Definition File on your
computer.
5. Tap or click “Submit”.
➢ This will generate either a list of
Targetfaces uploaded, or an error
message.
6. Tap or click the “back” button on your
browser to return to the “ADMIN
functions” page.
7. Shut down your S10 Server (see p.22).
Note: Targetface Definition Files are written in JavaScript. Advanced users may feel
comfortable modifying and customizing their own files.
Silver Mountain Targets Owner & User Manual
6
Mounting Plate Installation
The SMT system can be used with both conventional, manually operated targets, and fixed
installation target frames. The microphones and radio are attached to the target frame using
acrylic mounting plates and velcro.
Install Mounting Plates:
1. Remove the protective paper covering from the mounting plates.
2. Fasten the mounting plates firmly to the corners of the frame using 2-4 screws per
plate. Do not over-tighten. The plates are colour-coded and numbered to correspond
with the microphones and connections on the T-Mark 600X. They should be fastened
as follows:
◦ Red (2) – Top left
◦ Green (4) – Top right
◦ Blue (5) – Bottom right
◦ Black (1,3)* – Bottom left
* The thicker, black mounting
plate holds the heavier, dualmicrophone unit, which must
directly face the shooters on
the firing line.
Note: You must install the mounting plates at 90º angles and parallel to each other. They do
not need to make a square, but they must make a rectangle (with a maximum 2cm error at
each corner).
Note: The black mounting plate must be mounted exactly perpendicular to the bullet path,
regardless of the overall orientation of the frame (see p.12 for detailed instructions).
Note: You will need to know the distances between microphones when entering this target
frame into the system. Measure and record the distances between the bottom-edges of one
set of the top and bottom mounting plates and the left-edges of one set of the left and right
mounting plates.
Silver Mountain Targets Owner & User Manual
7
Here are some good examples of different installations:
Silver Mountain Targets Owner & User Manual
8
T-Mark 600X Target Controller Setup
Location
The Target Controller and all of its components stay at the target line, with the yellow box
safely hidden, the microphones connected to the mounting plates and the radio in direct line
of sight with the S10 Server.
Place Target Controller
1. Place the yellow box where it cannot be hit by a stray bullet.
Turn Power On
1. Press the button marked “Power” on the T-Mark 600X faceplate, revealing the red,
power-on indicator marking.
➢ The battery will last for at least 10 hours before it needs recharging. The power can be
turned on at the beginning of the day and left on until the end of the day
Silver Mountain Targets Owner & User Manual
9
Temperature Probe
The temperature probe must stick out of the yellow box, in contact with the open air, but not in
direct sunlight.
Deploy Temperature Probe:
1. Ensure that the temperature probe is
plugged into the receptacle marked
“Temp” on the T-Mark 600X faceplate.
2. Thread the red probe tip through the
hole at the edge of the case.
3. Orient the case and lid such that the
red tip will be in shade throughout the
entire shooting day.
Note: To achieve the most accurate shot
measurements, the temperature reading
must be within 1ºC/2ºF of the actual air temperature. The probe must be out of the sun and
properly calibrated (see p.20).
Radio
The radio is connected to the Target Controller via ethernet cable, and then mounted on the
target frame with velcro, in line of sight to the S10 Server.
Connect Radio:
1. Plug the loose end of the ethernet cable into the receptacle marked “Radio PoE” on the
T-Mark 600X faceplate.
➢ There are status lights on the back of the radio:
◦ “PWR” – Comes on when power is applied.
◦ “LAN” – Indicates a working Target
Controller.
◦ “Signal Strength Meter” – Indicates the
strength of the connection to the Server.
Provided the Server is within range and
powered on, you should expect the red,
orange and at least one green light to come
on ~25 seconds after the radio has power.
Silver Mountain Targets Owner & User Manual
10
Mount Radio:
1. Detach the hook velcro strip from the loop velcro strip stuck to the back of the radio.
2. Peel the adhesive backing off the hook velcro strip and stick it to the target frame in
such a way that the radio, when mounted, will have a direct line of sight to the S10
Server at the firing line. The radio should be placed either above or below the waterline
to avoid being struck by bullets blown sideways by a wind change.
3. Mount the radio on the target frame using the velcro strips. As long as it is pointed uprange and has a direct line of sight with the S10 Server, you should expect to see good
signal strength.
Microphones
Mounting and connecting the microphones is made simple by the in-place colour-coding,
custom-keying and numbering systems.
Mount and Connect Microphones:
1. Carefully unwind the coaxial cable from
around the microphone unit (one at a time).
2. Mount the microphone on the corresponding
colour-coded, numbered mounting plate,
attached to the target frame. Positioning
screws on the back of the microphone fit into
holes in the mounting plate, ensuring a firm,
true fit in only the correct mounting plate.
Silver Mountain Targets Owner & User Manual
11
3. Plug the attached cable into the corresponding numbered receptacle, located along the
right side of the T-Mark 600X faceplate.
➢ Repeat these three steps for each microphone unit.
Note: The dual-microphone has two cables, one for each microphone. Make sure that they
are plugged into the correct, numbered receptacles on the T-Mark 600X faceplate.
Microphone 1 is the one closest to the mounting plate, microphone 3 protrudes toward the
shooter.
Note: When mounting the dual-microphone unit, it is critical that the microphones are pointing
directly at the shooter*. The dowels connecting the two microphones should be as close to
parallel as possible to the path of the incoming bullets.
*During your initial setup, measure this by placing one edge of a piece of wood with parallel
edges against the dowels and sighting along the other edge to the firing line, as shown below.
Adjust the mounting plate as necessary.
Silver Mountain Targets Owner & User Manual
12
Here is an example of the T-Mark 600X Target Controller and all of its components correctly
set up:
Silver Mountain Targets Owner & User Manual
13
S10 Server Setup
Location
The Server stays at the firing line, within 50m of all shooters and in direct line of sight with the
radio(s) at the target line. It can serve up to 10 separate Target Controllers.
Place Server at Firing Line:
1. Place the orange box at the target line, behind, beside or between the shooters. It must
have a direct line of sight with the radio of each target it is serving.
➢ Leave the lid of the box wide open on hot days to ensure adequate air circulation. On
wet days, the lid may be left mostly or fully closed.
➢ The Server must be within 50 meters of all shooters using its targets to ensure that
they can connect via WiFi.
Power
As with the Target Controller, the power can be turned on at the beginning of the day and left
on until the end of the day.
Turn Power On:
1. Press the button marked “Power” on the S10 faceplate, revealing the red, power-on
indicator marking.
➢ There is a 75-second boot-up time, after which WiFi becomes available.
➢ The Server should not be turned off without first performing a soft shutdown from your
display device (see p.22).
Silver Mountain Targets Owner & User Manual
14
Display Devices
The operation for most display devices is similar. The SMT software is touch-screen
optimized, but can also be used with a traditional mouse/trackpad setup.
Connect Display Device:
1. Power on your device.
2. Verify that you are connected to the SMT WiFi network.
3. Open your web browser.
4. Type in the IP address “192.168.0.48” (the same for all S10 Servers*) to access SMT –
this displays your customized splash page.
➢ You may want to bookmark this address for future use.
* At present, multiple servers on the same range are not supported by the equipment
as shipped. Contact your local Silver Mountain Targets dealer to inquire about custom
configurations.
Software Setup
On your customized splash page you will see a welcome message, the SMT logo, a prompt to
the range officer to “Choose targetfaces” and a button labelled “ADMIN TOOLS”.
Access the Administration Page:
1. Tap or click the “ADMIN TOOLS” button.
2. Type in the password “becareful” (the same for
all S10 Servers).
3. Tap or click “OK”.
➢ This takes you to the “ADMIN functions” page.
Silver Mountain Targets Owner & User Manual
15
The first thing you must do on the “ADMIN functions” page is scroll down to the “TargetFrame
Setup, Geometry and Calibration” section and set up a new TargetFrame to correspond with
each physical target frame to which you have attached a T-Mark 600X Target Controller.
Set up a New TargetFrame:
1. Tap or click the “+New” button.
2. Enter the parameters of your target frame in each field as follows:
◦ TargetFrame name – Your choice
◦ IP addr – 192.168.0.XXX (replace “XXX” with the two or three-digit number on your
T-Mark 600X battery cover)
◦ mic_width(mm) – Centre to centre* distance between left and right mics
◦ mic_height(mm) – Centre to centre* distance between top and bottom mics
*Best measured at the edges, as per the Mounting Plate Installation section on p.7. If
measuring in inches, multiply by 25.4 to get a millimetre reading.
➢ The remaining fields should be left at their default values at this time:
◦ chrono_spacing – Distance between mics 1 and 3, should be set to 200mm
◦ targetface angle(mils) – Usually 0, can be changed to correct for side-angle tilt
◦ x_cal(mm) – Default is 0, calculated through the “Shot calibration worksheet”
◦ y_cal(mm) – Same as x_cal; “Shot calibration worksheet” covered on p.19
Silver Mountain Targets Owner & User Manual
16
◦ temp_cal(C) – Default is 0, used to calibrate temperature probe
◦ fallback temperature(C) – Enter a seasonally appropriate temperature, will be used
if the probe is missing or failed
◦ sensor geometry (STD) – Set to “STD”, for conventional mic geometry (rectangular)
◦ m4z_cal – Usually 0, can be changed to correct for a twisted frame
◦ locn_x(mm) – Physical location on the range, usually 3000mm between targets
(T1=0, T2=3000, T3=6000...See p.26)
◦ locn_y(mm) – Not currently active, can be used to indicate vertical target position
◦ targetframe enabled? - Tap or click the “ENABLED” button
3. Scroll down to the “Targetfaces available on this TargetFrame” section.
4. Tap or click on any target faces that you think you might use with this target frame,
certainly remembering to include the target face currently attached to your target
frame.
➢ This can be performed again, as necessary, should you miss a target face that you
might want want to use in the future.
➢ Targetfaces come pre-loaded on a customer-by-customer basis. Contact your local
Silver Mountain Targets dealer for additional Targetface definition files.
5. Tap or click the “SAVE this TargetFrame data” button – An icon for each Targetface
that you selected will appear below the “Targetface Activation” sub-heading, in the
“RANGE OFFICER CONTROL” section at the top of the screen.
Silver Mountain Targets Owner & User Manual
17
Activate the Targetface:
1. Scroll up to the “RANGE OFFICER CONTROL” section.
2. Tap or click the “Freeform Mode” button. This button should be green.
3. Tap or click the Targetface icon that corresponds with the target face that is currently
attached to your target frame. The Targetface button that you select becomes green.
4. Tap or click the “return to splashpage” button at the top of the screen.
➢ This takes you back to your customized splash page – below the SMT logo, you should
now see an icon with the name of your newly created TargetFrame at the top.
➢ A TargetFrame will not show up on the splashpage until one of its Targetfaces is
activated.
Silver Mountain Targets Owner & User Manual
18
Target Calibration
You should only need to perform a target calibration the first time you install the system, and
whenever the mounting arrangement between the microphones and the target face changes.
1. From the splash page, tap or click the “ADMIN TOOLS” button.
➢ This takes you to the “ADMIN functions” page.
2. Scroll down to the “TargetFrame Setup, Geometry and Calibration” section.
3. Select the TargetFrame you are going to calibrate, by tapping or clicking on the
corresponding button directly below the section title.
4. Scroll down to the “Shot calibration worksheet”, near the bottom of the page.
➢ Confirm that the “Target datalink:” is showing “<Ready>”.
5. Fire a shot and confirm that its coordinates have been automatically recorded in the
“Most recent shot” fields.
6. Travel down-range and inspect the target face to locate your shot, measuring and
recording its actual x and y position, in millimetres*. Then travel back up-range.
*Positive x values indicate right of centre and negative x values, left of centre.
Likewise, positive y values indicate above centre and negative y values, below centre.
7. Type the actual x and y position (mm) of your shot into the corresponding fields of the
“Measured shot position” section of the worksheet.
8. Tap or click the “APPLY & SAVE these new calibration values” button – this creates
fixed x_cal and y_cal values, which are added to all future shots on this TargetFrame.
Silver Mountain Targets Owner & User Manual
19
9. Determine the accuracy of the “AirTemp”
reading displayed below the worksheet.
For errors greater than 1ºC/2ºF, adjust the
“temp_cal(C)” field:
1. Increase temp_cal if “AirTemp” is too
low.
2. Tap or click the “SAVE this
TargetFrame data” button
10. (Optional) Repeat from step 5 to confirm
that the calibration was succesful.
Silver Mountain Targets Owner & User Manual
20
Operation
Range Officer
The typical daily routine for the Range Officer in charge of a range with an installed and
calibrated SMT system involves the following:
Start of Day
1. Set up the T-Mark 600X Target Controller(s):
(a) Place Target Controller at Target Base (p.9)
(b) Turn Power On (p.9)
(c) Deploy Temperature Probe (p.10)
(d) Connect and Mount Radio (p.10-11)
(e) Mount and Connect Microphones (p.11-12)
2. Set up the S10 Server:
(a) Place Server at Firing Line (p.14)
(b) Turn Power On (p.14)
(c) Connect Display Device (p.15)
3. Set up the Software:
(a) Access the Administration Page (p.15)
(b) Activate the required Targetface(s) for the TargetFrame(s) to be used (p.18).
➢ On the splash page you should see an icon for the TargetFrame(s) you just
enabled, each with the name of the activated Targetface at its bottom.
4. Assign shooters to the correct TargetFrames and start shooting!
Silver Mountain Targets Owner & User Manual
21
End of Day
5. Shutdown the S10 Server at the end of the
shooting day:
(a) Access the “ADMIN functions” page
and scroll down to the “SPECIAL –
shutdown, etc” section.
(b) Tap or click the “SERVER safe
shutdown” button.
(c) After 30 seconds, physically turn off the
Server by pressing the “Power” button
on the S10 faceplate, hiding the red,
power-on indicator marking.
6. Take down and stow the SMT system equipment, repeating for each T_Mark 600X:
(a) Turn off the Target Controller by pressing the “Power” button on the T-Mark 600X
faceplate, hiding the red, power-on indicator marking, and disconnect all cables.
(b) Remove each microphone and neatly wind each cable around its respective
microphone. If you do not do this, the equipment may not fit the storage
compartment.
(c) Remove the radio and neatly wind the ethernet cable.
➢ This is a good time to inspect for nicked, crushed or otherwise damaged cables and
equipment. Should you require any replacement parts, be sure to contact your local
Silver Mountain Targets dealer.
(d) Carefully place all components in the Target
Controller storage compartment.
(e) Ensure that the temperature probe is swung
back inside the case, so that it doesn't get
crushed when you close the lid.
Silver Mountain Targets Owner & User Manual
22
7. Clean, dry and recharge each T-Mark 600X and the S10 Server:
(a) Once home from the range, remove any debris and set the equipment to dry.
(b) Plug the AC ends of the charger cables into AC sockets.
(c) Plug the DC ends of the charger cables into the receptacles marked “Charger” on
the T-Mark 600X and S10 Server faceplates. The chargers are interchangeable.
➢ The charger light turns green when plugged into the socket, and then red when
plugged into the unit, indicating that the unit is charging.
➢ The charger light will turn green again when charging is complete.
➢ The T-Mark 600X requires 1 hour of charging for every 2 hours of operation. The S10 Server requires 2 hours of charging for every 3 hours of operation.
Note: The intended way to use the SMT system includes daily setup and takedown. It is
assumed that you start each day with clean, dry, fully-charged equipment.
Note: When storing the SMT system for the winter, the batteries should be fully charged. The
entire system should be stored above freezing.
Silver Mountain Targets Owner & User Manual
23
Shooter
The typical daily routine for a shooter using a range with an installed and calibrated SMT
system involves the following:
1. Receive your assigned TargetFrame name and physical shooting position from the
Range Officer.
2. Access the SMT System:
(a) Connect Display Device (p.15)
(b) Access the Target Viewer for your
assigned TargetFrame:
i. Tap or click the TargetFrame icon
that has your assigned TargetFrame
name written across its top.
3. Use the Target Viewer, as follows:
•
Zoom In – Tap or click anywhere
within the large target viewing grid.
•
Zoom Out – Tap or click either the
one-step or the full zoom out button.
•
A list of shots fired, beginning with the
most recently taken shot, is shown.
➢ Newly fired shots are displayed
extra large for 10 seconds.
•
To clear the display of shots, tap or
click “CLEAR”.
•
To retrieve previous shots, tap or click
the previous shot button, located
beneath the “CLEAR” button.
•
Zoom In Other Targets – Tap or click on any of the small target viewing grids.
•
Zoom Out Other Targets – Tap or click the “UNZOOM OTHER TARGETS” button.
4. Shoot and record your shots as you usually would, but with the benefit of immediate,
accurate feedback on your shooting.
Silver Mountain Targets Owner & User Manual
24
Troubleshooting & Service
Troubleshooting
Physical Setup Issues
•
Two T-Mark 600X Target Controllers with the same IP address cannot be used on the
same range at the same time.
•
If one of the dimensions, mic_width(mm) or mic_height(mm), is wrong, shots that land
in the centre of the target will generate fairly accurate data, but the data from shots that
are off centre will be very wrong, or will not register at all.
•
If the “AirTemp” reading is not accurate to within 1°C/2°F, there will be 'scaling errors'
in the calculated shot positions.
•
If the dual-microphone unit is not pointing directly at the shooter, there will be 'scaling
errors' in the calculated shot positions as well as errors in the measurement of bullet
speeds at the target.
•
A twisted target frame is acceptable. Provided that it is consistent, it can be corrected
for in the “TargetFrame Setup, Geometry and Calibration” section, using the m4z_cal
field.
•
A target frame that is at a small, constant angle (4-5°) to the firing line is acceptable,
and can be corrected for in the “TargetFrame Setup, Geometry and Calibration”
section, using the targetface angle(mils) field.
•
If your SMT system is set up on a range with fixed frames, and your location
experiences a deep freeze during Winter, you should recalibrate each target frame
every Spring, after the thaw (see p.19).
Silver Mountain Targets Owner & User Manual
25
Server Issues
•
If the S10 Server USB memory stick fails, the Server will not boot. On your device, you
will be able to connect to WiFi “SilverMountainTargets”, but you will not be able to load
the splash page.
•
If you experience an actual Server crash, please contact your local Silver Mountain
Targets dealer for servicing.
Administration Page Issues
•
Refreshing the “ADMIN functions” page, makes the first (top-left) TargetFrame in the
“TargetFrame Setup, Geometry and Calibration” section active for modification,
regardless of which TargetFrame was active prior to refreshing.
•
In the “TargetFrame Setup, Geometry and Calibration” section, when you create a new
TargetFrame and tap or click the “SAVE this TargetFrame data” button, you are
automatically returned to the “create new target” screen, and not your newly created
TargetFrame.
•
When setting up multiple TargetFrames use the locn_x(mm) field in each target's
“TargetFrame Setup, Geometry and Calibration” section to define the physical location
of the targets on the range, relative to each other (T1=0, T2=3000, T3=6000...). This
determines the order in which the live-feed miniature Target Viewers appear at the
bottom of the splash page.
◦ Note that the Target Viewer icons at the top of the splash page are listed
alphabetically, and not necessarily in accordance with the physical locations of the
targets.
Silver Mountain Targets Owner & User Manual
26
Usage and Maintenence Issues
•
A delayed shot report usually indicates intermittent loss of connection either between
the Target Controller and the Server, or, as is more likely, between the Server and your
device.
◦ If a Target Viewer device loses WiFi
contact with the Server, the message
“<Ready>” is replaced with “--FAIL:
server connection down --”. When WiFi
contact is re-established, the page
should return to a “Ready” state; if not,
refresh the browser page on your
device.
◦ Connection problems between the
Server and your device are often fixed
through a minor elevation or
reorientation of your device.
◦ An optional Signal Repeater can be used to extend the Wifi coverage area near the
Server, if required. Please contact your local Silver Mountain Targets dealer for
more information.
•
In the case of a temporary loss of connection between the Target Controller and the
Server, any shots fired while the connection is down will be picked up once the
connection is re-established.
•
When charging the T-Mark 600X or S10 Server batteries, if the charger light doesn't
turn red when you plug it in, there is likely a malfunctioning fuse in your unit. You can
easily buy replacement fuses at any electronics shop.
Silver Mountain Targets Owner & User Manual
27
Replacing the T-Mark 600X and S10 Server Batteries
•
Both batteries are sealed lead-acid rechargeable batteries. They are designed to have
a lifetime of 150 charge-discharge cycles. You will need to replace them every 3 years,
or as required.
•
The T-Mark 600X battery specifications are as follows:
◦ Panasonic PS1270 or equivalent – 12V7AH (8AH and 9AH batteries will also work)
◦ 5.95” x 2.56” x 3.71” (151mm x 65mm x 94mm)
◦ Terminal Type – F1 or F2 (Adapter taped to the underside of Battery cover)
•
To change the T-Mark 600X battery:
1. Unscrew the lid to the battery compartment
2. Pull the terminals off
3. Take out the old battery (may have to turn unit upside down)
4. Replace the battery, terminals and battery compartment lid
•
The S10 Server battery specifications are as follows:
◦ Panasonic PS12120 or equivalent – 12V12AH
◦ 5.95” x 3.86” x 3.71” (151mm x 98mm x 94mm)
◦ Terminal Type – F2
•
To change the S10 Server battery:
1. Take the orange box apart:
(a) ???Unscrew...
(b) ???
(c) ???
2. Remove the battery cage
3. Pull the terminals off
4. Take out the old battery
5. Replace the battery and cage, put the orange box back together
Silver Mountain Targets Owner & User Manual
28
Service
If factory support or software updates are required, you will need to do the following:
•
Through your local Silver Mountain Targets dealer, arrange a time and place to
collaborate with Silver Mountain Targets support team.
•
At the appointed time:
1. Have your S10 Server booted up and running.
2. Connect a cable from the ethernet port on your S10 Server to the LAN port on a
router that is connected to the internet (a wired internet connection).
➢ When you plug the cable into the LAN port, the corresponding “port activity” light
should light up – if not, use a new cable or a different port (or both).
3. Follow the directions of the Silver Mountain Targets support team.
Silver Mountain Targets Owner & User Manual
29
Contact
International Dealers
Australia
Aubrey Sonnenberg - [email protected]
Silver Mountain Targets Australia
Sydney, NSW
electronictargets.biz
Canada
Daniel Chisholm - [email protected]
Silver Mountain Targets Canada Ltd.
NB, Canada
silvermountaintargets.com
Europe
Peter Hahn - [email protected]
Silver Mountain Targets Europe/CAW Westphal Group
Germany
silver-mountain-targets.com
New Zealand
John Hastie - [email protected]
Silver Mountain Targets Australasia Limited
United States
Wayne Forshee - [email protected]
Stallings Machine Ltd.
Georgia, USA
stallingsmachine.com
Silver Mountain Targets Owner & User Manual
30