1
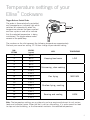
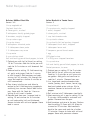
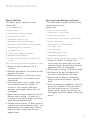
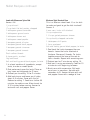
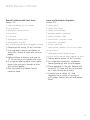
Ellise®
Stainless Steel
Cookware
User Guide
WW8950
SK6450
FP8950
MASTER
SERIES
Contents
Sunbeam’s safety precautions 1
Features of your Sunbeam Ellise Frypan
2
Features of your Sunbeam Ellise Skillet
4
Features of your Sunbeam Ellise Wok 6
Temperature settings
9
Using your Ellise cookware 10
Cooking with your Ellise Frypan 11
Cooking with your Ellise Skillet
13
Cooking with your Ellise Wok
14
Stainless steel cooking surface
16
Care and Cleaning
17
Recipes
18
Important instructions –
retain for future use.
Sunbeam’s Safety Precautions
SAFETY PRECAUTIONS FOR YOUR ELLISE
COOKWARE
• Use your Ellise cookware at least 200mm away
from walls and curtains
• Do not immerse the control probe in water.
• Use only with the control probe provided.
• If using a plastic spatula do not leave in cooking
vessel when hot.
Sunbeam is very safety conscious when designing
and manufacturing consumer products, but it is
essential that the product user also exercise care
when using an electrical appliance. Listed below are
precautions which are essential for the safe use of
an electrical appliance:
• Read carefully and save all the instructions
provided with an appliance.
• Always turn the power off at the power outlet
before you insert or remove a plug. Remove by
grasping the plug - do not pull on the cord.
• Turn the power off and remove the plug when the
appliance is not in use and before cleaning.
• Do not use your appliance with an extension cord
unless this cord has been checked and tested by
a qualified technician or service person.
• Always use your appliance from a power outlet of
the voltage (A.C. only) marked on the appliance.
• This appliance is not intended for use by persons
(including children) with reduced physical,
sensory or mental capabilities, or lack of
experience and knowledge, unless they have
been given supervision or instruction concerning
use of the appliance by a person responsible for
their safety.
• Children should be supervised to ensure that they
do not play with the appliance.
• The temperature of accessible surfaces may be
high when the appliance is operating.
• Never leave an appliance unattended while in
use.
• Avoid using on metal surfaces eg sink, hotplate.
• Remove the control probe before cleaning the
cooking vessel.
• After cleaning the cooking vessel ensure that the
control probe inlet area is completely dry before
using again.
• The handles on the lid and vessel may become
hot during use – oven mitts may be required.
• Do not use an appliance for any purpose other
than its intended use.
• Do not place an appliance on or near a hot gas
flame, electric element or on a heated oven.
• Do not place on top of any other appliance.
• Do not let the power cord of an appliance hang
over the edge of a table or bench top or touch any
hot surface.
• Do not operate any electrical appliance with a
damaged cord or after the appliance has been
damaged in any manner. If damage is suspected,
return the appliance to the nearest Sunbeam
Appointed Service Centre for examination, repair
or adjustment.
• For additional protection, Sunbeam recommend
the use of a residual current device (RCD)
with a tripping current not exceeding 30mA in
the electrical circuit supplying power to your
appliances.
• Do not immerse the appliance in water or any
other liquid unless recommended.
• Appliances are not intended to be operated by
means of an external timer or separate remote
control system.
• This appliance is intended to be used in
household and similar applications such as: staff
kitchen areas in shops, offices and other working
environments; farm houses; by clients in hotels,
motels and other residential type environments;
bed and breakfast type environments.
If you have any concerns regarding the performance and use of your appliance,
please visit www.sunbeam.com.au or contact the Sunbeam Consumer Service Line.
Ensure the above safety precautions are understood.
1
Features of your FP8950
Ellise® Stainless Steel Frypan
Glass lid
Tempered glass lid enables you to monitor
your food while it cooks.
18/10 stainless steel cooking vessel
Long lasting 25 year guaranteed 18/10
Stainless Steel cooking surface.
2400 watt butterfly cast-in element
The 2400 watt butterfly element provides
even heat distribution across the entire
pan surface, preventing cooler spots.
The element is completely cast into the
aluminium base which is adhered onto the
stainless steel pan. This provides faster and
superior heat transfer and heat retention.
Extra Deep Cooking Vessel
Ideal for cooking foods with a liquid base
such as casseroles, pasta, sauces, soups,
custards etc.
2
Steam Vent
Fixed steam vent controls the moisture level
during cooking.
Ergonomic handles
Heavy duty cast, ergonomic-shaped handles
for comfortable use when cooking and when
carrying to the table for serving.
Pan tilt lever
When the lever is in the lowered position the
cooking pan tilts, so juices collect at one
end of the pan. Both hands are then free for
basting.
Trigger-release heat control probe with 15 heat
settings
15 heat settings for perfect cooking control.
The probe is thermostatically controlled and
incorporates an indicator light which switches
off automatically when the temperature
selected has been reached and then cycles
on and off to indicate that the selected
temperature is being maintained.
3
Features of your Sunbeam Ellise®
Stainless Steel Skillet SK6450
Cook & look lid
Tempered glass lid enables you to monitor your
food while it cooks.
High domed lid
Turns your skillet into a compact oven. Ideal
for roasts and racks of lamb and other cooking
where temperature and moisture levels need to
be controlled.
18/10 stainless steel cooking vessel
Long lasting 25 year guaranteed 18/10
Stainless Steel cooking surface.
1600 watt cast-in element
The 1600 watt element is completely cast into
the aluminium base which is adhered onto the
stainless steel pan. This provides faster and
superior heat transfer, heat distribution and
heat retention.
4
Trigger-release heat control probe with 15
heat settings
15 heat settings for perfect cooking
control. The probe is thermostatically
controlled and incorporates an indicator
light which switches off automatically
when the temperature selected has been
reached and then cycles on and off to
indicate that the selected temperature is
being maintained.
Ergonomic handles
Heavy duty cast, ergonomic-shaped
handles for comfortable use when
cooking and when carrying to the table
for serving.
5
Features of your WW8950
Ellise® Stainless Steel Wok
Glass Lid
Tempered glass lid enables you to
monitor your food while it cooks.
18/10 Stainless steel cooking vessel
Long lasting 25 year guaranteed 18/10
Stainless Steel cooking surface.
2400 Watt ‘Heat-Wall’ Element
The element wraps around the heavy
duty base and sides of the wok to
provide superior heat distribution.
Quick-Release Detachable Base
Quick-release detachable base allows
for easy cleaning. Simply twist the
knob and pull to release the ‘cook
and clean’ base.
Non-Slip Feet
Non-slip rubber feet provides extra
stability and prevents slipping.
6
Ergonomic handles
Heavy duty cast, ergonomic-shaped handles
for comfortable use when cooking and when
carrying to the table for serving.
Trigger-release heat control probe with 15 heat
settings
15 heat settings for perfect cooking control.
The probe is thermostatically controlled and
incorporates an indicator light which switches
off automatically when the temperature
selected has been reached and then cycles
on and off to indicate that the selected
temperature is being maintained.
Tempura rack
The rack sits on the rim of the wok to hold
your food after deep frying. Ideal for deep
frying spring rolls, curry puffs, money bags
etc.
Steaming Rack
The steaming rack sits in the base of the wok
and is ideal for steaming of a variety of fresh
vegetables, fish and poultry.
7
Features of your WW8950 Ellise® Stainless Steel Wok continued
2400 Watt ‘Heat-Wall’ Element
Your Sunbeam Ellise® Stainless Steel Wok
features a 2400 watt patented 'heat-wall'
element. This element wraps around both the
bottom and side of your wok wall, providing
superior cooking temperatures and heat
distribution. See figure 1.
Figure 1
The heat is quickly channelled from the
base of the wok up the wall. This 'heatwall' system creates the ideal wok cooking
environment for fast and easy cooking. See
figure 2.
Figure 2
8
The patented 'heat-wall' element is
completely cast into the heavy duty base.
This increases the life of the element and
provides faster heat distribution.
Temperature settings of your
Ellise® Cookware
Trigger Release Control Probe
The probe is thermostatically controlled
and incorporates an indicator light which
switches off automatically when the
temperature selected has been reached
and then cycles on and off to indicate
that the selected temperature is being
maintained. The trigger release makes
removal of the probe easy.
The numbers on the dial represent the following temperatures approximately.
Pre-heat your vessel on setting 12-13 then change to your desired setting.
DIAL
SETTING
CELCIUS
(approx)
1
50°C
2
60°C
3
70°C
4
80°C
5
90°C
6
105°C
7
120°C
8
130°C
9
140°C
10
150°C
11
160°C
12
175°C
13
190°C
14
200°C
15
210°C
USES
TEMPERATURE
Keeping food warm
LOW
Simmering, slow cooking
Pan frying
MEDIUM
Shallow frying, roasting
Searing and sealing
HIGH
Note: The temperature settings are a guide only and may require adjustment to suit various
foods and individual tastes. When the dial is set to a low setting, it is quite normal for food
to stop and start bubbling, as the thermostat maintains the selected temperature.
9
Using your Ellise® Cookware
Before the first use: Ensure all stickers are
removed from the product. Wash in warm
soapy water, rinse thoroughly and dry your
pan and lid.
Note: We recommend 'seasoning' the pan
before use. Lightly heat the pan on setting 5
for 1 minute only, without adding oil. Turn off
the heat and remove the probe. Then rub a
small amount of oil into the cooking surface
with paper towelling.
The light on the control probe will illuminate.
This light will remain on until the set
temperature has been reached and then will
cycle on and off throughout cooking, as the
cooking temperature is maintained by the
thermostat.
1.Insert the Control Probe into the inlet on
the cookware.
Hint: On initial heating of the cookware, it
is recommended that the temperature be
allowed to cycle (the light glowing on and
off) several times. This will help the cooking
surface to adjust to a more accurate cooking
temperature.
2.Plug the cord into a 230-240V power
outlet and turn the power on.
Note: The cookware must only be used with
the Control Probe provided.
3.Pre-heat the cookware to setting 12-13.
Then set the Control Probe Dial to the
desired temperature setting. Refer to
page 9 for the temperature guide.
10
Cooking with your FP8950 Ellise®
Stainless Steel Frypan
Baking
Your frypan can be used for baking cakes,
with deliciously moist results.
1.Preheat the frypan to setting 15,
with the lid on.
2.Elevate the cake pan or tray from the base
of the frypan using a small wire rack.
Cooking times will be longer than those of
a conventional oven. Use the recipes in this
book as a guide to the cooking times for your
own recipes.
Basting
The pan tilt lever makes basting easy as it
allows the juices to drain to one side of the
pan. Reduce the temperature to prevent any
fat and juices spattering. Position the pan tilt
lever and spoon the juices over the food as
desired.
Boiling
Pasta
1.Bring 6 cups of water to the boil on
setting 9. Add 1-2 tablespoons of oil to
stop the pasta from sticking together.
2.Add 250g (1 ½ cups) of pasta and cook
until tender, for approximately 8-12
minutes.
3.Reduce to a lower setting if the water boils
too rapidly.
Note: Cooking times will vary with different
types of pasta.
Rice
1.Bring 6 cups of water to the boil on
setting 9. Add 200g (1 cup) of rice and
position the lid.
2.Cook until tender, approximately 10-12
minutes and then drain.
3.Reduce to a lower setting if the water boils
too rapidly. Stir occasionally so that the
rice does not stick.
Browning and Sealing Meat
It is necessary to brown and seal meat in
many recipes. Meat retains its juices and the
flavours develop after browning and sealing.
This also prevents it from sticking when
baking or roasting. Preferably use meat that
is at room temperature, as this reduces the
cooking time.
1.Preheat the frypan to settings 12-13. Add
approximately 1-2 tablespoons of oil.
2.Brown meat on all sides, with the lid off.
3.After sealing, reduce the temperature to
settings 6-7 and replace the lid until the
meat is cooked as desired. Steaks should
only require turning once or twice.
11
Cooking with your FP8950 Ellise® Stainless Steel Frypan continued
Frying
The frypan is ideal for shallow or dry frying.
Deep frying is not particularly suitable as
the frypan has shallow sides and a greater
surface area, which results in heat loss and
the possible overflow of oil.
Pan Frying: Suitable for eggs, omelettes,
bacon, sausages, steaks and chicken pieces.
Preheat to settings 8-9 with a little oil to add
flavour.
Shallow Frying: Suitable for vegetable pieces
e.g roast pumpkin and potato, and crumbed
food. Preheat on settings 9-11 with sufficient
oil so that the food is half immersed. Cook
food with the lid off.
Sautéeing: Preheat on settings 8-9 with a
little oil to add flavour.
Stir Frying: Food is cooked quickly, over a
high heat and vegetables retain their flavour
and crispness. For best results and even
cooking, cut food into even sized, smaller
pieces.
1.Preheat the frypan on settings 12-13 with
a little oil.
2.Slice meat into strips. Coat meat in a little
oil and stir-fry in batches until browned.
This prevents meat from stewing.
3.Add vegetables and seasoning, stirring
continuously. Vegetables which take longer
to cook, such as carrots, should be cooked
first, adding the other ingredients later.
Cook until the vegetables are still slightly
crisp. Return the meat back into the pan
when the vegetables are almost cooked.
The lid can be in position in the last few
minutes of cooking.
12
Roasting
Meat and poultry: The frypan is ideal for
roasting meat and poultry, as the meat
retains the flavour and juices.
1.Preheat the frypan on settings 12-13. Use
only a small amount of oil for less fatty
joints and no oil for fattier joints of meat.
2.Brown and seal the meat on all sides and
position the lid.
3.After browning, turn the dial to settings
6-7 to cook the meat as desired. Turn meat
occasionally during cooking to ensure even
cooking.
4.Remove meat from pan and cover with
foil. Allow meat to rest for 5-10 minutes,
meanwhile you can make a gravy from the
juices in the frypan.
Vegetables: Cut into even sized pieces. Add
to the frypan 45-60 minutes before serving.
For crisper vegetables, remove the meat and
increase the heat for the last few minutes of
cooking.
Roasting Times:
Note: These times are for well done. Reduce
the times to suit personal taste.
PORK: 30-40 minutes per 500g after browning.
VEAL: 30-40 minutes per 500g after browning.
LAMB: 25-30 minutes per 500g after
browning.
CHICKEN: 30-35 minutes per 500g after browning.
Cooking with your SK6450 Ellise®
Stainless Steel Skillet
Frying
The skillet is ideal for shallow or dry frying.
Deep frying is not suitable as the skillet has
shallow sides and a greater surface area,
which results in heat loss and the possible
overflow of oil.
Pan Frying: Suitable for eggs, omelettes,
bacon, sausages, steaks and chicken pieces.
Pre-heat to settings 8-9 with a little oil
to add flavour. Steaks should only require
turning once or twice.
Tip: A good suggestion is to lightly coat the
meat with the oil, this helps to reduce the
amount of oil needed, and stops spattering of
excess oil.
Shallow Frying: Suitable for vegetable
pieces e.g roast pumpkin and potato, and
crumbed food. Pre-heat on settings 9-11
with sufficient oil so that the food is half
immersed. Cook food with the lid off.
Sauteéing: Pre-heat on settings 8-9 with a
little oil to add flavour.
Stir Frying: Food is cooked quickly, over a
high heat and vegetables retain their flavour
and crispness. For best results and even
cooking, cut food into even sized, smaller
pieces.
1.Pre-heat the skillet on settings 12-13.
2.Slice meat into strips. Coat meat in a little
oil and stir-fry in batches until browned.
This prevents meat from stewing. Remove
meat from pan.
3.Add vegetables and seasoning, stirring
continuously. Vegetables which take longer
to cook, such as carrots, should be cooked
first, adding the other ingredients later.
Cook until the vegetables are still slightly
crisp. Return the meat back into the pan
when the vegetables are almost cooked.
The lid can be in position in the last few
minutes of cooking.
Roasting
Meat and Poultry
The skillet is ideal for roasting meat and
poultry, as the meat retains the flavour and
juices. It is necessary to brown and seal
meat in many recipes. Meat retains its juices
and the flavours develop after browning and
sealing. This also prevents it from sticking
when baking or roasting.
1.Pre-heat the skillet on settings 12-13. Use
only a small amount of oil for less fatty
joints and less oil for fattier joints of meat.
2.Brown and seal the meat on all sides and
position the lid.
3.After browning, turn the dial to settings
6-7 to cook the meat as desired. Turn meat
occasionally during cooking to ensure even
cooking.
4.Remove meat from pan and cover with
foil. Allow meat to rest for 5-10 minutes,
meanwhile you can make a gravy from the
juices in the skillet.
Vegetables
Cut into even sized pieces. Add to the skillet
45-60 minutes before serving. For crisper
vegetables, remove the meat and increase the
heat for the last few minutes of cooking.
Roasting Times: These times are for well done.
Reduce the times to suit personal taste.
PORK: 30-40 minutes per 500g after browning.
VEAL: 30-40 minutes per 500g after browning.
LAMB: 25-30 minutes per 500g after browning.
CHICKEN: 30-35 minutes per 500g after browning.
13
Cooking with your WW8950 Ellise®
Stainless Steel Wok
Stir-Frying.
Stir-frying is a quick cooking method
conducted over very high heat. The wok
should be hot before adding oil or any
ingredients. Be sure to maintain maximum
heat when stir-frying, by cooking food in
small batches. Use a tossing motion to
ensure the food is evenly exposed to the
heat.
Tips When Stir-Frying.
• Meat should be cooked in batches,
approximately 150g per batch. This
prevents the temperature of the wok
dropping too low and also preventing
the meat from stewing. Once the meat
is cooked, remove it from the wok and
continue cooking vegetables, sauce and
noodles. Then return the meat to the wok
to heat through.
• Vegetables and meat should be cut into
uniform shapes and sizes before starting,
as stir-frying relies on quick cooking for
best results.
• Slice meats into thin strips (about 5cm)
so that they can cook quickly.
• If stir-frying marinated meat strips, drain
off excess marinade as it tends to boil,
which toughens the meat.
• Ensure the oil has been preheated to the
correct temperature before cooking. The
best oil to use is a canola or sunflower oil.
Traditional asian oils used include peanut
or sesame oils.
• Stir-frying is done quickly, the less cooking
time, the less chance there is for the meat
to toughen or overcook. This also keeps the
food crisp.
14
• Do not use the lid when stir-frying as stirfrying is a method of dry cooking and the
steam droplets will toughen the meat.
• Serve stir-fried foods immediately to retain
their crisp texture.
Shallow Frying.
Shallow frying is a method used to cook and
crispen foods in a small amount of oil. The
food is cooked at a lower temperature so that
a brown crust forms on the underside. The
food is then turned over to brown the other
side. Usually 1 cup of oil is sufficient for
shallow frying.
Deep Frying.
Deep fried food should be crispy on the
outside and tender inside. The food should
be coated with batter or breadcrumbs and
placed in hot oil.
Tips When Deep Frying.
• Preheat the oil to the desired temperature
before adding food. Do not cover the wok
with the lid when deep frying.
• Wipe moisture from foods to avoid any
splattering or foaming of oil.
• Do not fill the wok with more than 8 cups
of oil. For best results use a vegetable oil.
Cooking with your WW8950 Ellise® Stainless Steel Wok
• Cook food pieces a few at a time. This
prevents lowering the oil temperature and
food from having a soggy crust.
• Drain the food on paper towelling as soon
as it is removed from the oil.
• Always allow the oil to cool before
removing from the wok.
Steaming.
Steamed foods are tender and juicy retaining
most of their nutritional value. Most foods
respond well to steaming, especially fish and
seafood. Place food on the steaming rack
provided and place in wok over simmering
water or stock. Cover with wok lid.
Braising and Stewing.
The wok can be used to make your favourite
stews. The lid should be left on when
stewing.
Braising is a variation to stir-frying where
liquid is added at the end of stir-frying and
the ingredients are left to simmer, usually
uncovered.
15
Stainless steel cooking surface
The Sunbeam stainless steel cooking surface
is manufactured from high quality stainless
steel. Stainless steel is hygienic, easy to
care for and extremely durable. To keep your
stainless steel cooking surface looking good
and to achieve the best results, follow these
simple instructions:
Removing burnt-on food
Fill the wok with sufficient water, cover and
simmer for five minutes or until the burnt-on
food softens and lifts. For stubborn burnt-on
food, leave the wok to soak overnight, after
first simmering as described. Then wash and
dry thoroughly.
Before the first use
We recommend 'Seasoning' the pan before
use. Lightly heat the pan on setting 5 for 1
minute only, without adding oil. Turn off the
heat and remove the probe. Then rub a small
amount of oil into the cooking surface with
paper towelling.
Removing stubborn stains
We recommend that stubborn stains on the
cooking surface can be removed by using
nylon abrasive pads in conjunction with any
brand of stainless steel powder cleaner.
Use of metal utensils
Continued use of knives, forks or spoons will
eventually start to mark the stainless steel
cooking surface. We recommend using nylon
or wooden utensils to maintain the polished
surface finish.
Rubbing a paste of bicarbonate of soda and
water into the stained area is also helpful in
removing stains. Wash thoroughly.
To clean after each use
Wash in hot soapy water. Rinse and dry
thoroughly. To remove cooked-on food, fill
the wok with hot water and allow to stand
for a few minutes. This will soften the food,
making cleaning easier.
Note: Never fill a hot wok with cold water.
16
Note: Constant use of nylon abrasive pads,
will affect the polished surface finish.
Note: Re-season the cooking surface after
using any of the above methods to remove
stains.
Dishwasher-safe
Your Ellise cookware is completely
dishwasher-safe. The heating element is
totally sealed so it is safe to fully immerse in
water.
Care and Cleaning
Heat Control Probe.
If cleaning is necessary, wipe over probe with
a damp cloth.
Do not immerse the Control Probe in water or
any other liquid.
Storage.
Store the probe carefully in a safe place. Do
not knock or drop it as this can damage the
probe.
If damage is suspected, return the control
probe to your nearest Sunbeam Service
Centre for inspection. Refer to the back
of your instruction book for Service Centre
listings.
WW8950 Wok
Wok, Base and Glass Lid
The wok, base and lid are fully immersible
and can be washed in warm soapy water
using a mild household detergent and a soft
washing sponge.
They can also be cleaned in the dishwasher.
To Clean Steaming Rack and Tempura Rack
Wash in warm soapy water using a mild
household detergent. Rinse thoroughly and
dry with a soft cloth before storing.
FP8950 Frypan and SK6450 Skillet
Pan and Lid
The pan and lid are fully immersible and
can be washed in warm soapy water using a
mild household detergent and a soft washing
sponge. They can also be cleaned in the
dishwasher.
To clean the Frypan Roast Rack
Wash in warm soapy water using a mild
household detergent. Rinse thoroughly and
dry with a soft cloth before storing.
17
Frypan Recipes
All the recipes have been specifically created
and tested by our Sunbeam Test Kitchen for
each of the Ellise cookware pieces. We hope
you enjoy using your Sunbeam Ellise Stainless
Steel Cookware.
Pumpkin Soup
Serves: 4
2 tablespoons olive oil
20g butter
1.5kg pumpkin, skin and seeds removed,
cubed
4 cups chicken stock
½ cup thickened cream
Salt and freshly ground black pepper, to taste
1.Heat oil and butter in frypan on Setting
6. Add onions to pan and cook for 2-3
minutes or until tender/ Add pumpkin and
cook for a further 2-3 minutes.
2.Add stock to the pan and bring to a
simmer. Cover with lid. Reduce heat to
Setting 4. Cook for a further 30 minutes or
until pumpkin is tender. Set aside to cool.
3.Blend or process soup until smooth. Return
soup to frypan. Heat on Setting 7 until
desired temperature. Add cream. Season to
taste with salt and pepper. Serve.
18
Chilli Crab
Serves: 4
6 raw blue swimmer crabs
2 tablespoons peanut oil
3 cloves garlic, crushed
3 shallots, chopped
1 large red chilli, chopped
1 tablespoon freshly grated ginger
½ cup chicken stock
1/3 cup sweet chilli sauce
1/3 cup tomato sauce
1 tablespoon fish sauce
1 tablespoon oyster sauce
1 tablespoon grated palm sugar
Salt and freshly ground black pepper, to taste
1.Remove flap from the underside of the
crabs. Turnover. Place thumb under the
shell between the two back legs and slowly
pull the shell away from the body. Discard.
Remove the feather like gills and front
feelers. Cut the crabs in half and crack
the large nippers. This will allow for even
cooking.
2.Heat oil in frypan on Setting 12. Add
garlic, shallots, chilli and ginger to the
pan. Cook for 1-2 minutes or until fragrant.
3.Reduce to Setting 9. Add crabs to the pan.
Pour over remaining ingredients. Simmer
for 10-15 minutes or until the crabs have
turned a deep orange colour. Season to
taste with salt and pepper. Serve.
Frypan Recipes continued
Spanish Paella
Serves: 6-8
2 small raw blue swimmer crabs
8 large green prawns, peeled, deveined
8 small black mussels, cleaned
3 ½ cups fish stock
1 teaspoon saffron
2 chorizo sausages, sliced
2kg chicken thighs, halved
5.Add tomatoes to the pan and bring to a
simmer. Add rice to the pan and cook
stirring for 2 minutes.
6.Add stock and reduce to Setting 4. Cover
with lid. Cook for 10-15 minutes or until
rice is cooked.
7.Place remaining ingredients in the pan.
Cover with lid. Cook for a further 5 minutes
or until done. Season to taste with salt and
pepper. Serve.
1 tablespoon olive oil
1 onion, chopped
1 clove garlic, crushed
½ teaspoon smoked paprika
400g can crushed tomatoes
1 ½ cups Arborio rice
300g pipis, cleaned
½ cup frozen peas
1 small roasted red capsicum, sliced
Salt and freshly ground black pepper, to taste
1.Remove flap from the underside of the
crabs. Turnover. Place thumb under the
shell between the two back legs and slowly
pull the shell away from the body. Discard.
Remove the feather like gills and front
feelers. Cut the crabs in half and crack
the large nippers. This will allow for even
cooking.
2.Heat frypan to Setting 12. Add chorizo to
pan. Cook for 3-4 minutes or until golden.
Set aside.
3.Add chicken thighs to the pan and cook for
3-4 minutes or until golden. Set aside.
4.Reduce to Setting 9. Add oil and cook
onion and garlic until tender about 3-4
minutes. Add paprika and cook until
fragrant.
19
Frypan Recipes continued
1kg lamb forequarter chops, trimmed
Family Beef Casserole with Semi Dried
Tomatoes
Serves: 6-8
2kg chuck steak, cut into 2cm cubes
5 fresh curry leaves
½ cup plain flour
1 teaspoon black mustard seeds
¼ cup olive oil
1 onion, chopped
2 bunch shallots, trimmed
Spicy Dry Lamb Curry
Serves: 4-6
2 tablespoons vegetable oil
2 cloves garlic, crushed
2 cloves garlic, crushed
2 tablespoons freshly grated ginger
½ cup red wine
1 tablespoon curry paste
½ cup tomato paste
2 teaspoons tandoori paste
5 sprigs fresh thyme
2 teaspoons ground cumin
3 carrots, peeled, diced
1 teaspoon garam masala
3 celery stalks, diced
2 teaspoons chilli powder
2 bay leaves
2 tablespoons lemon juice
2 cups beef stock
1 cup water
1 cup semi-dried tomatoes, chopped
1 cup fresh coriander, chopped
Salt and freshly ground black pepper, to taste
Salt and freshly ground black pepper, to taste
1.Coat beef with flour. Season with salt and
pepper.
2.Heat oil in frypan on Setting 11. Cook beef
in batches until golden brown. Set aside.
3.Reduce heat to Setting 9. Add shallots and
garlic to the pan. Cook for 1-2 minutes or
until golden. Add wine and tomato paste to
the pan. Stir until combined and slightly
reduced.
4.Add thyme, carrot, celery, bay leaves,
stock and beef to the pan. Stir to combine.
Cover with lid. Reduce heat to Setting
5. Cook for 1 hour, stirring occasionally.
Add tomatoes and cook for a further 20
minutes. Season to taste with salt and
pepper. Serve.
1.Heat oil in frypan on Setting 12. Add lamb
and cook until golden. Set aside.
2.Add mustard and curry leaves to the pan
and cook for 1 minute or until they begin
to pop.
3.Add onion and garlic to the pan and cook
for 2 -3 minutes or until tender. Add ginger
and dry spices and cook until fragrant.
4.Add lamb and remaining ingredients,
expect coriander. Reduce heat to Setting
3. Cover with lid. Cook for 1 – 1 ½ hours,
stirring occasionally. Season to taste with
salt and pepper. Top with fresh coriander.
Serve.
20
Frypan Recipes continued
Pan fried Chicken Breast with Salsa Verde
Serves: 6
1-2 tablespoons olive oil
Pan fried Fish with Garlic and Lemon
Serves: 4
¼ cup basil leaves, shredded
6 chicken breast fillets
2 tablespoons lemon juice
1 cup fresh flat-leaf parsley
2 tablespoons olive oil
½ cup fresh dill
2 shallots, minced
½ cup fresh mint leaves
2 cloves garlic, crushed
2 cloves garlic
4 firm white fish fillets
1 tablespoon capers, rinsed
Salt and freshly ground black pepper, to taste
1 tablespoon lemon zest
1.Combine basil, lemon, oil, shallots and
garlic in a bowl. Add fish. Cover and
refrigerate for 20 minutes.
2.Heat frypan on Setting 13. Add fish and
cook for 2-3 minutes on each side or until
cooked. Season to taste with salt and
pepper. Serve.
¾ cup olive oil
Salt and freshly ground black pepper, to taste
1.Heat oil in frypan on Setting 10. Add
chicken and cook for 6-8 minutes or until
golden and cooked. Set aside.
2.Process remaining ingredients. Season to
taste with salt and pepper. Serve salsa
Verde over chicken.
21
Frypan Recipes continued
Beef Stroganoff
Serves: 4-6
2 tablespoons plain flour
Dhal
Serves: 4
1 tablespoon vegetable oil
2 tablespoons olive oil
1 onion, chopped
1 kg chuck steak, cut into 2cm strips
1 clove garlic, crushed
250g button mushrooms, sliced
1 tablespoon ground cumin
1 cup beef stock
1 teaspoon black mustard seeds
¼ cup tomato paste
½ teaspoon cumin seeds
2 cloves garlic, crushed
2 tablespoon tomato paste
½ cup sour cream
2 cups red lentils, rinsed, drained
Salt and freshly ground black pepper, to taste
2 cups vegetable stock
1.Coat beef with flour. Season with salt and
pepper.
2.Heat oil in frypan on Setting 12. Cook beef
in batches until golden brown.
3.Return all beef and add remaining
ingredients, except sour cream. Cover with
lid. Reduce heat to setting 6. Cook for 45
minutes or until beef is tender.
4.Stir through sour cream. Season to taste
with salt and pepper. Serve.
4 cups water
22
400g can chopped tomatoes
3 baby eggplants, chopped
4 hard-boiled eggs, quartered
Salt and freshly ground black pepper, to taste
1.Heat oil in frypan on Setting 6. Add onion
and garlic, cooking for 3-4 minutes or until
tender. Add cumin and mustard seeds
cooking for 1 minute or until fragrant.
2.Add tomato paste and lentils cooking for
1 -2 minutes. Add stock and water. Stir to
combine. Cover with lid. Reduce heat to
Setting 4. Cook for 10 minutes.
3.Add tomatoes and eggplant. Cover with lid.
Cook for a further 15-20 minutes or until
Dahl has thickened and eggplant is soft.
4.Add eggs. Season to taste with salt and
pepper. Serve.
Frypan Recipes continued
Lamb Tagine
Serves: 4-6
2 tablespoons olive oil
Penne Boscaiola
Serves: 4
6 rashers bacon, chopped
8 lamb shanks
200g button mushrooms, sliced
1 onion, chopped
²⁄³ cup white wine
2 cloves garlic, crushed
1 ¼ cups thickened cream
1 ½ tablespoons Moroccan dried spice mix
500g penne pasta, cooked
1 tablespoons tomato paste
Salt and freshly ground black pepper, to taste
400g can whole peeled tomatoes
Grated parmesan cheese, to serve
1 cup chicken stock
1.Heat frypan to Setting 12. Cook bacon
and mushrooms for 4-5 minutes or until
golden.
2.Add wine and cook until reduced by half.
Add cream and stock. Allow to simmer
until thickened.
3.Add pasta to the pan. Season to taste
with salt and pepper. Serve with parmesan
cheese.
3 cardamom pods, cracked
1 cinnamon stick
400g can chickpeas, drained, rinsed
1 sweet potato, peeled, chopped into 2cm
cubes
1 cup fresh coriander, roughly chopped
Salt and freshly ground black pepper, to taste
Cous cous, to serve
1.Heat oil in frypan on Setting 12. Cook
lamb in batches until golden brown. Set
aside.
2.Reduce heat to setting 7. Add onion and
garlic to the pan and cook for 2-3 minutes
or until golden brown. Add spice mix and
tomato paste to the pan and cook for 1
minute.
3.Add whole tomatoes, cardamom, cinnamon
and chicken stock to the pan. Cover with
the lid. Reduce heat to Setting 4 and cook
for 2 hours.
4.Add chickpeas and potato. Cover with the
lid and cook for a further 20 minutes or
until sweet potato is tender. Season to
taste with salt and pepper.
5.Stir through coriander and serve over cous
cous.
23
Frypan Recipes continued
Roast Chicken with Stuffing
Serves: 4
2 teaspoons olive oil
Mustard Seed Potatoes
Serves: 8
1.5kg baby new potatoes
1 onion, chopped
2 tablespoons extra virgin olive oil
3 cups fresh breadcrumbs
2 tablespoons black mustard seeds
30g butter, melted
Salt and freshly ground black pepper, to taste
2 tablespoons fresh flat-leaf parsley, chopped
1.Heat frypan on Setting 15. Add potatoes
and cover with water. Cover with the lid.
Simmer until potatoes are tender. Drain.
2.Heat frypan on Setting 12. Add potatoes,
oil and mustard seeds. Season to taste
with salt and pepper. Cook for 15 minutes
or until potatoes are golden. Serve.
2 teaspoons fresh thyme, chopped
1 teaspoon lemon zest
1.2kg whole chicken, washed, dried
1.Heat oil in the frypan on Setting 12. Add
onion and cook for 2-3 minutes or until
tender. Set aside.
2.In a large bowl combine onion,
breadcrumbs, butter, parsley, thyme and
lemon. Season with salt and pepper. Place
mixture inside the cavity of the chicken.
Tie chicken wings together with kitchen
twine.
3.Preheat frypan on Setting 10. Place
chicken in the pan. Cook for 1-2 minutes
on each side or until golden. Cover with
the lid. Reduce heat to Setting 8. Cook for
1 -1½ hours or until cooked. Season to
taste with salt and pepper. Serve.
24
Frypan Recipes continued
Buttermilk Pancakes
Makes: 8
1 cup self raising flour, sifted
2 tablespoons caster sugar
½ teaspoon bicarbonate soda
1 egg, lightly beaten
2 tablespoons vegetable oil
1 cup buttermilk
60g butter
1.In a large bowl combine flour, sugar and
bicarbonate soda.
2.In a separate bowl combine all wet
ingredients and stir to combine.
3.Pour wet ingredients into dry and whisk
until smooth.
4.Heat frypan on Setting 9. Melt butter in
the pan. Add ¼ cup cupful’s of mixture
into the pan. Cook for 2-3 minutes on each
side or until golden and cooked. Serve.
25
Skillet Recipes
Corn Fritters
Makes: about 20
1 cup self raising flour
Gyoza (Japanese Dumplings)
Makes: about 20
150g pork mince
½ teaspoon bicarbonate of soda
150g chicken mince
½ teaspoon ground coriander
2½ cups Chinese cabbage, finely sliced
½ teaspoon sweet paprika
¹⁄³ cup finely chopped water chestnuts
²⁄³ cup buttermilk
2 tablespoons kecap manis
2 eggs
1 tablespoon mirin
2 cups corn kernels
2 teaspoons sesame oil
3 shallots, sliced
1 teaspoon caster sugar
1 small red capsicum, diced finely
4 shallots, chopped finely
2 tablespoons chopped fresh flat leaf parsley
1 egg
1 tablespoon chopped fresh coriander
50 sheets gow gee wrappers
Salt and freshly ground black pepper, to taste
Vegetable oil, for frying
Olive oil
Salt and freshly ground black pepper, to taste
Tomato chilli jam, to serve
Dipping Sauce:
1.Combine flour, soda, coriander and paprika
in a bowl. Whisk through buttermilk and
eggs to form a batter.
2.Combine corn, shallots, capsicum, parsley
and coriander in a large bowl. Stir to
combine. Season to taste with salt and
pepper.
3.Heat frypan on setting 10. Drizzle
a little olive oil in frypan and spoon
tablespoonful’s of mixture into pan.
Cook fritters for 2-3 minutes on each side
until golden.
4.Serve with tomato chilli jam if desired.
2 tablespoons kecap manis
26
1 tablespoon black vinegar
1.Combine all ingredients in a bowl and mix
well. Season with salt and pepper.
2.Line a tray with baking paper. Lay out
several sheets of gow gee wrappers.
3.Place a rounded teaspoon of filling into
the centre of the wrapper. Moisten the
edges with a little water. Fold the wrapper
over the filling but before sealing carefully
pleat on one side. The pastry will look
plain on one side but have a small pleat on
the other. Gently press the pastry to seal.
Repeat with remaining wrappers.
4.Heat frypan on setting 9. Heat 1
tablespoon of oil in the frying pan and
place the dumplings, in batches, into
the pan, pleat side up. Cook until the
dumplings are golden on the bottom.
Do not turn. Carefully pour enough water
in the frying pan so that the dumplings
are half covered. Place the lid on the
Skillet Recipes continued
frying pan and cook, covered for 1 minute.
Remove lid and cook, uncovered, until
all tender and cooked. Remove from pan,
repeat with remaining dumplings.
Note: The water should be simmering the
whole time. If this does not happen increase
the heat.
5.Serve with dipping sauce.
Steamed Salmon Parcels
Serves: 4
4 shallots, finely sliced
2 cloves garlic, crushed
1 large red chilli, seeds removed, sliced
1 stalk lemon grass, finely chopped
½ cup coconut milk
¹⁄³ cup fresh coriander leaves
2 teaspoons grated fresh ginger
4 x 180g Atlantic salmon fillets
1 tablespoon peanut oil
4-6 baby bok choy, quartered
Salt and freshly ground black pepper, to taste
Steamed jasmine rice, to serve
1.Preheat frypan on setting 12 with the lid
on for 2 minutes.
2.In a bowl combine shallots, garlic, chilli,
lemon grass, coconut milk, coriander
and ginger. Season to taste with salt and
pepper.
3.Place each piece of salmon on 4 individual
pieces of aluminium foil. Divide the
coconut mixture evenly over the salmon.
Fold each piece of foil up to make 4 sealed
parcels.
4.Place parcels in frypan. Place lid on pan. Reduce heat to setting 9 and cook for
12-15 minutes or until cooked as desired.
Remove from heat.
5.Quickly increase heat to setting 15.
Add oil and bok choy. Cook for 1-2 minutes
until wilted. Season to taste with salt and
pepper.
6.Serve salmon with bok choy and steamed
jasmine rice.
27
Skillet Recipes continued
Prosciutto Wrapped Pork Loin
Serves: 4-6
2 tablespoons Dijon mustard
Thai Chicken Stir Fry
Serves: 4
2 tablespoons vegetable oil
1 tablespoon horseradish cream
2 large chicken breasts, sliced
1 tablespoon olive oil
4 shallots, finely sliced
2 teaspoons fresh rosemary, chopped
3 tablespoons red curry paste
2 teaspoons fresh thyme, chopped
1 red capsicum, seeds removed, sliced
2 teaspoons soy sauce
150g baby green beans, trimmed, halved
1 teaspoon Worcestershire sauce
125g baby corn, halved
500g pork loin
1 cup coconut milk
6 slices prosciutto
4 kaffir lime leaves, shredded
Salt and freshly ground black pepper, to taste
2 teaspoons caster sugar
1.In a small bowl combine all ingredients
except pork and prosciutto. Stir to
combine.
2.Lay the prosciutto out so it is slightly
overlapping.
3.Rub pork loin with mustard sauce and
place in the centre of the prosciutto.
Encase the pork loin in the prosciutto.
Using kitchen twine tie the roast at 2 cm
intervals.
4.Preheat pan to setting 15. Place pork in
the pan and cook for 1-2 minutes on each
side or until golden and crisp. Lower heat
to setting 9. Cover with the lid. Cook for a
further 40 minutes or until done.
5.Remove the string. Allow to rest for 5- 10
minutes before carving. Season to taste
with salt and pepper. Serve.
28
1 teaspoon fish sauce
½ cup fresh coriander, chopped
Salt and freshly ground black pepper, to taste
Jasmine rice, to serve
1.Preheat frypan to setting 15. Add half of
the oil.
2.Add chicken to the pan and cook in
batches until golden and cooked. Set
aside.
3.Add remaining oil to the pan and cook
scallions for 2-3 minutes or until tender.
Add curry paste and cook for a further
minute or until fragrant.
4.Add capsicum, green beans, corn, coconut
milk, lime leaves, sugar, fish sauce and
chicken to the pan. Continue to cook for
4-5 minutes or until vegetables are tender.
Season to taste with salt and pepper. Serve
over rice with coriander.
Skillet Recipes continued
Roast Chicken with Sage and Garlic
Serves: 6
1.6kg whole chicken
Sweet and Sticky Teriyaki Wings
Serves: 4-6
1 tablespoon vegetable oil
3 cloves garlic, crushed
500g chicken wings
1 lemon
½ cup honey
1 bunch fresh sage leaves, roughly chopped
¼ cup balsamic vinegar
80g butter, room temperature
¼ cup brown sugar
2 tablespoons olive oil
2 tablespoons soy sauce
8 sprigs fresh flat leaf parsley
1 tablespoon freshly minced ginger
1 onion, quartered
3 cloves garlic, crushed
Salt and freshly ground black pepper, to taste
2 tablespoons sesame seeds, toasted
1.Peel lemon and finely chop the skin.
Reserve the flesh.
2.In a small bowl combine garlic, lemon
peel, sage and butter. Season to taste with
salt and pepper.
3.Using your fingers loosen the skin around
the breasts and thighs of the chicken.
Place butter mixture between the skin and
flesh. Rub the skin of the chicken with
oil. Season with salt and pepper. Stuff the
parsley, onion and lemon flesh in the cavity
of the chicken. Tie chicken legs together
with twine.
4.Preheat pan on setting 15 for 2 minutes. 5.Add chicken to pan and brown on all sides.
Cover with the lid. Reduce setting to 8.
Cook for 1 hour or until cooked. Season to
taste with salt and pepper. Serve.
Salt and freshly ground black pepper, to taste
1.Preheat oil in frypan on setting 12 for 2
minutes. Add chicken wings to the pan.
Cover with lid. Reduce to setting 9. Cook
for 20 minutes, stirring occasionally.
2.Combine all remaining ingredients except
sesame seeds in a large bowl.
3.Remove chicken wings from the pan and
toss in marinade.
4.Increase frypan to setting 12. Add chicken
wings and cook for a further 5 minutes,
turning occasionally. Remove from pan
when golden and crisp. Season to taste
with salt and pepper. Sprinkle with sesame
seeds before serving. Serve.
29
Skillet Recipes continued
Delicious BBQ Beef Short Ribs
Serves: 3-4
¼ cup vegetable oil
Italian Meatballs in Tomato Sauce
Serves: 4
½ cup olive oil
1kg beef short ribs
²⁄³ cup pine nuts, roughly chopped
1 onion, chopped
6 cloves garlic, crushed
2 tablespoons freshly grated ginger
3 cloves garlic, crushed
5 tomatoes, roughly chopped
1 cup fresh breadcrumbs
¾ cup caster sugar
½ cup ricotta cheese
½ cup dry sherry
¼ cup freshly flat leaf parsley, chopped
2 tablespoons tamarind paste
2 tablespoons fresh basil, chopped
1 ½ tablespoons bean paste
1 tablespoon lemon zest
1 ½ tablespoons soy sauce
2 teaspoons ground fennel seeds
½ cup water
1 egg
4 cups chicken stock
500g beef mince
Salt and freshly ground black pepper, to taste
2 x 400g cans chopped tomatoes
1.Preheat pan with half of the oil on setting
15 for 2 minutes. Add ribs to the pan and
cook for 3-4 minutes or until browned. Set
aside.
2.Reduce heat to setting 10. Add remaining
oil, garlic and ginger. Cook for 1 minute
or until fragrant. Add tomatoes and cook,
stirring, for 3-4 minutes. Stir through the
sugar and cook for a further 3 minutes or
until caramelised.
3.Pour sherry into the pan and allow to
reduce by half. Add remaining ingredients
and bring to a simmer. Return beef to the
pan. Cover with lid. Cook for 1 hour on
setting 6 until meat is tender.
4.Remove beef from pan. Increase heat to
setting 13 and simmer for 3-4 minutes
or until reduced by half and thickened.
Season to taste with salt and pepper. Serve
beef in sauce.
½ cup red wine
30
Salt and freshly ground black pepper, to taste
Grated parmesan, to serve
1.Preheat pan on setting 12 for 2 minutes.
2.Add half of the oil, pine nuts and onion.
Cook for 3 -4 minutes or until pine nuts
are golden. Add garlic and continue to
cook for 1 minute. Remove from pan.
3.In a large bowl combine breadcrumbs,
ricotta, parsley, basil, lemon, fennel, egg,
beef and cooled onion mixture. Stir to
combine. Season to taste with salt and
pepper.
4.Roll mixture into 2 tablespoon sized balls.
5.Heat remaining oil in pan on setting 15 for
2 minutes. Add meatballs and cook until
golden. Remove from the pan.
6.Add tomatoes and wine to the pan. Reduce
heat to setting 9. Cover with lid. Allow to
simmer for 20 minutes. Add meatballs
back to the sauce and cook for a further
10 minutes. Season to taste with salt and
pepper. Serve with parmesan cheese.
Skillet Recipes continued
Mexican Chilli Beef
This beef is great in burritos or tacos.
Serves: 6-8
¼ cup vegetable oil
2 kg beef roast
Roast Leg of lamb with Apples and Fennel
The combination of apple and fennel really
compliment the lamb.
Serves: 6-8
1.5kg mini lamb leg roast
2 white onions, roughly chopped
5 cloves garlic, finely sliced
4 cloves garlic, crushed
3 sprigs fresh rosemary
1 tablespoon ground cumin
4 small granny smith apple, cored, halved
1 tablespoon freshly grated ginger
2 onions, quartered
1 tablespoon ground Mexican chilli powder
1 bulb fennel, cut into 8 wedges
2 teaspoons ground cinnamon
1 cup apple juice
4 cups beef stock
½ cup beef stock
2 x 400g cans chopped tomatoes
1 tablespoon lemon juice
2 teaspoons dried oregano
1 tablespoon lemon zest
2 x 400g cans kidney beans, drained and
rinsed
Salt and freshly ground black pepper, to taste
1.Heat oil in pan on setting 15 for 2
minutes.
2.Add beef and cook for 3-4 minutes or until
browned. Set aside.
3.Reduce to setting 10. Add onions to the
pan and cook for 7-10 minutes or until
caramelised.
4.Stir through garlic, cumin, ginger, chilli
and cinnamon. Cook for a further 1-2
minutes or until fragrant. Add stock,
tomatoes and oregano. Season with salt
and pepper.
5.Return beef to the pan. Cover with the lid.
Reduce heat to setting 7. Simmer for 1
hour or until the beef is tender and falling
apart. Remove beef from pan.
6.Increase heat to setting 15. Bring sauce to
a simmer and allow to reduce by half. Just
before serving stir through beans. Return
beef to the pan. Season with salt and
pepper. Serve.
Salt and freshly ground black pepper, to taste
1.Pierce the lamb in 10 places. Stuff
the incisions with garlic and half of the
rosemary. Season the outside of the lamb
generously with salt and pepper.
2.Preheat pan to setting 15 for two minutes.
3.Add lamb to the pan and cook for 3-4
minutes or until browned. Set aside.
4.Reduce heat to setting 5. Add apples,
onions and fennel to the pan. Top with
lamb.
5.Pour over remaining ingredients. Place lid
on the pan. Cook for 1 hour for medium.
Set lamb aside to rest for 10 minutes
before carving. Season to taste with salt
and pepper. Serve with apples, fennel and
onions.
31
Skillet Recipes continued
Lamb with Moroccan Spice Rub
Serves: 4-6
¹⁄³ cup olive oil
¹⁄³ cup fresh flat leaf parsley, chopped
1 tablespoon ground coriander
1 tablespoons ground cumin
1 tablespoon lemon zest
1 tablespoon sweet paprika
1 teaspoon ground all spice
1 teaspoon ground black pepper
1 teaspoon ground cinnamon
1 teaspoon ground turmeric
Pinch saffron threads
4 cloves garlic, crushed
1kg lamb roast
Salt and freshly ground black pepper, to taste
1.In a bowl combine all ingredients, except
lamb, to make a smooth paste.
2.Rub paste evenly over the lamb. Place on
tray, cover and refrigerate for 2 hours.
3.Preheat pan to setting 15 for 2 minutes.
4.Add lamb to pan and brown on all sides,
about 4-5 minutes. Cover with the lid.
Reduce to setting 7. Cook for a further 55
minutes for medium rare. Allow to rest for
5-10 minutes before carving. Season to
taste with salt and pepper. Serve.
32
Mexican Style Roasted Corn
This is a Mexican street food. It’s a fun dish
to make and great to get the kids involved!
Serves: 4
4 ears corn, husks still attached
½ cup mayonnaise
1 ½ cups grated parmesan cheese
¼ cup freshly chopped coriander
1 tablespoon chilli paste
1 lime, quartered
Salt and freshly ground black pepper, to taste
1.Peel back the husks to expose the corn
kernels. Leave the husks attached at
the base. Remove all threads. Tie husks
together around the base of the cob to
form a handle. Repeat with remaining ears.
2.Preheat pan for 2 minutes on setting 15.
3.Add corn, turning occasionally. Cook for 10
minutes or until beginning to brown.
4.Brush corn with mayonnaise. Roll each
ear of corn in parmesan. Sprinkle with
coriander, chilli. Season to taste with salt
and pepper. Serve with a wedge of lime.
Skillet Recipes continued
Roasted Cauliflower with Tahini Sauce
Serves: 4-6
1 head cauliflower, cut into florets
Lemon and Herb Roasted Vegetables
Serves: 4-6
5 cloves garlic
1/4 cup olive oil
5 sprigs fresh thyme
3 tablespoons ground cumin
3 sprigs fresh rosemary
¼ cup tahini
2 potatoes, peeled, quartered
¼ cup water
2 carrots, peeled, sliced
2 tablespoons lemon juice
2 fennel bulbs, trimmed, sliced
3 cloves garlic, crushed
2 red onions, quartered
Salt and freshly ground black pepper, to taste
1 lemon, quartered
1.Preheat pan on setting 15 for 2 minutes.
2.In a large bowl combine cauliflower, oil
and cumin. Season to taste with salt and
pepper.
3.Add cauliflower to the pan and cook for
10-15 minutes or until golden and crisp.
4.In a separate bowl combine tahini, water,
lemon juice and garlic. Season to taste
with salt and pepper.
5.Pour sauce over cauliflower. Toss to
combine. Serve.
1 sweet potato, peeled, cut into 3cm cubes
½ cup olive oil
1 tablespoons freshly grated ginger
Salt and freshly ground black pepper, to taste
1.Preheat pan to setting 15 for 2 minutes.
2.In a large bowl combine all ingredients.
Season generously with salt and pepper.
3.Place vegetables in the pan. Reduce heat
to setting 10. Cover with the lid and cook
for 1 hour, stirring occasionally.
4.Increase heat to setting 15. Cook
vegetables for a further 10 minutes or
until golden. Season with salt and pepper.
Serve.
33
Skillet Recipes continued
Individual Sticky Date Puddings
Serves: 8
2 cups dried dates, chopped
1¼ cups boiling water
1 teaspoon bicarbonate of soda
¹⁄³ cup olive oil
1 cup brown sugar
1 cup self raising flour
¼ teaspoon ground mixed spice
2 eggs
Butterscotch Sauce:
160g butter
²⁄³ cup firmly packed brown sugar
1 cup thickened cream
1.Preheat pan on setting 6 with the lid on.
Grease 8 individual 1-cup capacity metal
moulds.
2.Place dates, boiling water and baking soda
into a small bowl and set aside for 10
minutes.
3.In a large bowl combine date mixture, oil
and sugar. Stir to combine.
4.Add remaining ingredients to the bowl and
mix until just combined.
5.Pour mixture into prepared moulds. Place
moulds in frypan and carefully pour enough
boiling water to come half way up the sides
of the moulds. Cook for about 25 minutes
or until cooked when tested with a wooden
skewer. Carefully remove from frypan;
stand for 5 minutes before turning out onto
a wire rack.
6.Butterscotch Sauce: Place all ingredients
in the pan on setting 12. Stir until sugar
has dissolved and mixture begins to
simmer. Pour over the date puddings.
Serve.
Tip: Puddings can be made in advance and
then rewarmed in a microwave.
34
Wok Recipes
Arancini – Risotto Balls
Makes: 24
2 ½ cups chicken stock
Curry Puffs
Serves: 24
2 teaspoons vegetable oil
1 tablespoon olive oil
1 onion, chopped
1 onion, chopped
1 clove garlic, crushed
1 clove garlic, crushed
400g beef mince
¾ cup Arborio rice
2 teaspoons curry powder
2 tablespoons finely chopped fresh basil
½ teaspoon ground coriander
2 tablespoons grated parmesan ½ teaspoon ground turmeric
40g mozzarella, cut into 1cm pieces
¼ cup mango chutney
¼ cup fresh breadcrumbs
24 wonton wrappers
3 cups vegetable oil
1 egg white, lightly beaten
Salt and freshly ground black pepper, to taste
Salt and freshly ground black pepper, to taste
1.Heat oil in wok on setting 12. Add onion
and garlic cooking until softened.
2.Add rice and 1 cup of stock to the wok. Stir occasionally until all the liquid has
been absorbed. Continue adding the
stock in batches until all the liquid has
absorbed. This should take approximately
30 minutes. Season to taste with salt and
pepper.
3.Stir through basil and cheese. Remove
from wok. Set aside to cool.
4. Roll mixture into tablespoon sized balls.
Press a piece of cheese into the centre of
the rice and roll to enclose. Coat balls in
breadcrumbs.
5.Pour oil into the wok and heat on setting
12 for 5 minutes. Add risotto balls and
cook for 2-3 minutes or until golden and
cooked. Allow to drain on paper towel.
Serve.
1.Heat oil in wok on setting 12. Add onion
and garlic cooking until softened. Add
mince and cook until browned and cooked. 2. Add curry powder, coriander and turmeric.
Cook for 1 minute or until fragrant. Stir
through chutney. Season to taste with salt
and pepper.
3.Place a heaped teaspoon of mixture into
the centre of wrappers. Brush edges with
egg white. Fold wrappers in half diagonally;
pinch edges together to seal.
4.Pour oil into the wok and heat on setting
12 for 5 minutes. Add curry puffs and cook
for 4-5 minutes or until golden brown.
Allow to drain on paper towel. Serve.
35
Wok Recipes continued
Steamed Pork Buns
Makes: 6
400g pork mid-loin chops
¼ cup Hoi Sin sauce
2 tablespoons soy sauce
3 teaspoons finely grated fresh ginger
1 teaspoon Chinese five spice powder
1 teaspoon sesame oil
1 garlic clove, crushed
1 ¼ cups plain flour
3 teaspoons caster sugar
2 teaspoons dried yeast
¼ cup warm milk
¼ cup lukewarm water
1 ½ tablespoons peanut oil
Salt and freshly ground black pepper, to taste
1.Heat 2 cups of water in wok with steamer
rack in place on setting 9. Cover with lid.
2.Once water has reached a simmer add
pork to the rack. Cover and cook for 15
minutes.
3.Transfer pork to a bowl and shred meat.
4.Combine pork, hoi sin sauce, soy, ginger,
five spice powder, oil and garlic in a large
bowl. Season to taste with salt and pepper.
Cover and refrigerate for 1 hour.
5.Meanwhile, combine the flour, sugar and
yeast in a large bowl. Make a well in the
centre. Combine the milk, water and 1
tablespoon of the oil in a jug. Add to dry
ingredients and stir to combine.
6. Knead dough on a lightly floured surface
for 5 minutes or until smooth. Use
remaining oil to lightly grease a large bowl.
Place dough in bowl. Cover with plastic
wrap and place in a warm place for 30
minutes or until doubled in size. 36
7. Punch dough down. Knead for a further
5 minutes. Place in a greased bowl and
allow to proof for a further 30 minutes.
8. Shape dough into a 5 x 20cm log.
Cut into six equal portions.
9. Flatten each dough portion. Place equal
amounts of pork mixture on centre of
dough and bring side of dough up to
enclose. Roll into a ball. Cut a small
cross in top of each bun.
10.Heat 2 cups of water in wok on setting 9.
Cover with lid. Bring to a simmer. Cover
rack with a piece of baking paper. Place
pork buns crease side down on paper.
Cover with lid. Cook for 15-20 minutes or
until cooked. Serve.
Wok Recipes continued
Spring Rolls
Makes: 20
1 tablespoon peanut oil
Thai Fish Cakes
Serves: 4-6
500g firm white fish fillets, bones removed,
chopped
¼ cup canned bamboo shoots, thinly sliced
3 tablespoons red curry paste
1 tablespoon grated fresh ginger
2 tablespoons fish sauce
2 cloves garlic, crushed
1 teaspoon caster sugar
350g chicken mince
2 egg whites
2 tablespoons kecap manis
½ cup thinly sliced snake beans
1 large carrot, peeled, grated
2 kaffir lime leaves, shredded
3 shallots, thinly sliced
Peanut oil, for deep frying
1 cup finely shredded Chinese cabbage
Dipping Sauce
Salt and freshly ground black pepper, to taste
½ cup caster sugar
100g vermicelli noodles, cooked, drained
½ cup water
½ cup white vinegar
6 dried shiitake mushrooms, soaked, drained,
chopped
1 large red chilli, thinly sliced
20 medium spring roll wrappers
1 tablespoon chopped fresh coriander
Peanut oil, for deep frying
1 tablespoon finely chopped roasted peanuts
1.Heat oil in wok on setting 12. Add bamboo
shoots, ginger and garlic. Cook for 1
minute or until fragrant. Add chicken
mince and cook for a further 5 minutes or
until cooked.
2.Add remaining ingredients and stir-fry
until the cabbage has just wilted. Remove
ingredients from the wok. Allow to cool.
3.Meanwhile, clean wok and heat oil to
setting 12 for deep frying.
4.Place 2-3 tablespoons of the filling near
one corner of each wrapper. Lightly brush
edges of each wrapper with a little water,
tuck in ends and roll up to enclose filling.
5.Deep fry spring rolls in batches for 3-4
minutes or until golden brown. Drain on
paper towel. Serve.
Salt and freshly ground black pepper, to taste
1.Combine fish, curry paste, fish sauce,
sugar and egg whites into a food processor.
Process until mixture is combined.
2.Place mixture into a bowl and stir through
beans and lime leaves. Season to taste
with salt and pepper.
3.Heat oil in wok on setting 11-12.
4.Roll mixture into 2 tablespoon sized balls.
Carefully drop mixture into the oil in
batches. Cook for 2-3 minutes until golden
brown and cooked through. Drain on paper
towel. Repeat with remaining mixture. 5.Dipping Sauce: Combine sugar, water and
vinegar into a small saucepan. Stir over
a low heat until sugar dissolves. Increase
heat and simmer mixture for 5 minutes.
Remove from heat and allow to cool. Stir
through chilli, coriander and nuts.
6.Serve with dipping sauce.
37
Wok Recipes continued
Sang Choy Bao
Serves: 4
1 tablespoon peanut oil
Chicken Laksa
Serves: 4
¼ cup laksa paste
10 water chestnuts, chopped finely
1 clove garlic, crushed
6 fresh shitake mushrooms, chopped finely
2 cups chicken stock
3 shallots, chopped
2 cups coconut milk
1 clove garlic, crushed
300g cooked chicken, roughly chopped
½ teaspoon grated fresh ginger
150g soft tofu
350g chicken mince
250g rice vermicelli noodles, cooked, drained
4 lettuce leaves, to serve
100g bean sprouts
2 teaspoons sesame seeds, toasted
½ cup fresh coriander leaves
Sauce
Salt and freshly ground black pepper, to taste
1 tablespoon hoisin sauce
1.Heat wok on setting 10. Add paste and
garlic. Stir fry for 1-2 minutes or until
fragrant. Add stock and coconut milk.
Bring to a simmer. Allow to simmer for 5
minutes.
2.Add chicken and tofu and cook for 3-4
minutes.
3.Divide warm noodles among four bowls.
Ladle liquid with chicken and tofu among
the bowls. Top with bean sprouts and
coriander leaves. Serve.
1 tablespoon light soy sauce
1 tablespoon oyster sauce
1 tablespoon shao hsing cooking wine
1 teaspoon sesame oil
1 teaspoon white sugar
Salt and freshly ground black pepper, to taste
1.Heat oil in wok on setting 13. Add
chestnuts, mushrooms, shallots, garlic and
ginger to the wok and cook for 1 minute.
2.Add mince and cook for a further 4-5
minutes or until golden and cooked.
3.Pour over sauce ingredients and stir-fry for
3 minutes or until sauce has thickened.
Season to taste with salt and pepper.
4.Spoon mixture into lettuce cups. Garnish
with sesame seeds. Serve.
38
Wok Recipes continued
Chinese Style Fried Rice
Serves: 4
2 tablespoons peanut oil
Pad Thai
Serves: 4
200g rice thick noodles, cooked, drained
4 eggs, lightly whisked
200g firm tofu, diced
175g bacon, chopped
¼ cup vegetable oil
3 shallots, chopped
500g large green prawns, peeled, deveined
1 small red capsicum, seeds removed, sliced
½ cup pad Thai paste
¾ cup fresh or frozen peas
3 eggs, lightly beaten
4 cups cold cooked rice (see tip)
1 bunch garlic chives, cut into 4cm pieces
2 tablespoons soy sauce
100g bean sprouts
2 tablespoons oyster sauce
½ cup fresh coriander leaves
250g prawns, cooked, peeled, deveined
¼ cup packaged fried shallots
2 cups shredded wom bok cabbage
¼ cup chopped peanuts
White pepper, to taste
Lime wedges, to serve
1.Heat half of the oil in wok on setting 5.
Add ¼ of the egg to the wok. Carefully
swirl the wok around to spread the egg into
a thin omelette. Cook for 1-1 ½ minutes
without turning over. Remove from the
wok. Repeat with remaining egg to make
4 omelettes. Roll omelettes up and thinly
slice.
2.Increase heat to setting 10. Add bacon and
cook until browned; set aside.
3.Add remaining oil to the wok and cook
shallots for 1 minute. Add capsicum and
peas to the wok cooking for a further 1
minute.
4.Add rice, sauces and prawns to the wok
and stir fry for 2-3 minutes. Add bacon,
cabbage and eggs to the wok. Season with
white pepper. Toss to combine. Serve.
Tip: Cook the rice the day before or several
hours in advance as per the directions on the
packet. Rinse rice and drain well then layer
on a tray lined with baking paper; cover with
paper towelling and refrigerate.
1.Heat 2 teaspoons of oil in wok on setting
10. Add tofu and cook until golden.
Set aside.
2.Reduce to setting 7. Add remaining oil and
cook prawns until pink and just cooked.
Set aside.
3.Add paste to wok and stir fry for 1 minute
or until fragrant. Add noodles and stir until
coated in paste. Add eggs to the wok and
stir every 10 seconds or until the eggs are
just beginning to set.
4.Add tofu, prawns, chives and bean sprouts
to the wok. Cook for a further 2 minutes.
Top with coriander, shallots, peanuts and
lime wedges. Serve.
39
Wok Recipes continued
Mussels in White Wine and Garlic
Serves: 4
1 tablespoon olive oil
Beef with Cashews and Hokkien Noodles
Serves: 4
500g rump steak, sliced thinly
3 shallots, chopped finely
2 tablespoons peanut oil
3 cloves garlic, crushed
1 onion, sliced
2 kg black mussels, cleaned
2 cloves garlic, crushed
1 cup white wine
2 teaspoons grated fresh ginger
100g butter, chopped
1 bunch gai lan (Chinese broccoli), roughly
sliced
½ cup fresh flat-leaf parsley, chopped
Salt and freshly ground black pepper, to taste
400g fresh hokkien noodles
Sliced ciabatta bread, to serve
2 tablespoons light soy sauce
1.Heat oil in the wok on setting 7. Add
shallots and garlic, cooking until softened.
2. Add the mussels and wine. Cover with lid
and increase heat to setting 12. Cook for 2
½ minutes until the mussels have opened.
Remove mussels and set aside.
3.Add the butter and parsley and cook for
another 2-3 minutes until the butter has
melted and the sauce has thickened.
4.Spoon mussels into bowls and carefully
spoon over liquid. Season to taste with salt
and pepper. Serve with crusty bread.
40
1 tablespoon honey
1 cup roasted cashew nuts
Salt and freshly ground black pepper, to taste
1.In a large bowl combine beef and half of
the oil.
2.Heat wok on setting 12. Cook beef in
batches until browned. Set aside.
3.Reduce heat to setting 9. Add remaining
oil to wok. Add onion, garlic and ginger,
stir-fry for 1 minute.
4.Add gai lan and stir fry for 1 minute. Add
remaining ingredients to the pan and cook
for a further 2-3 minutes. Season to taste
with salt and pepper. Serve.
Wok Recipes continued
Soy Ginger Steamed Fish
Serves: 2
1½ tablespoons light soy sauce
Chinese Style Tofu and Green Vegetables
Serves: 4
300g firm tofu, halved
1½ tablespoons shao hsing cooking wine
2 tablespoons peanut oil
2 teaspoons peanut oil
1 onion, sliced
1 teaspoon finely grated ginger
2 cloves garlic, crushed
1 teaspoon caster sugar
3 bok choy, trimmed, quartered
2 x 200g white fish fillets
2 small zucchini, sliced
Sliced shallots and coriander, to serve
100g enoki mushrooms, ends trimmed,
separated
Salt and freshly ground black pepper, to taste
1.Combine soy, shao hsing, oil, ginger and
sugar in a bowl.
2.Place fish on a heatproof plate. Spoon 1
tablespoon of sauce over the fish.
3.Pour 2 cups of water into the base of the
wok. Place steamer rack in wok. Cover with
lid and place on setting 5. Once water
starts to simmer, place fish in wok. Steam
for 9-10 minutes or until fish is cooked.
4.Heat remaining sauce. Pour over fish. Top
with shallots and coriander. Season to taste
with salt and pepper. Serve.
2 tablespoons oyster sauce
1 tablespoon light soy sauce
1 tablespoon sweet chilli sauce
1.Heat oil in the wok on setting 10. Cook
one piece of tofu at a time until golden on
both sides. Drain on paper towelling. Cut
each slice into 6 pieces.
2.Add onion to wok and stir fry for 1 minute.
Add garlic and cook for a further minute.
Add the bok choy and zucchini, cooking for
1-2 minutes or until the zucchini starts to
soften.
3.Add the mushrooms and the sauces and
cook for a further 1 minute. Season to
taste with salt and pepper. Serve.
41
Wok Recipes continued
Cinnamon Doughnuts
Makes: 14
2 teaspoons dry yeast
1 ¼ cups buttermilk, warmed
¼ cup caster sugar
4 cups plain flour
1 teaspoon salt
¼ cup light olive oil
5.Heat oil in wok on setting 12. Cook
doughnuts, in batches, turning once during
cooking, until golden in colour. Drain
doughnuts on paper towelling then toss in
cinnamon sugar mixture.
Tip: To make jam filled doughnuts, use a
7cm cutter only. Once fried, toss with caster
sugar only and pipe some sieved jam into the
centre of the doughnuts.
2 eggs, lightly beaten
Vegetable oil, for deep frying
Cinnamon sugar
1 cup caster sugar
2 teaspoons ground cinnamon
1.In a small bowl combine yeast, buttermilk
and half of the sugar. Mix well and stand
in a warm place for 10 minutes or until the
mixture begins to foam.
2.In a large bowl combine flour, salt and
remaining sugar. Make a well in the centre
and add oil, eggs and yeast mixture.
Mix to a soft dough.
3.Place mixture onto a lightly floured surface
and knead dough for about 10 minutes or
until smooth and elastic. Place dough in
a bowl and cover. Stand in a warm place
for about 40 minutes or until dough has
doubled in size.
4.Turn dough onto a lightly floured surface
and knead for 5 minutes or until smooth
and elastic. Roll dough out to 1cm thick.
To cut doughnuts use either a doughnut
cutter or a 9cm cutter and a 3cm cutter.
Place doughnuts onto a tray lined with
baking paper and cover with plastic wrap.
Stand in a warm place for about 20
minutes.
42
Banana Fritters
Serves: 4
½ cup plain flour
¼ cup cornflour
2 teaspoons caster sugar
1 egg
¹⁄³ cup cold water
4 medium bananas, peeled
Vegetable oil, for deep frying
Icing sugar for dusting
Ice cream, to serve
1.In a large bowl combine flours and sugar.
Add egg and water. Stir to combine.
2.Heat oil in wok setting 12 for 3-4 minutes
or until hot.
3.Cut bananas in half lengthways.
Dip halves, one at a time, into batter.
Carefully lower banana halves into oil
in batches. Fry for 1-2 minutes or until
golden. Drain on paper towelling.
4.Serve fritters dusted with icing sugar and
ice cream.
Notes
25
Year
Stainless Steel
Cooking Surface
Guarantee
Sunbeam Ellise® Stainless Steel Cookware is
constructed from the highest quality materials.
So much so, we guarantee the stainless steel
cooking surface of our Ellise® Stainless Steel
Cookware for 25 years against faulty materials
or workmanship. This guarantee is just
another expression of our confidence in the
way we make appliances at Sunbeam.
This guarantee is in addition to your rights
under:
• our Sunbeam 12 month replacement or
repair warranty against faulty material
or manufacture (full details of which are
set out in this Instruction Booklet) ; and
Should you experience any
difficulties with your product
during the warranty period,
please contact our customer
service line for advice on 1300
881 861 in Australia, or 0800
786 232 in New Zealand.
Australia
• the Australian Consumer Law (if your
product was purchased in Australia) or
the New Zealand Consumer Guarantees
Act (if your product was purchased in
New Zealand).
Should you experience any difficulties
with your Ellise® Stainless Steel Cookware
during the applicable warranty period,
please phone our customer service line
for advice. The Sunbeam 25 year Stainless
Steel Cooking Surface guarantee begins
from date of purchase and extends for 25
years. It covers only the stainless steel
cooking surface, guaranteeing it against
faulty materials or workmanship.
It does not:
www.sunbeam.com.au
1300 881 861
Units 5 & 6,
13 Lord Street,
Botany NSW 2019
Australia
• cover damage caused by accident,
misuse or negligent handling (including
damage caused by failing to use the
product in accordance with this
Instruction Book);
New Zealand
www.sunbeam.com.nz
0800 786 232
Unit 3, Building D,
26 Vestey Drive,
Mt Wellington
Auckland
New Zealand
• extend beyond 12 months if the product
is used in commercial, industrial,
educational or rental applications.
• cover freight or any other costs incurred
in making a claim; or
If a fault should develop with the stainless
steel cooking surface during the warranty
period, please call Sunbeam Customer
Service on the number listed below or
send a written claim to Sunbeam at the
address listed below. Alternatively, you
can (at your cost) return the Ellise®
Stainless Steel Cookware to any of
Sunbeam’s authorised service centres,
together with your receipt. On receipt of
your claim, we will examine the cooking
surface and if it is faulty or defective, we
will replace your Ellise® Stainless Steel
Cookware free of charge.
For a complete list of Sunbeam’s
authorised service centres visit our
website or call:
Australia
Units 5 & 6, 13 Lord Street
Botany NSW 2019 Australia
New Zealand
26 Vestey Drive
Mt Wellington, Auckland New Zealand
The benefits given to you by this
guarantee are in addition to your other
rights and remedies under any laws
which relate to the product.
In Australia our goods come with
guarantees that cannot be excluded
under the Australian Consumer Law.
You are entitled to a replacement or
refund for a major failure and for
compensation for any other reasonably
foreseeable loss or damage. You are also
entitled to have the goods repaired or
replaced if the goods fail to be of
acceptable quality and the failure does
not amount to a major failure.
Our goods also come with guarantees
that cannot be excluded under the New
Zealand Consumer Guarantees Act.
IMPORTANT NOTE
To assist us in managing warranty
claims, we recommend you register your
Ellise® Stainless Steel Cookware as soon
as practicable after purchase by creating
a MySunbeam account on our website
and sending in a copy of your original
receipt.
In order to make a claim under our
warranty, you must have the original
proof of purchase documentation for the
Ellise® Stainless Steel Cookware and
present it when requested.
12
Month
Replacement
Guarantee
This Sunbeam product is covered by a
12 month replacement or repair warranty,
which is in addition to your rights under the
Australian Consumer Law (if your product
was purchased in Australia) or New Zealand
Consumer Guarantees Act (if your product
was purchased in New Zealand).
Upon receipt of your claim, Sunbeam will
seek to resolve your difficulties or, if the
product is defective, advise you on how to
obtain a replacement or refund.
To assist us in managing warranty claims,
we recommend you register your product
as soon as practicable after purchase by
creating a MySunbeam account on our
website and uploading a copy of your
original receipt.
Should you experience any
difficulties with your product
during the warranty period,
please contact our customer
service line for advice on 1300
881 861 in Australia, or 0800
786 232 in New Zealand.
Australia
www.sunbeam.com.au
1300 881 861
Units 5 & 6,
13 Lord Street,
Botany NSW 2019
Australia
New Zealand
www.sunbeam.com.nz
0800 786 232
Unit 3, Building D,
26 Vestey Drive,
Mt Wellington
Auckland
New Zealand
In order to make a claim under our
warranty, you must have the original proof
of purchase documentation for the
product and present it when requested (if
not already uploaded to our website).
Should your product develop any defect
within 12 months of purchase because of
faulty materials or workmanship, we will
replace or repair it, at our discretion, free
of charge. A product presented for repair
may be replaced by a refurbished product
of the same type rather than being
repaired. Refurbished parts may be used
to repair the product.
Our replacement or repair warranty only
applies where a defect arises as a result
of faulty material or workmanship during
the warranty period. Your warranty does
not cover misuse or negligent handling
(including damage caused by failing to use
the product in accordance with this
instruction booklet), accidental damage,
or normal wear and tear.
Your warranty does not:
• cover freight or any other costs incurred
in making a claim, consumable items,
accessories that by their nature and
limited lifespan require periodic renewal
(such as filters and seals) or any
consequential loss or damage; or
• cover damage caused by:
- power surges, power dips, voltage
supply problems, or use of the product
on incorrect voltage;
- servicing or modification of the
product other than by Sunbeam or an
authorised Sunbeam service centre;
- use of the product with other
accessories, attachments, product
supplies, parts or devices that do not
conform to Sunbeam specifications; or
- exposure of the product to
abnormally corrosive conditions; or
• extend beyond 3 months if the product
is used in commercial, industrial,
educational or rental applications.
The benefits given to you by our
warranty are in addition to other rights
and remedies under law in relation to
the product.
In Australia our goods come with
guarantees that cannot be excluded
under the Australian Consumer Law. You
are entitled to a replacement or refund
for a major failure and for compensation
for any other foreseeable loss or
damage. You are also entitled to have the
goods repaired or replaced if the goods
fail to be of acceptable quality and the
failure does not amount to a major
failure.
Our goods also come with guarantees
that cannot be excluded under the New
Zealand Consumer Guarantees Act.
If your warranty claim is not accepted, we
will inform you and if requested to do so
by you, repair the product provided you
pay the usual charges for such repair.
You will also be responsible for all freight
and other costs.
Should your product require repair or
service after the warranty period, contact
your nearest Sunbeam service centre.
For a complete list of Sunbeam’s service
centres, visit our website or call our
customer service line for advice on 1300
881 861 in Australia, or 0800 786 232 in
New Zealand.
Need help with your appliance?
Contact our customer service team
or visit our website for information
and tips on getting the most from
your appliance.
Australia
| visit
phone
mail
New Zealand | visit
phone
mail
www.sunbeam.com.au
1300 881 861
Units 5 & 6, 13 Lord Street,
Botany NSW 2019 Australia.
www.sunbeam.com.nz
0800 786 232
Unit 3, Building D, 26 Vestey Drive,
Mt Wellington Auckland
New Zealand.
Sunbeam Corporation Limited | ABN 45 000 006 771
Sunbeam Corporation is a division of GUD Holdings Limited.
Sunbeam is a registered trademark.
Ellise is a registered trademark of Sunbeam Corporation.
Made in China to Sunbeam’s specification.
Due to minor changes in design or otherwise,
the product you buy may differ slightly from the one shown here.
Approved by the appropriate electrical regulatory authorities.
©Copyright Sunbeam 2013.
8/13