1
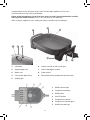
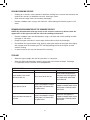
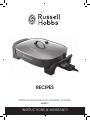
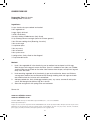
RHEFP17_IB&RB_FA_131213 PERFECT SEAR FRYPAN WITH CERAMIC COATING 2 YEAR WARRANTY RHEFP17 INSTRUCTIONS & WARRANTY Spectrum Brands Australia Pty Ltd Locked Bag 3004 Braeside Victoria 3195 Australia Spectrum Brands New Zealand Ltd PO Box 9817 Newmarket Auckland 1149 New Zealand Customer Service in Australia Toll Free: 1800 623 118 Email: [email protected] Website: www.spectrumbrands.com.au Customer Service in New Zealand Toll Free: 0800 736 776 Email: [email protected] Website: www.spectrumbrands.co.nz W Spectrum Brands Australia Pty Ltd and Spectrum Brands New Zealand Ltd Warranty Against Defects 0911 In this warranty: Australian Consumer Law means the Australian consumer law set out in Schedule 2 to the Competition and Consumer Act 2010; CGA means the New Zealand Consumer Guarantees Act 1993; Goods means the product or equipment which was accompanied by this warranty and purchased in Australia or New Zealand, as the case may be; Manufacturer, We or us means: 1. for Goods purchased in Australia, Spectrum Brands Australia Pty Ltd ABN, 78 007 070 573; or 2. for Goods purchased in New Zealand, Spectrum Brands New Zealand Ltd, as the case may be, contact details as set out at the end of this warranty; Supplier means the authorised distributor or retailer of the Goods that sold you the Goods in Australia or in New Zealand; and You means you, the original end-user purchaser of the Goods. 1. Our goods come with guarantees that cannot be excluded under the Australian Consumer Law, or the CGA. You are entitled to a replacement or refund for a major failure and compensation for any other reasonably foreseeable loss or damage. You are also entitled to have the goods repaired or replaced if the goods fail to be of acceptable quality and the failure does not amount to a major failure. 2. 3. The benefits provided by this Warranty are in addition to all other rights and remedies in respect of the Goods which the consumer has under either the Australian Consumer Law or the CGA. The original purchaser of the Goods is provided with the following Warranty subject to the Warranty Conditions: We warrant the Goods for all parts defective in workmanship or materials from the date of purchase (Warranty Period), for the period of:(a) Two (2) years for Russell Hobbs products (see product packaging for details) (b) Two (2) years with five (5) year motor warranty for Russell Hobbs products (see product packaging for details) (c) Limited Lifetime, Ten (10) years for Russell Hobbs cookware. (d) One (1) year for George Foreman. If the Goods prove defective within the Warranty Period by reason of improper workmanship or material, we may, at our own discretion, repair or replace the Goods without charge. 2 W 4. 5. 6. 7. 8. 9. 10 11 12 Co Re If If Re A ne A Warranty Conditions 4. The Goods must be used in accordance with the manufacturer’s instructions. This Warranty does not apply should the defect in or failure of the Goods be attributable to misuse, abuse, accident or non-observance of manufacturer’s instructions on the part of the user. As far as the law permits, the manufacturer does not accept liability for any direct or consequential loss, damage or other expense caused by or arising out of any failure to use the Goods in accordance with the manufacturer’s instructions. 5. Exhaustible components (such as batteries, filters and brushes) of the Goods are included under this Warranty only where there is a defect in workmanship or materials used. 6. The warranty granted under clause 3 is limited to repair or replacement only. 7. Any parts of the Goods replaced during repairs or any product replaced remain the property of the manufacturer. In the event of the Goods being replaced during the Warranty Period, the warranty on the replacement Goods will expire on the same date as for the Warranty Period on the original Goods which are replaced. 8. In order to claim under the warranty granted under clause 3 you must: (a) Retain this warranty with your receipt/proof of purchase; and (b) Return the Goods to us at the relevant address or to the Supplier by prepaid freight within the Warranty Period accompanied with (i) the legible and unmodified original proof of purchase, which clearly indicates the name and address of the Supplier, the date and place of purchase, the product name or other product serial number and (ii) this warranty. 9. This warranty is immediately void if: (a) Any serial number or appliance plate is removed or defaced; (b) The Goods have been serviced or otherwise repaired by a person not authorised to do so by us or where non approved replaced parts are used. on a or or y 10. The Goods are designed for domestic use only. A limited 90-day Warranty applies to any industrial or commercial use of the Goods. The Goods must be connected to the electrical voltage requirements as specified in the ratings label located on the Goods. of 11. This warranty does not cover the cost of claiming under the warranty or transport of the Goods to and from the Supplier or us. o 12. This warranty is only valid and enforceable in Australia against Spectrum Brands Australia Pty Ltd and in New Zealand against Spectrum Brands New Zealand Ltd. Contact us or the Supplier for further details. Register your product online If you live in Australia please visit: www.spectrumbrands.com.au/warranty If you live in New Zealand Please visit: www.spectrumbrands.co.nz/warranty Registration of your warranty is not compulsory, it gives us a record of your purchase AND entitles you to receive these benefits: Product information; Hints and tips; Recipes and news; Information on special price offers and promotions. Any questions? Please contact Customer Service for advice. 3 Congratulations on the purchase of your new Russell Hobbs appliance. Each unit is manufactured to ensure safety and reliability. Before using the appliance for the first time, please read this instruction booklet carefully and keep it for future reference. Pass it on if you pass on the appliance. When using this appliance, basic safety precautions should always be followed. 5 4 1 2 6 3 9 8 7 1. Lid handle 6. Grease channel (at front inside pan) 2. Tempered glass lid 7. Intelli-Probe digital controls 3. Steam vent 8. Probe socket 4. Pan handles (both sides) 9. Retractable tilt feet (underneath both rear feet) 5. Cooking pan 1. SEAR indicator light 2. Temperature p button 3. SEAR button 4. ON/OFF button 5. Temperature button 6. Temperature indicator lights 7. WARM indicator light 4 BEFORE FIRST USE • Remove all packaging material and any stickers from the product. • As some parts may be packed separately, check to ensure all items have been unpacked before disposing of the packaging. • Wash the appliance as instructed in the “CARE AND CLEANING” section of this manual. • Select a level, dry countertop where the appliance is to be used, allowing air space on all sides to provide proper ventilation (100mm gap min). • Condition your frypan by wiping the interior of the frypan base lightly with a paper towel and cooking oil. This will help prolong the life of the ceramic. HOW TO USE Using the Intelli-Probe digital controls 1. Insert the control probe firmly into the probe socket. NOTE: Always grip the body of the control probe when handling. Important: Be sure the control is securely inserted. 2. Plug the power cord into a wall power outlet and switch the power on. Note: Always attach the control to the pan before plugging into an outlet. 3. Press the ON/OFF button on the digital probe. 4. Select the desired temperature setting based on what you would like to prepare. (See GENERAL TEMPERATURE RANGES section for recommendations.) 5. When finished cooking, turn off the power at the wall power outlet. WARNING: Do not use any other temperature control probe other than the type supplied with this frypan. USING THE GREASE CHANNEL There is a shallow channel at the front of the frypan. As food is browning, use a rubber spatula to direct the drippings into the channel. This feature allows you to separate grease and oils from browned and seared foods before adding any sauce ingredients, for healthier meals. • There are two cooking positions, flat and tilted. The tilted position assists drippings to naturally flow into the grease channel located along the front edge of the frypan. The tilt feet are located in the rear legs of the frypan. • To adjust for tilted cooking, turn the frypan upside down and flip out the feet so they are protruding from the legs. Set the frypan right side up. • For flat cooking, flip the feet back into the legs. CAUTION: Do not try to adjust the retractable tilt feet when the frypan is warm or hot. It must be completely cool when adjusting the retractable feet. Helpful Tips: 2 ways to remove the drippings from the grease channel: • Use a turkey baster. • Remove the browned food from the frypan. Using pot holders, pour the drippings into a container 5 USING YOUR FRYPAN 1. Set temperature to desired temperature setting or according to your recipe. The indicator light will flash next to the selected temperature. 2. When the selected temperature is reached, the light becomes constant. Note: During cooking the light will cycle on and off, indicating the temperature is maintained. 3. If desired you may use oil to coat the cooking surface. 4. When you have finished cooking, set the temperature control to WARM to keep food at serving temperature or OFF before unplugging. Caution: Do not cut food in the frypan. This may damage the cooking surface and your knife. GENERAL TEMPERATURE RANGES Warming - 80°C/180°F / WARM Used to keep foods that have been prepared in the frypan at serving temperature for a short period of time. Low Heat – 120°C/250°F / SIMMER Use for simmering, steaming and gentle boiling. Some foods are started at higher temperatures then reduced to low heat to finish the cooking process. Use for poaching, simmering soups and curries or for sauce reductions. Medium Heat – 150°C/300°F / COOK Use for eggs, bacon and sausages. Also to cook roasts and other cuts of meat after they have been browned at higher temperatures. Medium-High Heat – 175°C/350°F / SAUTÉ Use to sauté vegetables such as onions, green pepper or mushrooms. High Heat – 200°C/400°F / BROWN Use to brown and pan fry meats and to stir fry meats and vegetables. Breaded and crumbed foods such as vegetables, meats, fish and poultry are pan fried at this temperature with a small quantity of oil. Searing - 260°C/500°F / SEAR Use to quickly brown meats at high temperature while sealing in the meat’s juices. When preheated to this setting, the frypan will retain this temperature for 3 minutes. If longer searing is needed, press the SEAR button on the digital control probe. USING THE SEAR FUNCTION This unique feature allows you to sear meats, fish, vegetables and fruits for up to 3 minutes at a high temperature and then automatically lowers the temperature to the original setting to continue cooking. 1. Begin preheating by setting your desired regular cooking temperature. 6 2. Press the SEAR button on the digital control probe to raise the temperature in the frypan to 260°C. The light next to SEAR on the temperature control probe will begin flashing. 3. When the frypan has reached the SEAR temperature, the light next to SEAR will become constant. It will hold that temperature for approximately 3 minutes. Note: It is not necessary to wait for the frypan to heat to the preset temperature before selecting SEAR. 4. Carefully place food to be seared into the frypan. Sear the food on each side for about 1½ minutes. 5. After about 3 minutes, the temperature on the digital control probe will change to the preset temperature initially selected. (For example, if you select 180°C and then SEAR, the frypan will return to 180°C after the searing function is complete.) Note: You can turn off SEAR by pressing the SEAR button again. The frypan will automatically revert to the preset temperature. 6. If you have more food to sear, press the SEAR button again and follow steps 2 through 5. 7. When you have finished searing, you can add more food and continue cooking at your regular temperature or press the ON/OFF button and unplug the appliance if you are finished using the frypan. CARE AND CLEANING This appliance contains no user-serviceable parts. Refer service to qualified service personnel. General Cleaning 1. Unplug the cord and let the frypan cool completely. 2. Remove the digital control probe from the control probe socket. 3. To wash the cooking pan, fill with warm, soapy water; wash with a soft cloth or sponge, rinse, then dry thoroughly. Remove stubborn spots using a soft cloth with a little cooking oil while the frypan is still warm. Important: For hard stains, use a sponge or nylon scouring pad with liquid detergent. Important: Do not use any abrasive cleaners or metal pads as they can damage the ceramic coating. 4. The lid can be washed in the dishwasher, top-rack only. 5. Rinse and dry all parts thoroughly. 6. Wipe the cooking pan exterior base with a damp cloth and dry thoroughly. 7. To clean the temperature control probe, wipe over with a slightly damp cloth. Ensure it is completely dry before using again or storing away. CAUTION: Do not immerse the digital control probe in water or any other liquid. CAUTION: After cleaning, always make sure that the digital control probe socket is fully dry before inserting the temperature control probe, or storing away. 7 CERAMIC COOKING SURFACE • Cooking on a ceramic surface prevents food from sticking to the surface and minimizes the need for fats and oil. As food does not stick, cleaning is easier. • Clean with hot soapy water, rinse and dry thoroughly. • Remove stubborn spots using a soft cloth with a little cooking oil while the frypan is still warm. REMOVING DISCOLOURATION OF THE CERAMIC SURFACE NOTE: Any discolouration that may occur on the ceramic surface may detract from the appearance of the frypan but will not affect the cooking performance. • Remove stubborn spots and discoloration using a soft cloth with a little cooking oil while the frypan is still warm. • Empty the frypan and clean in warm soapy water and rinse then dry thoroughly. • Re-condition the frypan before using again by wiping the interior of the frypan base lightly with a paper towel and cooking oil. This will help prolong the life of the frypan and the ceramic coating. • In some instances this may not remove all the staining. STORAGE • Store the frypan upright with the lid in position, in a dry place. • Store the digital control probe carefully, taking care not to knock or drop it. If damage is suspected, call the customer service department. TROUBLESHOOTING Problem Possible cause Solution Frypan smokes or has an odd odour on the first use. This is normal on the first use. Due to manufacturing processes, during initial use of this appliance, some slight smoke and/or odour may be detected. Frypan does not turn on. Frypan is not plugged in or digital control probe is not inserted fully into probe socket. Check to be sure appliance is plugged into working outlet and the control probe is fitted fully into the probe socket. Temperature does not register on the probe. Frypan is not plugged in or digital control probe is not inserted fully into probe socket. Check to be sure appliance is plugged into working outlet and the control probe is fitted fully into the probe socket. 8 IMPORTANT SAFEGUARDS When using this appliance, basic safety precautions should be followed, including but not limited to the following: 1. To protect against electrical hazards do not immerse the power cord, plug, temperature control probe or frypan base in water or any other liquid. 2. Do not use in the bathroom or near any source of water. 3. Do not use outdoors. 4. Always use the appliance handles as some parts will be hot. The temperature of accessible surfaces/parts may become very hot when the appliance is operating. 5. Do not touch the hot cooking surfaces. 6. This appliance is not intended for use by persons (including children) with reduced physical, sensory or mental capabilities, or lack of experience and knowledge, unless they have been given supervision or instruction concerning use of the appliance by a person responsible for their safety. 7. Always turn off and unplug from the power outlet before cleaning the appliance. 8. Do not operate this appliance with a damaged cord/plug or after the appliance has malfunctioned, or been dropped or damaged in any manner. Contact Customer service for replacement, examination, repair or adjustment. 9. The power cord is not replaceable. If the power cord is damaged, the complete digital probe assembly must be discarded. 10. Do use any other temperature control probe other than the type as supplied with this frypan. 11. Do not use on an inclined plane or unstable surface. 12. Do not move the appliance when in use. 13. Do not cover the appliance when in use. 14. Do not cook food items too large for the appliance. 15. Always take care when removing food after cooking as it is hot. 16. Food may burn. Always monitor the cooking process when using this appliance. 17. Do not use the appliance near or below any curtains or other combustible materials. 18. Keep the appliance and the power cord away from the edge of tables or countertops and out of reach of children and infirm persons. 19. To disconnect, turn off the wall power outlet, then grasp the plug and remove from wall power socket. Never pull by the cord. 20. Do not cook food wrapped in plastic film or polythene bags. It may create a fire hazard. 21. Do not place on or near any heat sources. 22. Always clean the appliance after use. 23. Do not leave the appliance unattended when in use. 24. Follow the instructions provided when cleaning this appliance. 25. The temperature control probe must be removed from the frypan before commencing cleaning. 26. After cleaning, ensure that the temperature control probe socket is completely dry before inserting the temperature control probe and using the frypan. 9 27. Do not use appliance for other than its intended purpose. 28. This appliance is not a toy. Children should be supervised to ensure they do not play with the appliance. 29. This appliance is not intended to be operated by means of an external timer or separate remote control system. 30. For added safety, electrical appliances should be connected to a power outlet that is protected by a residual current device (RCD), also often referred to as a ‘Safety Switch’. Your switchboard may already incorporate an RCD. If unsure, call an electrician for verification and fitting if necessary. CAUTION: This appliance is hot during operation and retains heat for some time after turning off. Always use oven mitts when handling hot materials and allow metal parts to cool before cleaning. CAUTION: The Temperature Control Probe is a sensitive device. Use care not to drop, hit or impact the temperature control probe against hard surfaces. Never pull on the cord of the temperature control probe. SAVE THESE INSTRUCTIONS THIS APPLIANCE IS FOR HOUSEHOLD USE ONLY NOTES 10 NOTES 11 RECIPES PERFECT SEAR FRYPAN WITH CERAMIC COATING RHEFP17 INSTRUCTIONS & WARRANTY CHINESE FRIED RICE Preparation Time: 20 minutes Cooking Time: 10 minutes Ingredients: 3 cups Jasmine rice, pre cooked and cooled 2 tbs vegetable oil 3 eggs, lightly whisked 1 onion, diced finely 4 rashers rindless middle bacon, finely sliced 3 Lup Cheong Chinese sausages (found in Chinese grocers) 1 tbs Chinese cooking wine (Shaoxing, rice wine) 1 tbs caster sugar ½ cup frozen peas 1 tbs soy sauce 1 tbs sesame oil 2 tbs oyster sauce 3 spring onions, finely sliced on the diagonal ½ cup coriander leaves Method: 1. Heat 1 tbs vegetable oil in the electric fry pan to medium heat and pour in whisk egg. Swirl the pan so the egg mix covers the base. Once it is cooked on one side, use a rubber spatula to flip over and cook on the other side. Remove from the pan, roll up into a log and thinly slice. Set aside. 2. Heat remaining vegetable oil in the electric fry pan and sauté onion, bacon and Chinese sausage over medium heat until browned. Stir through cooking wine and sugar and cook over medium heat for 1 minute until caramelised. 3. Add pre-cooked rice, finely sliced egg omelette, peas, soy sauce, sesame oil and oyster sauce. Stir through and cook on high for 1 minute. 4. Serve hot and garnish with spring onion and coriander. Serves 6-8 www.russellhobbs.com.au www.russellhobbs.co.nz RUSSELL HOBBS and logo are Trade Marks of Spectrum Brands, Inc., or one of its subsidiaries. ©2013 Spectrum Brands, Inc. Recipes are to be used in conjunction with the RHPC1000 Pressure Cooker by Russell Hobbs. All rights reserved. No part of this publication may be reproduced, stored in a retrieval system or transmitted in any form or by any means, electronic, mechanical, photocopying, recording or otherwise, without prior permission of the copyright owner. 2 GINGER CHICKEN ON MANGO NOODLES Preparation Time: 35 minutes Cooking Time: 20 minutes Ingredients: Marinade: 2tbs ginger, minced 2 tbs honey Zest & juice of 1 lemon 1 tbs soy sauce 1 tbs kecap manis (Indonesion sweet soy sauce) 1 tsp five-spice powder 4 chicken breast fillets, skin off 1 tbs soy sauce 2 tsp sesame oil 3 tsp Chinese cooking wine (Shaoxing, rice wine) 100g snow peas, blanched (still crisp) 1 cup baby spinach 200g rice noodles (dry), cooked to packet instructions 1 mango, flesh diced (or 1 can of unsweetened mango cheeks) 2 spring onions, thinly sliced on the diagonal 1 cup mint leaves Olive oil spray Method: 1. Place the chicken in a shallow dish and pour marinade over. Refrigerate for 20 minutes. 2. Mix the soy sauce, sesame oil and Chinese cooking wine in a bowl and set aside as the salad dressing. 3. Heat electric fry pan to medium/high heat and lightly spray with olive oil spray. Cook chicken for 6 minutes either side until cooked through. Remove from pan and rest for 5 minutes. 4. Meanwhile, place cooked noodles, spinach and snow peas in a large bowl. Pour over the dressing and add mango, spring onions and mint. Divide among 4 plates and top with chicken. Serves 6 Serve with rice or cous-cous; delicious! 3 MIDDLE EASTERN CHICKEN CASSEROLE Preparation Time: 10 minutes Cooking Time: 20 minutes Ingredients: 2 tsp salt 2 tsp ground cumin 2 tsp ground cinnamon 1 tsp black pepper 1 tsp ground turmeric 6 small chicken marylands (or thigh fillets) 100ml extra virgin olive oil 2 brown onions, roughly sliced in rings 100g fresh ginger, peeled and sliced into matchsticks 5 cloves garlic, peeled & smashed 2 small red chillies, split 6 tomatoes, roughly chopped 2 pinches saffron threads ½ tsp cumin seeds 8 sprigs thyme, leaves only 1 lemon, juiced & zested 80g currants 2 tbs honey 2 tbs vegetable stock powder 1 bunch coriander, washed, leaves only Method: 1. Combine salt, cumin, cinnamon, pepper and turmeric in a large zip lock or plastic bag. Add the chicken pieces and shake to cover. 2. Heat olive oil in an electric frypan over medium/high heat. Add the chicken and brown on all sides. Remove from the pan and set aside. Add the ginger, chilli, onion and garlic to the pan and cook for 3-4 minutes. Add tomatoes, saffron, cumin seeds and thyme and cook for 2 minutes. 3. Return chicken to the pan and add honey, lemon juice, zest, currants and stock powder. Stir in enough water to just cover the chicken. Cover with a lid and simmer over medium heat for 10 minutes. Uncover and simmer on low heat for 20 minutes. 4. Stir in coriander and serve with rice. Serves 6 Serve with rice or cous-cous; delicious! 4 SWEETCORN FRITTERS WITH AVOCADO SALSA Preparation Time: 20 minutes Cooking Time: 10 minutes Ingredients: Corn fritters: 3 large corn cobs (or 400g tin) 1 small red onion, finely diced 2 eggs ½ cup coriander leaves 125g plain flour 1tsp baking powder Sea salt & black pepper Vegetable oil for frying Avocado salsa: 2 ripe avocadoes, stones removed and diced ½ cup coriander 2tbs lime juice (or lemon juice) 3 spring onions, finely chopped 1 punnet cherry tomatoes, halved 1 dash Tabasco sauce (optional) Sea salt & black pepper Method: 1. For the avocado salsa, combine all ingredients in a small bowl and set aside for flavours to infuse. 2. Meanwhile, place 2/3 of the corn kernels, onion, eggs, coriander, flour, baking powder, salt and pepper in a food processor and blitz until combined. Pour this mix into a large bowl and stir through remaining corn. 3. Heat 1 tbs vegetable oil in your electric fry pan to medium heat. When the oil is hot, drop 2 heaped tablespoons of mixture per fritter into the pan and cook 1-2 minutes each side until lightly golden brown. 4. Drain on paper towel then serve topped with the avocado salsa. Makes 8-10 A delicious twist on breakfast or serve accompanied with a vibrant green salad for lunch! 5