1
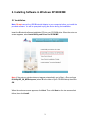
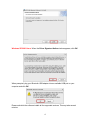
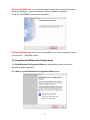
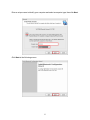
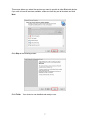
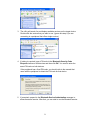
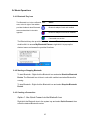
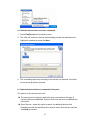
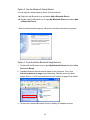
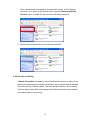
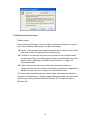
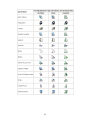
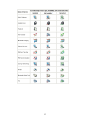
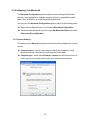
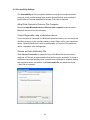
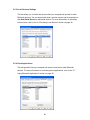
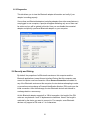
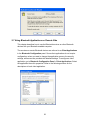
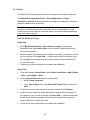
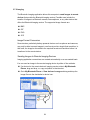
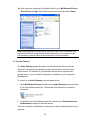
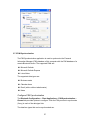
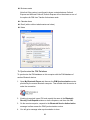
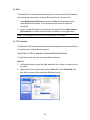
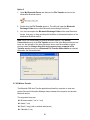
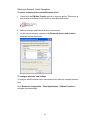
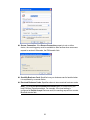
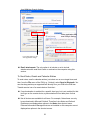
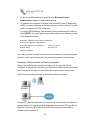
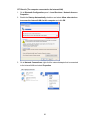
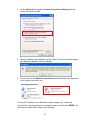
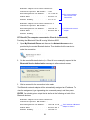
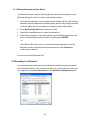
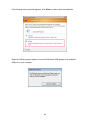
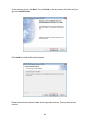
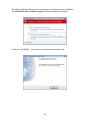
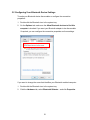
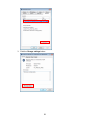
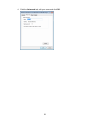
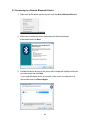
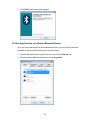
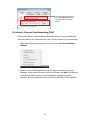
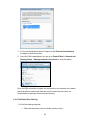
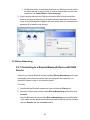
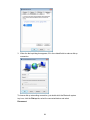
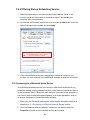
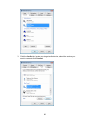
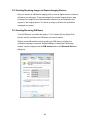
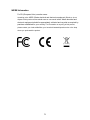
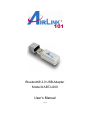
Bluetooth® 2.0 USB Adapter Model # ABT-U200 User’s Manual v 1.0 Table of Contents 1. Introduction ......................................................................................................................1 1.1 Features ..................................................................................................................................... 1 1.2 Package Contents ...................................................................................................................... 1 1.3 System Requirements................................................................................................................ 2 2. For Windows XP/2000......................................................................................................3 2.1 Installation................................................................................................................................. 3 2.2 Complete Initial Bluetooth Configurations ............................................................................... 3 2.3 Quick Start Guide...................................................................................................................... 8 2.4 Basic Operations ..................................................................................................................... 10 2.5 Configuring Your Bluetooth.................................................................................................... 18 2.6 Security and Pairing ................................................................................................................ 21 2.7 Using Bluetooth Applications on Remote Side....................................................................... 22 2.8 Providing Local Service .......................................................................................................... 40 3. For Windows Vista 32/64-bit .........................................................................................47 3.1 Installation............................................................................................................................... 47 3.2 Configuring Your Bluetooth Device Settings.......................................................................... 51 3.3 Connecting to a Remote Bluetooth Device ............................................................................. 54 3.4 Checking Services on a Remote Bluetooth Device................................................................. 56 3.5 Exchanging Files Between Bluetooth Devices ....................................................................... 57 3.6 Sending File by File Transfer Service ..................................................................................... 59 3.7 Receiving File from another Bluetooth Device....................................................................... 60 3.8 Joining a Personal Area Networking (PAN)............................................................................ 61 3.9 Dial-up Networking................................................................................................................. 63 3.10 Connecting to a Bluetooth Audio Device.............................................................................. 65 3.11 Connecting to a Bluetooth Audio Gateway ........................................................................... 67 3.12 Sending/Receiving Images to Remote Imaging Devices ...................................................... 68 3.13 Sending/Receiving PIM Items .............................................................................................. 68 4. Troubleshooting.............................................................................................................69 5. Specifications.................................................................................................................71 6. Regulatory Compliance.................................................................................................72 FCC Compliance and Advisory Statement.................................................................................... 72 CE.................................................................................................................................................. 73 WEEE Information........................................................................................................................ 73 ii 1. Introduction Airlink101 Bluetooth® USB 2.0 Adapter, ABT-U200 adds Bluetooth technology to your existing computer or notebook. Simply plug it into the USB port of your machine for seamless connectivity with other Bluetooth devices, such as phones, computers, peripherals and other devices. ABT-U200 features the industry's most extensive range of profiles available, ensuring a common application between two Bluetooth-enabled devices. ABT-U200 is fully compliant with the Bluetooth v2.0 specification and backward-compatible with Bluetooth version 1.1 or 1.2 standards. Moreover, it supports the new Bluetooth Enhanced Data Rate (EDR), providing raw bandwidth of up to 3 Mbps* for wireless applications. It also adopts dedicated interference avoidance technology to reduce possible disruption from nearby Wi-Fi® products, which operate in the same 2.4 GHz radio frequency as Bluetooth. 1.1 Features Supports Bluetooth v2.0 + EDR (Enhanced Data Rate), offering a data rate of up to 3 Mbps* Maximizes ranges and simplifies system integration by providing exceptional output power and receiver sensitivity Backward compatible with Bluetooth version 1.1 and 1.2 standards Compliant with USB full speed Uses 2.4Ghz ISM Frequency Band Automatic calibration of frequency Supports up to 7 Bluetooth client devices Supports industry's most extensive range of applications Transmission range of up to 10 meters in an open environment Features data encryption and user authentication to ensure secure communication 1.2 Package Contents Bluetooth® USB 2.0 Adapter Driver and Utility CD Quick Installation Guide 1 1.3 System Requirements Computer with an available USB port Windows® Vista 32/64-bit, XP, 2000, ME 2 2. Installing Software in Windows XP/2000/ME 2.1 Installation Note: Do not connect the USB Bluetooth Adapter to your computer before you install the provided software. You will be prompted to plug the device during the installation. Insert the Bluetooth software installation CD into your CD-ROM drive. When the auto-run screen appears, select Install Utility and Driver for XP/2K/ME Note: If the auto-run window does not appear automatically, go to Start -> Run and type D:\Utility\XP_2K_ME\Setup.exe (where D is the letter of your CD-ROM drive) then click OK. When the welcome screen appears, click Next. Then click Next on the two screens that follow, then click Install. 3 Windows XP/2000 Users: When the Driver Signature Notice window appears, click OK. When prompted, plug your Bluetooth USB adapter into an available USB port on your computer and click OK. Please wait while the software installs all the supported services. This may take several minutes. 4 Windows 2000/ME Users: You may be prompted to restart your computer a few times during the installation. Ignore the prompts until the installation is complete. At the end, click Finish to complete the installation. Windows 2000/ME Users: At the end of the installation, you will be prompted to restart your computer. Click OK to restart. 2.2 Complete Initial Bluetooth Configurations The Initial Bluetooth Configuration Wizard will automatically launch to guide you through the initial configuration. Click Next at the Initial Bluetooth Configuration Wizard screen. 5 Enter a unique name to identify your computer and select a computer type, then click Next. Click Next at the following screen 6 This screen allows you select the services you want to provide to other Bluetooth devices. If you wish to have all services available, make sure that they are all checked and click Next. Click Skip at the following screen. Click Finish. Your device is now installed and ready to use. 7 2.3 Quick Start Guide This section provides you with the basic guidelines to get your Bluetooth adapter connected to a service provided by another Bluetooth-enabled device. 1. Double-click the Bluetooth icon in the notification area. If the Bluetooth icon is blue in color with a red insert ( ), make sure the adapter is properly connected, right-click the icon and select Start the Bluetooth Device. 2. The utility will search for and display available Bluetooth devices in range. Double-click the target device that you want to connect to. If you want to connect to a Bluetooth peripheral such as headset or imaging device, refer to the manual that came with the peripheral for instructions about how to make the device discoverable. 8 3. The utility will search for and display available services on the target device. Double-click the service that you want to use. (Ignore this step if you are connecting to a peripheral that offers single service.) 4. If pairing is required, type a PIN code in the Bluetooth Security Code Request window on both devices and then click OK. You need to enter the same PIN code on both devices. If the peripheral has a fixed PIN code, you should refer to the manual that came with the peripheral to obtain the PIN code for that device. 5. If prompted, respond to the Bluetooth Service Authorization message to allow access the service. After that, you can start to use the Bluetooth service. 9 2.4 Basic Operations 2.4.1 Bluetooth Tray Icon The Bluetooth icon in the notification Icon Status area, at the far right of the taskbar provides feedback about Bluetooth Bluetooth adapter found and enabled. status as described in the table opposite. Bluetooth adapter not found or disabled. Connected to a service. The Bluetooth tray also provides fast access to most Bluetooth operations. You can double-click it to access My Bluetooth Places or right-click it to pop up the shortcut menu and access the provided functions. 2.4.2 Starting or Stopping Bluetooth To start Bluetooth - Right-click the Bluetooth icon and select Start the Bluetooth Device. The Bluetooth icon is blue in color with a white insert when Bluetooth is running. To stop Bluetooth - Right-click the Bluetooth icon and select Stop the Bluetooth Device. 2.4.3 Creating a Connection Option 1. Use Quick Connect via the Bluetooth Icon Right-click the Bluetooth icon in the system tray and select Quick Connect, then select the desired Bluetooth service. 10 a. If selected service has never been connected: 1. Select Find Devices on the shortcut menu. 2. The utility will search for devices that potentially provide the desired service. Highlight the desired one and click Next. 3. The succeeding steps vary according to the service you selected. Just follow the on-screen prompts to proceed. b. If selected service has been connected in the past: The options on the shortcut menu are: The name(s) of any device(s) with which prior connections to this type of service have been established. Select a name from the list to re-establish the connection. Other Devices - select this option to search for additional devices that potentially provide the desired service, select a device from the list, and then click Next to proceed. 11 Option 2. Use the Bluetooth Setup Wizard You can open the setup wizard by either of these methods: Right-click the Bluetooth icon and select Add a Bluetooth Device Double-click the Bluetooth icon to open My Bluetooth Places and select Add a Bluetooth Device. When the wizard window pops up, follow the on-screen instructions to proceed: Option 3. From the Entire Bluetooth Neighborhood 1. Double-click the Bluetooth icon to open My Bluetooth Places and select View Devices in Range. 2. Available Bluetooth devices should appear in the right pane. If not, click Search for devices in range to start searching. Devices icons have three states. Refer to “2.4.5 Device and Service Icons” section on page 15 for details. 3. Double-click a desired Bluetooth device to display its available services. 12 If the selected device has added or reconfigured a service, or if the desired service is not an option in the shortcut menu, select the Discover Available Services option to update the list of services offered by the device. 4. Double-click the desired service to make the connection. 2.4.4 Security and Pairing If Secure Connection is enabled for any of the Bluetooth services on either of the two devices that attempting to make a connection, they must exchange an identical PIN code upon the initial connection. The code request window on your computer is like the figure below. After the exchange, the two Bluetooth devices are allowed to exchange data in a secure way. 13 2.4.5 Device and Service Icons Device Icons Devices are physical things, such as computers, cameras, headsets, etc. Device icons vary according to device types and have three states: Normal - this unadorned icon indicates the presence of a device in the vicinity. Each type of device is represented by a different icon. Connected - devices that are have been connected to this computer before are represented by an icon with a green tint and/or a small butting arrows box added to them, regardless of whether they are turned on, in range, or in Discoverable mode. Paired - devices that have been paired with this computer before are represented by a normal icon with a small check box added to it, regardless of whether they are turned on, in range, or in Discoverable mode. The icons used to indicate device type, paired status, and connection status are illustrated in the table below. (There are some differences between the device and service icons used by Windows 2000 and Windows XP. The table is based on Windows XP.) 14 15 Service Icons Services are what a Bluetooth device can do with other Bluetooth devices, such as access to a local area network, or the ability to send a fax. Some devices, such as headsets or network access points, may provide only a single service. Others, such as desktop and laptop computers, can potentially provide all of the Bluetooth services. Service icons vary according to services types and have three states: Normal - this type of unadorned icon indicates that a specific service is potentially available from the selected device. Not Available - this type of icon indicates that the service that it represents is not available. Services that are not available are represented by a normal icon with a small X box added to it. Note: This type of icon only applies to the services on your Bluetooth device (which can be viewed via My Bluetooth Places > View My Bluetooth service. When you try discovering the services on a remote Bluetooth device, not available services will not be displayed. Connected - this type of icon indicates that this computer is connected to this service. The icon has a green tint and/or a small butting arrows box added to it. The icons used to indicate service type, availability, and connection status are illustrated in the table below. (There are some differences between the device and service icons used by Windows 2000 and Windows XP. The table is based on Windows XP.) 16 17 2.5 Configuring Your Bluetooth The Bluetooth Configuration panel provides access to settings for Bluetooth services, client applications, hardware, security, discovery, accessibility, default paths, event notification, and other Bluetooth related items. You can open the Bluetooth Configuration panel by either of the following ways: Right-click the Bluetooth tray icon and select Bluetooth Configuration. Double-click the Bluetooth tray icon to open My Bluetooth Places and select View or modify configuration. 2.5.1 General Settings The settings on the General tab determine information that is displayed to remote devices. Computer name - enter a unique name to identify this computer to other Bluetooth devices in the vicinity; this field cannot be left blank. Computer type - select either Desktop or Laptop from the shortcut menu to set the type of icon remote devices will use to represent this computer. 18 2.5.2 Accessibility Settings The Accessibility tab lets you specify whether remote devices may access this computer, which remote devices have access, and whether an audio warning is played when a Personal Identification Number (PIN code) is required. Allow Other Devices to Discover This Computer Select Let other Bluetooth devices discover this computer to permit remote Bluetooth devices to find this computer. Control Skype calls using a hands-free device If your computer is connected to a Bluetooth hands-free device, you can check this checkbox so that you can remotely answer or end a Skype call by your hands-free device. Normally hands-free control is enabled after you connect to a hands-free device, regardless of the settings here. Choose an Audio Notification File When Secure Connection is enabled for any of the Bluetooth services on this computer, a PIN code is required before that service can be accessed. To chose a notification sound that will play when a remote device attempts to access a service that requires a secure connection, click Select audio file and select the sound (*.wav) file to be played. 19 2.5.3 Local Services Settings This tab allows you to select the services that your computer will provide to other Bluetooth devices. You can also double-click a service name to set its properties or click Add Serial Service to add serial service. For more information on providing local services, refer to the “2.8 Providing Local Service” section on page 40. 2.5.4 Client Applications This tab specifies how your computer will access services on other Bluetooth devices. For more information on accessing client applications, refer to the “2.7 Using Bluetooth Applications” section on page 22. 20 2.5.5 Diagnostics This tab allows you to view the Bluetooth adapter information and verify if your adapter is working properly. If more than one Bluetooth adapters (excluding adapters from other manufacturers) are plugged to one computer, a prompt will appear indicating only one of them can be active and you will be guided to this tab. Here you can disable the unwanted adapter and specify a preferred Bluetooth adapter on your computer. 2.6 Security and Pairing By default, the properties of all Bluetooth services on this computer and the Bluetooth applications (except Human Interface Device) that this computer uses are set to require a secure connection. When Secure Connection is enabled for any of the Bluetooth services on this computer, the two devices attempting to make a connection must exchange a Personal Identification Number (PIN) code upon the initial connection. After the exchange, the two Bluetooth devices are allowed to exchange data in a secure way. As this Bluetooth adapter supports 8 to 128-bit encryption, the length of the PIN code can vary between 1 and 16 alphanumeric characters. Hence, the length is restricted by the device you want to connect to. For example, some Bluetooth devices only support a PIN code of 1 to 4 characters. 21 2.7 Using Bluetooth Applications on Remote Side This chapter describes how to use the Bluetooth services on other Bluetooth devices with your Bluetooth-enabled computer. The services on remote Bluetooth devices are referred to as Client Applications in the Bluetooth Configuration panel. Some client applications do not require configuration unless you want to change the application name or the security settings, while some are provided with detailed settings. To configure a client application, go to Bluetooth Configuration Panel > Client Applications, Select the application then click properties. Refer to the following sections for the descriptions of each client application. 22 2.7.1 Printer The Bluetooth Printer application allows this computer to use a Bluetooth printer. The Bluetooth Configuration Panel > Client Applications > Printer > Properties > General tab provides options to configure the application name and enable or disable secure connection. Note: The secure connection depends on the Bluetooth printer you want to connect to. If the Bluetooth printer’s security function is de-activated, or if the printer does not have a secure connection feature, you should always disable the secure connection service. Install a Bluetooth Printer Option One: 1. Go to My Bluetooth Places > View devices in range and right-click a Bluetooth printer, select Add Printer from the shortcut menu and follow the on-screen instructions. 2. Select the printer manufacturer and model at the prompt. If your printer is not in the list of options, click Have Disk…, insert the driver disk for the printer, and then navigate to the drive and directory that contains the driver initiation file (*.inf) for the printer. 3. Follow the on-screen instructions to complete the installation. Option Two: 1. From the Windows Control Panel, select Printers and Faxes > Add a Printer > Next > Local printer > Next. 2. On the Select a Printer Port window of the wizard: • Select Create a new port. • In the Type of port menu, select Bluetooth Printer Port, and then click Next. 3. On the next screen, select the printer by name, and then click Connect. 4. Install the driver: Select the printer manufacturer and model at the prompt. If your printer is not in the list of options, click Have Disk…, insert the driver disk for the printer, and then navigate to the drive and directory that contain the driver initiation file (*.inf) for the printer. 5. Follow the on-screen instructions to complete the installation. 23 2.7.2 Imaging The Bluetooth Imaging application allows this computer to send images to remote devices that provide the Bluetooth imaging service. Possible uses include the transfer of images to a Bluetooth camera, camera/phone, or any other device that offers the Bluetooth Imaging service. The supported image formats are: BMP GIF PNG JPG Image Format Conversion Some devices, particularly battery-powered devices such as phones and cameras, may only be able to accept images in one format and at a single fixed resolution. In that case, the image is converted to the required format and resolution before it is transferred to the remote device. Sending Images to Remote Imaging Devices Imaging application connections are created automatically on an as-needed basis. You can send an image to the remote imaging device by either of the methods: If a shortcut to the remote device’s imaging service exists in My Bluetooth Places, drag and drop, or, copy and paste, to that shortcut. Go to My Bluetooth Places > View devices in range and drag and drop the image file onto the destination’s device icon. 24 After copying an image file in Windows Explorer, go to My Bluetooth Places > View devices in range, right-click the destination device and select Paste. Note: Battery-powered remote devices, such as a cell phones or cameras, may require that Bluetooth be specifically enabled before they can accept an image; see the battery-powered device’s documentation for more information. 2.7.3 Audio Gateway The Audio Gateway application allows a remote Bluetooth device to use this computer’s microphone and speakers as the remote device’s audio input and output devices. For example, if your Bluetooth cellular phone supports audio gateway service, you can redirect the phone’s conversation to your computer’s speakerphone. To connect to an Audio Gateway service enabled device: 1. Open My Bluetooth Places and discover the Audio Gateway service provided by the remote Bluetooth device. Then double-click the service to make the connection. 2. If required on the remote Bluetooth device, respond to the Bluetooth Service Authorization message to allow the access. Once the connection is established, remote device’s audio will be redirected to your computer. 25 2.7.4 Headset The Bluetooth Headset application allows this computer to use a Bluetooth headset as the audio input and output device for this computer. When a Bluetooth headset is connected to this computer, it functions as a wireless microphone and speaker for an audio application, such as an internet soft-phone or Instant Messaging software. Connect to a Bluetooth Headset 1. Make a Bluetooth headset discoverable. Refer to the manual that came with the headset for instructions about how to make the device discoverable. 2. Open My Bluetooth Places and discover the Headset device, then double-click the device to make the connection. 3. If the headset has a fixed PIN code and sends out a paring request, type that PIN code in the Bluetooth Security Code Request window, and then click OK. Refer to the manual that came with the headset device for the PIN code. 4. Once the connection is established, you will be notified that the connection has been made. Verifying Bluetooth Headset Installation Once the Bluetooth headset is installed, it will automatically take over the function of microphone and speakers of your PC. To verify the installation, go to Control Panel > Sounds and Audio Devices (or Sounds and Multimedia) > Audio. Your Bluetooth audio device will be identified as Bluetooth Hands-free Audio, Bluetooth Stereo Audio or other name according to the device. 26 2.7.5 PIM Synchronization The PIM Synchronization application is used to synchronize the Personal Information Manager (PIM) database of this computer with the PIM database of a remote Bluetooth device. The supported PIMs are: Microsoft Outlook Microsoft Outlook Express Lotus Notes The supported data types are: Business cards Calendar items Email (with or without attachments) Notes Configure PIM Synchronization The Bluetooth Configuration > Client Applications > PIM Synchronization > General tab provides options to configure. Click the PIM you want to synchronize (if any) in each of the data type lists. The data item types that can be synchronized are: 27 Business cards Note that if the system is configured to share contacts between Outlook Express and Microsoft Outlook, Outlook Express will not be shown as one of the options for PIM Item Transfer for business cards. Calendar items Email (with or without attachments-see below) Notes To Synchronize the PIM Database To synchronize the PIM database on this computer with the PIM database of another Bluetooth device: 1. Open My Bluetooth Places and discover the PIM Synchronization service provided by the remote Bluetooth computer. Then double-click the service to make the connection. 2. If pairing is required, type a PIN code exactly the same in the Bluetooth Security Code Request window on both computers, and then click OK. 3. On the remote computer, respond to the Bluetooth Service Authorization message to allow access the PIM Synchronization service. 4. You will get a message when synchronization is done. 28 2.7.6 Fax The Bluetooth Fax service allows this computer to send a fax using a Fax/Modem that is physically connected to a remote Bluetooth device. To send a Fax: 1. Open My Bluetooth Places and discover the Fax service provided by the remote Bluetooth computer. Then double-click the service to make the connection. 2. Open or create the document to be faxed, and then select the Print, Send to Fax Recipient or a similar command that is available in most applications. Note: The fax application needs to use the Bluetooth Fax Modem. 2.7.7 File Transfer The Bluetooth File Transfer application allows this computer to access, send files to or copy files from another Bluetooth device. Send Files on This Computer to Remote Bluetooth Device To send files on this computer to another Bluetooth device: Option 1 1. In Windows Explorer, open the folder where the file or folder you want to send is located. 2. Right-click the file or folder name, point to Send To, point to Bluetooth, and then click the name of the destination Bluetooth device. 29 Option 2 1. Open My Bluetooth Places and discover the File Transfer service on the destination Bluetooth device. 2. Double-click the File Transfer shortcut. The utility will open the Bluetooth Exchange Folder on the other Bluetooth device and get its file list. 3. You can now explore the Bluetooth Exchange Folder of the other Bluetooth device. Just copy, or drag-and-drop the file/folder to the desired location on the destination Bluetooth device. Note: When you send folders to another Bluetooth device, if the Secure Connection property of the File Transfer service of the other Bluetooth device has been set, the operator of the other Bluetooth device must be available to allow access unless the Always allow this device access to my computer's File Transfer service check box in Bluetooth File Transfer Authorization is selected. Otherwise, the file transfer fails. 2.7.8 PIM Item Transfer The Bluetooth PIM Item Transfer application allows this computer to send and receive Personal Information Manager items between this computer and another Bluetooth device. The supported items are: Business cards (*.vcf or *.vcd) Notes (*.vnt) Email (*.vmg) (with or without attachment) Calendar (*.vcs) 30 Electronic Business Cards Operations To send a business card to remote Bluetooth device 1. Double-click the PIM Item Transfer service on a remote device. This service is also referred to as Object Push Service on other Bluetooth device. 2. Select a business card that will be sent to other device. 3. On the remote computer, respond to the Bluetooth Service Authorization message to allow the transfer. To configure business card settings To configure which business card to send and where to store the received business card: Go to Bluetooth Configuration > Client Applications > PIM Item Transfer to configure required settings. 31 Secure Connection: If the Secure Connection property is set on either device, the receiving party must be available to allow access when an access request is received. Otherwise, the PIM transfer fails. Send My Business Card: Specifies how your business card is handled when it is requested by a remote device. Received Business Cards: Specifies where to store received business cards. Note: The selected Received Business Cards option is influenced by the local PIM Item Transfere settings. For example, if the local setting is configured to Do Not Accept business cards, the sending request from remote Bluetooth device fails. 32 Local PIM Item Transfer Settings Client Application PIM Item Transfer Settings Local setting takes over the client application settings. Email attachments: The only option is to include or not to include attachments with email that is sent or received on the computer using this service. To Send Notes, Emails and Calender Entries To send notes, email or calendar entries, just select one or more target items and then, from the File menu of the PIM (e.g., Outlook), select Send to Bluetooth. You can also drag-and-drop a supported item directly from your PIM to the PIM Item Transfer service icon of a remote device. Note that : If synchronization is enabled for a specific item type, but is not enabled for that item type on the remote device, synchronization will not take place for that item. Not all choices are available for all items. For example, Notes items can only be synchronized in Microsoft Outlook. Therefore Lotus Notes and Outlook Express are not displayed as options in the Notes item shortcut menu. Personal Information Managers that are not installed on this computer are not displayed as options in the shortcut menus. 33 2.7.9 Dial-up Networking The Bluetooth Dial-up Networking application allows this computer to use a modem that is physically connected to a remote device to access the Internet or log on to a remote network. Open a connection to the Dial-up Networking service that is provided by another Bluetooth device, following the instructions in “2.4.3 Creating a Connection” on page 10. After the Bluetooth dial-up networking connection is established, a virtual Bluetooth modem will be installed on your computer and a Bluetooth Connection icon will be added to Dial-up Connection group. You can double-click the icon to make the connection. The connection can be used the same way as any other networking connection. For example, you can open a browser and explore the World Wide Web, if the remote computer has Internet access. To close a dial-up networking connection, just go to My Bluetooth Places, right-click the service name and select Disconnect. 2.7.10 Network Access The Bluetooth Network Access application allows this computer to join a Personal Area Networking (PAN) or Local Area Network (LAN). The type of network connection that is available is determined by the configuration of the remote Bluetooth device. Joining a Personal Area Networking (PAN) PAN provides ad hoc network between Bluetooth devices. If a remote Bluetooth device provides ad hoc network service, then you can connect to it by these steps: 1. Open My Bluetooth Places and discover the Network Access service provided by the remote Bluetooth device. Then double-click the service to make the connection. 34 2. On the remote Bluetooth device respond to the Bluetooth Service Authorization message to allow network access. 3. To establish the connection, Windows uses Automatic Private IP Addressing (APIPA) to assign addresses to the computers in an ad hoc network. You don’t need to configure the TCP/IP networking. To view the APIPA address, type ipconfig at a command prompt, and then press ENTER. You should get an output that is similar to the following on both of the Bluetooth devices: Ethernet adapter Local Area Connection: Connection-specific DNS Suffix .: Autoconfiguration IP Address . : 169.254.125.34 Subnet Mask . . . . . Default Gateway . . . . . . : 255.255.0.0 . . : Once the connection is made, the computers on the same ad hoc network should be able to locate each other and use the network service such as file sharing. Accessing LAN or Internet via Remote Computer When a remote Bluetooth computer is connected to the Internet/LAN and configured to sharing that connection, your Bluetooth-enabled device can connect to the Internet/LAN using the remoter Bluetooth computer as the intermediary. We will use the following example to describe the setup procedures: Example: BT Client A is physically connected to the Internet/LAN via an Ethernet network adapter. It’s also Bluetooth-enabled and can connect to BT Client B over Bluetooth connection. BT Client B will use BT Client A as the intermediary to connect to the Internet/LAN. 35 BT Client A (The computer connected to the Internet/LAN) 1. Go to Bluetooth Configuration panel > Local Services > Network Access > Properties.. 2. Enable the Startup Automatically checkbox and select Allow other devices to access the Internet/LAN via this computer and click OK. 3. Go to Network Connections, right-click the network adapter that is connected to the Internet/LAN and select Properties. 36 4. On the Advanced tab, enable the Internet Connection Sharing option as shown below and click OK. 5. When IP address prompt appears, just click Yes. This will automatically assign your Bluetooth adapter a virtual IP address. 6. You will return to the Network Connections window and find a hand appended to the network connection icon. To view the IP address of your Bluetooth network adapter (e.g., Local Area Connection 2), type ipconfig at a command prompt, and then press ENTER. You should get an output that is similar to the following: 37 Ethernet adapter Local Area Connection: Connection-specific DNS Suffix .: test Autoconfiguration IP Address . : 10.0.128.24 Subnet Mask . . . . . Default Gateway . . . . . . : 255.255.0.0 The network adapter that connects to the Internet/LAN. . . : 10.0.0.21 Ethernet adapter Local Area Connection 2: Connection-specific DNS Suffix .: Autoconfiguration IP Address . : 192.168.0.1 Subnet Mask . . . . . Default Gateway . . . . . . : 255.255.255.0 The Bluetooth network adapter. . . : BT Client B (The computer connected to Client A via Bluetooth) Providing that Bluetooth Client B is using Windows 2000: 1. Open My Bluetooth Places and discover the Network Access service provided by the remote Bluetooth device. Then double-click the service to make the connection. 2. On the remote Bluetooth device (i.e. Client A in our example) respond to the Bluetooth Service Authorization message to allow network access. 3. Wait a moment for the connection to be made. The Bluetooth network adapter will be automatically assigned an IP address. To view the assignment, type ipconfig at a command prompt, and then press ENTER. You should get an output that is similar to the following on both of the Bluetooth devices: Ethernet adapter Local Area Connection: Connection-specific DNS Suffix .: Autoconfiguration IP Address . : 192.168.0.190 Subnet Mask . . . . . Default Gateway . . . . . . : 255.255.255.0 . . : 192.168.0.1 38 The IP address of Bluetooth adapter on Client A If you want to enable Internet Connection Sharing (ICS) on Windows 98SE, ME, you should run the Network Setup Wizard from the CD or floppy disk. As this manual only describes a very typical connection method, actual connection method varies according to your network environment and a computer’s operation system. For more information please refer to Windows online help or your network administrator. Note: If a client is going to use the Network Access service provided by another remote Bluetooth device, the client should either reboot or manually renew the ip address. 2.7.11 Bluetooth Serial Port The Bluetooth Serial Port application allows this computer to establish a wireless serial connection with a remote Bluetooth device. The applications on both this computer and the remote device must be configured to send and receive data to and from the respective communications port (COM port) assigned to the Bluetooth serial port. The wireless serial connection may then be used by the applications as though a physical serial cable connected the devices. To establish a virtual serial port connection between this computer and another Bluetooth device: 1. Open My Bluetooth Places and discover the Serial Port service on the destination Bluetooth device. 2. Double-click the Serial Port shortcut to make the connection. 3. If secure option is enabled, the operator of the other Bluetooth device must be available to respond to any authorization requests. 4. You will be prompted of the COM port name that is associated with the connection. Now you can configure programs to use that port. 39 2.7.12 Bluetooth Human Interface Device The Bluetooth Human Interface Device application allows this computer to use a Bluetooth keyboard, mouse, or other human interface device 1. Verify that the keyboard, mouse or other human interface device (HID) contains batteries, that the batteries are inserted properly and are fully charged, and that you know where the Connect button is to make the device discoverable. 2. Open My Bluetooth Places and discover the HID. 3. Double-click the HID shortcut to make the connection. 4. If the HID is a keyboard, using the keyboard, type the Bluetooth security code that is in the Bluetooth security code box, and then press ENTER. -orIf the HID is a Bluetooth mouse or other Bluetooth pointing device, use the Bluetooth mouse or other Bluetooth pointing device to click Click here if confirmation is required. You can now use the Bluetooth HID. 2.8 Providing Local Service Local services are the services that your Bluetooth-enabled computer provides to other Bluetooth devices. Your computer can offer one or more services, which can be configured via the Local Services tab in the Bluetooth Configuration panel. 40 2.8.1 Common Configuration Settings These properties can be set individually for each Bluetooth service: Service Name - the default name of each service can be changed. Secure Connection - requires that remote devices provide proof of identity and that all data be encrypted. Startup Automatically - starts the service automatically when Bluetooth is started. Notifications - provides visual and/or audio notification that a remote device is attempting to connect (or has connected) to a service on this computer. 2.8.2 Printer The Printer service allows other Bluetooth devices to use a printer that is physically connected to your computer. To provide this service, the local printer should be physically connected to this computer by a USB or parallel cable, is set as the default printer and is turned on. Note if the secure connection property for the printer has been set on either computer, the operators of both computers must be available to allow access and to supply the Bluetooth security code when requested. Thereafter, access is granted automatically and it is not necessary to supply the security code. 2.8.3 Bluetooth Image Transfer The Bluetooth image transfer service allows this computer to accept images from remote devices that support Bluetooth image transfer. The supported image formats are: BMP GIF PNG JPG Received images are stored in My Documents > Bluetooth Exchange Folder. 41 2.8.4 Audio Gateway/Headset The Audio Gateway/Headset service redirects this computer’s audio to another Bluetooth device. For example, if this computer is connected to a Bluetooth audio device and other computer is connected to this computer’s audio gateway service, the audio is directed to the Bluetooth audio device. 2.8.5 PIM Synchronization The PIM Synchronization service can be used by a remote device to synchronize its Personal Information Manager (PIM) database with the PIM database of this computer. Four data types are supported: Business cards Calendar items Email messages Notes Whether an individual item is accepted and where it is stored after it is accepted is configured in the PIM Item Transfer service. If that service is not configured to store a particular data type in Outlook, then that data type cannot be synchronized. Microsoft Outlook permits duplicate entries, so all duplicates may not be exchanged in the synchronization process. Note: Only Outlook’s default contacts folder is synchronized. Items in sub-folders are not synchronized. Items that are moved from the default folder to a sub-folder will not be displayed the next time synchronization takes place. 2.8.6 Fax The Fax service allows other Bluetooth devices to use this computer’s Fax modem to send a fax. To provide this service, your computer must be physically connected to a modem offering fax function. 42 2.8.7 File Transfer The File Transfer service allows other Bluetooth devices to explore this computer’s Bluetooth exchange folder and send files to or copy from that folder. To configure your local file transfer service, go to Bluetooth Configuration > Local Services > File Transfer. Here you can specify your default exchange folder location and remote user access permissions. 43 Note: If you set the Secure Connection property of the File Transfer service of this computer, you must be available to respond to the Bluetooth Security Code Request sent by the other device when the other device initially attempts to connect to this computer. Otherwise, the pairing process fails. After the two device are paired, the other device can access the files on this computer without having to obtain access permissions. 2.8.8 PIM Item Transfer The PIM Item Transfer service allows to exchanges Personal Information Manager items between this computer and other Bluetooth devices. In addition to the configuration options common to all Bluetooth services, this service also has settings that determine: How business card requests are handled. Where to store inbound data items, on an individual basis. Whether to send/receive attachments with email. 2.8.9 Dial-Up Networking The Dial-Up Networking service allows other Bluetooth devices to use this computer’s modem to access the Internet or a remote network. To provide this service, your computer must be physically connected to a modem offering fax function. 44 2.8.10 Network Access The Network Access service allows other Bluetooth devices to: Create a personal area network (PAN) with this computer. To provide a PAN service, select Allow other devices to create a private network with this computer from the drop down list. Windows will use Automatic Private IP Addressing (APIPA) to assign addresses to the computers in an ad hoc network. You don’t need to configure the TCP/IP networking. -or Access the Internet/LAN through this computer. To provide this function, select Allow other devices to access the Internet/LAN via this computer from the drop down list. In addition, this computer must be configured to share the Internet connection. For more information, refer to the “Accessing LAN or Internet via Remote Computer” section on page 35. 2.8.11 Bluetooth Serial Port The Bluetooth Serial Port service allows other Bluetooth devices to establish a wireless serial connection with this computer. In addition to the configuration options common to all Bluetooth services, this service also has setting for specifying a COM port. Note: Unless you have a specific reason to do so, DO NOT CHANGE the default COM port setting. 45 46 3. Installing Software in Windows Vista 32/64-bit 3.1 Installation Note: Do not connect the USB Bluetooth Adapter to your computer before you install the provided software. You will be prompted to plug the device during the installation. Insert the Bluetooth software installation CD into your CD-ROM drive. When the auto-run screen appears, select Install Utility and Driver for Vista Note: If the auto-run window does not appear automatically, go to Start -> All Programs -> Accessories -> Run and type D:\Utility\Vista\Setup.exe (where D is the letter of your CD-ROM drive) and click OK. 47 If the following warning window appears, click Allow to continue with the installation. When the following screen appears, connect the Bluetooth USB adapter to an available USB port on your computer. 48 At the welcome screen, click Next. Then click Next on the two screens that follow until you get to the Install Screen. Click Install to install the Bluetooth software. Please wait while the software installs all the supported services. This may take several minutes. 49 The following Windows Security alert may appear a few times during the installation. Click Install this driver software anyway to continue installing the software. At the end, click Finish. Your device is now installed and ready to use. 50 3.2 Configuring Your Bluetooth Device Settings To make your Bluetooth device discoverable or configure the connection properties: 1. Double-click the Bluetooth icon in the system tray. 2. On the Options tab, make sure the Allow Bluetooth devices to find this computer is checked if you want your Bluetooth adapter to be discoverable. If required, you can configure the connection properties and icon settings. If you want to change the name that identifies your Bluetooth-enabled computer: 1. Double-click the Bluetooth icon in the system tray. 2. Click the Hardware tab, select Bluetooth Ultimate… and click Properties. 51 3. Click the Change settings button. 52 4. Click the Advanced tab, edit your name and click OK. 53 3.3 Connecting to a Remote Bluetooth Device 1. Right-click the Bluetooth system tray icon and click Add a Bluetooth Device. 2. Make sure to enable the option that makes your Bluetooth adapter discoverable and click Next. 3. Available Bluetooth devices in the vicinity will be displayed. Highlight the device you want to add and click Next. If your target Bluetooth device is not listed, make sure it is configured to be discoverable and click Search Again. 54 4. Enter a passkey as required by your target Bluetooth device. • Choose a passkey for me/Let me choose my own passkey: If your target Bluetooth device can be entered with a customized passkey, select to use a system-chosen passkey or enter a key that you want to use. • Use the passkey found in the documentation: Some Bluetooth devices (e.g., Bluetooth camera or cellular phone) are pre-configured with a passkey, which can be found on the documentation that came with the device. In this case, select this option and enter that key. • Don’t use a passkey: If your targe Bluetooth doesn’t require a passkey, select this option. 5. If a passkey is entered in previous step, your Bluetooth adapter will exchange the key with your target Bluetooth device. At this point, move on to your target Bluetooth device and enter the same passkey you entered in step 4. 55 6. Click Finish when this screen appears. 3.4 Checking Services on a Remote Bluetooth Device Once you have connected to a remote Bluetooth device, you can view the services available on the remote Bluetooth device by these steps: 1. Double-click the Bluetooth system tray icon and click the Devices tab. 2. Select the desired Bluetooth device and click properties. 56 3. Click the Services tab and you can view the available services. To use a service on remote Bluetooth device, it must be listed and checked. 3.5 Exchanging Files Between Bluetooth Devices There are two methods that you can send files to or receive files from a remote Bluetooth device, one is File Transfer Service and the other is Object Push Service. 3.5.1 Sending File by Object Push Service To send a file to a remote Bluetooth device utilizing the Object Push service, follow the steps below: 1. Right-click the Bluetooth system tray icon and click Send a File. 57 2. If the Send to field doesn’t show your target Bluetooth device, click Browse to select the Bluetooth device you want to send file to and click OK. Then click Next to proceed. 3. Click Browse to select the file you want to send and click Next. 58 4. While sending the file, the operator of the target Bluetooth device must be available to accept the file; otherwise the file transfer fails. 5. Once the file is successfully sent, click Finish. The target Bluetooth device should have received the file, which is usually saved in the default Bluetooth folder for Object Push service object. 3.6 Sending File by File Transfer Service To send a file to remote Bluetooth device by File Transfer service: 1. Double-click the Computer icon on the desktop. 2. Remote Bluetooth devices supporting File Transfer service will be listed under the Other category. Just drag and drop your file onto the target icon or double-click the icon and do copy and paste operations. 59 Notes: If the target Bluetooth device is not listed, make sure you have added it by following the steps described in “3.3 Connecting to a Remote Bluetooth Device” section on page 54. If error message appears when you attemp to send a file, check if File Transfer service is still availabe on the target device by following the steps descriebed in “3.4 Checking Services on a Remote Bluetooth Device” section on page 56. 3. On the remote Bluetooth device, respond to the File Transfer Service (or FTP access) message to accept the file. 3.7 Receiving File from another Bluetooth Device When a remote Bluetooth device is attempting to send you a file, in the system tray area you will get either a request for PIM Item Transfer access (if remote device is using Object Push service) or FTP file access (if remote device is using File Transfer service) permission. Just follow the prompts to receive the file. (There is no need to use the Receive a File item on the Bluetooth icon’s shortcut menu.) The file will be saved in the default Bluetooth exchange folder, which can be specified by double-clicking the Bluetooth icon, selecting the Share tab and clicking Browse. 60 You must enable this option to allow remote Bluetooth device to access your File Transfer service. 3.8 Joining a Personal Area Networking (PAN) PAN provides ad hoc network between Bluetooth devices. If a remote Bluetooth device provides ad hoc network service, then you can connect to it by these steps: 1. Right-click the Bluetooth system tray icon and click Join a Personal Area Network. 2. Select the remote Bluetooth device that you want to connect to and click Connect. (If the remote Bluetooth device is not listed, click Add and follow the instructions to add the device. Note that passkey exchange is needed otherwise the remote Bluetooth device will not be listed as a PAN candidate.) 61 3. On the remote Bluetooth device, respond to the Personal Area Network message to allow the access. 4. Once the PAN is established, you can go to Control Panel > Network and Sharing Center > Manage network connections to verify the status. Once the PAN connection is made, the computers on the same ad hoc network should be able to locate each other and use the network service such as file/printer/drive sharing or Internet access sharing. 3.8.1 File/Printer/Drive Sharing 1. On the file-sharing computer: • Share the resoucres such as a folder, printer or drive. 62 • On Windows Vista, it’s necessary that there is a Windows account which the client can use to log on locally. If such an account does not yet exist, create one (via Control Panel > User Accounts.) 2. Each computer that joins the PAN should now be able to locate each other. When a computer is attempting to access the shared resources on Windows Vista, a log on dialog box will appear and user should enter the username and password of an existing user account. 3.9 Dial-up Networking 3.9.1 Connecting to a Remote Bluetooth Device with DUN Service If there is one remote Bluetooth device providing Dial-up Networking service and is physically connected to a modem, then your computer can connect to it to access the Internet or log on to a remote network. To do this: 1. Double-click the Bluetooth system tray icon and click the Dial-up tab. 2. Select the remote device that provides Dial-up Networking service and click Connect. Only the Bluetooth device providing Dial-up Networking service will be listed. If you make sure the target remote device provides that service but is not listed, click the Devices tab and click Add to add it. 63 3. When the dial-up dialog box appears, fill in the related fields to make a dial-up connection. To close a dial-up networking connection, just double-click the Bluetooth system tray icon, click the Dial-up tab, select the connected device and select Disconnect. 64 3.9.2 Offering Dial-up Networking Service 1. Make sure the modem is connected and properly installed. (Refer to the manual comes with the modem for installation steps. Then restart your computer after the installation.) 2. Double-click the Bluetooth system tray icon and click the Share tab. Check the option that shares your modem and click Apply. 3. When remote Bluetooth device is attempting to wirelessly connect to your modem, you must respond to the notification message to allow the connection. 3.10 Connecting to a Bluetooth Audio Device Your Bluetooth-enabled computer can connect to a Bluetooth audio device (e.g., handsfree headset, stereo headphone and so on) as the audio input/output device for this computer. When a Bluetooth audio device is connected to this computer, it can function as a wireless microphone/speaker for an audio application, such as an Internet soft phone or Instant Messaging software. 1. Make sure your Bluetooth audio device is discoverable and add the device as described in “3.3 Connecting to a Remote Bluetooth Device ”section. 2. Once the Bluetooth device is added, if needed you can select it and click Properties to make sure the required services are checked. 65 3. Click the Audio tab, locate your target audio device, select the service you want to use and click Connect. 66 4. Once connected, Bluetooth audio device will be automatically configured as Windows default playback and recording device. You can now use the Bluetooth headset to wirelessly listen to music played on the host computer or record sound (if Bluetooth microphone function is provided). 3.10.1 Using Bluetooth hands-free device with IM software Once connected to a Bluetooth hands-free device, by default it will be automatically configured as the audio in/out devices for Skype. To use it in other telephony software, such as MSN Messenger or Yahoo Messenger, you can open that software and make sure Bluetooth audio device is set as the audio in/out devices. 3.11 Connecting to a Bluetooth Audio Gateway If you connect to a remote Bluetooth audio device’s Audio Gateway service, then you can use this computer’s microphone and speakers as the remote device’s audio input and output devices. For example, if your Bluetooth cellular phone supports audio gateway service, you can redirect the phone’s conversation to your computer’s microphone and speaker. To use Audio Gateway service on remote Bluetooth device, follow the steps described on previous section and connect to Telephony Audio Gateway service. 67 3.12 Sending/Receiving Images to Remote Imaging Devices After you connect to a Bluetooth imaging device, such as digital camera, a shortcut will add to your computer. To send an image to the remote imaging device, drag and drop your image file onto the destination’s device icon and respond to the request on the imaging device. To receive an image, just follow the notification messages to proceed. 3.13 Sending/Receiving PIM Items To send PIM items, just follow the steps in “3.5.1 Sending File by Object Push Service” section and select the PIM items you want to transfer. When a remote Bluetooth device is sending you PIM items, just follow the notification message to proceed. Related settings, including the PIM storage location, can be configured via the PIM Interface tab on the Bluetooth Devices dialog box. 68 4. Troubleshooting Problem or Symptom I cannot connect to a paired device that is listed in Entire Possible Solution • Check to see if the device is turned on, in range, and in Discoverable mode (refer to the manual that came with the device for instructions for making the device discoverable). Devices that you have paired with are listed in Entire Bluetooth Neighborhood regardless of whether they are turned on, in range, or in Discoverable mode. • Check to see if the device Bluetooth radio is turned on (refer to the manual that came with the device for instructions). If the other device is a Bluetooth computer, check the appearance of the Bluetooth icon in the notification area. • If you have connected a Bluetooth device with another Bluetooth device besides this computer (for example, connecting a headset with a cellular phone), you must delete the existing connection to this computer, and then re-create the connection. • Check to see if the device is turned on, in range, and in Discoverable mode. • If you have printed to the printer before, verify that the printer is in range, is turned on, is not malfunctioning, and is still paired with this computer. • If you have not printed to the printer before, did you install the printer? If not, install the printer according to the instructions provided in this manual. If you did install the printer, verify that the procedure you followed matches the instructions. • If you have printed to the printer before, verify that you are in range of and paired with this computer, that both the printer and this computer are powered on, that the printer is not malfunctioning, and that the printer is the default printer for this computer. Bluetooth Neighborhood. The device I want to connect to is not listed in Entire Bluetooth Neighborhood. I cannot print to the Bluetooth printer from this computer. I cannot print from another Bluetooth computer to a standard printer that is physically connected to this computer. 69 • I cannot send a fax using the fax • capabilities of a Bluetooth telephone, modem, or other device that offers fax service. If you have not printed to the printer before, did you install the printer on your computer? If not, install the printer and try again. The device offering the fax service may be set to use another device instead of the fax modem. • Check to see if the volume on the headphones is set to minimum. • Adjust the volume using the volume control on the media player rather than the master volume control on the computer. I cannot communicate with a cell • phone or reconnect to a cell Verify that the cell phone is in Discoverable mode, is in range, and that the Bluetooth radio is turned on. I cannot adjust the headphone volume. phone. 70 5. Specifications Item Description Interface USB 1.1 compliant A type female connector Supported OS Windows XP, 2000, Vista 32/64-bit Frequency Band 2.400–2.4835 GHz Spread Spectrum Frequency hopping spread spectrum (FHSS) Data Rate 3 Mbit/s, 2 Mbit/s (EDR) and 1 Mbit/s 3 dBm typical, Power Class 2 with dynamic power control Transmission Power 12 dBm typical, Power Class 1 with dynamic power control Receive Sensitivity –80 dBm maximum Antenna PCB antenna Operating Range 100m (Class 1) / 10m (Class 2) Operating Temperature 0°C to 55°C Operating Humidity 95% maximum (no condensing allowed) Storage Temperature –20°C to 85°C Security 8~128-bit encryption Standard Bluetooth v2.0 + EDR Dimension 51 x 18.7 x 11mm (L x W x H) (with lid) Weight 9 g (with lid) Compliance FCC, CE *Specifications are subject to change without notice. 71 6. Regulatory Compliance FCC Compliance and Advisory Statement This device complies with Part 15 of the FCC rules. Operation is subject to the following two conditions: 1) this device may not cause harmful interference, and 2) this device must accept any interference received, including interference that may cause undesired operation. This equipment has been tested and found to comply with the limits for a Class B digital device, according to Part 15 of the FCC rules. These limits are designed to provide reasonable protection against harmful interference in a residential installation. This equipment generates, uses and can radiate radio frequency energy and if not installed and used in accordance with the instructions, may cause harmful interference to radio communications. However, there is no guarantee that interference will not occur in a particular installation. If this equipment does cause harmful interference to radio or television reception, which can be determined by turning the equipment off and on, the user is encouraged to try correct the interference by one or more of the following measures: 1. Reorient the receiving antenna. 2. Increase the separation between the equipment and receiver. 3. Connect the equipment into and outlet on a circuit different from that to which the receiver is connected. 4. Consult the dealer or an experienced radio/TV technician for help. Any special accessories needed for compliance must be specified in the instruction manual. CAUTION: Any changes or modifications not expressly approved by the party responsible for compliance could void your authority to operate the equipment. CE This equipment is in compliance with the requirements of the following regulations: EN 55 022: CLASS B 72 WEEE Information For EU (European Union) member users: According to the WEEE (Waste electrical and electronic equipment) Directive, do not dispose of this product as household waste or commercial waste. Waste electrical and electronic equipment should be appropriately collected and recycled as required by practices established for your country. For information on recycling of this product, please contact your local authorities, your household waste disposal service or the shop where you purchased the product. 73 Technical Support E-mail: [email protected] Toll Free: 1-888-746-3238 Web site: www.airlink101.com *Actual data throughput will vary. Network conditions and environmental factors, including volume of network traffic, building materials and construction, and network overhead, lower actual data throughput rate. Environmental factors will adversely affect wireless signal range. Specifications are subject to change without notice. All products and trademarks are the property of their respective owners. Copyright ©2007 Airlink101® 74