1
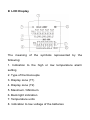
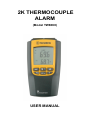
2K THERMOCOUPLE ALARM (Model TW8060) USER MANUAL Introduction Thank you for purchasing the 2K thermocouple alarm thermometer. Please take a few minutes to browse through this user manual before you begin to operate the meter to ensure that you are familiar with how best to operate the meter as accurately and safely as possible. This meter accepts type K thermocouples only configured with mini K connectors. 1 Precautions safety measures To get the best service from this meter, please read this user's manual carefully and observe the detailed safety precautions strictly. 1.1.1 During use 1.Thermocouple: standard mini type K thermocouple connector, the center spacing is 7.9mm (between the two prongs). 2. When the battery voltage is under proper operation requirement, the symbol will display on the LCD and the battery will need to be replaced. 3. To keep the instrument clean, wipe the case with a dry cloth and detergent, do not use abrasives or solvents. 1.1.2 Maintaining the product When not using the instrument for a long time, please remove the battery and avoid storing in high temperature and high humidity environments. Features 1. Display: 4 digits LCD Display 2. Resolution: 0.1°C/0.1°F below 1000°C 1°C/1°F above 1000°C 3. Range: K-type: -200°C ~ 1300°C (-328°F ~ 2372°F) 4. Accuracy: (-200 ~ -100°C) ± (0.2%reading+1°C) (-100 ~ 1300°C) ± (0.1% reading +0.7°C) (-328 ~ -148°F) ± (0.2% reading +2°F) (-148 ~ 2372°F) ± (0.1% reading +1.4°F) 5. Sample rate: 1 second 6. Auto power off: about 20 minutes. (Default set to auto-off disabled. Settable by user.) 7. Low battery indicator 8. Operating environment: 0°C ~ 50 °C (32°F~122°F), 0 ~ 80%RH 9. Storage environment: -20°C ~ 60°C (-4°F~140°F), 0 ~ 80%RH 10. Battery Life: 50 hours continuous (with auto-off disabled, no alarm sounding); 8 to 10 hours if alarm is sounding continuously. 11. Dimension and Weight: 121 (L) x 60 (W) x 30 (H) mm, about 180g 12. Accessories: DC1.5V (AAA) x 3 pcs Users Manual x 1 pc Optional mini tripod Names of parts Instrument Familiarization 1. Sensor cover 2. Temperature input connectors 3. LCD display 4. Function keys LCD Display The meaning of the symbols represented by the following: 1. Indication to the high or low temperature alarm setting 2. Type of thermocouple 3. Display zone (T1) 4. Display zone (T2) 5. Maximum / Minimum 6. Back light indication 7. Temperature units 8. Indication to low voltage of the batteries Operation Instruction NOTE: After abrupt ambient temperature changes, allow meter at least 20 minutes to equilibrate to the new ambient condition before taking measurements. This allows ample time for the internal CJC to equilibrate to the new ambient temperature. Turning the Unit On and Off Press the ON/OFF button momentarily to power the unit on. Make sure that there is sufficient battery power. Press and hold the ON/OFF button for 2 seconds to power the unit off. Enabling and Disabling the Auto-Off To save battery power, the unit includes an Auto-Off feature that automatically shuts the unit off after approximately 20 minutes. The factory default setting is Auto-Off disabled. To enable the Auto-Off function, press and hold the Light button while powering the unit on. A double beep sound will confirm that the Auto-Off is now enabled. To disable the Auto-Off, press and hold the Light button while powering the unit on. A single beep sound will confirm that the Auto-Off is now disabled. Max/Min Function The TW8060 includes a Max/Min function. While the unit is powered on, it will continuously record the maximum and minimum recorded temperature. The Max/Min temperatures will be stored until they are cleared by the user, even if the power is shut off. To view the Max/Min readings, press the Max/Min button once to see the Max reading for both channels, then again to see the Min reading for both channels, and one more time to return to the main display. To clear the Max/Min function, press and hold the Max/ Min button for 3 seconds. CLER will be displayed momentarily. NOTE: If the Max or Min display show OL, clear the Max/Min function and continue. It is recommended to clear/reset the Max/Min function after replacing probes. Alarm On/Off After the alarm high and low values are set the user can turn the alarm function on or off. To turn the alarm monitoring on press the ALARM ON/OFF button and the word LIMIT will be displayed directly above the T1 temperature display. To turn the alarm monitoring off press the ALARM ON/OFF button and the word LIMIT will no longer be displayed. NOTE: It is recommended to disable the Auto-Off function prior to alarm monitoring as the unit will power off after 20 minutes if the Auto-Off function is enabled. See above for instructions. NOTE: Alarm monitoring is for channel 1 only (T1). Setting the Hi/Lo Alarm Limits To set the alarm high and low monitoring temperatures for channel 1 only, press the HI/LO button and the current HI limit will be displayed. Press the UP and DOWN buttons to set the desired temperature. Once the desired HI limit temperature is set, press the HI/LO button again to display the current LO limit setting. Press the UP and DOWN buttons to set the desired temperature. Once the LO limit setting is reached press the HI/LO button to accept. To cancel at any time and not store the HI/LO readings press the ALARM ON/OFF button to return to the main display. NOTE: To scroll up and down faster during the alarm temperature setting, press and hold the UP and DOWN buttons for a longer period of time. NOTE: To reset the alarms to factory default settings, press and hold the ALARM HI/LO button for 3 seconds. CLER will be displayed momentarily. Setting the Display Units The TW8060 will display temperature in two scales, Fahrenheit and Celsius. To switch from one scale to the other press the UNIT button momentarily and the display will change. The factory default scale is Fahrenheit. NOTE: When changing temperature scales, the MAX/ MIN and alarm settings will convert to the new scale. Turning on the Backlight The TW8060 is enabled with a backlight for ease in viewing the display in dark environments. The backlight will shut off after 30 seconds to preserve battery life. To turn on the backlight, press the LIGHT button momentarily. To turn off the backlight, press and hold the LIGHT button momentarily. Maintenance 1. CLEANING INSTRUCTIONS The meter may be wiped down with a wet sponge or cloth using a mild water based detergent or antibacterial soap and rinsed under a gentle stream of cold water. NOTE: This unit is not designed for complete submersion or washing in water. 2. BATTERY REPLACEMENT Use the following procedure: When the battery voltage drops below proper operating range the symbol will appear on the LCD display and the battery should be replaced. • Remove the battery cover and press towards base of meter to open the battery cover. • Replace the battery with three new 1.5V batteries (AAA). • Replace the battery cover. WLS298 1762 W. 20 S. #100 Lindon, UT 84042 Ph: 801-756-7705 Fx: 801-756-8948 www.thermoworks.com