1
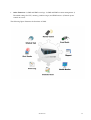
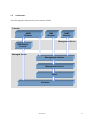
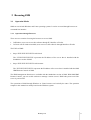
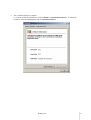
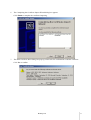
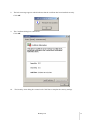
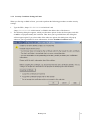
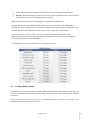
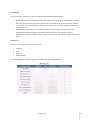
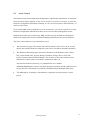
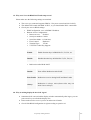
Server Management System
Ver 2.01
User Manual
Copyright Notice
© 2005 Inventec Enterprise System Corporation (IESC). All rights reserved.
All product names or brands mentioned herein are the trademarks of IESC or their respective owners.
Contents
About This Manual ........................................................................................................................................i
SMS Documentation ................................................................................................................................... i
Manual Conventions ................................................................................................................................... i
Supporting Information ............................................................................................................................... i
1
Introduction ........................................................................................................................................1-1
1.1 Features .......................................................................................................................................... 1-1
1.2 Architecture .................................................................................................................................... 1-3
2
Prenotice .............................................................................................................................................2-1
3
Browsing SMS ....................................................................................................................................3-1
3.1 Operation Modes ............................................................................................................................ 3-1
3.1.1 Operation through Browsers................................................................................................... 3-1
3.1.2 Operation through Command Line Interface.......................................................................... 3-2
3.2 Display Requirements .................................................................................................................... 3-4
3.3 Security Certificate Settings ........................................................................................................... 3-4
3.3.1 Security Certificate Settings in Windows ............................................................................... 3-4
3.3.2 Security Certificate Settings in Linux..................................................................................... 3-9
3.4 Logging in SMS ........................................................................................................................... 3-10
4
Configuration......................................................................................................................................4-1
4.1 Creating SMS Accounts ................................................................................................................. 4-1
4.1.1 Adding an SMS Account from an Existing OS Account:....................................................... 4-1
4.1.2 Adding an SMS Account from a Non-existing OS Account................................................... 4-1
4.1.3 Setting Security Levels for the SMS Accounts....................................................................... 4-1
4.2 Creating IPMI Accounts ................................................................................................................. 4-2
4.2.1 Adding a New IPMI Account ................................................................................................. 4-4
4.2.2 Enabling/Disabling an IPMI Account..................................................................................... 4-4
4.3 Configuring Mail Server and IPMI LAN Parameters..................................................................... 4-5
4.3.1 Configuring Mail Server......................................................................................................... 4-5
4.3.2 Configuring IPMI LAN Parameters ....................................................................................... 4-6
5
Application..........................................................................................................................................5-1
5.1 Management of Power-on and Power-off Servers.......................................................................... 5-1
5.2 Assets Control ................................................................................................................................ 5-2
5.3 System Status Monitor.................................................................................................................... 5-3
5.3.1 Viewing System Status ........................................................................................................... 5-3
5.3.2 Controlling System Status ...................................................................................................... 5-3
5.4 System Events and Automatic Responses ...................................................................................... 5-5
5.4.1 Viewing System Events .......................................................................................................... 5-5
5.4.2 Automatic Responses to the Events........................................................................................ 5-6
5.5 Automatic Management Tasks ....................................................................................................... 5-8
5.6 Console Redirect ............................................................................................................................ 5-9
5.6.1 Console Redirect Client Application ...................................................................................... 5-9
5.6.2 Access Permission .................................................................................................................. 5-9
5.7 Reboot or Shutdown of the Remote Server .................................................................................. 5-10
Appendix A
Frequently Asked Questions............................................................................................A-1
Appendix B
Glossary............................................................................................................................. B-1
Appendix C
Index..................................................................................................................................C-1
This chapter lists the available
documentations in SMS, introduces the
conventions in the manual, and provides
the supporting information sources.
About This Manual
About This Manual
About This Manual
SMS Documentation
The following documents are available with Server Management System:
User Manual
The user manual presents the key information of the system requirements, software
structure, installation, configuration, and major functions.
On-line Help
The on-line help directs to perform the management tasks.
Release Note
This file shows the software’s version and main features.
This document narrates the copyright information of the software, the software content,
Readme
and the installation process. Please refer to the installation disk of the software.
Manual Conventions
Bold Font
SMS
Represents buttons or window names of SMS.
SMS is the acronym of Server Management System. Hereinafter, SMS will be used for
the sake of briefness.
Note: Describes the helpful supplementary information related to the current topic.
Caution: Provides important messages that could result in damage to the server or loss of
data.
Supporting Information
•
Related Documentation
HP provides documentation related to the storage server products. These documents can be obtained at
http://h18006.www1.hp.com/storage/nas.html.
Select your product, then click Technical documentation under the Support section.
Note: Known issues and workarounds are addressed in release notes.
To view the latest version, visit http://www.hp.com/go/support. Select See support and
troubleshooting information and enter a product name/number.
Under self-help resources, select the manuals (guides, supplements, addendums, etc) link.
About This Manual
i
•
Getting Help
If you still have a question after using Help, contact an HP
authorized service provider or access our web site: http://www.hp.com.
• HP Technical Support
Telephone numbers for worldwide technical support are listed on the following HP web site:
http://www.hp.com/support/. From this web site, select the country of origin.
Note: For continuous quality improvement, calls may be recorded or monitored.
Be sure to have the following information available before calling:
• Technical support registration number (if applicable)
• Product serial numbers
• Product model names and numbers
• Applicable error messages
• Operating system type and revision level
• Detailed, specific questions
•
HP Authorized Reseller
For the name of your nearest HP authorized reseller:
• In the United States, call 1-800-282-6672
• Elsewhere, see the HP web site for locations and telephone numbers: http://www.hp.com.
•
Helpful Web Sites
For additional information, see the following HP web sites:
• http://www.hp.com
• http://www.hp.com/go/storage
• http://www.hp.com/support
• http://www.docs.hp.com
About This Manual
ii
Introduction
This chapter describes the general
features of SMS.
Introduction
Chapter 1
1 Introduction
1.1
Features
Server Management System Ver 2.01 is designed to simplify management of single servers. It keeps
24-hour watching on a server to ensure its normal operation. For servers with IPMI (Intelligent Platform
Management Interface) support, SMS can also manage the IPMI hardware components through the
software interface.
SMS provides powerful functions as below:
•
Assets Control: SMS provides the detailed hardware configuration information of the server.
•
Status Monitor: SMS monitors the real-time status of the server, and provides the real-time
information of CPU, Memory, Partition and NIC. For servers with IPMI support, the real-time
values of IPMI sensors will also be provided. Thus, the administrator can easily know whether the
server is in healthy status or not and take corresponding actions if necessary, or set thresholds and
define event triggers to realize automatic management of the system status.
•
Event Handler: SMS provides two kinds of event handling mechanism – SMS event trigger and
IPMI PEF. The SMS event trigger is a mechanism for triggering responding actions automatically
when specific events occur to the server. This mechanism helps to solve the problems in the first
time. IPMI PEF (Platform Event Filter) provides a mechanism for configuring the BMC to take
selected actions on event messages, so that the IPMI hardware can be protected.
•
Schedule Task: Administrators can define tasks for the SMS agent to carry out at the specified
time, such as reboot, shutdown, or launching executable files.
•
Report: The SMS report is a summary of the relevant information of a certain period and can be
sent to the administrator or other server managers through mail server.
•
Console Redirect: SOL (Serial Over LAN) is supported currently. When the host server restarts,
users can observe POST boot messages and initiate ROM-based setup routines to configure the
hardware of the host server remotely. Under OS mode, its output is redirected to serial port, such
as Linux GRUB (Grand Unified Bootloader), etc. Thus, users can view and control the host
server.
Introduction
1-1
•
Other Functions: 1) SMS and IPMI event logs. 2) SMS and IPMI accounts management. 3)
Threshold settings for CPU, memory, partition usages, and IPMI sensors. 4) Remote power
control on servers.
The following figure illustrates the functions of SMS:
Introduction
1-2
1.2
Architecture
The following figure illustrates the system structure of SMS:
Console
SNMP
Browser
WMI
Browser
SNMP
Browser
Management Server
IPMI Remote
Console
Managed Server
Management Interface
Management Service
Driver
Hardware
Introduction
1-3
Chapter 2
This chapter provides information
that users should learn before using
SMS.
Prenotice
Prenotice
2
Prenotice
Please read the following information before using SMS:
•
•
•
•
•
•
•
•
•
•
In order to use this software normally, cookies should be supported and, in the security settings
of IE, the active script should be enabled.
Don't try to start or stop service by the application named "service" with path of "/sbin/" in
Linux System. Otherwise, the environment variables associated with service program will be
reset and some applications may run abnormally.
SNMP service is required for browsing SNMP information.
WMI service is required for browsing WMI information. The WMI function in windows can
be used normally with the SMS WMI packages installed. You can use WMI tool to get (/set)
IPMI information. The connection namespace is "root\IESC_SMS".
Only with the SNMP packages of Red Hat 9.0 installed, can the SNMP function of AS 3.0 QU3
run normally. You need to uninstall the SNMP packages of AS 3.0 QU3 manually and install
them from the Red Hat 9.0 setup disk.
These SNMP packages include:
net-snmp-5.0.6-17.i386.rpm, net-snmp-devel-5.0.6-17.i386.rpm, and
net-snmp-utils-5.0.6-17.i386.rpm. You can also use "#rpm -Uvh --force" to make mandatory
installation of "net-snmp-5.0.6-17.i386.rpm", and then install
"net-snmp-devel-5.0.6-17.i386.rpm" and "net-snmp-utils-5.0.6-17.i386.rpm".
When IPMI driver or firmware is changed, please reboot SMS Local Agent service to ensure
the system run normally.
In Linux OS, the default host name is "localhost". If this name is changed, the SMS reports can not
be sent out via mails. This problem can be solved with the following method:
In the file "/etc/hosts", add a line of "*.*.*.* local host name".
For example: if the local host's IP address is "192.168.0.1", and its host name is "abc", you
should put a line of "192.168.0.1 abc" in the file.
You can get the host name by entering the command of "hostname".
When the above operation is done, please restart the SMS Webservice.
When SMS web page can't be accessed, please restart SMS web service.
Please choose 1024*768 screen resolution for best display.
In SMS, do not enter the non-English characters which can not be recognized by the software.
Prenotice
2-1
Browsing SMS
This chapter provides information
about how to browse SMS.
Browsing SMS
Chapter 3
3 Browsing SMS
3.1
Operation Modes
SMS can run in both Windows and Linux operating systems. It can be accessed through browsers or
command line interface.
3.1.1 Operation through Browsers
There are two scenarios for using the browsers to access SMS:
•
•
In Windows, users can access this software through IE, Mozilla, or Firefox.
In Linux with X window installed, users can access this software through Mozilla or Firefox.
The URLs of SMS:
•
https://XXX.XXX.XXX.XXX:16569/local
The "XXX.XXX.XXX.XXX" represents the IP address of the server that is installed with the
Standalone version of SMS.
•
https://XXX.XXX.XXX.XXX:16569/remote
The "XXX.XXX.XXX.XXX" represents the IP address of the server that is installed with the SMS
IPMI Remote Console of SMS.
The IPMI management functions are available with the Standalone version of SMS. With SMS IPMI
Remote Console, you can use this software to manage a remote server’s IPMI sub-system even if the
server is powered off.
The operations of SMS through Windows or Linux browsers are basically the same. The operation
samples in this manual are mostly based on the Windows system.
Browsing SMS
3-1
3.1.2 Operation through Command Line Interface
In Linux, you can operate SMS through command line interface.
After installing SMS in Linux, users can manage the server by typing the relevant commands in the
software installation path "/usr/local/Hewlett-Packard/sms/agent/".
Each command should start with "./smscli get(set)". The command with "get" means to acquire
information from the software, whereas "set" means to change the configuration of the software. For
example: "./smscli get sysinfo cpu" means to display the CPU information, and “./smscli set eventlog
clear” means to clear the SMS event log.
Commands List
Command
Classes
Usage
Description
smscli get sysinfo [cpu] [memory] Default: Get ALL
sysinfo
[system]
[storage]
[nic]
[cdrom] Some parameters "[chassis], [product], [board]" might
[partition] [device] [chassis] [product] not acquire data on some models.
[board]
smscli get status < [nic] | [partition] | Default: No refresh. Interval scope: 10-30 (sec.).
status
[performance] > [interval=XX]
smscli
get
sensor
Press Ctrl+C to stop refreshing.
[type=xx
| Default: No refresh. Interval scope: 10-30 (sec.).
number=xx] [interval=XX]
Press Ctrl+C to stop refreshing.
sensor
Type: 1-temperature; 2-voltage; 3-fan.
Some parameters might not acquire data on some
models.
smscli get eventlog records
Default: Get ALL. start scope: 1-65534.
count scope: 1-65534.
smscli
get
eventlog
records
[start=XX] [count=XX]
bmctime format: MM/DD/YYYY HH:MM, with yyyy
between 1970-2100.
lastoccurtime format: MM/DD/YYYY HH:MM, with
smscli get eventlog bmctime
yyyy between 1970-2100.
eventlog
smscli set eventlog bmctime XX
Some parameters might not acquire data on some
models.
smscli get eventlog lastoccurtime
smscli set eventlog clear
smscli get eventlog count
Browsing SMS
3-2
smscli get account [id=XX]
username: IPMI username. Users can only set password
for the account with ID between 2-4.
smscli
account
set
account
id=XX
< values for role: administrator/operator/user/callback.
[username=XX] | [password=XX] |
[role=XX] | [enable=XX] >
values for enable: yes/no. Input "yes" to enable this
account, or "no" to disable it.
Some parameters might not acquire data on some
models.
smscli set bmclan [channel=XX] < channel: the IPMI channel number (in the webpage
[community=XX] [ip=XX mask=XX] mode, the channel is presented by name of "LAN
[gwip=XX gwmac=XX] [bgwip=XX Channel #").
bgwmac=XX] >
Default: channel=7. channel scope: 1-7.
"ip" must be in front of "mask".
community: string (< = 18).
ip:mask: the IP address and mask of BMC LAN
bmclan
channel.
gwip:gwmac: the IP address and MAC address of the
gateway.
bgwip:bgwmac: the IP address and MAC address of the
backup gateway.
Some parameters might not acquire data on some
models.
smscli set bmcreset cold
The IPMI firmware of the server does not support BMC
warm reset currently.
bmcpower
smscli set bmcreset warm
Some parameter might not acquire data on some
models.
smscli get watchdog
smscli
watchdog
set
Values for enable: yes/no.
count: the value for BMC watchdog countdown
enable=XX (60-6000 sec.).
watchdog
[count=XX] [action=XX]
Values for action: pwcycle/reboot/shutdown/none.
Some parameter might not acquire data on some
models.
smscli get mailcfg
loginname/loginpwd: used for setting ESMTP mail
server.
mailcfg
smscli set mailcfg < ip=XX port=XX port scope: 0-65535
from=XX to=XX > [loginname=XX
from: mail address of mail sender
loginpwd=XX]
to: mail address of mail receiver
smscli get trigger [id=XX]
trigger
The id number for a specific trigger is fixed and can not
be changed. It can be acquired through the command
smscli
set
[action=XX]
trigger
id=XX
< "smscli get trigger".
[smslog=XX]
Browsing SMS
3-3
[sendmail=XX] [sendtrap=XX] >
action: designates the action to be taken when this
trigger is activated.
smscli
set
trigger
[action=runapp
argument=XX]
id=XX < Values for action: reboot/shutdown/runapp/none. For
program=XX action=runapp, the program name and necessary
[smslog=XX] parameters should be provided.
[sendmail=XX] [sendtrap=XX] >
3.2
Values for smslog/sendmail/sendtrap: yes/no
Display Requirements
It is recommended to adopt 1024*768 resolution and 24 bit colors on the client. Some part of the
screen will be out of view if the client resolution is too low.
3.3
Security Certificate Settings
3.3.1 Security Certificate Settings in Windows
When you first log on SMS, you need to perform the following procedures to make security settings:
1.
Type the URL (“https://***.***.***.***:16569/local” or
“https://***.***.***.***:16569/remote”) of SMS in the address box of the browser.
2.
The Security Alert dialog box appears.
Click View Certificate to view and install the security certificate.
Browsing SMS
3-4
3.
The Certificate dialog box appears.
To view the certificate information, click the Details or Certification Path tabs. To install the
certificate, select the General tab, and click Install Certificate.
Browsing SMS
3-5
4.
The Certificate Import Wizard starts.
Click Next to continue.
5.
Select the first option as the below picture shows, and then click Next.
Browsing SMS
3-6
6.
The Completing the Certificate Import Wizard dialog box appears.
Click Finish to complete the certificate importing.
7.
The Root Certificate Store dialog box pops up, which asks for confirmation to add the certificate.
Click Yes to confirm.
Browsing SMS
3-7
8.
The below message appears which indicates that the certificate has been installed correctly.
Click OK.
9.
The Certificate dialog box comes back.
Click OK.
10.
The Security Alert dialog box comes back. Click Yes to complete the security settings.
Browsing SMS
3-8
3.3.2 Security Certificate Settings in Linux
When you first log on SMS in Linux, you need to perform the following procedures to make security
settings:
1.
Type the URL (“https://***.***.***.***:16569/local” and
“https://***.***.***.***:16569/remote”) of SMS in the address box of the browser.
2.
The following dialog box appears, which provides three options. Select the first option, and click
on OK to accept permanently the certificate. Thus when you log on SMS later, this dialog box
will not appear again. If you select either of the other two options, this dialog box will pop up
whenever you log on SMS. For more information, click the Examine Certificate button.
Browsing SMS
3-9
3.4
Logging in SMS
After you typing the URL of SMS in the address box of the browser, and completing the certificate
settings, the SMS logon interface will be shown.
In this interface you need to:
1.
enter the user name and the password. The default user names for Windows and Linux are
"administrator" and “root” respectively. The passwords are the same as those of the system
accounts.
2.
press Logon.
To read the online help of SMS, click on the Help button.
Browsing SMS
3-10
Configuration
This chapter provides information
about SMS configuration.
Configuration
Chapter 4
4 Configuration
4.1
Creating SMS Accounts
An SMS account is created from existing OS accounts. There might be two possibilities when you
create new SMS accounts:
•
•
The OS account already exists.
The OS account does not exist.
4.1.1 Adding an SMS Account from an Existing OS Account:
In the SMS Account page, click on Add New Account to add a new account.
An account may contain all or some of the following information:
•
•
•
•
Account Name
The valid existent OS accounts are included in the list. You can select one from it.
Role Level
Select the security level for the account: Guest or Administrator.
Phone Number
Input the contact phone number of the account.
E-Mail
The E-Mail address of the account.
4.1.2 Adding an SMS Account from a Non-existing OS Account
In this case, you need to create the OS account at first, and then add the SMS account based on the
newly created OS account. Please refer to 4.1.1 Adding an SMS Account from an Existing OS Account.
4.1.3 Setting Security Levels for the SMS Accounts
The security levels determine the operation scopes of the SMS accounts. There are two security levels:
Administrator and Guest. The administrator has the complete access permission to all SMS pages. The
access permission for Guest is defined by accounts with the administrator security level in the Security
panel.
In the Accounts page, click the Security icon to view the access permission settings for the Guest.
Configuration
4-1
•
•
View: Select this item to assign Guest the permission for viewing the individual page.
Manage: When this item is selected, the View item is selected simultaneously. Thus, the Guest
has the permission to view and manage the current page.
When the View item is checked off, the Manage is checked off simultaneously.
Only the administrator can modify the administrator account's information. The administrator's
privilege can not be changed. The account with the Administrator role level has the authority to add
accounts and modify the information of the other accounts except the accounts names.
The accounts with role level of Guest can not access the Account page by default. If the
administrator assigns Guest the manage permission for this page, the Guest can only modify the
password, phone number and E-Mail address.
The following table shows the default access permission of Guest:
4.2
Creating IPMI Accounts
An IPMI account can be used to log in the SMS IPMI Remote Console. In the IPMI Account page, you
can view the existing accounts of the system, modify an account, add a new account, enable or disable
an account.
There can be at most four users (user ID 1~4) simultaneously in the system, one of which is the
Administrator that already exists by default.
Configuration
4-2
Account ID
The account ID is assigned to a new account based on the following principles:
•
•
When there is only one available account ID in the system, the program will grant this account
ID to the new account. For instance: there are three accounts in the system currently, with the
account ID’s of 1, 2, 4 respectively. In this case, when a new account is created, it will get an
account ID of 3.
When there are more than one available account ID’s, the program will always give the
numerically smallest available account ID to the new account. For example, only the
Administrator with account ID 2 exists in the system, the new account will acquire an account
ID of 1.
Role Level
There are four security levels for the accounts:
•
•
•
•
Callback
User
Operator
Administrator
Click on Security to view the pages access permission of each individual role.
Configuration
4-3
4.2.1 Adding a New IPMI Account
In the IPMI Account page, click Add New Account to create a new account.
•
•
•
•
•
•
Account ID
Assigned automatically by the program.
Account Name
Length < =16 characters. It must be blank only when the account ID=1,
and must not be blank when the account ID is not 1.
Password
Length < =16 characters. This field may be blank.
Confirm Password
Role Level
The default role level is Callback.
Enable this account.
Check or check off this box to enable or disable this account.
Click on Save to submit the settings.
4.2.2 Enabling/Disabling an IPMI Account
A new IPMI account should be enabled before it can be used to log in SMS IPMI Remote Console.
•
•
In the IPMI Account page, check the Enable checkbox of the new account.
Click on Set Enable/Disable to submit the enabling operation.
In the same way, checking off the Enable checkbox of an old account and clicking on Set
Enable/Disable will disable it. Thus, this account can no longer be used to log in the SMS IPMI Remote
Console.
Configuration
4-4
4.3
Configuring Mail Server and IPMI LAN Parameters
Before you use SMS, it’s necessary to configure the mail server and IPMI LAN parameters in the SMS
Configuration and IPMI Configuration pages, so that the event messages received by SMS agent and
BMC can be sent out via mails, alerts or other events notification manners.
4.3.1 Configuring Mail Server
The system event messages issued by SMS agent can be notified to the administrators or other relevant
persons via mails or SNMP traps. This function is available only when the mail server is properly
configured and the events notification manners are enabled.
If you've skipped the configuration of mail server during the installation of SMS, you can still complete
it here in the SMS configuration page.
The SMS configuration page provides the following functions:
Setting and Testing Mail Server
The following information should be configured for the mail server:
Server IP: The IP address of the mail server.
Port Number: The port number (1-65535) of the mail server.
Mail From: The sender's mail address. Length < = 128 characters.
Require Authentication:
If the mail server supports ESMTP, this item should be selected and the following information
should be provided. Otherwise, this item should not be selected.
User Name: The user name of the mail account. Length < = 32 characters.
Password: The password of the mail account. Length < = 32 characters.
When finishing, you can test the validation of the mail server with the mail testing function.
Enabling Events Notification Manners
Only when you've configured the general notification manners for the SMS agent in this page can
the specific notification settings of each SMS event trigger take effect.
The system events can be notified through the following ways:
Write Operating System Event Log
The SMS events will be written to the operating system event log.
Send Mail
When this option is selected, the SMS events will be notified through mails. Subsequently, you
Configuration
4-5
need to set the mail recipients’ address, sender’s address, the mail subject and content.
Send SNMP Trap
Notify the events through SNMP trap.
4.3.2
Configuring IPMI LAN Parameters
In the IPMI Configuration page, you need to configure the IPMI LAN parameters, especially the BMC
IP address, so that the BMC LAN interface can work normally and the IPMI sub-system information of
the local host can be acquired remotely by the management console.
LAN Parameter
LAN Channel List
Select one channel from the drop-down list box.
Read Only Community String
Specify the read only community string of SNMP. Length < = 18 chars. If you do not set this field
manually, the default content will be the value read from BMC.
IP Address
Specify the IP address of the NIC connected to the BMC. Obey the IP address criterion.(Necessary
field)
Subnet Mask
Specify the subnet mask of the NIC connected to the BMC. Obey the subnet mask criterion.
Physical Address
Physical address of the NIC connected to the BMC.
Default Gateway IP Address
Specify the default gateway address. Obey the IP address criterion.
Default Gateway Physical Address
Specify the default physical address of the gateway. Obey the physical address criterion.
When you click on the Detect Gateway button, the program will detect the Default Gateway IP
Address and Default Gateway Physical Address, and fill them in the text boxes automatically.
Backup Gateway IP Address
Specify the backup gateway address. Obey the IP address criterion.
Backup Gateway Physical Address
Specify the physical address of the backup gateway. Obey the physical address criterion.
Note: Physical address is equal to MAC Address.
Configuration
4-6
BMC Watchdog Timer
BMC Watchdog Timer can be enabled and disabled in the IPMI Configuration page. Once enabled,
the following settings can be made:
Countdown value: the countdown time for the watchdog timer.
Timer Actions: the action the BMC will carry out when the countdown time goes to 0.
Configuration
4-7
Application
Chapter 5
Application
This chapter provides information
about SMS Application.
5 Application
SMS provides two management interfaces - SMS Standalone Management and SMS IPMI Remote
Console. The first section introduces the unique functions of IPMI Remote Console. The other
sections describes are mainly based on operations with SMS Standalone Management.
5.1
Management of Power-on and Power-off Servers
Before we execute the management operations through SMS, it is necessary to understand the
difference between the SMS Standalone Management and SMS IPMI Remote Console. With SMS
Standalone Management, you can manage a server through SMS agent and IPMI protocol when it is
powered on. While with SMS IPMI Remote Console, you can still manage the server’s IPMI system
when it is powered off. In the following sections, we’ll introduce how SMS realizes its efficient and
successful management of servers with SMS Standalone Management, and here is a quick view of the
unique functions of SMS IPMI Remote Console, since most of its functions are in common with the
SMS Standalone Management component.
SMS IPMI Remote Console can search the network for the servers through SMS and/or IPMI
protocols and list these servers’ IP addresses on the first page of its UI. The following is a quick view
of its unique functions:
When a server supporting SMS is powered on, the SMS IPMI Remote Console provides an
interface to access the SMS UI.
For a server supporting IPMI and installed with IPMI Remote Console, the SMS IPMI Remote Console
provides an interface to access the IPMI remote management, no matter whether or not it is powered on.
Note: Servers should be accessible through network in order to receive the SMS
management.
SMS Application
5-1
5.2
Assets Control
The hardware assets and configuration management is significantly important for an enterprise
whose business largely depends on the servers system. It used to be necessary to check the
hardware configuration information manually on site, the inconvenience and inefficiency of
which is self-evident.
If you install SMS on the individual servers in the network, you can get a quick view of the
hardware configuration information of these servers from a remote management console.
Different from other assets control tools, SMS provides not only the hardware information
(both static and dynamic), but also the SMS managing information of the specific hardware.
The assets control function is provided in three ways:
•
The General View page: The internal and external structure of the server can be viewed
directly here and the hardware component icons can be selected for detailed information.
•
The Hardware Information page: the static information of the hardware items is listed
here, which include CPU, System, Memory, Partition, Storage, Device, Port, NIC,
Chassis, Product, Board, DVD/CD-ROM. Click on the icon, the static hardware assets
information is shown such as asset name, manufacturer and so on.
Note that the hardware items may vary with different server models.
With SMS IPMI Remote Console, only the information of Chassis, Product and Board can
be provided. This information is provided by the BMC FRU(Field Replaceable Unit).
•
The SMS Report: A summary of the hardware component inventory during a certain
period.
SMS Application
5-2
5.3
System Status Monitor
5.3.1 Viewing System Status
SMS supervises the real-time running status of the server, and provides the real-time information of
CPU, Memory, Partition and NIC. For servers with IPMI support, the real-time values of IPMI sensors
will also be offered. Thus, the administrator can easily know whether the server is in healthy status or
not and take corresponding actions manually if necessary, or set thresholds and define event triggers to
realize automatic management of the system status.
You can view the system status information in the System Status pages of SMS which offers the
following information. Basing on this information, you can evaluate the hardware performance and
healthy status and determine the system upgrading time.
Usage histories of CPU and memory
Current usage percentage of partition
Traffic history of NIC
IPMI hardware status and sensors values.
The threshold values of the above items are also shown so that you can easily analyze how far the
current status is away from the threshold value.
Besides through the System Status module, you can also acquire the status summary information
through SMS report. In this case, you need to define the specific report contents in advance.
5.3.2 Controlling System Status
With the SMS Threshold module, you can control the system status by setting threshold values. for the
hardware usages (CPU, memory and partition), NIC traffic, and IPMI sensors.
The SMS agent keeps watching on the status of CPU, memory, partition and NIC to judge whether the
threshold values are exceeded.
IPMI sensors supervise the status of fan, power supply, and temperature. With SMS, you can set the
agent thresholds values, so that when the IPMI sensors' values exceed these values, the SMS agent will
trigger corresponding actions to protect the IPMI hardware items.
SMS Application
5-3
There may be two possibilities when you’ve enabled a threshold:
When you don’t correlate the threshold to event trigger.
When you’ve enabled a threshold but not correlated it to the event trigger, the threshold status will
only be recorded in the SMS event log.
When you correlate the threshold to the event trigger.
When you enable a threshold and correlate it to the event trigger, the threshold status will not only
be recorded in the SMS event log, but dealt with as defined in the event trigger – the SMS agent
may notify certain persons in certain ways or implement some actions in response. The most
important advantage of this mechanism is to guarantee the normal and safe running of the hardware
system and to avoid the hardware damage automatically and timely.
SMS Application
5-4
5.4
System Events and Automatic Responses
It’s important for the administrator to know what’s happening with the server and take remedial actions
immediately if anything is abnormal. However, with traditional manual management methods, there’s
surely a reasonable (or unreasonable) delay to take remedial actions when events occur. Apart from this
disadvantage, the manual management of server systems will also take too much time and labor.
With SMS, timely and automatic management of servers becomes true. Once this software is installed
on the individual servers, the administrator can perform the management tasks from a remote
management console in the network. Thus the inconvenience aroused by the physical locations of the
individual servers is solved. Administrator or other persons can be informed of the events in time by
mails. They can also view the events information through event logs or reports as routine management
operations. SMS provides an event trigger mechanism, through which the pre-defined events can set off
a series of actions of the SMS agent. SMS also supports the IPMI hardware management. Like SMS
event trigger, the IPMI PEF (platform event filter) will be implemented, and the actions such as Power
Down, Power Cycle, and Send Alert will be carried out when there are any changes in the IPMI
hardware status. The automatic management is thus realized.
5.4.1 Viewing System Events
SMS provides two kinds of system event information: SMS events and IPMI events.
An SMS event reports not only the abnormal status of a hardware unit (e.g.: Fan Fail), but also the
normal status (e.g.: CPU Usage Level OK). In this case, administrator or others in charge will get a full
scope understanding or control of the individual server. SMS events are classified into three severity
levels which, from low to high, are informational, warning, and critical.
An IPMI event reports the status change of IPMI system.
You can view the system events mainly through the following ways:
SMS Report
You can designate SMS to report the server status information and the software managing
information at regular intervals.
The report may contain information of the following major categories based on users’ selection:
Status and Summary, Hardware Inventory, Dynamic Information, Schedule Task Status, Events,
and Account.
For different purpose of the reports, you can select different categories of content.
SMS Application
5-5
Once you’ve defined the schedule and the recipients, the reports will be sent out via the mail server
at the defined time and interval.
SMS Event Log
The SMS event log records the SMS system events by sequence of occurring time. Besides
viewing the events information in this page, the administrator can also confirm the events once
they are dealt with properly. For specific types of events, the administrator can view or modify the
responding actions and the threshold values.
IPMI Event Log
IPMI Event Log records the important hardware events or errors of the IPMI sub-system for the
reference of maintainers. The administrator should check it at intervals to avoid the using up of the
event log space.
5.4.2 Automatic Responses to the Events
SMS realizes automatic reactions to system events through the following mechanisms:
SMS Event Trigger
SMS provides a event trigger mechanism. For a specific pre-defined event in the SMS event list,
you can define the event notification manners and responding actions of the SMS agent. Thus once
this event occurs, the SMS agent will respond accordingly by sending notifications and carrying
out designated actions - launch an executable file, root the server, or shut down the server. The
hardware damage can thus be avoided to the largest extent automatically, thus realizing the
unattended hardware management. The administrator will also be able to acquire such information
at the very early time.
Caution: Be cautious when you set reboot or shutdown for events like CPU usage exceeds
the threshold in the event trigger. Otherwise, the server may repeatedly reboot or
shutdown, since such kind of events may occur easily.
SMS Application
5-6
IPMI PEF (Platform Event Filter)
When BMC receives an event message, it will apply the event to PEF (Platform Event Filter). PEF
provides a mechanism for configuring the BMC to take selected actions on event messages that it
receives or has internally generated. These actions include operations such as system power-off,
system reset, as well as triggering the generation of an alert.
In the IPMI Event Filter page, you can configure the PEF and manage its entries.
SMS Application
5-7
5.5
Automatic Management Tasks
Management tasks can be scheduled and automatically implemented with the module of SMS Schedule
Task. These automatic tasks include reboot, shutdown, and launching of executable files.
One point is worth to be mentioned here. For Windows, the designated program will be executed in the
same way as you run a program with the Start > Run menu. At this time, the DOS internal commands or
pipe commands are not supported. For Linux, the designated program will be invoked by the
background service. The GUI or interactive programs are not supported here.
The schedule of a task may contain some or all of the following elements:
Period: The task can be implemented immediately, for once, daily, or weekly.
Occurring day: For weekly tasks only. Defines on which day of the week the task will be
implemented.
The accurate starting date and time for one time, daily, or weekly tasks.
Repeating frequency (during a day) for daily or weekly tasks.
Once you complete the schedule, the task will be carried out automatically on the specified date and
time at the defined intervals.
Note:
The schedule tasks can not be carried out during BMC flashing or backing up.
You can modify or delete an SMS schedule task only with the permission for
modifying the SMS Schedule Task page.
It is recommended to restart SMS Web Service and SMS Local Agent when the
current time zone is changed.
If a schedule task has never been modified, its Last Modify Time is equal to the
Create Time.
SMS Application
5-8
5.6
Console Redirect
In Windows or Linux GUI mode, SMS supports the console redirect function which includes SOL
currently.
Traditionally, it's a common feature for a server to redirect its output to serial port. The distance
between terminal and host server is limited by using a RS-232 cable.
SOL stands for “Serial over LAN” and is the working name for the specification of IPMI interfaces for
redirecting baseboard serial controller traffic over an IPMI session via RMCP+ (Remote Management
Control Protocol+). This can be used to enable asynchronous serial-based OS and pre-OS
communication over a connection to the BMC.
With SOL, you can observe POST boot messages as the remote host server restarts, and initiate
ROM-based setup routines to configure the hardware. For the operating system that redirects its output
to serial port, such as Linux GRUB, etc., SOL enables you to view and control the host server screen
throughout. With SOL, you can also make power control over the remote host server, such as
powering on, powering off, and resetting.
5.6.1 Console Redirect Client Application
Before launching Console Redirect on your client desktop, you must make sure Console Redirect Client
package has been installed. SMS provides the Windows setup kit and Linux RPM for console redirect
depending on the operating systems.
5.6.2 Access Permission
According to the specification of IPMI 2.0, BMC manages its own accounts and passwords which are
independent to the security of operating system.
SOL uses IPMI accounts to login the remote host server and only the administrators can access SOL.
For more information about IPMI accounts, please refer to Chapter 4.2 Creating IPMI Accounts.
SMS Application
5-9
5.7
Reboot or Shutdown of the Remote Server
With SMS, the administrator can reboot or shut down a remote server conveniently and never need
bother to operate on field.
Caution: When multiple software power control commands are sent to the operating
system, all of them will be accepted and the executing result will be returned with
success message. But actually, only the first one has been carried out.
SMS Application
5-10
Frequently Asked Questions
This chapter provides information
about frequently asked questions and
answers to them.
Frequently Asked Questions
Appendix A
Appendix A
Frequently Asked Questions
1. Where can I view system health? Can I do something for it?
In the Information > System Status page, you can view the utilization status of CPU, memory
and partition, the network traffic, and the IPMI sensors' current status.
You can set the thresholds for CPU, memory, partition and IPMI sensors in the Event
Management > SMS Threshold, so that warnings will be issued and recorded in the event log
when the thresholds are exceeded or lowered. In the SMS Event Trigger page, you can also
command the SMS agent to take responding actions and send mails when the abnormal events
occur.
2. What's the difference between the SMS event log and IPMI event log?
The SMS event log belongs to the SMS software, which records the status changing and
abnormal information of the hardware and software for reference.
IPMI event log is maintained by the IPMI firmware. The hardware health/status monitoring
information will be recorded in a non-volatile storage space for reference.
3. What's the difference between the SMS event trigger and IPMI event filter?
The SMS event trigger is a mechanism for carrying out a set of actions through software when
an event happens.
The IPMI event filter is a mechanism for triggering protection actions on IPMI system
through hardware. For example, when the CPU temperature rises to the threshold, the IPMI
sub-system will shut down automatically to protect CPU, which will greatly affect the
operating system.
It's much safer to use SMS event trigger to notify the event and shut down the server.
4. What's IPMI policy?
IPMI policy is a component of IPMI event filter. It defines the destination IP addresses and
alert string for sending PET (SNMP trap) over network when IPMI sub-system detects an
event.
Frequently Asked Questions
A-1
5. Why can I only add 4 IPMI accounts?
The IPMI sub-system only supports four IPMI accounts according to the Intel IPMI SPEC.
What you can do is just to modify the existing accounts when there are already four IPMI
accounts.
6. What's the difference between the SMS account and IPMI account?
The SMS account is the OS account, and it is used to log on SMS Standalone Management;
while the IPMI account is used to log on SMS IPMI Remote Console.
7. How can I start a remote control session?
First you need to install the Remote Control plug-in correctly: Enter SMS > Toolkit >
Console Redirect. Click the setup link at the bottom of the page to download and install the
setup kit.
Then, you can click the Console Redirect icon in the SMS > Toolkit > Console Redirect page
to start a remote control session.
8. Can 'Launch Executable' in Schedule Task start a GUI / Command Line program?
Yes. SMS supports GUI / Command Line programs in Windows. But in Linux, SMS runs as
background service in invisible consoles, so the GUI or interactive programs can not be
executed through SMS Standalone Management.
9. Why can't the batch file (*.bat/*.cmd) be executed by Schedule Task / Event Trigger?
The batch files are not really the executable files. They need to be parsed and executed by the
Shell. SMS does not support these files presently.
10. How can I make SMS send trap to another server?
First you need to find the SNMP service (Windows) or /etc/snmp (Linux) and add the trap
destination.
Then make sure the checkbox of Send Trap is checked in SMS > Configuration.
11. Does SMS support SNMP management? How?
Yes, it does. In Windows (32-bit for example) you can load the MIB definition file - SMS-MIB
in the sub-directory "%systemroot%\system32\snmpconfig" of your setup directory. But in Linux,
the Net-SNMP with version 5.0.7 or above has got rid of the node for sub-SNMP, so SMS
only supports Net-SNMP with version 5.0.6. or lower, and in this case, the MIB file is
"sms-mib" in /usr/local/Hewlett-Packard/sms/snmp.
Frequently Asked Questions
A-2
12. Does SMS support WMI management? How?
Yes, it does. You can use the standard interfaces of Microsoft WMI SDK. The name space is
iesc_sms. You can use WMI CIM Studio of the WMI SDK to connect and see.
13. Why can’t I log in SMS?
If you can not log in SMS, maybe it is caused by the account restrictions. Please check the OS
security policy and the account properties.
14. Why can't I receive mails from SMS?
Please make sure that the mail server supports SMTP and/or ESMTP. For ESMTP, you need
to input the account name and password in Configuration > SMS Configuration; For SMTP,
you can not input them.
Then you can test the mail server with the Mail Testing function. If it still fails, please contact
the administrator to confirm whether the port number of the mail server is 25.
15. How to show the animation in SMS?
For Windows family except Windows 2003, the animation in the web pages will be played by
default. But for Windows 2003, this function is not enabled by default and you need to enable
it manually:
In IE, select Tools>Internet Options. Click the Advance tab name. In the Media options,
select "Play the animation in web pages". Click OK.
16. Why does not the Linux Console Redirect help information pop up when I click on the
Help button,?
The help of Linux Console Redirect can not be used when Mozilla is not installed in the
default folder. To resolve it, run: #/usr/sbin/csrdplugin [path of mozilla]. The path name of
Mozilla can only consist of letters, numbers, "-", "_" and ".".
17. The software fonts are too small in Mozilla. How to solve it?
To enlarge the software fonts, click the View menu of Mozilla, select the Text Zoom
command, and from the sub-menu select a suitable value.
18. How can I get the user name and password to logon SOL?
You need to know the BMC administrators account of the remote server which you want to
logon SOL. You can get these accounts' information from SMS > Account panel.
Frequently Asked Questions
A-3
19. Why can't I see the BIOS POST and setup screen?
Please make sure the following settings are matched:
♦
The server you connected supports IPMI (1.5 for power control and 2.0 for SOL).
♦ The default NIC bound with BMC is NIC1, so you should make NIC1 connectible.
♦ Check your server's BIOS settings:
IPMI Configuration: set a valid BMC IP address
Remote Access Configuration:
Remote Access:
Enabled
Serial port number: COM1
Serial Port Mode: 115200 8,n,1
Flow Control:
Hardware
Terminal Type:
VT100
VT-UTF8 Combo Key Support:
Enable
Enable function keys in BIOS like F1, F2, F10, etc.
Disable
Disable function keys in BIOS like F1, F2, F10, etc.
Redirection After BIOS POST
Disable
Turns off the Redirection after POST.
Boot Loader Redirection is active during POST and Boot Loader
Always
Redirection is always active.(Some OSes may not
work if set to Always)
20. Why is nothing displayed after SOL logon?
♦
Sometimes SOL can't refresh the display window automatically after logon, you can
press arrow keys to refresh the display area.
♦ Please make sure the server is power on and not in OS mode.
♦ Check if the BIOS Configuration is right according to question 19.
Frequently Asked Questions
A-4
21. Why do I fail logging on with an administrator account of BMC?
The account must be enabled. You can check if the account is valid in SMS. Please open the
port 623:rmcp of the firewall.
Frequently Asked Questions
A-5
Glossary
This chapter provides the glossary
information about SMS.
Glossary
Appendix B
Appendix B
Glossary
CIM
Common Information Model, also a DMTF standard, is an extensible data model for logically
organizing management objects in a consistent and unified manner in a managed environment.
ESMTP
ESMTP is an extension to SMTP whereby an SMTP client may indicate an authentication mechanism
to the server, perform an authentication protocol exchange, and optionally negotiate a security layer for
subsequent protocol interactions. This extension is a profile of the Simple Authentication and Security
Layer.
FRU
The IPMI specifications include support for storing and accessing multiple sets of non-volatile Field
Replaceable Unit (FRU) information for different modules in the system. An enterprise-class system
will typically have FRU information for each major system board (e.g. processor board, memory board,
I/O board, etc.). The FRU data includes information such as serial number, part number, model, and
asset tag.
GRUB
Grand Unified Bootloader. A small software utility that loads and manages multiple operating systems
(and their variants). GRUB is the default bootloader for Red Hat Linux.
GUI
Graphical User Interface
IPMI
IPMI is the abbreviation of Intelligent Platform Management Interface. The IPMI Specifications
presents the base specifications for IPMI architecture. The IPMI specifications define standardized,
abstracted interfaces to the platform management subsystem. IPMI includes the definition of interfaces
for extending platform management between board within the main chassis, and between multiple
chassis. BMC, Baseboard Management Controller, is the heart of IPMI architecture.
LAN
Local-Area Network
MIB
A Management Information Base (MIB) is a schema or blueprint that contains the hierarchical order of
all of the managed objects. Each managed object in a MIB has a unique identifier. The identifier
includes the object's type (such as counter, string, gauge, or address), access level (such as read/write),
size restrictions, and range information.
Frequently Asked Questions
B-1
NIC
Network Interface Card
PEF
Platform Event Filtering (PEF) provides a regular mechanism for configuring the BMC to take selected
actions on events. These actions include operations such as powering off, resetting, as well as triggering
the generation of an Alert.
PET
Platform Event Trap. A specific format of SNMP Trap used for system management alerting. Used for
IPMI Alerting as well as alerts using the ASF specification. The trap format is defined in the PET
specification.
POST
Power-on Self-Test. When a computer starts or boots, the BIOS carries out a procedure to verify that all
the system's components are operating properly.
RAM
Random Access Memory
SDK
Software Development Kit
SNMP
Simple Network Management Protocol (SNMP) is an application layer protocol that facilitates the
exchange of management information between network devices. It is part of the Transmission Control
Protocol/Internet Protocol (TCP/IP) protocol suite. SNMP enables network administrators to manage
network performance, find and solve network problems, and plan for network growth.
SOL
SOL stands for “Serial over LAN” and is the working name for the specification of IPMI interfaces for
redirecting baseboard serial controller traffic over an IPMI session via RMCP+ (Remote Management
Control Protocol+). This can be used to enable asynchronous serial-based OS and pre-OS
communication over a connection to the BMC.
WMI
Windows Management Instrumentation (WMI) provides access to information about objects in a
managed environment. Through WMI and the WMI application programming interface (API),
applications can query for and make changes to static information in the Common Information Model
(CIM) repository and dynamic information maintained by the various types of providers.
Frequently Asked Questions
B-2
Index
Appendix C
Index
This chapter provides the index
information about SMS.
Appendix C
Index
A
R
Account ID
4-2
Assets Control
5-1
C
Role Level
4-2
S
Security Certificate
3-4
Command Line Interface
3-2
Security Level
4-1
Commands List
3-2
SMS Accounts
4-1
SMS Event
SMS Schedule Task
5-5
5-6
5-6
5-1
5-5
5-8
Status Monitor
5-3
Console Redirect
2-2, 5-9
SMS Event Log
I
SMS Event Trigger
IPMI Event
IPMI Event Log
IPMI PEF
5-5
5-6
5-7
L
LAN Parameter
4-5
SMS IPMI Remote Console
SMS Report
T
Threshold
Index
5-3
C-1