1
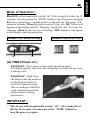
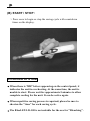
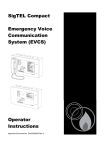
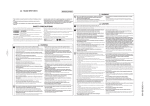
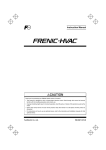
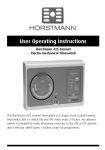
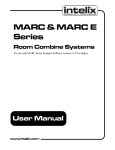
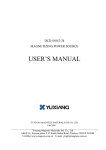
Table of Contents
PREFACE ------------------------------------------------------- 1
DISCLAIMER -------------------------------------------------- 1
SAFETY PRECAUTIONS ------------------------------------- 2
PARTS AND FUNCTIONS ------------------------------------ 3
GENERAL INSTALLATION ---------------------------------- 4
PANEL OPERATIONS ----------------------------------------- 5
COOLING SYSTEM ------------------------------------------ 6
CHARGER SIGNALS ----------------------------------------- 7
TROUBLE SHOOTING ---------------------------------------- 8
ENVIRONMENTAL CONDITIONS OF TRANSPORT
AND STORAGE ------------------------------------------------ 8
DEVICE SPECIFICATION ------------------------------------ 8
Concerning the discrepancy of the product, which caused
by weather, temperature and used materials, we reserve the
rights of explanation. The specifications are subject to
change and revision without prior notice.
WARNING : Beware of high temperature and strong light.
Do not look directly into the light source without eye protection.
ENGLISH
1
PREFACE
TM
Upon your purchase of the “
LD-105” high efficiency
LED (Light Emitting Diode) curing light, please pay attention to the
following contents.
Prior to using the product, please read this USER MANUAL carefully
and thoroughly as it provides details of proper implementation of the
operations, maintenances, and troubleshooting instructions.
Please keep this manual well preserved for future reference.
DISCLAIMER
1. The manufacturer shall not assume any responsibility for any
malfunction, damage, or accident of personal bodily injury caused
by improper removal, modification, maintenance, or repair, which
is conducted by an unauthorized technical personnel.
2. The manufacturer shall not assume any responsibility if any
malfunction, damage, or accident of personal bodily injury is caused
by the use of this product in conjunction with other regulated products.
3. The manufacturer shall not assume any responsibility if any
malfunction, damage, or accident of personal bodily injury is caused
by improper removal, modification, maintenance, or repair with
device components not supplied by the manufacturer.
4.The manufacturer shall not assume any responsibility if any
malfunction, damage, or accident of personal bodily harm is caused
by improper operation that is incompliant with the manual instructions.
5.The manufacturer shall not assume any responsibility if any
malfunction, damage, or accident of personal bodily harm is caused
by inappropriate modifications to the power supply, installation
environment or any other safety-regulated operating conditions as
specified in this manual.
2
SAFETY PRECAUTIONS
Please follow instruction steps in this manual for correct and
safe operations of the device. Pay high attention to the following
warning signs beside the operation descriptions where applicable.
a) DANGER ─ This message appears where the operation may
potentially cause severe injury if instruction
not followed correctly.
b) WARNING ─ This message appears where the operation may
cause serious damage or defect to other objects.
c) CAUTION ─ This message appear where the operation may
cause slight damage to other objects or slight
bodily harm if operation not properly conducted.
d) IMPORTANT ─ This message appears where the operation
may involve risk of defecting the device itself
if not properly conducted.
Explantion
Symbol
Type B applied part
Attention, consult
ACCOMPANYING DOCUMENTS
Signifies the device has meet all essential requirements of
European Medical Device Directive 93/42/EEC.
Symbol used to indicate the polarity of the DC power input.
Direct Current
Sterilization for Fiber-Optic Tip:
After operation on each patient, the fiber-optic tip should be disinfected
or sterilize. Suggestion is to use autoclave 134°C / 75 psi for maximum
result. The sterilization time at 134°C should be 5 minutes.
Note: Please disconnect the fiber-optic tip off the handpiece and
autoclave by itself.
Product Cleaning:
If there is any dirt or stains on the surface of control panel or surface
of the handpiece, please use cloth to wipe clean. If it is hard to clean,
then please use a neutral cleansing agent.
Note: Never use a solvent or volatile oil for cleaning. This can
lead to fading in the fiber optic shades.
PARTS & FUNCTIONS
PART A
The LED Handpiece :
(1) Button switch TIME (Power on)
(2) Button switch START/STOP
(3) Fiber optic probe (8 mm)
(4) Handpiece cover
(5) Anti-glare cone
(6) DC Charger input receptacle
(5)
(2)
(1)
(6)
(3)
(4)
PART B The Charger :
(1) DC Charger stand
(2) DC Adapter (9V)
ENGLISH
3
4
GENERAL INSTALLATION
** Please follow the instructions below carefully to insure proper
function of the device.
1. Insert the fiber optic probe into the handpiece and make sure it is
securely installed at the fixed position.
2. Put the orange anti-glare cone onto the fiber probe and adjust the
cone position on the probe according to the dentist's preference.
3. Connect the DC adapter to the charger stand and plug the adapter into
an electricity outlet.
** NOTE: Check to make sure the red(CHARGE) led light is lit on and
immediately switch to green(READY) led light at this point.
4. Place the handpiece in the charger stand to begin charging cycle.
(As shown in picture below)
** IMPORTANT :
> Please make sure to fully charge the battery for
at least 4 hours before the FIRST time of using
this device. This will insure the full length of
battery life.
> When battery power decreases to the lowest
supply level, the unit will release an alarm sound
as “beeps” for every 5 seconds. At the same
time, “bL” letters will appear on the control panel
to remind the user to recharge.
Mode of Operation :
BlueLEX will automatically switch “off” after being left at idle for 25
seconds. User may press the “TIME” button to turn the power on again.
For every operation, 2 seconds before curing end, the “Beeping” will
sound as warning. When the battery power is low, the “bL” letters will
appear on the display and the “Beeping” sound will start. It is time for
recharge. When the device is over heating, “HH” character will appear
on the display and stop operation.
PANEL OPERATIONS
PANEL INDICATOR
Low Battery
(B)
Over Heat
(A)
(A) TIME (Power on) :
> Function 1 : Press once to turn on the operation panel.
The digital display will show the curing time set from the previous
working cycle.
> Function 2 : Hold down
the button until the numbers
on the display flashes to
reset the required curing
time according to different
resin composite materials
and personal working
preferences.
IMPORTANT :
** This device will automatically switch“off ”after being left at
idle for 25 seconds. User may press the“TIME”button to
turn the power on again.
ENGLISH
5
6
(B) START / STOP :
> Press once to begin or stop the curing cycle with countdown
timer on the display.
COOLING SYSTEM
When there is “HH” letters appearing on the control panel, it
indicates the unit is overheating. At the same time, the unit is
unable to start. Please wait for approximate 5 minutes to allow
complete cooling for the unit. It can be active again.
When repetitive curing process is required, please be sure to
shorten the "time" for each curing cycle.
The BlueLEX LD-105 is not suitable for the use for "Bleaching".
CHARGER SIGNALS
** Please note the following different color signals indicating the
current status of the charger stand, to charge or recharge the
LED handpiece.
red
green
(CHARGE)
(READY)
Current Status
(red)
CHARGE
Signal
(green)
READY
Signal
Charger is Ready
Off
On
Charging in Progress
On
Off
Charging is Finished
Off
On
Battery is Defective
Flash
Off
Warning: Li-Ion Battery.
To prevent a possibility of the battery from locking out, leaking, heat
generation or explosion, please observe the following precautions:
Please charge the battery every 2-month period without usage.
Please recycle the battery.
Do not dispose in fire to prevent injury or burns.
Do not short circuit.
Do not disassemble.
Do not crush.
Keep the battery dry.
Keep away from high temperature.
**Improper usage may have the possibility battery explosion;
we suggest changing the battery every year after usage.
**Battery inside LED handpiece shall not be changed by the
user, but by a trained technician.
ENGLISH
7
8
TROUBLESHOOTING
CAUTION :
When failures or errors occur, please use the table below to try and
fix the device. If it remains problematic, please send back to the
manufacture for repair.
DESCRIPTIONS
FAILURE
CAUSE
No signs of electrification
or time display even when
button switch is pressed
Defect on Li-Ion battery
LED lamp is unable to emit
Defect on LED module
The handpiece can not
be charged when insert
into the charger
Defect on main IC board
SOLUTION
Return to the dealer or
manufacturer for repair
Poor connection between
the charger and power
adaptor
Check the connection
between the charger and
power adaptor
The handpiece is inserted
into the charger backwards
Check the cover page
picture for correct
charging position
Defect on charger
Return to the dealer or
manufacturer for repair
Environmental conditions of transport and storage
Temperature: -20℃ to 65℃ (-4℉ to 149℉)
Humidity: 15-95%, non-condensing
DEVICE SPECIFICATIONS
Model Number : LD-105
Class II equipment (Power supply unit)
Light Intensity : > 1,000 mW/cm2
Wavelength : 450 ~ 470 nm (Dominant Range)
Consumption : 11 Watt
Charger stand : 9V
1.2A
Adapter : AC100V ~ 240V 50/60 Hz
Weight : 154 g (Handpiece) / 110 g (Charger Stand)
Internally powered equipment (LED handpiece)
Type B applied parts
IP code : IPX0
The equipment is not suitable for use in the presence of flammable mixtures
Continuous operation