1
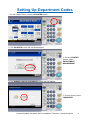
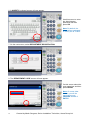
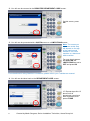
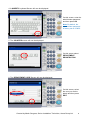
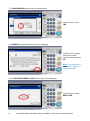
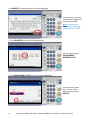
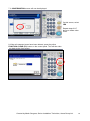
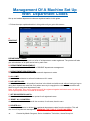
Basic User
Guide for
Toshiba
Multi-Function
Devices
Department Management
Contents
Subject
Page
Setting up of Department Codes
3-7
Editing Department Codes
9 - 13
Deleting Department Code
15 - 17
Management of a machine set up with
Department Codes
18
This Guide has been produced to provide you with a quick reference on how to perform the very
basic, most commonly used features. For more detailed information on these topics, please refer to
the official Toshiba user manual provided with this machine.
To request further training on any of these topics, or on the more advanced functions, please call
Arena Group Ltd on 0844 863 8000 (calls charged at local rates).
2
Created by Martin Sturgess, Senior Installation Technician, Arena Group Ltd.
Setting Up Department Codes
1. On the Control Panel, press the COUNTER button:
2. The COUNTER screen will now be displayed:
3. On the COUNTER
screen, select
DEPARTMENT
MANAGEMENT
4. The ADMINISTRATOR PASSWORD screen will now appear:
5. On this screen, select
PASSWORD.
Created by Martin Sturgess, Senior Installation Technician, Arena Group Ltd.
3
6. A QWERTY keyboard screen will now appear:
Use this screen to enter
the Administrator
password and then
press OK
Note: By default, the
Administrator password
is factory set at 123456
7. On the next screen, select DEPARTMENT REGISTRATION
8. The DEPARTMENT CODE screen will now appear:
On this screen select the
next empty box and then
press ENTRY
Note: On some older
models, you will be
required to press
CHANGE instead of
ENTRY
4
Created by Martin Sturgess, Senior Installation Technician, Arena Group Ltd.
9. A QWERTY keyboard will now appear on the screen:
Use this keyboard to
type in the name of the
person or department to
be registered as a user
and then press OK
10. The REGISTER DEPARTMENT CODE screen will now appear:
`
On this screen select
NEW CODE
11. A QWERTY keyboard will now appear on the screen:
Use this screen to enter
the desired user code to
be used by that
particular person or
department and then
press OK.
Note. The user code can
contain any combination
of numbers or letters
from 1-63 characters in
length.
Created by Martin Sturgess, Senior Installation Technician, Arena Group Ltd.
5
12. You will now be returned to the REGISTER DEPARTMENT CODE screen:
On this screen, press
OK
13. You will now be presented with a QUOTA screen or a LIMITATIONS screen:
Note: The screen you
encounter at this step
will depend on the age
of the machine and
whether it is a colour
machine or a black and
white machine.
For now, simply ensure
that QUOTAS OR
LIMITATIONS are set to
OFF and press OK
For Instructions on using Quota’s or Limitations, please refer to your Toshiba user manual.
14. You will now be taken back to the DEPARTMENT CODE screen:
15. Repeat steps 8 to 13
above until all
department users have
been registered, then
press CLOSE
6
Created by Martin Sturgess, Senior Installation Technician, Arena Group Ltd.
16. You will now be taken back to the COUNTER screen:
On this screen select
DEPARTMENT
MANAGEMENT
17. The DEPARTMENT MANAGEMENT screen will now be displayed:
On this screen select
ENABLE
18. You will now be taken back to the COUNTER screen:
Setting up of
department
management is now
complete.
Press the yellow
FUNCTION CLEAR
(FC) key on the control
panel to exit this setup and return to copy
mode.
Created by Martin Sturgess, Senior Installation Technician, Arena Group Ltd.
7
Editing Department Codes
1. On the control panel, press the COUNTER button:
2. The COUNTER screen will now be displayed:
On the COUNTER
screen, select
DEPARTMENT
MANAGEMENT
3. The ADMINISTRATOR PASSWORD screen will now be displayed:
On this screen, press
PASSWORD.
8
Created by Martin Sturgess, Senior Installation Technician, Arena Group Ltd.
4. A QWERTY keyboard Screen will now be displayed:
On this screen, enter the
administrator password
and then press OK
Note: By default, the
administrator password
is factory set at 123456
5. The COUNTER screen will now be displayed
On this screen select
DEPARTMENT
REGISTRATION
6. The DEPARTMENT CODE Screen will now be displayed:
On this screen, select
the user you wish to
delete and then press
EDIT
Created by Martin Sturgess, Senior Installation Technician, Arena Group Ltd.
9
7. A CONFIRMATION screen will now be displayed:
On this screen, select
YES
8. A QWERTY keyboard screen will now be displayed:
On this screen, edit the
name of the user if
required, and then press
OK
Note: If no editing of the
user name is required,
simply press OK
9. The EDIT DEPARTMENT CODE Screen will now be displayed:
On this Screen, select
NEW CODE
10
Created by Martin Sturgess, Senior Installation Technician, Arena Group Ltd.
10. A QWERTY keyboard screen will now be displayed:
On this screen, type in
the new code to be used
by this user and then
press OK
11. The EDIT DEPARTMENT CODE screen will now be displayed:
On this screen, press
OK
12. You will now be presented with a QUOTA screen or a LIMITATIONS screen:
On this screen, set any
required QUOTA or
LIMITATION and press
OK
Note: The screen you
encounter at this step
will depend on the age
of the machine and
whether it is a colour
machine or a black and
white machine.
Created by Martin Sturgess, Senior Installation Technician, Arena Group Ltd.
11
13. The DEPARTMENT CODE screen will now be displayed:
Repeat steps 6-12
above to edit other users
and then press CLOSE
Editing of department codes is now complete.
14. Press the Yellow FUNCTION CLEAR (FC) key on the control panel to return to the front
screen:
12
Created by Martin Sturgess, Senior Installation Technician, Arena Group Ltd.
Deleting Department Codes
1. On the control panel, press the COUNTER button:
2. The COUNTER screen will now be displayed:
On the COUNTER
screen, select
DEPARTMENT
MANAGEMENT
3. The ADMINISTRATOR PASSWORD screen will now be displayed:
On this screen, press
PASSWORD.
Created by Martin Sturgess, Senior Installation Technician, Arena Group Ltd.
13
4. A QWERTY keyboard screen will now be displayed:
On this screen, enter the
administrators password
and then press OK
Note: By default, the
administrator password
is factory set at 123456
5. The COUNTER screen will now be displayed
On this screen select
DEPARTMENT
REGISTRATION
6. The DEPARTMENT CODE screen will now be displayed:
On this screen, select
the user you wish to
delete and then press
DELETE
14
Created by Martin Sturgess, Senior Installation Technician, Arena Group Ltd.
7. A CONFIRMATION screen will now be displayed:
On this screen, select
YES
Repeat steps 6 & 7
above to delete other
users.
8. When all unwanted users have been deleted, press the yellow
FUNCTION CLEAR (FC) button on the control panel. This will then take
you back to the front screen:
Created by Martin Sturgess, Senior Installation Technician, Arena Group Ltd.
15
Management Of A Machine Set Up
With Department Codes
Set up and enable department codes as explained earlier in this guide.
1. Follow the steps explained earlier in this guide until you get to this screen:
A.
B.
C.
F.
G.
H.
D.
E.
A.
PRINTOUT
DEPARTMENT CODES:
Allows the administrator to print out a list of all department codes registered. The printout will also
give a breakdown of all jobs carried out by each user.
B. DEPARTMENT MANAGEMENT:
Allows the administrator to ENABLE or DISABLE department management.
C. DEPARTMENT REGISTRATION:
Allows the administrator to add, delete and edit department codes.
D. ALL LIMIT:
Allows the administrator to enforce limitations on ALL users.
E. NO LIMIT BLACK:
Allows ALL users to use all machine functions in the black and white mode without having to log-on
using their department code first. Only when users try to copy/print in colour will the machine ask
them to log-on using their department code.
Note: In this mode, only colour copies/prints will be registered against individual users. All black &
white copies/prints will be recorded as undefined.
F. SET REGISTERED QUOTA:
Allows the administrator to enforce quotas for all registered users.
G. RESET ALL COUNTERS:
Allows the administrator to reset all the counters, for all users, back to zero.
H. DELETE ALL:
Allows the administrator to delete ALL registered department codes from the machine. This will
also turn off department management. WARNING: USE THIS AT YOUR OWN PERIL!
16
Created by Martin Sturgess, Senior Installation Technician, Arena Group Ltd.