1
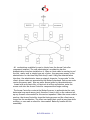
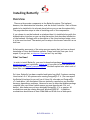
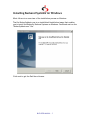
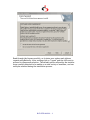
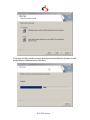
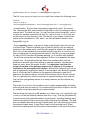
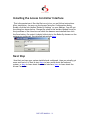
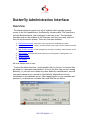
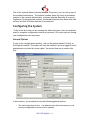
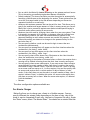
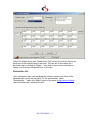
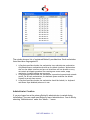
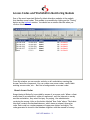
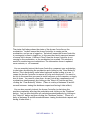
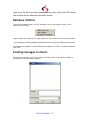
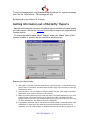
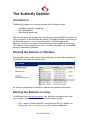
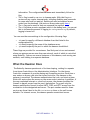
Butterfly New Edition (BNE)
Introduction
Butterfly is designed for environments in which time spent on computers
(workstations) and the Internet is charged for. We designed Butterfly
particularly for Internet cafés, however we believe that the concepts
developed work well in other environments. Most Internet cafés charge clients
based on how much time the client spends on a workstation. It can be difficult
to simultaneously monitor several clients without the help of a software timer.
Most software timers available are not effective enough at preventing clients
from using more time than they've paid for. Butterfly seeks to solve these
issues. The system is designed to make timing clients easy and flexible. It is
designed to do more. To provide additional management tools for the Café
owner. This document describes Butterfly's approach to Internet Café
management.
Overview
The Butterfly system consists of three cooperating pieces of software in a
client/server configuration. Two of these, the Access Controller and the
Management Interface, are Microsoft Windows® programs, the other is a
daemon/server that provides backend access control services. The daemon can
run on both Windows and Linux. Butterfly depends on a backend SQL database
for data storage. Currently the only SQL server supported is the PostgreSQL
server.
How does Butterfly work? The key idea behind Butterfly is to use Linux's
dynamic firewall capabilities (if the daemon is running on Linux) and Windows®
keyboard/mouse locking to control who can surf the Internet or simply use a
computer, and for how long. Butterfly assumes it is being used on a private
network. If the daemon is running on a Linux machine it also assumes the
gateway to the rest of the Internet is a Linux server. The picture below
illustrates this.
BNE USER MANUAL - 1
All workstations available for use to clients have the Access Controller
component installed. The café administrator's workstation has the
Administration Interface installed on it. When a client walks in wanting to surf
the Net, read e-mail or simply type out a letter, they pay some money to the
administrator for the time they think they'll need. Using the Administration
Interface, the administrator issues a unique 6-character "access code" to the
client. Access codes are generated by the Butterfly backend. Each access code
carries the money paid, plus any extra (bonus) given by the administrator.
Armed with an access code, a client can sit at any workstation, enter the
access code into the Access Controller component and begin working.
The Access Controller contacts the Butterfly server to authenticate the code,
determine how much money (and, therefore, time) is left on the code and set
up any firewall rules needed for the service requested. When the access code is
used up, the Access Controller stops the timing process and the client can no
longer use the workstation. The client can topup their credit at any time while
working, or even seek a refund for time unused. Butterfly handles all this
seamlessly.
BNE USER MANUAL - 2
The combined use of Linux's dynamic IP firewalling capabilities and Windows'
keyboard/mouse locking makes Butterfly very effective at managing timing
issues in an Internet Café.
Noteworthy Features
Other noteworthy features of Butterfly include:
•
•
•
•
•
•
Butterfly allows you to charge your clients in quite a flexible manner. You can
have different charge groups e.g. members and non-members and for each of
these you can charge different amounts per minute depending on the time of
day or day of the week or the service requested.
You can record sales of items other than time on your computers. These could
include printing, photocopying, etc...
Butterfly keeps a detailed log of transactions, including a full trail of use for
each access code, sales made, etc...
Butterfly allows you to set up e-mail accounts/user-ids for your clients on your
Linux server with just a few mouse clicks from the Administration Interface.
You can charge for these accounts. You can instruct Butterfly to use password
disabling on accounts/user-ids that are not paid up. Butterfly is careful not to
modify any user-id on the server it did not create.
Much of the way Butterfly works is configurable. Do you hate the over-effective
keyboard locks? You can banish them! Do you want to charge your clients for
time in increments of 5 minutes? It can be done! Do you want to use an existing
database server elsewhere on your network instead of setting up a new one?
You can!
All services are charged on a prepayment basis only. This includes time on
workstations, e-mail accounts and any other services you may setup. When
clients don't have money, they do not use the service.
The purpose of this document is to explain in detail how the entire Butterfly
system works. We shall do this in stages. We'll describe how to install and
configure Butterfly, then we'll talk about what the backend daemon does, then
we'll describe the Access Controller, and finally the Administration Interface.
Contacting Us
For further information on Butterfly, to report a problem/bug, or simply get in
touch, please send an email to [email protected]. Please include all relevant
information if reporting a bug, for instance what you were doing when it
happened, which component died, etc...
BNE USER MANUAL - 3
Installing Butterfly
Overview
There are three main components to the Butterfly system: The backend
daemon, the Administration Interface, and the Access Controller. Each of these
needs to be installed in its relevant place before you can use the system fully.
This page describes steps to take in installing each of the components.
If you choose to run the backend on windows then it is installed along with the
Administration Interface so you can skip the section that describes installation
of the backend .We begin with a description of the Linux backend setup, since
it is the most involved. The easiest part to setup is the Access Controller as we
shall see.
Unfortunately some parts of the setup process require that you have a decent
knowledge of Linux and Windows systems. Please seek help from your local
expert if you get lost, or drop us a line and we'll try and help.
What You Need
In order to install Butterfly, you need to download packages ButterflyAdmin.exe,
and, optionally cbserver.tgz (if you wish to run the backend on
Linux) from the Digital Solutions Website. We shall explain later what each of
these files contains and how to use them.
ButterflyClient.exe
On Linux, Butterfly has been compiled and tested on glibc2.3 systems running
Linux kernel v2.6. All systems were running PostgreSQL v7.4. (You can expect
the Butterfly backend to run well on all Linux 2.6.x kernels and PostgreSQL
v7.4 and above.) All distributed files are statically compiled so you shouldn't
have any dependency problems. However be sure to have the iptables package
compiled into your kernel (which means you must have kernel v2.4.x or
better). Also make sure you have obtained PostgreSQL v7.4 or greater. All
workstations must be running Microsoft Windows 2000/XP. . In addition,
workstations should have at least 32Mb RAM and 50 Mb free of disk space.
BNE USER MANUAL - 4
Installing Backend Systems on Windows
What follows is an overview of the installation process on Windows.
The file ButterflyAdmin.exe is an installshield installation image that enables
you to install the Butterfly Backend Systems on Windows. Download and run the
"ButterflyAdmin.exe" file.
Click next to get the End Users License.
BNE USER MANUAL - 5
Read through the license carefully, as it states your options and rights as
regards using Butterfly. After reading click on "I agree" and the click next to
proceed to component selection. The default options offered by the installer
were carefully selected to be usable on a wide variety of machines, and can
safely be selected during the installation process.
BNE USER MANUAL - 6
Click next and then install to install both the butterfly Backend Systems as well
as the Butterfly Administration Interface.
BNE USER MANUAL - 7
After installing the backend systems on windows you do not need to install the
Administration Interface separately, as described in the following section. This
is because the interface is installed and configured for you automatically. So
proceed directly to the "" section
Installing Backend Systems on Linux
What follows is an overview of the installation process on Linux.
The file cbserver.tgz is a gzipped tar file containing the following files:
1. Setup, which is the setup utility.
2. Firewall default, which is a sample firewall script. This script shows you how to
setup your default firewall on the gateway server at boot time.
3. Cbserver and cbserver-noshadow which are the daemon executables. One for
systems with shadow password files, one for systems without. The setup utility
will install the correct one.
4. pg_hba.conf, which is a sample PostgreSQL host-based authentication
configuration file. The PostgreSQL server requires one of these. Look in this
file for guidelines on its use. pg_hba.conf should be installed in the PostgreSQL
data directory (typically /usr/local/pgsql/data).
5. The README file, containing additional notes , license and information on
payment and registration.
You will need to install and configure the Butterfly backend system on all
servers that need to run the Butterfly daemon. A server fulfills one of three
roles in a Butterfly managed environment:
1. A server can be a database server, meaning that it is running a PostgreSQL
database which houses data used by Butterfly.
2. A server can be a mail server, which means that The Administration Interface,
will create all e-mail accounts on this server.
3. A gateway server is the server that sits at the edge of the network, through
which all traffic to the outside world must pass. Butterfly controls external
network access from this server.
You could use one machine for all three roles without any problems. Indeed a
lot of people who use Butterfly do it this way. It is vital however that the mail
server is not on the internal network, unless it is the gateway as well. This is
important for control purposes, otherwise you can not restrict/time access to
local e-mail services.
In installing Butterfly, it is best to begin with the database server.
BNE USER MANUAL - 8
Installing Butterfly on the Database Server
Before attempting to install Butterfly on the database server, make sure you
have installed the PostgreSQL server and that it is running. It can be a bit of a
trick installing and configuring PostgreSQL. Follow the PostgreSQL Team's
instructions carefully--or better still do it from an RPM. You can get PostgreSQL
from ftp.postgresql.org in your preferred format.
After installing PostgreSQL and starting it, you can install Butterfly. To do this,
unzip and untar the file cbserver.tgz into an empty directory:
bash# mkdir tmp; cd tmp
bash# tar xzvf cbserver.tgz
Then run setup like this:
bash# ./setup
You must be logged on as root to run setup, otherwise Butterfly will not install
properly. Setup will need to create a database and the configuration file used
by Butterfly, and copy the right daemon executable into place.
The first question you'll be asked by the setup utility is whether the current
server is a database server. If you answer yes to this question, the utility will
then ask you a number of questions (what is your PostgreSQL superuser name
and password, what is the name of the database you want to create for
Butterfly, what is the data directory of your PostgreSQL installation, etc...). It
will then go ahead and create the database to be used by Butterfly. If the
setup program reports any errors while trying to connect to the PostgreSQL
server, check that your PostgreSQL host-based authentication configuration is
correct (see sample provided) and that the PostgreSQL daemon is running on
the local machine. It is a good idea to familiarise yourself with the PostgreSQL
system before installing Butterfly, as Butterfly relies on it fully for data
storage.
A PostgreSQL user who will serve as the administrator for Butterfly will also be
created. The user is replaced if they exist. The utility will also ask you to set a
password for the user. (You can verify that the user is correctly installed using
the PostgreSQL psql utility to connect to the new Butterfly database with the
username/password created.) You will also be asked to create a PostgreSQL
user to be used by the backend daemon when connecting to the database.
Please note the name and password you use for this as you will need it while
configuring the other servers. This information is written to the configurations
file.
BNE USER MANUAL - 9
Finally you must supply additional information needed to configure the
Butterfly daemon at run time: Port number to listen on, installation directory,
etc... By default the Butterfly system expects to be installed in
/usr/local/butterfly as cbsvr. You can change this of course, but you must then
supply the configuration file on the command line when you run the daemon.
Installing on Other Servers
As earlier indicated, you can use one server as mail, gateway and database
server. If this is what you plan on doing, then skip to the next section which
discusses system configurations for running the backend system.
If you must install a separate mail and/or gateway server, then simply
unzip/untar the files as above and run setup. When asked if the current
machine is a database server, answer 'n' for no. The utility will then ask you to
supply information it needs to create the configuration file: The hostname of
the database server, the port on which it is running, what username/password
to use to connect to it (as earlier created) the port for the database server, the
Butterfly port number, etc... Make sure you enter the information correctly. If
you make a mistake, you can always repeat the procedure, thereby replacing
your previous installation.
System Configurations
After installing the daemon, you must modify your host configuration files to
start it automatically at boot time. The preferred way is to use the master
control process init to start and monitor it. You want to add a line like the
following into your /etc/inittab file:
cb:2345:respawn:/usr/local/bin/cbsvr -c /etc/cb.conf
This tells init to start the Butterfly daemon (specifying /etc/cb.conf as the conf
file) in run levels 2,3,4 and 5, and to restart it if it dies. It is safe to start this
here. Butterfly is carefully designed to do its job and no more. Note that
Butterfly needs to run with root access so that it can add/remove users from
the password file on command from the Administration Interface. If this is
worrying to you, please write to us and we'll help allay your fears. The modules
that do this are well tested, and have been in use in many products we've
designed over the years.
You should also setup your database server to start the PostgreSQL daemon
automatically, and keep it up and running. If you are running RedHat or SuSe
and installed PostgreSQL from an RPM file, then most likely PostgreSQL is
started for you automatically. If not, then best to do this using init. My inittab
file contains the following entry for this purpose:
BNE USER MANUAL - 10
pg:2345:respawn:/bin/su - postgres -c /home/postgres/bin/pgsql-start
The file /home/postgres/bin/pgsql-start is a script that contains the following lines:
#!/bin/sh
/bin/rm -f /tmp/.s.*
/usr/local/pgsql/bin/postmaster -i -D/usr/local/pgsql/data 2>&1 >> /var/log/pgsql.log
An explanation: The first line is standard in many such scripts. The second
line removes the UNIX socket used by PostgreSQL in case it crashes and fails to
remove itself. The third line (yes, it is only one line) starts PostgreSQL, tells it
to listen for network connections as well (-i), tells it to use /usr/local/pgsql/data
as the root of its data directory tree. The last bit of goo simply redirects the
output of the command to a file, which can then be used to monitor what
PostgreSQL is up to.
On your gateway server, you need to setup some firewall rules to be thrown
in at boot time. These are default rules to shut off traffic from the internal
network to the outside world, until Butterfly explicitly allows it for particular
hosts. Part of the distribution is a sample firewall setup (file is Firewall default).
You will notice that we use ipchains exclusively. See the ipchains(8) man pages
for help. DO NOT use the old ipfwadm package, as it conflicts with ipchains.
You will also notice that our basic approach in this is to manipulate the input
firewall only. By preventing internal hosts from sending traffic into the
gateway we prevent them from talking to external networks. We therefore
need not worry about the output firewall. It is absolutely vital that the
primary hostname of the gateway maps to the IP address of the network
interface on the internal/private network. Without this, Butterfly will not be
able to dynamically modify the firewall in a meaningful way. Butterfly assumes
that if it looks up the IP address for the gateway's hostname it gets the IP
address of the internal device, not that of the network device on the 'outside'.
This is a typically not a serious restriction as regards setting up your network.
You can have you gateway answer to as many names as you like without any
problems.
The script Firewall default also includes a rule for doing masquerading, including
notes on what else you must do. You should modify your boot scripts to run this
(or a similar script) automatically at system startup.
The last thing you must do on all servers, is to add a rule root's crontab file (see
crontab(1)) to run the Butterfly daemon with the -m flag. This flag tells Butterfly
to perform any daily tasks that need to be performed, including disabling users
who have not paid (if that is turned on) and cleaning up the database. The best
time to schedule this task is during off-peak times, as it can severely slow down
the system at peak times. A good time is early in the morning (say 5.30am)
when most ordinary souls are oblivious to the existence of the world (let alone
BNE USER MANUAL - 11
your Internet Cafe). A line like the following in root's crontab file would do the
trick:
30 5 * * * /usr/local/bin/cbsvr -c /etc/cb.conf -m
This arranges for Butterfly to do its cleanup work at 5.30am each morning.
Having done all of the above, you are now ready to start Butterfly. Simply give
init a kick (kill -HUP 1) and Butterfly should start. When started, Butterfly waits
ten seconds before attempting to talk to the database. This is a small
precaution against bad boot sequences that start the database after starting
Butterfly. It is not perfect. If you find that Butterfly is reporting that it can't
connect to the database, try killing it and waiting for it to restart (hopefully
the database is up by then).
Installing the Administration Interface
Please make sure you have read the bit about system requirements. Go
back if you haven't!
If you have installed the backend systems on Windows you should skip this
section, and go directly to the "Initial Administrative Configuration" section
After installing the backend systems, and having them started, you want to
install the Administration Interface on your Cafe administrator's workstation.
The Admin Interface communicates directly to the Butterfly daemon and the
PostgreSQL database. The latter via ODBC, the former via our own lightweight
RPC protocol.
To install the Admin Interface, use the ButterflyAdmin.exe file. This should be a
fairly painless affair, involving a series of mouse clicks. You might be asked to
reboot your workstation. Please do so. The utility then adds an ODBC data
source called "butterfly" to your "User DSN" tab in the "32-bit ODBC" control
panel item. You must configure this item correctly before trying to run the
Administration Interface. If you run the backend on Windows this is done
automatically for you. To do this, open the ODBC control panel by clicking on
"32-bit ODBC" in the Windows Control Panel. Select the data source marked
"butterfly" from the "User DSN" tab, then click on the "Configure" button. You
should see a window like this:
BNE USER MANUAL - 12
In the window above, make sure the "server" option is filled in with your
database server address, and the "database" option indicates the PostgreSQL
database you created for butterfly during installation. You can leave the rest of
the options as they are. Please leave the "user name" and "Password" options
blank for security reasons. Click "OK" and your ODBC data source for butterfly is
correctly configured.
Initial Administrative Configuration
Before installing or running the Access Controllers, you should first configure
your Butterfly system from the Administration Interface. To do this, run the
Admin Interface, log onto Butterfly as the Administrative user. You will be
asked to enter some information about your company (name, city, etc...). The
company information is useful for 'branding' your Butterfly installation, and is
also used in generating your registration key.
After entering your company information, proceed to the configurations
window and specify your gateway and mail servers. (See Configurations help on
how to do this.) Next you must enter a list of all workstation on your LAN that
will be controlled using the Access Controller, and those that will run the
Admin Interface (including the one you have just installed). (See workstations
list help on this.) The backend Butterfly daemon will quietly refuse to service
requests from any workstation not listed in the database. The symptoms of
this are that the Windows-based Butterfly Access Controller will not be able to
contact the backend, whereas the backend is running.
BNE USER MANUAL - 13
Installing the Access Controller Interface
This is the easiest part. Run the file ButterflyClient.exe and follow instructions.
After installation, you may run the Access Controller Configuration dialog.
Double click the icon labeled "Butterfly Settings" on your desktop. You will get
the dialog box shown below. Change the value in the textbox labeled Server to
the ip address of the Linux box on which the daemon was installed then click
the Save button. On restart it should talk nicely to the Butterfly daemon on the
gateway as configured. See detailed instructions here.
Next Stop
Now that you have your system installed and configured, time you actually got
some work out of it. Best to start here to learn more about the backend
system, or here to learn about the Admin Interface, here to learn about the
Access Controller.
BNE USER MANUAL - 14
Butterfly Administration Interface
Overview
The Admin Interface consists of a set of modules which together provide
access to the full capabilities of the Butterfly software suite. The Interface is
entirely Windows-based, and is designed to be easy to use. This document
describes each of the modules of the Interface, how they are used, and how
they fit into the entire scheme. There are five main modules:
1. Configurations module, with which you set options for the Butterfly system.
2. Access control module, which is concerned with access code creation, deletion and use
3.
4.
5.
6.
7.
monitoring
User accounts module, which manages user accounts including e-mail accounts on the
server
Sales module, which handles issues relating to recording sales, voiding sales, etc...
Reports module.
Database module.
Chat module.
We will discuss each in turn.
To start the Admin Interface, simply double-click on its icon. You should then
be asked for a username and password. If this is the first time you are running
Butterfly, or you have not created any other Butterfly administrators, use the
username/password you created for the Butterfly Administrator during
installation on the database server. After supplying the correct username and
password, you should see a window that looks like the one below.
BNE USER MANUAL - 15
This is the toplevel Admin Interface window. From here, you can call up any of
the modules listed above. The toplevel window shows the level of permission
granted to the current administrator, indicates whether Butterfly is correctly
registered. On unregistered versions, the backend daemon shut down after half
an hour and kills all clients and has to be restarted.
Configuring the System
If this is the first time you are running the Admin Interface, then you probably
want to complete configuration before you proceed. (Of course you can change
your configurations are any time.)
General Options
To get to the configurations window, click on the button labeled "Config" on
the toplevel window. This option will only be enabled if you are logged in as an
administrator who has full access rights. You should then see a window like
this:
In this window, you are asked to set the following general options:
•
The mail and gateway servers. You must set these before attempting to use
accounts management or access control modules.
BNE USER MANUAL - 16
•
•
•
•
•
•
•
•
•
•
•
•
Port on which the Butterfly daemon is running on the gateway and mail server.
This is the setting you made during backend daemon installation.
Default websites. The Access Controller provides the option for automatically
launching a Web Browser at the beginning of a session. These options allow you
to set the first page loaded in the web browser depending on the service
requested (Internet or e-mail only).
Minimum and maximum amounts that can be paid for time. This allows you to
specify the smallest and largest amount of time (in money terms) you can sell.
Really this is just a precaution against some absent-minded person keying in
too much money when creating an access code.
Minimum time unit used for charging clients when they use your system. Time
is charged in increments of 60 seconds, or whatever value you indicate here.
You can specify whether you want the backend Butterfly system to use
password disabling on users whose accounts are overdue for payment. This is
effected by making non-destructive changes to the password entry for the
particular user-id.
You can specify whether a code can be used to login to more than one
workstation simultaneously.
You can specify a message that will appear on the client interface when the
workstation is not timing , under ‘Motd’.
You can specify a logo that appear on the client interface when the
workstation is not timing , under ‘Logo’.
You can specify what will be shown every 20 minutes on the client interface
when the workstation is not timing , under ‘Ad’.
Low time warning is the number of minutes before a clients time expires that a
warning will be flashed informing them that their time is nearly running out
You can specify when access codes expire. If you want access codes to expire
unconditionally a certain number of days from date of creation, then specify
the number of days. Indicate "Never" if you do not want this. (That is, as long
as an access code has money on it, it never expires.) You can also specify that
an access code expires after a certain number of days of disuse. In other
words, if the client does not use the code in a certain number of days, then it
expires. Indicate "Never" to disable this option. All access codes expire when
they have no money left on them. When an access code expires, it is deleted
from the database.
Bonuses
The other configuration options available are:
Per Minute Charges
Butterfly allows you to charge your clients in a flexible manner. You can
specify different per minute rates depending on the time of day, day of the
week or service requested (E-mail only, Internet or Computer Use only). Under
the "Rates" menu, select "Per Minute Rates". You should see a window like this:
BNE USER MANUAL - 17
Select the Charge Group and "Connectivity Type" to see the cost per minute for
each hour of the selected day of the week. You can set all the values for a
particular day by clicking on "Range". Note that a value of zero indicates no
charge or free access during that hour of the day.
Workstation List
Each workstation that runs any Butterfly software needs to be listed in the
database with correct access rights. To list workstations, select
"Workstations..." under the "Admin" menu of the main configurations window.
You should then see a window like this:
BNE USER MANUAL - 18
The window shows a list of registered Butterfly workstations. Each workstation
listed has three flags against it:
1. A flag that specifies whether the workstation is an administrator workstation.
Only administrator workstations should run the Admin Interface. Workstations
that run the Admin Interface and are not listed here will not be able to carry
out certain privileged operations like creating new access codes, usage
monitoring, creating/editing user accounts.
2. A flag that specifies whether the workstation is permitted unrestricted network
access. For all such workstations, the backend system modifies the default
firewall to permit them access.
3. A flag that specifies whether the workstation should be locked (i.e. keyboard
and mouse input disabled) when not in use.
Administrator Creation
If you are logged on as the primary Butterfly administrator (created during
installation), you can create new Butterfly users/administrators. You do this by
selecting "Administrators" under the "Admin..." menu:
BNE USER MANUAL - 19
You should probably create as many different administrators as you have staff
using Butterfly. There are two classes of administrators. One class is termed
"Full Access", the other "Restricted Access". Only "Full Access" administrators
can:
•
•
•
•
•
Change configuration options
Give bonus amounts on access codes, or create unlimited access codes.
Void sales they didn't make. Other administrators can only void sales they made, and
only within 2 days of having made them.
Create, edit or delete paid services.
Force the Butterfly Access Controller to shutdown on any workstation.
Auto-emailing of Sales reports
You can have sales reports emailed to one or more email address daily at a
preset time. To do this select ‘Autoemail report’ under the ‘Admin menu’.
Enter the email address(es) and the time at which they should be emailed
daily.
BNE USER MANUAL - 20
Access Codes and Workstation Monitoring Module
One of the most important Butterfly Admin Interface modules is the module
that handles access codes. This module is accessible by clicking on the "Timing"
button on the toplevel window. You should see a window like this when you
click on this button:
From this window you can monitor activity on all workstations running the
Access Controller component. You can create new access codes, credit/debit
existing access codes, etc... But first a backgrounder on access codes:
About Access Codes
Usage timing in Butterfly is provided by means of an access code. When a client
wants time on a workstation, either to read email, surf the Internet or merely
use the workstation, they must first pay. On paying, the administrator
receiving the money clicks on the button labeled "New Code" above. The Admin
Interface contacts the backend daemon, which issues a unique 6-character
code. Each code is a random sequence of uppercase letters and digits. The
code generated is stored in the database together with the amount of money
BNE USER MANUAL - 21
the client has paid, and (optionally) the client's name . You should write down
the access code for the client, and give it to them. In creating the access code
you can (if logged on with "Full Access" rights) also specify a bonus amount
(above and beyond the money paid).
A client can enter their access code in the Access Controller component on any
workstation controlled by Butterfly. On submitting the access code, the Access
Controller shows how much time is left, and begins timing the client. When the
money deposited on the code is used up, timing stops, and the Access
Controller shuts down access to whatever service was requested. If
keyboard/mouse locking is in effect, the workstation stops responding to input
when time is used up. Butterfly does however allow you to credit a code with
more money before the money on it is used up. The credits take immediate
effect.
You can use access code in three ways:
1. Generate a new access code
Click the 'New Code' button
2. Reuse an existing access code
Click the 'Find Code' button
3. Pregenerate a batch of access codes with a common initial amount of money
.
Click the 'Batch' button This is the most convenient way of using access codes.
In the textbox labeled 'No. of Codes' enter the number of access codes you wish
to generate and enter the amount of money they should be initially credited
with.
Click the "Generate" button and a list of generated access codes will be displayed in a preview
window . Click the printer icon in the upper left cornet of the preview window to print them
out on your default printer.
One can pregenerate say 100 access codes with zero money on them and then
print them out. When a customer pays , click the find button then enter the
first few letters of a code from the list you printed out. From the list of
matches displayed select the code and credit it with the amount of money that
the customer paid.
BNE USER MANUAL - 22
Remote Login
Butterfly 2.0 introduces a fast convenient way of logging in users. Older
versions of Butterfly required the user to type in the access code at the client
machine. Now if you select a workstation from the dropdown list and click the
‘Buy Time’ button . The access code will be automatically logged in to the
selected workstation . This is especially useful for small cafes where the
operator has a view of all the workstations and the customer would like to use
a particular workstation
Workstation Monitoring
From the window shown above, you can monitor clients logged on to
workstations. A client can deposit more money (or seek a refund) on their
access code at any time. If the user is logged on to a workstation, then you can
select the workstation from the dropdown list and click on the ‘Buy Time’
button. You can then enter the amount to credit (a negative amount if you are
refunding money). All such transactions are logged in the sales journal for the
day.
BNE USER MANUAL - 23
The status field above shows the status of the Access Controller on the
workstation. "Locked" means the Access Controller is running on the
workstation, and no one is logged on. "UnLocked" means the Access Controller
is running and a client is logged on. In this case the client's name and amount
of money left is shown. If status is "Dead" then the Access Controller is not
running on the workstation, or the workstation has crashed. This window is
useful for monitoring your workstations. The information shown is updated
once a minute, or on command.
You can remotely instruct the Access Controller component on a workstation
to shut down by selecting the workstation and clicking on the "Close Butterfly"
button. This is particularly useful when keyboard/mouse locking is in use. It
causes the Access Controller to remove all locks and cleanly exit. You want to
do this in the event that you need to install software on the computer or simply
shut it down. You can also close down Access Controllers components on all
workstations simultaneously by clicking on the "Select All" button and then
clicking the "Close Butterfly" button. (There is a delay of between 30 and 60
seconds between issuing the shutdown request and having it take effect.)
You can also remotely instruct the Access Controller to shut down the
machine completely selecting the workstation and clicking on the "Shutdown"
button. You can also shut down all workstations simultaneously by clicking on
the "Select Al" button and then clicking the "Shutdown" button.. (There is a
delay of between 30 and 60 seconds between issuing the shutdown request and
having it take effect.)
BNE USER MANUAL - 24
Managing Client Accounts
As indicated earlier, Butterfly includes a module for managing client accounts,
be they e-mail accounts or other types of accounts for which a monthly charge
is levied. Butterfly helps you track these accounts (who hasn't paid, who is due
for payment, etc...) and for e-mail accounts helps you prevent access to e-mail
for those who have not paid.
You can access the accounts module by clicking on the "Accounts" button on
the toplevel window.
For each account we maintain mailing information for the account owner. A
comments box is also included for miscellaneous notes on the account.
When you create a new account, you can also specify that an e-mail account
be created on your mail server. (The mail server should have Butterfly installed
on it as described here.) When you specify that an e-mail account be created,
the Admin Interface instructs the Butterfly daemon on the mail server to create
a user with the same name as the account. The password and fullname are not
set yet. You can set the password and/or fullname by clicking on the button
marked "Add" in the window above. (The "Add" button above changes to "Edit"
when a user has been added.) You can remove the user entirely from the server
by clicking on the "Del" button.
You can have other types of accounts. These are accounts which you charge a
monthly fee for some service or services you perform. You can create as many
different types of services as you like. Each service has a name, a monthly fee,
BNE USER MANUAL - 25
a one time fee, and a short description. to create a new service, select
"Services" under the toplevel window "Admin" menu. After creating the service
and setting its parameters, you can add a service to an account by clicking on
the "services" button in the toolbar shown above. You then specify the service
name and the number of months payment is being made for. You will then be
shown the next date on which payment is expected.
When a new account is created, it is marked as unpaid. Payment is on a
monthly basis, paid in advance. For e-mail accounts, clicking on the "Pay"
button brings up a dialog box asking you how many months you would like to
accept payment for, and showing the rate. The monthly rate can be configured
by making changes to the "Monthly Fee" option of the special service "Email".
Note that you cannot remove the "Email" service as it is needed for e-mail
clients. If you are not charging for email accounts, simply set the "Monthly Fee"
to zero or turn off password disabling in the configurations module. Note that
when a user's password is disabled for non-payment, it is automatically enabled
next time you click on the "Pay" button above and enter payment for some
months.
When you delete an account, any associated e-mail account is automatically
removed from the server.
Recording and Voiding Sales
Butterfly allows you to keep records of all sales made in your Internet Cafe.
This module was added to address the need to keep good records of other
charges other than time. One might for instance charge for printing or
copying. You can record all such sales so as to make management of money
easier.
The first step in being able to record sales is to create and maintain a record
of all products sold. The products module allows you to keep a list of products
and their basic prices. To access the products module, select "Products" under
the "Admin" menu of the toplevel window.
BNE USER MANUAL - 26
To record a sale, chose "Record a Sale" under the "Sales" menu of the "Admin"
menu on the toplevel window. You should then see a window like this:
The picture buttons on the left allow you to add/edit or remove sale items
from the list shown to the right of them. Clicking on the first button brings up a
dialog box in which you can select the product you want to add to the list, and
the quantity. The price is selected automatically from the records created
earlier. You can edit or remove a sale item added to the list of items shown
BNE USER MANUAL - 27
above. You should also enter the name of the client for purposes of good
record keeping. For each sale that is made, the date and time it is made, and
the administrator who made it are recorded in the sales journal. A report is
provided to view sales made during a particular period, sorted by the
administrators who recorded the sales, with subtotals.
You can void a sale recorded earlier at any time during the day on which it is
made. You may want to do this if, for instance the sale was recorded in error.
To do this, select "Void Sales" from the "Admin/Sales" menu. You should then
see a window like this:
The box on the left should show all sale items that can be voided. An
administrator can only void sales that they made themselves if they are not the
overall administrator. Furthermore an administrator can only void sales made
on the same day. The overall administrator (the user you created during
installation) can void any sale made at any time, regardless of who made the
sale.
To void a sale item, select the item in the list on the left, then click on the
BNE USER MANUAL - 28
right arrow. Do this to as many items as you like, then click on the "OK" button.
Your actions will be reflected in the sales journal.
Database Utilities
To access the Database menu, click the "Database" menu of the toplevel window. Three
submenus are displayed
‘Import Legacy Data’ allows you to import data from older versions of butterfly and chrysalid
‘Clean Database’ performs database maintenance tasks that keep the database lean and fast.
‘Backup/Restore Database’ is used to backup the database to the file or restore the database
from a file.
Sending messages to clients
To access the chat menu, select "Chat" under the "Admin" menu of the toplevel window. A
window like the one below should pop up.
BNE USER MANUAL - 29
To send a message select a workstation in the dropdown list, type the message
and click the ‘Send button’. The message will only
Be displayed on the client if it is timing.
Getting Information out of Butterfly: Reports
Butterfly Administration Interface includes a reports module with some simple
pre-built reports. We use the Seagate Crystal Reports engine for preparing and
viewing reports.
To access the reports menu, select "Reports" under the "Admin" menu of the
toplevel window. A window like the one below should pop up.
Reports provided include:
1. Sales report. This shows the sales made during a particular day, or cumulatively over a
2.
3.
4.
period. Select "Cumulative" and then select the date range you would like to use to get
a cumulative report.
List of accounts. You can request to view only email accounts, other types of accounts
(which have other types of services) or all accounts.
Report on when a particular access code was used. The system maintains a log of each
time an access code is used. Enter part of the access code in the window and the
system will show you when access codes matching your query were used, for how long,
on which workstations, and what services were requested.
A workstation utilisation report. This shows the actual number of seconds used on each
workstation for each day of the week during a particular period, sorted by service
requested. You can use this report to measure how efficient your pricing regime is. It
BNE USER MANUAL - 30
also serves as a starting point for more advanced data processing. You can export the
data to a file in one of several formats, then perform further processing on the data.
You can also load and view a report by specifying the Crystal Reports report file
that contains your report template.
You can choose to view the selected report in a window or send it directly to
the default printer. (To set the default printer, select "Printer Setup" under the
"Admin" menu of the toplevel window.) When you choose to preview the
report, you get a window like this:
You can print the report by selecting the button marked with a printer icon.
You can export the report in one of several formats (including MS Excel, HTML,
tab-delimited text) to file. To do this click on the button marked with an
envelope icon. This option is particularly useful if you want to do additional
processing on report data.
Additional Note: You should have at least one Windows printer installed before
attempting to preview a report. Previewing will fail otherwise.
Creating Your own Reports
Those with some experience in using report writer tools accessing data in SQL
databases can write their own reports. Since the Butterfly Admin Interface
talks to PostgreSQL via ODBC, you can use any report generator tool that is
ODBC-aware. Butterfly stores a lot of raw data that you can extract and
analyze in complicated ways. It is beyond the scope of this documentation to
BNE USER MANUAL - 31
explain how all the data is stored. However you should be able to figure it out
by inspection of the database tables. Most report writer tools will list all the
tables in a database for you, including the fields they have. If you want certain
specific information and cannot figure out how to get it, drop us a line and
we'll see if we can help.
BNE USER MANUAL - 32
The Butterfly Access Controller
Overview
The Butterfly Access Controller component acts as the timing system on all
workstations open to clients for use. It should be run on all workstations whose
use is timed and charged for.
Using the Access Controller
When started, the component should show you a window like this:
If keyboard/mouse locking is in use (see configurations module here) then the
component will prevent normal keyboard and mouse user input until a valid
access code is submitted.
When started, the component attempts to contact the gateway server. If this
fails, either because the address and port number of the Butterfly daemon on
the gateway have not been set or because the gateway is unreachable, then
BNE USER MANUAL - 33
the component will prevent normal keyboard and mouse user input until a valid
access code is submitted unless a user with Windows 2000/XP administrative
privileges is logged in.
When a client sits before a workstation, they must enter their 6-character
access code into the main component window above before being able to use
the workstation.
Clicking on the "Proceed" button submits the access code to the Butterfly
daemon on the gateway, including information about the service requested.
Should the access code prove invalid, or have no money on it, then a dialog box
reporting this is presented. If you get an error like "There was a problem with
the server", then you should click on the "Reset" button before submitting the
code. The "Reset" button makes the component re-configure itself and
contact the backend server anew. You want to do this each time you restart
the gateway server or Butterfly daemon while access controller components
are running.
If the access code entered is successfully authenticated, then the timing
window is displayed for two seconds before being minimised:
The window above shows how much time is left. It will flash and warn the user
just before time is up. When time is up, the startup window is displayed. A
client can stop working at any time and click on the "Logout" button. This
stops the timing process.
A client can send a message to the administrator by clicking the ‘Tell Admin’
button.
Other things to note: Time is charged in increments of 60 seconds by default,
or whatever value is configured here. Butterfly deducts money used each
minute based on the per minute rate configured for that hour of the day of the
week. If two clients use the same access code at the same time, then naturally
money is deducted twice as fast.
The Access Controller component is kept deliberately simple so that clients
find it easy to use.
BNE USER MANUAL - 34
The Butterfly Daemon
Introduction
The Butterfly daemon (or service) provides the following services:
•
•
•
Timing and dynamic firewalling.
User management.
Workstation monitoring.
The daemon listens for requests on a specific port (typically 8050), and services
them as needed. It should always be running. This page provides an overview of
the Butterfly daemon. You do not really need to read this page to use
Butterfly, however your might find the information here useful at some stage.
The daemon, when compiled for Linux, is a static executable, so you shouldn't
have any dependency problems.
Running the Daemon on Windows
The butterfly daemon runs as a service on windows. it is started automatically
by windows every time the system starts.
No special configuration is required to operate the daemon in this mode
Running the Daemon on Linux
As indicated in the installation guide, cbsvr should be started at boot time.
a number of command line options when started:
cbsvr accepts
•
The -c option is used to specify a configurations file. By default cbsvr
tries to read /usr/local/butterfly/cb.conf for startup configuration
BNE USER MANUAL - 35
•
•
•
information. The configuration file name must immediately follow the
flag.
The -m flag is used to run cbsvr in cleanup mode. With this flag cbsvr
carries out any regular cleanup tasks, including disabling user passwords
for users who have not paid up, Deleting all used and expired access
codes from the database. (See note on access code expiry here.)
The -X flag can be used for help on command line options.
The -L flag takes an extra argument which is the debug level. You can set
this to increase the amount of logging to /var/log/cbserver.log. By default,
logging is turned off.
You can override some settings in the configuration file using flags:
•
•
•
-d is
used to specify a different database from that listed in the
configurations file
-h is used to specify the name of the database server
-p is used to specify the port to which the daemon should bind.
These flags are provided for convenience. One likely use is in an environment
where one gateway serves more than one network, each of which is controlled
using Butterfly. You can run several instances of the daemon, each serving one
network, each talking to a separate database.
What the Daemon Does
The Butterfly daemon spends most of its time sleeping, waiting for requests
from Access Controllers or the Administration Interface. For the Access
Controller component it provides timing and firewalling services. Each time a
user enters an access code into the Access Controller, the daemon on the
gateway is consulted. The daemon authenticates the code, and starts a timer
which will expire when the money on the access code is used up. In addition, if
the user requested Internet or e-mail only access, the daemon modifies the
firewall to permit access from the user's workstation. For e-mail only the
daemon modifies the firewall to allow SMTP, POP3 and HTTP access from the
workstation to the designated mail server. The port numbers used for these
services are those listed in the file /etc/services on Linux or the well known
defaults. For Internet access, the daemon permits unrestricted access.
BNE USER MANUAL - 36