1
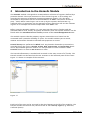
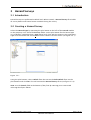
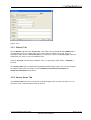
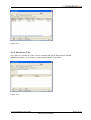
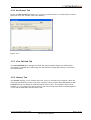
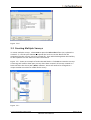
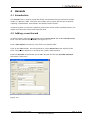
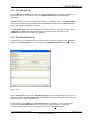
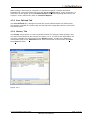
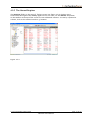
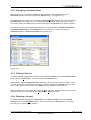
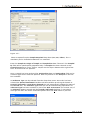
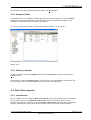
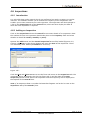
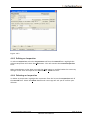
Hazards
User Manual
v2.1.01
© The Technology Forge 1998–2006
Document Control
Course no
Document name
Owner
Date last updated
Last updated by
Doc version no
tf. version
Date printed
Hazard User Manual
Jenny Wattis
JJ
1.0
26/09/2006 09:51
Modification History
Date
Sept 05
Doc
version
no
1.0
Author
Summary of additions / changes
JJ
Revision to bring in line with v2.1.01
© The Technology Forge 2006
Page 1 of 33
Hazards User Manual
CONTENTS
1
tf. facility Background ...................................................................... 1
2
Introduction to the Hazards Module........................................ 2
3
Hazard Surveys ..................................................................................... 4
4
5
6
7
3.1
Introduction.................................................................4
3.2
Creating a Hazard Survey ...........................................4
3.3
Creating Multiple Surveys...........................................8
3.4
Technical Report .........................................................9
3.5
Editing a Hazard Survey............................................10
3.6
Deleting a Hazard Survey .........................................10
3.7
Changing a Surveys Status .......................................10
Hazards....................................................................................................11
4.1
Introduction...............................................................11
4.2
Adding a new Hazard ...............................................11
4.3
Samples......................................................................16
4.4
Risk Assessments......................................................18
4.5
Actions .......................................................................22
4.6
Inspections ................................................................25
No Access ...............................................................................................27
5.1
Introduction...............................................................27
5.2
Adding a No Access Record .....................................27
No Hazard ..............................................................................................28
6.1
Introduction...............................................................28
6.2
Adding a No Access Record .....................................28
Reports.....................................................................................................29
7.1
Technical Reports......................................................29
7.2
System Reports..........................................................29
© The Technology Forge 2006
Page 2 of 33
Hazards User Manual
1
tf. facility Background
tf. facility is a premises register that contains detailed information on entities such as
sites, buildings, blocks and spaces. This data can be fully integrated with other modules
such as Suitability, Sufficiency, DAA (Disability Access Audit) and Hazards, amongst
others. There is also the capability to link documents and drawings, including linking
CAD drawings to import data in to the system.
tf. facility enables you to easily manage the information entered, it provides full
reporting and analysis, and automates and facilitates the tasks involved in managing a
variety of establishments.
tf. facility has been developed to conform to DfES requirements and therefore a number
of standard outputs have been developed which will streamline the production of
electronic data exchange.
The system also makes extensive use of Microsoft products such as Word and Excel to
output data quickly and easily. We therefore recommend that you ensure that these
products are available on your system.
Some tasks are considered to be the responsibility of the System Administrator; these
include the setting up of look-up data, and the managing of user permissions and
system security.
© The Technology Forge 2006
Page 1 of 33
Hazards User Manual
2
Introduction to the Hazards Module
The Hazards module is designed to accommodate a collection of registers defined by a
particular hazard. The most common use of our hazard register is for tracking and
recording the presence of Asbestos Containing Materials (ACM’s). This has been
developed in conjunction with the recommendations of MDHS 100 (correct at time of
print – 2002). Other hazard types can be set up by the systems administrator e.g.
confined space, IT equipment. For the purposes of this manual we will use the asbestos
register as an example and show example data from MDHS 100.
Before using the Hazards module it is a pre-requisite that you are familiar with the
standard features of tf. facility. An outline of interface rules and system functions can be
found under the Introduction to tf. facility section of the Asset Management Manual.
The module requires that the property register contain data so a hazard can be
associated with a particular building or space. The module enables you to record,
monitor and maintain hazards associated with properties or assets.
Hazard Surveys are performed at Block level. Any hazards detected or presumed are
recorded during the survey. Sample, Action, Risk Assessment and Inspection details
can be documented against a hazard. It is also possible to record instances of No
Hazards found in a room or No Access to a room.
The hazard information in recorded and accessed via the main screen of tf. facility. The
Hazards module can be found on the tree structure in the left hand pane of the screen.
Figure 2.1 shows an example of the structure.
Figure 2.1
Each level of the tree can be accessed by the plus buttons to the left of the modules. The
Hazards module on the tree may consist of one or more Survey Types (e.g. Asbestos,
Confined Spaces).
© The Technology Forge 2006
Page 2 of 33
Hazards User Manual
The first level below the type is Surveys, where the main surveys are contained. Each
status folder (A – New, B – Issued, C – QA and D – Complete) enables the management
of the surveys. For example a Survey is created at the A – New status, then moved to B –
Issued where the data collected is then entered. The survey can then be moved to C –
QA if the survey is to be verified and to D – Complete when the survey data is complete.
See section 3.6 for more details on moving the surveys between each status.
The Register folder on the tree structure contains a complete list of all the Hazards
recorded against the Survey Type, while the Actions folder shows every Action recorded.
Hint
The first one hundred records are displayed on the list views (Register and Actions
folders) in the right hand pane of the screen. When this is exceeded More and All
buttons will be apparent at the top right of the pane. Use these buttons to view any
additional records.
© The Technology Forge 2006
Page 3 of 33
Hazards User Manual
3
Hazard Surveys
3.1 Introduction
Hazard Surveys are performed at Block level. When created, a Hazard Survey form holds
all survey details and hazard items recorded during the survey.
3.2 Creating a Hazard Survey
Select the Hazard Type by operating the plus button to the left of the Hazard module
on the property Tree. Select the Surveys folder via the plus button for the hazard type
(e.g. asbestos). Highlight the A - New status level, then with the mouse in the right pane,
right click the mouse and select New from the context sensitive menu (see figure 3.2.1).
Figure 3.2.1
Using the plus buttons, select a Block from the tree on the Select Block form via the
plus buttons and click OK. This will activate the Hazard Survey form (see figure 3.2.2).
Note: Use the Search field at the bottom of the form by entering your criteria and
selecting the ellipsis button.
© The Technology Forge 2006
Page 4 of 33
Hazards User Manual
Figure 3.2.2
3.2.1 Details Tab
On the Details tab enter the Survey Ref. This field is auto-populated with (NEW) when a
new hazard survey is created. Each survey must have a unique survey ref. and is a
mandatory field. Enter a Client Ref No (this is optional). Choose a Survey Type from the
drop-down list. This is also a mandatory field.
Select a Surveyor via the ellipsis button. This is a mandatory field. Select a Sampler if
desired.
The Survey Date will be automatically populated with today’s date. This can be changed
to another date. Enter any notes in the Comments, Non-Hazard Comments or
Inspection Comments text boxes.
3.2.2 Survey Items Tab
The Survey Items tab lists and hazards recorded against the surveys (see figure 3.2.3).
Section 4 of this manual details how to do this.
© The Technology Forge 2006
Page 5 of 33
Hazards User Manual
Figure 3.2.3
3.2.3 No Access Tab
Any rooms or sections of a room can be recorded and will be displayed on the No
Access tab (figure 3.2.4). Section 5 of this manual gives more details.
Figure 3.2.4
© The Technology Forge 2006
Page 6 of 33
Hazards User Manual
3.2.4 No Hazard Tab
Finally, the No Hazard tab (figure 3.2.5) lists any rooms where it is certain that a hazard
does not exist (see section 6 for more details).
Figure 3.2.5
3.2.5 User Defined Tab
The User Defined tab is designed so that the system administrator can define fields.
The options available for customising are look up fields (drop down menus), text fields
and check boxes.
3.2.6 History Tab
The History tab (fig 3.2.6) records when the survey is amended. For example, when the
date and time that the survey record was created. It also records when No Access or No
Hazard records are added or removed and for which room. This enables rooms to be
audited, e.g. if a room once had no access, but now a Hazard has been recorded against
it, this will be detectable on the History tab.
© The Technology Forge 2006
Page 7 of 33
Hazards User Manual
Figure 3.2.6
3.3 Creating Multiple Surveys
To create multiple surveys, select New to open the Select Block form (as explained in
section 3.2). Use the plus buttons to expand the levels to see the blocks for the
properties that the surveys are to be created for. Then while holding down the Ctrl key
on the keyboard use the mouse to select each block.
Figure 3.3.1 shows an example of multi-selected blocks. Click OK to create the surveys.
A message will confirm how many surveys have been created. All surveys created in a
batch will have the Survey Ref. (New). However, these will need to be changed to a
unique number once data is added to the survey.
Figure 3.3.1
© The Technology Forge 2006
Page 8 of 33
Hazards User Manual
3.4 Technical Report
On the Hazard Survey form there is the facility to produce a technical report for all the
Hazards recorded as part of the survey. To activate the report, select the Technical
Report button at the bottom of the Hazard Survey form. This will produce the report. See
sections 7.1 and 4.2 for more information on Technical Reports and linking picture files.
© The Technology Forge 2006
Page 9 of 33
Hazards User Manual
3.5 Editing a Hazard Survey
To edit a Hazard Survey, select the survey from the list view on the main tf. facility
screen. Highlight the survey in the right pane, right click the mouse and select Edit from
the context sensitive menu. This will open the Hazard Survey form.
When amendments to the data are made the Save button is enabled. Make the necessary
changes to the form and operate the Save button. Close the form.
3.6 Deleting a Hazard Survey
To delete a Hazard Survey, select the item from the status on the list view. Right click
the mouse and select Delete from the context sensitive menu.
Note: A Hazard Survey cannot be deleted until all the records attached to the survey
have been deleted.
3.7 Changing a Surveys Status
Each status on the main tf. facility screen enables the surveys to be managed. To change
the status of a Survey select the Status/History button at the bottom of the Hazard
Survey form. This will activate the Hazard Survey Status form (figure 3.6.1). Use the
drop-down menu on the New Status field to select the correct status and click OK. The
survey will then appear under the correct status on the tree structure of the main tf.
facility screen.
Figure 3.6.1
© The Technology Forge 2006
Page 10 of 33
Hazards User Manual
4
Hazards
4.1 Introduction
The Hazard form is used to record the details and location of any presumed or known
ACM’s in a block or room. The form also enables you to input and analyse associated
sampling, identification, assessments and quality control checks.
Technical reports can also be created to present the results of the recorded hazard. The
report uses the most current data from the form.
4.2 Adding a new Hazard
To add a hazard, select the New button on the Survey Items tab of the Hazard Survey
form. This will activate the Hazard Form (figure 4.2.1).
Enter a Description if necessary. This field is an optional field.
Click on the Save button. This will generate a unique Hazard ID at the top left of the
form. The number sequence is set up by the systems administrator.
Enter the Position of the hazard and an ID if desired and tick the ID Label Attached
check box if necessary.
Figure 4.2.1
© The Technology Forge 2006
Page 11 of 33
Hazards User Manual
4.2.1 The Details Tab
Select a Block or a Room via the ellipsis on the Location field to identify the position of
the Hazard. This is a mandatory field. The Upper Location will be automatically
populated.
A Plant Item can be chosen if the hazard relates to a particular asset. The Identified By
field will be automatically populated with the Surveyor inputted on the Hazard Survey
form. This may be changed if necessary.
The Identified Date field will be populated by today’s date, but may be changed. Select
a Material and Sub-Type from the drop down menu and enter any notes in the
Comments text box. These fields are optional.
4.2.2 The Documents Tab
A document e.g. a photograph can be linked to the hazard by clicking on the New Link
button on the Documents tab. This will load the Linked Documents form (figure 4.2.2).
Figure 4.2.2
Enter a Description and select a Document Type from the drop down menu. These are
mandatory fields. The Document Date field will be populated with today’s date when the
form is saved if a date is not entered.
All the fields on the Details and User Defined tabs are optional. To link a document
search for the Document Path in the system via the ellipsis button. To view the
document either double click on the document or press the View button.
© The Technology Forge 2006
Page 12 of 33
Hazards User Manual
When linking a document to a hazard it is possible to specify a default document.
Highlight the correct document and click the Set As Default button. If the document is a
picture file it will appear on any Technical Reports produced regarding the hazard. See
section 7 of this manual for more on Technical Reports.
4.2.3 User Defined Tab
The User Defined tab is designed so that the system administrator can define fields.
The options available for customising are look up fields (drop down menus), text fields
and check boxes.
4.2.4 History Tab
The History tab provides an event log of the hazard, for example status changes and
any notes associated with the hazard (see figure 4.2.3). To view all the information for
an event, highlight the event and click the Details button. To enter any additional
information click on the Add Note button. Enter the details in the text box and Save
then Close the form.
Figure 4.2.3
© The Technology Forge 2006
Page 13 of 33
Hazards User Manual
4.2.5 The Hazard Register
The Register folder on the main tf. facility screen (see figure 4.2.4) displays every
hazard recorded against the Survey Type. On this list view, use the Details drop-down
on the toolbar at the top of the screen to view additional columns. To sort by a particular
column, click on the column header e.g. location.
Figure 4.2.4
© The Technology Forge 2006
Page 14 of 33
Hazards User Manual
4.2.6 Changing a Hazards Status
When a hazard is recorded the Status of the hazard will be automatically set to
Presumed (shown at the top right of the Hazard form – see figure 4.2.1).
The Status can be changed by selecting the Status/History button. This will activate the
Hazard Status form (figure 4.2.5). Change the status via the drop-down menu on the
new status field. Click OK and the status at the top of the Hazard form will be updated.
The Status can also be changed automatically by selecting either Hazard Confirmed or
Hazard Not Detected on the Samples tab (see section 4.3), or by confirming an
Asbestos Type on a Risk Assessment (see section 4.4)
Figure 4.2.5
4.2.7 Editing a Hazard
To edit a Hazard, highlight the hazard from the Survey Items tab on the Hazard Survey
form. Select the Edit button. This will activate the Hazard form.
Alternatively, select the Register folder from the list view on the main tf. facility screen.
This will list all the hazards that have been recorded. Highlight a Hazard from the right
pane, right click the mouse and select Edit from the context sensitive menu.
When amendments to the data are made the Save button is enabled. Make the necessary
changes to the form and operate the Save button. Close the form.
4.2.8 Deleting a Hazard
To delete a hazard, highlight the Hazard from the Survey Items tab on the Hazard
Survey form. Select the Delete button. This will activate the Hazard form. A message
will ask you to confirm your deletion.
© The Technology Forge 2006
Page 15 of 33
Hazards User Manual
Alternatively, select the item from the Register folder on the list view. Right click the
mouse and select Delete from the context sensitive menu.
Note: Any records associated with the hazard, e.g. samples or inspections, will also be
deleted.
Hint
A Hazard can also be added via the Register folder. This may be useful for recording
independent hazards, when a survey is not required. Select the Register folder from the
hazard type on the tree on the main screen. In the right pane, right click the mouse and
select new from the context sensitive menu.
4.3 Samples
4.3.1 Introduction
A sample of the hazard can be collected and recorded on the Sample tab of the Hazard
form. Each sample should be labelled and given an Identification number, which can also
be inputted on the form. Once a sample has been taken, details of the analysis of the
sample can also be recorded on the Sample form
4.3.2 Adding a Sample
To add sample details to a Hazard click on the Sample tab of the Hazard form (see
figure 4.3.1)
© The Technology Forge 2006
Page 16 of 33
Hazards User Manual
Figure 4.3.1
Select an option from the Sample Required drop-down (Yes, No, Taken). This is
mandatory and is defaulted to No until it is amended.
Enter the Sample ID, Origin of Sample and Sampled On date if desired. The Sampled
By field will be automatically populated only if a Sampler has been selected on the
Hazard Survey form. If not, select a sampler via the ellipsis button to the right of the
field. All these fields are optional.
Once a sample has been analysed the Analysed On date and Analysed By field can be
selected. Again these fields are optional. Enter any details on the Analysis in the text
box available.
An Asbestos Type can be selected from the drop-down menu. Once this has been
selected the Hazard Confirmed checkbox will be available. By ticking the hazard as
Hazard Confirmed or Hazard not detected this will automatically update the status of
the Hazard item. The Asbestos Type field will also be automatically populated if an
Asbestos Type has been recorded as part of the Risk Assessment (see section 4.4). If
an Asbestos Type is entered and the Hazard Confirmed checkbox is not ticked a
message will ask if the status should be updated once the Save button is pressed.
© The Technology Forge 2006
Page 17 of 33
Hazards User Manual
Once details have been added to the tab, Select the Save button
4.3.3 Samples Folder
This folder lists every sample recorded against every hazard (fig 4.3.2). Use the Detail
drop-down menu on the toolbar at the top of the screen to view more columns. The
samples can be edited from this folder (see below).
To sort by a particular column, click on the column header, e.g. Action ID.
Figure 4.3.2
4.3.4 Editing a Sample
To edit a sample select the Samples tab from the Hazard form, amend the data and
Save the form.
Alternatively, select the Samples folder from the list view. Highlight the action form the
list in the right pane and select Edit from the context sensitive menu.
4.4 Risk Assessments
4.4.1 Introduction
Once a sample has been taken a Risk Assessment may be required to assess the degree
of risk of the hazard. The Material Assessment section of the form allows you to
identify the high-risk materials. And the Priority Assessment identifies the management
priority, determined by the extent of the damage and the activities of the location.
© The Technology Forge 2006
Page 18 of 33
Hazards User Manual
4.4.2 Adding a Risk Assessment
Once a sample has been taken a risk assessment may be required. To add a risk
assessment, select the New button on the Risk Assessment tab of the Hazard form.
This will load the Risk Assessment form (figure 4.4.1).
Figure 4.4.1
The Risk Assessment No. will be automatically populated but may be amended. This is
a mandatory field.
Enter the Assessed On date, Assessed By and Comments fields if desired.
The Form must then be saved in order to activate the Assessment and Actions tabs.
Complete the assessments as necessary. For each Category choose the related SubCategory from the drop down menus, which are accessible by clicking the mouse in the
Sub-Category field. This will automatically populate the Risk and Score fields. Each SubCategory is an optional field.
If an Asbestos Type is selected as part of the Risk Assessment then it will be
automatically populated on the Samples tab (see section 4.3).
The Overall Assessment field will be automatically populated and will be calculated
from the Material Assessment or the Material and Management assessments
combined. These options will be determined and set up by the systems administrator.
On the Risk Assessment form there is also the option to mark the form as complete by
ticking the Completed check box. If ticked as complete, when the form is saved the
message shown in figure 4.4.2 will be displayed.
© The Technology Forge 2006
Page 19 of 33
Hazards User Manual
Note: Once set to complete the Risk Assessment form cannot be edited.
Figure 4.4.2
Any Risk Assessments will be displayed in a list on the Assessment tab of the Hazard
form. The current assessment in the list will be in Bold. The tab will also display a
summary of the current Risk Assessment (figure 4.4.3)
Figure 4.4.3
4.4.3 Adding Additional Assessments
Once an initial risk assessment has been recorded, further assessments may be required.
Follow the instructions above for Adding a Risk Assessment. When the New button is
selected the message shown in figure 4.4.4 will be displayed.
© The Technology Forge 2006
Page 20 of 33
Hazards User Manual
Figure 4.4.4
If No is chosen a blank assessment form will be displayed. Select Yes and a copy of the
current risk assessment will be produced, which can be amended and saved as a new
assessment. A new assessment will be automatically set to the current assessment,
which will appear in bold on the list view of the Assessment tab (figure 4.4.3).
4.4.4 Setting a Current Risk Assessment
One or more risk assessments may be recorded against a hazard. To make a risk
assessment the current assessment, select the Assessment tab on the Hazard form.
Highlight the Risk Assessment from the list and select the Set Current button. The
current risk assessment will be in bold on the list.
Note: The last recorded assessment will be automatically set to the current risk
assessment.
4.4.5 Adding an Action to a Risk Assessment
An action can be added to a risk assessment by selecting the Actions tab on the Risk
Assessment form (see figure 4.4.1). Section 4.5 of this manual explains how to do this.
Any actions recorded against a risk assessment will also be displayed on the Actions tab
of the Hazard form (see figure 4.5.1).
4.4.6 Editing a Risk Assessment
To edit a risk assessment, select the Risk Assessment tab from the Hazard form.
Highlight the risk assessment and select the Edit button. This will activate the Risk
Assessment form.
When amendments to the data are made the Save button is enabled. Make the necessary
changes to the form and operate the Save button. Close the form.
4.4.7 Deleting a Risk Assessment
Highlight the Risk Assessment from the list on the Hazard form. Select the Delete
button and a message will ask you to confirm your deletion.
© The Technology Forge 2006
Page 21 of 33
Hazards User Manual
4.5 Actions
4.5.1 Introduction
Actions can be created as measures that can be taken to combat the hazard. An action
may be added on the Actions tab of the Risk Assessment form or on the Actions tab of
the Hazards form (figure 4.5.1).
Figure 4.5.1
© The Technology Forge 2006
Page 22 of 33
Hazards User Manual
4.5.2 Adding an Action
To enter an action, select the Action tab on the Hazard form and click on the New
button. This will load the Hazard Action form (see figure 4.5.2). The Upper Location
and Location fields will be automatically populated. Select an Action from the drop
down menu and enter the Target Date. These are both mandatory fields.
Figure 4.5.2
Complete the remaining fields if required: Price Band, Cost, Priority, Responsible
Party, and Action Owner.
When the action has been carried out you have the option of ticking the Completed
check box, entering the Actual Date of the completion and any additional Comments.
Operate the Save and Close buttons to exit the form. When the form is saved a unique
Action Id will be automatically generated at the top of the Action form. The action will
be displayed in the list on the Actions tab of the Hazard form and also on the Actions
tab of the Risk Assessment form
Note: if an action goes beyond its target date for completion the record will appear red
in the list view on the Actions tab and also on the list view of the Actions folder on the
main tf. facility screen.
© The Technology Forge 2006
Page 23 of 33
Hazards User Manual
4.5.3 Actions Folder
An Actions folder is available on the main screen of tf. facility (see figure 4.5.3)
Figure 4.5.3
This folder lists every action recorded against every hazard. Use the Detail drop-down
menu on the toolbar at the top of the screen to view more columns.
To sort by a particular column, click on the column header, e.g. Action ID.
4.5.4 Editing an Action
To edit an action select the Actions tab from the Hazard form. Highlight the action and
select the Edit button. This will activate the Hazard Action form.
Alternatively, select the Actions folder from the list view. Highlight the action form the
list in the right pane and select Edit from the context sensitive menu.
When amendments to the data are made the Save button is enabled. Make the necessary
changes to the form and operate the Save button. Close the form.
4.5.5 Deleting an Action
To delete an action, highlight the action from the list on the Actions tab of the Hazard
form. Select the Delete button and a message will ask you to confirm your deletion.
Alternatively, select the Actions folder from the list view. Highlight the action in the
right pane, right click the mouse and select Delete from the context sensitive menu.
© The Technology Forge 2006
Page 24 of 33
Hazards User Manual
4.6 Inspections
4.6.1 Introduction
It is advisable that quality control checks are performed on work in progress at regular
intervals. The software enables you to choose the frequency of the inspections and
enables you to enter comments on each inspection. The inspections will be displayed in
a list on the Inspections tab of the Hazard form, which will also display the date of
when the next inspection is required.
4.6.2 Adding an Inspection
Click on the Inspections tab on the Hazard form to enter details of an inspection. Enter
the number of times an inspection should take place in the Frequency field and select
whether it should be weekly, monthly or yearly.
Operate the Add button and the Hazard Inspection form will be loaded (figure 4.6.1).
Choose a Surveyor via the ellipsis button and enter the Date of the Inspection. These
are mandatory field. Add any Comments if necessary.
Figure 4.6.1
Click the Save and Close Buttons to exit the form and return to the Inspections tab. The
inspection will be displayed in the list (see figure 4.6.2) and the date of the Next
Inspection (based on the date of the inspection and the frequency) will be displayed in
the top half of the Hazard form.
Note: if an Inspection date is overdue the hazard will appear red in the list view on the
Inspections tab of the Hazards form.
© The Technology Forge 2006
Page 25 of 33
Hazards User Manual
Figure 4.6.2
4.6.3 Editing an Inspection
To edit an Inspection, select the Inspections tab from the Hazard form. Highlight the
relevant Inspection and select the Edit button. This will activate the Hazard Inspection
form.
When amendments to the data are made the Save button is enabled. Make the necessary
changes to the form and operate the Save button. Close the form.
4.6.4 Deleting an Inspection
To delete an Inspection, highlight the inspection from the list on the Inspections tab of
the Hazard form. Select the Delete button and a message will ask you to confirm your
deletion.
© The Technology Forge 2006
Page 26 of 33
Hazards User Manual
5
No Access
5.1 Introduction
It may be useful to record rooms where access could not be gained. Rooms were access
is prohibited can be added via the No Access tab on the Hazard Survey form, previously
shown in figure 3.2.4.
5.2 Adding a No Access Record
On the No Access tab of the Hazard Survey form select the New button. This will
activate the No Access form (figure 5.2.1)
Figure 5.2.1
Select a Room via the ellipsis button to the right of the field. This is a mandatory field.
Enter any Comments if necessary. Save then Close the form. The record will be
displayed on the list on the No Access tab.
Enter any specific areas within rooms that were not accessible in the Inaccessible Areas
text box on the No Access tab of the Hazard Survey form.
© The Technology Forge 2006
Page 27 of 33
Hazards User Manual
6
No Hazard
6.1 Introduction
If it is ascertained that a room does not contain any hazards (asbestos), the rooms can
be recorded via the No Hazard tab on the Hazard Survey form, previously shown in
figure 3.2.5.
6.2 Adding a No Access Record
On the No Hazard tab of the Hazard Survey form select the New button. This will
activate the No Hazard form (figure 6.2.1)
Figure 6.2.1
Select a Room via the ellipsis button to the right of the field. This is a mandatory field.
Enter any Comments if necessary. Save then Close the form. The record will be
displayed on the list on the No Hazard tab of the Hazard Survey form.
© The Technology Forge 2006
Page 28 of 33
Hazards User Manual
7
Reports
7.1 Technical Reports
A technical report can be produced for all hazards with a sample recorded. The report
shows the current sample details along with any Analysis, Risk Assessment (current
only) or Action details that have been recorded. The report will also display a document
(if it is a picture file) that is set as default for the hazard (see section 4.2 Adding a New
Hazard).
To produce a report, highlight the hazard from the Register category of the Hazards
module. Right click the mouse and select Technical Report from the context sensitive
menu. You then have the option of printing or previewing the selection.
To produce a report of all hazards with a sample click on the All button of the Register
category to display all the hazard records. Highlight the first record then hold down the
shift key and scroll down and click the last record. All the records will be highlighted.
Right click the mouse and select Technical Report. The resulting report will show all
hazard records that have a sample recorded against them.
7.2 System Reports
There are a number of System Reports for the hazard module. These can be accessed in
the usual way via the Reports menu on the toolbar or the System Reports icon on the
toolbar.
© The Technology Forge 2006
Page 29 of 33
Hazards User Manual
thetechnologyforge
top floor, pegholme mills, wharfebank business centre, otley, leeds, LS21 3JP
helpdesk 01943 855050 tel 01943 464844 fax 01943 464833
www.technologyforge.com