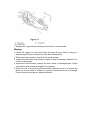
1
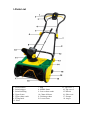
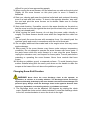
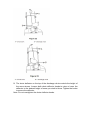
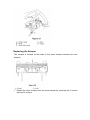
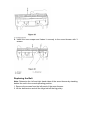
LE60200-50
(022459)
IMPORTANT: Read and understand this manual before assembling or
operating this Electric Snowthrower. Improper use of Snowthrower can cause
injury. Keep this manual for future reference.
Contents
I-Parts List
II- Technical Data
III-Safety Instructions
IV-Getting Started
V- Operation
VI-Maintenance and storage
I-Parts List
1. Switch button
2. Switch trigger
3. Switch housing
4. Upper frame
5. Upper chute crank
6. Fixing knob
19. Plate
7. Plug
8. Middle frame
9. Lower chute crank
10. Chute deflector
11. Discharge chute
12. Lower frame
13. Top cover 1
14. Top cover 2
15. Wheels
16. Side cover
17. Scraper
18. Auger
II .Technical Data
LE60200-50 (QT3121)
Rated Voltage: 230V~50Hz
Input Power: 2000W
Plowing Capacity: Max. 200 ㎡/h
Rotation Speed: 3000rpm
Plow depth and width: Approx. 25cm, 50cm
Max Spraying Distance: 9m
Weight: 16 kg
NOISE AND VIBRATION DATA
LPA: 87dB(A)
LWA: 101dB(A)
Vibration: 7M/S2
III-Safety Instructions
GENERAL SAFETY INSTRUCTIONS
Warning: Read all instructions. Failure to follow all instructions listed below may result in
electric shock, fire and/or serious personal injury. The term “power tool” in all of the
warnings listed below refers to your mains-operated (corded) power tool or
battery-operated (cordless) power tool.
SAVE THESE INSTRUCTIONS
1) WORK AREA
a) Keep work area clean and well lit. Cluttered and dark areas invite accidents.
b) Do not operate power tools in explosive atmosphere, such as in the presence of
flammable liquids, gases, or dust. Power tools create sparks which may ignite the dust
or fumes.
c) Keep children and bystanders away while operating a power tool. Distractions can
cause you to lose control.
a)
b)
c)
d)
2) ELECTRICAL SAFETY
Power tool plugs must match the outlet. Never modify the plug in any way. Do not use
any adapter plugs with earthed (grounded) power tools. Unmodified plugs and
matching outlets will reduce risk of electric shock.
Avoid body contact with earthed or grounded surfaces such as pipes, radiators,
ranges, and refrigerators. There is an increased risk of electric shock if your body is
earthed or grounded.
Do not expose power tools to rain or wet conditions. Water entering a power tool will
increase the risk of electric shock.
Do not abuse the cord. Never use the cord for carrying, pulling or unplugging the
power tool. Keep cord away from heat, oil, sharp edges or moving parts. Damaged or
entangled cords increase the risk of electric shock.
e) When operating a power tool outdoors, use an extension cord suitable for outdoor use.
Use of a cord suitable for outdoor use reduces the risk of electric shock.
a)
b)
c)
d)
e)
f)
g)
3) PERSONAL SAFETY
Stay alert, watch what you are doing and use common sense when operating a power
tool. Do not use a power tool while you are tired or under the influence of drugs,
alcohol, or medication. A moment of inattention while operating power tools may result
in serious personal injury.
Use safety equipment. Always wear eye protection. Safety equipment such as a dust
mask, non-skid safety shoes, hard hat, or hearing protection used for appropriate
conditions will reduce personal injuries.
Avoid accidental starting. Ensure the switch is in the off-position before plugging in.
Carrying power tools with your finger on the switch or plugging in power tools that
have the switch on invites accidents.
Remove any adjusting key or wrench before turning the tool on. A wrench or a key that
is left attached to a rotating part of the power tool may result in personal injury.
Do not overreach. Keep proper footing and balance at all times. This enables better
control of the power tool in unexpected situations.
Dress properly. Do not wear loose clothing or jewellery. Keep your hair, clothing, and
gloves away from moving parts. Loose clothes, jewellery or long hair can be caught in
moving parts.
If devices are provided for the connection of dust extraction and collection facilities,
ensure that these are connected and properly used. Use of these devices can reduce
dust-related hazards.
4) POWER TOOLS USE AND CARE
a) Do not force the power tool. Use the correct power tool for your application. The correct
power tool will do the job better and safer at the rate from which it was designed.
b) Do not use the power tool if the switch does not turn it on and off. Any power tool that
can not be controlled with the switch is dangerous and must be repaired.
c) Disconnect the plug from the power source before making any adjustments, changing
accessories, or storing power tools. Such preventive safety measures reduce the risk of
starting the power tool accidentally.
d) Store idle power tools out of the reach of children and do not allow persons unfamiliar
with the power tool or these instructions to operate the power tool. Power tools are
dangerous in the hands of untrained users.
e) Maintain power tools. Check for misalignment or binding of moving parts, breakage of
parts, and any other conditions that may affect the power tools operation. If damaged,
have the power tool repaired before use. Many accidents are caused by poorly maintained
power tools.
f) Keep cutting tools sharp and clean. Properly maintained cutting tools with sharp cutting
edges are less likely to bind and are easier to control.
g) Use the power tool, accessories and tool bits etc., in accordance with these instructions
and in the manner intended for the particular type of power tool, taking into account the
working conditions and the work to be performed. Use of the power tool for operations
different from intended could result in a hazardous situation.
5) SERVICE
a) Have your power tools serviced by a qualified repair person using only identical
replacement parts. This will ensure that the safety of the power tools in maintained.
ADDITIONAL SAFETY RULES FOR SNOW THROWER
1. Know your tool. Read owner’s manual carefully. Learn its applications and limitations as
well as the specific potential hazards related to this tool.
2. Do not operate this unit when tired, ill or under the influence of alcohol, drugs, or
medication.
3. All guards and safety attachments must be installed properly before using the unit.
4. Inspect the unit before use. Ensure the parts are installed correctly and secure.
5. Clear the area to be plowed before each use. Remove all objects such as rocks, broken
glass, nails, wire, or string which can be thrown or become entangled in this tool.
6. Keep the area of operation clear of all persons, particularly children and pets.
7. Avoid dangerous environment. Don’t use power tools in damp or wet locations or
expose to rain. Keep work area well lit.
8. Keep work area clean. Cluttered areas and benches invite accidents.
9. Be cautious to avoid electric shock. When using the machine keep your body away
from different ground terminal of power (e.g. upper and lower water pipes, outer frame of
heating equipment, microwave oven, or in a place that is locked.
10. The machine should be stored carefully and safely in a dry environment when not
used, far from the reach of children, or in a place that is locked.
11. Please do not use the machine in any purposes other than it is designed for, otherwise,
it may cause mechanical defaults or serious damage or injuries.
12. Special care should be drawn to the following issues when using this machine:
operation methods, procedures, surroundings, and environment states, etc.
13. When using this machine, the user should be cautious about the nearby status or
changes: The user should constantly observe the position and movement of other people,
nearby window, vehicles, obstacles, etc. Exercise caution to find any small piece of rocks
or other articles in the snow to avoid them from flying out and causing personal injury.
14. In case of following conditions, please turn off the machine and pull out the power
plug:
When not used, being repaired, replaced of some parts, being cleaned and checked as
well as any other conditions in which dangerous factors exist. If cord is damaged in
manner while plugged in, pull extension cord from wall receptacle.
15. Never carry snow thrower by cord yank it to disconnect from receptacle.
16. Do not use hands to unclog chute. Stop motor before removing Debris. Do not walk in
front of running machine. Do not direct discharge at bystander.
17. When using the machine the user must keep correct postures. Heels should be placed
firmly on the ground, while the hands hold the handles firmly.
18. Before using the machine, the user should have a careful inspection of the main
machine. Carefully check the different parts of the machine before starting, solving any
problem immediately. If you find any abnormal condition, please don’t use the machine
before repairing.
19. If you find the main power cable or the extension cable damaged, please pull out the
plug from the socket and disconnect the power immediately. Repair the cable for replace it
if necessary. When adding the lubricant or replacing any parts, you must strictly observe
the instructions and procedures described in this User Manual.
20. Special care should be paid to any rubber parts, since these parts may increase the
engine load and decrease its mechanical power if damaged.
21. When you examine, service clean the machine or replace parts, you must turn off the
power switch and disconnect the power cable. Any such operation should be performed
after revolving part inside the machine stops completely.
22. The first time you use the machine or after replacing some parts, you should perform a
test running and ensure no abnormal conditions exist to avoid any potential damages or
incidents.
23. Do not move or transport the machine when the plug is connected into the power
socket and the switch is turned on.
24. When using the machine you must respect local laws and regulations regarding noise
control and environment protection. To avoid any noise disturbance to other people, you
should carefully decide operation time and consider the surrounding conditions.
25. When the machine is running, be cautious to prevent your hands, feet or head from
moving near to the revolving part or the snow exit of the machine.
26. In case you fall or collide with the machine, please check the main machine and parts
for any damages or cracks.
27. When stepping backwards, be cautious about any obstacles beneath your feet or
behind you to avoid falling.
28. When using the machine, if you notice the machine running in an unstable state or
hear abnormal sound from the engine, please stop the machine and disconnect the power
immediately and contact your original distributor.
29. When operating the machine, while taking care of your safety, you should also be
cautious to avoid any harm to other people. Call nearby passengers’ attention to avoid
potential personal injury.
30. Use for snow removal only.
31. Please do not take back and store the machine while it is still connected to the power
source. It may cause damage and injury.
32. Keep the plug clear from water.
33. To prevent electric shock use only with an extension cord suitable for outdoor
use.( Does not apply to battery-operated Snow Thrower)
34. Keep hands away from moving parts. Shut off engine before unclogging discharge
chute.
35. Dress properly. Do not wear loose clothing or jewellery. They can be caught in moving
parts. Rubber gloves and non-skid footwear are recommended when working outdoors.
The user should wear a protective helmet to avoid your hair from getting in contact with
any revolving part of the machine.
36. Keep children and visitors away. Visitors should wear safety glasses and be kept a
safe distance from work area. Do not let visitors contact too or extension cord.
37. Use right tool. Don’t force small tool or attachment to do the job of a heavy duty tool.
Don’t use tool for purpose not intended.
38. Do not force unit. It will do the job better and with less likelihood of injury at a rate for
which it was designed.
39. Always wear safety glasses. Everyday eyeglasses have only impact resistance lenses.
They are not safety glasses.
40. Keep hands, face and feet at a distance from all moving parts. Do not touch or try to
stop the machine when they are rotating. Do not operate without guards in place.
Symbols
The rating plate on your tool may show symbols. These represent important information
about the product or instructions on its use.
Double insulated for additional protection
Conforms to relevant safety standards.
Read the instruction manual
The following warning symbols are to remind you of the safety precautions
you should take when operating the snow thrower.
Always keep the children or pets away from the working area.
Always keep away from the working area. The throwing snow may hurt you.
Waste electrical products should not be disposed of with household waste.
Please recycle where facilities exist. Check with your local authority or
retailer for recycling advice.
Keep hands away from the moving parts of the snow thrower. The rotating
parts will hurt you.
Keep foot way from the moving parts of the snow thrower. The rotating parts will
hurt you.
IV-GETTING STARTED.
1. Remove the snow thrower and all other items from box.
2. Check all items for shipping damage. If you find any damage or any parts are
missing, promptly inform the dealer where you bought the Snow Thrower.
The Snow Thrower comes with below accessories, packed in part bag.
Cable clip
2pcs
Fixing knob(M4*50)
4pcs
Bolt
4pcs
Screw ( M4*16) 1pc
Nut (M4) 1pc
Note: Upper chute crank and lower chute crank are packed as two parts in the
box.
The snow Thrower is to be assembled before Operation. To assemble the snow thrower,
follow the instructions below.
Upper, Middle and Lower Frame Assembly
1. Loosen and remove the four sets of joint fixing T-bolts, washers, and joint
fixing knobs to separate the upper frame from the lower frame.
2. Hold the middle frame so that the screw holes align with the holes on the
lower frame. Insert the T-bolt with washer into the holes on each side and
use the joint fixing knobs to secure the connection on both sides. The joint
fixing bolts and washers should be inserted inside the frame of the unit so
that the joint fixing knobs are fastened to the outside of the frame. Note: Do
not over-tighten the knobs.
3. Connect the upper frame with the middle frame in the same way as described in
step 2. Use the joint fixing T-bolts, washers and knobs to secure the connection
on both sides.
4. Locate the cable clips in the parts bag. Secure the power cord to the
frame of the unit by clipping them onto the frame at evenly spaced
intervals.
Discharge Chute and Chute Crank Assembly
1. Lift the chute deflector so that it snaps and locks securely onto the discharge
chute.
Discharge chute
Chute deflector
Chute deflector knob
2. Raise or lower the chute deflector to the desired height of the snow stream
and tighten the chute deflector knobs.
Note: Do not overtighten the chute deflector knobs.
Chute deflector knob
3. Locate the low and upper chute crank in the parts bag. Loosen the screw
and nut located on the upper chute crank with screwdriver and wrench.
Note: You may be able to unfasten the screw and nut by hand.
4. Slide the upper chute into the lower chute crank, aligning the screw holes.
Tighten the screw into the aligning holes using a screwdriver. Fasten the unit
with wrench.
5. Slide the lower crank into the chute base hole.
Slide into chute base hole
6. Remove the washer and nut from the eye bolt with rubber grommet found on
the upper chute crank. Position the chute crank so that the eye bole with
rubber grommet inserts into the center hole of the middle frame. Secure with
washer and nut.
V. Operation
Note: Before using the machine, please make sure the power source you
will use is in accordance with the specifications shown in this manual.
Before inserting the plug into the socket, make sure the machine’s roll shaft
and the snow thrower’s rubber plates are all fixed firmly with screws, and
the rubber plates are facing to the correct direction. Perform a test run to
ensure that the rotor turns feeely.
Securing the extension cord
1. For safe and efficient use of your snow thrower, use only a CE-rated
extension cord recommended for outdoor use.
2. To prevent the extension cord from disconnecting during use, tie the
extension cord into a loose knot on the top right side of middle frame before
connecting the plug in the switch cord socket of the snow thrower.
Powering on and off
Keep the plug into the outlet.
To power on, press the button B and trigger C or A at the same time, power
is on, then you can release the button B, the machine started.
Release the trigger A or C, power is off.
To power off, Release the trigger A or C.
Moving the Machine and Plowing the Snow
WARNING Foreign objects, such as rocks, broken glass, nails, wire, or
string, can be picked up and thrown by the snow thrower, causing serious
personal injury. Remove all foreign objects from the area to be plowed before
operating the snow thrower.
1. Keep the area of operation free of foreign objects that can become thrown by
the rotor blades. Perform a thorough inspection of the area since some
objects may be hidden from view by surrounding snow. If the snow thrower
hits an obstruction or picks up a foreign object during use, stop the snow
thrower, disconnect the extension cord, remove the obstruction, and inspect
the unit for damage. Repair or replace any damaged part before restarting
and operating the unit.
2. Keep children, pets, and bystanders away from the area of operation. Be
aware that the normal noise of the machine when turned on may make it
difficult for you to hear approaching people.
3. When moving the snow thrower, use the wheels on one side as the pivot point.
Slightly tilt the snow thrower on this pivot point to move it forward or
backward.
4. Start your clearing path near the electrical outlet and work outward, throwing
snow in a back and forth motion. To clear in the opposite direction, step over
the cord and pivot the snow thrower on its wheels. Make sure to overlap
clearing paths.
5. Note wind direction. If possible, move in the same direction as the wind so
that the snow is not thrown against the wind (and thus back into your face and
on the just cleared path).
6. While moving the snow thrower, do not drag the power cable violently or
roughly. The snow thrower should move within the range that the cable can
reach.
7. Do not push the snow thrower with excessive force. You should push the
machine gently and evenly in accordance with the unit’s throw rate.
8. Do not apply additional man-made load to the engine since this may cause
engine damage.
9. Some parts of the snow thrower may freeze under extreme temperature
conditions. Do not attempt to operate the snow thrower with frozen parts. If
the parts freeze while the snow thrower is in use, stop the snow thrower,
unplug the extension cord, and inspect for frozen parts. Free all parts before
restarting or operating the snow thrower. Never force controls that have
frozen.
10. Working on pebbles, gravel, or unpaved surfaces - To avoid throwing loose
surface material along with the snow, push down on the handle to raise the
scraper at the base of the unit above the pebbles or gravel.
Changing Snow Exit Direction
WARNING Never direct the snow discharge chute at the operator, at
bystanders, at vehicles or at nearby windows. The discharged snow and foreign
objects accidentally picked up by the snow thrower can cause serious damage and
personal injury. Always orient the discharge chute in the opposite direction from
where you, bystanders, surrounding vehicles, or windows are located
1. The discharge chute can be adjusted 180 degrees by rotating the chute
crank. Rotate the chute control crank clockwise to move the discharge chute
to the left; counterclockwise to move the chute to the right.
2. The chute deflector on the top of the discharge chute controls the height of
the snow stream. Loosen both chute deflector knobs to raise or lower the
deflector to the desired height of snow you wish to throw. Tighten the knobs
to secure the deflector.
Note: Do not overtighten the chute deflector knobs.
WARNING Make sure that the chute deflector snaps and locks completely
onto the discharge chute. An opening between the discharge chute and the chute
deflector may allow foreign objects to be picked up by the snow thrower and
thrown in the direction of the operator causing serious boldly injury. l Do not
advance the chute deflector too far forward causing an opening to appear between
the deflector and discharge chute. l Do not overtighten the knobs on the chute
deflector.
VI Maintenance
WARNING Make sure to turn off the switch and disconnect the extension
cord before performing any maintenance task on your snow thrower.
Lifetime Lubrication
Lubrication is not necessary and may damage the unit. The snow thrower is
lubricated for lifetime use at the factory before shipment.
General Maintenance Tips
1. Do not attempt to repair the machine unless you have the proper tools and
instructions for disassembly and repair of the machine.
2. Check the shear bolts and other bolts at frequent intervals for proper tightness
to ensure that the equipment is in safe working condition.
3. After each snow removal session, run the snow thrower for a few minutes to
prevent the collector/impeller from freezing. Shut off the motor, wait for all
revolving parts to stop completely, and wipe residual ice and snow off the
unit. Rotate the chute crank several times to remove any excess snow.
Replacing the Rubber Plates
Note: When replacing worn rubber plates, pay close attention to carefully
distinguish between the coarse and smooth side of the plates. Place the coarse
side inside and the smooth side outside.
1. Detach the worn rubber plate by removing the two sets of nuts, bolts, and
washers used to secure it.
2. Install the new rubber plate so that the coarse side faces inward and the
smooth side faces outward.
3. Insert the bolt with the small flat washer into the corresponding holes on each
end of the rubber plate. Use the large flat washer and locknut to secure the
bolt on each end. Install the other rubber plates in the same way.
Replacing the Scraper
The scraper is located at the base of the snow thrower beneath the rotor
housing.
1. Detach the worn scraper from the snow thrower by removing the 3 screws
that hold it in place.
2. Install the new scraper and fasten it securely to the snow thrower with 3
screws.
Replacing the Belt
Note: Determine the left and right hand sides of the snow thrower by standing
behind the unit in the normal operating position.
1. Remove the screws from the left panel of the snow thrower.
2. Lift the belt tension and roll the large belt off the big pulley.
3. Replace the large belt by following instructions in reverse order.
Storage
1. Allow the engine to cool and clean the snow thrower before storing or
transporting. Be sure to secure the unit while transporting.
2. Disconnect the extension cord from the snow thrower.
3. Inspect the extension cord closely for signs of wear or damage. Replace it if it
is worn or damaged.
4. Inspect the snow thrower carefully for worn, loose, or damaged parts. Check
connections and screws and tighten if necessary.
5. Store the unit, along with the disconnected extension cord, in a locked, dry
place out of the reach of children to prevent unauthorized use or damage.
Cover loosely with a tarp for added protection.
DECLARATION OF CONFORMITY (CE)
Who has signed below, Aurelio de Michele, authorised by Dunsch Europe
SRL , with the following address Via dell'Artigianato n. 10 ,I-29010
GRAGNANO TREBBIENSE (ITALY), declares that the products brand LEA
model LE60200-50 (QT3121)with serial number of year 2013 on (the year of
manufacture is clearly indicated on the tool identification plate, followed the
serial number) , comply with all the requirements stated by the Directive
2006/42/EC of the European Parliament and of the Council of 17 May 2006 on
machinery.
These tools also comply with the requirements of the following community
directives:
•
•
•
•
•
•
•
•
•
•
•
•
Directive 2000/14/EC
Directive 2004/108/EC
Directive 2006/95/EC
ISO/DIS 8437:2008
EN 60335-1:2002+A11:2004+A1:2004+A12:2006+A2:2006+A13:2008+
A14:2010+A15:2011
EN 62233:2008
EN55014-1:2006/+A1:2009/+A2:2011
EN 55014-2: 1997/+A1:2001/+A2:2008
EN 61000-3-2: 2006/+A1:2009/+A2:2009
EN 61000-3-3: 2008
EN 61000-3-11:2000
EN ISO 3744
Power (kW)
2,0
Measured sound power level dB(A)
87,1
Guaranteed sound power level
dB(A) (K=3.0)
101
Aurelio de Michele
Product Manager
17-07-2013