1
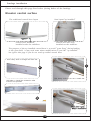
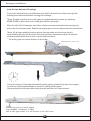
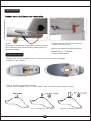
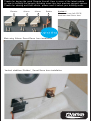
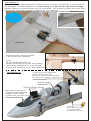
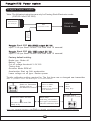
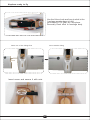
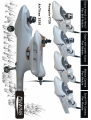
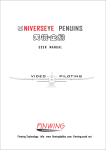
FINWING PENGUIN 1720
USER MANUAL
FINWING TECHNOLOGY
WWW . FINWINGHOBBY . COM
PATENT PENDING
Please read through the manual carefully before installation and flying
This manual aims to help direct the user on how to build the Penguin RC plane.
Penguin pilots ' feedbacks : the Penguine is easy f lying , recommend for FPV beginner
Please visit the Finwing official website for additional highlighted features, functions, and more.
Warning:
1 . This model airplane is not a toy , not recommended for children under 14 years old ,
2. Be cautious and prepared while flying this plane as a range of issues could lead to a crash
including the environment/weather, speed, pilot error, improper building/testing,
interference or other component failures .
3. Flying field: Choose an adequate flying space at least 100 meters long/wide and in an unpopulated
and non-built up area for safe flying. This includes avoiding flying over cities or other populated areas.
4. Please don't fly this model airplane in bad weather including rainy and/or windy environments.
5. Remember to unplug your flight/video battery when not in use to avoid any interference to others
who might be on similar channels.
6. Please remember switch on the transmitter first before connecting the battery, and disconnect
the battery first before switching off your transmitter.
7. Keep away from the propeller when the Penguin is powered as it can be dangerous and could
lead to injury. Keep the powered plane away from children at all times to avoid any accidents or injury.
FINWING TECHNOLOGY
WWW . FINWINGHOBBY . COM
PATENT PENDING
Fuselage installation
Please read through this page first before joining halves of the fuselage
Elevator control surface
New layout " up installed "
The traditional control horn layout
Control horn has been
installed under the stabilizer
Control horn has been
installed on the stabilizer
The purpose of the up installed control horn is to avoid " grass Drag " during landing
at the grass field , it may need some minor modifications if you like " up installed "
but ignore this page if you do not need up stalled control horn
Use hobby knife to elarge the tube slot
25M
2
M
1
Use hobby knife to cut out a small slot
Add glue to install the extension tube
insert it into position
3
4
* Note : Don ' t glue
keep it removable
1
Fuselage installation
Join the two halves of fuselage
If you have other wiring or modifications to add for the build run those through the
fuselage and tail-boom before closing the fuselage
*Note: Double check to ensure all parts are prepared and no parts are missing.
MAKE SURE to plan where you need glue before you begin!
Glue the left-half of fuselage, and other reinforcements parts that also need gluing
where the fuse halves meet. Make sure ample glue is across all points to be connected.
*Note: All gluing needs to be done at one time so make sure to move quickly
once starting as glue will dry fast. Gluing should be completed in about 9 minutes.
* Add a moderate amount of glue to the contact surface.
Too much glue can cause erosion in the foam.
* Note : Glue don ' t flow to nut
Join both halves of fuselage immediately after gluing, press firmly and use clamps
or other tools like painters tape to secure it until glue has dried.
Generally with air-drying indoors the glue will set after a 24 hour period.
* Note
please find out one wood washer
size :Φ15MM . Thickness : 3 . 0MM
add a little glue install it to the bottom of the tail - boom
2
Vertical stabilizer
Rudder servo and Servo horn Installation
*Note
Wrap tape to secure the connectors as it can prevent
the connectors from disconnecting when pulling the
extension cables.
Cockpit and Canopy
* Install the control horn with screws to
secure the servo horn
* Reinforce rudder joint with pack tape
* Install servo, ( FUS009 )
Push rod and clevis
Please find out the Camera mount wood base from Airplane package
installed it as needed
This is the third generation canopy .
Adopted new material and it ' s much better than the Second generation canopy
Don ' t recommend over - height
3
Big size and Heavy Camera
Thanks for buying the great Penguin Aircraft . Here is some of the latest update
on how to building the penguin including some tips from previous penguin owners .
Thanks for sharing and their efforts , please read it before your building works
Elevator
Aileron
Aileron
Rudder
Update # 1
New servo horn ( left - 3PCS )
Stainless steel Servo horn
Main wing Aileron Servo & Servo horn installation
Vertical stabilizer ( Rudder ) _ Servo & Servo horn installation
Tips Sharing # 1
Some of Penguin owners preferred to install the servo on the H - wing directly or at the back of
the fuselages . The Main purpose is to avoid cutting out a hole by the side of the fuselage .
Another reason is to use as shorter pull rod as possible , this is good to protect the Servo Gear
Here Shown is the pilot modified his Airplane for your reference
Elevator
Another Penguin owners modified
it like this for your reference
* note :
All the tips displayed here is
Not the must works to do with your building
Just sharing information for your reference
Please do it according to your own preference
Tips Sharing # 2
I noticed some flyers installed the
propeller at wrong direction !
Bear in mind for most of the Propeller
the embed words forward ( toward the nose )
Outside Cooling
0
Finwing 390 Pan Module
Use Velcro to secure it
if you wish fast install and
uninstall of the cockpit
( modified it like the AirTitan Aircraft )
Wrap tape
this is the easiest way
it ' s good to further
reinforce this junction
Penguin1720 Power system
Penguin Power Combo
*Note: The following instructions are only for Finwing Stock Electronic combo
(FUP1201 and FUP1205)
6CH Receiver
ESC
( with built - in BEC )
FINWING
Stock Motor
3 - 4 S Lipo
Battery
( For Example )
B
6
5
4
3
2
1
Penguin Stock ESC 60A (SBEC output : 5V . 3A )
Input : 3 - 4S lipo / Burst Current : 70A ( Less than 10 seconds )
Penguin Stock ESC 40A ( BEC output : 5V . 3A )
Input : 2 - 3S lipo / Burst Current : 5 0 A ( Less than 10 seconds )
Factory default setting :
Brake type : Brake off
Battery : Lipo
Cut off voltage threshold : 3 . 0V / 60 %
Timing : Auto
Governor Mode : RPM off
Acceleration Start up : Soft acceleration
Lower voltage cut off type : Reduce power
Throttle calibration setting required for The first time use or changed new transmitter
* Note : it ' s possible to cause " lost throttle signal " if no throttle calibration
Switch on Transmitter
Throttle stick to
the Maximum Position
Disconnect UBEC and ESC
Reconnect UBEC and ESC
Ready to fly
Power on UBEC
Power on ESC
waiting for a moment
< 2 - 3 Seconds >
Motor Beep.....
Indicating cell number
and signal confirmation
Throttle calibration done
Hear
Motor
Beep Beep
Throttle stick to
the Minimum Position
Plese visit FINWINGHOBBY . COM FAQ for detailed introductions and instructions of program
6
Airplane ready to fly
Use the Velcro hook and loop to stick to the
fuselage wooden base to hold
your battery, FPV gear, etc. into place.
Generally Hook stick to fuselage body
Insert one of the Wings first
Insert another Wing
Insert screw and secure it with nuts
77
Please read through the manual carefully before installation and flying
This manual aims to help direct the user on how to build the Penguin RC plane.
Penguin pilots ' feedbacks : the Penguine is easy f lying , recommend for FPV beginner
Please visit the Finwing official website for additional highlighted features, functions, and more.
Warning:
1 . This model airplane is not a toy , not recommended for children under 14 years old ,
2. Be cautious and prepared while flying this plane as a range of issues could lead to a crash
including the environment/weather, speed, pilot error, improper building/testing,
interference or other component failures .
3. Flying field: Choose an adequate flying space at least 100 meters long/wide and in an unpopulated
and non-built up area for safe flying. This includes avoiding flying over cities or other populated areas.
4. Please don't fly this model airplane in bad weather including rainy and/or windy environments.
5. Remember to unplug your flight/video battery when not in use to avoid any interference to others
who might be on similar channels.
6. Please remember switch on the transmitter first before connecting the battery, and disconnect
the battery first before switching off your transmitter.
7. Keep away from the propeller when the Penguin is powered as it can be dangerous and could
lead to injury. Keep the powered plane away from children at all times to avoid any accidents or injury.
FINWING TECHNOLOGY
WWW . FINWINGHOBBY . COM
PATENT PENDING