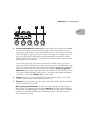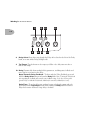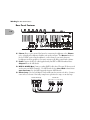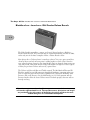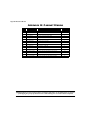
1
Pilot’s Handbook
An in-depth exploration of the revolutionary
technologies and tonal pleasures of the Flextone III.
Electrophonic Limited Edition. Also available at www.line6.com. Revision C.
The serial number can be found on the back panel of your Flextone III. It’s
the number that begins with “(21)”. Please note it here for future reference:
SERIAL NO:
WARNING: To reduce the risk of fire or
electric shock, do not expose this appliance to
rain or moisture.
CAUTION: To reduce the risk of fire or electric shock,
do not remove screws. No user-serviceable parts inside. Refer
servicing to qualified service personnel.
CAUTION:
This equipment has been tested and found to comply with the limits for a Class B digital device
pursuant to Part 15 of FCC Rules. Operation is subject to the following two conditions: (1) This device may not cause
harmful interference, and (2) this device must accept any interference received, including interference that may cause
undesired operation.
The lightning symbol within a triangle means
“electrical caution!” It indicates the presence
of information about operating voltage and
potential risks of electrical shock.
The exclamation point within a
triangle means “caution!” Please
read the information next to all
caution signs.
YOU SHOULD READ THESE IMPORTANT SAFETY INSTRUCTIONS
KEEP THESE INSTRUCTIONS IN A SAFE PLACE
Before using your Flextone III, carefully read the applicable items of these operating instructions and safety
suggestions:
1.
Obey all warnings on the Flextone III and in this Pilot’s Handbook.
2.
Do not place near heat sources, such as radiators, heat registers, or appliances which produce heat.
3.
Guard against objects or liquids entering the enclosure.
4.
Connect only to AC power outlets rated 100-120V or 230V 47-63Hz (depending on the voltage range of the
unit; refer to the back panel). Current ratings should be 4A for the 120V range and 2 A for the 230V range.
5.
Do not step on power cords. Do not place items on top of power cords so that they are pinched or leaned on.
Pay particular attention to the cord at the plug end and the point where it connects to the amp.
6.
Unplug your Flextone III when not in use for extended periods of time.
7.
Do not perform service operations beyond those described in the Flextone III Pilot’s Handbook. In the
following circumstances, repairs should be performed only by qualified service personnel:
• liquid is spilled into the unit
• an object falls into the unit
• the unit does not operate normally or changes in performance in a significant way
• the unit is dropped or the enclosure is damaged
8.
Prolonged listening at high volume levels may cause irreparable hearing loss and/or damage. Always be sure
to practice “safe listening.”
Flextone III Pilot’s Handbook © 2003, Line 6, Inc.
Please Note:
Line 6, Flextone, Vetta, POD, Duoverb, Tone
Transfer, Line 6 edit, FBV Shortboard and FBV are
trademarks of Line 6, Inc. All other product names,
trademarks, and artists’ names are the property of
their respective owners, which are in no way
associated or affiliated with Line 6. Product names,
images, and artists’ names are used solely to
identify the products whose tones and sounds were
studied during Line 6’s sound model development
for this product. The use of these products,
trademarks, images, and artists’ names does not
imply any cooperation or endorsement.
Welcome to Flextone III .................................................................................................1•1
Register ............................................................................................................................................1•1
Connect at www.line6.com .................................................................................................1•1
Line 6 and Flextone III.............................................................................................................1•1
Working It
Quick Start Guide ....................................................................... 2•1
Front Panel Features ................................................................................................................2•2
Manual Mode: What You See Is What You Get....................................................2•6
Using The Channel Memories............................................................................................2•6
Creating Amp Defaults...........................................................................................................2•7
Rear Panel Features..................................................................................................................2•8
Using Your Direct XLR Outputs ......................................................................................2•9
The Amps & Cabs
Meet The Family.........................................................................................................................3•1
What’s In There..........................................................................................................................3•2
The Cabinets ................................................................................................................................3•28
The Effects
About the Delay and Modulation Effects ....................................................................4•1
Delays ...............................................................................................................................................4•2
Modulations...................................................................................................................................4•4
Using Your Feet
FBV Class Foot Controllers..................................................................................................5•1
Connecting an FBV ...................................................................................................................5•1
So What Do All These Buttons and Pedals Do? ....................................................5•2
Saving and Naming with an FBV .......................................................................................5•4
Appendices
Amp Mod.......................................................................................................................................A
Cabinet Models...........................................................................................................................B
MIDI Channel & Programs....................................................................................................C
MIDI Continuous Control.....................................................................................................D
Customer Service ......................................................................................................................E
Warranty Information .............................................................................................................F
Welcome to Flextone III • Register
WELCOME TO FLEXTONE III
Register
Thanks for buying a Flextone III! Please send in that included registration card or
click on over to www.line6.com to get registered. We’ll wait right here...
Connect at www.line6.com
Join the thriving community at www.line6.com. It’s the place for ToneTransfer,
the expanding online tone library for Line 6 products. It’s also the place to get free
Line 6 Edit software that lets you tweak every last detail of you’re Flextone’s sound,
backup its memory, and build up your own tone library on your computer! The
discussion boards are humming with Line 6ers sharing insights to get the most from
their gear and the great adventure of making music. And you can also learn what’s
new from the artists that rely on Line 6, be the first to hear about new products, and
tap into Customer Support via the powerful FAQTRAQ system.
Line 6 and Flextone III
You probably know Line 6 as a technological innovator in the guitar world—first to
put digital software modeling technology to work in guitar combo amps, pioneering
direct recording technology in POD and other products, and capturing the soul of
classic pedals in modern stomp boxes. We make gear that’s packed with features
and hi-tech breakthroughs, and bring new value and capabilities to guitarists.
With Flextone III, our goal was to give you everything you needed for gigging —
including booty-shaking volume and simple operation—in one compact box. So
it’s naturally got carefully selected premium amp models like those in our Vetta and
PODXT, for the versatility to go from syrupy tweed rhythm to down right massive
crunch without missing a beat. And powerful, great sounding effects that are also
bone-head simple to use. The 112+ and 212 models even include Line 6’s signature
A.I.R. II direct outs, so you can always get your tone to its destination without
compromise or complication. And, of course, it’s all ready to dazzle your audience
with the tasteful look and feel of a classic tube amp.
So flip the page, you lucky devil. And let’s take your hot new tone buggy for a spin!
1•1
Working It • Quick Start Guide
WORKING IT
2• 1
In a rush? Well, then, just read this page and come back to the rest later:
Quick Start Guide
POWER: Connect the power cord from Flextone III’s rear panel to your power outlet.
But don’t turn the power on yet.
PLUG IN: Jack your guitar into Flextone III’s INPUT. Turn Flextone III’s MASTER
knob (on the far right) all the way down. Locate Flextone III’s POWER switch on the
back by the power cord, and fire that bad boy up. Spin MASTER up to 9 o’clock or so.
Get ready for tasty tones...
MODELS KNOB: Spin this to select from the 16 amp flavors, each with two
variations, for 32 Amp Models total.
DRIVE, BASS, MID,TREBLE, PRESENCE,VOLUME KNOBS: What you see is
what you get here—turn knobs ’til things sound good!
DELAY: Press the button to the left of the Delay knob to pick one of the Delay effects.
Tap in a tempo for the delay, and turn the Delay knob to get more or less of the effect.
MOD: Press the button to the left of the Mod knob to pick one of the Mod effects.
Turn the Mod knob to speed up or slow down the selected effect.
COMP/GATE: Press COMP and/or GATE to engage each effect. The Compressor
will smooth out your dynamics and add sustain. The Gate will mute the inherent noise
common to high gain amp tones when you’re not playing.
CHANNEL MEMORIES: These are like the buttons on a car radio that remember
your favorite stations. Press A, B, C or D to recall one of the 4 Channel Memories.
Press that button again to get back to “manual mode.” You’re in manual mode if none
of the A, B, C, or D buttons are lit. And just like a car radio, hold any of the buttons for
3 seconds to save your current settings to that memory for later recall.
Working It • Front Panel Features
Front Panel Features
1
2
3
4
5
2• 2
CHANNEL SELECT
MODELS
A
Double Verb
Tweed B-man
Match Chief
Blackface Lux
Class A-30
Jazz Clean
Plexi 45
Line 6 Insane
INPUT
B
C
D
Plexi Lead 100
Line 6 Mood
Brit J-800
Line 6 Crunch
Treadplate
Solo 100
Line 6 Clean
Gib Explorer
0
10
DRIVE
0
10
BASS
0
10
MID
0
10
0
10
TREBLE PRESENC
(PRESS TO SELECT CAB)
1.
Guitar Input: Plug your guitar in here.
2.
Models - Amps: As you turn this knob, one of the lights surrounding it will light. An
AMBER (yellow) light next to one of the Model names tells you that you’ve selected
that Amp Model. Turn the knob one more click to get a RED light, and you’ve chosen
a second variation of that amp “flavor.” Chapter 3 describes all 32 Amp Models.
Models - Cabs: When you select an Amp Model, your Flextone III is selecting an
appropriate Cab Model to go with it behind the scenes. To choose a different one from
the 16 available Cab Models, press and hold the Model knob while turning it; you’ll
see GREEN lights. The cabs run from smallest to largest, so selecting green lights from
“Line 6 Crunch” through “Gib Explorer” takes you all the way from petite combo amp
cabinets to ferocious 4x12s. Turn to “Line 6 Clean” to bypass the cab modeling.
3. Drive: Turn this knob to set how hard you’re driving the chosen Amp Model. Similar
to the input volume control on a non-master volume amp, the higher the setting, the
more “dirt.”
4.
Tone Controls – Bass, Mid,Treble and Presence: These controls are made to
behave like the controls of the amps that were modeled for Flextone III. Twist ’em
round until things sound just the way you like. See Chapter 3 for details.
Working It • Front Panel Features
5
6
7
2• 3
CHANNEL SELECT
A
0
B
10
MID
5.
C
0
10
D
0
10
0
10
TREBLE PRESENCE VOLUME
0
10
REVERB
Channel Select Buttons – A, B, C, D: Flextone III uses these buttons to remember
your favorite settings—no more need to mark up the front of your amp with grease
pencil to note your favorite settings! Each memory is pre-set with delicious tone when
a Flextone III leaves the factory—press a button to hear the saved setting. As you do,
notice that Flextone III’s lights indicate which Amp Model is used in the Channel
Memory, which effects are on, etc. To get back to the “manual mode,” just press the lit
button again to turn it off. Plus...
As you come across your own favorite settings that you’d like to keep, you can save
them to the A, B, C and D buttons to replace the factory presets. Just hold down any of
A, B, C or D buttons for about 3 seconds until all of them flash and presto—Flextone
III has now memorized your custom tone for easy recall! See Using The Channel
Memories on page 2•6 for more detail. The Line 6 FBV class foot controllers let you
select these Channel Memories with your feet—and expand the number of memories
available to a total of 36. Chapter 5 has got the details.
6.
Volume: Use this to set the volume for the current channel, and get it to the right
relative volume versus the other channels that you use.
7.
Reverb: Just turn the knob to get the amount of reverb you’d like. Turn the knob fully
counter-clockwise for no reverb.
Bonus Feature: Reverb Tweak- To adjust the type and decay of the Reverb, press
and hold the Tap Tempo button and turn the Reverb knob. There are three different
Reverb types accessible throughout the range of the knob. The first third of the knob is
a spring, the second third a Room, and the final third a Plate, each with a range of
decays, from short to long.
Working It • Front Panel Features
12 13
9
15
2• 4
TAP
TEMPO
GATE
SWEEP ECHO
PING PONG
DIGITAL
ANALOG
TAPE ECHO
TUBE ECHO
COMP
ROTARY
U-VIBE
PHASER
FLANGER
CHORUS
TREMOLO
0
DELAY
8
10 11
MOD
10
MASTER
14
8.
Delay Select: Press this to step though the Delay effects listed to the left of the Delay
knob, or to turn off the Delay (all lights off).
9.
Tap Tempo: Tap the button at the tempo you’d like—the delay time switches to
match that tempo.
10. Delay: Dynamically adjusts multiple delay parameters, including mix, feedback and
tone. Spin it to get more or less delay.
Bonus Features: Delay Feedback - To adjust only the Delay Feedback, press and
hold the Delay Select button and turn the Delay knob. Note: Turning the Delay knob
after tweaking the feedback will override your feedback setting. So it’s best to first get the
general Delay set with the Delay knob, and then fine-tune the feedback if necessary.
Delay Time - To set the delay time without having to deal with tempos and such,
press and hold the Tap Tempo button while turning the Delay knob. For shorter
delays dial counter-clockwise. Long delays, clockwise.
Working It • Front Panel Features
11. Mod: Press this to step though the Mod effects listed to the left of the Mod knob, or to
turn off the Mod (all lights off).
12. Gate: Engages the on-board gate. The gate kicks in when your guitar signal drops
below a certain “threshold,” and is intended to mute the noise that you might
otherwise hear at that time. To adjust the Gate threshold, press and hold the Gate
button while turning either the Delay or Mod knob. The lower the threshold
(clockwise), the more the sustain of your notes will tend to get chopped off.
13. Comp: Engages the on-board Compressor. The compressor will add sustain to your
guitar sound, and smooth out your dynamics. To set the amount of compression, press
and hold the Comp button while turning either the Delay or Mod knob. The lower
the setting, (clockwise) the more your notes will sustain.
14. Mod: Dynamically adjusts multiple modulation parameters, including rate and depth.
Bonus Feature: Modulation 2nd Function - Each modulation model can be finetuned by pressing and holding the Mod Button while turning the Mod Knob. The list
below shows which fine-tuning is available for each effect. Note: Turning the Mod knob
after fine-tuning an effect will override the fine-tuned parameter you’ve tweaked. So it’s best to
first get the general Mod set with the Mod knob, and then fine-tune if necessary.
MOD Effect
Rotary
U-Vibe
Phaser
Flanger
Chorus
Tremolo
Fine-Tune
Tone
Depth
Feedback
Feedback
Depth
Depth
15. Master: Sets the overall volume of your Flextone III. Adjust this to set your basic
loudness, then use the Channel Volume knob to balance the relative volume of the sounds
you store with the A, B, C, D buttons.
2• 5
Working It • Manual Mode: What You See Is What You Get
Manual Mode: What You See Is What You Get
2• 6
When none of the A, B, C, D Buttons are lit, Flextone III is operating in Manual
Mode, meaning that all of the controls are active and the sound of the amp is
determined by the current knob settings. Just like a regular amplifier, right?
If you are not in Manual Mode and would like to be, simply give the lit A,B, C, or D
Button a quick press.
Using The Channel Memories
Flextone III can store and recall your favorite settings using the A, B, C, D Buttons.
Save: Any time you’ve dialed up a sound that you’d like to save for later recall, all you
have to do is hold down button A, B, C or D for 3 seconds. At the end of that 3
seconds, the button you held will flash to let you know that you’ve successfully stored
your present setting of all the controls to that button.
Recall: When you tap one of the A, B, C, D Buttons to light it up, Flextone III
recalls the settings that were stored in that button’s Channel Memory. This includes
your choice of Amp and Cab Models, the Drive, Bass, Mid, Treble, Presence,
Reverb and Channel Volume settings, plus your Mod and Delay settings. Note: The
Master Volume setting is not stored with each Channel, instead it acts as a global volume that
controls the overall volume of all channels.
The various front panel lights will show the recalled settings, but the knobs will not.
Turning any knob or operating any button will override the recalled setting for that
control only. To override all the recalled settings and get the sound determined by the
current setting of all the knobs, press the lit A, B, C, or D Button. You’re now back in
what-you-see-is-what-you-get Manual Mode.
See Chapter 5 for details on how to store and recall a total of 36 Flextone III Channel
Memories using your feet.
To reset all the Channel Memories (including all 36 available from an FBV and MIDI)
to their factory state, hold the A and D Buttons while powering up your Flextone III.
Working It • Creating Amp Defaults
Creating Amp Defaults
Amp Defaults are simply snapshots of all the important Amp Model controls that
are automatically recalled when you select a model via the Model knob. Every
time you select a model, Flextone III loads the associated Amp Default to expedite
your trip to tone nirvana.
You can edit any or all of the Amp Defaults, and pack your Flextone III with all
the special amp-tweaking genius that only you possess. This brilliance will then be
available instantly at the turn of the MODEL knob. For instance, when you turn
the MODEL knob to load the Plexi-45 model, you’ll get your personal Plexi-45,
with all the controls set for your very own version! Here’s how it works:
Choose an Amp Model, change the cab if you like, dial in the amp controls, etc.
When you’re happy with what you’ve got, press and hold the MODEL knob being
careful not to turn it. After about 5 seconds, the light for the selected model will
start to blink and you can let go. Your custom settings have been saved.
Using MIDI, you can customize a whole bunch of other controls and store them with
the Amp Setup. Download the free Line 6 Edit software from www.line6.com to do
all this with software customized for your Flextone III. The MIDI Appendix gives detail
on the continuous controller messages that drive each of these parameters. After
making tweaks via MIDI, you can save the result as the Amp Default.
Amp parameters accessible via MIDI and Line 6 Edit software include:
Drive
Bass
Mid
Treble
Presence
Channel Volume
Compression Gain
Compression Threshold
Comp Enable
Gate Threshold
Gate Decay Time
Noise Gate Enable
Reverb Model
Reverb Decay
Reverb Tone
A.I.R. II Model
Cabinet Model
Volume PRE/POST
2• 7
Working It • Rear Panel Features
Rear Panel Features
2• 8
U.S. PATENT NO. 5,789,689
Part #41-00-1027 Rev. B
16
12
13
17
18
14
19
15
SPEAKER OUTS
LEFT
PHONES
PEDAL
RETURN
SEND
MIDI IN
MIDI OUT LEFT (MONO)
RIGHT
®
21
17
XLR OUTPUTS - PIN 2 HOT
EFFECTS LOOP
connect FBV Class Foot Controller here
(not compatible with Floor Board)
Class 2 Wiring
8 Ohms Only
RIGHT
20
16
LEFT (MONO)
RIGHT
RIGHT
LEFT/MONO
LEVEL TRIM
-22dBu
+4dBu
GROUND
LIFT
For Plus Configuration Only:
Connect Right Speaker Output to External Cab
22
18
16. Phones: Keep it quiet around the house by connecting headphones to the Phones
jack—plugging in headphones disables your speaker outputs. The Master knob sets
the level while you’re using headphones—turn it down as you switch between
headphones and the speakers so you won’t unexpectedly blast yourself with volume.
17. Pedal: Connect the RJ-45 cable supplied with your FBV or FBV Shortboard here.
Chapter 5 has the full details.
18. MIDI In & MIDI Out: Connect standard MIDI cables here. Flextone III always sends
and receives on MIDI Channel 1. Use MIDI with the free Line 6 Edit software from
www.line6.com. See the MIDI appendix for more MIDI details.
19. Effects Loop: Use the Left(Mono) Send and Return for a mono rack effect. Connect
stereo effects as shown. Generally, stomp boxes go before the amp, not in this loop.
Flextone III FX Loop
Rack FX unit
EFFECTS LOOP
SEND
LEFT (MONO)
RETURN
RIGHT
LEFT (MONO)
LEFT
RIGHT
LEFT
RIGHT
RIGHT
OUTPUT
INPUT
Working It • Rear Panel Features
20. Level Trim: The level of the XLR Outputs is set by the small rear panel trim, and is
not affected by the Master knob.
21. XLR Balanced Outputs & Ground Lift: These versatile connections are designed
with Line 6’s exclusive A.I.R. II technology to give you the perfect pair of direct
connections for live performance and studio recording sessions. See Using Your
Direct XLR Outputs on page 2•10 for details. Try flipping the Ground Lift switch if
you are experiencing buzzing or hum when connected to other equipment via the
Direct XLR Outs.
Please Note: there can be an audible ‘pop’ on the XLR outputs when powering
Flextone III on or off. We recommend that you either disconnect the direct outputs or
power down whatever the direct outs are connected to before turning your Flextone III
On or Off.
22. Speaker Outs: This is where you can jack in an external cabinet or two to be
powered by your Flextone III amp. Please note, the Flextone III XL and Plus are
designed to be connected to 8 ohm speaker loads only.
Flextone III XL – Plugging into either the Left or Right speaker connection
disconnects the internal speaker and lets you run a different 8 ohm speaker cabinet
instead.
Flextone III Plus – If you have a Flextone III Plus, these jacks will be labeled
Internal and External. Plugging into the Internal connection disconnects the
internal speaker and lets you run a different 8 ohm speaker cabinet instead. The
External connection is designed for the Flextone Cab, and operates at the same time
as the internal speaker. It supplies 50 Watts of power to the Flextone Cab, giving you a
100 Watt Stereo setup.
Power Switch & Connector (not shown in diagram): These are on the side of the
rear panel that’s not included in the illustration. Connect the supplied power cable to
your wall outlet, then flick the power switch to let the electrons in to do their stuff.
2• 9
Working It • Using Your Direct XLR Outputs
Using Your Direct XLR Outputs
2• 10
One of the nifty features inside your Flextone III is Line 6’s exclusive A.I.R. II
technology that enables you to get that great mic’d up sound out of your amplifier
without the microphone! Your Direct outputs can be used either in the studio or as a
direct feed to the house sound system for a live performance.
The Master knob on your Flextone III sets the level for the internal speakers (and any
external speakers you connect), without having any effect on your Direct Output level.
This is a good thing, for instance, when you’re playing live. It means you can set a low
volume level for your amp on stage (maybe it’s a small venue) while still pumping out
full level at the direct outs so the house sound system is getting plenty of juice. And any
adjustments you make to your on-stage level during the gig don’t send the sound man
scrambling to compensate on his end. This is also a good thing if you’re recording in the
studio, using your amp to monitor with the other band members while your direct out is
being recorded. Once again, an appropriately low master volume level that you might
want for the amp doesn’t force you to have a low level signal going to tape, and
adjustments you make to your level don’t interfere with the levels in the control room.
Flextone III can send enough direct out level to light up the input meters for +4 dBu
pro recording. For live sound systems, as well as many recording setups designed to work
with lower levels, this can sometimes be overkill. The Level Trim knob on Flextone
III’s rear panel lets you roll back the direct out level and keep your sound guy or lowerlevel recording system happy.
If you’re setting the levels yourself, and want to make sure you don’t overdo it, you can
follow these basic steps. First, plug the hottest output level guitar you plan to use into
Flextone III, switch to your hottest pickup setting, and crank the guitar’s output volume
(or put it as high as you ever set it). If you plan to change sounds on your Flextone III
during the gig, start by selecting the Flextone III sound that seems to have the loudest
output level. You can set your Master knob on Flextone III low as you do all this so
you don’t blow yourself out; it won’t affect the direct output level. Now, with this guitar
and Flextone III setup, play hard (so you’re sending maximum volume out those direct
outputs) and have someone adjust Flextone III’s rear panel Level Trim knob until a
good healthy level is being received by the equipment you’re sending sound to. The
level shouldn’t be so hot that it’s causing input distortion or clipping on that receiving
equipment. If the receiving equipment has an input level adjustment, you’ll probably
get your best signal-to-noise ratio by setting it as low as possible while setting your
Flextone III’s Level Trim as high as possible.
The Amps & Cabs • Meet The Family
THE AMPS & CABS
Flextone III’s heart is its collection of Amp and Cab Models—resulting from Line 6’s
meticulous study of a dream collection of vintage and modern amplifiers and cabinets.
Each position of Flextone III’s Model knobs calls up a particular Amp/Cab
combination, powered by many of the same coveted models that appear in the Line 6
Vetta series amps as well as PODXT.
Meet The Family
Once we’ve set our sights on creating a software emulation of a particular kind of amp
or cabinet here at Line 6, the first step is to get our hands on the very best example that
we can find to study. We will (and have) scoured the globe in search of just the right
specimen—that one, very particular unit that has the magic.
After all, amps from ’57, ’62, ’65, ’67, ’75, and 2002 may all bear the same model name,
yet have totally different circuit designs, sound and response—and quite often a
different look as well. Even two amps with the same circuit design, from the same era,
can sound radically different, just on the basis of variance in component tolerances, as
well as how the wiring harness was dressed—and maybe even what the amp assembler
had for lunch that day. Plus there’s the fact that every amp has its own special way of
settling in over the years and, just like people, some of them only get better with age.
Each of the distinguished amps and cabs that we select for modeling thus has a
character and specialness as uniquely individual as a treasured friend. And we’ve
included photos here of the actual amps that we selected, studied and measured so that
you’ll know exactly which amp we’re talking about.
So, let’s meet the Amp and Cab Models that live inside your Flextone III, and the
original equipment that helped to make them possible....
3•1
The Amps & Cabs • What’s In There
What’s In There
Line 6 Clean
3•2
To create this Amp Model, we essentially grafted the preamp and tone stack of a
JC-120 (Roland’s popular “Jazz Chorus” solid state combo) onto the power amp and
transformer of a classic Marshall JTM-45 tube head, thereby giving you the crisp and
clear front end typical of a solid state amp, but with a rich, satisfying tube amp-style
bite as you turn it up.
Line 6 Super Clean (Red alternate model for “Line 6 Clean”)
Forget what you know about how clean or how bright a guitar amplifier can go. Line 6
Super Clean goes farther, adding a lot of brightness. Caution: Because Super Clean adds
so much brightness, it generally won’t work so well with distortion pedals, since they
usually add lots of high frequencies, too. The combination may produce un-natural
artifacts—or just rip your head off. Plug an un-distorted guitar in here, though, and
we’re talking super happy shiny bright.
Line 6 Crunch
While having cousins marry is not such a good idea in real life, in the amp world, it can
have a great payoff. Since the design of some early Marshall amps had a lot in common
with the Fender Tweed Bassman circuitry, we wondered what it would be like if we
took the preamp and tone stack of our JTM-45 and ran it into the power amp and
transformer of our ’58 Tweed Bassman. Point, click, cut, paste (it would be nice if it
were really that easy, huh? We’d sure be able to get more sleep). What we got was way
happening, as Line 6 Crunch will attest. Great grind and nice punch. A tone that the
whole family can enjoy.
Line 6 Sparkle (Red alternate model for “Line 6 Crunch”)
We love tweed Fenders. We love blackface Fenders. We love ’em both so much, we can
never really decide which one we like more. Luckily, we were able to come up with the
perfect way to share the love. We took the preamp and tone stack from our model based
on the ’58 Tweed Bassman, and we wired (in the virtual world) our model of a
blackface Bandmaster power amp and transformer onto it. Voilà! Line 6 Sparkle.
Line 6 Mood
And here we give you a fantasia tone, based on our fondest memories of grunge guitar
tones we have known and loved.
The Amps & Cabs • What’s In There
Line 6 Chemical X (Red alternate model for “Line 6 Mood”)
Just like those secret ingredients that detergent companies used to crow about (Now!
Contains Ingredient X-27!), the Line 6 sound design guys wouldn’t tell us anything
about what the inspiration for this one was or who it might have belonged to (no
matter what type of bribery we attempted). Suffice to say that it’s a very punchy hi-gain
sound that also cleans up quite nicely when you roll your volume back.
Line 6 Insane
Imagine running your Soldano SLO-100 as a preamp for your Boogie Dual Rectifier,
and you’ve got a pretty good picture of just how much sheer gain is involved in Line 6
Insane. It’s entirely possible to get completely out of control with this one, and we
heartily encourage you to do just that.
Line 6 Fuzz (Red alternate model for “Line 6 Insane”)
Although not technically an amp, we felt that the unique tonal qualities of the classic
1960’s Arbiter Fuzz Face earned it a place among the amps modeled to create your
Flextone’s Amp Models. This fuzz box used broad frequency, transistor-based clipping.
The result is a buzzing kind of distortion that has become popular again with the
alternative and grunge set. Jimi Hendrix was among the first guitarists to popularize
the Fuzz Face in the States, but our model is considerably dirtier than the tones found
on “Are You Experienced.” Try playing “Satisfaction” by the Stones, or the lead from
“American Woman” by The Guess Who. Liberal use of the Bass, Mid, and Treble
controls will let you go beyond the tones that the Fuzz Face could deliver, enabling you
to discover your own unique recipe for those elusive fuzz tones in your head. Just a
note: when recording Purple Haze, Jimi didn’t even use an amp – he just went straight
from a Fuzz Face to an Orange power amp to a 4x12 cabinet. Which is the same sort of
tone you find here....
3•3
The Amps & Cabs • Jazz Clean - based on a Roland JC-120
Jazz Clean - based on a Roland JC-120
3•4
This Amp Model is modeled after the classic Roland JC-120.
This transistor amp was known for a strident clean sound and built-in stereo chorus.
When using the JC-120 model, try cranking up the Treble for a shimmering clean
sound that’ll cut through just about any mix. It’s also perfect for that 80’s “new wave”
sound (after all, it was Andy Summers’ favorite amp with The Police).
You should also try setting all the tone controls at 12 o’clock for a darker jazz tone. It’ll
give you an essentially flat response, providing a balanced tone across the fret board for
jazz chord melodies or single-line phrasing.
All product names are trademarks of their respective owners, which are in no way
associated or affiliated with Line 6. These product names, descriptions and images
are provided for the sole purpose of identifying the specific products that were
studied during Line 6’s sound model development.
The Amps & Cabs • Hiway 100 – based on a Hiwatt 1973 Custom 100
Hiway 100 – based on a Hiwatt 1973 Custom 100
3•5
This is the alternate, “red light” model at the Jazz Clean spot on the Model knob.
Based on a Hiwatt DR-103, this model gives a great, punchy sound that will cut
through almost anything and retains great definition even when cranked. That’s
exactly what designer Dave Reeves was looking for when he left the Sound City
division of Dallas Arbiter in 1966 to form HyLight Electronics. Though his first designs
were more reminiscent of the Vox and Selmer amps of the day, it wasn’t long before
Reeves had started producing the amps that ’60s Brit-Rock fans have become familiar
with. Renowned for their ‘tank-like’ construction (due in part to Reeves’ hiring of ‘milspec’ wiring specialist Harry Joyce), it was small wonder this amp was the choice of Pete
Townshend for so many years. In fact, many of the then-current crop of British rockers
like Pink Floyd, The Moody Blues, Manfred Mann, and Jethro Tull were also Hiwatt
endorsees. Crank this one up and you can see for miles.
All product names are trademarks of their respective owners, which are in no way
associated or affiliated with Line 6. These product names, descriptions and images
are provided for the sole purpose of identifying the specific products that were
studied during Line 6’s sound model development.
The Amps & Cabs • Blackface Lux – based on a 1964 Fender Deluxe Reverb
Blackface Lux – based on a 1964 Fender Deluxe Reverb
3•6
The Holy Grail for many blues, country, and “roots” players has been a blackface
Fender Deluxe Reverb. The particular amp we studied for modeling was built in 1964,
and is truly one of the finest examples of what a Deluxe Reverb can be.
Most players love a Deluxe when it’s turned up to about 7 for a nice gritty sound that
cleans up when you back off your guitar’s volume knob just a little. Notice how the
tone control response changes as this Amp Model’s Drive is changed: clean settings are
crisp and present, while more driven settings will mellow the high end. This is typical
of what you get from a Deluxe and is nicely captured here.
The Deluxe itself has only Bass and Treble controls. The Mid knob of Flextone III’s
Blackface model lets you add some post-Amp Model midrange contouring when you
want to expand on the Deluxe Reverb’s capabilities for a little more flexibility. And
Presence adds, well, Presence. Set the Mid knob to its 12 o’clock position and the
Presence knob to 0 for the classic Deluxe sound. Tweaked up right, this tone will cut
through and sing.
All product names are trademarks of their respective owners, which are in no way
associated or affiliated with Line 6. These product names, descriptions and images
are provided for the sole purpose of identifying the specific products that were
studied during Line 6’s sound model development.
The Amps & Cabs • Small Tweed – based on a 1953 Fender Tweed Deluxe
Small Tweed – based on a 1953 Fender Tweed Deluxe
3•7
This is the alternate, “red light” model at the Blackface Lux spot on the Model knob.
Modeled after a 1953 “wide panel” Fender Tweed Deluxe, this Amp Model will snarl
with the best of them. The original amp had only a single tone control, essentially a
Treble roll off. We set up Flextone III’s Treble knob to give you this roll off when using
this Amp Model.
Which left us with the Bass and Mid knobs just sitting there. So we set up the Bass and
Mid as post-Amp Model controls, which essentially lets you EQ up your tone as you
would do on a mixing console after recording your amp. For a classic Tweed sound, try
the Treble knob somewhere above halfway, set the Bass and Mid knobs at halfway to
put them in “neutral,” and turn the Presence to 0 for no extra Presence.
All product names are trademarks of their respective owners, which are in no way
associated or affiliated with Line 6. These product names, descriptions and images
are provided for the sole purpose of identifying the specific products that were
studied during Line 6’s sound model development.
The Amps & Cabs • Tweed B-man – based on a 1958 Fender Tweed Bassman
Tweed B-man – based on a 1958 Fender Tweed Bassman
3•8
The classic ’58 Fender Bassman 4x10 combo was the amp that started it all—instant
rock and roll tone. Originally a bass guitar amp, the Bassman became a Blues staple for
6-string guitarists thanks to its fat bottom end and the Fender twang on the top.
An interesting thing about the Bassman—and Flextone III’s Tweed 410 model—is just
how interactive the Mid and Treble controls are. The Mid control isn’t a bandpass, as
in most tone control setups. Instead, it’s almost like a second treble control. The two
are additive, so if you’re running the Mid knob higher than halfway up, you’ll find the
Treble control might give you more bright than you really want. On the other hand,
when you turn the Mid knob down, you’ll probably want to boost the Treble.
The Bassman, like many of the amps modeled by Flextone III, didn’t have a master
volume, and you had to really crank it up to get the great tone it delivers at high
volume. With Flextone III, you can get that kind of tone at a bedroom or studio level—
or through your headphones even—by cranking up the Drive knob. Give your best
R&B licks a try with Drive set to about 4 or 5.
All product names are trademarks of their respective owners, which are in no way
associated or affiliated with Line 6. These product names, descriptions and images
are provided for the sole purpose of identifying the specific products that were
studied during Line 6’s sound model development.
The Amps & Cabs • Tweed Vibro – based on a 1963 Fender Vibroverb 6G16
Tweed Vibro – based on a 1963 Fender Vibroverb 6G16
3•9
This is the alternate, “red light” model at the Tweed B-man spot on the Model knob.
In early 1963 the Fender 2x10 brown tolex Vibroverb was introduced and later that
same year it was replaced by the 1x15 blackface Vibroverb made famous by SRV only
to be discontinued in 1964. The Vibroverb was introduced right before Fender decided
to change the look of the entire amp line to what guitarists now call “Blackface
Fenders”. The Vibroverb we studied to create this model has the two 10-inch speakers
and transitional cosmetics. There’s black tolex, a dark brown numbered faceplate and
brown barrel knobs. Like other Vibroverb 2x10 amps, it’s 40 watts of pure heaven.
These were the first guitar amps with on-board reverb and also utilized a vibrato circuit
that modulates the bias of the power tubes for creamy smooth tremolo sounds. It all
added up to great tone with the latest guitar effects built-in... sort of like your Flextone
III! The electronically-inclined will also appreciate the fact that this version of the
Vibroverb also used a tapped treble control and a 7025 phase inverter (as opposed to a
12AT7). The Vibroverb had no Mid or Presence controls, so these are both “extras” on
our Tweed Vibro model. You can set Mid to 12 o’clock and Presence to minimum for
the unadulterated Vibroverb-style sound.
All product names are trademarks of their respective owners, which are in no way
associated or affiliated with Line 6. These product names, descriptions and images
are provided for the sole purpose of identifying the specific products that were
studied during Line 6’s sound model development.
The Amps & Cabs • Double Verb – based on a 1965 Fender Twin Reverb
Double Verb – based on a 1965 Fender Twin Reverb
3 • 10
The classic blackface Fender Twin (in this case, a 1965 Twin) was a real workhorse.
Everybody used it, from jazz and country players to serious rockers. I myself remember
seeing Johnny Winter at a concert where both he and Rick Derringer—am I dating
myself or what?—were using six Twins stacked in a pyramid. Each. We were in the
second balcony and it was REALLY loud even all the way back there. The Twin has a
lot of tonal flexibility and is at home in a great many different situations. It never gets
extremely overdriven and dirty, mostly just louder—a lot louder.
With Flextone III’s killer spring reverb model, this is a great choice for the classic surf
sound. Goose the reverb, crank up the volume, and get ready to party with Annette
Funicello and the rest of the gang!
One quick note: Twins are generally regarded a really loud and fairly clean amplifiers. Most
people find that running the channel volume on a Twin at about 3 is quite adequate for gigs
and startling small children. To get the real Twin experience on your Flextone III, try setting
the Master Volume and Channel Volume to max, then bring up the Drive control to set your
level.
All product names are trademarks of their respective owners, which are in no way
associated or affiliated with Line 6. These product names, descriptions and images
are provided for the sole purpose of identifying the specific products that were
studied during Line 6’s sound model development.
The Amps & Cabs • Zen Master – based on a 2001 Budda Twinmaster
Zen Master – based on a 2001 Budda Twinmaster
3 • 11
This is the alternate, “red light” model at the Double Verb spot on the Model knob.
This model is based on a Budda Twinmaster 2x12 combo. The Budda has a great, warm,
Class A/B, sound. The Budda philosophy is all about power tube distortion. Simplicity
is the key. With relatively low front end gain, highly interactive tone controls, and
tube rectifier “sag,” it’s great at getting a classic cranked sound for small gigs and
recording (it’s all of 18 watts).
Since the original Twinmaster has no mid control, we’ve added a little bonus to our
model in the form of some post-Amp Model mid contouring available via Flextone III‘s
Mid control. Set this control to 12 o’clock to get groovy with the unadorned Buddastyle vibe. The Presence knob is also an “extra”—set it to 0 for no added Presence.
All product names are trademarks of their respective owners, which are in no way
associated or affiliated with Line 6. These product names, descriptions and images
are provided for the sole purpose of identifying the specific products that were
studied during Line 6’s sound model development.
The Amps & Cabs • Match Chief - based on a Matchless Chieftain
Match Chief - based on a Matchless Chieftain
3 • 12
We crafted this model from our studies of the Matchless Chieftain.
The Chieftain was designed by Mark Sampson at Matchless to blend a Fender/Marshall
type front end with a classic ‘spongy’ and very reactive Class A power section.
With its fairly high gain preamp section, the Chieftain is a great roots-music amp. It
also features the incredibly sexy feature of a light up front logo name plate, which may
not affect tone, but it sure does look cool.
When, sad to say, Matchless went out of business the Chieftain became highly
collectable pieces of gear, with used ones often fetching up to a thousand dollars more
than their original price. We’re happy to do our part to keep the Matchless legacy alive
with the Matchless models in your Flextone III.
All product names are trademarks of their respective owners, which are in no way
associated or affiliated with Line 6. These product names, descriptions and images
are provided for the sole purpose of identifying the specific products that were
studied during Line 6’s sound model development.
The Amps & Cabs • Connor 50 – based on a Cornford mk50h
Connor 50 – based on a Cornford mk50h
3 • 13
This is the alternate, “red light” model at the Match Chief spot on the Model knob.
The Cornford mk50h is a fine, British-made boutique amplifier that our very own
Line 6 UK lads tipped us onto. The Cornford has a fair amount of gain and breaks up
like a Marshall Plexi, but retains a certain clarity that is more typical of Vox amplifiers.
One odd thing about the Cornford is the fact that it actually runs its drive channel in
series with the Clean channel. This provides for some unique interaction that we
captured during our modeling process by sweeping both controls though their range at
the same time, and tying all of this to your Flextone III’s Drive knob. Lower Drive
settings give you a tone dominated by the clean channel tonalities. As you turn the
knob up past noon, you’ll be moving into it more progressive high gain territory.
All product names are trademarks of their respective owners, which are in no way
associated or affiliated with Line 6. These product names, descriptions and images
are provided for the sole purpose of identifying the specific products that were
studied during Line 6’s sound model development.
The Amps & Cabs • Class A-30 TB – based on a 1967 Vox AC-30 Top Boost
Class A-30 TB – based on a 1967 Vox AC-30 Top Boost
3 • 14
Music was changing in the early ’60s and guitarists were asking for more brilliance &
twang. So the Jennings Company, makers of Vox amps, decided to add Treble and Bass
controls (and an extra 12AX7 gain stage, incidentally) in addition to the Treble Cut
knob it already had (which in actuality was a sliding bandpass filter); this additional
circuit became known as Top Boost.
The AC 30 with Top Boost was the amp made famous by many British invasion bands.
Much of the unique character of the Vox sound can be attributed to the Class A
circuitry—Class A amps overdrive in a very different way than Class AB. Brian May of
Queen, Mike Campbell of Tom Petty’s Heartbreakers, and The Edge of U2 have all
used classic AC 30s to make their music. Although often played fairly clean, a cranked
AC 30 has a great saturated lead tone, a la Brian May on early Queen albums.
On this Amp Model, Flextone III’s Mid control acts like the original Cut knob on the
AC 30. We also turned the Bass and Treble controls around, unlike the design of the
Top Boost electronics, which has the bass and treble turned all the way down when the
knob was all the way up. Go figure.
All product names are trademarks of their respective owners, which are in no way
associated or affiliated with Line 6. These product names, descriptions and images
are provided for the sole purpose of identifying the specific products that were
studied during Line 6’s sound model development.
The Amps & Cabs • Class A-15 – based on a 1961 Vox AC-15
Class A-15 – based on a 1961 Vox AC-15
3 • 15
This is the alternate, “red light” model at the Class AC-30 TB spot on the Model knob.
This model is based on a wonderful 1961 Vox AC-15. The sound is similar to the
Vox AC-30 that was the inspiration for the Class A-30 model, but this is a smaller amp
(only one 12-inch speaker instead of two) with a warmer, more “woody” sound.
Once again, the original amp had only a single tone control—a treble cut. We
faithfully modeled that and then slipped in some post-Amp Model Bass and Mid
contouring. Set Bass and Mid in neutral (which is 12 o’clock, or halfway up), Presence
to 0, and play with the Treble control to get yourself some of those classic British
invasion sounds.
All product names are trademarks of their respective owners, which are in no way
associated or affiliated with Line 6. These product names, descriptions and images
are provided for the sole purpose of identifying the specific products that were
studied during Line 6’s sound model development.
The Amps & Cabs • Plexi 45 – based on a 1965 Marshall JTM-45
Plexi 45 – based on a 1965 Marshall JTM-45
3 • 16
When the royal agents that we had dispatched to the UK found this particular amp, we
instantly fell in love. The amp even has the original KT-66 tubes in it, still in great
shape! It’s one of the finest examples of a JTM-45 we’ve ever heard, and it’s a constant
battle at Line 6 to see who gets to take it home for the weekend.
Those interested in the genealogy of tone will be interested to note that the JTM-45
marked the beginning of Marshall’s transition from a mellower Fender-like tone to the
distinctive, bright “crunchy” sound of the later Marshalls.
All product names are trademarks of their respective owners, which are in no way
associated or affiliated with Line 6. These product names, descriptions and images
are provided for the sole purpose of identifying the specific products that were
studied during Line 6’s sound model development.
The Amps & Cabs • Plexi Bass 100 - Marshall 1968 Super Bass
Plexi Bass 100 - Marshall 1968 Super Bass
3 • 17
This is the alternate, “red light” model at the Plexi 45 spot on the Model knob.
Based on a ’68 Super Bass Plexi head, the principal differences between the ’68 Super
Bass and the ’68 Super Lead are some small changes in the tone stack. What look like
minor differences in a schematic, though, can add up to larger differences in actual tone
(like a bass control that actually seems to do something at higher levels). A number of
’60s British rock icons actually preferred the Super Bass to the Super Lead for these
exact reasons. Check it out for yourself. You may find this is the bottom end you’ve
been searching for.
Input I was the one we connected our high tech modeling tools to.
All product names are trademarks of their respective owners, which are in no way
associated or affiliated with Line 6. These product names, descriptions and images
are provided for the sole purpose of identifying the specific products that were
studied during Line 6’s sound model development.
The Amps & Cabs • Plexi Lead 100 - based on “Jumped”1968 Marshall Super Lead
Plexi Lead 100 - based on “Jumped”1968 Marshall Super Lead
3 • 18
We literally scoured the world for this particular amp, finally
finding a great example of a Super Lead languishing (we like to
think fate preserved it for us) in Holland. One of the fun things
you can do with a Plexi is take a short guitar cable and jumper
channel I and channel II (as they’re frequently numbered)
together for a little extra saturation. Some guys loved this sound so
much that they pulled the chassis and permanently wired a jumper
into the amp. We modeled the Super Lead this way.
Hendrix used a Super Lead with the ‘lay down’ transformer unique to the 68 models,
and Van Halen’s first two records also owed their “brown sound” to a ’68 Plexi. To get a
nice crunch sound out of a Plexi, you crank all the volume and tone controls to 10. In
keeping with our “make-it-sound-a-whole-lot-like-the-original” concept, diming all
your knobs with Flextone III’s Plexi Lead gets you pretty darned near the same thing.
All product names are trademarks of their respective owners, which are in no way
associated or affiliated with Line 6. These product names, descriptions and images
are provided for the sole purpose of identifying the specific products that were
studied during Line 6’s sound model development.
The Amps & Cabs • Brit Silver – based on 1985 Marshall Silver Jubilee
Brit Silver – based on 1985 Marshall Silver Jubilee
3 • 19
This is the alternate, “red light” model at the Plexi Lead 100 spot on the Model knob.
In 1987, to commemorate 25 years in the amp business, Jim Marshall introduced a
limited edition collection of tube amps based on the 2203 and 2204 master volume
designs. They were very distinctive products, with silver vinyl covering and chrome
panels, known simply as the “25/50 Silver Jubilee” Series models. The Silver Jubilee
models used a unique diode clipping stage for extra gain and a redesigned tone block to
offer much more tonal variation than previous Marshalls.
Guns N’ Roses’ lead guitarist, Slash, is way into this amp. So much so, in fact, that
Marshall reintroduced the 100 watt model as the “Slash Limited Edition Signature
Amplifier” in 1996.
All product names are trademarks of their respective owners, which are in no way
associated or affiliated with Line 6. These product names, descriptions and images
are provided for the sole purpose of identifying the specific products that were
studied during Line 6’s sound model development.
The Amps & Cabs • Brit J- 800 – based on a 1987 Marshall JCM 800
Brit J- 800 – based on a 1987 Marshall JCM 800
3 • 20
Turn to this Amp Model to conjure up tones of the coveted JCM 800, one of Marshall’s
most universally-acclaimed modern amps. This updated version of the Plexi continued
Marshall’s heritage with added gain and edge for a new generation of rock guitarists.
One of the biggest differences here is that the tone controls are located after the
preamp tubes, giving them more tone-sculpting effect at high gain settings. Some
versions of the JCM 800, by the way, get their distortion by clipping a diode. The amp
we modeled uses a tube for distortion.
The JCM 800 is, of course, the metal sound Marshall made famous. And although not
many people play Marshalls clean, it is a great tone, so you should also be sure to check
out this model with a low Drive setting. Of course, you can always pump up the drive
and rage....
All product names are trademarks of their respective owners, which are in no way
associated or affiliated with Line 6. These product names, descriptions and images
are provided for the sole purpose of identifying the specific products that were
studied during Line 6’s sound model development.
The Amps & Cabs • Brit J-2000 – based on a Marshall JCM2000
Brit J-2000 – based on a Marshall JCM2000
3 • 21
This is the alternate, “red light” model at the Brit J-800 spot on the Model knob.
The JCM2000 captures the modern Marshall tone, by refining the JCM series into a
multi-channel power house. Our recreation captures the OD2 channel, with the Deep
switch kicked in on a 60W TSL. The JCM200 uses a quartet of ECC83 pre-amp tubes
and a pair of EL34 output tubes.
All product names are trademarks of their respective owners, which are in no way
associated or affiliated with Line 6. These product names, descriptions and images
are provided for the sole purpose of identifying the specific products that were
studied during Line 6’s sound model development.
The Amps & Cabs • Treadplate Dual – based on a 2001 Mesa Boogie Dual Rectifier
Treadplate Dual – based on a 2001 Mesa Boogie Dual Rectifier
3 • 22
This Amp Model is based on a 2001 Mesa Boogie Dual Rectifier Solo Head.
The Dual Rectifier was part of Boogie’s more modern, high gain approach. In contrast
to the earlier Boogies, the Dual Rectifier’s tone controls have more influence at high
gain settings, so you can scoop the mids and increase the bottom end. This is a great
model to try if you’re looking for the aggressively high gain sound of much of today’s
modern rock.
All product names are trademarks of their respective owners, which are in no way
associated or affiliated with Line 6. These product names, descriptions and images
are provided for the sole purpose of identifying the specific products that were
studied during Line 6’s sound model development.
The Amps & Cabs • Treadplate Triple – based on a Mesa Boogie 2001 Triple
Treadplate Triple – based on a Mesa Boogie 2001 Triple Rectifier
3 • 23
This is the alternate, “red light” model at the Recto Dual spot on the Model knob.
This model is based on the Channel 3 ‘Modern’ setting of a 2001 Mesa Boogie Triple
Rectifier Solo Head. Rock and roll is all about excess, now, innit? If two are good, three
have got to be better, especially if you like the spongy feel of sagging rectifier tubes. No
need to be bashful. Plug in, dial up some volume, and have some fun.
As with the Dual Rectifier model, we used Channel 3 in its Modern mode, with the
rear switches set to Bold and Tube for this.
All product names are trademarks of their respective owners, which are in no way
associated or affiliated with Line 6. These product names, descriptions and images
are provided for the sole purpose of identifying the specific products that were
studied during Line 6’s sound model development.
The Amps & Cabs • Solo 100 – based on a Soldano SLO-100
Solo 100 – based on a Soldano SLO-100
3 • 24
This model is based on a Soldano SLO-100 head.
Mike Soldano first came to fame as the guy who could do all the really cool mods to
your Marshall. It wasn’t long before he started building his own ‘hot-rod’ amps—
sporting chromed transformers and chassis, no less. Mike’s amps are also famous for
their bullet-proof construction and military spec wiring and components.
While primarily known for its high gain personality, the SLO-100 has a great clean
tone as well. Eric Clapton put Soldano on the map when he played “Saturday Night
Live” with his Soldano SLO-100.
All product names are trademarks of their respective owners, which are in no way
associated or affiliated with Line 6. These product names, descriptions and images
are provided for the sole purpose of identifying the specific products that were
studied during Line 6’s sound model development.
The Amps & Cabs • Bomber X-TC – based on a Bogner Extacy
Bomber X-TC – based on a Bogner Extacy
3 • 25
This is the alternate, “red light” model at the Solo 100 spot on the Model knob.
Reinhold Bogner was good enough to personally select and deliver a Bogner Extacy for
use in crafting this model. Reinhold was designing and building amplifiers long before
he left Germany in 1989 to move to Los Angeles. Once in the US, he quickly gained
the trust of many influential players including Steve Stevens, Dan Huff, Allan
Holdsworth, Mike Landau and Steve Vai. They all sought out his skill at modifying and
custom-building their amps. Eddie Van Halen entrusted Reinhold to overhaul and
revitalize Eddie’s #1 Marshall Plexi. We hear that Eddie was pleased.
The Ecstasy covers a wide range of tone, and you’ll find that your Flextone III’s Bomber
X-TC model lets you do much the same as you work the Drive knob, as well as your
guitar’s volume knob. On the top end, this one’ll bark like a Plexi, or you can take it
down through swampy crunch and finally arrive in the realm of lush clean tone. The
Extacy is a really versatile amp from a really great guy, and we’re pleased that he helped
us model it for your Flextone III.
All product names are trademarks of their respective owners, which are in no way
associated or affiliated with Line 6. These product names, descriptions and images
are provided for the sole purpose of identifying the specific products that were
studied during Line 6’s sound model development.
The Amps & Cabs • Gib Explorer – based on a 1960 Gibson Explorer
Gib Explorer – based on a 1960 Gibson Explorer
3 • 26
This Amp Model is based on a 1960 Gibson Model GA-18T Explorer (little brother to
the Gibson “Les Paul” GA40T).
The particular amp we modeled originally belonged to the father of one of the high
school buddies of Line 6’s Artist Relations guru, Tim Godwin. It was sitting in a
crawlspace for years, until Tim happened to ask his friend if he still had the amp, and
whether he was interested in selling it. When Tim finally got his hands on it, the amp
still had the original Gibson branded tubes in it!
Some time passed, and Tim brought his little treasure into the office one day. Once a
few of us played through it, we cried out as one voice, “We’ve got to model this one!”
Working from codes found on the pots and speaker, we were able to date this amp’s
build to the week of May 21, 1960. 14 watts, with a 10-inch Jensen speaker, the amp
runs Class A with 6SJ7 preamp tubes, 6V6 Power tubes, and a 5Y3 rectifier—just in
case you were interested.
All product names are trademarks of their respective owners, which are in no way
associated or affiliated with Line 6. These product names, descriptions and images
are provided for the sole purpose of identifying the specific products that were
studied during Line 6’s sound model development.
The Amps & Cabs • Super 0 – based on a Supro 1960’s 6x9 S6616
Super 0 – based on a Supro 1960’s 6x9 S6616
3 • 27
This is the alternate, “red light” model at the Gib Explorer spot on the Model knob.
Here we have yet more of the stuff of legend. Jimmy Page has admitted to using his ’58
Tele and a Supro amp to record most of the first two Led Zeppelin albums. The only
problem is, he’s never really copped to which Supro model he used, since his simply
saying the word ‘Supro’ caused a run on pawnshops and music stores everywhere,
making it virtually impossible to find another one of whichever model it was that he
used. The one we studied for Flextone III has got a 6x9-inch speaker, just like in your
car stereo.
We went so far as to impose on our friendship with people we know who were actually
present during the recording of “Led Zeppelin II” to see if they remembered anything
about that particular amp. They didn’t recall the specific model number, only that it
was “a grey and silver tiny little bastard.” Other sources have claimed that it was the
1x12-inch version. Until Pagey speaks, the mystery remains. But whatever the truth of
those Zep sessions may be, we’re confident that this model can be a fine entrance ticket
to the Houses of the Holy.
All product names are trademarks of their respective owners, which are in no way
associated or affiliated with Line 6. These product names, descriptions and images
are provided for the sole purpose of identifying the specific products that were
studied during Line 6’s sound model development.
The Amps & Cabs • The Cabinets
The Cabinets
Here’s the list of speaker Cabinet Models you’ve got in Flextone III:
3 • 28
Cab
Size
The model was created
through careful study of
this actual cabinet:
0
1x6
1X10
1x12
1x12
2x10
2x12
2x12
2x12
2x12
4x10
4x12
4x12
4x12
4x12
4x12
Cabinet Modeling Bypass
Supro S6616
Gibson Explorer
‘53 Celestion Blue Bell
Fender '64 Deluxe
Fender '63 Vibroverb
Fender ‘65 Twin
Matchless Chiefian
Roland JC-120
Vox '67 AC-30
Fender '58 Bassman
Marshall '67 with Greenbacks 20’s
Marshall '68 with Greenback 25’s
Marshall with Celestion T75’s
Marshall with Celestion V30’s
Mesa Boogie with Celestion V30’s
Model Knob
Position
Line 6 Clean
Line 6 Crunch
Line 6 Mood
Line 6 Insane
Jazz Clean
Blackface Lux
Tweed B-Man
Double Verb
Match Chief
Class A-30 TB
Plexi 45
Plexi Lead 100
Brit J-800
Treadplate
Solo 100
Gib Explorer
As described in Chapter 2, you can select a Cab Model by pressing and holding the
Model knob. A green light will come on in the ring around the knob to show you what
cab is currently selected. Turning the knob while still pressing and holding it will change
the cabinet selection. The cabinets are organized from small to large. It all starts out
small with the cab at the “Line 6 Crunch” position and gets bigger as you go clockwise
to the “Gib Explorer” spot. Turn the knob to “Line 6 Clean” to disable the cab
modeling. As you select Amp Models via the Model knob, Flextone III is loading an
appropriate cab for each amp in the background so you don’t have to. See Creating
Amp Defaults on page 2•7 to learn how to change which cab will load with a
particular Amp Model.
All product names are trademarks of their respective owners, which are in no way
associated or affiliated with Line 6. These product names, descriptions and images
are provided for the sole purpose of identifying the specific products that were
studied during Line 6’s sound model development.
The Effects • About the Delay and Modulation Effects
THE EFFECTS
About the Delay and Modulation Effects
Welcome to the Effects section of our manual. Against our accountant’s better
judgement, we took the liberty of adapting a bunch of great stomp box models from
Line 6’s MM4 Modulation Modeler and DL4 Delay Modeler pedals, and stuffed them
all into your Flextone III.
Now you may be wondering, how it is that we were able to take all of the controls
associated with cool effects like a Flanger or an Analog Delay and distill it all down to a
single Delay or Mod control? Well, we asked around and discovered that a lot of people
like to run their effects in similar ways. For example, it’s common when setting up a
slap echo to turn the feedback down, while long delay times usually are accompanied by
increased feedback. Similarly, with modulation its generally accepted that as the rate is
increased, the depth needs to decrease in order for the perceived intensity of the effect
to remain the same.
We used this knowledge to make the Delay and Mod knobs ‘smart,’ with each
controlling a number of parameters as needed to give you a full range of usable sounds
via just one control. Then, as described on page 2•4 and page 2•5, we threw in the
ability to further fine-tune Delay Feedback as well as various aspects of the Mod effects.
The result is great sounding effects that are also really easy to use!
So, why don’t we learn about each of the effects in detail...
4•1
The Effects • Delays
Delays
As detailed on page 2•4, you’ve got these controls for Delay:
Delay Select Button chooses from the Delay Models or turns Delay off
Delay Knob gives you more/less of the selected delay effect
Tap Tempo Button sets the delay time when you tap it
Or press and hold Tap Tempo and turn the Delay Knob to set delay time
4•2
For extra tweakability, press and hold the Delay Select Button and turn the
Delay Knob to fine-tune just the Delay Feedback
Tube Echo - Maestro EP-1 Echoplex
The classic 1963 Maestro EP-1 was the first of a series of
“Echoplex” designs distributed by the company, and made
by Harris-Teller in Chicago. As touted in a Maestro
advertisement, the Echoplex’s “...special effects range all
the way from a controlled high speed reverberation to a
full, throbbing echo”!
The main feature of the Echoplex design is a special
cartridge of looped 1/4-inch audio tape that wraps past
separate record and playback heads. The position of the
playback head can be moved to adjust the delay time from
60 to 650 milliseconds.
If you listen closely, you can hear some wow and flutter in the delay sound of this
model, just like you’d get on the wonderfully organic-sounding original.
All product names are trademarks of their respective owners, which are in no way
associated or affiliated with Line 6. These product names, descriptions and images
are provided for the sole purpose of identifying the specific products that were
studied during Line 6’s sound model development.
The Effects • Delays
Tape Echo - Roland RE-101 Space Echo
Long before Boss pedals, the Space Echo was Roland’s first
venture into the world of effects processing. Rather than the
single movable playback head of the Echoplex, this machine
has multiple stationary heads that can all play back at the
same time to create its signature multi-tap delay effects. The Tape Echo in your
Flextone III recreates this classic sound.
Analog - Electro-Harmonix Deluxe Memory Man
This model is based on the Electro-Harmonix Deluxe Memory
Man and its classic analog echo “bucket brigade” electronics.
This classic effect also has a chorus circuit that is applied to
the echoes only, leaving the direct sound unaffected. The
resulting warm, distorted tone and swimming echoes of the
Memory Man appealed to many guitarists, and were an
essential part of the guitar sounds for the first U2 album.
Digital
Straight up mono digital delay here, for basic echo-cho-cho-cho.
Ping-Pong
Ping pong Delay bounces the delays all around the stereo field. Our Ping Pong delay has
two modes: when the Delay Knob is turned counter-clockwise past noon, your delay
time is set to quarter notes on the left and straight eighth notes on the right for a more
traditional stereo ping pong delay. Turning the delay Knob past noon gives you quarter
notes on the left and dotted-eighths on the right for a classic U2 Edge sound.
Sweep Echo
Sweep Echo is a Line 6 original. It first appeared on our DL4 Delay Modeler and has
turned out to be a special favorite amongst the many DL4 users that we’ve spoken to.
It’s kind of like a garden variety digital delay line with the unique addition of a
sweeping resonant filter applied to the delayed signal. The Filter’s Sweep rate is tied to
Tap Tempo and will complete a cycle every two bars. “Warp speed, Scotty!”
All product names are trademarks of their respective owners, which are in no way
associated or affiliated with Line 6. These product names, descriptions and images
are provided for the sole purpose of identifying the specific products that were
studied during Line 6’s sound model development.
4•3
The Effects • Modulations
Modulations
As detailed on page 2•5, you’ve got these controls for Mod:
Mod Select Button chooses from the Mod Models or turns Mod off
Mod Knob gives you more/less of the selected mod effect
For extra tweakability, press and hold the Mod Select Button and turn the Mod
Knob to fine-tune a Modulation 2nd Function
4•4
Tremolo
This is based on the smooth, even-sounding tremolo circuits of blackface Fender amps
like the ’64 Deluxe and ’65 Twin Reverb. They have a light bulb and a photo-resistor:
when the light gets brighter, the tremolo gets louder. Adjusting the Mod Knob will
change the speed and depth of the Tremolo from a smooth Fender sound to Ginsu
knife-style chopping. The Mod 2nd Function adjusts the Depth.
Chorus
Here’s big, beefy, extra wide, stereo sine wave modulated-chorus. This custom bad boy
take cues from the greats like the Roland CE-1 and the TC Electronic SCF. Adjusting
the Mod knob will change the chorus rate, and scale the depth appropriately. Use the
Mod 2nd function to adjust the Chorus Depth independently.
Flanger - A/DA Flanger
This is our model of the A/DA Flanger. Introduced in 1977,
this stomp box’s 35-to-1 sweep range and built-in compressor
work together with the tone circuitry to create a signature
jet-like sweep. It can be very dramatic with its unique wave
shape and ability to create almost ring modulator-like effects
at extreme settings. The Mod knob changes rate and scales
depth and feedback though the range of subtle to extreme. Use the Mod 2nd function
to adjust the Feedback level independently.
All product names are trademarks of their respective owners, which are in no way
associated or affiliated with Line 6. These product names, descriptions and images
are provided for the sole purpose of identifying the specific products that were
studied during Line 6’s sound model development.
The Effects • Modulations
Phaser - MXR Phase 90
The unassuming metal box pictured here is the phaser that
changed the world—the MXR Phase 90. The Phase 90 is
relatively subtle compared to other phasers, and when you use
it, it becomes part of the overall guitar tone rather than trying
to grab the spotlight all to itself. Its lush, organic, and groovy
swirl can be heard all over the first two Van Halen albums, as
well as Jimmy Page’s work on Physical Graffiti. The Mod knob
adjusts the rate. Use the MOD 2nd function to adjust the
Feedback independently.
U-Vibe - Uni-Vibe
The now-legendary Uni-Vibe was put on the map
in 1969 by Jimi Hendrix. Essentially a four-stage
phase shifter, the Uni-Vibe is best known for its
watery texture and sultry tones. One listen to
“Machine Gun” and you’ll know what we mean.
Adjusting the Mod knob changes the rate. Use
the MOD 2nd function to adjust the Depth
independently.
Rotary - Leslie 145
Fine furniture and cool tones—the Leslie 145 gave you both
at once. This tube-driven behemoth (you definitely don’t
want to try picking one up on your own) features a belt-drive
rotating high frequency horn along with a downwards facing
15-inch speaker that had a segmented drum spinning over it
to disperse the sound. It was originally designed to be used
with electric organs like the Hammond B3, but once
guitarists (and even vocalists!) heard it, they just had to get
in on the rotate-o-rama. The Leslie’s sole control is a fast/
slow switch labeled Tremolo/Chorale. Setting the Mod
knob below 12 O’Clock selects the slow setting, above noon,
the fast. The 2nd function adjusts the Tone.
All product names are trademarks of their respective owners, which are in no way
associated or affiliated with Line 6. These product names, descriptions and images
are provided for the sole purpose of identifying the specific products that were
studied during Line 6’s sound model development.
4•5
Using Your Feet • FBV Class Foot Controllers
USING YOUR FEET
FBV Class Foot Controllers
The optional FBV series of foot controllers includes the original FBV, with its
extensive effects controls for the Line 6 Vetta amps, and the more-compact FBV
Shortboard, which includes all the controls needed for the Flextone III. Both give you
Wah and Volume pedals plus the ability to name, store and recall 36 Flextone III
Channel Memories. The Shortboard comes with a sticker that re-labels some of the
controls that are used for non-Flextone III functions on other Line 6 products. We’ll
assume you’ve got that in place as we describe the Shortboard’s functions here.
The FBV series also includes the simple FBV4, which lets you choose between the four
Flextone III channels, and tap tempo.
Note that the Line 6 Floor Board and FB4 foot controllers will not work with Flextone III.
Connecting an FBV
Your FBV comes with an included RJ-45 cable. Connect this cable between the rear
panel of the Flextone III and the rear panel of the FBV. The cable supplies power as
well as communication, so there’s no separate power supply required for the pedal.
If you ever need a replacement cable, look for a Category 5, 10 Base-T or RJ-45
cable with male connectors on both ends.
• “Category 5” refers to a 1 to 5 grading system for cable quality, with 5 being the
highest quality. Get the good one.
• “10 Base-T” is a kind of computer network that uses these same cables.
• “RJ-45” is what you call the connectors on the ends of the cable.
If you’re unsure if you’ve got the right thing, note that RJ-45 connectors basically look
like a wide version of standard US telephone line connectors, with eight contacts
instead of four.
5•1
Using Your Feet • So What Do All These Buttons and Pedals Do?
So What Do All These Buttons and Pedals Do?
9
7
6
VOLUME
1
WAH
FBV SHORTBOARD
FX LOOP
3
MODULATION
COMP
DELAY
REVERB
8
5•2
CHANNEL A
CHANNEL B
CHANNEL C
TAP
CHANNEL D
HOLD FOR TUNER
5
2
7
6
WAH
FX LOOP
STOMP BOX 1
STOMP BOX 2
AMP 1
AMP 2
REVERB
3
BANK UP
CHANNEL A
MODULATION
DELAY
CHANNEL B
TAP TEMPO
HOLD FOR TUNER
CHANNEL C
CHANNEL D
FAVORITE CHANNEL
FACTORY/USER
1
VOLUME
5
TREMOLO
4
BANK DOWN
PEDAL 1
CUSTOM FOOT CONTROLLER
STOMP BOX 3
2
11
10
PEDAL 2
Using Your Feet • So What Do All These Buttons and Pedals Do?
1.
2.
3.
4.
5.
6.
Bank Up - Bank Down: Use these two switches to choose any of the 9 Banks of
Flextone III Channel Memories. Bank 1 is the same four memories you get from the
front panel A, B, C, D Buttons when no FBV is connected, or an FBV4 is used.
Channel A, B, C & D: Select from the four Channel Memories in the current Bank.
COMP/MOD/DELAY/REVERB: You guessed it! These switch the Flextone III
effects COMP, MOD, DELAY and REVERB on and off kinda like they were stomp
boxes on a pedal board.
TREMOLO (FBV only): The Tremolo button on the FBV will turn Flextone III’s
Compressor on/off. Contact our Customer Service department if you’d like a handy
dandy sticker to re-label your FBV.
Tap/Tuner: Tap a couple beats to set the tempo. Or press and hold this switch until
you see the tuner on the pedal’s display. Press it again to exit tuner mode.
FX Loop: Turns Flextone III’s Effects Loop on or off.
7.
Wah and Volume Lights: These light to show that a pedal is ready to control Wah
or Volume.
8.
FBV Shortboard Pedal: Press the pedal fully forward to click the toe-switch,
switching the pedal to control Wah or Volume. If a separate expression pedal is
connected to the Shortboard’s rear panel 1/4-inch jack, the Shortboard pedal controls
Wah only, with the toe switch toggling the Wah on/off.
9.
External Pedal Jack: You can connect an expression pedal (such as the Line 6 EX-1)
to the Shortboard’s rear panel 1/4-inch jack, and the connected pedal will control
Volume, while the Shortboard pedal controls Wah only.
10. FBV Pedals: Press a pedal forward to click the toe-switch, turning the pedal on/off.
11. Favorite Channel (FBV only): Recalls a channel of your choice no matter what
bank you are currently using. To make a channel your favorite, select that channel,
then press and hold the favorite switch until the display shows “SAVING”—that’s it!
Note: Any switches not being used by your Flextone III do send MIDI messages and
can be used to control other devices. See the MIDI Appendix for details.
Flip the page for details on saving and naming Flextone III sounds with your FBV....
5•3
Using Your Feet • Saving and Naming with an FBV
Saving and Naming with an FBV
You can’t name with an FBV4. But you can with the free Line 6 Edit software downloadable
from www.line6.com!
To prepare for saving, it’s a good idea to browse through the various factory-stored
preset sounds to decide which you can do without. Make a note of their Bank number
and Channel letter so you can save your own sounds there instead.
1. Save: Step on the FX LOOP switch until “NAME EDIT” is displayed.
5•4
2. FBV SHORTBOARD users - Name: The Shortboard’s COMP and MOD
switches (labeled Cursor in small text) select one of the characters of the
channel name so you can edit it. The DELAY and REVERB switches (labeled
Character in small text) choose from the available letters, numbers and
symbols. Once you’ve got a name you’re happy with, jump ahead to step 3.
2. FBV Users - Name: The REVERB and TREMOLO switches select which
character of the channel name you would like to edit. The MODULATION
and DELAY switches choose from the available letters, numbers and symbols.
Once you’ve got a name you’re happy with...
3. Pick a Bank: Bank Up and Bank Down switches pick a Bank you’d like to
save to.
4. Complete the Save: Press the A, B, C or D switch to store to that Channel
Memory in the chosen Bank. The display will show “SAVING”.
Congratulations, you’re all done!
Appendix A: Amp Models
APPENDIX A: AMP MODELS
#
1a
1b
2a
2b
3a
3b
4a
4b
5a
5b
6a
6b
7a
7b
8a
8b
9a
9b
10a
10b
11a
11b
12a
12b
13a
13b
14a
14b
15a
15b
16a
16b
Amp Model
Line 6 Clean
Line6 Super Clean
Line 6 Crunch
Line 6 Sparkle
Line 6 Mood
Line 6 Chem X
Line 6 Insane
Line 6 Fuzz
Jazz Clean
Hiway 100
Blackface Lux
Small Tweed
Tweed B-Man
Tweed Vibro
Double Verb
Zen Master
Match Chief
Connor 50
Class A-30 TB
Class A-15
Plexi 45
Plexi Bass 100
Plexi Lead 100
Brit Silver
Brit J-800
Brit J-2000
Treadplate Dual
Treadplate Triple
Solo 100
Bomber X-TC
Gib Explorer
Super O
Based On
Cab Model
Mic
MIDI CC
Line 6 21st Century Clean
Line6 Super Clean
Line 6 Crunch
Line 6 Sparkle
Line 6 Mood
Line 6 Chemical X
Line 6 Insane
Line 6 Fuzz
’87 Roland JC-120
Hiwatt DR-103
’64 Fender Deluxe
’53 Fender Deluxe
’58 Fender Bassman
‘63 Fender Vibroverb
’65 Blackface Fender Twin
Budda Twinmaster 2x12 Combo
’96 Matchless Chieftain
‘02 Cornford mk50h
’63 Vox AC 30 with Top Boost
’61 Vox AC 15
’65 Marshall JTM-45
’68 Marshall Super Bass
’68 Marshall ‘Plexi’ Super Lead
‘85 Marshall Silver Jubilee
’90 Marshall JCM-800
‘00 Marshall TSL100
’01 Mesa Boogie Dual Rectifier
‘02 Mesa Boogie Triple Rectifier
Soldano SLO-100 Head
Bogner Extacy
Gibson Explorer
Supro S6616
No Cab
No Cab
4x12 Green 25’s
2x12 Match
2x12 Match
4x12 Celest T75
4x12 Treadplate
4x12 Green 25’s
2x12 Jazz
4x12 Green 25’s
1x12 Blackface
1x12 Blue Bell
4x10 Tweed
2x10 Brown
2x12 Blackface
2x12 Line 6
2x12 Match
4x12 Celest V30
2x12 Class A
1x12 Blue Bell
4x12 Green 20’s
4x12 Green 25’s
4x12 Green 25’s
4x12 Green 25’s
4x12 Celest T-75
4x12 Celest T75
4x12 Treadplate
4x12 Treadplate
4x12 Celest V30
4x12 Celest V30
1X10 Gibson
1x6 Super O
SM-57 Off Axis
SM-57 Off Axis
SM-57 Off Axis
SM-57 Off Axis
SM-57 Off Axis
SM-57 Off Axis
SM-57 Off Axis
SM-57 Off Axis
U-67
SM-57 Off Axis
SM-57 On Axis
MD-421
SM-57 On Axis
SM-57 Off Axis
SM-57 Off Axis
SM-57 On Axis
SM-57 On Axis
SM-57 Off Axis
SM-57 On Axis
SM-57 Off Axis
SM-57 Off Axis
MD-421
SM-57 On Axis
SM-57 Off Axis
MD-421
SM-57 Off Axis
SM-57 Off Axis
SM-57 Off Axis
SM-57 On Axis
SM-57 Off Axis
U-67
SM-57 On Axis
0
16
1
17
2
18
3
19
4
20
5
21
6
22
7
23
8
24
9
25
10
26
11
27
12
28
13
29
14
30
15
31
All product names are trademarks of their respective owners, which are in no way associated or
affiliated with Line 6. These product names, descriptions and images are provided for the sole purpose
of identifying the specific products that were studied during Line 6’s sound model development.
Appendix B: Cabinet Models
APPENDIX B: CABINET MODELS
#
1
2
3
4
5
6
7
8
9
10
11
12
13
14
15
16
Cab Model
No Cab
1x6 Super O
1X10 Gibson
1x12 Tweed
1x12 Blackface
2x10 Brown
2x12 Blackface
2x12 Match
2x12 Jazz
2x12 Class A
4x10 Tweed
4x12 Green 20’s
4x12 Green 25’s
4x12 Celest T75
4x12 Celest V30
4x12 Treadplate
Based On
Cabinet Modeling Bypass
1 x 6" Supro S6616
1 x 10" Gibson Explorer
1 x 12" '53 Celestion Blue Bell
1 x 12" Fender '64 Deluxe
2 x 10" Fender '63 Vibroverb
2 x 12" Fender ‘65 Twin
2 x 12" Matchless Chieftain
2 x 12" Roland JC-120
2 x 12" Vox '67 AC-30
4 x 10" Fender '58 Bassman
4 x 12" Marshall '67 with Greenbacks 20’s
4 x 12" Marshall '68 with Greenbacks 25’s
4 x 12" Marshall with Celestion T75’s
4 x 12" Marshall with Celestion V30’s
4 x 12" Mesa Boogie with Celestion V30’s
MIDI CC
0
1
2
3
4
5
6
7
8
9
10
11
12
13
14
15
All product names are trademarks of their respective owners, which are in no way associated or
affiliated with Line 6. These product names, descriptions and images are provided for the sole purpose
of identifying the specific products that were studied during Line 6’s sound model development.
Appendix C: MIDI Channel & Programs
APPENDIX C: MIDI CHANNEL & PROGRAMS
MIDI Channel
Flextone III always communicates on MIDI Channel 1.
MIDI Program Changes
MIDI Program Change Messages 0-36 can be used to select Flextone III’s Channel
Memories or Manual Mode, and are sent by Flextone III to control MIDI effects, etc.:
MIDI
Flextone III
Program Change Channel Memory
0
Manual Mode
1
1A
2
1B
3
1C
4
1D
5
2A
6
2B
7
2C
8
2D
9
3A
10
3B
11
3C
12
3D
13
4A
14
4B
15
4C
16
4D
17
5A
18
5B
MIDI
Program Change
19
20
21
22
23
24
25
26
27
28
29
30
31
32
33
34
35
36
37
Flextone III
Channel Memory
5C
5D
6A
6B
6C
6D
7A
7B
7C
7D
8A
8B
8C
8D
9A
9B
9C
9D
Tuner
Notes:
MIDI PC 0 puts the Flextone in Manual mode. (See Chapter 2 for a description of Manual Mode).
MIDI PC37 toggles tuner mode on and off. This is only useful if you have a FBV series controller
attached to your Flextone.
Appendix D: MIDI Continuous Control
APPENDIX D: MIDI CONTINUOUS CONTROL
Amp Parameter
MIDI
TX
MIDI CC Range
RX
CC#
Min
Notes
Max
Amp Settings
Amp Model Select
√
Amp Select
√
12
0
31
√
11
0
31
13
14
15
16
21
17
18
0
0
0
0
0
0
0
127
127
127
127
127
127
127
Drive
Bass
Mid
Treble
Presence
Channel Volume
Reverb Level
√
√
√
√
√
√
√
√
√
√
√
√
√
√
Cabinet Model
A.I.R. II Model
√
√
√
Loads Amp Model without Amp
Model Defaults. Amp Models list
gives CC values.
Loads Amp with Amp Defaults.
Amp Models list gives CC values.
A.I.R. Settings
71
70
0
0
15
127
Cab Model list gives CC numbers.
Range = 0~6. See Note 1
127
127
127
0 to +31dB
-63dB to 0dB
0-63=Off, 64-127=On
96
127
127
0 to -96dB
0=.1msecs; 127=3000msecs
0-63=Off, 64-127=On
Compressor
Compression Gain
Compression Threshold
Comp Enable
√
√
√
√
√
5
9
26
0
0
0
Noise Gate
Gate Threshold
Gate Decay Time
Noise Gate Enable
√
√
√
√
√
23
24
22
0
0
0
Modulation
Modulation Model
√
√
58
0
5
See note 2
Mod Tweak
√
3
0
127
Same as adjusting the Mod knob
Mod Param 1 (Speed)
√
29
0
127
Mod Speed
Mod Param 1 Dbl Precision
√
61
0
127
Mod Speed, Double Precision
Mod Param 1 Note value
√
51
1
13
See note 3
Mod Param 2
√
52
0
127
See note 4
Mod Param 3
√
53
0
127
See note 4
Mod Param 4
√
54
0
127
See note 4
Mod Volume/Mix
√
56
0
127
0 to 100%
Mod Pre/Post
√
57
0
127
0-63=Pre, 64-127=Post
Mod Enable
√
√
50
0
127
0-63=Off, 64-127=On
Note 1 - A.I.R. II Models: 0=A.I.R. II Off, 1=Shure SM 57on axis, 2=Shure SM 57off axis, 3=MD 421 on axis,
4=MD4210 off axis, 5=U-67 on axis, 6= U-67 off axis
Note 2 - Modulation Models: 0= Tremolo, 1= Chorus, 2= Flanger, 3= Phaser, 4= U-Vibe, 5= Rotary
Note 3 - Note Values: 0 = Note Value off,1 = Whole, 2=Dotted Half, 3 =Half, 4=Half Triplet, 5=Dotted Quarter, 6 =Quarter,
7 =Quarter Triplet, 8 =Dotted Eighth, 9 =Eighth, 10 =Eighth Triplet, 11 =Dotted Sixteenth, 12=Sixteenth, 13=Sixteenth Triplet
Note 4 - Modulation Parameters: Some Mod models have unique parameters. All use P1(parameter) for Speed.
For Tremolo P2= Waveform; Chorus P2= Depth, P3= Bass, P4= Treble; Flanger P2= Depth, P3= Feedback, P4= Manual; Phaser
P2= Feedback; U-Vibe P2= Depth; Rotary P2= Tone.
Appendix D: MIDI Continuous Control
Amp Parameter
MIDI
TX
MIDI CC Range
RX
CC#
Min
Notes
Max
Delay
Delay Model
Delay Tweak
Delay Param 1 (Time)
Delay Param 1 Dbl Prec
Delay Param 1 Note value
Delay Param 2 (Feedback)
Delay Param 3
Delay Param 4
Delay Volume/Mix
Delay Pre/Post
Delay Enable
√
√
√
√
√
√
√
√
√
√
√
√
√
Tap Tempo MSB
Tap Tempo LSB
Tap
√
√
√
√
√
√
88
2
30
62
31
33
35
85
34
87
28
0
0
0
0
1
0
0
0
0
0
0
5
127
127
127
13
127
127
127
127
127
127
See Note 5
Same as adjusting the Delay knob
Delay time
Delay time, double-precision
See note 3
See note 6
See note 6
See note 6
0 to 100%
0-63=Pre, 64-127=Post
0-63=Off, 64-127=On
127
127
127
30.0-960.0 BPM
127
15
127
127
127
0-63=Off, 64-127=On
Range = 0~15, see note 7
0.1 to 9.0sec
0 to 100ms
0 to 100%
Tempo Settings
89
90
64
0
0
0
64-127= a Tap
Reverb
Reverb Enable
Reverb Model
Reverb Decay
Reverb Pre-Delay
Reverb Tone
√
√
√
√
√
√
FX Loop
Tuner Enable
Wah Enable
Wah Position
Vol Pedal Position
Volume Pedal Min Position
Volume PRE/POST
√
√
√
√
√
√
√
√
√
√
√
√
√
√
36
37
38
40
39
0
0
0
0
0
Performance Controllers
107
69
43
4
7
46
47
0
0
0
0
0
0
0
127
127
127
127
127
127
127
0-63=Off, 64-127=On
0-63=Off, 64-127=On
0-63=Off, 64-127=On
0~63 = Pre, 64~127 = Post
FBV Series Foot Controllers
(FBV) Stomp Box 1
(FBV) Stomp Box 2
(FBV) Stomp Box 3
(FBV) Amp 1
(FBV) Amp 2
(FBV) Pitch/Tremolo
(FBV) Modulation
(FBV) Delay
(FBV) Reverb
(FBV) Tap
√
√
√
√
√
√
√
√
√
√
25
109
110
111
112
113
50
28
36
64
0
0
0
0
0
0
0
0
0
0
127
127
127
127
127
127
127
127
127
127
0-63=Off, 64-127=On
0-63=Off, 64-127=On
0-63=Off, 64-127=On
0-63=Off, 64-127=On
0-63=Off, 64-127=On
0-63=Off, 64-127=On
0-63=Off, 64-127=On
0-63=Off, 64-127=On
0-63=Off, 64-127=On
TX127
Note 5 - Delay Models: 0= Tube Echo, 1= Tape Echo, 2=Analog, 3=Digital, 4=Ping Pong, 5=Sweep Echo
Note 6 - Delay Parameters: All use P1 for Delay Time, P2 for Feedback..Tube Echo P3=Flutter, P4= Drive; Tape Echo P3=
Heads, P4= Flutter; Analog & Digital P3= Bass, P4= Treble; Ping Pong P3= Offset, P4= Spread; Sweep Echo P4= Sweep Depth
Note 7- Reverb Models: 0= Deluxe Spring, 1= Twin Spring, 2= King Spring, 3= Small Room 1, 4= Tiled Room 1,
5= Bright Room 1, 6= Dark Hall 1, 7= Medium Hall, 8= Really Large Hall, 9= Rich Chamber 1, 10= Rich Chamber 2,
11= Cavernous Chamber, 12= Slap Plate 1, 13= Plate, 14= Large Plate 1
Appendix E: Customer Service
APPENDIX E: CUSTOMER SERVICE
Customer Service
Before contacting the Line 6 Customer Service team, please take the time to look
through the documentation that was included with your product to see if it can answer
your questions. Additional helpful information is on the Support page of the Line 6
web site (www.line6.com), including the searchable FAQTRAQ system which is often
the fastest and easiest way to get answers. If you need to talk to a member of the Line 6
Customer Service team by phone, take notes before calling to ensure that you
remember everything you want to ask about. In the USA or Canada, you can contact
Line 6 at (818) 575-3600, 8AM to 5PM Monday through Friday (Pacific Time).
Outside the USA and Canada, please contact your distributor directly to arrange
service. The list of Line 6 distributors is available on the Internet at www.line6.com.
To obtain factory service:
If you live in the United States, call 818-575-3600 (or you can log an incident in our
support FAQ system available at www.line6.com) and we will help you find the best
way to get your unit repaired, whether it be returning the unit to Line 6 or finding an
Authorized Service Center. If you live in Europe, contact Line 6 U.K. at: Line 6
Europe Rugby, Warwickshire United Kingdom Butlers House, Clifton Road 44 (0) 178
882 1600 [email protected]. If you live outside of these areas contact your local
distributor. If you do not know whom your distributor is, either call us at 818-575-3600
or there is a distributor locator in the support area of www.line6.com.
Appendix E: Customer Service
APPENDIX E: CUSTOMER SERVICE
LINE 6 LIMITED WARRANTY INFORMATION
Sending in your registration card allows us to register key information so that we may handle problems faster and inform you of advance
information, upgrades and other news. Thanks in advance for filling out your registration card and sending it to us. And good luck in your music!
Line 6, Inc. (hereinafter “Line 6”) warrants that your new Line 6 product, when purchased at an authorized Line 6 dealer in the United States of
America (“USA”) or Canada, shall be free of defects in materials and workmanship for a period of one (1) year from the original date of purchase.
Please contact your dealer for information on warranty and service outside of the USA and Canada.
During the warranty period, Line 6 shall, at its sole option, either repair or replace any product that proves to be defective upon inspection by
Line 6.
Line 6 reserves the right to update any unit returned for repair and to change or improve the design of the product at any time without notice.
Line 6 reserves the right to use reconditioned parts and assemblies as warranty replacements for authorized repairs.
This warranty is extended to the original retail purchaser. This warranty can be transferred to anyone who may subsequently purchase this product
provided that such transfer is made within the applicable warranty period and Line 6 is provided with all of the following items: (i) all warranty
registration information (as set forth on the registration card) for the new owner, (ii) proof of the transfer within thirty (30) days of the transfer
purchase, and (iii) a photocopy of the original sales receipt. Warranty coverage shall be determined by Line 6 in its sole discretion.
This is your sole warranty. Line 6 does not authorize any third party, including any dealer or sales representative, to assume any liability on behalf
of Line 6 or to make any warranty for Line 6.
Line 6 may, at it’s option, require proof of original purchase date in the form of a dated copy of original authorized dealer’s invoice or sales receipt.
Service and repairs of Line 6 products are to be performed only at the Line 6 factory or a Line 6 authorized service center. Line 6 may require
advanced authorization of repairs to authorized service centers. Unauthorized service, repair or modification will void this warranty.
DISCLAIMER AND LIMITATION OF WARRANTY
THE FOREGOING WARRANTY IS THE ONLY WARRANTY GIVEN BY LINE 6 AND IS IN LIEU OF ALL OTHER WARRANTIES.
ALL IMPLIED WARRANTIES, INCLUDING WARRANTIES OF MERCHANTABILITY AND FITNESS FOR ANY PARTICULAR
PURPOSE, EXCEEDING THE SPECIFIC PROVISIONS OF THIS WARRANTY ARE HEREBY DISCLAIMED AND EXCLUDED FROM
THIS WARRANTY. UPON EXPIRATION OF THE APPLICABLE EXPRESS WARRANTY PERIOD (1 YEAR), LINE 6 SHALL HAVE NO
FURTHER WARRANTY OBLIGATION OF ANY KIND, EXPRESS OR IMPLIED. LINE 6 SHALL IN NO EVENT BE LIABLE FOR ANY
SPECIAL, INCIDENTAL OR CONSEQUENTIAL DAMAGES SUFFERED BY THE PURCHASER OR ANY THIRD PARTY,
INCLUDING WITHOUT LIMITATION, DAMAGES FOR LOSS OF PROFITS OR BUSINESS, OR DAMAGES RESULTING FROM USE
OR PERFORMANCE OF THE PRODUCT, WHETHER IN CONTRACT OR IN TORT. LINE 6 SHALL NOT BE LIABLE FOR ANY
EXPENSES, CLAIMS, OR SUITS ARISING OUT OF OR RELATING TO ANY OF THE FOREGOING. Some states do not allow the
exclusion or limitation of implied warranties so some of the above limitations and exclusions may not apply to you. This warranty gives you
specific legal rights, and you may also have other rights, which vary, from state to state. This warranty only applies to products sold and used in the
USA and Canada. Line 6 shall not be liable for damages or loss resulting from the negligent or intentional acts of the shipper or its contracted
affiliates. You should contact the shipper for proper claims procedures in the event of damage or loss resulting from shipment.