1
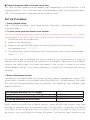
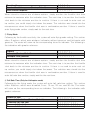
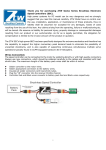
450
INSTRUCTIONS
More fun flight with NHA-50-SB5
JR NHA-50-SB5 brushless motor speed controllers were designed and
manufactured
specifically for the R/C aircrafts. For the extra ordinary high
efficiency and performance, it is a revolutionary product for R/C aircraft market The
NHA-50-SB5 speed controller adapts brand new fuzzy design for smart functions
and ease of use.
Its fuzzy program design offers you an easy interface to change settings from the
throttle stick on your transmitter. It supports from traditional NiCd/NiMH batteries
to the up-to-date popular Li-Polymer batteries. It supports all high-end in-runner,
out-runner, high speed, and high torque brushless motors . You will be experiencing
a totally new feeling on your R/C aircrafts with NHA-50-SB5.
Product Functions
● Battery Management System
It was a built in Battery Management System function of the speed controller. The power
cut off timing was based on the cell number and continues output current of the battery.
There were 4 options defined in the battery management system in NHA-50-SB5.
3 options were for Li-Polymer batteries and 1 option for using with NiCd/NiMH batteries.
The battery management system allows you to protect your batteries from over discharge
and moreover to extend the lifetime of your batteries.
● Fuzzy Motor Timing
There were 3 options in this function that allows you to maximize the performance of
your motor output. You could choose from low/mid/high to fit with different brushless
motors. Higher timing offers more power output at the expense of efficiency. Please check
the current draw after changing the timing option in order to prevent overloading of
battery.
● Brake Mode
There were 3 options in brake function that allows you to choose from no brake, soft
brake, and hard brake option.
● Throttle Sensitivity
The throttle sensitivity function offers you different throttle response time for different
set up in different occasions. It could be an ideal function while driving different cars
in different courses. The faster throttle response time will offer you quick and sensitive
throttle feedback.
● Flying Mode
The flying mode offers you different options for different aircrafts. You could choose from
airplane, helicopter and helicopter with governor. Please reconnect the battery then enjoy
it.
● Fall Safe Time (Helicopter Mode Only)
The fall safe time offers you different time setting for helicopter soft start inhibition on
the air. This function was designed for beginner user to prevent helicopter crashing due
to soft start. The helicopter soft start will be disabled for few seconds if user pulls the
throttle to off position imprudently. It can help user restart the motor quickly. This functi
on also offers you a quick motor start for auto rotation practice.
● Soft Start Speed (Helicopter Mode Only)
The fall safe time offers you different acceleration setting for helicopter soft start. You
could choose from slow,standard, and fast acceleration speed.
● Switching BEC Voltage
The SBEC voltage offers you different BEC voltage output. You could choose from 5.0V,
5.25V, 5.5V, 5.75V, and 6.0V output for your servo.
● Thermal Protection (Built in function, set-up free)
The NHA-50-SB5 speed controller adapts high temperature cut off protection. If the
controller reaches 110°C, the motor will not be allowed to start. If the controller reaches
120°C during operation, the power will be forced to cut off.
Set Up Procedure
① Factory default setting:
High Li-Polymer discharge + Auto motor timing + No brake + Standard throttle speed +
Helicopter mode.
② To enter set up mode and throttle curve initiation
Due to the signal differentiation amount different remote control brands, it is strongly
recommended to run the throttle curve initiation process whenever set up a new aircraft.
Ⅰ . Throttle position to the maximum
Ⅱ . Power on the transmitter
Ⅲ . Power on the NHA-50-SB5 speed controller, the motor will come up with
acknowledge tones ♪♪♪♪♪♪
Ⅳ . Throttle position to the minimum position, the motor will come up with acknowledge
tones ♪♪ ~ ♪♪
This procedure was to calculate the throttle range by the microprocessor in order to
optimize the throttle curve and the smoothness of operation. When finish the initiation
process, we could simply shut down the power in the system is intend to use other
factory default settings. If not, simply waiting for 1 second. The system will enter the set
up mode.
③ Battery Management System
Following by the brake mode, the system will enter battery management system. This
section offers 4 options for using with either NiCd/NiMH or Li-Polymer battery. The motor
will come up the corresponding tones as indicator. The following is the indication with
graphic reference.
Low discharge protection for Li-Polymer
♪-♪
Standard discharge protection for Li-Polymer
♪ - ♪♪
High discharge protection for Li-Polymer (Factory Default) ♪ - ♪♪♪
+5V cut-off protection for NiCd/NiMH
♪ - ♪♪♪♪
When intend to choose one of above options, simply position the throttle stick from
minimum to maximum after the indication tone. The next step is to position the throttle
stick back to the minimum position to confirm. If there is no need to enter next set
up section, you could simply shut down the power. The selection was stored into the
microprocessor when the throttle stick was in confirmation position. If there is need to
enter motor timing set up section, simply wait for the next tone.
④ Motor timing
Following by the brake mode, the system enters fuzzy motor timing set up section. In this
section the system offers 4 options, auto timing, soft timing,standard timing and hard
timing. The motor will come up the corresponding tones as indicator. The following is the
indication with graphic reference.
Auto timing (Factory Default)
Soft timing
Standard timing
Hard timing
♪♪ - ♪
♪♪ - ♪♪
♪♪ - ♪♪♪
♪♪ - ♪♪♪♪
When intend to choose one of above options, simply position the throttle stick from
minimum to maximum after the indication tone. The next step is to position the throttle
stick back to the minimum position to confirm. If there is no need to enter next set
up section, you could simply shut down the power. The selection was stored into the
microprocessor when the throttle stick was in confirmation position. If there is need to
enter brake mode section, simply wait for the next tone.
⑤ Brake Mode
Following by the motor timing mode, the system will enter brake mode. This section
offers 3 options, no brake, soft brake and hard brake. The motor will come up the
corresponding tones as indicator. The following is the indication with graphic reference.
No brake(Factory Default)
Soft brake
Hard brake
♪♪♪ - ♪
♪♪♪ - ♪♪
♪♪♪ - ♪♪♪
When intend to choose one of above options, simply position the throttle stick from
minimum to maximum after the indication tone. The next step is to position the throttle
stick back to the minimum position to confirm. If there is no need to enter next set
up section, you could simply shut down the power. The selection was stored into the
microprocessor when the throttle stick was in confirmation position. If there is need to
enter throttle sensitivity section, simply wait for the next tone.
⑥ Throttle Sensitivity
Following by the brake mode, the system will enter throttle sensitivity setting. This
section offers 3 options to be slow, standard, and quick. The motor will come up the
corresponding tones as indicator. The following is the indication with graphic reference.
Slow throttle response
Standard throttle response (Factory Default)
Quick throttle response
♪♪♪♪ - ♪
♪♪♪♪ - ♪♪
♪♪♪♪ - ♪♪♪
When intend to choose one of above options, simply position the throttle stick from
minimum to maximum after the indication tone. The next step is to position the throttle
stick back to the minimum position to confirm. If there is no need to enter next set
up section, you could simply shut down the power. The selection was stored into the
microprocessor when the throttle stick was in confirmation position. If there is need to
enter flying mode section, simply wait for the next tone.
⑦ Flying Mode
Following by the throttle sensitivity, the system will enter flying mode setting. This section
offers 3 options, which were airplane, helicopter without governor and helicopter with
governor. The motor will come up the corresponding tones as indicator. The following is
the indication with graphic reference.
Airplane
Helicopter (Factory Default)
Helicopter with governor
♪♪♪♪♪ - ♪
♪♪♪♪♪ - ♪♪
♪♪♪♪♪ - ♪♪♪
When intend to choose one of above options, simply position the throttle stick from
minimum to maximum after the indication tone. The next step is to position the throttle
stick back to the minimum position to confirm. If there is no need to enter next set
up section, you could simply shut down the power. The selection was stored into the
microprocessor when the throttle stick was in confirmation position. If there is need to
enter fall safe time section, simply wait for the next tone.
⑧ Fall Safe Time (Only for Helicopter mode)
Following by the flying mode, the system will enter fall safe time setting. This section
offers 5options, which were disabled, 5-sec, 10-sec, 20-sec, and 30-sec. The motor
will come up the corresponding tones as indicator. The following is the indication with
graphic reference.
Disable fall safe
5 seconds fall safe time (Factory Default)
10 seconds fall safe time
20 seconds fall safe time
30 seconds fall safe time
♪♪♪♪♪♪ - ♪
♪♪♪♪♪♪ - ♪♪
♪♪♪♪♪♪ - ♪♪♪
♪♪♪♪♪♪ - ♪♪♪♪
♪♪♪♪♪♪ - ♪♪♪♪♪
When intend to choose one of above options, simply position the throttle stick from
minimum to maximum after the indication tone. The next step is to position the throttle
stick back to the minimum position to confirm. If there is no need to enter next set
up section, you could simply shut down the power. The selection was stored into the
microprocessor when the throttle stick was in confirmation position. If there is need to
enter soft start section, simply wait for the next tone.
⑨ Soft Start Speed (Only for Helicopter mode)
Following by the fall safe time, the system will enter soft start setting. This section
offers 3 options, which were slow, standard, and fast speed. The motor will come up the
corresponding tones as indicator. The following is the indication with graphic reference.
Slow Soft Start
Standard Soft Start (Factory Default)
Fast
♪♪♪♪♪♪♪ - ♪
♪♪♪♪♪♪♪ - ♪♪
♪♪♪♪♪♪♪ - ♪♪♪
When intend to choose one of above options, simply position the throttle stick from
minimum to maximum after the indication tone. The next step is to position the throttle
stick back to the minimum position to confirm. If there is no need to enter next set
up section, you could simply shut down the power. The selection was stored into the
microprocessor when the throttle stick was in confirmation position. If there is need to
enter SBEC voltage section, simply wait for the next tone.
⑩ Switching BEC Voltage Setting
Following by the flying mode, the system will enter SBEC output voltage setting. This
section offers 5 options, which were 5.0V(HV with SBEC), 5.75V(HV with SBEC),
6.5V(HV with SBEC), 7.25V(HV with SBEC) and 8.0V(HV with SBEC). The motor will
come up the corresponding tones as indicator. The following is the indication with
graphic reference.
SBEC
SBEC
SBEC
SBEC
SBEC
Output
Output
Output
Output
Output
Voltage
Voltage
Voltage
Voltage
Voltage
=
=
=
=
=
5.0V
5.25V (Factory Default)
5.5V
5.75V
6.0V
♪♪♪♪♪♪♪♪ - ♪
♪♪♪♪♪♪♪♪ - ♪♪
♪♪♪♪♪♪♪♪ - ♪♪♪
♪♪♪♪♪♪♪♪ - ♪♪♪♪
♪♪♪♪♪♪♪♪ - ♪♪♪♪♪
When intend to choose one of above options, simply position the throttle stick from
minimum to maximum after the indication tone. The next step is to position the throttle
stick back to the minimum position to confirm. Then you could simply shut down the
power. The selection was stored into the microprocessor when the throttle stick was in
confirmation position. The controller is now ready to fly.
More about Battery Management System
This section is to give you more details of the smart design of battery management
system in order to help you to utilize the function.Technically the power cut off timing
was based on the cell number and continues output current of the battery. The
microprocessor will calculate the timing and to cut the power with two steps. Because
the late stage of each battery discharge cycle has quick voltage change, such function
will provide a safe process during the operation.
1st step : enabled when the single cell reaches the low point, the motor will be forced to
lower the RPM by microprocessor
2nd step : enabled when the single cell reaches the lowest point will be completely cut
off. To regain the power, the user needs to adjust the throttle stick to the“stop”position
until the battery voltage comes back to the safe level.
The following were the detailed definition of each option in battery management system.
NiCd/NiMH battery
Li-Polymer low discharge
Li-Polymer standard discharge
Li-Polymer high discharge
+5.0 volt cut off
1st step voltage @3.2V
2nd step voltage @2.9V
1st step voltage @ 3.0V
2nd step voltage @2.7V
1st step voltage @2.8V
2nd step voltage @2.5V
More about Helicopter Mode
In the programmed helicopter modes, a soft-start-up function is designed in the program
in order to provide a smooth power launch on helicopters. However, such function will
be working only from a completed stop. The function will be disabled for 5 seconds
whenever the throttle was moved from any position of“ON”status. This was to prevent
crashes from any accidentally control.
Caution!!
High power motor systems could be very dangerous. High current could generate heat on
wires, batteries, and motors. Always follow the instruction and use proper tools to set up
the system within safe range. Always fly at a designed field with caution even though this
controller is equipped with safety arming program.
Age Recommendation:
14 years or over. This is not a toy.
This product is not intended for use by children without direct adult supervision.
Mar. 2013
NHA-50-SB5 INSTRUCTIONS vol.1
The product and the contents of these instructions are
subject to change without notice due to improvement.