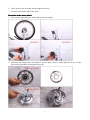
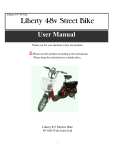
1
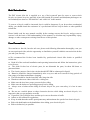
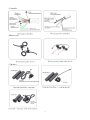
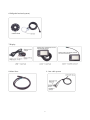
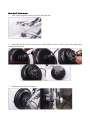
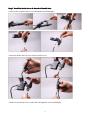
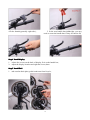
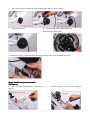
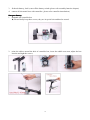
DIY Electric bike conversion Kits
User Manual
Please kindly read the user manual carefully before starting convert the bicycle.
Please kindly keep the user manual in your hand in order to to read it conveniently.
Please convert the bicycle on the basic of full understanding of the manual.
1
Brief Introduction
The DIY electric bike kit is supplied as a set of do-it-yourself parts for users to convert their
bicycles to electric bicycles, generally it has full kit(with all systems) and kits(battery&chargers are
not included),here short as “full ebike kit” and “ebike kit” in the manual.
To convert a bicycle could be interested, but it could be dangerous if you do not have mechanical
ability, you should obtain the assistance of a professional electric bicycle dealer or other qualified
technician.
Please kindly read the user manual carefully before starting convert the bicycle, and get start to
convert it on the basic of full understanding of the manual, we disclaim any responsibility injury,
damage or other consequences arising from the use of this product.
User Precautions
We want have a fun ride, but also safe one, please read following information thoroughly, even you
are an experienced rider, take the opportunity to familiarize yourself with this conversion kits before
you take your first trip.
● We recommend the kit has been installed by professional electric bike dealer or qualified
technician.
● Read all of the enclosed installation and operating instructions and follow the instructions, prior
to its first use
● The ebike kit has lots of electric parts, do not dismantle the parts, let them fall down or
punctured them
● The electric parts are fine in the rain but should NEVER be submerged in liquid;
● Batteries should be charged immediately after every use and never stored for long periods of
time empty of without maintenance charging.
● The bike should be checked carefully after long time idle
● Watch out other new riders while have a riding test
● Make sure the tires have proper pressure before riding
● Make sure the brakes are operating properly before riding
● Always wear a helmet when riding an electric bicycle for your own safety, it is law in some
areas
● Do not use a mobile phone or other electronics devices while riding an electric bicycle; it is
imperative that you pay attention to traffic
● If possible, ride in all bike lines and always in correct direction of traffic
● Adhere to all valid traffic regulations.
● Keep in mind that other traffic participants may underestimate the speed of an electric bicycle.
● Ride with both hands on the handlebars when riding your electric bicycle.
● Ride as defensively as possible.
2
Contents
-----------------------------------------------------------------2
Brief Introduction
Introduction-----------------------------------------------------------------2
------------------------------------------------------------------2
User Precautions
Precautions------------------------------------------------------------------2
--------------------------------------------------------------4~6
Parts Introduction
Introduction--------------------------------------------------------------4~6
Installation Steps
---------------------------------------------------------------7~17
Steps---------------------------------------------------------------7~17
--------------------------------------------------------------------------17~18
Charging
Charging--------------------------------------------------------------------------17~18
-------------------------------------------18
Taking out/assembly the batteries
batteries-------------------------------------------18
--------------------------------------------------------------------19
Maintenance
Maintenance--------------------------------------------------------------------19
------------------------------------------------------------------------19~20
Warranty
Warranty------------------------------------------------------------------------19~20
3
Parts Introduction
There’s a packing list in each kits carton, please check the parts before converting, any missing
parts please contact us
Here list full sorts parts,please find your part and read carefully.
1.Hand-Built motor wheel
2.Lithium battery&Charger
4
3.Controller
4.Brake levels
5.Throttles
5
6.PAS(pedal assisted system)
7.Display
8.Motor lines
9. One cable system
6
Installation Guide
Step 1 Make sure your bike is suitable for conversion
Our ebike kit is universal and can be used to convert most conversional bicycles, however there are
criteria which much be meet first.
Your front forks and rear dropouts must be wide enough to accept hub motor.
--front fork dropout MUST BE at least 100mm
--rear conversions REQUIRED 135mm at least
--the opening on the fork or rear frame MUST BE suitable to fit hub motor axles, too wide is not
acceptable.
★generally the diameter of motor axle is 10mm
Step 2 Transfer your tire&tub & Install the motor wheel
You will need to transfer your existing tire and tub or a new tire and tub to hand-built motor wheel,
Now we start to insert the motor wheel:
Front V brake motor wheel
1. take out the original bicycle wheel;
2. insert the screws of torque arm on two sides of the fork;
3. fit the spacers on the axle
★spacer quantity depends on the width of dropout
4. insert the motor wheel on the fork;
5. fit the torque arm spacer and tight the screw;
7
6. fit the spacers out of torque arm and tight the screws;
7. do same again on the other side, done.
Front disc brake motor wheel
1. take out the original bicycle wheel and release the caliper;
2. dismantle the original disc and install it on the motor wheel ( when tight the screws of disc,
please must tight them in diagonal direction);
8
3. fit the spacers close to motor
★ spacers quantities depend on your bicycle
4. fit the spacers on the axle and insert the motor wheel;
5. tight all screws
6. adjust caliper to suitable location and tight the screw
9
Rear disc/V brake motor
1. Take out the original real bicycle wheel from the bike;
2. Install the disc/free wheel on the motor( when tight the screws of disc, please must tight them
in diagonal direction)
3.
Install the motor wheel and tight it.
10
Step 3 Install the brake levers & throttle & handle bars
1.take out the original brake levers and handle bars(left&right);
2.insert the brake lines two new electric brake levers;
3.fit the electric brake levers on the bike and tight the screws(left&right)
11
4.fit the throttle(generally right side);
5. fit the new handle bars(left&right; you may
need to warm the handle bars if they are hard to fit)
Step 4 Install display
1. release the screws on the back of display, fit it on the handle bar;
2. adjust the display location and tight the screws,done.
Step 5 Install PAS
1. take out the chain plate, pedal crank arm from bicycle;
12
2.
take out the spacers and fit the PAS mental plate, then fit spacers back;
3.
fit the PAS sensor;
4. fit the chain plate, pedal crank arm
back and tight them,done;
5.Connect PAS plug with controller( this step could be done while building batteries)
Setp 6 Intall battery and controller
Tub battery
1. take out the bottle bracket on the bicycle;
screws;
13
2.
insert the bracket of tub battery, tight the
3.
4.
fit the tub battery, lock it, turn off the battery switch (please refer assembly batteries chapter)
connect all electronic lines with controller ( please refer controller introduction)
Seat post battery
1. dismantle the controller box
★ Please kindly keep these screws, they are in special size and hard to resend.
2.
twine the rubber around the hole of controller box, insert the saddle seat stem, adjust the box
location and tight the screws;
14
3.
connect all electronic lines with controller;
4.
put the controller into the box, build up the box;
5.
insert the seat post battery.
Rear pack battery
1. take out the existing rear pack, please
go No 2 if this is not existing;
2.
15
check out the rear pack battery set;
3.
fit the rear pack on the bicycle, adjust and tight the screws;
4.
insert the battery into the pack, lock the battery;
5.
connect all electronic lines with controller;
16
6.
put the controller into the box, build up the box, done.
Step 7 Make final adjustments & Enjoy
Make sure the brakes are adjusted, the wheel is secure, screws are tighten, everything is functioning
as expected, you need to twist the throttle to test the hub motor with the motor wheel lifted off the
ground, if anything is not working properly please contact the distributors for help.
Now you are ready to have fun riding, be careful and take it slow until you get feel of your ebike.
Take time to learn your new ebike and how it handles now that is motorized. Ride a few miles and
stop to check everything over again. Be 100% sure that the wheel is secure and nothing has come
loose. You should inspect your ebike and component regularly to ensure all connectors are secure,
especially the controller and battery connectors.
Charging
Charging plug—to connect local power
Charging port—to connect battery
1. Please insert charging port on battery in advance, then insert charging plug with local power,
you are free to charging with battery on the bike, or taking out battery to office, home etc.;
2. The charging signal is red during charging, it turns to green after full charging, do not over
charging or leave charger connect with power, it will decrease battery and charger’s life;
3. Please arrange charging when you take electric bike kits from distributors, stop charging when
signals turn to green;
17
4. Photos of charging plug&charging port
Taking out/assembly the batteries
1. Tub battery
Ignition: Please refer tub battery introduction
Turn left/right: lock/unlock battery
2. Seat post&rear pack battery
Ignition: turn on/off battery
Push+turn left/right: unlock/lock battery
18
Maintenance
We recommend to have the spoke tension of the rear wheel and the torque of all screws checked by
a qualified dealer after the first 200km (125 miles).
In order to ensure extended use of the propulsion system, all plug-in contacts of the system should
be checked every two to three months and cleaned with a soft and dry brush, if necessary. It must be
ensured that no dirt or humidity penetrates the battery docking station when the battery is removed.
Clean
CAUTION:Never use a high pressure washer or a garden hose to clean the propulsion system.
The force +f a water jet could damage the electrical components of the propulsion system.
We recommend a soft sponge or a soft brush to clean the bicycle. Use a moist rag to clean the
battery docking station. Always use very little water, and keep water away from the electrical
contacts. Check the plug-in connections for moisture after cleaning and let these dry, if necessary,
before using the bicycle.
Warranty
All product warranties are effective at the purchase date from the local distributor, damaged caused
by water, dropping or any collision is NOT covered
Motor: 1 year
Battery: 2 years
Kits&battery charger: 6monthes
NOTICE
Water damage to the battery/Improperly caring for the battery
The battery warrant does not include damage from power surges, use of improper charger, improper
maintenance or other such misuse, or normal wear, our battery packs are water resistant and fine in
the rain but should NEVER be submerged in liquid.
Batteries need to be stored fully charged and kept in a cool dry environment. They should be
charged immediately after every use and never stored for long periods of time empty of without
maintenance charging.
Limited warranty does not cover or apply to the following: Normal wear and tear: any damage,
failure and/or loss caused by accident, misuse ,neglect, abuse and/or failure to follow instructions or
19
warning as stated on the manual.
Rentals, Commercial Use
The limited warranty does not cover or apply to rentals and commercial purpose unless these
products are authorized by us, we disclaim the warranty of non-authorized reseller or retailer; or any
replacement, maintenance or accessory parts not sold by us.
20