1
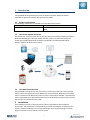
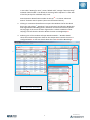
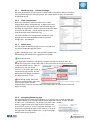
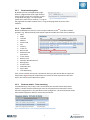
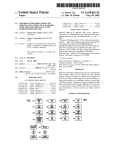
User manual QTA Web Portal Version 1.0 Table of contents 1 Introduction ______________________________________________ 3 1.1 System requirements .................................................................... 3 1.2 System overview ........................................................................... 3 1.3 QTA Web Portal function............................................................... 3 2 Installation _______________________________________________ 3 3 Usage __________________________________________________ 4 3.1 Register Nodes (System administrators only) ................................ 4 3.1.1 Register QTA Access Point ............................................... 4 3.1.2 Register QTA Check-in Node............................................. 5 3.2 QTA Web Portal – Blood bag info ................................................. 5 3.2.1 Blood bag logs – column headings .................................... 7 3.2.2 View configuration ............................................................. 7 3.2.3 Status color........................................................................ 7 3.2.4 Navigating Blood bag logs ................................................. 7 3.2.5 Advanced Search .............................................................. 8 3.2.6 Readouts - Column headings............................................. 8 3.2.7 Readouts Navigation ......................................................... 9 3.2.8 Export CSVs ...................................................................... 9 3.2.9 Readout details - Time remaining ...................................... 9 3.2.10 Readout Details – Tracer info .......................................... 10 3.2.11 Readout Details – Blood bag info:.................................... 10 2 Manufactured by 1 Introduction The QTA Web Portal gives the user access to QTA tracer data. Data from Tracers uploaded via QTA Access points and QTA Check-in Nodes. 1.1 System requirements The following accessories are needed to use the QTA Tracer System Accessory Description PC with Windows 7 Note book, Lap Top or stationary PC, 2Mb RAM 1.2 QTA Tracer System overview The QTA Tracer system consists of a PC with the QTA Tracer System software installed, a Bluetooth USB dongle, a Barcode reader and QTA Tracers. For full functionality the system also includes QTA Check-in Nodes, QTA Readers and the QTA Web Portal. Figure 1 displays the QTA Tracer system. Figure 1. The QTA Tracer System 1.3 QTA Web Portal function The QTA Web Portal gives the user easy access to QTA Tracer data. All tracers initiated with a product are registered on the Web Portal at the initiation. Whenever an initiated tracer is scanned in the QTA Access Point or passes a QTA Check-in Node – data from the tracer is uploaded to the QTA Web Portal. Data can be filtered with many criteria to help the user get the information they need. 2 Installation The installation process of the QTA Tracer system is described in the installation instructions. The installation is performed by personnel from Abbott or Tridentify. The system could be installed by a local system manager who has gone through a training program on how to set up the QTA Tracer system. 3 Manufactured by 3 Usage Open your web browser and go to: www.qtatracersystem.com click on in the upper right corner to sign in with user id and password (provided by the system administrator) 3.1 Register Nodes (System administrators only) 3.1.1 Register QTA Access Point To register a QTA Access point on the QTA Web Portal follow these steps: 1. Open QTA Access Point Configurator 2. Choose “PortalCommunication Settings” tab 3. Make sure “Upload Information” box is selected and Portal URL is correct (http://www.qtatracersystem.com) 4. Click on Save-button 5. Copy QTA Access Point Id Figure 2 QTA Access Point Configurator – Portal Communication Settings 6. On QTA Web Portal (Signing in – see above) choose “Nodes” tab 7. Paste the QTA Access Point Id into the “Node unique id” text field 8. Click on “Search and Edit”-button Figure 3 QTA Web Portal – Node registration 4 Manufactured by 9. Fill in the form. Make sure the description and Location makes it easily identified on the Portal Figure 4 QTA Web Portal – Node form 3.1.2 Register QTA Check-in Node To register a QTA Check-in Node on the QTA Web Portal follow these steps: 1. On iPad choose “Settings” 2. Scroll down to “QTA Check-in Node” 3. Make sure Server location is correct (http://www.qtatracersystem.com) 4. Copy CIN UUID (if the field is empty, first open the Check-in Application on the iPad) Figure 5 QTA Check-in Node – Settings Follow steps 6-9 on “Register QTA Access point” above, to complete the registration. 3.2 QTA Web Portal – Blood bag info Signing in on the QTA Web Portal, your organization’s blood bags will be listed. 1. In the left column the Blood Bag Logs/hits will be listed1. The default number of logs is ten. At the bottom of the box you can navigate to other hits1A. The end of each row displays a colored dot revealing the status of the blood 1B bag/tracer from the latest Readout . Hovering over the dot displays the status 5 Manufactured by in text. Blue=”Waiting for start”, Green=”Blood valid”, Orange=”Near expiration” and Red=”Blood invalid”. The default for showing “Near expiration” is when 20% of the life (42 days for red blood cells) is left. Search Donation identification number at the top1C – or choose “Advanced Search” for better search options (see more information below). 2. Clicking on a Donation identification no opens the Readouts list for that blood bag in the right column2. “Readouts” lists Access Points and Check-in Nodes that have registered the Bloodbag(Tracer) with date and time and Location (default 10 hits/page). If the tracer has been registered in a Check-in Node the “Show lat/long”-link will show the Check-in Node’s location on Google Maps2A. 3. Selecting one of the readouts will open Readout Details3. “Readout details” shows the estimated expiration date for the temperature intervals the tracer is 3A 3B 3C configured with . It also lists details about the Tracer and the Blood bag . 2A 1C 1 1B 2 3A 1A 3B 3 3C Figure 6 Web Portal – Blood Bags 6 Manufactured by 3.2.1 Blood bag logs – column headings Donation identification no, Blood group, Product code and Collection date are scanned from the blood bag at the initiation process. All, except Collection date, are searchable in Advanced Search. 3.2.2 View configuration Next to the column for Collection date there is a View Configuration link for each blood bag. It displays the tracer configuration for that specific tracer and the blood bag info including the “Expire date”, which is the presumed Expire date at the time of collection – not the expire date the Tracer recalculates after each temperature log. For more information on configuration read Access point Configurator User Manual (00035-5 QTA Access Point Configurator - User Manual). 3.2.3 Status color The last column on Blood bag Logs consists of colored dots. This shows the Blood bag/tracer status. Figure 7 Tracer configuration Settings Blue=”Waiting for start” (the tracer has been initiated with the Blood bag, but temperature logging has not started) Green=”Blood valid” Orange=”Near expiration” (the blood is valid but nearing its expiration date). By default the orange dot is shown when 20% or less of the time of the life span remains. To edit the default setting – log in as administrator and click on the “wrench” in the upper right corner of the Blood bag logs info box. Choose Preferences and change the number for “Near expiration, % left” Red=”Blood invalid” (Blood has passed its expiration date which may Figure 8 Edit “Near expiration” settings have occurred earlier than the expiration date printed on the blood bag if the temperature at some point has been too high or too low). 3.2.4 Navigating Blood bag logs The blood bag with the most recent Readout (in an Access point or Check-in Node) first. The default setting is 10 hits/page (Administrator might edit settings. Change “Number of rows in list” in preferences – see above 3.2.3 status color – orange.) Click on a page number (four page numbers closest to the current one is shown) or click > to step back one page, < to step forward (towards the most recent readout), >> to go to the page with the oldest readouts and << to go to the page Figure 9 Navigating Blood bag logs with the most recent readouts. 7 Manufactured by 3.2.5 Advanced Search Choose Advanced Search in “Blood Bag Logs” to fine tune your search. Figure 10 Web Portal – Advanced Search Default settings search for all blood bags – Blood valid (incl. Near expiration) and Blood invalid (incl. Waiting for start) Selecting “Near expiration only” will automatically discard Blood valid that is not near expiration (green) and Blood invalid (red). “Node” lets you search for tracers registered only in a specific Node (Access Point or Check-in Node) “Tracer id” – search for a specific tracer. Note that a tracer might have more than one Blood bag log since tracers are reused after the blood bag has been depleted. You can enter only part of a tracer id using * - e.g. *8198 or 78c5*. “Product Code” – listing all blood bags with a certain Product code. “Blood group” – Search a specific blood group only. “Donation identification no” lets you search for a specific blood bag 3.2.6 Readouts - Column headings The first column of the Readouts info box shows the date and time for the Readout. The five columns next to the Date show Node name and the location of the node. Figure 11 Readouts columns The last column displays a link – “Show lat/long – if the node is a Check-in Node. Selecting that link opens Google Maps to reveal the location of the Check-in Node (at the time of the Readout). Figure 12 Readouts – show lat/long 8 Manufactured by 3.2.7 Readouts Navigation By default ten hits are displayed per page. Click on a page number (four page numbers closest to the current one is shown) or click > to step back one page, < to step forward Figure 13 Navigating Readouts (towards the most recent readout), >> to go to the page with the oldest readouts and << to go to the page with the most recent readouts. 3.2.8 Export CSVs Below the Readouts list there is a link to export readouts to CSV14A (CSV-files could be opened in e.g. Microsoft Excel) Information exported includes (for each of the readouts): Date Node Location Address Postal code City Country Tracer id 14A 14B Blood valid Released from quarantine Figure 14 Web Portal – Export CSVs Tracer status Battery level Donation identification no Blood group Product code Collection date Expire date Time Remaining If the Tracer has been scanned in a QTA Access Point you will also be able to export last temperature log14B listing all temperatures the Tracer has been exposed to from Start until it was scanned in the QTA Access point. 3.2.9 Readout details - Time remaining “Time Remaining” lists (in days, hours and minutes) the time left before the product expires. It shows the time remaining for each of the temperature intervals the Tracer has been configured for in the QTA Access Point Configurator. The second column shows the Estimated expiration date for each of these intervals. Figure 15 Readout details – Time remaining & Estimated expiration date 9 Manufactured by 3.2.10 Readout Details – Tracer info Tracer info includes: ID = tracer Id Blood valid: Green tic means log is initiated and blood is valid. Red x means the tracer is “waiting for start” or the blood has expired Released from quarantine: Green tic = released. Red x = not released. Status: Showing the tracer status. Running: tracer initiated and temperature is logged Waiting for start: Tracer is initiated but temperature not yet logged. (See “Start log in temp below” and “Start log timeout in minutes” in QTA Access Point Configurator – User Manual.) Configuration: the tracer is in configuration mode. Initiation not completed. Tracer needs to be reinitiated. Error: Tracer is malfunctioning or battery depleted. Return to Blood Center. Batter level: in % how much buttery life remains Figure 16 Readout details – Tracer information 3.2.11 Readout Details – Blood bag info: Displays Donation identification number, Blood group, Product code, Collection date and Expire Date printed on the blood bag. Expire date is estimated expiration date at the collection – not the actual expiration date that is continuously recalculated by the tracer. Figure 17 Readout details – Tracer information Manufactured by 10 Manufactured by