1
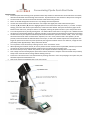
Concentrating Pipette Quick Start Guide Important notes: Ensure the quick connect fitting on the permeate tube is fully seated in its Permeate Port on the side of the instrument; otherwise the fluid will not flow through the instrument. Clip the fluid line to the container to keep it from coming out. The instrument can concentrate and extract with the Fluidics Head in any position. Never run alcohol through the instrument as it may damage internal components. Use the Arm Tension Knob on the left side of the arm to adjust how tightly the Fluidics Head is held in place. Use the up (▲) and down (▼) arrows to highlight options on the Control Panel and press enter ( ↵ ) to select. To adjust settings, press enter and use the up and down keys to select the value desired. Then press the enter key again. At the bottom of each menu tree, the option “Return” is displayed; selecting this option will return you to the previous menu. A run can be paused at any time by pressing enter. You will be able to restart the run as long as no air is allowed to enter the Single-use Concentrating Pipette Tip. Selecting “End Run” on the pause menu will allow you to perform an extraction. The final volume of your sample is controlled by the extraction fluid valve open time. Generic “small”, “med.” and “large” extraction fluid volume values are found in the “Options”/”Ext. size” menu, however under “Adv. Options” you can precisely control the number of milliseconds the valve is open, as well as the number of pulses the valve performs. The longer the open time and the more pulses performed, the larger the extraction volume. For reference, a single 75 msec pulse will produce approximately a 100 µL extraction volume. You can perform a test extraction by selecting “Extract” in the “Procedures” menu. When adjusting the extraction volume, be sure to perform the test extraction with a tip installed, otherwise you will not account for the volume of elution fluid that remains in the tip at the end of an extraction cycle. Be sure that the tip is firmly “clicked” into position; it will snap into the detent indicating that it is fully seated. Once a Single-use Concentrating Pipette Tip has been used to concentrate a sample it cannot be reused. Keep a used tip handy to test extraction volume settings without wetting a new tip. Protect the ‘Can Interface Port’ from contaminants by covering when not in use to or by keeping a can in place. The port should be wiped with alcohol before use. Refer to the chemical compatibility chart in the user manual. Concentrating Pipette Quick Start Guide Setting up the instrument: 1. Plug the 24VDC power supply into the 24VDC Jack on the side of the instrument. 2. Attach the permeate tube to the Permeate Port using the quick connect fitting and insert the other end of the permeate tube in a waste container. 3. Flip the Power Switch to turn the instrument on, it will take approximately 5 seconds for the unit to power up. 4. Press enter to advance from the welcome screen. 5. To decontaminate the unit after receipt perform the following: a. Insert the Maintenance Tip received with the unit into the Tip Interface Ports located on the underside of the Fluidics Head. The larger port on the Maintenance Tip should be at the back (the Maintenance Tip can only be inserted one way). You should feel the Maintenance Tip “click” into place, and you should be able to confirm that the Maintenance Tip is fully seated by looking through the clear plastic of the Fluidics Head. b. Select the following on the Control Panel “Options”>”Procedures”>”Decon cycle”. c. Install the Decontamination Fluid Can from the Maintenance Fluid Kit by first placing the tip of the inverted can into the Can Interface Port on the right side of the instrument. Then push the can down and latch it under the Can Latch. d. Select “Start” by pushing enter. The unit will count down from 10 minutes. e. The unit will automatically perform a flush of the system. f. Install the Rinse Fluid Can from the Maintenance Fluid Kit into the Can Interface Port as above. g. Select “Start” by pushing enter. 6. Install an elution Fluid Can into the Can Interface Port as above. 7. It is necessary to purge air from the extraction fluid line and prime the fluidics when a new fluid can is installed or when the instrument has been idle with an elution fluid can installed for a period of 4 hours or overnight. The quality of the foam may be reduced due to off‐gassing of CO2 in the fluid lines. To purge the fluid lines: a. b. Hold a waste container under the Tip Interface Ports on the bottom of the Fluidics Head. Select the following on the Control Panel “Options”>”Procedures”>”Ext. fluid prime”. A small amount of foam will come out of the front Tip Interface Port. 8. Select “Return” to go back to the options menu, select “Ext. size” and choose the desired final extraction volume. Further control of the extraction volume is found under the “Adv. Options” menu. Concentrating a sample: 1. Insert a Single-use Concentrating Pipette Tip into the Tip Interface Ports located on the underside of the Fluidics Head. 2. Place the sample on the Sample Platform under the Single-use Concentrating Pipette Tip and lower the Fluidics Head so the Single-use Concentrating Pipette Tip reaches all the way to the bottom of the sample container. Conical sample containers are recommended. 3. From the main menu, select “Start run”. The pump will start, a red light in the Fluidics Head will flash and the Control Panel will display “Running” with a timer. It will take several seconds for the liquid to reach the pump, once it does it may sound louder. 4. When the entire sample has been pulled through the Single-use Concentrating Pipette Tip, the unit will stop automatically. This will occur 3 to 30 seconds after the last of the fluid is pulled into the tip. 5. When the run is finished, raise the Single-use Concentrating Pipette Tip out of the sample container. Hold a small sample container under the Single-use Concentrating Pipette Tip and select “Extract”. The extraction cycle will take about 10 seconds and a jet of white foam will be eluted from the Single-use Concentrating Pipette Tip into your sample container. 6. If you run out of elution fluid during an extraction, remove the concentrating tip, replace the elution can, perform an Ext. fluid prime, re-insert the concentrating tip, perform another extract. 7. Remove the used Single-use Concentrating Pipette Tip by pushing your thumb up against the bottom of the Fluidics Head while you pull the Single-use Concentrating Pipette Tip down with your hand, the Single-use Concentrating Pipette Tip is only held in place by a detent.