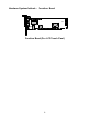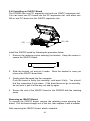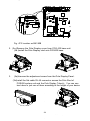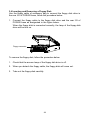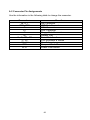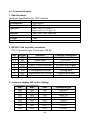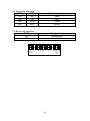
1
USER’S MANUAL
POS400
Point-of-Sales
Hardware System
January 2002, V1.1
Part #48200510
POS400 User’s Manual
This Manual was written for installation purposes. It is to provide the
information about the POS400 with B63 all-in-one motherboard for users.
COPYRIGHT
All rights reserved. The information contained in this guide has been
validated and reviewed for accuracy. No patent liability is assumed with
respect to the use of the information contained herein. While every
precaution has been taken in the preparation of this guide, the
Manufacturer assumes no responsibility for errors or omissions.
Neither the Manufacturer nor it’s affiliates shall be liable to the purchaser of
this product or third parties for damages, losses, costs, or expenses
incurred by the purchasers or third parties as a result of accident, misuse,
or abuse of this product or unauthorized modifications, repairs, or
alterations to this product, or (excluding the U.S.) failure to strictly comply
with Manufacturer's operating and maintenance instructions.
No part of this publication may be reproduced, stored in a retrieval system,
or transmitted in any form or by any means, electronic, mechanical,
photocopying, recording, or otherwise, without the prior written permission
of Manufacturer.
TRADEMARK
®
®
®
Intel , Pentium and MMX are registered trademarks of Intel Corporation.
Microsoft and Windows are registered trademarks of Microsoft Corporation.
General Notice: Other products and company names used herein are for
identification purposes only and may be trademarks of their respective
companies.
POS400 are registered trademarks of Manufacturer.
NOTICE
The contents of this manual are subject to change without notice.
January 2002, V1.1
Part #48200510
i
FCC COMPLIANCE STATEMENT FOR AMERICAN USERS
This equipment has been tested and found to comply with the limits for a
Class A digital device, pursuant to Part 15 of the FCC Rules. These limits
are designed to provide reasonable protection against harmful interference
when the equipment is operated in a commercial environment.
This equipment generates, uses, and can radiate radio frequency energy
and, if not installed and used in accordance with the instruction manual,
may cause harmful interference to radio communications. Operation of
this equipment in a residential area is likely to cause harmful interference,
in which case the user will be required to correct the interference at his own
expense.
WARNING
The connection of a non-shielded interface cable to this product will
invalidate the FCC Verification of this device and may cause interference
levels which exceed the limits established by the FCC for this equipment.
You are cautioned that changes or modifications not expressly approved by
the party responsible for compliance could void your authority to operate
the equipment.
ii
Contents
Chapter 1 Introduction
1.1 Introduction … … … … … … … … . … … … … … … … … … … . … … …
1.2 Hardware System Outlook for Front View … … … . … … … … . …
1.3 Hardware System Outlook for Rear View … … … … … . . … … . …
1.4 Hardware System Outlook for Option Module View … … … . . …
1.5 Handling Guidelines … … … … … … … … … … … … … … … … … …
1
3
4
5
7
Chapter 2 Setup
2.1 Setup … … … … … … … … . … … … … … … … … … … … … … … … …
2.2 Precautions on Setting up … … … … … … … … . … … … … … … …
2.3 Unpacking POS400 … … … . . … … … … … … … … … … … … … … . .
2.4 Setting up the POS400 ….. … … … … … … … . … … … … … … … . .
2.4.1 Removing a Support Base / LCD Module … … … … … . .
2.4.2 Setting Jumpers and DIP Switches …. … … … … … … …
2.4.3 Installing a CPU … … … … … … … … . . … … … … … … … …
2.4.4 Installing a DIMM … … … … … … … … … … … … … … … …
2.4.5 Installing a Hard Disk Drive … … … … . . … … … … … … …
2.4.6 Installing an ISA/PCI Board …..… … … … … … … … … …
2.4.7 Installing an LCD Module … … … … … … … … … … … . …
2.4.8 Installing a Compact Flash Expansion Module … … . …
2.4.9 Installing Other Peripherals … … … … … … … … … … . . …
2.4.10 Attaching a Power Cable … … … … … … … … … … … … . .
2.4.11 Installing an MSR Module (option) … … … … … … … . . …
2.4.12 Installing Customer Display Module (option) … … … . …
10
10
11
12
13
14
21
23
25
26
27
29
30
31
32
33
Chapter 3 Operation
3.1 Operation … … … … … … … … . . … . … … … … … … … … … . … . … …
3.2 Power ON and Off … … … … … … … … . . … . … … … … … … … . . … .
3.3 Indicators … … … … … … … … . . … . … … … … … … … … … … . . … …
3.4 Inserting and Removing a Floppy Disk … … … … … … … … … …
3.5 Inserting and Removing a second HDD or CD-ROM … … … …
3.6 Reset … … … … … … … … … … … … … . … … … … … … … … … … …
3.7 LCD Contrast Adjustment … … … … … … . . … … … … … … … . . . …
3.8 LCD Panel Angle Adjustment … … … … … … . . … … … … … … . . …
3.9 How to Install Touch Screen … … … … … . . … … … … … … … … …
3.10 How to Read a Magnetic Stripe Card … … … … … . . … … … . . …
35
36
37
38
39
40
41
41
42
42
iii
Chapter 4 System Utilitie s
4.1 System Utilities … … . … … … … … … … … … … … … … … … … . . …
4.2 BIOS Setup Utility … … . … … … … … … … … … … … … … … … . …
4.2.1 Starting the BIOS Setup … … … … … . … … … … … … . . …
4.2.2 Help Window … … … … … … … … … … … … … … … … … . .
4.2.3 When a Problem Occurs … … … … … … … … … … . . … …
4.2.4 Legend Keys … … … … … … … … … … … … … … … . . … …
4.2.5 Main Menu … … … … … … … . . … … … … . . … … … … … … .
4.2.6 Standard CMOS Setup … … … … … … … … . … … … … …
4.2.7 BIOS Features Setup … … … … … … … … … … … … … . . .
4.2.8 Chipset Feature Setup … … … … … … … . . … … … … … …
4.2.9 Power Management Setup … … . … … … … … … … … . . …
4.2.10 PnP/PCI Configuration … … … … … … … … … … . . … … …
4.2.11 Integrated Peripherals … … … … … … … … … … … … … . ..
4.2.12 Password Setting … … … … … … … … … … … … … … … …
43
43
44
44
44
45
46
48
52
59
64
69
72
75
Chapter 5 Troubleshooting your POS400
5.1 Troubleshooting your POS400 …..… … … … … … . … … … . . … …
76
5.2 Error Messages … … … … … … … … … … … … . . … … … … … … … … . .. 76
Appendix A Specifications
A.1 Specifications … … … … … … … … … … … … … … … … … … … … …
A.2 Connector Pin Assignments .… … … … … … … … … … … … … . . …
A.3 Customer Display .… … … … … … . . … … … … … … … … … … … . . …
v
80
81
87
Chapter 1
1.1 Introduction
The POS400 is a wise terminal developed for the Point-of-Sales application.
Listed below are the following features.
1.
Combining your POS400 with a variety of options and peripheral
devices allows you to construct a system that suits your best need.
2.
The POS 400 is equipped with power management function to ensure
power stability for data processing, while assuring optimum power
saving.
3.
We have chosen a PC/AT compatible BIOS to execute specific
application software or any PC program of your choice.
4.
The system has the capability of supplying +5V or +12V to all serial
ports.
5.
This unit uses a PC-based open architecture to increase system
expandability by providing one extra PCI/ISA slot.
6.
The POS 400 has a PS/2 keyboard port at the rear of the cabinet by
moving forward the Customer Display module upwards. Therefore, it
is possible to connect any commercially available keyboard in
accordance with your environment.
7.
The use of standard DIMMs allows you to install memory of up to
256MB.
8.
The unit has available four serial ports and one parallel port that allow
connection of industry standard peripheral devices, increasing system
expandability.
9.
In addition to the standard 3.5-inch floppy disk drive in the system, you
can also use one external CD-Drive for OS or Application software
installation and another FDD for data storage.
10. The hard disk drive can easily be removed or mounted from the
designated bay by taking out the support base. In the event of a
system failure, the hard disk can be moved immediately to another
POS400 to continue the processing.
1
11. Connection of the designated MCR (magnetic card reader) unit (option)
makes it possible to read magnetic cards.
2
1.2 Hardware System Outlook for Front View
Illustrations below show the part names of this product.
LCD unit
MSR Unit
(Optional
Power Indicator
HDD Indicator
Compact Flash & USB Port
Front View
Power Switch
Rear View
3
)
1.3 Hardware System Outlook for Rear View
FDD Connector
CD- ROM
Connector
COM3 / COM4
Keyboard Connector
Mouse Connector
COM2 Port
LAN Connector
COM1 Port
VGA Connector Printer
Rear View
4
Power Connector
1.4 Hardware System Outlook for Option Module View
In some cases, user can buy our bare bone hardware system excluding
two options, namely: (1)MCR module (Magnetic Card Reader) (2)
Customer Display module.
MSR Module
Customer Display Module
5
COM3
Hardware System Outlook - Function Board
CN2
Digital I/O
RT
COM4
CN5
¹
Function Board (For LCD Touch Panel)
6
1.5 Handling Guidelines
Warning and Precaution
Notes on precautions in this manual are identified by their level of
importance, as defined below.
F WARNING
Provides information that must be observed to prevent harm (not
life-threatening) to the user.
ê Caution
Provides information that must be observed to prevent damage to the
equipment or loss of data.
! Note:
Provides important information and useful tips on handling the equipment.
7
F WARNING
1. Do not attempt to repair this product by yourself.
- Improper repair can be dangerous.
2. Do not disassemble or modify this product.
- Tampering with this product may result in injury, fire, or electric shock.
3. Do not insert or disconnect the power cord plug with wet hands.
- Doing this may result in severe shock.
4. Do not allow foreign objects to fall into this product.
- Penetration by foreign objects may lead to fire or shock.
5. Do not place multiple loads on the power outlet (wall outlet).
- Overloading the outlet may lead to fire.
6. Do not spills water or other liquid into this product. It this happens, turn
off the power switch at the left side cover of the unit, and unplug the
power cable immediately.
- Continued usage may lead to fire or shock.
7. Always supply power directly from a standard domestic power outlet.
8. Handle the power cable with care.
8
ê Caution
1. Check and be sure your power cable meets the relevant safety
standards and includes a PE terminal (power-system ground terminal).
2. Check and be sure to set this equipment on a firm flat horizontal surface.
Otherwise, the product may break or cause injury when it falls.
3. Check and be sure to attach the rear Customer Display cover after
making the necessary connection.
4. Check and be sure to attach all the front and back covers after installing
the options.
5. Do not use the product in locations that are subject to high humidity or
dust levels. Excessive humidity and dust can cause this product to
damage, fire, or shock.
6. Do not place heavy objects on top of this product. The product may
collapse or slip to fall, causing breakage and possible injury.
7. Do not drop, bump or subject this product to strong vibration or impact.
8. For safety reasons, please unplug this product when you leave it
unattended or unused for an extended period of time.
9
Chapter 2
2.1 Setup
This chapter explains how to set up your hardware. For configuring your
system using the BIOS Setup, please see the next chapter.
2.2 Precautions on Setting up
This section describes items to observe when setting up the POS400. In
addition to the above, there are warning instructions and precautions to
observe at each work stage. They are given in each explanation.
ê Caution
1. Turn off the power of all equipment including the POS400 and the
peripherals before setup. Be sure to turn off the side power switch for
the POS400. When power is on, the POS400 or peripherals units may
be damaged during setup.
2. Before setup, be sure to discharge the static electricity on your body.
Trouble may result on the product if you do not allow static electricity to
discharge. Find and touch a grounded metal surface to allow static
electricity to discharge.
3. Do not touch the connectors with your fingers, to prevent dirt from
causing malfunction.
10
2.3 Unpacking POS400
1. Take out the POS400 unit from the carton box, check if the unit is
properly secure in the plastic bag.
2. Check the contents of the carton box:
← Accessory Bag
↑ POS400 Hardware system
→ CD Driver Bank
↓ FDD / HDD / Power Cable
3. Check the content of the accessory bag:
Accessory Bag
Name of Accessory Q’ty
1. Installation Guide
1
L
1
2. CD Driver Bank
1
1
3. Power cable
1
4. External IDE cable
1
5. External FDD cable
1
To
From
180cm AC inlet
U.S. type 110Vac power connector
connector
European 220Vac power connector
45 cm 50-pin Flat cable 40-pin Flat cable connector & 4-pin
connector
power plug
45 cm 40-pin Flat cable 34-pin Flat cable connector & 4-pin
connector
FDD power plug
11
2.4 Setting Up the POS400
Setup the POS400 according to the following steps as listed below. If you
don't use the specified options, skip that step.
2.4.1
2.4.2
2.4.3
2.4.4
2.4.5
2.4.6
2.4.7
2.4.8
2.4.9
2.4.10
2.4.11
2.4.12
Step
Removing a Support Base / LCD Module
Setting the Jumpers and DIP Switches
Installing a CPU
Installing DIMMs
Installing a Hard Disk Drive
Installing an ISA/PCI Board
Installing an LCD Module
Installing a Compact Flash Expansion Module
Installing Other Peripherals
Attaching a Power Cable
Installing an MSR Module (option)
Installing Customer Display Module (option)
12
2.4.1 Removing a LCD Module / Supporter / Base Unit
1.Remove the LCD Module from Supporter
To remove the LCD Module, please remove a Philips type screw at the
back side of POS 400 LCD module.
Screw
Supporter
2. Separate Supporter and Base unit by removing four screws fixed the
Base unit and supporter. See below figure.
LCD Module
Supporter
Screws
Base Unit
13
2.4.2 Setting Jumpers and DIP Switches
There are jumpers and DIP switches on the board of the POS400. You
can set them to control how the system operates.
For three-pin jumpers, the jumper setting is 1-2 when the jumper connects
pins 1 and 2. The setting is 2-3 when pins 2 and 3 are connected. You
see a 1 and a 3 printed on the circuit board to identify these pins. Also,
one of the lines surrounding jumpers is thick, which indicates pin NO.1.
To move a jumper from one position to another, use needle-nose pliers or
tweezers to pull it off the pins and move it to the desired position.
ê Caution
1. Be careful not to bend the jumper pins or damage any components on
the board.
2. Do not change settings for jumpers and DIP switches not covered in this
manual.
14
P
2
4
I
J1
JP4
J5
J6
J7
JP5
5
6
10
JP6
2
JP8
9
JP14 JP13
40
J8
1
39
4
1
3
JP32
1
1
1
JP11
2
1
2
1
JP7
10 1
2
8
JP10
9
JP11
1
40
33
39
34
1
J9
2
2
I
2
1
2
1
8
J
1 5
2 6
JP3
J4
3
1
2
1
2
P
5
6
5
6
J2
2
C
U1
JP9
JP31
3
2
C
1
J
2
DOC
3
1
8
U
1
2
P
1
F
JP18
U16
BT1
3
1 5
1
2 6
2
J19
U24
J20
U25
1
4
9
1
3
2
3
U31
S3
W
J30
2
2
2
1
1
11
12
1
10
J
W
J11
TRIO 3D/2X
1
2
9
10
J
3
U
1
3
6
6
JP24
JP27
1 3
1
2
8
1
7
CN2
1
1
J13 J14
JP28
JP25
JP26
2
3
15
J
2
1
F
2
3
U32
CPU
J
PGA370
168-PIN DIMM RAM SOCKET-DIMM
2
1
JP21
8
168-PIN DIMM RAM SOCKET-DIMM
P
J
0
P
Jumpers and DIP Switches Locations
The figure below shows the location of jumpers and the DIP switches on
the POS400 main board - B63 version 2.x.
Table for Jumper Location Description:
Use the information in the following table to change the jumpers and the
DIP switches.
Jumpers
JP1
JP3, JP4, JP5, JP9
JP18, J3
JP19, JP20
JP21
J11
J12
Functions
Watch Dog Time Setting
COM Port Jumper Setting
ATX / AT Power Mode
M-System DiskOnChip
CPU Type Selection
Digital I/O (4 Output & 4 Input)
CMOS Operation Mode
16
Watch Dog Timer Settings: JP1
This jumper is designated to do the setting of the Watch Dog Time.
Time
0.1 sec
0.5 sec
1.0 sec
1.6 sec
10 sec
1 min
10 min
1hr
JP1
3-4
ON
ON
OFF
OFF
ON
ON
OFF
OFF
1-2
ON
ON
ON
ON
OFF
OFF
OFF
OFF
5-6
ON
OFF
ON
OFF
ON
OFF
ON
OFF
Watch Dog Timer Programming:
Input / Output
Output
Input
Input
Address
205H
205H
204H
Watch Dog ON
Watch Dog WDI
Watch Dog OFF
Example : If Output 205H, Watch Dog ON
If Input 205H, Watch Dog WDI
If Input 204H, Watch Dog OFF
:
User DOS SYSTEM for Test
C:\DEBUG
- O 205 00
--- Watch ON
- I 205
--- Watch WDI
- I 204
--- Watch OFF
17
COM Port Jumper Setting: JP3, JP4, JP5, JP9
1. Customer Display use COM2 (+12V)
2. Touch Panel use COM3 (+5V)
3. Card Reader use COM4 (+5V)
COM PORT
COM1
JP4
COM2
JP3
COM3
JP9
COM4
JP5
PIN
1-2 (Default)
3-4
5-6
1-2(Default)
3-4
5-6
1-2(Default)
3-4
5-6
1-2(Default)
3-4
5-6
1
Data Line
+5V
+12V
Data Line
+5V
+12V
Data Line
+5V
+12V
Data Line
+5V
+12V
ATX / AT Power Mode: JP18, J3
Function
POS400 FT-8007
AT Internal power supply (Default)
ATX power supply
JP18
Close
J3
1-2
Open
2-3
M-System DiskOnChip: JP19, JP20
Address
0C800-0C9FF (Default)
0CC00 - 0CDFF
0D000 - 0D1FF
0D400 - 0D5FF
0D800 - 0D9FF
0DC00 - 0DDFF
18
JP19
1-2
3-4
1-2
3-4
1-2
3-4
JP20
1-2
1-2
3-4
3-4
5-6
5-6
CPU Type Selection: JP21
CPU Clock
100.3MHz
66.8MHz
PCI Clock
JP30
FS0
1-3
1-3
33.43MHz
33.40MHz
FS1
7-9
7-9
FS2
2-4
4-6
FS3
10-12
10-12
Digital I/O (4 Output & 4 Input): J11
This main board provides the basic digital I/O signal controller, user can
develop the program and extra controller to open and sense of the cash
drawer based on the digital I/O function on this main board.
Pin
1
2
3
4
5
Pin Assignment
GND
VDC +12V
IN 0
Out 0
IN 1
IN3
IN2
Pin
6
7
8
9
10
IN1
IN0
Pin Assignment
Out 1
IN 2
Out 2
IN 3
Out 3
GND
9
7
5
3
1
10
8
6
4
2
OUT3
OUT2
OUT1
OUT0
19
V DC +12V
Digital Output Programming
The output is TTL Level. The output signal must be TTL compatible.
Output
Out 0
Out 1
Out 2
Out 3
Example : ( “0” = off
Address
206
206
206
206
Bit
0
1
2
3
“1” =on )
Data 00 = Out 0 and Out 1 = “0”
Data 01 = Out 0 = “1”
Data 02 = Out 1 = “1”
Data 03 = Out 0 and Out 1 = “1”
Digital Input Programming
The input signal must be TTL compatible.
Input
IN 0
IN 1
IN 2
IN 3
Address
206
206
206
206
Bit
0
1
2
3
Example : If input 206 is [0111], then input 3 is “0”,
If input 206 is [0011], then input 3 & 4 are “0”
CMOS Operation Mode: J12
Function
CMOS Normal (Default)
CMOS Reset
J12
2-3
1-2
20
2.4.3 Installing a CPU
The POS400 contains a Socket 370, which can accept the following CPU
types.
®
l Intel PPGA / FC-PGA processor.
Be sure to attach a CPU cooling fan to the CPU included in the package
after you install the CPU. It prevents the CPU from overheating.
ê Caution
1. To avoid generating static electricity and damaging the CPU, ground
yourself by touching a grounded metal surface before you touch the
CPU.
2.
Do not remove the heat dissipation mylar under the CPU cooling fan.
3.
Do not touch the pins of the CPU. Dirt may cause a malfunction.
Follow these steps to install the CPU:
1. Check and confirm that the jumpers are correctly set for the CPU you
are going to install.
2. Lift the release lever of the Socket 370.
3.
Align the pins of the CPU to the pin holes of the Socket 370. Be sure
to pay attention to the orientation of the CPU.
Lever
Notch
4.
Push down the CPU into the Socket 370.
5.
Push down the release lever and lock it.
6.
Hook the hole in ZIF clip for the CPU cooling fan onto the notch on the
socket 370.
21
7. Place the CPU cooling fan atop the CPU surface.
8.
Push down the opposite side of the ZIF clip and hook it.
9. Slide the head of the clip to left and lock it.
10. Connect the cooling fan cable to the socket as shown below.
careful not to place the cable on the CPU cooling fan.
Be
Removing a CPU:
ê Caution
1. Before removing the CPU, turn off the POS400 power; then wait for
about 20 minutes until the heat radiation plate of the cooling fan and the
CPU cools down.
The CPU and the heat radiation plate are hot. They may cause burns.
To remove the CPU, reverse the installation steps.
22
2.4.4 Installing a DIMM
The main board contains two DIMM sockets. You can insert one DIMM or
two DIMMs. However, it is recommended that you use two DIMMs of the
same type and same access speed.
ê Caution
1. To avoid generating static electricity and damaging the DIMM, ground
yourself by touching a grounded metal surface or using a ground scrap
before you touch the DIMM.
2.
Do not touch the connector of the DIMM. Dirt may cause a malfunction.
Follow these steps to install the DIMMs:
1.
Hold the DIMM with its notch to the front side of the POS400 and insert
it completely into the socket. A DIMM should be inserted into the inner
socket first. Guiding the hole at each end of the DIMM over the
retaining post at each end of the DIMM socket.
Pull it
2.
Pull it
If you install two DIMMs, install the second DIMM using the same
procedure as above.
23
! Note:
1. If DIMM does not go in smoothly, do not force it. Pull it all the way out
and try again.
ê Caution
1. Make sure the DIMM is properly installed and locked by the tabs on
both sides of the socket.
Removing a DIMM:
To remove the DIMM, use your fingers or a small screwdriver to carefully
push away the plastic tabs that secure the DIMM at each end. Lift it out of
the socket.
Make sure you store the DIMM in an anti-static bag.
24
2.4.5 Installing a Hard Disk Drive
You can install a 3.5 inches hard disk drive in the POS400.
ê Caution
1. Handle the hard disk drive gently. Do not bump or drop the hard disk
drive. Small shocks or vibrations could damage the drive.
Follow these steps to install the hard disk drive.
1.
Unlock the four screws fixed on the Supporter and Base unit of
POS400. You can see a HDD bay in the right of POS400 base unit.
Screws
Screws
HDD bay
2.
Connect the HDD cable and it’s corresponding DC power cable. Lay
down the HDD into the HDD bay.
Removing a Hard Disk Drive:
To remove the hard disk drive, reverse the installation steps.
25
2.4.6 Installing an ISA/PCI Board
The POS400 has one PCI expansion slot and one ISA/PCI expansion slot.
You can insert one PCI board into the PCI expansion slot, and either one
ISA or one PCI board into the ISA/PCI expansion slot.
PCI / ISA
PCI
Install the ISA/PCI board by following the procedure below.
1. Remove the retaining screw securing the bracket. Keep the screw to
secure the ISA/PCI board.
2.
Slide the bracket out and set it aside. Store the bracket in case you
remove the ISA/PCI board later.
3.
Gently guide the board into the connector.
Push the board in firmly (but carefully), and insert it fully. You should
feel the connectors fit into place. If the board does not go in smoothly,
do not force it; pull it all the way out and try again.
4.
Secure the end of the ISA/PCI board to the POS400 with the retaining
screw.
Removing an ISA/PCI Board:
To remove the ISA/PCI board, remove the retaining screw securing the
board. Pull the board straight out of the slot, then replace it with a bracket.
After removing the ISA/PCI board, attach a bracket.
26
2.4.7 Installing an LCD Module
The specifications for the LCD Module are as follows:
LCD panel:
12.1-inches, color TFT type
800 x 600
Back light life:
25,000 hours until brightness is reduced to half.
Touch panel:
Resistor film type
Serial communication: COM3
(Touch panel)
A gear slider mechanism lets the LCD surface inclination slide up vertically
for setting the optimum angle.
Follow these steps to install a LCD module:
1.
Take the LCD cable from the accessory bag and connect it to the
designated connector on the Function Board.
2.
Take the Support base from the carton box and align it against the bay
area of the Unit base.
3.
Take four Philips type screw from the accessory bag and lock it on the
designated screw holes.
4.
Unlock the screws of the Top metal cover at the Support base.
5.
Pull the loose connector of the LCD cable out of the Support base.
6.
Pull out the cable at the lower part of the Support base and align it
against the protrude cutting area of the Top metal cover.
7.
Lock the four screws of the Top metal cover to the inner bay of the
Support base.
8.
Connect the loose LCD cable connector to the designated connection
at LCD module.
27
9.
Set the LCD module by sliding it atop in the downward angle position to
the Support base. And listen to the clipping sound.
10. Lock the LCD module with a screw at the designated area in the bottom
of the LCD module.
Set the LCD module on the POS400 and slide it downward. At this time, the
LCD module and POS400 should be aligned with each other, as shown
below.
Push
On the bottom of
LCD Module with
a screw
Removing an LCD Module:
To remove the LCD module, follow the procedure below.
1.
Unlock the screws of the LCD Module.
2.
With the LCD Panel Display facing you, pull the LCD Module towards
you.
3.
Detach the LCD module cables from their designated connector.
As shown below, slide the lock of the LCD module while pulling it up with
your fingers and lift it up as shown.
Pull
On the bottom of
LCD Module with
a screw
28
2.4.8 Installing a Compact Flash Expansion Module
You can install a Compact Flash expansion module in the front of POS400.
Compact Flash
Compact Flash cover
Install the Compact Flash expansion module using the procedure below.
1.
Remove the cover of Compact Flash and USB port.
2.
Insert the Compact Flash.
3.
Push the cover back to its place.
Removing a Compact Flash Module:
To remove the Compact Flash expansion module, reverse the installation
steps.
29
2.4.9 Installing Other Peripherals
The following options can be attached to the POS400.
manual for each peripheral for the installation procedure.
1.
Mouse (connected to the PS/2 mouse connector)
2.
Keyboard (connected to the PS/2 keyboard connector)
30
Refer to the
2.4.10 Attaching a Power Cable
Take the power cable from the accessory Bag.
cable that meets the specifications below.
Input voltage (rating)
Frequency (rating)
Always select a power
90 (100-10%) VAC to
264 (240+10%) VAC
50/60 Hz + 2 Hz
ê Caution
1. Never insert or disconnect the power plug with wet hands. Doing so
may result in severe shock.
2.
Do not place multiple loads on the power outlet (wall outlet).
Overloading the outlet may lead to fire.
Always supply the
power directly from a power outlet.
Follow these steps to attach the power cable:
1. Connect the power cable to the POS400.
2.
Connect the power plug to the power outlet.
31
2.4.11 Installing an MCR Module (option)
The LCD module and touch screen are equipped with an interface for a
connection to a magnetic card reader (MCR).
Mount the MCR module by following the procedure described below.
1.
Open the MSR module on the package and check it.
2.
Connect the MSR module to the right side of LCD module and lock it
using two screws.
Lock screws
Removing an MSR module:
To remove the MSR module, reverse the installation steps.
! Note:
1. When you remove the screws and then want to fix them again, first turn
off the power.
32
2.4.12 Installing Customer Display Module (option)
The POS400 is equipped with an interface for a connection to a Customer
display module.
Customer display module mount by following the procedure described
below.
1.Jumper settings for POS 400
(1a.) Use screw driver to remove 4 pieces of screws which fix POS400
system base and supporter.
(1b.) Remove screws and flat cable which is connected on expansion card
on system unit.
(1c.) Remove the expansion card and interface board off the system.
2
1
3
(1d.) B63 main board jumper setting for P07301XX Pole Display:
Set JP3 on 5-6 (+12VDC)
1-2 Default (without VFD)
3-4
5-6 (VFD bundled)
COM2 PORT JP3
DATA LINE
+5V
+12V
33
15
26
JP3
J2
1
2
JP9
J4
3
1
2
1
2
1
JP5
5
6
1
8
10
JP6
2
1
1
2
40
J8
1
10 1
9
J5
82
1
JP10
J6
JP11
2
JP8
9
JP7
JP14
39
4
40
39
JP11
JP13
1 3
33
34
J7
JP32
1
2 1
5
6
JP4
5
6
1
J9
2
J
J
P
J1
U1
JP31
2 1
P
1
2
2
1
J
3
1
J30
JP8
12
2
U31
1
2
S3
TRIO 3D/2X
9
10
2
10
9
JP21
1
JP6
U25
J
1
U24
J20
2
1
2
1
2
JP5
5
6
1
4 26
1
10
2
1
2
1
JP7
10 1
3
JP3
3 15
J19
9
J11
1
11
JP4
1 5
2 6
J2
1
2
P
5
6
P
J
J1
U1
J
U16
BT1
5
6
U
C
F
JP18
DOC
9
PGA370
P
JP9
3
6
JP24
JP27
1 3
1
2
8
CN2
1
1
J13
J14
1
7
JP28
JP25
JP26
2
C
1
1
6
P
C
P
2
J
1
F
2
J
U
1
1
1
U32
CPU
JP31
3
W
2
6
6
1
Fig. JP3 location on B63 MB
9
3
8
3
8
2
8
2
I
2
0
2
I
2
2. (2a.)Remove the Pole Display cover from POS 400 base unit.
(2b.)Install the Pole Display stud onto POS400 base.
(3a)Unscrew the adjustment screw from the Pole Display Panel.
-
P
I
L
L
4
S
S
2
-
P
I
(3b)Install the flat cable RJ-45 connector across the Pole Stud of
POS400 system unit and the Pole Display Tube(s). You can use
two tubes or just one of them according to the height of your desire.
4
34
O
3.
Chapter 3
3.1 Operation
This chapter explains the operations described below.
1.
Power on and off
2.
Indicators
3.
Inserting and removing a floppy disk
4.
Inserting and removing a second HDD or CD-ROM
5.
Reset
6.
LCD contrast adjustment
7.
LCD panel angle adjustment
8.
How to adjust touch screen
9.
How to read a magnetic stripe card
35
3.2 Power On and Off
1. When you use this product for the first time, open the switch cover and
turn on the power switch situated at the left side of the base with the
LCD panel display facing you. A "l" red mark inscribed on the case
indicates power on and no mark indicates power off.
Power Switch
2.
The side power switch should usually be kept on. Turn off the side
power switch only when attaching peripherals, transporting this product,
and when not using it for an extended period of time.
36
3.3 Indicators
Both the front of LCD module and POS400 base have two indicators.
LCD unit
MSR Unit (Option)
Power Indicator
HDD Indicator
Cable Hole
Compact Flash & USB Port
These indicators have the following meaning:
LED
Power
HDD
Color
Green
Green
Meaning
Power is turned on.
HDD is being accessed.
(If no HDD is attached, this indicator has no meaning.
37
3.4 Inserting and Removing a Floppy Disk
Use the floppy cable of accessory bag to connect the floppy disk drive in
the rear I/O of POS400 base, follow the procedure below.
1.
Connect the floppy cable to the floppy disk drive and the rear I/O of
POS400 base as designated in the figure below.
When the floppy disk is connected correctly, the lamp of the floppy disk
drive will be turn on.
Floppy connector
To remove the floppy disk, follow the procedure below.
1.
Check that the access lamp of the floppy disk drive is off.
2.
When you detach the floppy cable, the floppy disk will come out.
3.
Take out the floppy disk carefully.
38
3.5 Inserting and removing a second HDD or CD-ROM
Uses the IDE cable of accessory bag to connect the second HDD or
CD-ROM drive in the rear I/O of POS400 base, please follow the procedure
below.
1.
Connect the IDE cable to either the second HDD or CD-ROM drive and
the rear I/O of POS400 base as designated in the figure below.
When the second HDD or CD-ROM is connected correctly, the lamp of
the CD-ROM drive will be turn on.
IDE connector
To remove the second HDD or CD-ROM, follow the procedure below.
1.
Check that the access lamp of the second HDD or CD-ROM drive is off.
2.
When you detach the IDE cable, the second HDD or CD-ROM drive will
come out.
3.
Take out the second HDD or CD-ROM carefully.
39
3.6 Reset
This restarts the POS400 while power in on.
Reset is necessary in the following cases:
l When a reset instruction has been issued by the operating software.
l To restart the POS400.
l When software has entered an endless loop.
When the system is reset, all data in memory will be lost. Unless software
has entered a loop, save the required data on an external storage medium
such as hard disk before resetting the system.
There is only one type of reset: a soft reset performed by pressing the Ctrl,
Alt, and Delete keys at the same time.
Perform a soft reset by following the procedure below.
1.
Press the Ctrl, Alt, and Delete keys at the same time.
2.
Messages for confirmation appear on the screen.
following the messages.
Proceed by
Under windows mode, a message showing “ The system is ready to be
shut down “, it will last for a second or two – then proceed directly to the
DOS mode, showing the POST test.
40
3.7 LCD Contrast Adjustment
When you use the LCD module, you can adjust LCD contrast by depressing
the contrast dial in left side of the LCD module.
LCD contrast dial
3.8 LCD Panel Angle Adjustment
The view angle of the LCD module is adjustable.
steps to change it:
Follow these
1.
Fix the POS400 base with one hand and pull the LCD module upward
to fit your desired position.
2.
Adjust the angle anyway you like, from 25 to 45 .
o
41
o
42
3.9 How to Install Touch Screen
1. Shutdown Windows 95/98/2000 and turn off your computer.
2.
Start your computer.
3.
After Windows is loaded, insert the Driver Bank CD for Windows
95/98/2000 disk into CD-ROM.
4.
Click the Start button, and then click Run.
5.
Type "D:\POS400\ELO\setup" in the space provided and press Enter. If
you downloaded the driver, Browse for setup.exe in the directory to
which you extracted the driver files.
6.
Follow the directions on the screen.
7.
Choose your Elo touchscreen controller from the list.
8.
If you have a serial touchscreen, select the serial port you connected
the touchscreen cable to in step 2 above. All serial ports reported by
Windows are displayed.
9.
Complete the Setup program.
10. Restart Windows 95 when prompted. The touchscreen calibration
program will automatically run when Windows starts up. Touch each of
the three targets as they appear on the screen. Click “Yes” when the
cursor lines up correctly with your finger.
3.10 How to Read a Magnetic Stripe Card
When you attach a MSR module, you can read magnetic stripe cards.
Hold the card as shown below, and pass it through the MSR track.
43
Chapter 4
4.1 System Utilities
This product comes with the following utility programs in System ROM and
on the CD disk drive:
1.
BIOS setup, for defining the configuration of the system
2.
Device diagnostics, for troubleshooting devices attached to this product
Hard disk
3.
Touch screen configuration utility
4.
Card reader configuration utility
5.
Customer display configuration utility
4.2 BIOS Setup Utility
The BIOS setup defines how the system is configured. You need to run
this program the first time you configure this product. You may need to run
it again if you change the configuration.
You need to connect a PC keyboard to the keyboard connector to run the
BIOS setup utility.
ê Caution
1. Do not change the settings for features not described here.
2. If you change them, it is possible that this product will not
work. If this happens, refer to "When a Problem Occurs" in
this chapter.
44
4.2.1 Starting the BIOS Setup
To start the BIOS setup:
1. Turn on or reboot this product.
2.
Press the DEL key immediately after the product is turned on, or press
the DEL key when the following message is displayed during POST
(the Power On Self Test).
Press DEL to enter SETUP.
3.
The main menu of the BIOS setup is displayed.
password is set, you must enter it here.
If the supervisor
4.2.2 Help Window
1. Pressing the F1 key on any menu brings up a display area that
describes the legend keys and the selectable items.
Press the ESC key to exit the help window.
4.2.3 When a Problem Occurs
If, after making and saving system changes with the Setup utility, you find
that this product no longer boots, start the BIOS setup and execute either
one of the following.
l Load Setup Default or
l BIOS Setup Default
45
4.2.4 Legend Keys
Use the keys displayed on the bottom of the screen to make your
selections,
exit the current menu, and so on.
The table below shows the available keys:
Legend Keys
Control Keys
Description
Up arrow
Down arrow
Left arrow
Right arrow
Esc key
Move to previous item
Move to next item
Move to the item to the left side
Move to the item to the right side
Main Menu:
Quit and do not save changes to CMOS.
Except Main Menu:
Exit current BIOS screen and return to Main Menu.
PgUp / “+” key
Increase the numeric value or make changes
PgDn / “−“ key
Decrease the numeric value or make changes
F1 key
General help, only for Status Page Setup Menu and
Option Page Setup Menu
F2, (Shift+F2) key Change color from total 16 colors. F2 to select color
forward, (Shift + F2) to select color backward
F3 key
Reserved
F4 key
Reserved
F5 key
Restore the previous CMOS value from CMOS, only for
Option Page Setup Menu
F6 key
Load the default CMOS value from BIOS default table,
only for Option Page Setup Menu
F7 key
Load the Setup default, only for Option Page Setup Menu
F8 key
Reserved
F9 key
Reserved
Save all the CMOS錯 誤 ! 尚 未 定 義 書 籤 。 changes, only for
F10 key
Main Menu
! Note:
Shift+F2 means that the Shift key and F2 key are pressed at the same time.
46
4.2.5 Main Menu
When the Main Menu is displayed, the following items can be selected.
Use arrow keys to select items and the Enter key to accept and enter the
sub-menu.
ROM PCI/ISA BIOS (2A69KF1E)
CMOS SETUP UTILITY
AWARD SOFTWARE, INC.
STANDARD CMOS SETUP
BIOS FEATURES SETUP
CHIPSET FEATURES SETUP
POWER MANAGEMENT SETUP
PNP/PCI CONFIGURATION
LOAD BIOS DEFAULTS
LOAD SETUP DEFAULTS
INTEGRATED PERIPHERALS
SUPERVISOR PASSWORD
USER PASSWORD
IDE HDD AUTO DETECTION
SAVE & EXIT SETUP
EXIT WITHOUT SAVING
Esc:Quit
↑ ↓ → ←:Select Item
F10:Save & Exit Setup
(Shift) F2:Change Color
Time, Date, Hard Disk Type...
Standard CMOS setup
This setup page includes all the items in standard compatible BIOS.
BIOS features setup
This setup page includes all the items of AWARD special enhanced
features.
Chipset features setup
This setup page includes all the items of chipset special features.
Power Management setup
This category determines how much power consumption for system after
selecting below items. Default value is Disable.
47
PNP/PCI Configuration
This category specifies the value (in units of PC bus clocks) of the latency
timer for this PCI bus master and the IRQ level for PCI device.
Load BIOS defaults
BIOS defaults indicates the most appropriate value of the system
parameter which the system would be in minimum performance.
Load setup defaults
Setup defaults indicates the values required by the system for the
maximum performance.
Integrated Peripherals
Change, set, or disable on board supers I/O function.
Supervisor password & Password setting
Change, set, or disable password. It allows you to limit access to the
system and Setup, or just to Setup.
IDE HDD auto detection
Automatically configure hard disk parameters.
Save & exit setup
Save CMOS value changes to CMOS and exit setup.
Exit without save
Abandon all CMOS value changes and exit setup.
48
4.2.6 Standard CMOS Setup
In the standard CMOS menu, you can set the system clock and
calendar, record disk drive parameters and the video subsystem
type, and select the type of errors that stop the POST ( Power On
Self Test).
ROM ISA BIOS (2A69KF1E)
STANDARD CMOS SETUP
AWARD SOFTWARE, INC.
Date (mm:dd:yy):Mon, Jul 05 2000
Time(hh:mm:ss):08:30:23
HARD DISK
TYPE
Primary Master : Auto
Primary Slave
:
AUTO
Secondary Master : Auto
Secondary Master :
AUTO
SIZE
HEAD
PRECOMP
LANDZ
0M
0
Auto 0 M
CYLS
0
0
0
0
0
0
0
0
AUTO
0
0M
0
Auto 0 M
0
0
0
0
0
0
0
0
AUTO
0
Drive A
Drive B
:
:
1.44M, 3.5 in.
None
Video
Halt On
:
:
EGA / VGA
All Errors
SECTOR
MODE
Base Memory : 640K
Extended Memory : 64512K
Other Memory : 384K
Total Memory : 65530K
ESC : Quit
F1
: Help
↑ ↓ → ← : Select Item
(Shift) F2 : Change Color
PU / PD / + / - : Modify
Date
The date format is <day>, <date> <month> <year>. Press <F3> to show
the calendar.
Item
Description
Day
Date
The day of week, from Sun to Sat, determined by the BIOS is read
only
The date, from 1 to 31 (or the maximum allowed in the month), can
key in the numerical / function key
49
Month
Year
The month, Jan. through Dec.
The year, depend on the year of BIOS
Time
The time format is <hour> <minute> <second>. Which accepts both
function keys or numerical keys The time is calculated based on the
24-hour military-time clock. For example, 1 p.m. is 13:00:00.
Primary master / Primary slave / Secondary master / Secondary slave
The categories identify the types of hard disk drive C or drive D that has
been installed in the computer. There are 45 predefined types and 1 user
definable types and 1 automatic type for Normal BIOS. Type 1 to Type 45
are predefined. Type User is user-definable. Type Auto is auto-definition
by your computer.
Press PgUp/<+> or PgDn/<−> to select a numbered hard disk type or type
the number and press <Enter>. Note that the specifications of your drive
must match with the drive table. The hard disk will not work properly if you
enter improper information for this category. If your hard disk drive type is
not matched or listed in 1 to 45, you can use Type User or Auto to define
your own drive type manually or automatically.
If you select Type User, related information is asked to be entered to the
following items. Enter the information directly from the keyboard and
press <Enter>. This information should be provided in the documentation
from your hard disk vendor or the system manufacturer.
If the controller of HDD interface is ESDI, the selection shall be “Type 1”.
If the controller of HDD interface is SCSI, the selection shall be “None”.
If the controller of HDD interface is CD-ROM, the selection shall be “None”.
Item
CYLS.
HEADS
PRECOMP
LANDZONE
SECTORS
MODE
Description
number of cylinders
number of heads
write precom
landing zone
number of sectors
HDD access mode
If a hard disk has not been installed select NONE or Auto and press
<Enter>.
50
Drive A / Drive B
The category identifies the types of floppy disk drive A or drive B that have
been installed in the computer.
Item
Description
None
No floppy drive installed
360K, 5.25 in 5-1/4 inch PC-type standard drive; 360 kilobyte capacity
1.2M, 5.25 in 5-1/4 inch AT -type high-density drive; 1.2 megabyte capacity
720K, 3.5 in 3-1/2 inch double-sided drive; 720 kilobyte capacity
1.44M, 3.5 in 3-1/2 inch double-sided drive; 1.44 megabyte capacity
2.88M, 3.5 in 3-1/2 inch double-sided drive; 2.88 megabyte capacity
Video
The category selects the type of adapter used for the primary system
monitor that must match your video display interface and monitor.
Item
Description
EGA/VGA
CGA 40
CGA 80
MONO
Enhanced Graphics Adapter/video Graphics Array. For EGA,
VGA, SVGA, or PGA monitor adapters.
Color Graphics Adapter, power up in 40 column mode
Color Graphics Adapter, power up in 80 column mode
Monochrome adapter, includes high resolution monochrome
adapters
Halt on
The category determines whether the computer will stop if an error is
detected during power up.
Item
Description
No errors
All errors
All, But
Keyboard
All, But
Diskette
All, But
Disk/Key
Whenever the BIOS detects a non-fatal error the system will stop
and you will be prompted.
The system boot will stop for any error that may be detected.
The system boot will not stop for a keyboard error; it will stop for all
other errors.
The system boot will not stop for a disk error; it will stop for all other
errors.
The system boot will not stop for a keyboard or disk error; it will
stop for all other errors.
51
Memory
The category is display-only which is determined by POST (Power On Self
Test) of the BIOS.
Base Memory
The POST of the BIOS will determine the amount of base (or conventional)
memory installed in the system. The value of the base memory is typically
512K for systems with 512K memory installed on the motherboard, or 640K
for systems with 640K or more memory installed on the motherboard.
Extended Memory
The BIOS determines how much extended memory is present during the
POST. This is the amount of memory located above 1MB in the CPU's
memory address map.
Other Memory
This refers to the memory located in the 640K to 1024K address space.
This is memory that can be used for different applications. DOS uses this
area to load device drivers to keep as much base memory free for
application programs. Most use for this area is Shadow RAM.
Total Memory
System total memory is the sum of basic memory, extended memory, and
other memory.
52
4.2.7 BIOS Features Setup
This menu sets up the BIOS feature.
ROM PCI/ISA BIOS (2A69KF1E)
BIOS FEATURES SETUP
AWARD SOFTWARE, INC.
Virus Warning
CPU Internal Cache
External Cache
CPU L2 Cache ECC Checking
: Disabled
: Enabled
: Enabled
: Enabled
Quick Power On Self Test
Boot Sequence
Swap Floppy Drive
Boot Up Floppy Seek
Boot Up NumLock Status
Gate A20 Option
Typematic Rate Setting
Typematic Rate(Chars/Sec)
Typematic Delay (Msec)
Security Option
PCI/VGA Palette Snoop
Assign IRQ For VGA
OS Select For DRAM>64MB
: Disabled
: A ,C,SCSI
: Disabled
: Enabled
: On
: Normal
: Disable
:6
: 250
: Setup
: Disabled
: Disabled
: None-OS2
HDD S.M.A.R.T. capability
Report No FDD For WIN 95
: Disabled
: No
Video BIOS
C8000-CBFFF
CC000-CFFFF
D0000-D3FFF
D4000- D7FFF
D8000-DBFFF
DC000- DFFFF
Shadow
Shadow
Shadow
Shadow
Shadow
Shadow
Shadow
: Enabled
: Disabled
: Disabled
: Disabled
: Disabled
: Disabled
: Disabled
ESC
: Quit
↑↓→←
F1
: Help
PU/PD/+/ - : Modify
F5
: Old Values
(Shift) F2 : Color
F6
: Load BIOS Defaults
F7
: Load Setup Defaults
: Select Item
Virus Warning
This category flashes on the screen. During and after the system boots up,
any attempt to write to the boot sector or partition table of the hard disk
drive will halt the system and the following error message will appear, in the
mean time, you can run an anti-virus program to locate the problem.
53
WARNING !
Disk boot sector is to be modified
Type "Y" to accept write or "N" to abort write AWARD Software, Inc.
Item
Description
Enabled
Activates automatically when the system boots up causing a
warning message to appear when anything attempts to access the
boot sector or hard disk partition table.
No warning message to appear when anything attempts to access
the boot sector or hard disk partition table.
Disabled
! Note:
1. This function is available only for DOS and other OSes that do not trap
INT13.
CPU Internal Cache / External Cache
These two categories speed up memory access. However, it depends on
CPU/chipset design. The default value is Enable. If your CPU is without
Internal Cache then this item “CPU Internal Cache” will not appear.
Item
Enabled
Disabled
Description
Enable cache
Disable cache
Quick Power On Self Test
This category speeds up Power On Self Test (POST) after you power on
the computer. If it is set to Enable, BIOS will shorten or skip some check
items during POST.
Item
Enabled
Disabled
Description
Enable quick POST
Normal POST
54
Boot Sequence
This category determines which drive computer searches first for the disk
operating system (i.e., DOS). Default value is A, C.
Item
A, C, SCSI
C, A, SCSI
C, CDROM, A
CDROM, C, A
D, A, SCSI
E, A, SCSI
F, A, SCSI
SCSI, A, C
SCSI, C, A
C only
LS/ZIP, C
Description
System will first search the floppy disk drive then hard disk
drive for booting purpose
System will first search the hard disk drive then floppy disk
drive for booting purpose
System will first search the harddisk drive then CDROM drive
and the next is floppy disk drive for booting purpose
System will first search the CDROM drive then harddisk drive
and the next is floppy disk drive for booting purpose
System will first search the hard disk D drive then floppy disk
drive for booting purpose
System will first search the hard disk E drive then floppy disk
drive for booting purpose
System will first search the hard disk F drive then floppy disk
drive for booting purpose
System will first search the SCSI hard disk drive then floppy
disk drive for booting purpose
System will first search the SCSI hard disk drive then hard
disk drive for booting purpose
System only search the harddisk drive for booting purpose
System will first search the LS120 drive then hard disk drive
for booting purpose
Swap Floppy Drive
Item
Enabled
Disabled
Description
Enable Floppy Drives A and B Swap function
Disable Floppy Drives A and B Swap function
55
Boot Up Floppy Seek
During POST, BIOS will determine if the floppy disk drive installed is 40 or
80 tracks. 360K type is 40 tracks while 720K, 1.2M and 1.44M are all 80
tracks.
Item
Description
Enabled
BIOS searches for floppy disk drive to determine if it is 40 or 80
tracks. Note that BIOS can not tell from 720K, 1.2M or 1.44M
drive type as they are all 80 tracks.
BIOS will not search for the type of floppy disk drive by track
number. Note that there will be no warning message if the drive
installed is 360K.
Disabled
Boot Up NumLock Status
The default value is On.
Item
On
Off
Description
Keypad is number keys after boot-up
Keypad is arrow keys after boot-up
Gate A20 Option
This entry allows you to select how the gate A20 is handled. The gate A20
is a device used to address memory above 1 Mbytes. Initially, the gate
A20 was support, it is more common, and much faster, for the chipset to
provide support for A20.
Item
Normal
Fast
Description
Handling gate A20 by keyboard
Handling gate A20 by chipset
Typematic Rate Setting
This determines the typematic rate.
Item
Description
Enabled
Disabled
Enable typematic rate and typematic delay programming
Disable typematic rate and typematic delay programming. The
system BIOS will use default value of this 2 items and the default is
controlled by keyboard.
56
Typematic Rate (Chars/Sec)
When the typematic rate setting is enabled, this selection allows you select
the rate at which the key is accelerated.
Item
6
8
10
12
15
20
24
30
Description
6 characters per second
8 characters per second
10 characters per second
12 characters per second
15 characters per second
20 characters per second
24 characters per second
30 characters per second
Typematic Delay (Msec)
When the typematic rate setting is enabled, this selection allows you to
select the delay between when the key was first depressed and when the
acceleration begins.
Item
250
500
750
1000
Description
250 msec
500 msec
750 msec
1000 msec
Security Option
This category allows you to limit access to the system and Setup, or just to
Setup.
Item
Description
System
The system will not boot and access to Setup will be denied if the
correct password is not entered at the prompt.
The system will boot, but access to Setup will be denied if the
correct password is not entered at the prompt.
Setup
! Note:
1. To disable security, select PASSWORD SETTING at Main Menu and
then you will be asked to enter password. Do not type anything and
just press <Enter>, it will disable security. Once the security is disabled,
the system will boot and you can enter Setup freely.
57
PCI/VGA Palette Snoop
It determines whether the MPEG ISA/VESA VGA cards can work with
PCI/VGA or not.
Item
Enable
Disable
Description
When PCI/GA works with MPEG ISA/VESA VGA card
When PCI/VGA doesn‘t work with MPEG ISA/VESA card
Assign IRQ For VGA
This item allows you to assign an IRQ for VGA use.
Item
Description
Enabled
Disabled
Allowed
Restricited
OS Select For DRAM > 64MB
This item allows you to access the memory that over 64MB in OS2.
Item
Non-OS2
OS2
Description
OS2 cannot access the memory address over 64MB
OS2 can access the memory address over 64MB
HDD S.M.A.R.T. Capability
Enable, support hard disk drive quick start up function when re-boot
system.
The Choice: Enable, Disable
Report No FDD for WIN 95
Item
Yes
No
Description
Release IRQ channel for system after disable FDD function
Without release IRQ channel for system after disable FDD function
58
Video BIOS Shadow
BIOS Shadow
It determines whether system BIOS will be copied to RAM or the system
BIOS is always shadow to support LBA HDD.
Item
Enabled
Disabled
Description
System shadow is enabled
System shadow is disabled
Video ROM Shadow
It determines whether video ROM will be copied to RAM, however, it is
optional from chipset design. Video Shadow will increase the video speed.
Item
Enabled
Disabled
Description
Video shadow is enabled
Video shadow is disabled
C8000 - CBFFF Shadow / CC000 - CFFFF Shadow / D0000 - D3FFF
Shadow / D4000 - D7FF Shadow /D8000 - DBFFF Shadow / DC000 DFFFF Shadow
These categories determine whether optional ROMs will be copied to RAM.
An example of such option ROM would be support of SCSI add-on card.
Item
Enabled
Disabled
Description
Optional shadow is enabled
Optional shadow is disabled
59
4.2.8 Chipset Feature Setup
In the chipset feature setup menu, you can set the following items for
chipset feature.
ROM PCI/ISA BIOS (2A69KF1E)
CHIPSET FEATURES SETUP
AWARD SOFTWARE, INC.
Auto Configuration
EDO DRAM Speed Selection
EDO CASx# MA Wait State
EDO RASx# Wait State
SDRAM RAS-to-CAS Delay
SDRAM RAS Precharge
Time
SDRAM CAS latency Time
SDRAM Precharge Control
DRAM Data Integrity Mode
System BIOS Cacheable
Video BIOS Cacheable
Video RAM Cacheable
8 Bit I/O Recovery Time
16 Bit I/O Recovery Time
Memory Hole At 15M-16M
Passive Release
Delay Transaction
AGP Aperture Size (MB)
: Enabled
: 60ns
:2
:2
:3
:3
:3
: Disabled
: Non-ECC
: Disabled
: Disabled
: Disabled
:3
:2
: Disabled
: Enabled
: Disabled
: 64
ESC
: Quit
↑↓→←
F1
: Help
PU/PD/+/ - : Modify
F5
: Old Values
(Shift) F2 : Color
F6
: Load BIOS Defaults
F7
: Load Setup Defaults
: Select Item
The parameters in this screen are to configure the system based on the
specific features of the installed chipset. This chipset manages bus
speeds and access to system memory resources, such as DRAM and the
external cache.
It also coordinates communications between the
conventional ISA bus and the PCI bus. Do not reset these values unless
you understand the consequences of your changes.
Auto Configuration
Auto Configuration selects predetermined optimal values of chipset
parameters.
When Disabled, chipset parameters revert to setup information stored in
60
CMOS.
Many fields in this screen are not available when Auto Configuration is
Enabled.
The Choice: Enabled, Disabled.
EDO DRAM Speed Selection
Item
50ns
60ns
Description
DRAM Timing Type.
DRAM Timing Type.
EDO CASx# MA Wait State
You could select the wait state timing control type of EDO DRAM CAS MA
(memory address bus).
The choice: 1, 2.
EDO RASx# Wait State
You could select the wait state timing control type of EDO DRAM CAS MA
(memory address bus).
The choice: 1, 2.
SDRAM RAS-to-CAS Delay
You can select RAS to CAS Delay time in HCLKs of 2/2 or 3/3. The system
board designer should set the values in this field, depending on the SDRAM
installed. Do not change the values in this field unless you change
specifications of the installed SDRAM or the installed CPU.
The Choice: 2, 3.
SDRAM RAS Precharge Time
Defines the length of time for SDRAM Row Address Strobe is allowed to
precharge.
The Choice: 2, 3.
61
SDRAM CAS latency Time
Define the length of time for SDRAM CAS latency time.
The Choice: 2, 3.
SDRAM Precharge Control
Defines the length of time for Row Address Strobe is allowed to precharge.
The Choice: Disable, Enable.
DRAM Data Integrity Mode
Select Parity or ECC (error-correcting code), according to the type of
installed DRAM.
The Choice: Non-ECC, ECC.
System BIOS Cacheable
Select Enabled allows caching of the system BIOS ROM at F000h-FFFFFh,
resulting in better system performance. However, if any program writes to
this memory area, a system error may result.
Item
Enabled
Disabled
Description
BIOS access cached
BIOS access not cached
Video BIOS Cacheable
Select Enabled allows caching of the video BIOS ROM at C0000h-F7FFFh,
resulting in better video performance. However, if any program writes to
this memory area, a system error may result.
Item
Enabled
Disabled
Description
Video BIOS access cached
Video BIOS access not cached
62
Video RAM Cacheable
Select Enabled allows caching of the video RAM, resulting in better system
performance. However, if any program writes to this memory area, a
system error may result.
8 Bit I/O Recovery Time
The recovery time is the length of time, measured in CPU clocks, which the
system will delay after the completion of an input/output request. This
delay takes place because the CPU is operating so much faster than the
input/output bus that the CPU must be delayed to allow for the completion
of the I/O.
This item allows you to determine the recovery time allowed for 8 bit I/O.
Choices are from NA, 1 to 8 CPU clocks.
16 Bit I/O Recovery Time
This item allows you to determine the recovery time allowed for 16 bit I/O.
Choices are from NA, 1 to 4 CPU clocks.
Memory Hole At 15M-16M
In order to improve performance, certain space in memory can be reserved
for ISA cards. This memory must be mapped into the memory space
location 15-16MB.
Item
Enabled
Disabled
Description
Memory hole supported.
Memory hole not supported.
Passive Release
When Enabled, CPU to PCI bus accesses is allowed during passive
release. Otherwise, the arbiter only accepts another PCI master access to
local DRAM.
The Choice: Enabled, Disabled.
63
Delay Transaction
The chipset has an embedded 32-bit posted write buffer to support delay
transactions cycles. Select Enabled to support compliance with PCI
specification version 2.1.
The Choice: Enabled, Disabled.
AGP Aperture Size (MB)
Select the size of the Accelerated Graphics Port (AGP) aperture. The
aperture is a portion of the PCI memory address range dedicated for
graphics memory address space. Host cycles that hit the aperture range
are forwarded to the AGP without any translation. See www.agpforum.org
for AGP information.
The Choice: 4, 8, 16, 32, 64, 128, 256
64
4.2.9 Power Management Setup
In the power management menu, you can set the following items for power
management.
ROM PCI/ISA BIOS (2A69KF1E)
POWER MANAGEMENT SETUP
AWARD SOFTWARE, INC.
ACPI function
Power Management
PM Control by APM
Video Off Method
: Disable
: User Define
: Yes
: V/H SYNC +
** Reload Global Timer
IRQ[3-7,9-15],NMI
Primary IDE 0
Primary IDE 1
Events **
: Disabled
: Disabled
: Disabled
Blank
Video Off After
MODEM Use IRQ
Doze Mode
Standby Mode
Suspend Mode
HDD Power Down
Throttle Duty Cycle
PCI/VGA Act-Monitor
Soft-Off by PWR-BTTN
PowerOn by Ring
Resume by Alarm
Wake Up On LAN
IRQ 8 Break Suspend
: Standby
:3
: Disable
: Disable
: Disable
: Disable
: 62.5%
: Disabled
: Instant-Off
: Disabled
: Disabled
: Enabled
: Disabled
Secondary IDE 0
Secondary IDE 1
Floppy Disk
Serial Port
Parallel Port
: Disabled
: Disabled
: Disabled
: Enabled
: Disabled
ESC
: Quit
↑↓→←
F1
: Help
PU/PD/+/ - : Modify
F5
: Old Values
(Shift) F2 : Color
F6
: Load BIOS Defaults
F7
: Load Setup Defaults
: Select Item
Power Management
This category allows you to select the type (or degree) of power saving and
is directly related to the following modes:
1. Doze Mode
2. Standby Mode
3. Suspend Mode
4. HDD Power Down
65
There are four selections for Power Management, three of which have fixed
mode settings.
Item
Disable
(default)
Min. Power
Saving
Max. Power
Saving
User
Defined
Description
No power management. Disables all four modes
Minimum power management. Doze Mode = 1 hr. Standby
Mode = 1 hr., Suspend Mode = 1 hr., and HDD Power Down = 15
min.
Maximum power management -- ONLY AVAILABLE FOR SL
CPU’S. Doze Mode = 1 min., Standby Mode = 1 min., Suspend
Mode = 1 min., and HDD Power Down = 1 min.
Allows you to set each mode individually. When not disabled,
each of the ranges are from 1 min. to 1 hr. except for HDD Power
Down which ranges from 1 min. to 15 min. and disable.
PM Control By APM
The option of power management is subject to the operation system which
supports APM (Advanced Power Management ) function; e.g. WIN 95 /WIN
98.
When enabled, an Advanced Power Management device will be activated
To enhance the Max. Power Saving mode and stop the CPU internal clock.
If the Max. Power Saving is not enabled, this will be preset to No.
Video Off Method
This determines the manner in which the monitor is blanked.
Item
Description
V/H
SYNC+Blank
Blank Screen
DPMS
This selection will cause the system to turn off the vertical and
horizontal synchronization ports and write blanks to the video
buffer.
This option only writes blanks to the video buffer.
Initial display power management signaling.
66
Video Off After
When enabled, this feature allows the VGA adapter to operate in a power
saving mode.
Item
Description
N/A
Suspend
Standby
Doze
Monitor will remain on during power saving modes.
Monitor blanked when the system enters the Suspend mode.
Monitor blanked when the system enters Standby mode.
Monitor blanked when the system enters any power saving mode.
MODEM Use IRQ
Name the interrupt request (IRQ) line assigned to the modem (if any) on
your system. Activity of the selected IRQ always awakens the system.
The choices: NA, 3, 4, 5, 7, 9, 10, 11
Doze Mode
When enabled and after the set time of system inactivity, the CPU clock will
run at slower speed while all other devices still operate at full speed.
Standby Mode
When enabled and after the set time of system inactivity, the CPU clock will
run at lower speed and the video would be shut off while all other devices
still operate at full speed.
Suspend Mode
When enabled and after the set time of system inactivity, all devices except
the CPU will be shut off.
HDD Power Down
When enabled and after the set time of system inactivity, the hard disk drive
will be powered down while all other devices remain active.
Throttle Duty Cycle
When the system enters Doze mode, the CPU clock runs only part of the
time. You may select the percent of time that the clock runs.
67
The Choice: 12.5%, 25.0%, 37.5%, 50.0%, 62.5%, 75.0%
PCI/VGA Act Monitor
When Enabled, any video activity restarts the global timer for Standby
mode.
The Choice: Enabled, Disabled.
Soft-Off by PWR-BTTN
When Enabled, turning the system off with the on/off button places the
system in a very low-power-usage state, with only enough circuitry
receiving power to detect power button activity or Resume by Ring activity.
The Choice: Instant-Off, Delay 4 Sec.
PowerOn by Ring
An input signal on the serial Ring Indicator (RI) line (in other words, an
incoming call on the modem) awakens the system from power off state.
The Choice: Enabled, Disabled.
Resume by Alarm
To set Date and Time to resume the system.
Wake Up On LAN
An input signal on the mainboard control by LAN chip awakens the system
from power off state. The W-O-L will function when this system connected
to ATX power supply.
The Choice: Enabled, Disabled.
IRQ 8 Break Suspend
You can Enable or Disable monitoring of IRQ8 so it does not awaken the
system from Suspend mode.
68
The Choice: Enabled, Disabled.
Reload Global Timer Events
When Enabled, an event occurring on each device listed below restarts the
global time for Standby mode.
l
l
l
l
l
l
l
l
IRQ[3 -7, 9-15], NMI
Primary IDE 0
Primary IDE 1
Secondary IDE 0
Secondary IDE 1
Floppy Disk
Serial Port
Parallel Port
69
4.2.10 PnP/PCI Configuration
This section describes configuring the PCI bus system. PCI, or Personal
Computer Interconnect, is a system which allows I/O devices to operate at
speed nearing the speed the CPU itself uses when communicating with its
own special components. This section covers some very technical items
and it is strongly recommended that only experienced users should make
any changes to the default settings.
ROM PCI/ISA BIOS (2A69KF1E)
PNP/PCI CONFIGURATION
AWARD SOFTWARE, INC.
PNP OS Installed
Resources Controlled By
Reset Configuration Data
: No
: Auto
: Disabled
Assign IRQ For USB
: Enabled
ESC
: Quit
↑↓→←
F1
: Help
PU/PD/+/ - : Modify
F5
: Old Values
(Shift) F2
F6
: Load BIOS Defaults
F7
: Load Setup Defaults
: Select Item
: Color
PnP OS Installed
Select “Yes” if the system-operating environment is Plug-and-Play aware
(e.g., Windows 95).
The Choice: Yes and No.
70
Resource Controlled by
The Award Plug and Play BIOS can automatically configure all the boot and
Plug and Play-compatible devices. If you select Auto, all the interrupt
request (IRQ) and DMA assignment fields disappear, as the BIOS
automatically assign them.
The choice: Auto and Manual.
Reset Configuration Data
Normally, you leave this field Disabled. Select Enabled to reset Extended
System Configuration Data (ESCD) when you exit Setup if you have
installed a new add-on and the system reconfiguration has caused such a
serious conflict that the operating system cannot boot.
The choice: Enabled and Disabled.
IRQ n Assigned to
When resources are controlled manually, assign each system interrupt as
one of the following types, depending on the type of device using the
interrupt:
Legacy ISA Devices compliant with the original PC AT bus specification,
requiring a specific interrupt (such as IRQ4 for serial port 1).
PCI/ISA PnP Devices compliant with the Plug and Play standard, whether
designed for PCI or ISA bus architecture.
DMA n Assigned to
PCI/ISA PnP Devices compliant with the Plug and Play standard, whether
designed for PCI or ISA bus architecture. When resources are controlled
manually, assign each system DMA channel as one of the following types,
depending on the type of device using the interrupt:
Legacy ISA Devices compliant with the original PC AT bus specification,
requiring a specific DMA channel.
PCI/ISA PnP Devices compliant with the Plug and Play standard, whether
designed for PCI or ISA bus architecture.
71
Used MEM base addr
Select a base address for the memory area used by any peripheral that
requires high memory.
The Choice: C800, CC00, D000, D400, D800, DC00, N/A.
Assign IRQ for USB
Enable / Disable system to assign IRQ channel to USB devices.
72
4.2.11 Integrated Peripherals
The menu sets up the connections between the CPU and the I/O ports and
the hard disk controllers.
The printer unit specialized for the POS400 uses COM3 and is assigned to
3E8h/IRQ 11.
The touch panel uses COM4 and is assigned to 2E8h/IRQ 10.
ROM PCI/ISA BIOS (2A69KF1E)
INTEGRATED PERIPHERALS
AWARD SOFTWARE, INC.
IDE HDD Block Mode
IDE Primary Master PIO
IDE Primary Slave PIO
IDE Secondary Master PIO
IDE Secondary Slave PIO
IDE Primary Master UDMA
IDE Primary Slave UDMA
IDE Secondary Master
UDMA
IDE Secondary Slave UDMA
On-Chip Primary PCI IDE
On-Chip Secondary PCI IDE
USB Keyboard Support
Init Display First
: Disabled
: Auto
: Auto
: Auto
: Auto
: Disabled
: Disabled
: Disabled
Onboard Parallel Port
Parallel Port Mode
ECP Mode Use DMA
Onboard Serial Port 3
Serial Port 3 Use IRQ
Onboard Serial Port 4
Serial Port 4 Use IRQ
: 378 / IRQ7
: ECP+EPP1.9
:3
: 3E8
: IRQ 10
: 2E8
: IRQ11
: Disabled
: Enabled
: Enabled
: Disabled
: PCI Slot
Onboard FDC Controller
: Enabled
Onboard Serial Port 1
Onboard Serial Port 2
UART2 Mode
: Auto
: Auto
: Standard
ESC
: Quit
↑↓→←
F1
: Help
PU/PD/+/ - : Modify
F5
: Old Values
(Shift) F2
F6
: Load BIOS Defaults
F7
: Load Setup Defaults
: Select Item
: Color
IDE HDD Block Mode
This allows your hard disk controller to use the fast block mode to transfer
data to and from your hard disk drive (HDD).
Item
Description
Enabled
IDE controller uses block mode.
Disabled
IDE controller uses standard mode.
73
IDE Primary/Secondary Master/Slave PIO
The four IDE PIO (Programmed Input / Output) fields let you set a PIO
mode (0-4) for each of the four IDE devices that the onboard IDE interface
supports.
Modes 0 through 4 provide successively increased performance. In Auto
mode, the system automatically determines the best mode for each device.
IDE Primary/Secondary Master/Slave UDMA
Ultra DMA/33 implementation is possible only if your IDE hard drive
supports it and the operating environment includes a DMA driver (Windows
95 OSR2 or a third-party IDE bus master driver). If your hard drive and
your system software both support Ultra DMA/33, select Auto to enable
BIOS support.
The Choice: Auto, Disabled
On-Chip Primary/Secondary PCI IDE
The integrated peripheral controller contains an IDE interface with support
for two IDE channels. Select Enabled to activate each channel separately.
USB Keyboard support
Select Enabled if your system contains a Universal Serial Bus (USB)
controller and you have a USB keyboard.
The Choice: Enabled, Disabled.
Onboard FDD Controller
This should be enabled if your system has a floppy disk drive (FDD)
installed on the system board and you wish to use it. Even when so
equipped, if you add a higher performance controller, you will need to
disable this feature.
The Choice: Enabled, Disabled.
Onboard Serial Port 1/Port 2
This item allows you to determine access onboard serial port 1/port 2
controller with which I/O addresses.
74
The Choice: 3F8/IRQ4, 2F8/IRQ3, 3E8/IRQ4, 2F8/IRQ3, Disabled, Auto.
Onboard Parallel Port
Select a logical LPT port name and matching address for the physical
parallel (printer) port.
The choice: 378H/IRQ7, 278H/IRQ5, 3BCH/IRQ7, Disabled.
Parallel Port Mode
Select an operating mode for the onboard parallel port. Select Compatible
or Extended unless you are certain both your hardware and software
support EPP or ECP mode.
The choice: SPP, ECP + EPP1.7, EPP1.7 + SPP, EPP1.9 + SPP, ECP,
ECP + EPP1.9, and Normal.
ECP Mode Use DMA
Select a DMA channel for the port. Choices are 3, 1.
75
4.2.12 Password Setting
When you select this function, a message appears at the center of the
screen:
ENTER PASSWORD:
Type a password, up to eight characters, and press the Enter key. Typing
a password clears any previously entered password from CMOS.
Now the message changes:
CONFIRM PASSWORD:
Again, type the password and press the Enter key.
To clear the password, simply press the Enter key when asked to enter a
password. Then the password function is disabled.
To abort the process at any time, press the Esc key.
In the Security Option item in the BIOS Features Setup screen, select
System or Setup:
Item
Description
System
Enter a password each time the system boots
and whenever you enter setup.
IDE controller uses standard mode.
Setup
76
Chapter 5
5.1 Troubleshooting your POS400
The POS 400 is designed with the sense of quality for users. You are
advise to read this chapter when you encounter any difficulties using this
product. In the first section, shows error messages for diagnostics running
the system during the power-on self test (POST). There are also other
troubleshooting guidelines for the system.
5.2 Error Messages
System failure showing error messages …
1.
BIOS RAM checksum error--- System halted
When the checksum of the BIOS code is incorrect, this is an indication
that the BIOS code may have become corrupt.
Contact your system dealer to replace the BIOS.
2.
CMOS battery failed
This is an indication that the CMOS battery is no longer functioning.
Contact your system dealer to replace the battery.
3.
CMOS checksum error--- Default loaded
When the checksum of the CMOS is incorrect, the system loads the
default product configuration. A checksum error may be display to
indicate the CMOS has become corrupt. This is also an indication of a
weak battery that may have caused this error.
Contact your system dealer to replace the battery.
4.
CPU at nnnn
This display indicates the running speed of the CPU.
5.
Press ESC to skip memory test
The user may press Esc to skip the full memory test.
77
6.
Floppy disk(s) fail
This is an indication that the system cannot initialize the floppy drive
controller or find the drive. Check and make sure that the floppy drive
is installed correctly.
7.
HARD DISK initializing please wait a moment...
This is an indication that some hard drives require extra time to
initialize.
8.
HARD DISK INSTALL FAILURE
This is an indication that the system cannot initialize the floppy drive
controller or find the drive. If no hard drives are installed, be sure that
the Hard Drive selection in Setup is set to NONE. Also check and
make sure that the hard drive is installed correctly.
9.
Hard disk(s) diagnosis fail
There is a possibility that the system may run specific disk diagnostic
routines. When this message appears, this is an indication that one or
more hard disks did return an error when the diagnostics run.
10. Keyboard error or no keyboard present
This is an indication that the system cannot initialize the keyboard.
Check and make sure that the keyboard is attached correctly and no
keys are pressed or locked in place during POST.
11. Memory test
This message will appear in the display during a full memory test,
indicating the count down of the memory areas being tested.
12. Memory test fail
If POST detects an error during memory testing, there is an additional
information appearing on the display, giving the type and location of the
memory error.
13. Primary master hard disk fail.
This is an indication that the POST detects an error in the primary
master IDE hard drive.
78
14. Primary slave hard disk fail.
This is an indication that the POST detects an error in the primary slave
IDE hard drive.
15. The screen displays a keyboard error message when you turn on or
reset the POS400.
Make sure to check the keyboard is securely connected to the
keyboard port, and that no pins in the connector are missing or bend.
16. The items that appear on the screen do not correspond to the keyboard
options.
This is an indication that your keyboard may not be mapped properly
for the system.
Check and see if a standard PC/AT keyboard
connected to your PS/2 connector is working properly.
17. There is no display on the screen.
Make sure to check that the monitor is turned on and plugged in.
18. The power switch is on, but the power light is not on.
Make sure to check the electrical outlet for power.
19. You see a floppy disk error message.
Make sure to check the floppy disk connectors are properly connected.
20. A newly installed hard disk drive is not working properly.
Make sure that you have installed the drive correctly. Check that the
cable has been fully inserted into the connector.
Run the BIOS setup again and make sure the system is auto-sensing
the correct drive type.
21. A device attached to a serial port is not working.
Make sure that the cable is securely connected. Also be sure that the
COM ports are set properly in the BIOS setup utility.
Check and make sure that the jumper or connector on the device are
set correctly.
22. A device attached to the LPT1 port is not working properly.
Check and make sure that the device has power and is properly
79
connected to the POS400.
23. An expansion slot card installed in the expansion module is not
working.
Unlock the bracket screw and pull it out, try reinserting the card again.
Check and make sure that the expansion module is installed correctly.
Also, be sure that the card and socket services software is installed
correctly. At the same time, check that the correct card drivers and
utilities are installed. The supplied card and socket services software
supports most PC cards, but some do require special drivers or
software. Read the documentation that came with the card for more
information.
80
Appendix A
A.1 Specifications
The above model was installed with a “B63” sk370 all-in-one as system
main board. Following is the technical detail of the "B63" main board.
Technical Specification for "B63" Main Board
Main Board
: "B63" all-in-one M/B
CPU
: Intel PPGA / FC- PGA Processor
Co-processor
Internal Cache
: Built-in CPU
: Built-in CPU
External Cache
: Built-in CPU
System RAM
BIOS
: 2 x 168pin DIMM sockets, support 16 / 32 / 64 / 128 / 256 MB
: AWARD PnP BIOS
Core Logic
: Intel FW82443ZX / BX
Video Display
Video RAM
: S3 Trio 3D AGP
: 4MB SGRAM
Video Display port
: One 15-pin D-SUB female VGA monitor connector
HDD Controller
FDD Controller
: Support two 40-pin 2.54 pitch IDE pin-header
: SMSC37C602 support one 34-pin 2.54mm pitch pin-header
I/O Port
: Two 9-pin D-SUB RS232 FIFO Serial Ports connector
Two 10-pin header support COM3/COM4 port
One 25-pin D-SUB Parallel Port (SPP/EPP/ECP) connector
Keyboard & Mouse
LAN port
: 1 x PS2 Keyboard connector , 1 x PS2 mouse connector
: Optional LAN Rising Card
USB port
: 2 x USB ports
ROM disk
Compact Flash
: DiskOnChip Socket supported
: Compact Flash Socket Supported
Expansion Slot on board
: Manufacturer Bus Slot for system expansion slot used
Mainboard Dimension
: W x D 29 x 21cm
POS400System Dimension : W x D x H : 36 x 33.5 x 36 cm
POS400 Weight (Net)
: 7.5 Kgs. (16.5 Lbs.)
The content of this specification is subject to change without notice.
81
A.2 Connector Pin Assignments
Use the information in the following table to change the connector.
Connectors
J8, J11
JP25, JP26
J5
U1
J9
J4
J1, J2, JP7, JP6
J7, J6
J13, J14
JP29
JP12
Functions
IDE Connector
USB Port Connector
VGA Connector
LAN Connector
Floppy Disk Connector
Parallel Port
Serial Port 1 ~ 4
PS2 Keyboard & Mouse
Fan Connector
Compact Flash Power
Power Push Button
82
IDE Connector
Primary: J8 40pin 2.54mm, Primary: JP11 40pin 2.0mm
Pin #
1
2
3
4
5
6
7
8
9
10
11
12
13
14
15
Assignment
Reset
Ground
Data bit 7
Data bit 8
Data bit 6
Data bit 9
Data bit 5
Data bit 10
Data bit 4
Data bit 11
Data bit 3
Data bit 12
Data bit 2
Data bit 13
Data bit 1
Pin #
16
17
18
19
20
21
22
23
24
25
26
27
28
29
30
Assignment
Data bit 14
Data bit 0
Data bit 15
Ground
NC
IDE DRQ
Ground
Disk Write
Ground
Disk read
Ground
Disk ready
NC
IDE DACK
Ground
Figure
Pin #
Assignment
31
IRQ 14
32
NC
33
Disk address 1
34
NC
35
Disk address 0
36
Disk address 2
37
Disk chip select 0
38
Disk chip select 1
39
Disk LED
40
Ground
2
40
1
39
83
USB Port Connector (Pin-Header 8 Pin): JP25, JP26
Pin
1a
2a
3a
4a
Assignment
Pin
Vcc via Ploy-fuse
1b
USBPO
2b
USBP0 +
3b
Signal ground
4b
Figure
Assignment
Vcc via Poly-fuse
USBP1
USBP1 +
Signal ground
VGA Connector (D-SUB 15-pin Female Connector): J5
Pin #
1
2
3
4
5
6
7
8
9
10
11
12
13
14
15
Assignment
Red signal
Green signal
Blue signal
NC
Ground
Red Ground
Green Ground
Blue Ground
+5V (via polyfuse)
Ground
NC
Data of monitor ID
(with 10KΩ pull high)
H Sync.
V Sync.
Clock of monitor ID
(with 10KΩ pull high)
84
Figure
LAN Connector (10 / 100Base -T RJ-45): U1
Pin #
1
2
3
4
5
6
7
8
Assignment
Transmit output (+)
Transmit output (-)
Receive input (+)
NC
NC
Receive input (-)
NC
NC
Figure
Floppy Disk Connector (34pin 2.54mm Pitch Pin-Header with
Housing): J9
Pin #
1
2
3
4
5
6
7
8
9
10
11
12
Assignment
Ground
Density select
Ground
Vcc
Ground
Vcc
Ground
Index
Ground
Motor on 0
Ground
Driver select 1
Pin #
Assignment
Pin #
13
Ground
25
14
Driver select 2
26
15
Ground
27
16
Motor on 1
28
17
Ground
29
18
Data direction
30
19
Ground
31
20 Step motor active 32
21
Ground
33
22
Write data
34
23
Ground
24
Write gate
Figure
85
Assignment
Ground
Track 00
Ground
Write protected
Ground
Read data
Ground
Head select
Ground
Disk change
Parallel Port (D-SUB 25pin Female Connector): J4
Pin #
1
2
3
4
5
6
7
8
9
10
11
12
13
Figure
Assignment
Strobe (-)
Data bit 0
Data bit 1
Data bit 2
Data bit 3
Data bit 4
Data bit 5
Data bit 6
Data bit 7
ACK (-)
Busy
Paper empty
SLCT
Pin #
14
15
16
17
18
19
20
21
22
23
24
25
Assignment
Auto feed (-)
Error (-)
INIT (-)
SLCT IN (-)
Signal Ground
Signal Ground
Signal Ground
Signal Ground
Signal Ground
Signal Ground
Signal Ground
Signal Ground
Serial Port 1: J1 / Serial Port 2: J2
Serial Port 3: JP7 / Serial Port 4: JP6
Pin #
1
2
3
4
5
6
7
8
9
Assignment
Data carrier detect
Receive data
Transmit data
Data Terminal ready
Signal Ground
Data set ready
Request to send
Clear to send
Ring indicator
86
Figure
PS2 Keyboard & Mouse (Mini Din 6 Pin): J7, J6
Pin #
1a
2a
3a
4a
5a
6a
1b
2b
3b
4b
5b
6b
Assignment
Mouse data
NC
Ground
+5V via Poly-fuse
Mouse clock
NC
Keyboard data
NC
Ground
+5V via Poly-fuse
Keyboard clock
NC
Figure
PS2 Keyboard/
Mouse
AT Keyboard
Fan Connector: J13, J14 (Default to use +12V Power)
Pin #
1
2
3
Assignment
+12V (Default)
Ground
VCC
Figure
Compact Flash Power: JP29 (Default to use +5V Power)
Pin #
1
2
Assignment
+5V
Ground
Power Push Button: JP12
87
A.3 Customer Display
1. Specifications:
Technical Specification for "VFD" Module
Data transmission
: Serial
Synchronization
: Asynchronous
Handshaking
Signal level
: DTR / DSR
: Mark = -3 to –15 V (logic “1”)
Space = +3 to +15 V (logic “0”)
Baud rates
: 4800, 9600, 19200, 38400 bps
Parity
Bit length
: None, even
: 8 bits
Stop bits
: 1 or more
2. RS-232C link to printer connector:
CN1 / Connector type: Phone-jack 10P/8C
No.
1
2, 3
4, 5
6
7
8
9
10
Signal
NC
Vin
GND
DTR
DSR
TXD
RXD
NC
Direction
--Power input
--From PC/Host to printer
From printer to display
From display to printer
From printer to PC/Host
---
3. Customer display DIP switch Setting:
3.1Command type selection
SW1
SW2
SW3
ON
ON
ON
OFF
ON
ON
ON
OFF
ON
OFF
OFF
ON
ON
ON
OFF
OFF
ON
OFF
ON
OFF
OFF
OFF
OFF
OFF
88
Function Description
Not connect
9-35 VDC
Signal ground
PC/Host ready signal
Printer ready signal
Printing data
Printer status data
Not connect
Command type
DSP800
ESC/pos
ADM 787
WD202
EMAX
UTC/P
UTC/S
CD5220
3.2 Baud rate selection
SW8
SW9
ON
ON
OFF
ON
ON
OFF
OFF
OFF
Baud rate (bps)
4800
9600
19200
38400
3.3 Baud rate selection
SW10
ON
OFF
Parity check
None-parity
Even-parity
1 2 3 4 5 6 7 8 9 10 11 12
DIP
ON ò
89