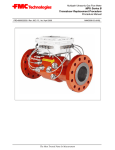
1
Installation, Operation & Maintenance
Manual
L100 & L150 Peristaltic Pumps
BEFORE INSTALLING YOUR PUMP HAVE YOU…………..
Read this Manual in its entirety?
Ordered recommended spares? (spares not always in stock)
Checked we have shown the correct pump duty on the data sheet?
Checked pump supplied as per the technical data sheet?
Installed overpressure protection for the pump?
Protected the pump motor against over current?
Installed suitable pulsation dampeners where required?
Completed all Pre start-up checks highlighted in this manual?
Tick
Contents:
Introduction ............................................................................................................... 4
General ................................................................................................................... 4
Safety ...................................................................................................................... 5
Intended Use........................................................................................................... 5
Warranty Conditions................................................................................................ 6
Description .............................................................................................................. 6
Operation of the pump......................................................................................6
Pump hose .......................................................................................................7
Hose Lubrication ..............................................................................................7
Drive systems...................................................................................................8
Available options ..............................................................................................8
Installation ................................................................................................................. 9
Unpacking ............................................................................................................... 9
Storage.................................................................................................................... 9
Locating the Pump .................................................................................................. 9
Connecting the Pipework ...................................................................................... 10
Pulsations.............................................................................................................. 11
Lifting the Pump .................................................................................................... 12
Mounting the Pump ............................................................................................... 12
Electrical Connection ............................................................................................ 12
Use of Frequency Inverters................................................................................... 13
ATEX Approved Units ........................................................................................... 13
Commissioning...................................................................................................... 14
Prestart-up Checks.........................................................................................14
Start-up Checks..............................................................................................14
Maintenance ............................................................................................................ 15
Routine Maintenance ............................................................................................ 15
Cleaning the pump Hose....................................................................................... 16
Hose Removal....................................................................................................... 16
Replacing the Roller Bushes................................................................................. 17
Adjusting the Compression Rollers ....................................................................... 18
Fitting the Pump Hose........................................................................................... 18
Fitting the Front Cover .......................................................................................... 21
Rotor Removal ...................................................................................................... 21
Gearbox Drive Removal ........................................................................................ 21
Gearbox Drive Replacement ................................................................................. 22
Rotor Replacement ............................................................................................... 22
Hose Connector Assembly.................................................................................... 22
Parts List & Sectional Drawing .............................................................................. 22
User Guide ............................................................................................................... 26
Troubleshooting .................................................................................................... 26
Specifications ........................................................................................................ 28
Pump operating conditions.............................................................................28
Materials of Construction................................................................................28
Hose Lubricant Quantities ..............................................................................29
Weights and Dimensions................................................................................29
Recommendations for Hose Storage .................................................................... 30
EC Declaration of Conformity................................................................................ 31
Product Use Declaration Form .............................................................................. 32
Contact Information:
Manufacturer
Authorised Distributor
Environmental Pumping Solutions Limited
1210 Parkview
Arlington Business Park
Theale
Berkshire
RG7 4TY
www.environmentalpumping.co.uk
Tel: 0800 0180 007
Fax: 0870 873 0282
International Tel: +44 (0) 1635 576 028
International Fax: +44 (0) 1189 657 783
Manual Revision 1.1
The information contained in this document is believed to be correct but neither Environmental Pumping Solutions
nor its distributors or representatives accept any liability for any errors or omissions and reserves the right to alter any
specifications without notice.
This manual is owned by Environmental Pumping Solutions Limited and may not be reproduced by any means in part
without their written consent. Reproduction by the user for the purposes of Installation, Operation and Maintenance of
their L Series peristaltic pump only excepted.
Copyright 2009 - 2010 All rights reserved.
3
Introduction
Thank you for choosing a quality pump from Environmental Pumping Solutions Ltd.
Critical information before start up:
For safety reasons and in order for you to get the full usage of your new
pump, it is necessary to read this manual thoroughly before putting it
into service.
Ensure all commissioning checks on page 14 have been carried out
Within 7 days of delivery and before mounting and installing the pump please make
sure that the unit corresponds exactly to that ordered and has not been damaged
during transport.
This manual is divided into 4 parts:
1.
2.
3.
4.
Introduction to give the user an overview of the pump and this manual.
Installation Guide for installing or uninstalling and commissioning the pump.
Maintenance Guide for maintenance, repair or troubleshooting.
User Guide for daily use of the pump.
The L series pump range provides a high quality product that is designed to provide
reliability, low energy consumption and low maintenance costs.
Environmental Pumping Solutions Ltd supplies the complete range of peristaltic hose
pumps including 10mm, 15mm, 20mm, 32mm, 40mm, 50mm, 65mm, 80mm and
100mm
In addition we proudly produce the largest hose pump in the World the L150
General
These instructions are intended as a reference book by means of which qualified
users are able to install commission and maintain Environmental Pumping Solutions
L series peristaltic pumps. These instructions do not absolve the user of
responsibility for carrying out work in accordance with good engineering practices
and adherence to local Health & Safety regulations.
Documentation on the drive system used with the pump is not included within this
manual. Reference must be made to separate documentation for the drive system,
and its recommendations and instructions strictly observed.
For further information specifically about the L series range of peristaltic pumps
which is not found within these instructions, please contact Environmental Pumping
Solutions Limited, or your authorised local dealer. Please ensure you have the
following data at hand:
•
•
•
serial number of the pump
material of the pump hose
serial number of the drive gearbox and motor
Identification plates are mounted on the pumphead, drive gearbox and electric motor.
4
Model
Year
Ser. No.
REFER TO OPERATION MANUAL BEFORE USE
FOR DUTY RATING DETAILS SEE MANUAL
Manufacturing information
Arlington Business Park, Theale RG7 4TY
United Kingdom. Tel. +44 (0)1635 576 028
www.environmentalpumping.co.uk
Suppliers Information
Labels fixed to the pump body contain model type, year of manufacture, product
serial number and manufacturer’s details.
Safety
In these instructions the following symbols are used:
WARNING
Procedures, which, if not carried out with the necessary care, may
result in serious damage to the pump equipment or in serious bodily
harm.
CAUTION
Procedures not carried out with the necessary care, may result in
serious damage to the pump equipment, the surrounding area or the
environment.
Remarks, suggestions and advice.
During installation & maintenance all personnel should ensure they wear suitable
personal protection equipment (PPE) such as safety glasses, gloves, safety boots
and safety helmets as appropriate.
Intended Use
Environmental Pumping Solutions L series peristaltic pumps are designed exclusively
for pumping suitable products as defined in the technical data sheet supplied with
your final quotation. Every other or further use is not in conformance with the
“intended use” as laid down in EN 292-1.(1) The manufacturer cannot be held
responsible for damage or harm resulting from use other than the “intended use”.
If you wish to change the application of your pump, please contact Environmental
Pumping Solutions Limited, or your authorised local dealer to establish if the change
is appropriate for the supplied pump.
(1) The “Intended use” as laid down in EN 292-1 is “… the use for which the technical product is intended in
accordance with the specifications of the manufacturer, inclusive of his indications in the sales brochure”. In case of
doubt it is the use which appears to be its intended use judging from the construction, execution and function of the
product. Observing the instructions in the user’s documentation also belongs to intended use.
5
Warranty Conditions
Unless stated otherwise in the Technical Selection Sheet provided at the time of
pump selection, the manufacturer offers a two–year warranty on proper workmanship
of all parts of the pump. Exclusion is made for normal wear and tear of consumables,
such as pump hoses, lubricant, hose clamps, compression rollers, bearings and
bushes, wear ring and seals, or parts which have been misused or damaged through
negligence.
The warranty only applies if the pump has been used for the application specified in
the technical selection sheet and according to the guidance in this manual. Operation
at pressures outside of the range specified in the Technical Selection Sheet shall
invalidate this warranty.
This manufacturer’s warranty is null and void for any user who uses parts not of
Environmental Pumping Solutions Limited original supply in their L series peristaltic
pump (including use of an alternative hose lubricant).
The warranty is strictly a return to base warranty, which means that the pump is
required to be returned to our UK factory by arrangement for any investigation,
replacement or repair work. The cost of transport back to our factory is not covered
by this warranty; however with any valid warranty claim all time, replacement parts
and carriage back to the original delivery address are included.
Any parts to be returned to the manufacturer must be accompanied by a fully filled in
and signed declaration form declaring the conditions of use and materials pumped.
Parts which have been contaminated or which have been corroded by chemicals or
other substances which can pose a health risk must be cleaned before they are
returned to the manufacturer.
Furthermore, it should be indicated in the declaration form what specific cleaning
procedures have been followed, and that the equipment has been decontaminated.
The declaration form is required for all items, even if the parts have not been used.
A Declaration Form can be found at the end of this manual.
Warranties purporting to be on behalf of Environmental Pumping Solutions Limited
made by any person, including representatives of Environmental Pumping Solutions
Limited, its subsidiaries, or its distributors, which do not accord with the terms of this
warranty shall not be binding upon Environmental Pumping Solutions Limited unless
expressly approved in writing by a Director of Environmental Pumping Solutions
Limited.
Description
Operation of the pump
The heart of the L series peristaltic pump is a specially constructed pump hose which
lies within the pump housing. (Upon pump installation both ends of this hose are
connected to the suction and discharge lines). A rotor with two opposing
compression rollers lies in the centre of the pumphead.
During pump operation the rotor rotates, with the compression rollers compressing
the pump hose. This action “pushes” the pumped fluid through the hose, and as soon
6
as the compression roller has passed, the hose recovers to its original shape due to
the mechanical properties of the material.
Simultaneously fresh pumped fluid is drawn into the hose behind the compression
roller by the (continuous) turning motion of the rotor.
The second compression roller will subsequently compress the pump hose. Due to
the continuous rotating movement of the rotor not only is new product sucked in, but
the already present product is pushed out by the moving compression roller. When
the first compression roller leaves the pump hose, the second compression roller has
already closed the pump hose and the product is prevented from flowing back. This
is known as the “positive displacement principle” pumping principle.
Pump hose
The pump hose is made of specially compounded rubbers,
reinforced with nylon cords. The outer cover of the pump hose is
always made of natural rubber, whilst the inner layer is supplied
in a variety of materials to suit the product to be pumped.
Dependent on the specific requirements of your application a
corresponding pump hose must be selected. For each pump
model various hose types are available.
Consult Environmental Pumping Solutions Limited or your authorised local
dealer for more detailed information about the range of hoses available,
and their chemical and temperature resistance.
Environmental Pumping Solutions pump hoses have been carefully machined, to
ensure minimum tolerances in wall thickness. It is very important to guarantee the
correct compression of the pump hose, because over compression can cause too
high a load on the pump and pump hose leading to reduced pump hose life and
gearbox failure.
Under compression will result in loss of capacity and backflow resulting in reduced
pump hose life.
Please refer to the maintenance section of this manual regarding
adjustment of hose compression settings.
Hose Lubrication
The pumphead is part filled with our specially compounded Envirolube lubricant. The
lubricant lubricates the compression rollers and movement between the hose and the
pump housing and the cover.
To those familiar with other types of peristaltic pumps utilising compressions shoes,
our lubricant may appear thin, but this is essential in order to reach the roller
bearings with maximum efficiency of lubrication.
Our lubricant is the result of decades of development and is perfectly mixed for use
specifically in the L series pumps, ensuring the hose is fully lubricated at all times with
no reaction on the hose material that would cause swelling and early hose failure.
Environmental Pumping Solutions Envirolube lubricant will not freeze during cold
weather.
7
Drive systems
The L series pumps described in this manual use a variety of drive types. Motors and
gearboxes are selected according to the particular application for which the pump is
applied.
Available options
The following options are available for the L series range of pumps:
• High (lubricant) level float switch (detects hose failure)
• Flanged pipework connections
• Complete stainless steel pumps
8
Installation
Unpacking
Upon unpacking of the pump check and inspect all items against the purchase order
and packing list and for any damage caused during shipment. All claims for
shortages and/or damage must be notified immediately to Environmental Pumping
Solutions Limited.
Suitable lifting equipment must be used when handling components and
assembling pumps.
ENVIRONMENT
When disposing of unwanted packaging materials, please consider the
possibilities for reuse or environmentally friendly processing of packaging
materials.
Always observe local regulations with respect to disposal of non reusable
items.
Storage
After receipt and inspection, if pumps are not to be put into service immediately
provision should be made for the pump to be rotated for a couple of turns on a
weekly basis, ensuring the rollers are not allowed to come to rest in the same
position consecutively. Alternatively one roller can be removed from the pump,
leaving the remaining roller not in contact with the hose between the inlet and outlet
ports.
Failure to adhere to the above procedure may result in a ‘permanent set’ of
the hose which can result in reduced performance and premature hose
failure.
Pumps that are to be stored for extended periods of time should have the hoses
removed and stored in accordance with Environmental Pumping Solutions
recommendations. The pumps should be repackaged and placed in a suitable clean
dry storage area free from excess moisture and vibrations. Protective blanking caps
fitted before despatch from the factory should not be removed. Any unpainted
surfaces not factory treated with a rust inhibiting coating should have a protective
coating applied.
Where applicable, if pumps were supplied with electric motors fitted with anticondensation heaters, these should be connected to a temporary supply and
switched on throughout the storage period.
Locating the Pump
Before mounting the pump, make sure that all your site safety procedures
have been reviewed and that any appropriate risk assessments have been
completed.
9
Upon installation ensure that all markings on the pump will be clearly
visible when installation is complete.
Ensure the pump is to be sited in an area where the ambient temperature during
operation is not below –20° and above +45°C.
Check that the foundation where the pump is to be mounted can carry the load of the
pump. Also have the appropriate SWL marked lifting gear / crane ready for the given
situation.
Ensure the foundation/floor surface is flat and horizontal. Minor irregularities in
surface level can be accommodated by the use of shims placed under the support
frame.
Ensure there is sufficient room around the pump to carry out the necessary
maintenance activities. Particularly ensure the front cover door can be opened and a
hose taken out and replaced (If it cannot, it maybe possible to modify the door to
remove the hinge if fitted, please enquire).
Ensure the installation environment is sufficiently ventilated allowing heat developed
by the pump and drive to be discharged, particularly that the motor cowl has
sufficient air to circulate to support cooling.
No special tools are required to install the L series pumps, other than ordinary handtools and a hammer/drilling machine for the installation of the foundation bolts.
Connecting the Pipework
It is recommended that the connection to a pipe system is made as a flexible joint. There
are several flexible systems on the market which include both metallic and rubber
systems.
By making a flexible joint, the risk of introducing vibrations into the complete pipe system
is reduced. Vibrations may cause wear and in some cases fatigue fractures in the pipe
system.
The pipework system must be independently supported and must not use the pump in
anyway to support its weight (The pipe system must never hang by the connections of
the pump).
Permissible Load (N)
Fy
Fz
L100
L150
Fx
1800
1800
Fy
400
400
Fz
400
400
Fx
10
Suction line bore must be larger than the bore size of the pump hose. Discharge line
bore must be the same or larger than the bore size of the pump hose.
Keep the suction and delivery lines as short and direct as possible.
Suction and discharge lines should preferably exit straight from the pump so that the
pump is not pumping directly into a restriction for example a 90 degree bend, as this may
cause the hose to come off. Where bends are used, ensure the radiuses are as large as
possible. It is recommended to use Y-connections instead of T-connections.
Prevent any possibilities of exceeding the maximum working pressure of the pump. It
is essential that you discuss this with your system designers in order to ensure safe
system and pump operation. If necessary fit an overpressure protection device.
To avoid misunderstanding, protecting the motor against over current will
not protect the pump from overpressure. Pump overpressure needs to be
protected against independently using a pipeline mounted overpressure
protection device.
All L series pumps have a pressure overflow connection found on the front of the pump
above the lubricant fill plug. When the pump hose fails, liquid will come out of this
overflow connector. If this is a potential safety or hygienic issue, the connector will need
to be piped back to a safe location in a way that will not impede normal atmospheric
pressure reaching the pump body during normal operation.
Consider the maximum permissible working pressure of the pump and
pipework used.
Exceeding maximum working pressures may lead to serious damage.
Pulsations
Some systems require pulsation dampers to avoid excessive and damaging pressure
spikes and vibrations. Situations that may lead to excessive pulsations and vibration are:
• incorrectly secured pipelines
• high pump speeds with long suction and delivery lines or the product SG is high
• pipeline bore is too small
Where unacceptable pulsations are encountered, it may be possible to install pulsation
dampeners to alleviate the problems.
Dampeners need to be sized very carefully in order to protect the pump and system from
excessive pressure peaks.
•
•
Never use an existing dampener employed on another application or pump make
and assume it will automatically work on an application with an L series pump.
Different pump displacements and system characteristics often mean a
dampener will not work effectively.
Many dampeners are not suitable for variable speed applications. Where pump
speeds and pressures vary, dampeners need to be carefully selected and sized
to accommodate all the duty conditions.
Consult Environmental Pumping Solutions Limited or your authorised local
dealer for more detailed information about the need and use of pulsation
dampeners.
11
Lifting the Pump
The complete pump may be lifted either with the use of a forklift truck by utilising the
fork pockets in the pump frame, or by use of the lifting eyes on the pump frame.
Due to the selection of drives available the centre of lift will vary dependant upon the
size and weight of the drive fitted. If desirable to lift the pump squarely an additional
lifting strap may be positioned around the juncture of the gearbox and motor. The
length of this will need to be adjusted to establish a level lift if so desired. Suitably
rated lifting straps or slings only must be used. Gearbox and motor lifting eyes must
not be used for lifting the complete pump unit.
When lifting the pump ensure that all standard lifting practices are adhered to
and carried out by qualified personnel only.
If lifting with a forklift truck, ensure the forks are fully located through the
complete pump frame
Mounting the Pump
The pump is fastened to the foundation via the holes in the frame or pump-chassis using
suitable anchor bolts.
If the pump is to be mounted on rubber pads, it is very important that the connecting
pipeline is fitted with a flexible joint.
Electrical Connection
Electrical connection of the pump must only be done by suitably qualified
personnel.
The motor is to be thermally protected against overload by a protective circuit switch
and is to have the correctly sized fuse according to the local existing rules and
regulations.
Important:
In order to insure that the pump remains free of static electricity, the pump needs to be
grounded. This is done via the grounding of the motor. The motor must be grounded
with a wire of sufficient size!
12
For electrical connection details, please see the motor datasheet.
The pump should have its own dedicated electrical isolation switch meeting the
requirements of BS EN 60947‐3 (Switches, disconnectors, switch disconnectors
and fuse combination units) so that it is not possible to start the pump during
maintenance. There should also be an emergency stop button meeting the
requirements of BS EN 60947‐5‐1 (Electro‐mechanical control circuit devices)
and BS EN 60947‐5‐5 (Electrical emergency stop devices with mechanical
latching function.)
It is recommended to have local electrical control to the pump for use during
commissioning and maintenance operations.
These electrical items should be installed according to the manufacturer’s
instructions by an electrician qualified to install electrical equipment on machinery.
If the pump is incorporated into a more complex installation then the installer should
ensure the completed installation complies with the Machinery Directive 2006/42/EC.
Use of Frequency Inverters
The pump will not come with a motor that is suitable for use with a frequency inverter
unless this has been stated on the pump technical data sheet.
Use of an inverter when no allowance has been made for one, can be dangerous and
may lead to motor failure.
Where the use of an inverter has been specified on the pump technical data sheet it
is essential that the control panel does not allow an operator to run the pump outside
of the turndown design parameters there specified.
Frequency inverters used with peristaltic hose pumps must be of the constant torque
type, and ideally sized at least one size larger than the pump fitted motor kilowatts.
ATEX Approved Units
Standard L series pumps must not be used in potentially explosive hazardous
atmospheres (European Directive 94/9/EC -ATEX Directive). If you require a
pump to operate in a hazardous area classification, please contact
Environmental Pumping Solutions Limited or your authorised local dealer for
more detailed information.
13
Commissioning
Prestart-up Checks
Before commissioning, carry out the following checks:
•
Check the pipework connections,
ensuring there is no undue strain on
the pipework.
•
Ensure that there are no obstructions
such as closed valves in the pipework.
It is advisable to flush the system
through with water to clear any debris.
Transport plug
Fill plug
•
Ensure the Transport Plug is removed
from the pressure overflow connection
on the front of the pump.
•
Check the pump casing is filled to the correct level with Envirolube specially
compounded Roller Hose Lubricant. If necessary add lubricant. – Before
adding lubricant, check you have the correct hose lubricant; fill only
with our Roller grade lubricant?
•
Check there is oil in the gearbox, and filled to the correct level.
It is advisable prior to powering up the pump to check rotation by hand to ensure
there are no obstructions. This can be achieved as follows:
Isolate and lock off the electrical supply. Remove the motor fan cowl and turn the
electric motor fan by hand to ensure free running. The motor should be rotated for
enough turns to ensure the pump rotor has turned through 360 degrees. (If the
gearbox ratio is 50:1, the motor fan must be rotated 50 revolutions). If any difficulties
are found these should be investigated and rectified.
Start-up Checks
Prepare the electric motor for operation in accordance with the manufacturer’s
instructions, and ensure pump control panels are energised ready for operation.
When satisfied that all preliminary checks and procedures have been carried out,
start up the pump.
Whilst running carry out the following checks:
• Check the rotation of the rotor.
• Check for any leaks in the system
• Check for excessive vibrations
• Check the pumping capacity of the pump.
Generally monitor the behaviour of the pumpset during the run period, ensuring that
temperatures stabilise within the run period.
Check the integrity of the foundation holding bolts.
Following all start-up checks, if any items deviate from expected, refer to the
“Troubleshooting” section of this manual or contact Environmental Pumping Solutions
Limited, or your authorised local dealer.
14
Maintenance
Only use original Environmental Pumping Solutions parts when
maintaining the pump. Environmental Pumping Solutions Limited cannot
otherwise guarantee correct functioning of the pump. Any consequential
damage that occurs from the use of non-original components cannot be
warranted.
Routine Maintenance
The L series pumps are designed to have the minimum of service and maintenance.
A small number of simple preventive measures are however needed in order to
ensure continuous and trouble free pump life.
Important: it is very important, that the pump is maintained according to the table
below.
Never clean or repair the pump without it being fully isolated.
When cleaning, maintaining or repairing the pump, the power supply to the motor has
to be disconnected by means of a key locked switch.
Action
Check hose lubricant level
Check the pumphead
for any lubricant leakage
around the cover and the
connections
Check pump for high
temperature or unusual
noise
Check compression rollers
for wear
Changing the hose
lubricant
Check gearbox oil level
Replacing the gearbox oil
To be carried out
Before start-up and
thereafter on a daily
operational basis
Before start-up and
thereafter on a daily
operational basis
Comments
Lubricant should be visible
in the lower sight glass on
the pump front cover
On a daily operational
basis
When replacing the pump
hose
When replacing the pump
hose
Before start-up and
thereafter on a daily
operational basis
Refer to the gearbox
manufacturers instructions
Replace if there is more
than 1mm wear across the
roller
Only use Envirolube hose
lubricants
In certain installations it may be desirable to try and change the pump hose before
failure on a routine scheduled basis. If this is the case, we suggest changing the
hose after 75% of the time the first hose lasted.
Due to the variety of motor and gearboxes supplied according to both application and
client requirements, maintenance detail is not shown in this manual. Please refer to
the manufacturer’s manual for maintenance detail on your specific drive.
15
Cleaning the pump Hose
The inside of the pump hose is easily cleaned by flushing with water or any other
compatible cleaning fluid. Ensure that the pump hose can not only resist the chemical
compatibility of any cleaning fluids, but also the temperature of cleaning liquid used.
Cleaning systems must not generate pressures in excess of the pump operating
design pressure.
Hose Removal
When pumping potentially hot, hazardous or dangerous media, it is critical
to ensure that personnel are adequately protected during hose removal
and that the hose is washed through with a media harmless to man and
the environment before the hose is dismantled.
There can be a significant pressure difference between the upper and the
lower pump connections. This can mean that while having vacuum in one
connecting pipe there can be a large overpressure in the other connecting
pipe. It is therefore essential that the pipework is depressurised safely prior
to opening the pump cover and dismantling the hose.
Before dismantling any items, shut off the suction and discharge valves.
Drain the hose lubricant by positioning a container at the base of the pump, remove
the top fill plug, remove the drain plug at the bottom of the pump and drain the
lubricant into the container.
Always dispose of used lubricant in safe and proper manner. Refer to local
Environmental restrictions as appropriate.
Unbolt the pump front cover and swing open on its hinges.
There are two options of hose removal with the L series pumps. Either the complete
hose and inserts can be removed as one element assembly, or the hose can be
removed with the inserts left in the pump.
With both methods of hose removal we suggest that one of
the compression rollers is removed. To remove a roller
ensure the roller is not in contact with the hose, remove the
roller spindle screw and screws holding the roller side plate
in plate and lift the roller out. Rotate the rotor so that the
remaining roller lies between the inlet and outlet ports. The
hose can then be removed and a new one inserted easily
without having to rotate the rotor. To refit the compression
roller, rotate the rotor 180º so that the roller to be replaced
lies between the inlet and outlet ports.
Roller removed
Removing the hose as an Element Assembly
First disconnect suction and discharge piping
Remove the insert retaining bolts from both hose inserts
Lift the hose element assembly out of the pump,
withdrawing the inserts through the pump body.
Insert retaining bolts
16
Removing the hose only
Note: There is no need to disconnect the suction and discharge piping when
removing the hose only via this method.
Where difficulty pulling the hose off the connectors is encountered, try
cutting the hose along the side of the connector as shown.
Carefully loosen top and bottom hose clamps.
From the bottom hose connector pull the hose off and
out as far as possible. Continue pulling out the old hose
until you have arrived at the top hose connection and
finally pull the hose off this connection.
Check mechanical parts, such as Rollers, bushings and
shafts for damage or wear.
Clean all components thoroughly, flushing with clean
water if necessary. Pay particular attention to any
residue of pumped material. Deposits of any abrasive
media left within the pump body will be detrimental to
future component life.
Check before replacing the hose that it is the correct
diameter, and material and measure the exact thickness
of the hose and note this down. This is needed if
adjustment of the rollers is needed.
Before fitting the new hose, we recommend you check
the compression roller occlusion setting to ensure
optimum pumping efficiency throughout the pump life.
When ordering spare parts, please make reference to the serial number on
the nameplate.
Replacing the Roller Bushes
With the hose removed, remove the compression rollers if not already done so, by
removing the roller spindle screw and lifting the roller out of the roller carrier.
Using a suitable mandrel, press the old bushes out of the roller.
Lightly lubricate the outer surfaces of the new bushes and press into place, ensuring
the face of each bush is flush with the face of the roller each side.
Refitting the roller is a reversal of the removal process.
17
Adjusting the Compression Rollers
The distance ‘A’ between the inner face of the pump body housing, and the
compression roller should be set according to the
following formula:
A
A = (2 x t) - t1
(at pressures 0 to 5 bar)
When the application pressure is to exceed 5 bar,
subtract 0,25 x t1 x Pd
Variable
A
t
t1
Pd
Value
Distance from roller to pump housing, see Figure 1
Thickness of the hose wall, see Figure 2
Material dependent scale, see below
Nominal working pressure on the pump.
Figure 1 Distance from roller
to pump housing
Example:
Hose thickness t = 14 mm
Hose material NBR t1 = 1.0 mm
Working pressure Pd= 7 bar
A = 2 x 14 – 1.0 = 27.0 mm
Subtraction from higher working pressure:
0.25 x 1.0 x 7 = 1.75 mm
Figure 2 Thickness of the hose
A = 27.0 mm – 1.75 = 25.25 mm
Hose material
Natural rubber
NBR (Nitrile)
EPDM
Scale: t1
1,5 mm
1,0 mm
1,0 mm
Hose material
Butyl
Hypalon (CSM)
Neoprene
Scale: t1
1,0 mm
1,0 mm
1,0 mm
To adjust the compression roller gap shims should be inserted under the roller
carrier. Additional shims of 0.5mm and 1.0mm thickness are available from
Environmental Pumping Solutions Limited or your authorised local dealer.
The above procedure is intended as a guide only. After carrying out operational
tests as detailed later in these instructions it may be found necessary to further
adjust the rollers to decrease the distance ‘A’.
Should it be found necessary to further adjust the rollers to decrease the
distance ‘A’, this should be done in increments of 0,5 mm. If the rollers are
adjusted too much, over occlusion of the hose will occur. Hose over occlusion is
detrimental to hose life.
Fitting the Pump Hose
Take care when fitting the pump hose, there is a possibility of trapping hands
if care is not taken.
Ensure the pump body housing is clean and free from foreign particles.
18
If not already removed, remove one of the compression rollers. To remove a roller
ensure the roller is not in contact with the hose, remove the roller spindle screw and
screws holding the roller side plate in plate and lift the roller out. Rotate the rotor 180º
so that the remaining roller lies between the inlet and outlet ports. The hose can then
be inserted easily without having to rotate the rotor. To refit the compression roller,
rotate the rotor 180º so that the roller to be replaced lies between the inlet and outlet
ports.
Refitting the hose as an Element Assembly
Prior to installing a new element hose assembly, ensure that both hose inserts
are aligned correctly. The hose inserts can only be fitted to the pump in one
orientation, checking the correct orientation and alignment now will avoid
delays later.
Correct alignment can be achieved by assembly on a flat surface ensuring both insert
flanges sit flat on the surface whilst assembly takes place.
It is important to ensure correct alignment of the hose inserts. Misalignment
will result in a twisted hose once the hose is fitted, leading to premature hose
failure.
Both inserts must
be aligned
x
9
Push the hose onto the hose insets along with the hose clamps – do not tighten
clamps.
Aid assembly by lubricating inserts and hose bore with hose lubricant.
Never lubricate the hose, or any components in contact with the pump hose
with mineral oils or lubricants, these are not compatible with the materials of
hose construction.
Ensure the hose is pushed up to the insert flange on both connections, and that the
inserts are in correct alignment.
Tighten both hose clamps and re check the insert alignment.
If the assembled hose element is not to be installed into the pump straight
away, ensure the assembly is wrapped and stored in accordance with
Environmental Pumping Solutions recommendations.
19
Prior to fitting to the pump, ensure the hose assembly is clean and free from grit and
particles on the outer cover.
Place the hose connector gasket over the outer connections.
Insert the hose element assembly in to the pump, passing the outer connections
through the respective port in the pump body, with the gaskets on the inside of the
pump body.
Insert and tighten the insert retaining bolts.
The hose must now be properly positioned in the pump housing
as detailed below.
Failure to correctly position the hose may lead to
premature hose failure.
Insert retaining bolts
Refitting the hose only (inserts not removed)
Push the hose clamps and hose onto the top connector – do not tighten clamps.
To aid assembly, lubricate the hose connector and hose bore with a little
hose lubricant.
Never lubricate the hose, or any components
in contact with the pump hose with mineral oils
or lubricants, these are not compatible with the
materials of hose construction.
Push the hose over the bottom connector put the hose
clamps over the hose - do not tighten clamps.
With the roller removed the hose can be pushed into
the housing.
Positioning and Seating the hose
Roller removed
Ensure the hose clamps are loose. (If the hose was fitted as a complete element with
inserts, it will be necessary to loosen the clamps.)
Push the hose firmly into the “U” arc of the pump body,
ensuring contact is made with the hose and pump body
along the complete length of the compression path and
then tighten both hose clamps.
If difficulty is found seating the hose against the
pump body try refitting the roller as below, the
action of the rollers compressing the hose as the
pump is rotated will help position the hose.
Refit the compression roller, by first rotating the rotor
180º so that the roller to be replaced lies between the inlet and outlet ports.
Always recheck the roller gap after you have refitted the roller.
20
Fitting the Front Cover
The front cover gasket is a self adhesive strip that is pre-applied to the pump and
remains in place when the front cover is opened. Should this gasket strip become
damaged in any way, it should be removed and a new strip applied.
Swing the hinged front cover closed and hinge the swing bolts into the corresponding
slots in the outer cover before tightening evenly.
If the front cover has “dropped” on the hinges it may be helpful to use a lifting
jack or similar under the cover to help align the swing bolts.
Be careful to avoid trapping hands and fingers when closing the hinged front
cover.
Ensure the lubricant drain plug is installed with PTFE tape of similar demountable
pipe thread sealant.
Fill the pump housing with lubricant through the fill plug hole. Once filled you should
be able to see the lubricant in the middle of the sight glass at the front of the pump
Replace the fill plug and check the pump housing for leakage.
If previously disconnected, reconnect all pipework and open all suction and
discharge valves.
The pump is now ready for normal operation. Upon restarting check for abnormal
vibrations and other irregularities such as abnormal noise.
Rotor Removal
Follow the procedures as detailed earlier for the
removal of the pump hose.
B
Remove the rotor clamp screws (B) and slide
the rotor and splined adapter off the shaft.
The rotor assembly is heavy and
suitable lifting equipment will be
required to support the load as it is
pulled off the gearbox shaft.
A
Gearbox Drive Removal
Once the rotor has been removed, the gearbox can be removed if required.
The fixing screws (A) are socket headed cap screws through the gearbox flange into
the rear of the pump housing.
Before removing the gearbox fixing bolts ensure the gearbox is adequately
supported via the correct lifting method, and that the pump is properly
fastened to the floor as removing the gearbox will cause a sudden change
in the centre of gravity.
Remove the gearbox fixings and carefully pull the gearbox off the mating spigot..
21
Gearbox Drive Replacement
Prior to assembly clean and degrease all mating surfaces, ensuring all faces are free
from traces of paint and sealants
Carefully lift the gearbox drive into place and locate the flange spigot on the rear of
the pump housing.
Line up the fixing holes and insert the socket headed cap screws into the gearbox
adapter on the rear of the pump housing.
Rotor Replacement
Clean the bore of the rotor assembly applying a small amount of anti-seize
compound such as Copaslip® to the gearbox splines.
Slide the rotor assembly onto the gearbox shaft ensuring it is square at all times and
fit the retaining screws.
Do not hammer the rotor assembly if the shaft is a tight fit in the rotor; pull the
rotor onto the shaft with a long bolt.
Hose Connector Assembly
The hose connector inserts may be fitted independently, rather
than as a hose element assembly. After first ensuring all
mating faces are clean, fit the gaskets over the outer
connection of each hose connector.
Insert hose connector in to the pump, passing the outer
connection through the respective port in the pump body, with
the gaskets on the inside of the pump body.
Insert retaining bolts
Insert and tighten the insert retaining bolts.
Parts List & Sectional Drawing
Please refer to the simplified parts list below in conjunction with the cross sectional
drawings on the following pages. For a more detailed drawing and information on
spare parts and the ordering of spares, please contact Environmental Pumping
Solutions Limited or your authorised local dealer
Item
No.
1
2
4
5
6
7
8
9
10
11
12
Description
Pump Housing
Grearbox
Pump Frame Right
Pump Frame Left
Cross Bar Welded
Frame Mounting Screws
Flat Washer
Spring Washer
Nut
Cross Bar Fixing Screws
Flat Washer
Qty
Item
No.
1
1
1
1
2
4
8
4
4
8
8
36
37
38
39
40
41
42
43
44
45
46
Description
Qty
Washer
Flat Washer
Spring Washer
Nut
Front Cover Seal
Rotor
Spacer Ring
Rotor to Motor Fixings
Flat Washer
Spring Washer
Nut
8
4
4
4
6.5m
1
1
12
12
12
12
22
Item
No.
13
15
16
17
19
20
20
20
20
21
21
21
21
23
25
26
27
28
29
30
33
35
Description
Spring Washer
Gearbox Mounting Flange
Gearbox to Flange Fixing
Spring Washer
Flange to Pump Housing
Flat Washer
Nordlock Washer
Flat Washer
Flat Washer
Spring Washer
Nut
Spring Washer
Spring Washer
Adaptor Flange 'O' Ring
Front Cover
Front Cover Fixing
Flat Washer
Nut
Spring Washer
Swing Bolt
Hinge Link Plate
Front Cover Hinge Fixing
Qty
Item
No.
8
1
15
15
15
15
15
15
15
15
15
15
15
1
1
14
28
28
14
14
2
4
47
48
49
50
51
52
53
54
55
56
57
58
59
61
62
63
64
65
66
68
77
Description
Qty
Roller Mount
Roller Side Plate
Roller
Roller Shaft
Roller Bush
Shim
Shim
Roller Mount Fixings
Flat Washer
Spring Washer
Dowel
Roller Shaft Fixing
Roller Side Plate Fixing
Hose Connector
Hose Connector Seal
Hose Connector Fixing
Flat Washer
Spring Washer
Hose Clip
Pump Hose
Envirolube - Roller Lube
2
4
2
2
14
A/R
A/R
8
8
8
4
4
6
2
2
8
8
8
6
1
110L
23
24
25
User Guide
Troubleshooting
If the pump does not appear to be functioning correctly, consult the following guide to
see if you can identify and remedy the problem yourself. If the problem still persists,
please contact Environmental Pumping Solutions Limited or your authorised local
dealer for more detailed information
Problem
Probable Cause(s)
Suggested Remedy
The pump does not start
when turned on.
Defective motor
Check motor is running
Check fuses.
Check motor protection
switch.
Make sure that all phases
have required voltage
Connect motor DOL
Check inverter settings
Make sure that a key is fitted
and that all surfaces of
friction are clean and
undamaged. The hub screws
re correctly tightened
Check direction of the motor
is correct
Identify the source of air
intake and exchange seals
or gaskets
Adjust the roller occlusion
Frequency inverter (when
used) incorrectly set-up
Shaft key broken or missing
Pump rotating in reverse
The pump is taking in air
Pump runs but there is no
flow of media.
Rollers are not adjusted
correctly
Hose blocked
Restriction in the suction
pipe
Reverse the pumps rotation
and remove any obstacles.
If this is not possible with
your system, the pump
needs to be disassembled
and obstacles removed.
Clean pipeline, valves, filters
etc.
Remove reason for
overpressure, fit
overpressure protection,
check pump for damage and
reattach hose and refill lube
It maybe possible to fit a
speed inverter or make a
gear ratio change (not
always possible).
Call Environmental Pumping
Solutions Ltd to discuss
Locate the source of air
intake and exchange seals
or gaskets
Identify and remove the
restriction
Viscosity is too high for the
size of pump
Turn down the pump speed
and/or utilise a larger pump
Pipeline on suction side of
the pump is clogged
Pump has pumped against
excessive pressure and
hose has detached from
hose connector
Flow is less than calculated
Pump is running too slow
The pump is taking in air
Flow is less than calculated
26
Problem
Probable Cause(s)
Suggested Remedy
Flow is less than calculated
Rollers are not adjusted
correctly
Adjust the roller occlusion
Backpressure is too high
Change the pipeline on the
pressure side of the pump
Consult Environmental
Pumping Solutions Ltd
Noise
Suction pipe is too long for
the diameter creating too
high suction pulsation losses
Pump cavitating
Air or gas in the pipelines
Pressure too high
Vibration of the pump and
pipework
Rollers are not adjusted
correctly
Gearwheels or bearings
worn out
Hose damaged
Suction and discharge lines
not correctly fastened
High pump speed with long
suction and discharge lines
or high product specific
gravity or a combination of
these factors
Too small diameter of
suction and/or discharge
pipework
Pressure too high
Pump draws too much
current.
Short Hose life
Sedimentation of solid
substance when not using
the pump
Fluid or particle buildup in or
by the motor
High pump speed
Hose deteriorating
chemically
High pulsations
Incorrect hose lubricant used
Pump parts wearing quickly
Hose wearing mechanically
on the outside
Lower the speed or utilise a
bigger pump or change the
pipelines
Seal of possible air intakes
Clear pipelines and check
pipe sizes
Lower the pumping speed
Adjust the roller occlusion
Workshop overhaul of pump
needed
Exchange the hose
Fasten correctly
Reduce pump speed.
Reduce the line lengths on
both suction and discharge
where possible. Consult
Environmental Pumping
Solutions Ltd
Increase the pipework size
Check discharge pressure is
as per pump data sheet.
Check pump speed is as per
pump data sheet.
Check pipelines are clear
Check pump hose is not
damaged
(New installation) Check
pipes sized correctly
Empty the pump after use,
flush the pump with clean
water after use
Clean the motor
Reduce pump speed or
install larger pump
Reassess the choice of
material for the hose
Consult Environmental
Pumping Solutions Ltd for
detailed advice
Use only Envirolube
lubricant
Check compression roller
occlusion
27
Problem
Probable Cause(s)
Suggested Remedy
Pump parts wearing quickly
Hose wearing mechanically
on the inside
Roller bearings (bushings)
wear down quickly
Abrasive product mixed in
the hose lubricant
High pump temperature
Incorrect hose lubricant used
Check compression roller
occlusion
Check compression roller
occlusion
Wash out pump body and
change lubricant. Ensure
pump body is fully cleaned
when replacing a failed hose
Use only Envirolube
lubricant
Consult Environmental
Pumping Solutions Ltd
Reduce pump speed
Dismantle the suction piping,
identify the restriction and
remove
Identify the leaking seal or
gasket. Tighten retaining
bolts. Replace seal or gasket
if needed
Product temperature too
high
Pump running too fast
Possible restriction in the
suction pipe
Lubricant leakage
Leaking seal or gasket
For trouble free pump operation, please refer also to the Routine Maintenance
instructions as detailed earlier in this manual.
Specifications
Pump operating conditions
Description
L100
L150
3
Max continuous flow (m /hr)
51
135
Capacity per revolution
28.4
83.4
(l/rev)
Maximum working pressure
10 Barg*
7.5 Barg*
Ambient working
-10ºC to +40 ºC
temperature
Product working temperature
-10ºC to +80 ºC*
Sound level at 1m
< 70 dB(A) whilst pumping water at maximum continuous flow
* Your pump may not have been configured to run at these stated maximums. Please check
your Technical Data Sheet.
Materials of Construction
Description
Pump Body
Front Cover
Rotor
Compression Rollers
Hose connectors
Support Frame
Gasket seals
Fasteners
Standard
Carbon Steel
Carbon Steel
Carbon Steel
POM
304 st.stl.
Carbon Steel
Nitrile
MS BZP
Optional
304 st.stl.
304 st.stl.
304 st.stl.
316 st.stl.
316 st.stl.
316 st.stl.
316 st.stl.
304 st.stl.
316 st.stl.
304 st.stl.
316 st.stl.
28
Hose Lubricant Quantities
Volume of hose lubricant (litres)
L100
40
L150
110
Contact Environmental Pumping Solutions Limited or your authorised local
dealer should you require a Material Safety Data Sheet (MSDS) for
Envirolube hose lubricant.
Weights and Dimensions
The details below are approximate only. Please refer to your Technical Data Sheet or Environmental Pumping
Solutions for specific details of the supplied equipment.
Net weight (kgs)
Overall size (cm)
Gross (packed)
weight (kgs)
Overall packed
case size (cm)
L100
900
154x166x133
L150
1800
170x209x195
L100
L150
1135
2264
170x190x150
190x230x215
29
Recommendations for Hose Storage
We recommend that pump hoses are stored in accordance with BS3574. Peristaltic
Hoses can be considered as Group A products as detailed in this specification, i.e.
products with moderate susceptibility to deterioration. The relevant points from this
specification are:
Temperature:
To be below 25ºc and articles stored away from direct
sources of heat such as boilers, radiators and direct
sunlight.
For articles stored below 15ºc their temperature should
be raised to approx. 30ºc throughout their mass prior to
use.
Humidity:
Humidity shall be such that condensation shall not
occur. The criterion for this is that either the storage
temperature should be above the dew point or humidity
levels should be low enough to ensure the dew point is
below the storage temperature.
Light:
Protect from strong light sources, in particular direct
sunlight or intense artificial light having a high ultraviolet
content.
Ozone:
Storage areas shall not contain equipment which
generates ozone - e.g. mercury vapour lamps, high
voltage electrical equipment, combustion gases,
organic vapours.
Deformation:
Store free from superimposed tensions or compression.
For a hose this means that the supports must be wide
enough and spaced in a way as to spread the load over
a wide area. We would recommend a minimum width of
100mm for any support spaced no more than 500mm
apart. It is preferable that hoses are supported over
their entire length.
Do not store hoses coiled.
Contact with Liquids:
Do not allow contact with liquids (e.g. petrol, greases,
acids, disinfectants, cleaning fluids).
Contact between Hoses:
Avoid direct contact between hoses of different types,
particularly between hoses of different colours.
Rotation of Stock:
Hoses must be issued in strict
manufacturing date or production code.
rotation
by
Hoses will be delivered wrapped individually in opaque polythene, we would
recommend that the packing is kept on the hoses prior to use to reduce the effects of
light and to minimise contact with other materials. Individual hoses are marked with a
production code identifying the manufacturing period.
30
EC Declaration of Conformity
In accordance with EN ISO 17050-1:2004
We
Environmental Pumping Solutions Limited
of
1210 Parkview, Arlington Business Park, Theale, Berkshire, RG7
4TY, United Kingdom
in accordance with the following Directive(s):
2004/108/EC
The Electromagnetic Compatibility Directive
2006/42/EC
The Machinery Directive
hereby declare that:
Equipment
Peristaltic Pump
Models
L100 & L150
is in conformity with the applicable requirements of the following documents
Ref. No.
Title
Edition/date
BS EN ISO 12100-1 Safety of machinery. Basic concepts, general principles for design. Basic
terminology, methodology
2003
BS EN ISO 12100-2 Safety of machinery. Basic concepts, general principles for design. Technical
principles
2003
BS EN 809
Pumps and pump units for liquids. Common safety requirements
1998
BS EN 60204-1
Safety of machinery. Electrical equipment of machines. General requirements
2006 +A1:2009
BS EN 61000-6-1
Electromagnetic compatibility (EMC). Generic standards. Immunity for residential,
commercial and light-industrial environments
2007
BS EN 61000-6-3
Electromagnetic compatibility (EMC). Generic standards. Emission standard for
residential, commercial and light-industrial environments
2007
I hereby declare that the equipment named above has been designed to comply with the relevant
sections of the above referenced specifications and is in accordance with the requirements of the
Directive(s)
Signed by: ............................................................................................................................
Name:
Peter Wright
Position:
Managing Director
Done at
Theale, Berkshire, UK
On
March 2010
The technical documentation for the machinery is available from the manufacturer at the above
address.
Product Use Declaration Form
Product Use Declaration Form
In compliance with the Health & Safety Regulations and the Control of Substances Hazardous to
Health Regulations you, the user are required to declare the substances which have been in contact
with the product(s) you are returning to Environmental Pumping Solutions Limited or any of its
subsidiaries or distributors. Failure to do so will cause delays in servicing the item or in issuing a
response. Therefore, please complete this form to ensure that we have the information before receipt
of the item(s) being returned. A FURTHER COPY MUST BE ATTACHED TO THE OUTSIDE OF THE
PACKAGING CONTAINING THE ITEM(S) before returning. You, the user, are responsible for
cleaning and decontaminating the item(s) before returning them.
Please complete a separate Declaration Form for each item returned.
Company: ………………………………………………………………………………………………………...
Address:
………………………………………………………………………………………………………….
………………………………………………………………
Postcode:
Telephone:
Fax Number:
………………………………………………
e-mail:
…………………………………………………...
Product:
………………………………………………….
Serial Number:
………………………………………….
Has the Product been used?
YES
NO
……………………………………..
…………………………………
Cleaning fluids to be used if residue product is
found during servicing:
1.
…………………………………………..
2.
…………………………………………..
3.
…………………………………………..
4.
…………………………………………..
If yes, please complete all the following sections
1.
………………………………………………..
I herby confirm that the only substance(s) that
the item specified has handled or come into
contact with are those named, that the
information given is correct, and the carrier has
been informed if the consignment is of a
hazardous nature.
2.
………………………………………………..
Signed:
3.
………………………………………………..
Name:
4.
………………………………………………..
Position:
If no, please complete declaration only
Details of Substances Pumped
Chemical names:
Precautions to be taken when handling the above:
1.
……………………………………………….
2.
……………………………………………….
3.
……………………………………………….
4.
……………………………………………….
Action to be taken in the event of human contact:
Date:
Any other additional information you may regard
as useful:
……………………………………………………
……………………………………………………
1.
………………………………………………
……………………………………………………
2.
………………………………………………
……………………………………………………
3.
………………………………………………
4.
………………………………………………
Environmental Pumping Solutions Limited Tel: +44 (0) 1635 576 028
Fax: +44 (0) 1189 657 783