1
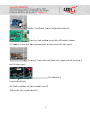
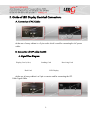
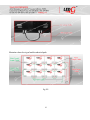
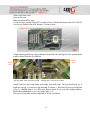
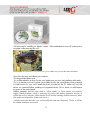
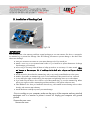
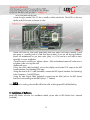
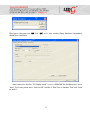
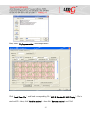
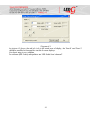
Grace Lites Corporation Warning! To prevent any bodily damage read entire manual before starting. DANGER To prevent possible electrical shock during an electrical storm, do not connect or disconnect cables or station protectors for communications lines, displays or any equipment. DANGER Do not attempt to open the covers of the power supply. Power supplies are not serviceable and are replaced as a unit. DANGER This equipment contains lethal voltages. All repairs and service should be performed by an authorized service support representative only. DANGER Multiple power cords. The product might be equipped with multiple power cords. To remove all hazardous voltages, disconnect all power cords. DANGER An electrical outlet that is not correctly wired might place a hazardous voltage on the metal parts of the system or the products that attach to the system. It is the customer’s responsibility to ensure that the outlet is correctly wired and grounded to prevent an electrical shock. This manual is subject to change without notice. 2 Grace Lites Corporation CONTENT 1. List of Equipment 2. Mechanical Installation Guide of LED Display a. Position of Cabinets b. Locking the Display Cabinets Together c. Securing the Display in a Permanent Location d. Guide for holding frame for permanent installation 3. Guide of LED Display Electrical Connections a. Connection of AC cables b. Signal Flow Diagram c. Installation of Display Card (Video Card) d. Installation of Sending Card e. Installation of Software 4. LED System Interface Card (Sending Card) Functions and Features 1. Giga Technology 2. Pixel by Pixel Correction and Unit box by Unit box correction function 3. Intelligent Identification Function 4. Gray level 5. Optional Refresh Frequency, Synchronous function 6. Super loading capacity 7. Double network cables switch automatically 8. Multi-display synchronous and combination functions. 9. Brightness 256 Levels Automatic Regulation 10. Voice Transmission Function 11. Upgrading Program Online 12. No Toggle Switch 13. Test Function 14. Super Long Transmission Distance 15. Matching software 5. LED Display and Software Set-up Model 701 6. LED Display and Software Set-up Model 701 7. LED Display Installation Check List 3 Grace Lites Corporation 1. List of Equipment LED Display Input Signal Cable (LAN) Signal Jumper Cable Long Power Input Cable Signal Jumper Cable Short 4 Power Jumper Cable Gra ace Lites Co orporation Sending Card (C Control Systtem Card) (installed ( in n the PC) Recceiving Carrd (installed d in each of o the LED Display D Cab binets -PC (Neeeds to includ de dual vid deo output card c with m minimum off one DVI vvideo output) DVI Display D Carrd (video ccard) (dual video outp put card with minimum m of one DVI video output) DVI Cablee (Short) Control Cable C (Rs23 32) -LED Stud dio installattion disk (a also installed d in the PC C) -SetData disk, (also installed in n the PC) 5 Grace Lites Corporation 2. Mechanical Installation Guide of LED Display A. Position of Cabinets In this example this LED display is composed of 12 cabinets. Assemble lower row first if stacking or Upper row if flying. B. Locking the Display Cabinets Together Lock the side units together first by placing the cabinets next to each other touching one another. Using an Alan Wrench turn the internal dual lock until it locks in place. Note this illustration is apart for demonstration of the dual lock only. After, lock the next row by placing it in place and lock the dual locks with an Allen wrench. 6 Grace Lites Corporation Now insert the Safety Pin as shown and hand tighten. Alignment Plate can now be installed between all cabinets with a grade 0.9 minimum bolt. C. Guide for Securing the Display in a Permanent Location This alignment plate may be used to secure display to a fixed frame structure. Bolts would need to be replaced with appropriate length as needed and would required to be grade 10.9 minimum with clean and dry threads. This alignment plate may be used with or without fixed frame. Rear of LED display 7 Gra ace Lites Co orporation D. Guid de for holding h frame ffor perm manent installa ation 8 Grace Lites Corporation 3. Guide of LED Display Electrical Connections A. Connection of AC Cables At the rear of every cabinet is a 3 pin socket which is used for connecting the AC power cables. B. Connection of UTP cable (Cat5E) A. Signal Flow Diagram Display Card (video) Sending Card Hub Card Receiving Card LED Display At the rear of every cabinet is a 9 pin connector used for connecting the UTP Cable Signal Cable. 9 Grace Lites Corporation Illustration shows the signal and the electrical path. Fig 2-9 10 Grace Lites Corporation C. Installation of Display Card (Video) Card IMPORTANT Care should be taken when removing card from original packaging as it is static sensitive. This device is wrapped in an antistatic bag to prevent from damage. Take the following precautions to prevent damage to the device from electrostatic discharge. Limit your movement. Movement can cause static electricity to build up around you. Attach a wrist strap to an unpainted metal surface of your hardware to prevent electrostatic discharge from damaging your hardware. When using a wrist strap, follow all electrical safety procedures. A wrist strap is for static control. It does not increase or decrease your risk of receiving electric shock when using or working on electrical equipment! Do not remove the device from the antistatic bag until you are ready to install the device in the system. With the device still in its antistatic bag, touch it to the metal frame of the system for at least 2 seconds. Grasp card by the edges. Avoid touching the components and gold-edge connectors on the adapter. If you need to lay the device down while it is out of the antistatic bag, lay it on the antistatic bag. Before picking it up again, touch the antistatic bag and the metal frame of the system at the same time. Take additional care when you handle this device during cold weather because heating reduces indoor humidity and increases static electricity. Handle the devices carefully to prevent permanent damage. - Prior to working on your computer, make sure the power of the computer and any attached equipment such as a monitor or printer is turned off. First unplug your computer and then ground yourself. 11 Grace Lites Corporation -Remove the case cover. Unscrew the case Slide case panel off the case -Locate slot type needed. The AGP is usually a brown colored slot close to the CPU. The PCI is a slot very similar to the AGP except it is white in color. -Some motherboards have a lug at the back of the AGP slot, this lug has to be pushed down to allow the AGP card to fit in the slot. AGP lug Open AGP lug Close AGP lug closed. Card cannot be installed. AGP lug open. Card can be installed. -Install Card into slot. Push firmly and evenly from both sides. The lug should pop up. It might not pop up, so just move it up manually if it doesn´t. If the card is having a hard time going in, carefully push it in a little from front to back. If you are still having problems, loosen the motherboard so you have some “play” in it. This can be a real help at times, especially in a new installation. 12 Grace Lites Corporation -Once the card is carefully put, tighten it down. If the motherboard comes off, make sure to re-tighten it after securing the card. Card installed. (This motherboard is not in a case for review purposes.) Make sure you screw the card to the chassis. -Now close the case and reboot your computer. -Windows should detect card. -You will be asked for a driver for this card. Make sure you have the installation disk ready. -If it is an Nvidia or Ati card (which it most likely is) press the cancel button when prompted to install drivers for your card. Install the driver provided on the CD. Make sure any old drivers are removed before installing new/updated drivers. This is done via add/remove programs in the control panel. -Reboot computer and set video card to “Clone Mode”. In Clone Mode, two monitors display identical images, which is necessary for correct LED display operation. Monitor A will be the working monitor, while monitor B will feed the sending card the necessary data. (See video card manual for further instructions.) - When you process the video, you could modify the video card frequency 75 Hrz. to 32 Bits for a better resolution and speed. 13 Grace Lites Corporation D. Installation of Sending Card Fig 2-10 IMPORTANT Care should be taken when removing card from original packaging as it is static sensitive. This device is wrapped in an antistatic bag to prevent from damage. Take the following precautions to prevent damage to the device from electrostatic discharge. Limit your movement. Movement can cause static electricity to build up around you. Attach a wrist strap to an unpainted metal surface of your hardware to prevent electrostatic discharge from damaging you hardware. When using a wrist strap, follow all electrical safety procedures. A wrist strap is for static control. It does not increase or decrease your risk of receiving electric shock when using or working on electrical equipment! Do not remove the device from the antistatic bag until you are ready to install the device in the system. With the device still in its antistatic bag, touch it to the metal frame of the system for at least 2 seconds. Grasp card by the edges. Avoid touching the components and gold-edge connectors on the adapter. If you need to lay the device down while it is out of the antistatic bag, lay it on the antistatic bag. Before picking it up again, touch the antistatic bag and the metal frame of the system at the same time. Take additional care when you handle this device during cold weather because heating reduces indoor humidity and increases static electricity. Handle the devices carefully to prevent permanent damage. - Prior to working on your computer, make sure the power of the computer and any attached equipment such as a monitor or printer is turned off. Unplug your computer and ground yourself. -Remove the case cover. Unscrew the case 14 Grace Lites Corporation Slide case panel off the case -Locate slot type needed. The PCI slot is usually a white colored slot. The AGP is a slot very similar to the PCI except it is brown in color. -Install Card into slot. Push firmly and evenly from both sides. If the card is having a hard time going in, carefully push in a little from front to back. If you are still having problems, loosen the motherboard so you have some “play” in it. This can be a real help at times, especially in a new installation. -Once the card is carefully put, tighten it down. If the motherboard comes off, make sure to re-tighten it after securing the card. -Replace all covers -Using short DVI cable (included), connect the display card (video) DVI output to the LED System Interface Card (sending) DVI input. -Using the serial to RJ11 cable (included), connect the LED System Interface Card (sending) to the Computer’s Com RS232 port. -Using the LAN Signal Cable (included) connect from the RJ45 jack on the LED System Interface Card (sending) to the LED Display’s 1st Cabinet. NOTE When the card is working, the red LED will be lite solid, and the green LED will be blinking. E. Installation of Software Install LED Studio software. For installation details please refer to LED Studio User’s Manual (included). 15 Grace Lites Corporation 4. LED System Interface Card (sending card) Model 701 Functions and Features 1. Giga Technology Veritable Giga technology. One sending card can support the max pixels: Model 701: 1280*1024; model 702: 2048*640; two cards are cascaded: 2048*1152. Single network cable supports the max pixels: model 701: 1024*640, 1280*512; model 702: 1600*400, 2048*320. 2. Pixel by Pixel Correction and Unit box by Unit box Correction Function Pixel by pixel correction supports four kinds of correction modes: single pixel, 2*2pixels, 4*4 pixels, 8*8 pixels; and the max correction is 6144 pixels/module, and brightness 256 levels for red, green, blue. Every unit box correction is used to adjust the chromatism in each unit box; and brightness 256 levels for red, green, blue. 3. Intelligent Identification Function The intelligent identification program can recognize every kind of scanning mode and every type of signal trend of all kinds of double-color, full-color (real pixel and virtual pixel) drive boards, and the accuracy rate is 99%. 4. Gray level 0---Gray Level 66536 (64K) are Optional Users can adjust the gray level from 0 to 66536 levels according to requirement of displays, making the display achieve the most desirable effects. 5. Optional Refresh Frequency, Synchronous function Refresh frequency is adjustable from 10HZ to 3000HZ, and the refresh frequency and phaselock function can make the display refresh lock at integral multiples of that of computer display, preventing the image from looking “torn”, and ensuring that the image is perfect. The phase-lock synchronous range is from 47HZ to 76HZ. 6. Super loading capacity Full-color receiving card with gray level 4096 (Model 4K) and refresh frequency 180HZ can support 512*128; full-color receiving card (model 16K, only for static) with gray level 16384 and refresh frequency 300HZ can control 160*64,.(Note: the drive board must have minimum high frequency of 30MHZ) 16 Grace Lites Corporation 7. Double network cables switch automatically The A and B ports of the receiving card can be both used as input ports or output ports. Users can adapt two computers to control a display at the same time (if one is out of order, the other will replace it automatically). Users can also use one computer with double network cables to control a display (if one is out of order, the other will take place of it automatically) making the display work normally all time. 8. Multi-display synchronous and combination functions. One sending card to control multi-display and the multi-display can be willful combination, synchronous display, and independent play, etc. through shortcut key. 9. Brightness 256 Levels Automatic Regulation The function of brightness 256 levels automatic regulation can make the display brightness regulation more efficient. 10. Voice Transmission Function Model 702 integrates voice transmission, and requires no audio cable to transmit audio signals to the display. Double 24bits and 64KHZ hi-fi digital analogy making display achieve the perfect video/audio effect. 11. Upgrading Program Online If the receiving card program needs to be upgraded, just open the display window, and upgrade it through Led Studio, no need to remove the receiving card from the display. 12. No Toggle Switch There are no toggle switches on the receiving card; all the setups are set through Led Studio. 13. Test Function Receiving card has a test function, no sending card is needed. It can test the display directly and with many various test modes such as bias, gray level, red, green, blue, etc. 17 Grace Lites Corporation 14. Super Long Transmission Distance The max transmission distance is 170M (actual measure); normal transmission distance is 140M. 15. Matching software Led Studio V8.0 or above. 5. LED Display and Software Set-up All the LED Display (hardware) is setup through the software “Led Studio”. First, upload the files from the CD “SetData, LED-G Outdoor/Indoor LED Touring Display System” provided to you by LED-G onto your PC. The CD contains 2 files, the first one is a *.RCG and the second one is a *.CON file. After installing Led Studio in the computer and completing setup process you may then open the program. You should now see the window below: Click “Option” in the window above then select “Software Setup”. A window will appear, as shown below. Without selecting anything types the letters linsn all in lower case, using the keyboard (There is no area to type this in. Just type it.). A new password dialogue window should appear. See example below. The computer screen will not show the letters while you are typing them in.) 18 Grace Lites Corporation Then type in the password 168, click “OK” and a new window (Setup Hardware Parameters) should open. See below. Next, make sure that the “PC Display mode” is set to 1024x768, the Hardware port set to “Auto”, the Screen power set to “Auto on/off” and the “Y Start” box is checked. Then click “Save on sender”. 19 Grace Lites Corporation Next, select the “Receiver” tab. Then select the “Load from files” option and load the corresponding Receive-Card Files (RCG) “LED G Standard II LED Display.rcg” then click “Open” (see below). After making selections click, ”Send to receiver”,then click ”Save on receiver”. 20 Grace Lites Corporation Next, select “Display connection” see example below. Click “Load from files”, and load corresponding file “LED G Standard II LED Display”(file in attached CD)Next, click ”Send to receiver”,then click “Save on receiver” and “Exit” 21 Grace Lites Corporation 6. Setup the original start bit of display Click ‘Option’ then ‘Screen Area(Y)’. Diagram 6-1 Diagram 6-2 22 Grace Lites Corporation Diagram 6-3 As picture 6-2 shows, the red ink circle is the actual area of display, the ’Start X’ and ‘Start Y’ should be modified to changed the start bit of screen displays. Your basic setup is now complete. For software (LED Studio) manipulation see “LED Studio User’s Manual”. 23 Grace Lites Corporation 7. LED Display Installation Check List 1. Assemble the cabinets making sure they are safely assembled. 2. Connect the AC cables between cabinets 3. Connect the Signal cables between cabinets. 4. Install Video card 5. Install Video card driver 6. Install Sending Card. 7. Connect the Video card to Sending card. 8. Connect the Sending card to serial port. 9. Install LED Studio software 10. Connect the Signal Input Cable (LAN) between Sending Card and 1st LED display cabinet. 11. Turn on control computer. 12. Turn on LED display. 24