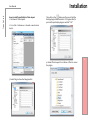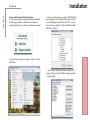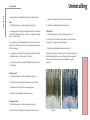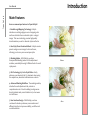
1
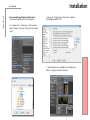
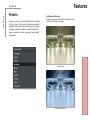
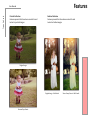
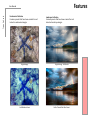
Topaz ReStyle
User Manual
I. Installation
A. How to Install
B. Entering Your Key
C. Host-Specific Installation
1. Paint Shop Pro
2. Photo Impact
3. Irfanview
D. Uninstalling
3
4
4
5
6
7
8
II. Introduction
A. About Topaz ReStyle
B. Main Features
D. Advanced Masking .
E. Masking Tools
F. Collections
G. Presets
9
10
11
12
14
15
III. Work Area
A. Interface
B. Preview
C. Effects & Presets
1. Adding Presets
2. Deleting Presets
3. Favorites
4. Snapshots
5. Importing Presets
6. Exporting Presets
7. Sharing Presets
D. Tools
E. Menu
1. Preferences
2. Check for Update
3. Enter Key
4. What’s This?
22
26
28
29
29
29
29
30
30
30
32
33
33
33
34
34
5. User Guide
6. Tech Support
7. Product Info
8. Gallery
9. MyTopaz
10. Tutorials
11. About
34
34
34
34
34
34
34
IV. Settings & Parameters
A. ReStyle - Color Style
B. ReStyle - Texture
C. Basic - Color &Tone Level
D. Basic - Detail
E. Blending Modes
35
35
36
37
38
VII. Additional Resources
A. Shortcut Keys
B. FAQ’s
C. Connect
D. Company Info
39
40
42
43
2
Installation
Topaz ReStyle
User Manual
Topaz ReStyle is a plug-in, which means it won’t run by
itself and requires a compatible host program for use.
On Macs, ReStyle will install to:
Computer->Mac HD-> Library->Application Support>Topaz Labs->Restyle
On Windows, ReStyle will install to:
To Install in Photoshop and Photoshop Creative Cloud
1. Exit out of Photoshop or other image editing program if you are using it.
2. Double-click on the Topaz ReStyle folder to access
the installer, and then follow the on-screen instructions.
64Bit Machines:
Presets, photoshop plugin files etc. go here
C:\Program Files (x86)\Topaz Labs
Mac dmg Windows exe
32Bit libraries, DLLs etc. go here
C:\Program Files (x86)\Common Files\Topaz Labs
3. Your Topaz ReStyle plug-in will automatically be
installed in your Photoshop plug-ins folder.
64Bit libraries, DLLs etc. go here
C:\Program Files\Common Files\Topaz Labs
4. After the installation, you will need to enter your
license or trial key in the bottom left Menu->Enter Key
inside of the program.
On 32Bit Machines:
Presets, photoshop plugin files etc. go here
C:\Program Files\Topaz Labs
32Bit libraries, DLLs etc. go here
C:\Program Files\Common Files\Topaz Labs
If your plug-ins do not appear in the filter menu see
directions in our knowledge base for instuctions:
www.topazlabs.com/support
Important for Mac Users:
After installation, Topaz ReStyle will be installed in the
following folder: “ Macintosh HD -> Library -> Application Support -> Topaz Labs -> ReStyle”.
If your Photoshop is installed in a customized location,
you will need to manually create a shortcut (alias) link
inside folder “<Photoshop install folder> -> Plug-ins”
that links to “ Macintosh HD -> Library -> Application
Support -> Topaz Labs -> ReStyle -> Plug-ins”.
3
Topaz ReStyle
User Manual
Entering Your Key
Entering your trial key allows you to save your projects and
print them during your evaluation period. Entering your
license key allows you do the same, except without any time
limitations.
1. Start by opening up an image in Photoshop.
2. Go to Filters -> Topaz Labs -> ReStyle -> Menu
-> Enter key.
3. You can then copy and paste or type your key in.
Important: To install the product on a second computer, you
will need to download Topaz ReStyle and then enter your
same license key.
Host-Specific Installation
Topaz ReStyle is also compatible with Lightroom, Aperture
and iPhoto. To use ReStyle in any of these programs you will
need to download and install the free Topaz Fusion Express
compatibility add on. You can get it online at: www.topazlabs.com/downloads
In Windows, Topaz ReStyle is supported by most host applications that support Photoshop plug-ins. This includes Paint
Shop Pro, Photo Impact and Irfanview, although there are additional host programs that may also support Topaz ReStyle.
To install ReStyle in either Paint Shop Pro, Photo Impact, or
Irfanview first download Topaz ReStyle to the default location. Then, to configure it into each program, follow the
host-specific instructions on the next page.
On Macs, Topaz ReStyle is also compatible with Lightroom,
Aperture, and iPhoto. To use ReStyle in any of these programs you will need to download and install the free compatibility program Fusion Express from
www.topazlabs.com/downloads.
Be sure to be closed out of Lightroom during the installation
process and Fusion Express should automatically appear in
your Photo->Edit In Menu.
After installation open Lightroom and go to Photo->Edit In>Fusion Express 2 and you will be able to access your Topaz
plug-ins from there.
For furture instructions or more information check out our
knowledge base at: www.topazlabs.com/support
4
Topaz ReStyle
User Manual
How to install Topaz ReStyle in Paintshop Pro
1. First launch PaintShop Pro / Photo Impact.
Installation
3. Choose C: \ Program Files \ Topaz Labs \ Topaz ReStyle\Plugins and click “OK”.
2. Go to Menu file -> Preferences -> File Locations.
Select “Plug-ins” from the “File Types” list and click
“Add”.
5
4. Topaz ReStyle is now available to use. Simply go to
Effects -> Plug-ins and select “ReStyle”.
Topaz ReStyle
User Manual
How to install Topaz ReStyle in Photo Impact
1. First launch Photo Impact.
2. Go to File -> Preferences -> General or use shortcut
key F6.
Installation
Then click on the
button and browse to find the
ReStyle plug-in folder located in: C:\Program Files\Topaz Labs\Topaz ReStyle plug-ins and click “OK”.
4. Restart Photo Impact. Go to Menu -> Effect to access
the plug-in.
3. Select Plug-ins from the Categories list.
6
Topaz ReStyle
User Manual
How to install Topaz ReStyle in Irfanview
1. Make sure that you have downloaded and installed
the 8bf plug-in add-on, available on the Irfanview
webpage. (http://www.software.com/irfanview-plugin)
Installation
3. In the screen that pops up, select “Add 8BF filters”
and navigate to the C:\Program Files\Topaz Labs\Topaz ReStyle\Plug-ins folder and click “OK”. You will
then see “Topaz ReStyle” in the Available/Loadable
8BF Filters section.
7
2. Open Irfanview and go to Image -> Effects -> Adobe
8BF filters.
4. To use Topaz ReStyle in the future, simply go to
Image -> Effects> Adobe 8BF filters again and select
“Topaz ReStyle”.
Uninstalling
Topaz ReStyle
User Manual
To uninstall Topaz ReStyle follow these instructions:
Mac
1. Quit Photoshop (or other editing program).
2. Navigate to the Topaz Labs support files and frames
located at: Macintosh HD -> Library -> Application Support -> Topaz Labs.
3. Locate the Topaz ReStyle folder and move it to the
trash. You will need to enter your system password to
OK this change.
4. Navigate to your Photoshop plug-ins folder located
at: Applications -> Photoshop -> Plug-ins
5. Locate any leftover Topaz ReStyle files and move it
to the trash.
3. Select Programs, then Uninstall a Program.
4. Select Topaz ReStyle and click remove.
Windows 7*
1. Quit Photoshop (or other editing program).
2. Click on the Start Menu and select Control Panel ->
Programs -> Programs and Features.
3. Select Topaz ReStyle and click uninstall.
*Please note that if you also have the 64-bit version of
ReStyle installed, then you will need to first uninstall
this version before you can uninstall the regular
version.
Windows XP*
1. Quit Photoshop (or other editing program).
2. Click on the Start Menu and select Control Panel.
3. Double-click on Add / Remove programs.
4. Select Topaz ReStyle and click remove.
Windows Vista*
1. Quit Photoshop (or other editing program).
2. Click on the Start Menu and select Control Panel.
Before
After
8
Introduction
Topaz ReStyle
User Manual
Topaz ReStyle
Explore Creative Possibilities
Topaz ReStyle opens up a whole new world of
creative possibilities by offering photographic effects
you might never have dreamed of or simply didn’t
know how to create. Topaz ReStyle lets
you transform your image into thousands of creative
and unique looks with just a click of the mouse.
Topaz ReStyle creates photographic effects by using
cutting-edge technology to map color/tone values
from sample images. The result is high-quality color
and tone transformations, even for dramatic looks.
ReStyle features over one thousand effects to choose
from that are easily searchable by overall style,
individual colors, and keywords making it very user
friendly. You can even create custom effects from
your own images. Topaz ReStyle also includes eight
different multiple blending modes to add even more
stylistic possibilities.
Before - Steve Rich
Topaz ReStyle includes the tools to enhance the effect
chosen in the 5-color HSL sliders under the color tab.
The 5 colors shown (in both the color theme swatches
and the sliders) are the 5 dominant colors in that
particular effect.
Visit the ReStyle Gallery to see more examples:
gallery.topazlabs.com/Photography/Topaz-ReStyle
After - Steve Rich
9
Introduction
Topaz ReStyle
User Manual
Main Features
Here are some unique features in Topaz ReStyle:
1. Breakthrough Mapping Technology. ReStyle
introduces a cutting-edge process of mapping color
and tone statistics from a selected style to a target
image. This new technology creates high-quality
transformations, even for dramatic styles and looks.
2. New Style/Preset Creation Method. ReStyle creates
presets using a source image’s color and tones,
allowing you to save your own unique styles.
5. Blending Modes. With ReStyle, we have
incorporated blending modes for the adjustment
modules, essentially showing 8 different looks for each
style preset.
Before
3. HSL Technology in 5-Color Style Sliders. Easily
enhance your selected style’s 5 dominant colors using
the unique hue, saturation and luminance controls.
4. Advanced Masking Workflow. The masking module,
attached to each adjustment tab, contains a
comprehensive set of tools including an edge-aware
brush, gradient mask, smart feather tool, color aware
tool and more.
5. User Interface Design. With ReStyle, we have
continued to develop a cleaner, more modern and
efficient interface to improve usability, workflow and
overall aesthetics.
After
10
Features
Topaz ReStyle
User Manual
Advanced Masking
Topaz ReStyle features a masking workflow designed to help you easily
and effectively achieve selective adjustments. Additionally, each adjustment module has an individual mask attached.
1. Reveal/Hide Option
Choose which color you would like paint with: white (reveal) or
black (hide). If you are masking on a white mask, you’ll want to
start with a black brush color and vice versa.
1
2
2. Undo/Redo/Invert/Reset
From the left: Undo and redo your steps, invert your mask colors
and reset all values to a white (reveal) mask.
3. Brush and Gradient Tools
4
11
3
Switch between a brush or gradient tool to
create our mask. The brush tool has 3 different
brushes: normal, edge aware and color aware.
The gradient tool can create 3 different types of
gradients: linear, radial and reflective.
4. Sliders/Tool Options
Controls the masking tool selected using sliders and buttons to adjust the available settings.
This area will change with each tool.
5
5. Refining Options
Use the Color Range and Smart Feather adjustments to refine or even create your mask.
The mask view allows you to see the areas where your
selective adjustments are being applied in your image.
Features
Topaz ReStyle
User Manual
Masking Tools
Several masking tools are included in Topaz ReStyle.
Brush Tool
The brush tool has 3 different brushes to choose from:
normal, edge aware and color aware.
Strength
Controls the strength of the brush value being applied.
At 1, the strength is 100% and will apply at the strongest
value of the brush....at lower values it will only apply a
percentage of the strength each time.
Brush Size
Controls the size of the brush.
Hardness
Controls the edge hardness of the brush. A value of 0
is 100% hard, while a value of 1.00 is 100% soft.
The normal brush is a standard brush controlled by the
sliders below.
The edge aware brush is a smart brush that detects the
edges of the area you are masking. Just keep the cross
hairs of your brush on the area/color you want to effect
and the brush will not bleed into any other areas.
The color aware brush uses the same technology as the
edge aware brush, but gives you a color picker instead
of having to keep your cross hairs in the area you are
masking. Just click the color picker icon, select a color
in your image that you’d like to mask, then brush away
without fear of going into another color. You can continue to select colors during your masking session.
Preset
The A/B presets allow you to create more than one
size/type brush so you can quickly switch back and
forth.
Gradient Tool
The brush tool has 3 different gradients to choose
from: linear, radial, reflective. Just click and drag in
your image to create the gradient.
Linear Gradient
The gradient follows a line.
Radial Gradient
The gradient radiates from a defined point
Reflected Gradient
The gradient is reflected based on your stroke.
12
Features
Topaz ReStyle
User Manual
Color Range
The Color Range tool selects a specified color within
an image and creates a mask based upon that color.
To use the Color Range tool, click on the button
within the mask module, then select the color in your
image that you would like to mask out (the green dot
lets you know which color is selected).
Smart Feather
The Smart Feather tool blurs the edges of the mask
to create a softer transition between the masked and
unmasked areas.
Feather Radius
Determines the size of the feathered edge. Use a small
radius for harder edged, and a large one for softer
edges.
Feather Aware
Controls how edge aware the feathered area is. Higher
values increase awareness, which is good for precise
yet natural transitions. Lower values indicate less
awareness, allowing for a more soft and blurred transition.
Mask Contrast
Determines the edge brightness of the mask. Increasing this parameter will give the mask edges more detail
and definition.
Size
Controls the size of the area effected by the Color
Range selection.
Sensitivity
Adjust the range of the color selected using the Sensitivity slider. Set a high Sensitivity value to restrict the
color range to only the selected color, a lower value to
increase the range.
Mask Strength
Determines how hard your mask is applied to subject
edges in your image. The higher the parameter the
harder your edges will be. The lower the parameter,
the softer your edges will be.
13
Topaz ReStyle
User Manual
Collections
The Collections menu features 11 default collections
which helps to manage your user-made presets there’s over 1000 default presets included in Topaz
ReStyle.
Each Collection features a set of its own presets that
can be applied to your image. During your workflow
you can select the type of effects that you want and
then choose from one of the included presets in that
collection.
Features
As in the other Topaz programs, you also have a presets panel. You can create and save your own presets.
You also have the ability to export and import presets
- allowing you to share with your friends.
* Default presets that come with the program can not
be deleted.
14
Collections can be added by clicking on the small
gear icon on the upper right of the collections panel.
You can Add, Delete or Rename your user collections.
Features
Topaz ReStyle
User Manual
Presets
There are over 1000 carefully crafted preset in ReStyle
to choose from. These one-click styles were specially
developed and fine-tuned for specific types of photos
including architecture, fashion, portrait, landscape,
nature, underwater, street, seascapes, moody, night,
and graphic.
Architecture Collection
Features presets that have been created for and
tested on architecture images.
15
Original Image
Shades of Blue Preset
Features
Topaz ReStyle
User Manual
Portrait Collection
Features presets that have been created for and
tested on portrait images.
Fashion Collection
Features presets that have been created for and
tested on fashion images.
16
Original Image
Original Image - Hal Schmitt
Summer Days Preset
Straw Frenzy Preset - Hal Schmitt
Features
Topaz ReStyle
User Manual
Underwater Collection
Features presets that have been created for and
tested on underwater images.
Landscape Collection
Features presets that have been created for and
tested on landscape images.
17
Original Image
Original Image - Hal Schmitt
Atoll Maldives Preset
Coffee Tint and Blue Skies Preset
Features
Topaz ReStyle
User Manual
Seascape Collection
Features presets that have been created for and
tested on seascape images.
Nature Collection
Features presets that have been created for and
tested on nature and wildlife images.
18
Original Image
Original Image
Pink Skies Preset
Treehouse Preset
Features
Topaz ReStyle
User Manual
Street Collection
Features presets that have been created for and
tested on street images.
Graphic Collection
Features presets that have been created for and
tested on graphic design images.
19
Original Image
Original Image
Earthy Tangerine Preset
Iris Twilight Preset
Features
Topaz ReStyle
User Manual
Night Collection
Features presets that have been created for and
tested on night images.
Moody Collection
Features presets that have been created for and
tested on images with a specific mood or feel.
20
Original Image
Original Image
Before Sunset Preset
Smoke Gray Veil Preset
Features
Topaz ReStyle
User Manual
We’ve included over 1,000 different looks in ReStyle broken down into various collections
for easy searching. We have also provided additional search tools located within the presets
panel and QuickLook grid view that will help you find the style you are after in a fun and
efficient workflow.
1
1. Presets Panel Search Options - From the left: search the presets selected as a favorite; search the snapshots taken during that session; show the previously applied presets during that session (a history); and find
presets that are similar to the currently selected preset. The last grid icon allows you to view the presets in
the current list in the QuickLook grid view.
Note: To mark a preset as a favorite, click on the star to the left of the name. To capture a snapshot during the session, click on the camera icon on the lower right of the panel.
2. Keywords/Random/Similar Search Options - From the left: search presets by keyword (i.e.: blue, sunset,
green, etc...); show a random selection of presets; and find presets that are similar by clicking on the icon,
then clicking on the preset that you would like to see similar styles of.
21
Note: You can also search similar dominant colors in presets by hovering over the color bar below the
preview and clicking on the color you would like to see more of.
3. Undo/Collections/Snapshot/Favorite/History: From the left: step back in
your search workflow; search presets by collection; search the snapshots taken
during that session; search the presets selected as a favorite; and show the
previously applied presets during that session (a history).
2
3
Work Area
User Manual
Topaz ReStyle
Interface (Main View)
Although the Topaz ReStyle interface may look intimidating at first glance, don’t worry: it’s actually quite simple. You’ll soon be a pro after experimenting with it. In order to make sense of the function of each of the various controls, we have divided the interface into a few sections:
3
1
4
2
5
22
1. Presets/Styles Panel
2. Preview Window
3. Viewing Tools
4. Navigator Panel
5. Settings & Parameters
Pre-defined presets,
organized by photography
genres.
Displays the preview
of the original and adjusted image.
Tools that control zoom and
other viewing options.
Tabs to view the preview
navigator, loupe, mask and
histogram information.
Options and sliders to adjust the
various styles and masks.
Topaz ReStyle
User Manual
Work Area
Interface (Tool Panel View)
Use the small arrow on the upper left of the interface to expand and collapse the preset panel. You can click the arrow
or grab the inside edge of the panel and drag it in or out.
23
Topaz ReStyle
User Manual
Work Area
Interface (No Panel View)
Use the small arrow on the upper corners of the interface to expand and collapse the preset and tool panels. You can
click the arrows
or grab the inside edge of the panels and drag them in or out.
24
Topaz ReStyle
User Manual
Work Area
Interface (Preset Panel View)
Use the small arrow on the upper right of the interface to expand and collapse the preset panel. You can click the arrow
or grab the inside edge of the panel and drag it in or out.
25
Topaz ReStyle
User Manual
Preview Section
The Preview section is the main window that is centered in the ReStyle interface. The preview section
shows you the original image and the processed preview of the image. Click on the image in the preview
window (or use the
and
buttons) to
switch and compare the filtered and unfiltered images. Use the
buttons to switch between the
processed view and the split screen (before/after).
Work Area
To pan the preview image, click and hold the space
bar and hold the mouse button on the preview image
and drag it around. When you let go of the mouse
button, the new portion of the image will be
processed and the result will be displayed.
You can also use SPACE bar or your numbered shortcut
keys “1” and “2” to switch back and forth between your
filtered and unfiltered image in the preview window.
26
Work Area
Topaz ReStyle
User Manual
You can zoom in or out of the preview image by clicking the “+”, or “-” buttons above the main preview
image. You can also re-size the window as well by
dragging the bottom right corner in and out.
The “Fit” button will fit the entire image into the preview window.
The “1:1” button will zoom to 100% view.
If zoomed below 100% the preview image will be internally re-sized in order to speed up preview updating.
Before
The “Ctrl +” and “Ctrl –” keys zoom in and out of the
image, just like in Photoshop.
A complete list of the shortcut keys can be found in
the Shortcut Keys section later in this manual.
Photoshop and other host software support many Image
Modes, such as Grayscale, RGB, LAB, CMYK, etc. Images
can also be 8, 16, or 32 bits per channel. Topaz Clarity supports both 8 bits per channel and 16 bits per channel. Clarity supports RGB mode only. To work on black-and-white
images, first convert them to RGB mode.
After
27
Work Area
Topaz ReStyle
User Manual
Presets are pre-defined settings that you can recall and reapply to any image at any time. They are a great way to speed up and simplify your workflow, and offer creative ideas.
We’ve included some default presets for you and, although they won’t
work for every single photograph, they serve as excellent starting points.
1
1. Collections List
Lists all of the included effect collections that can be applied to
your images.
2
2. Presets List
Lists all of the available presets for the selected Effect.
28
3. Preset Options
The preset options allow you to star your favorite presets, save/delete presets (default presets
cannot be deleted), import/export presets for
sharing, and take up to 99 “snapshots” to compare while editing.
4
3
4. Preset Preview
Provides a preview of the available presets included in the Effects list selected. Scroll over the
preset list to see each preview.
5. Preset QuickLook View
View all of the presets in a collection at the same
time by clicking the grid icon on the top right of
the Presets list.
5
Topaz ReStyle
User Manual
Adding Presets
Sometimes it’s convenient to be able to define presets and save your settings for later use. To do this,
first adjust the Topaz ReStyle parameters until you’re
satisfied with the result. Then, click on
.
Next, enter a preset name and description, then
choose which collection to save it in (you can create
a new collection here as well). To apply it later, just
click it like any other preset.
Please Note: If the name you’ve entered is the same
as a preset you’ve already defined then you will be
asked if overwrite the previous one.
Deleting Presets
If you’d like to delete a preset, click
desired preset selected.
Work Area
Snapshots
A snapshot is a temporary preset provided as a workflow tool so you can temporarily save, then go back
to a previous place in your session. You can take up
to 99 snapshots during each session by clicking on the
camera icon at the bottom right of the presets panel.
Note: Snapshots are NOT SAVED and will be deleted
after exiting the session.
with your
Please Note: Default presents cannot be overwritten
or deleted. Once you delete a preset or overwrite it,
it cannot be retrieved.
Editing Presets
This button
lets you edit your personal preset
name, description, and keywords.
Favorites
To add a default or user-made preset to you favorites,
just click on the star next to the preset. To remove a
preset, click the star while in your favorites collection.
Saved presets are located in the Topaz ReStyle “Presets” folder:
C:\Program Files (x86)\Topaz Labs \ Topaz ReStyle \ Presets
unless you’ve opted to install Topaz ReStyle into a different directory. Mac users have this folder at: HD / Library / Application
SupportTopaz Labs / ReStyle/ Presets.
29
Topaz ReStyle
User Manual
Importing Presets
To import a preset file, click the import icon..
This will open up a “Browse” box to import a saved
preset from your computer into Topaz ReStyle. This is
useful if you have downloaded a preset file
that you’d like to use.
Work Area
Exporting Presets
To export the preset file to a certain location, click
“Export”.
Name your preset and save it to your desktop or
other specified location that you have reserved for
saved presets.
30
You can then share this preset file with others who
may then import it.
Sharing Presets
Feel free to share your saved presets by emailing
them to your friends and having them put it into their
Topaz ReStyle Presets folder.
Visit the Topaz Labs Blog which features the latest
Photography, software and design information including
tutorials, videos, and thoughts about both Topaz and
non-Topaz topics: www.topazlabs.com/blog
Topaz ReStyle
User Manual
We’ve included over 1,000 different looks in ReStyle broken down into various collections
for easy searching. We have also provided additional search tools located within the presets
panel and QuickLook grid view that will help you find the style you are after in a fun and
efficient workflow.
1
1. Presets Panel Search Options - From the left: search the presets selected as a favorite; search the
snapshots taken during that session; show the previously applied presets during that session (a history);
and find presets that are similar to the currently selected preset. The last grid icon allows you to view
the presets in the current list in the QuickLook grid view.
Note: To mark a preset as a favorite, click on the star to the left of the name. To capture a snapshot
during the session, click on the camera icon on the lower right of the panel.
2. Keywords/Random/Similar Search Options - From the left: search presets by keyword (i.e.: blue,
sunset, green, etc...); show a random selection of presets; and find presets that are similar by clicking
on the icon, then clicking on the preset that you would like to see similar styles of.
31
Note: You can also search similar dominant colors in presets by hovering over the color bar below the
preview and clicking on the color you would like to see more of.
3. Undo/Collections/Snapshot/Favorite/History: From the left: step back in
your search workflow; search presets by collection; search the snapshots taken
during that session; search the presets selected as a favorite; and show the
previously applied presets during that session (a history).
Note: To mark a preset as a favorite, click on
the star to the left of the color bar. To mark a
preview as a snapshot in the grid view, click on
the camera icon
2
3
Work Area
Topaz ReStyle
User Manual
Tools
1
Use the various tools in the tool panel during your
workflow to make image adjustments.
1. Navigator/Loupe/Mask/Histogram - Depending on
which tab is chosen, various information will display.
• The Navigator displays the region of the preview image you are currently focused on. You can
drag the preview navigator box around to pan
your image.
• The Loupe displays the area of your image chosen at a 100% view.
• The Mask tab displays the current mask applied to your image from the individual adjustment tabs.
• The Histogram displays the graphical representation of the current tonal distribution in your
image.
2
32
2. Sliders and Parameters/Masks - Controls the editing process using sliders to adjust the various effects
and masks for each adjustment tab. To decrease the
effect of each tab, use the opacity slider on each tab.
3. Undo/Redo and Reset Buttons - From the left: Undo
and redo your steps, reset all sliders/values back to
default settings.
3
Topaz ReStyle
User Manual
Menu
Work Area
Check for Updates
Checks for available Topaz ReStyle updates.
You can access the Topaz ReStyle menu by clicking on
the “Menu…” button at the bottom of the interface.
Click the Show Details button to get find out what’s
included in the update before you install.
Preferences
Select this to enable or disable the program tool tips,
turn off interactive sliders and much more.
33
Topaz ReStyle
User Manual
Enter Key
Select this to enter your trial or purchased license key.
Enter your name, then copy and paste your 30 digit key
into the key field. Press OK to activate.
Work Area
Gallery
Select this to open up your Internet browser and go
to the Topaz ReStyle image gallery to see other user
images enhanced with Topaz ReStyle.
MyTopaz
Brings you to the Topaz community where you can
connect and interact with other Topaz users. Here
you can also participate in discussions and contests,
and share your favorite Topaz images.
Tutorials
Brings you to the Topaz ReStyle tutorials page where
you can access a variety of helpful video and text tutorials. You can also submit tutorials that you created
here as well.
What’s This?
Select this (or click F1) then click on a feature in the
ReStyle interface to learn more about it.
About
Select this to see what version of ReStyle you
currently have.
Users Guide
Select it to pull up this user guide.
Tech Support
Brings you to the Topaz Labs support page where
you can request assistance from our support specialists, contact our customer service team, retrieve lost
license keys, or browse through our Knowledge Base.
Product Info
Select this to go to the Topaz ReStyle web page to
learn more about the Topaz ReStyle plug-in.
To connect with other Topaz users, participate in Topaz
contests and to see the latest tips, tricks and tutorials sign
up for the new Topaz Forum online at:
www.topazlabs.com/forum
34
Topaz ReStyle
User Manual
Settings & Parameters
ReStyle
The ReStyle module allows you to fine tune the style you
have applied to your image. It contains Color Style and
Texture adjustments.
Color Style and Texture
The Color Style section allows you to adjust the hue,
saturation and luminance of the 5 most dominant
colors in the selected style. The 5 colors are displayed
with the most dominant (primary) color on the top and
the fifth dominant color on the bottom of the sliders
in this section. To choose which adjustment group to
work in, click on the Hue, Saturation or Luminance buttons.
After - Tony Sweet
Hue
Changes the color. For example, you can change a red
wagon (and all other red objects) from magenta to
green.
Saturation
Changes the color vividness. For instance, you can
change a green field from gray to highly saturated
green.
Luminance
Changes the brightness of the color range.
Texture
The Texture section works on strengthening or
diffusing the original image texture.
35
Topaz ReStyle
User Manual
Basic
The Basic module gives you the tools to make standard
image adjustments including color, tone and detail
levels.
Color
The Color section gives you the controls to increase or
decrease the saturation, as well as change the overall
temperature and tint of the image.
Saturation
Increases or decreases the color saturation of the image. Slide it to the right to brighten and deepen colors.
Slide to the left to decrease depth and brightness in
colors...a value of -1.00 will produce a monochrome
image.
Tone Level
Adjust the overall image tonal scale using the tone controls. You can correct black or white levels that may
have changed after the Dynamics adjustments.
36
Temperature
Controls the color temperature. Taking the slider left
will create a colder (blue) image and taking it right will
create a warmer (yellow) image.
Black Level
Adjusts black clipping. Drag to the left to boost shadows closer to black. Drag to the right to reduce shadow
clipping and recover shadow detail.
Tint
Effects the overall color cast of your image. Sliding it to
the left will give a green tint, while going to the right
introduces a magenta tint.
Midtones
Adjusts image brightness, mainly affecting midtones.
White Level
Adjusts white clipping. Drag to the left to reduce clipping in highlights and recover highlight detail. Drag to
the right to boost highlights closer to white.
Topaz ReStyle
User Manual
Settings & Parameters
Detail
The Detail section makes it easy to enhance or remove
details in your photo. Structure works on the large
image features and sharpness works on small detail.
Structure
Effects the contrast and and seperation of the large
image features.
Before - Rick Sammon
37
Sharpness
Determines the degree of sharpening .
After - Rick Sammon
User Manual
Topaz ReStyle
Blending Modes
The blending mode controls how the image pixels are
affected by the adjustments/presets/styles/etc. Each
blending mode will have a different effect on your image
and it gives you many more stylisitc options. It’s helpful
to think in terms of the following colors when visualizing
a blending mode’s effect:
- The base color is the original color in the image.
- The blend color is the color being applied with the
effect/style/sliders.
- The result color is the color resulting from the blend.
Click this button
to choose a blending mode from
the drop down menu in the module tab.
Settings & Parameters
Screen
Looks at each channel’s color information and multiplies the inverse of the blend and base colors. The
result color is always a lighter color. Screening with
black leaves the color unchanged. Screening with white
produces white.
Overlay
Multiplies or screens the colors, depending on the base
color. Patterns or colors overlay the existing pixels
while preserving the highlights and shadows of the
base color. The base color is not replaced, but mixed
with the blend color to reflect the lightness or darkness
of the original color.
Soft Light
Darkens or lightens the colors, depending on the blend
color. If the blend color (light source) is lighter than
50% gray, the image is lightened as if it were dodged.
If the blend color is darker than 50% gray, the image is
darkened as if it were burned in.
Hard Light
Multiplies or screens the colors, depending on the
blend color. If the blend color (light source) is lighter
than 50% gray, the image is lightened, as if it were
screened. If the blend color is darker than 50% gray, the
image is darkened, as if it were multiplied.
Multiply
Looks at the color information in each channel and
multiplies the base color by the blend color. The result
color is always a darker color. Multiplying any color
with black produces black. Multiplying any color with
white leaves the color unchanged.
Luminosity
Creates a result color with the hue and saturation of
the base color and the luminance of the blend color.
This blend creates the inverse effect of Color blend.
Color
Creates a result color with the luminance of the base
color and the hue and saturation of the blend color.
38
Shortcut Keys
Topaz ReStyle
User Manual
Topaz ReStyle uses some shortcut keys to speed up your workflow. Many of these
keys are similar to those in Photoshop. The following keys work at all times.
MAC Shortcut PC Shortcut Action
Spacebar
Spacebar
View Original Image. Hold to pan.
CMD-Shift-R
CTRL-Shift-R Reset All
CMD-0 CTRL-0
Zoom to Fit
CMD-Shift-0
CTRL-Shift-0
Zoom to 100%
CMD-ALT-0
CTRL-ALT-0
Zoom to 100%
+ or CMD +
+ or CTRL + Zoom In
- or CMD - - or CTRL Zoom Out
CMD -Z Ctrl - Z
Undo
CMD - Shift - Z
Ctrl - Shift - Z Redo
XXToggles between Hide/Reveal Brush
/ key
/ key
Toggles between Brush A and B
S
S
Takes a Snapshot
CMD-1CTRL-1View Original Image
CMD-2CTRL-2View Adjusted Image
Down/Up Arrow Keys
Scrolls through presets when selected.
Return (enter) key
Applies selected preset
[ key Reduces selected slider value by 0.1
] key
Increases selected slider value by 0.1
Right/Left Arrow Keys
With slider selected: .01 Adjustment
Double-click slider name
Resets the slider to it’s default value
Mac and PC Shortcuts are the same unless indicated otherwise.
39
Topaz ReStyle
User Manual
“I need a Topaz ReStyle trial key.”
Visit http://www.topazlabs.com/trials/ for a trial key.
Please check your Spam folder because your Spam
filter sometimes filters out the automated e-mail.
If you need more time to evaluate, please contact us at:
www.topazlabs.com/support for an extended trial key.
“I can’t find Topaz ReStyle in the Photoshop Filters
menu.”
If Photoshop was open when you installed then you
will need to restart Photoshop and then you should be
able to access it. If it is still not listed in your Filter menu
then do the following:
For Windows:
Please go to your preferences menu in Photoshop and
select Plug-ins. Check / enable the Additional Plug-ins
Folder option then click Choose. After that, please
navigate to: C: \ Program Files and select the Topaz
Labs folder. Then click Choose (or it may say Save /
OK) to save this back to Photoshop. Back in Photoshop
click OK to save your changes, then restart Photoshop.
Once Photoshop opens, go to your Filter menu and you
should be able to access Topaz.
For Mac:
Please go to your preferences menu in Photoshop and
select Plug-ins. Check / enable the Additional Plug-ins
Folder option then click Choose. After that, please
navigate to: Macintosh HD -> Library -> Application Support and select the Topaz Labs folder. Then click save /
Frequently Asked Questions
OK to save this back to Photoshop. Back in Photoshop
click OK to save your changes, then restart Photoshop.
Once Photoshop opens, go to your Filter menu and you
should be able to access Topaz.
“Do you have any ReStyle tutorials?”
Yes, you can visit: http://www.topazlabs.com/tutorials/
clarity for many tutorials or sign up for a free webinar
at: http://www.topazlabs.com/webinars
“I don’t have Photoshop, will ReStyle work with my
Elements, Aperture, Lightroom, iPhoto, Paint Shop
Pro, Photo Impact or Irfanview?”
Yes, you can use Topaz Clarity with any of the above
host programs. However, to use Clarity in Aperture,
Lightroom or iPhoto, you will need to download the
free Topaz Fusion Express plug-in. For more information please visit: www.topazlabs.com/fusion
“I already have photoFXlab/Fusion Express installed
for use with my other Topaz programs but ReStyle
does not show up in the menus?”
ReStyle requires the latest version of photoFXlab and
Fusion Express. You will need to download from: www.
topazlabs.com/downloads and then install. After that
you will be able to access and use ReStyle.
40
Topaz ReStyle
User Manual
“What are the limitations of the trial version of your
software?”
The only limit on the trial versions of the Topaz plug-ins
is time. The free trial versions are designed to enable
you to experience the full functionality of our plug-ins
for a 30-day trial period. After the trial period is up, you
will only be able to use the Topaz software by purchasing it. You will then receive a license key to activate the
plug-in, and the trial version will automatically become
the full version with no time limitations.
“If I use the 30-day trial version will I need to uninstall
the trial version before I upgrade to a full version?”
No, the Topaz trial software is designed to be unlocked
to become the full version simply by entering a license
key. The full license key will be e-mailed to you immediately after you purchase the software.
“Where do I enter my key?”
To enter your key please open an image in Photoshop.
Go to Filter -> Topaz Labs -> ReStyle. Once the program
opens go to Menu -> Enter Key. Then copy & paste or
type in your license key and then select OK.
“I had Topaz ReStyle as a trial, then I purchased. How
do I enter my new license key?”
You can enter your new license key by opening up an
image in Photoshop and go to Filter -> Topaz Labs ->
ReStyle -> Menu -> Enter Key. Please remove the trial
key and enter your new purchased license key, then
select OK and you are all set.
Frequently Asked Questions
“My ReStyle key doesn’t work!”
There are a couple of reasons why ReStyle might think
your key is invalid.
First, make sure that your key is in the proper format.
It’ll be in the format “xxxxxx-xxxxxx-xxxxxx-xxxxxxxxxxxx” and will be all numbers in 30 digits in five
groups of six (no letters).
Second, make sure that as you’re entering the key
there is nothing in the space beforehand. This means
clicking, pressing Ctrl-A, and hitting delete to make sure
that absolutely nothing is in that field before you paste
in the key.
If it doesn’t work when you copy and paste, try typing
it out, and vice versa.
My Topaz filters are grayed out in the filter menu.
Please make sure that you are using a 8-bit or 16-bit
image that is in RGB color mode. Also, if your project
includes adjustment layers please make sure that you
are not on an adjustment layer. You will need to select
the image layer. This will allow you to access your Topaz programs.
I have a question not listed here.
Please visit our knowledge base online at:
http://www.topazlabs.com/support
If you are not able to find the answer there then contact our support specialists online at: www.topazlabs.
com/support or e-mail customer support at: help@
topazlabs.com
41
Topaz ReStyle
User Manual
Connect with Topaz
Check out our new Forum and our blog for
tutorials, tips and updates from Topaz Labs!
42
Follow us on Twitter for notifications of
recent news and easily get in touch with us
whenever you feel like it!
Find us on our Facebook page and network
with other Topaz users!
Participate in the entirely user-led Topaz
Flickr group for a helpful and highly active
community for Topaz Photoshop plug-ins!
Subscribe to our YouTube channel to keep
up with any newly released product video
tutorials!
Topaz ReStyle
User Manual
Contact Information
Topaz Labs LLC
4100 Spring Valley Road
Suite 103
Dallas, TX 75244
Technical Support
Visit: http://topazlabs.com/support/
E-mail: [email protected]
For more information
[email protected]
Topaz Labs LLC, a privately owned company in Dallas, Texas, focuses on developing advanced video and image enhancement technology. With today’s widespread use of digital still cameras, digital video cameras, and HDTV, the need for highquality digital images and videos has greatly increased. Topaz Labs’ mission is to bring practical state-of-the-art image and
video enhancement technology to both professionals and consumers.
Copyright © 2010 Topaz Labs, LLC. All rights reserved. http://www.topazlabs.com
43
Topaz ReStyle
User Manual
Be sure to check out all of our other Topaz products.
Topaz Photoshop Plug-ins for digital photography.
Topaz Adjust creates
vibrant images that pop.
Includes tools for creative
exposure, detail, color and
pseudo HDR.
Topaz Lens Effects allows
you to create bokeh, add
vignettes and simulate a
variety of filter, lens and
specialty camera effects.
Topaz B&W Effects is the
most versatile black and
white image converter.
Designed specifically for
creating and enhancing
high-impact B&W images.
Topaz ReMask is the
quickest, easiest and best
masking tool for complex
masking and removing
unwanted image backgrounds.
Topaz InFocus offers tools
for advanced sharpening
and minor blur reduction
to refine and improve
overall image quality.
Topaz Simplify is a digital
art tool that makes it easy
to transform digital images
into works of art in just a
few clicks.
Topaz DeNoise offers highquality noise reduction
tools that eliminate digital
image noise and recover
lost image detail.
Topaz DeJPEG eliminates
jpeg artifacts and restores
optimal JPEG image
integrity, helping create
high-quality jpeg images.
Go to http://www.topazlabs.com/downloads to get your 30-day free trial!
Topaz Clarity allows you
to create compelling and
powerful photos by intelligently enhancing contrast
and clarity with absolutely
no artifacts or halos.
Topaz Detail features multilevel tools for control over
detail enhancement and
sharpening without edge
artifacts or halos.
Topaz Clean features
unique smoothing, edge
and texture control for
enhancing portraits or stylizing images.
Bring the power of Topaz
to your Aperture, iPhoto
and Lightroom workflow
with the new Fusion
Express plug-in.
44