1
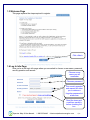
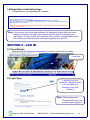
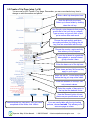
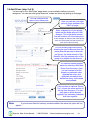
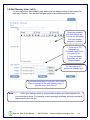
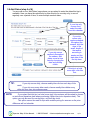
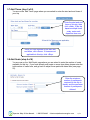
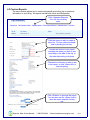
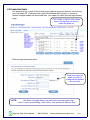
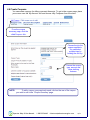
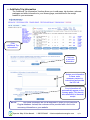
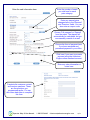
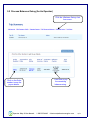
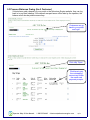
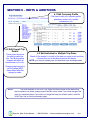
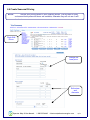
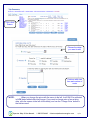
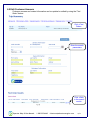
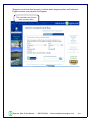
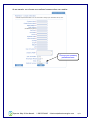
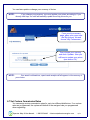
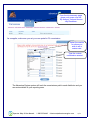
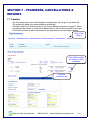
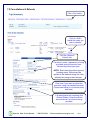
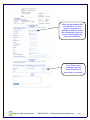
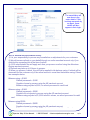
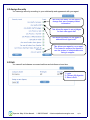
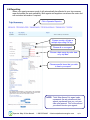
OPERATOR USER MANUAL 2008 TABLE OF CONTENTS
1- Registration
1.1 Open Website…………………………………………………………………………………………….………..
1.2 Registration Type………………………………………………………………………………………………….
1.3 Welcome Page…………………………………………………………………………………………………….
1.4 Log In Page………………………………………………………………………………………………………..
1.5 Company Information Page………………………………………………………………………………………
1.6 Registration Confirmation Page………………………………………………….………………………………
Page 2
Page 2
Page 3
Page 3
Page 4
Page 5
2- Logging In
2.1 Open Website……………………………………………………………………………………………………..
2.2 Log In Page……………………………………………………………………………………………………….
Page 5
Page 5
3- Add a Trip
3.1 Getting Started……….……………………………………………………………………………………………
3.2 Trip Summary Page…..…………………………………………………………………………………………..
3.3 Create a Trip (step 1 of 6)……includes loading photos………………………………………………………
3.4 Add Prices (step 2 of 6).…………..……………………………………………………………………………..
3.5 Add Itinerary (step 3 of 6)..………………………………………………………………………………………
3.6 Add Dates (step 4 of 6)..…………………………………………………………………………………………
3.7 Add Times (step 5 of 6)…..……………………………………………………….……………………………..
3.8 Add Seats (step 6 of 6)..…………………………………………………………………………………………
3.9 Confirm Trip Details…….………………………………………………………………………………………..
3.10 Back to the Trip Summary Page………………………………………………………………………………
3.11 Expanded View of Trip Summary Page………………………………………………………………………
Page 6
Page 6
Page 7
Page 8
Page 9
Page 10
Page 11
Page 11
Page 12
Page 13
Page 13
4- More Options and Features
4.1 Add a Client Form…..………………………………………………..…………..…………………………………
4.2 Customize requested contact information………………………..………………………………………………
4.3 Custom Reports……………………………………………………..……………………………………………...
4.4 Program minimum deposit required……………………………..……………………………………………….
4.5 Create Hot Seats…………………………………………………..……………………………………………….
4.6 Create Coupons……………………………………………………...……………………………………………..
4.7 Upload Your Terms and Conditions…………………… ………………………………………………………..
4.8 Find Order & Search by Customer………...……………………………………………………………………..
4.9 Add Extra Trip Information……………….………………………………………………………………………..
5- Process a Sale
5.1 Processing An Offline sale…………………………………………………….…………………………………..
5.2 Process Balances Owing (As An Operator)…..…………………………………………………………………
5.3 Process Balances Owing (As A Customer)…………………………………………..………………………….
6- Edits & Additions
6.1 Edit Company Profile …………………...…………….................................…………………......…………….
6.2 Edit Overall Trip Details ………………………..………………………………………………………………….
6.3 Edit Individual or Multiple Trip Dates…………...………….……………………………………………………..
6.4 Create Seasonal Pricing……………………………………………………..…………………………………….
6.5 Edit Customer Answers…………………………………………………………………………..………………..
6.6 Currency………….……………………………………………….....................................................................
6.7 Program Custom Commission Rates.……………………………………………………………………………
7- Transfers, Cancellations & Refunds
7.1 Transfers…………………………………………..………………………………………………..
7.2 Cancellations & Refunds…………………………………………………………………………………………..
8 - Net Rate Module for Agent Processing..............................................................
Page 14
Page 15
Page 16
Page 18
Page 19
Page 20
Page 21
Page 22
Page 23
Page 24
Page 26
Page 28
Page 29
Page 29
Page 29
Page 30
Page 32
Page 34
Page 37
Page 38
Page 40
8.1 Assign Privileges………………………………………………………………………..………………………….
8.2 Assign Security…………………………………………………………………………...…………………………
8.3 Edit……………………………………………………………………………………………………………………
8.4 Reporting…………………………………………………………………………………………………………….
Page 43
Page 44
Page 45
Page 45
Page 46
Links to DEMO site and video ‘how to’ instruction…http://www.adventureengine.com/movies.php….....
Page 47
Operator Help & User Manual
1-800-993-6648
[email protected]
1/47
SECTION 1- REGISTRATION
1.1 Open Website
Open the site http://www.adventureengine.com/trip_search.php and register from the top
toolbar <Join Now>.
Register here
1.2 Registration Type
Choose to register as a supplier / operator
Register here as a
Supplier or Operator
Operator Help & User Manual
1-800-993-6648
[email protected]
2/47
1.3 Welcome Page
This page explains the steps required to register.
Click <Next>
1.4 Log In Info Page
Now you’re at the login info page where you are asked to choose a user name, password,
security question and answer.
Choose a user
name you will
remember
Choose a password
This security question
and answer will allow
you to retrieve a
forgotten password at
a later time
Read the terms and
conditions carefully
before checking the
box
Operator Help & User Manual
1-800-993-6648
[email protected]
3/47
1.5 Company Information Page
Now you’re at the company information page where you are asked to enter your company
contact information, company profile and set commission rates.
This is your company contact
information that the consumer
will see
Enter your website in
http://www. format
GIS coordinates will help
consumers find your location
with map features in future
versions (not required)
Enter your company profile
including awards,
accreditations, etc. This is
your time to shine!
What % commission are you
willing to pay resellers to sell
your product?
Select your preferred
currency
Operator Help & User Manual
1-800-993-6648
[email protected]
4/47
1.6 Registration Confirmation Page
Congratulations, your registration is complete!
Note: Your account has not yet been activated. An Adventure Engine client care team
member will contact you within 48 hours with the final steps of completing your
registration. This may include your insurance policy number, banking details (so we
can transfer you funds) and more information regarding your product.
SECTION 2 - LOG IN
2.1 Open Website
Open the site http://www.adventureengine.com and log in from the top toolbar.
Login here
2.2 Login Page
Choose to log in as
Operators / Suppliers, enter
your username and
password, then click
<Submit>.
Note: The Username and
Password fields are case
sensitive when logging in.
Operator Help & User Manual
1-800-993-6648
[email protected]
5/47
SECTION 3 - ADD A TRIP
Note: You will automatically be directed past the ‘trip summary’ page to
the ‘create a trip’ page the first time you login.
3.1 Getting Started
You will need to prepare the following information in order to create your trip.
1.
2.
3.
4.
5.
6.
7.
Trip name
Description
Start and end times
Duration of trips and all dates (i.e. every Wednesday from May 25 – September 14)
Detailed trip itinerary
Pricing and pricing categories (i.e. student prices, senior prices, etc.)
Number of seats available (if some seats have already been booked, please let us know)
If this information is available on your website or in your brochures, then simply direct us
to where the information can be found. Remember, you can make additions and edits to
your trips at any time.
3.2
Trip Summary Page
When you login you will automatically be directed to the ‘trip summary’ page, with the
exception of the first time. Add a trip from the top menu bar.
Add a new trip here
Note: Please complete your trip entry from start to finish to avoid losing information.
In order to ensure complete and quality entries for our end users, the system will not
save incomplete trips.
Operator Help & User Manual
1-800-993-6648
[email protected]
6/47
3.3 Create a Trip Page (step 1 of 6)
You are now on the ‘Create A Trip’ page. Remember, you can come back at any time to
change or add information and photos.
Enter a brief trip description here.
Note the difficultly level here.
Select up to three levels by holding
down the ctrl key.
Like Google, enter keywords that people
would use to find your trip in a search.
Type as many as you can think of and
put a comma after each word.
Choose the main activity and three
secondary activities (by holding the ctrl
key) that are associated with the trip.
Choose the country, region and city
from where your trip departs
If your trip is aimed at a particular
demographic or special interest
group, choose it here.
Enter the base cost of the trip here.
Enter taxes and any flat fee as they
apply in your region.
Enter the ‘cut off’, or how many days
before the trip you stop online sales.
Enter the duration of one trip. Use
only numeric values.
Enter the number of days prior to
the trip that the balance is due.
Use the ‘Browse’ button to load
photos as per specifications in red.
Recommended for new users, once you have
completed all the fields, click <Next>
Operator Help & User Manual
If you are comfortable with the trip loading
process, choose fast add. This allows you to
save one page at a time.
1-800-993-6648
[email protected]
7/47
3.4 Add Prices (step 2 of 6)
You are now on the ‘Add Prices’ page where you are asked to define your price
categories. You can also add group discounts, extras and return trip pricing on this page.
You can customize the
name of your base price.
Here you can see your base
price as it was entered in the
‘Edit Trip’ page.
Enter a description of your pricing
levels and the dollar amount of the
discount. This is the dollar amount
that will be taken off of the base price.
In this example, at checkout, the adult rate will
show as $150 and the kids rate will show as
$125 ($25 off the adult rate).
You can create group discounts by
selecting the type of discount from the
menu (discount per seat or discount
per group), the dollar amount of the
discount, and the minimum size of the
group to be eligible for the discount.
You can also create optional
extras by selecting <Add New
Extra> from the menu. Here
you can choose to list the
extras in a particular order,
describe the extra, give
additional information and
define how many of this extra
are available.
If this trip has an optional ‘Return
Trip’, choose the return portion of
the trip from the menu. You can
then enter a dollar discount
applied if the customer purchases
both trips together.
Note:
If your account has the inventory module enabled, the return trip option will not
appear.
Operator Help & User Manual
1-800-993-6648
[email protected]
8/47
3.5 Add Itinerary (step 3 of 6)
You are now on the ‘Add Itinerary’ page where you can add an outline of the itinerary for
each day of this trip. You can also add gear required and additional photos here.
Outline the detailed
activities of each day.
You can cut and paste
from your current
brochures / website.
1. Enter up to 250
characters or…
2. Include a web link to
your gear list or…
3. Copy and paste
larger lists into the
itinerary space.
You can load up to 3
photos per itinerary day.
If you have more days on your trip, click <Next
Day> to proceed to the next itinerary page. If
you are done, click <Save>.
Note:
Utilize your itinerary space to communicate anything you deem important for
your customer to know. For example: custom packages available; minimum purchase
requirements; price list; etc.
Operator Help & User Manual
1-800-993-6648
[email protected]
9/47
3.6 Add Dates (step 4 of 6)
You are now on the ‘Add Dates’ page where you are asked to enter the dates this trip is
available. Here you have the opportunity to enter this trip for one day only; to recur it
regularly over a period of time; or enter multiple random dates.
If your trip only
occurs once,
select the date
from this calendar.
If your trip occurs
randomly throughout
the season, add
dates one at a time
here by choosing the
date and clicking
<Add>.
If your trip
occurs on a
regular schedule
throughout the
season, click the
days of the
week, length of
the season
according to
weeks and the
start date of the
first trip here.
If this trip is a hotel
room night, click this
box.
TIP:
If your trip occurs daily, choose weekly then click on each day of the
week.
If your trip runs every other week, choose weekly then delete every
other trip from your trip summary page.
NOTE:
If you select that this trip is a hotel room night, the customer will be asked to choose
an arrival and departure date when purchasing (rather than just a departure date). This
option can only be used for one-day trips, not multi-day tours.
This option cannot be used for trips with variable pricing for seasons as the price
difference will not calculate.
Operator Help & User Manual
1-800-993-6648
[email protected]
10/47
3.7 Add Times (step 5 of 6)
You are on the ‘Add Times’ page where you are asked to enter the start and end times of
your trip.
Enter the start and end
times of this trip, then
click <Add>. If this trip
departs multiple times
a day, enter each
departure time now.
Once you have entered all the start and
end times, click <Save>. If times are not
applicable to this trip, click <Skip>.
3.8 Add Seats (step 6 of 6)
You are now on the ‘Add Seats’ page where you are asked to enter the number of seats
available for this trip. If you have already sold seats on some trips dates, please enter the
total number of seats here, and go back to adjust those particular dates later (see page
22).
Enter the minimum
number of participants
required for this trip to
depart, and the maximum
number of participants
allowed.
Operator Help & User Manual
1-800-993-6648
[email protected]
11/47
3.9 Confirm Trip Details
Now you are on the ‘Confirm Trip Details’ page where you can read through the trip
information you have entered to ensure it is correct.
Check all the info here
and click <Finish>. If
you have found errors,
click finish anyway
and go back through
your trip summary
page to edit.
Operator Help & User Manual
1-800-993-6648
[email protected]
12/47
3.10 Back to the Trip Summary Page
Now you are back at the ‘Trip Summary Page’ where you can view all the trips you have
entered and make edits.
Click here to see all
your trip dates.
3.11 Expanded View – Trip Dates and Bookings ‘At A Glance’
Operator Help & User Manual
1-800-993-6648
[email protected]
13/47
SECTION 4 – MORE OPTIONS & FEATURES
FROM YOUR TRIP SUMMARY PAGE
4.1 Add a Client Form
Client forms allow you to customize questions you want your customers to answer when
purchasing a particular trip. Your customer will see these questions at checkout.
Click here
to add a
client form
Type the question here.
Click here to make answering this
question mandatory at check-out,
to sort the order your questions
appear and choose if you would
like the customer to type an
answer (text input) or pick from a
list of options (single select).
If this is a single select question,
type the answer list here,
separated by the <Enter> key.
Select <Add New> from this
menu to add a new question.
NOTE:
To view answers, choose <Client Questions> as a report option when
creating operator reports (see page 16).
When sorting their display order, questions will appear in descending
order (i.e. 99-1)
Operator Help & User Manual
1-800-993-6648
[email protected]
14/47
4.2 Add Client Contact Info
Programming pertinent contact info allows you to gather information about all your
clients; not just the one that paid.
Click <Add Contact Questions> to program
key contact info you want to get from your
customers.
Click any or all of the
boxes and your customer
will be prompted at
checkout to answer on
behalf of all participants
they are booking for.
Operator Help & User Manual
1-800-993-6648
[email protected]
15/47
4.3 Custom Reports
The report feature allows you to create customized accounting, trip or customer
information to your liking. All reports include both online and offline sales.
Click <Operator Reports>
from the trip summary
area.
Click the trips you wish to create a
report for. You can choose multiple
trips by holding the ctrl key.
Choose the criteria of your report,
including the dates you wish to see
according to the date of the trip, or
the date the booking took place.
Choose the columns you wish to see
in the report, or click <Select All> to
see everything.
Click <Submit> to process the report.
You can also use the <Save> field to
save the report template for later
use.
Operator Help & User Manual
1-800-993-6648
[email protected]
16/47
The report will appear in a new window. You can then click the <Download (csv)> button
to have the report appear in excel format.
Operator Help & User Manual
1-800-993-6648
[email protected]
17/47
4.4 Program Minimum Deposit Required
You can design the system to accept a set minimum deposit, rather than full payment
when customers book your trip online. The database will inform them at checkout to
‘check supplier terms and conditions for balance payment’. It is your responsibility to
remind your clients at this time to pay their balances.
Click <Edit
Min Deposit>
Click here to select if you
accept a % deposit amount,
or flat dollar amount.
Enter the deposit % or $ amount you
require. Leave the field as 100%, or
clear if you do not accept deposits.
NOTE:
Do not type <0> as that will allow someone to book your trip without
paying any deposit.
Operator Help & User Manual
1-800-993-6648
[email protected]
18/47
4.5 Create Hot Seats
Hot seats allow you to sell off last minute empty seats at a percent discount, so every trip
your trip leaves full. Customers can search the database by hot seats, or choose to
receive a regular update on discounted trips. You create hot seats from the trip summary
page.
Click <Add> in the hot seat column
beside the trip date you wish to
create hot seats for.
Enter hot seat information here.
Enter how many hot
seats you wish to
create and the percent
discount here.
NOTE:
Hot Seats only apply when your customer is purchasing their trip
online. If you are processing a sale ‘offline’, use the manual discount field.
Operator Help & User Manual
1-800-993-6648
[email protected]
19/47
4.6 Create Coupons
You can create coupons for dollar or percent discounts. To get to the coupon page, place
your cursor over the ‘My Account’ link and choose <My Coupons> from the menu.
From the coupon
summary page, click the
<Add Coupon> link.
Choose the trip the
coupon applies to.
You can select
multiple trips by
holding the ctrl key.
Choose the coupon
type, amount and
other defining
features.
NOTE:
To edit a coupon you previously made, click on the row of the coupon
you wish to edit in the ‘Coupon Summary’ page.
Operator Help & User Manual
1-800-993-6648
[email protected]
20/47
4.7 Upload Your Terms and Conditions
Click here to load your terms and
conditions covering deposit and
cancellation policies, etc.
Type or copy your terms and
conditions here.
Click <Browse> to upload an
existing waiver file from your
computer. The waiver is a
document that must be
‘accepted’ by shoppers to
proceed through checkout. It
can also be downloaded and
printed by the shopper.
Operator Help & User Manual
1-800-993-6648
[email protected]
21/47
4.8
Find Order & Search by Customer
This feature can be used to look up a customer and efficiently handle queries. It can also
be used to view, edit, transfer or cancel / refund order.
Click <Find Order>.
You can search by
Order Number,
Payee Name,
Participant Name or
any of the fields
listed here.
NOTE:
Do note enter the same name in both the ‘Payee’ and ‘Participant’
fields at the same time, as this will result in no orders being found.
If you are searching for an order with a return leg to the trip, 2 results
will appear, 1 line per trip leg.
Operator Help & User Manual
1-800-993-6648
[email protected]
22/47
4.8 Add Extra Trip Information
The ‘Additional Trip Information’ function allows you to add maps, trip dossiers, welcome
packages and other information to your itinerary page, and attached to the receipt
emailed to your customers.
Click
<Additional Trip
Information>
Click here
to add extra
information.
Assign your information
a name, enter
necessary content or
instructions and provide
the URL link.
Your information will
automatically appear on the
itinerary page. Click here to
also attached it to the email
receipt.
NOTE:
Your extra information will not be attached or stored on the Adventure
Engine database. Instead, the customer will be provided with a link to the
necessary information on your website.
Operator Help & User Manual
1-800-993-6648
[email protected]
23/47
SECTION 5 – PROCESSING SALES
5.1 Processing An Offline Sale
This section shows you how to process a sale made from your office in your trip summary
page.
Click <Process a
Sale> beside the
date you want to add
a sale to.
Click <Add> to
process (record)
a sale.
Operator Help & User Manual
1-800-993-6648
[email protected]
24/47
Enter the sale information here.
Enter the number of seats
you sold here for each
price category.
Enter any manual price
changes here in the ‘Discount’
and ‘Premium’ fields. You can
also enter a coupon code.
Choose ‘Full payment’ or ‘Deposit’
from the menu. The deposit will
automatically be calculated, but you
can manually override it as well.
Choose the form of payment here
if you have accepted and
processed payment in your office.
Click here if you want to process
payment using the Adventure
Engine online merchant account.
Enter any extra information or
notes here.
Complete the customer contact
and custom questions. These
are the questions you
programmed earlier. You can
also come back later to complete
this form.
Operator Help & User Manual
1-800-993-6648
[email protected]
25/47
5.2 Process Balances Owing (As An Operator)
Click the <Balance Owing> link
from menu.
Click here to pay
the remaining
balance owing.
Click on the Order
number to see the
payee details.
Operator Help & User Manual
1-800-993-6648
[email protected]
26/47
Select the payment type,
or click this box if you
wish to use the Adventure
Engine online merchant
account.
Add any additional
notes, then click
<Continue>.
A confirmation
notice will appear.
In your report you will see the balance paid under ‘Payment’. The order number
remains the same, but the balance payment is listed on a separate line.
NOTE:
You can also use the ‘Find Order’ function found in section 4.8 of this
manual to find and process a balance owing.
Operator Help & User Manual
1-800-993-6648
[email protected]
27/47
5.3 Process Balances Owing (As A Customer)
If clients have paid a deposit on your portal or the Adventure Engine website, they can log
back in to pay their balance. If the deposit was paid as an offline sale by the operator, the
balance must also be paid the same way.
Customers can go
back to your portal
and login.
Click <My Trips>.
Click here to pay
the outstanding
amount and follow
the credit card
payment prompts.
Operator Help & User Manual
1-800-993-6648
[email protected]
28/47
SECTION 6 – EDITS & ADDITIONS
6.1 Edit Company Profile
Click here to edit your company profile,
password, contact info, reseller
commissions, etc.
6.2 Edit Overall Trip
Details
These menu items are
for editing overall trip
info. Text & descriptive
changes will affect all
recurrences of your trip.
6.3 Edit Individual or Multiple Trip Dates
Check off the box(es) to the left of the date you want to edit and then
choose from one of the blue buttons at the bottom
NOTE: you cannot update price for dates that have bookings made
Changing the base price
will only affect NEW
dates added after the
change is made.
NOTE:
The price entered on the ‘Edit Trip’ page will always show as the base price
that customers see when viewing search results online, even if you have changed the
price for individual dates. If you wish to change the base price listed online, click the
<Edit Trip> link on the trip summary page.
Operator Help & User Manual
1-800-993-6648
[email protected]
29/47
6.4 Create Seasonal Pricing
NOTE:
Include your pricing details in your itinerary section. You will want to notify
customers these prices and terms are available, otherwise they will not see it until
checkout.
Click <Edit
Price>
Change the
base price
Edit extras
and
discounts
Operator Help & User Manual
1-800-993-6648
[email protected]
30/47
Click <Add
Dates>
Choose the dates
you want to add
Continue with start
time and number of
seats
NOTE:
When you change the price with the menu to the left, it will ONLY be reflected
in NEW dates added after that change. If you want to change price of an existing
date, click the square to the left of the date(s) and use the ‘Change Price’ button in
the bottom menu.
Operator Help & User Manual
1-800-993-6648
[email protected]
31/47
6.5 Edit Customer Answers
Customer answers and contact information can be updated or edited by using the ‘Find
Order’ feature.
Click <Find
Order>
Enter the search
parameters
Click <Edit>
in the search
results.
Operator Help & User Manual
1-800-993-6648
[email protected]
32/47
Complete or edit
any fields.
6.6 Currency
Operator Help & User Manual
1-800-993-6648
[email protected]
33/47
Shoppers can choose their currency of choice when shopping online, and Adventure
Engine converts your trip price for shoppers.
The customer can choose
their currency here.
Operator Help & User Manual
1-800-993-6648
[email protected]
34/47
As an operator, you choose your preferred currency when you register.
Choose your currency
preference here.
Operator Help & User Manual
1-800-993-6648
[email protected]
35/47
You can later update or change your currency of choice.
NOTE:
If you change your currency, you must update your prices accordingly. If you
already sold trips, our staff will manually update those trip prices for you.
From your trip summary
page, place your cursor over
the ‘My Account’ link and
choose <My Preferences>.
Then choose your currency
and click <Update>. Now you
will have to update your prices
(see section 5.4).
NOTE:
Your email confirmations, reports and receipts will all appear in the currency of
your choice.
6.7 Set Custom Commission Rates
You can assign custom commission rates for up to ten different distributors. If no custom
rates are programmed, the system will default to the assigned rate you programmed
when registering.
Operator Help & User Manual
1-800-993-6648
[email protected]
36/47
From the trip summary page,
place your cursor over the
‘My Account’ link and choose
<My Resellers>.
As a supplier, make sure you set your own portal to 0% commission.
Select the reseller
for whom you
wish to set a
custom rate.
Type the custom
commission amount.
The Adventure Engine system will track the commissions paid to each distributor and you
can review details in your reporting area.
Operator Help & User Manual
1-800-993-6648
[email protected]
37/47
SECTION 7 - TRANSFERS, CANCELLATIONS &
REFUNDS
7.1 Transfers
Use this feature when your client wishes to change dates, but still go on the same trip.
The system will adjust your seat availability accordingly.
Example: client has 2 seats booked for July 25 and wishes to transfer to August 3. When
you process the transfer, 2 seats will be added back to July 25 and removed from August
3. All client information will be transferred to the new date for trip reporting purposes.
Click <Find
Order>
Click <Edit> beside
the order you wish
to transfer.
Click the
<Transfer> tab.
Operator Help & User Manual
1-800-993-6648
[email protected]
38/47
Click the ‘Transfer to’
window and all dates
available for transfer
will appear.
NOTE: Only trips with
seats available to
match the seats you
are transferring will
appear.
Add any notes
you wish to
save.
The order
details will now
show a history
of the transfer
Operator Help & User Manual
1-800-993-6648
[email protected]
39/47
7.2 Cancellations & Refunds
Click <Find order>.
Click on <Edit>
beside the order you
wish to transfer.
Click the <Refund /
Cancel> tab.
If a refund / credit / adjustment is being
provided, enter the amount here
followed by refund pymt type.
NOTE: Enter the entire refund amount
including taxes. Refunds will be
applied to the balance owing first, then
reflected as owing to the customer.
Click here if you want to refund the
customer using our merchant account.
(Please see below for our refund policy
and fees).
If all participants are canceling click
<Cancel Order>. Enter the refund
amount above if a refund is being
provided.
Operator Help & User Manual
1-800-993-6648
[email protected]
40/47
Select the participants that
are canceling. You can
remove any number of
participants and the system
will automatically return the
inventory and update the
new seat availability.
If any ‘Extras’ were
purchased, you can
cancel them here to
return back to inventory.
Operator Help & User Manual
1-800-993-6648
[email protected]
41/47
The cancellation will
now show in the
order details. If this
booking was made by
an agent, these
details will also
appear in their login.
NOTE: Refund and Cancellation Policy
1) It is your responsibility to process any cancellations or adjustments for your customers
2) We will process refunds on your behalf through our online merchant account only if you
click the box requesting this at the time of refund
3) A $10 administration fee will apply each time you process a refund using the Adventure
Engine merchant account.
4) Refunds may take up to 24 hours to process
5) When you process a refund, this will first be applied to the balance owing. A refund will be
processed for the customer only if the refund amount is more than the balance owing. Please
see examples below
Balance owing = $1500
Refund processed = $1000
Supplier choose to process using the AE merchant account
Balance owing adjusts to $500, no refund processed to credit card
Balance owing = $1500
Refund processed = $2000
Supplier did not choose to process using the AE merchant account
Balance owing adjusts to $0, $500 refund is shown, no refund processed to credit
card
Balance owing $1500
Refund processed = $2000
Supplier choose to process using the AE merchant account
Balance owing adjusts to $0, $500 refund is processed to the credit card
Operator Help & User Manual
1-800-993-6648
[email protected]
42/47
SECTION 8 – ADVENTURE ENGINE AGENT MODULE
The ‘Net Rate Module’ is an add-on feature to the basic Adventure Engine subscription
that carry’s a one time start-up fee. Please contact Adventure Engine staff to activate this
module on your account.
This is where you can select your agents and assign them trips, various privileges, and
set your net rates.
NOTE: When you create an agent with net rates assigned, they will not have the ability to
manually assign a discount or premium when processing a sale. Also, the ‘add to order’
feature will not be activated for the agent. Rather, they will need to process a new sale to add
an additional item to the sale.
Login to your supplier account,
where you will automatically be
directed to your trip summary page.
Place your cursor over
the ‘My Account’ link and
choose <My Agents>
from the menu.
All distributors with agent status will appear in your drop down list
Select the Agent you
wish to add and click
<Add>.
Operator Help & User Manual
1-800-993-6648
[email protected]
43/47
8.1 Assign privileges
The agent privileges page will show a listing of all of your trips currently in the AE
database.
Click here if you want
For each trip,
Enter the
the agent to see your
Choose the Trips you
choose if you want
amount to be
retail price on their
want this agent to
the net rate to be a
discounted
offline sales screen. If
carry by checking the
% or flat fee
here.
you do not click it,
box beside each trip
deducted from
then the agent will see
name.
your retail rate.
their net rate price.
Check these boxes to allow your agent to override your
net rate amount. This is only recommended for staff or
well-established agent relations capable of collecting
more or less money for your trips.
NOTE: Net rate is calculated as a dollar or a percentage amount off your rack rate (the retail
price you programmed when you loaded the trip to the system).
Example: Rack rate $100 - 10% discount = $90 net rate. This means that the agent owes
you $90 if they sell a trip. They will have collected already from their customer and you must
invoice them for the net rate amount. When you run a report, you can select to run a report
by each agent. This report will show the number of trips they have sold for you and the net
rate they owe you.
Operator Help & User Manual
1-800-993-6648
[email protected]
44/47
8.2 Assign Security
You can ssign security according to your relationship and agreement with your agent.
This allows the ability for the agent to
change their own company contact
information.
This allows the agent to set privileges
for their own agent staff
This allows the ability for the agent to
add additional agent staff.
This allows your agent to run a report.
This feature is required for Agents to
use the system to calculate amounts
owing to supplier.
8.3 Edit
You can edit and change your agent settings and privileges at any time.
1. Login
2. Choose <My Agents>
3. Select <Edit>
Operator Help & User Manual
1-800-993-6648
[email protected]
45/47
8.4 Reporting
When your agent processes a sale it will automatically be reflected in your trip summary
area and update the seat availability. Both agents and suppliers can access the order and
edit customer information if required.
Click <Operator Reports>
Choose one trip, all trips or
multiple trips using Ctrl key.
Choose all or one agent.
Choose a date range by order date
or by trip date
Choose specific items that you wish
to see in your report.
NOTE: ‘Total Sale Amount’ for agent sales
represents the net rate amount that
agents purchased from you, not your
own retail amount. This is the amount
you should invoice your agents.
Operator Help & User Manual
1-800-993-6648
[email protected]
46/47
LINKS
The demo website is available to browse the Adventure Engine database.
http://demo.adventuengine.com
If you would like to try the system as a supplier, reseller(portal) or a customer please use
the login instructions below.
Login: demo
Password: demodemo
Type: choose the login type you want to try
Visit our Video Demo ‘How To’ area for brief demonstrations of various content in this
manual.
http://www.adventureengine.com/movies.php
Operator Help & User Manual
1-800-993-6648
[email protected]
47/47