1
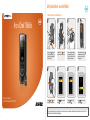
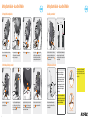
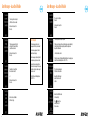
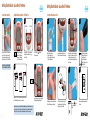
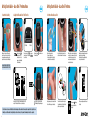
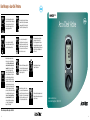
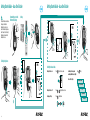
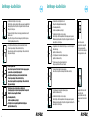
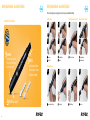
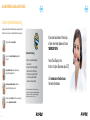
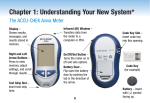
Accu-Chek Meter Guide
®
Experience what’s possible
Notes
Contents
2
Accu-Chek Mobile3
Getting Started Guide
4-6
Error Messages
7-9
Accu-Chek Active18
Getting Started Guide
19-21
Error Messages
22-23
Accu-Chek Performa10
Getting Started Guide
11-12
Error Messages
13
Accu-Chek Lancing System24
Getting Started Guide − Accu-Chek Multiclix 25-27
Getting Started Guide − Accu-Chek Softclix
28-29
Accu-Chek Performa Nano14
Getting Started Guide
15-16
Error Messages
17
Tips for gentle blood sampling30
Enquiry Details31
3
Getting Started Guide - Accu-Chek Mobile
®
Mobile
kim_manual_0090
Accu-Chek Mobile
®
1. Starting to use the Accu-Chek Mobile system
kim_manual_0240
1.
kim_manual_0280
2.
3.
4.
D
C
B
A
Open the tip cover A completely as far
as it will go. Only then will you be able
to open the cassette compartment and
insert the test cassette.
Push the slide button B upwards. This
opens the cassette compartment cover.
Remove a new test cassette C from
the packaging. Insert the test cassette
into the meter. Close the cassette compartment cover and the tip cover.
Pull the protective strip of the battery D
backwards out of the meter to activate
the batteries. Remove the protective
film from the display.
5.
6.
7.
8.
kim_manual_0180
F
E
G
H
www.accu-chek.com.au
Accu-Chek Enquiry Line: 1800 251 816
Press the
button E for about
2 seconds until the meter turns on.
Use the
language F .
buttons to select the
Press the
button to set the
desired language G .
Press the
button to confirm the
selected language H .
W
If you have set the wrong language by mistake, you may not be able to read the menus any more. You can nevertheless change the language. The instructions can be found in Chapter 5.2 of the
User’s Manual under the section Correcting a wrongly set language.
4
5
Getting Started Guide - Accu-Chek Mobile
Getting Started Guide - Accu-Chek Mobile
®
®
kim_manual_0410
kim_manual_0430
2. Preparing the lancing device
1.
kim_manual_0440
3.
2.
4. Loading a new lancet
4.
Red line
New
lancet drum
Used
lancet drum
B
A
Remove the rotatable cap for setting the
penetration depth A .
D
Insert a new lancet drum B (white end
first). You now have 6 new and sterile
lancets at your disposal.
Place the cap C back on again.
1
Push the lever at the side of the finger
pricker as far as it will go in direction
1 and then back again in direction 2
to load a new lancet.
5. What you need to know
3.
2.
W
4.
When you are ready to do a
test and the meter displays
Apply drop, ensure that you apply
the blood drop to the test area
immediately. Note that liquid
can evaporate quickly from the
tiny drop of blood increasing
the concentration of glucose
significantly.
B
C
A
Open the tip cover A . The meter
automatically turns on.
6
You can tell that a lancet drum has been
used because it has a red line visible
on the white portion. Used lancet drums
cannot be reused.
kim_manual_0130_5-9mmol
3. Performing a blood glucose test
1.
Rotate the cap D of the finger pricker
until the desired penetration depth is
level with the indicator. Start with a
medium penetration depth such as 3.
2
D
Press the finger pricker firmly against
the selected puncture site. Then press
the release button B all the way down
to obtain a blood drop.
Apply the blood drop to the centre of the
test area C . Touch the test area gently
because the blood is immediately drawn
up when contact is made.
Read the test result and close the tip
cover D . The meter automatically
turns off.
Wash your hands with warm water
and soap. Dry your hands well before
obtaining blood.
Use a small, fresh, well-formed blood
drop for each blood glucose test and
apply it to the centre of the test area on
the cassette.
Blood drop that is well-formed
Touch the test area gently when
applying blood. Do not press the
test area onto the finger and do
not spread the blood drop.
Blood drop that has spread
7
Error Messages - Accu-Chek Mobile
Error Messages - Accu-Chek Mobile
®
®
There is no test cassette in
the meter.
The use by period or use by date
of the test cassette is exceeded.
Insert a new test cassette in
the meter.
Insert a new test cassette in
the meter.
This message appears if you start
a test and all test areas in the test
cassette have been used.
Insert a new test cassette in
the meter.
Remove the test cassette from
the meter and re-insert it.
or
Insert a new test cassette in
the meter.
Insert a test cassette suitable
for this meter type.
8
Error messages
• Your blood glucose value may be very low.
The following pages describe all error
messages and how they can be remedied.
If the way you feel agrees with a very low blood glucose value, immediately
follow the relevant instructions given by your healthcare professional.
Repeat the test afterwards.
If an error message appears, follow the
instructions on the display.
• A meter error has occurred.
If error messages occur frequently, contact
your customer support and service centre
If the error message is still displayed after turning the meter on again, please
Contact the Accu-Chek Enquiry Line on 1800 251 816.
If your meter has been dropped, that can
also lead to error messages. In this case, you
should also contact your customer support
and service centre
The test area has drawn up too
little blood or control solution.
Contact the Accu-Chek Enquiry Line on
1800 251 816.
Repeat the test with a larger
amount of blood or control
solution.
Remove the dirt from the inside
of the cassette tip.
Press (Continue) if you
want to go directly to
the Clean menu.
9
Error Messages - Accu-Chek Mobile
®
Performa
Repeat the test.
Move to a place where the
ambient temperature is not
higher than +40 °C and wait
for the temperature of the
meter to adjust to this temperature.
Do not apply blood or control
solution to the test area until the
prompt apply drop is displayed.
Insert two new batteries.
Move into the shade or shield
the meter with your body,
for example.
Accu-Chek Performa
®
Repeat the test.
If the error message is displayed
after turning the meter on again:
Contact the Accu-Chek Enquiry Line on 1800 251 816.
Move to a place where the
ambient temperature is at
least +10 °C and wait for the
temperature of the meter to
adjust to this temperature.
10
www.accu-chek.com.au
Accu-Chek Enquiry Line: 1800 251 816
11
Getting Started Guide - Accu-Chek Performa
Getting Started Guide - Accu-Chek Performa
1. Insert the Code Chip
3. Perform a Blood Glucose Test
®
1.
2. Adjust the Time and Date – First Time Use
1.
2.
decrease
Press and release to turn
on the meter. The time and
date appear on the display.
“Set-up” and the hour flash.
Make sure the meter is off. Turn the meter
over. Turn the code chip over so that the
code number faces away from you, then
push it into the code chip slot until it stops.
Change the code chip every time
you open a new box of test strips.
®
3.
4.
5.
6.
increase
Press and release or to decrease or
increase the hour. Press and hold or
to scroll faster.
4.
Repeat steps 2 and 3 to set the minutes, am/pm, day, month, and
year. The flashing field is the one you are changing.
Note: Your new meter comes with the battery installed and a preset time and date. You may
need to change the time to your time zone. Having the correct time and date is important if
you use the meter’s memory or if you want to download your results to a computer.
12
1-3.
Press and release
The minutes flash.
to set the hour.
5.
Once you set the year, press and hold until
the flashing test strip symbol appears.
• Wash and dry your hands.
• Prepare the lancing device.
• Take one test strip from the container.
Close the container tightly.
7.
Gently squeeze your finger to assist the flow
of blood. This helps you get a blood drop.
Insert the test strip into the meter in the
direction of the arrows. The meter turns on.
8.
T ouch the blood drop to the front edge of
the yellow window of the test strip. Do not
put blood on top of the test strip.
ake sure the code number on the display
M
matches the code number on the test strip
container. If you miss seeing the code
number, take the test strip out and reinsert it
into the meter.
9.
When the blood drop symbol
flashes, obtain a blood drop
from your fingertip.
To test using blood from
alternative sites, refer to your
Owner’s Booklet.
10.
When you see flash, you
have enough blood in the
test strip.
After your result appears, discard the used
test strip.
13
Error Messages - Accu-Chek Performa
®
Performa Nano
= T he test strip is damaged. Remove the test
strip and reinsert it, or replace it if damaged.
Or the code chip is incorrect. Turn off the
meter and insert a new code chip. If the
message reappears, call Roche.
= N
ot enough blood or control solution was
drawn into the test strip for measurement
or was applied after the test has started.
Discard the test strip and repeat the test.
= T he code chip is incorrect. Turn off the
meter and insert a new code chip. If this
does not fix the problem, call Roche.
= The code chip is from an expired lot of test
strips. Ensure the code chip number matches
the code number on the test strip container.
Make sure the time and date in the meter
are correct.
= Y our blood glucose may be extremely
high or a meter or test strip error has
occurred. If this confirms how you feel,
contact your healthcare professional
immediately. If it does not confirm how
you feel, repeat the test and refer to
Chapter 2 “Unusual Test Results,” in the
Owner’s Booklet. If this does not confirm
how you feel, perform a control test with
your control solution and a new test strip.
If the control result is within the acceptable
range, review the proper testing procedure
and repeat your blood glucose test with a
new test strip. If the E-3 code still appears
for your blood glucose test, your blood
glucose result may be extremely high
and above the system’s reading range.
Contact your healthcare professional
immediately. If the control result is not
within the acceptable range, see Chapter 4
“Understanding Out-of-Range Control Test
Results,” in the Owner’s Booklet.
= Blood or control solution was applied to
the test strip before the flashing blood drop
symbol appeared on the display. Discard the
test strip and repeat the test.
= An
electronic error occurred or, in rare
cases, a used test strip was removed and
reinserted. Turn the meter off and on or take
the battery out for 20 seconds and reinsert
it. Perform a blood glucose or control test.
If the problem persists, call Roche.
Accu-Chek Performa Nano
®
= T he temperature is above or below the
proper range for the meter. Refer to the test
strip package insert for system operating
conditions. Move to an area with the
appropriate conditions, wait 5 minutes, and
repeat the test. Do not artificially heat or
cool the meter.
= T he battery is almost out of power.
Change the battery now.
= T he time and date settings may be incorrect.
Make sure the time and date are correct and
adjust, if necessary.
www.accu-chek.com.au
Accu-Chek Enquiry Line: 1800 251 816
If the error message continues, please call Roche
14
15
Getting Started Guide - Accu-Chek Performa Nano
Getting Started Guide - Accu-Chek Performa
1. Insert the Code Chip
3. Perform a Blood Glucose Test
®
1.
®
2. Adjust the Time and Date – First Time Use
1.
2.
3.
1-3.
4.
5.
6.
Yellow
Release Button
decrease
Make sure the meter is off. Turn over the
meter. Turn over the code chip so that the
code number faces away from you, then
push it into the code chip slot until it stops.
Change the code chip every time
you open a new box of test strips.
Press and release
to
turn on the meter. The
time, date, and “set-up”
appear on the display with
the hour flashing.
increase
or
to decrease or
Press and release
or
increase the hour. Press and hold
to scroll faster.
4.
epeat steps 2 and 3 to set the minutes, am/pm, day, month,
R
and year. The flashing field is the one you are changing.
Press and release
The minutes flash.
5.
Once you set the year, press and release
. The flashing test strip symbol appears.
Note: Your new meter comes with the batteries installed and a preset time and date. You may need to change the time to your time zone.
Having the correct time and date is important if you use the meter memory or if you want to download your results to a computer.
16
to confirm the hour.
• Wash and dry your hands.
• Prepare the lancing device.
• Take one test strip from the test strip
container. Close the container tightly.
7.
Gently squeeze your finger to assist the flow
of blood. This helps you get a blood drop.
Insert the test strip into the meter in the
direction of the arrows. The meter turns on.
8.
Touch the blood drop to the front edge of
the yellow window of the test strip. Do not
put blood on top of the test strip.
ake sure the code number on the display
M
matches the code number on the test strip
container. If you miss seeing the code
number, remove the test strip out and
reinsert it into the meter.
9.
When the blood drop symbol flashes, obtain
a blood drop from your fingertip.
To test using blood from alternative sites,
refer to your Owner’s Booklet.
10.
flash, you
When you see
have enough blood in the
test strip.
A fter your result appears, discard the used
test strip.
17
Error Messages - Accu-Chek Performa
®
Active
= T he test strip is damaged. Remove the test
strip and reinsert it, or replace it if damaged.
Or the code chip is incorrect. Turn off the
meter and insert a new code chip. If the
message reappears, call Roche.
= N
ot enough blood or control solution was
drawn into the test strip for measurement
or was applied after the test had started.
Discard the test strip and repeat the test.
= T he code chip is incorrect. Turn off the
meter and insert a new code chip. If this
does not fix the problem, call Roche.
= The code chip is from an expired lot of
test strips. Ensure the code chip number
matches the code number on the test strip
container. Remove the code chip and enter
the set-up mode to ensure the time and
date in the meter are correct.
= Y our blood glucose may be extremely
high or a meter or a test strip error has
occurred. If this confirms how you feel,
contact your healthcare professional
immediately. If it does not confirm how
you feel, repeat the test and refer to
Chapter 2, “Unusual Test Results.” If this
does not confirm how you feel, perform
a control test with your control solution
and a new test strip. If the control result
is within the acceptable range, review the
proper testing procedure and repeat your
blood glucose test with a new test strip. If
the E-3 code still appears for your blood
glucose test, your blood glucose result may
be extremely high and above the system’s
reading range. Contact your healthcare
professional immediately. If the control
result is not within the acceptable range,
see Chapter 4, “Understanding Out-ofRange Control Test Results.”
= Blood or control solution was applied to the
test strip before the flashing drop symbol
appeared on the display. Discard the test
strip and repeat the test.
= An
electronic error occurred or, in rare
cases, a used test strip was removed and
reinserted. Turn the meter off and on, or take
the batteries out for 20 seconds and reinsert
them. Perform a blood glucose or control
test. If the problem persists, call Roche.
Accu-Chek Active
®
= T he temperature is above or below the
proper range for the meter. Refer to
the test strip package insert for system
operating conditions. Move to an area with
appropriate conditions, wait 5 minutes, and
repeat the test. Do not artificially heat or
cool the meter.
= T he battery is almost out of power.
Change the battery now.
= T he time and date settings may be incorrect.
Make sure the time and date are correct and
adjust, if necessary.
www.accu-chek.com.au
Accu-Chek Enquiry Line: 1800 251 816
If the error message continues, please call Roche
18
19
Getting Started Guide - Accu-Chek Active
®
This Quick Reference Guide does
not replace the detailed
Instructions for use for your
Accu-Chek Active blood glucose
meter. Please refer to the safety
instructions contained in the
Instructions for use.
Removing the protective
film from the battery
Getting Started Guide - Accu-Chek Active
®
Coding
Testing blood glucose
Setting the time and date
Turning the meter on:
Press
for more than 3 seconds.
a
Confirming the change and
continuing with the next setting:
Order of the settings
Press
briefly.
Time and date format
Time (hour, minute)
Turning the meter off:
Press
+
briefly at the same time.
Year
Date (month, day)
Changing settings:
b
20
Press
or hold it down.
Final display
21
Error Messages - Accu-Chek Active
®
You did not insert the test strip correctly or completely.
Hold the test strip so the arrows printed on it and the orange square face upwards. Without
bending it, gently push the test strip into the test strip guide in the direction of the arrows
until you feel it lock into place.
You removed the test strip from the meter in order to apply blood and did not re-insert it
within 20 seconds.
Dispose of the test strip, even if blood has not been applied yet. Start the blood glucose
test from the beginning with a new test strip.
A code chip from another blood glucose system has been inserted into the meter.
The code chip does not belong to the Accu‑Chek Active test strips.
Remove the code chip and insert the code chip that belongs to the Accu‑Chek Active test
strips you are currently using.
The code chip cannot be read.
Remove the code chip and re-insert it into the meter. If the error message appears again,
you cannot use the code chip and test strips belonging to it.
A code chip from another blood glucose system has been inserted into the meter.
The code chip does not belong to the Accu‑Chek Active test strips.
Remove the code chip and insert the code chip that belongs to the Accu‑Chek Active test
strips you are currently using.
Your blood glucose may be very low (possibly a severe hypoglycaemia).
If you have typical symptoms of a very low blood glucose you should follow your doctor's
instructions for such cases. Repeat the test afterwards.
The measuring window is dirty.
Clean the measuring window (see Chapter 8).
The test strip is bent or is not positioned straight and flat in the test strip guide.
Repeat the test with a new test strip.
22
Error Messages - Accu-Chek Active
®
You have inserted a used test strip into the meter.
Start again from the beginning with an unused test strip.
The measuring window is dirty.
Clean the measuring window (see Chapter 8).
You did not insert the test strip correctly or completely.
Hold the test strip so that the arrows printed on it and the orange square face upwards.
Without bending it, gently push the test strip into the test strip guide in the direction of the
arrows until you feel it lock into place.
You applied blood or control solution to the test strip too soon, i.e. before the drop symbol
flashed in the display.
Repeat the test with a new test strip.
The test strip was bent or moved while testing was in progress.
Repeat the test with a new test strip.
The meter was exposed to a strong electromagnetic field.
Change your position or turn off the source of radiation.
A meter error has occurred.
Start again from the beginning. If the
error message appears again, the
meter is defective. Please contact your
customer support and service centre.
You removed the code chip while testing was in progress.
Re-insert the code chip into the meter and repeat the test with a new test strip.
The test strip was bent or moved while testing was in progress.
Repeat the test with a new test strip.
You did not insert the test strip correctly or completely.
Hold the test strip so that the arrows printed on it and the orange square face upwards.
Without bending it, gently push the test strip into the test strip guide in the direction of the
arrows until you feel it lock into place.
You applied too little blood or control
solution to the test strip.
Repeat the test with a new test strip
and a larger amount of blood or control
solution.
23
Getting Started Guide - Accu-Chek Multiclix
®
Lancing Systems
Accu-Chek Lancing System
®
3 simple steps to teach and learn
1 PRESS to prime
2
CLICK to prick
3
WIST & BACK
T
for next lancet
Used drum
www.accu-chek.com.au
Accu-Chek Enquiry Line: 1800 251 816
24
NO lancet handling
25
Getting Started Guide - Accu-Chek Multiclix
Getting Started Guide - Accu-Chek Multiclix
®
Set penetration depth
Load drum
A
A
Remove cap.
®
Step 1A Press
B
B
Insert new drum with blue ring end first.
Snap drum into place. Replace cap.
3 simple steps to teach and learn
Turn dial to select depth setting.
For beginners, select a lower setting.
(Start with level 1.)
1A
P ress priming button down like a
ballpoint pen.
1B
1B
T he transparent release button turns
yellow.
Step 2 Click
2
P ress lancing device firmly against side
of fingertip and press release button.
Exchange drum
C
Step 3A Twist
D
3B
You’re ready to test:
Press, click, and twist.
26
C
hen number 1 appears in the display,
W
last lancet is in use.
D
emove used drum. (It cannot be reinserted.)
R
Dispose of drum with household waste.
A
Remove cap.
B
Load new drum.
3A
T o change lancet, turn priming button
as far as it will go, and turn back again.
3B
T he numbers on the display show how
many lancets are left.
For more information,
please visit www.accu-chek.com.au
27
Getting Started Guide - Accu-Chek Softclix
Getting Started Guide - Accu-Chek Softclix
®
®
The classic lancing system using single lancets offers easy, well-established handling.
Getting started
3 simple steps to teach and learn
1 PREPARE
Remove cap, insert a
lancet, twist off cover
and replace cap
2
28
SELECT lancet depth
3 PRESS
priming button down;
the transparent release
button turns yellow
Selecting penetration depth
A
C
B
D
A
Remove cap
C
Twist off sterility cap
B
Insert lancet
D
Replace cap
Obtaining a blood sample
E
F
G
Select from 11 settings
E
F
Press priming button
G
Press release button
Changing lancets
I
H
H
Remove cap. Eject used lancet
I
J
Insert new lancet
J
Twist off sterility cap
K
K
Replace cap
29
Accu-Chek Multiclix and Accu-Chek Softclix
®
®
5 tips for gentle blood sampling.
Lancing correctly with Accu-Chek lancing devices keeps discomfort to
a minimum. You can test more comfortably with these five easy steps:
1
Ensure hands are clean and dry.
Lance on the side of the fingertip rather than
the pad.
Keep the skin taut by pressing the lancing
device firmly against the skin.
Select a penetration depth as shallow as
possible that still produces blood.
Alternate fingers daily and take the necessary steps
to ensure good blood circulation.
30
Clixmotion Technology
• Employs a patented dual-guided
lancet motion
• Ensures smooth, forward-guided,
and return motion of the lancet
• Lancet tip has a tapered 3-sided
cut to reduce pain and further
enhance smooth penetration
If you need assistance in the set up
of your new meter, please call us on
1800 251 816
Accu-Chek Enquiry Line
8.30am - 5.30pm (Business days EST)
Visit www.accu-chek.com.au
for more information.
1. Kocher S., Tshiang Tshiananga J. K., Koubek R. Comparison of
Lancing Devices for Self-Monitoring of Blood Glucose Regarding
Lancing Pain. Journal of Diabetes Science and Technology;
September 2009 Volume 3, Issue 5: 1136–1143.
31
For people with diabetes, use only as directed. Consult your healthcare professional for advice.
Accu-Chek, Accu-Chek Mobile, Accu-Chek Performa, Accu-Chek Performa Nano,
Accu-Chek Active, Accu-Chek Multiclix, Accu-Chek Softclix and Clixmotion are trademarks
of Roche © 2011 Roche Diagnostics. Roche Diagnostics Australia Pty Limited,
31 Victoria Avenue, Castle Hill NSW 2154, ABN 29 003 001 205
32