1
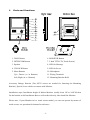
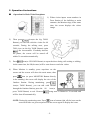
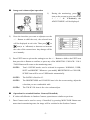
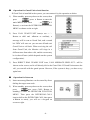
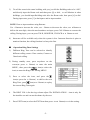
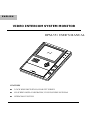
ENGLISH VIDEO INTERCOM SYSTEM MONITOR DPM-551 USER’S MANUAL FEATURES ■ 5 INCH HIGH DEFINITION COLOR TFT SCREEN ■ ON-SCREEN-DISPLAY OPERATION, TOUCH SCREEN OPTIONAL ■ INTERCOM FUNCTION 1. Parts and Functions TALK 1. TALK Button 6. MONITOR Button 2. INTERCOM Button 7. 5 Inch TFT-LCD (Touch Screen) 3. Speaker 8. LED for Message 4. UNLOCK Button 9. LED for In-use 5. Menu Buttons 10. Microphone Up/+, Down/- (/ Buttons) 11. Wiring Terminals Left, Right (/ Buttons) 12. Mounting Bracket Hold Accessory fittings: Bracket (Two 4X25 screws are needed for fastening the Mounting Bracket), Special 4 core cables to connect with Monitor. Installation steps: Installation height of Indoor Monitor, usually from 145 to 160CM, then fix the bracket on 86 Installation Box or wall surface directly, then install the Monitor. Please note, if your Monitor isn’t a touch screen model, you can not operate by means of touch screen, see operation for buttons for reference. -1- 2. Operation Instructions ■ Operation for Basic Video Doorphone 1) When visitor inputs room numbers in Door Station of the building or main entrance, the Monitor rings, at the same time, the screen displays the visitor image. 2) Then press icon(or the big TALK Button) you can talk with the visitor for 60 seconds; During the talking state, press TALk icon (or the big TALK Button) again to end the conversation. If nobody answers the phone, the screen will be turned off within 30 seconds automatically. 3) Press icon(or UNLOCK Button) to open the door during call waiting or talking. At the same time, the lift(elevator) will be sent down to catch the visitor. 4) When Monitor is standby, press anywhere on the screen and the screen will show the main menu, then press icon (or press MONITOR Button directly in the standby), the screen will display the view of the Outdoor Station. During monitoring, press TAiL icon(or TALK Button), you can talk with outside through the Outdoor Station; press the iiii icon(or press TALK Button) to exit. However, monitoring state is limited to 30 seconds and will be shut off automatically. NOTE: During the monitoring state, Press icon at bottom right, all the icons on the screen will hide out, press anywhere on the screen again to display the icons. - 2- ■ Image and volume adjust operation 1) 2) During the monitoring, press i icon on the screen(or press any of the + / - / / buttons), the ADJUST MENU will be displayed. Press the item that you want to adjust(or use the + / - Button to shift the row), the selected item will be displayed in red color. Then press o or icon(or /Button) to decrease or increase the value of the current item. Any change will be save instantly. 3) Press EXIT item to quit out the setting(or use the + / - Button to shift to the EXIT item then press the Button to confirm, or press any of the MONITOR / UNLOCK / CALL / TALK Button will return to the monitoring state). NOTE1: Total 4 SCENE modes can be selected in sequence: NORMAL, USER, SOFT and BRIGHT. Whenever you modify BRIGHTNESS or COLOUR, SCENE item will be set to USER mode automatically. NOTE2: The RATIO is fixed in 4:3. NOTE3: The BRIGHTNESS and COLOUR item is for the screen setting, adjust the value that you are comfortable with. NOTE4: ■ The TALK VOL item is for voice volume adjust. Operation for extended Outdoor Camera(If installed) 1. If visitor calls Monitor in Outdoor Camera, operations are similar as previous. 2. Door Camera can be used to survey if installed, by pressing MON/TALK Button one more time in monitoring state, the image will be switched to the Outdoor Camera. -3- ■ Operation for Guard Unit related function If Guard Unit is installed in the system, you can contact it by the operation as below. 1) When standby, press anywhere on the screen, then press icon(or press Button to enter the main MENU then select ; or press CALL Button), to activate the INTERCOM FUNCTION MENU as shown on the at right. 2) Press CALL GUART UNIT item(or use + / Button to shift and Button to confirm), a message will be sent to Guard Unit, and a sound hit ‘DiDi’ will sent out. you can turn off and wait Guard Unit to call back. When receiving the call from Guard Unit, the Monitor will rings in a different tune from other calls, and the screen may be in shut-off state (which depends on the system configuration). 3) Press DIRECT DIAL GUARD UNIT item, CALL MESSAGE SEND OUT…will be shown on the screen, and it will directly dial to the Guard Unit. If Guard Unit answers the call, you can talk with the guard person. However, If the system is busy, you have to try again later. ■ 1) Operation for Intercom Intercom among Monitors can be started by direct dialing the target room code. 2) When standby, press anywhere on the screen, then press icon(or press CALL Button in standby), to enter the INTERCOM FUNCTION MENU. Then press the INTERCOM CALL item(or shift to the INTERCOM CALL then press Button to enter), you will see a keypad on screen as right. -4- 3) To call the room in the same building with you, just left the Building code to be “000”, and directly input the Room code and then press [#] to dial; to call Monitor in other buildings, you should input Building code after the Room code, then press [#] to dial. During input state, press [*] to backspace and re-input number. NOTE. How to input numbers using Buttons: Use + Button to increase the value, use – Button to decrease the value; use Button to shift to the next digit; when the need numbers are input, press CALL Button to execute the calling. During input, you can press TALK, MONITOR, UNLOCK or Button to exit. 4) Intercom will be available only when the system is free. Intercom function is prior to monitor function, but calling function is always the first. ■ 1) Operation Ring Tune Settings Different Ring Tune can be selected to identify different calling source: Door station, Camera or Guard unit calling. 2) During standby state, press anywhere on the screen(or press Button) to enter the main MENU, then press the icon(or select the item) to enter the Ring Tune Setting MENU. 3) Press or select the item, and press the iii icon(or press the Button ) to shift to the next Ring Tune, press icon(or Button) to replay the current Ring Tune again. 4. The RING VOL is for the ring volume adjust. The INSTALLATION… item is only for the installer use and can not be chance by the user. 5. Press EXIT item(or select the EXIT item then press or Button) to exit the setting. -5- 3. Specifications 1) Power supply for Monitor: DC 15~18V 2) Power consumption: Standby 0.5W; Working status 15W (for kits) 3) Display screen: 5 Inch TFT-LCD ( 220,000 pixels ) 4) Display Resolutions: 960(R, G, B) x 234 dots 5) Touch screen panel: digital IPO film keypad 6) Video signal: 1Vp-p, 75Ω, CCIR standard 7) Connecting methods: 6 wires with system, 4 wires with Door Camera 8) Ring tune: chord ring, user configurable 9) Operating temperature 0 ~ +40 Centigrade 10) Dimensions: 280(W)×107(H)×28(D) 4. Precautions 1) All parts should be protected from violence vibration. And not allow to be impacting, 2) For the Lens& Screen cleaning, using hands or wet cloth is forbidden. 3) Please do the cleanness with soft cotton cloth, please do not use the organic or knocking and dropping. chemical clean impregnate. If necessary, please use a little pure water or dilute soap water to clean the dust. 4) Image distortion may occur if the video door phone is mounted too close to magnetic field e. g. Microwaves, TV, computer etc. 5) Please keep the video door monitor away from wet, high temperature, dust, and caustic and oxidation gas in order to avoid any unpredictable damage. 6) caustic and oxidation gas in order to avoid any unpredictable damage. WARNING Don’t attempt to service this product yourself as opening or removing covers may expose you to dangerous voltage or other hazards. To prevent fire or shock hazard, do not expose this product to rain or moisture. Do not install the product where it is exposed to constant sunlight or rain. Do not install the product where excess dust or humidity is present. -6- The design and specifications can be changed without notice to the user. Right to interpret and copyright of this manual are preserved.