1
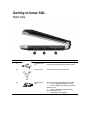
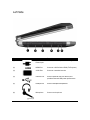
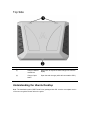
WeWi SOL Solar Powered Computer WeWi SOL Owner’s Manual Computer Model:DBR1-Y © Copyright 2013 WeWi Telecommunications, Inc. Bluetooth is a trademark owned by its proprietor and used by WeWi under rd 3 party license. SD Logo is a trademark of its proprietor. The information contained herein is subject to change without notice. The only warranties for WeWi products and services are set forth in the express warranty statements accompanying such products and services. Nothing herein should be construed as constituting an additional warranty. WeWi shall not be liable for technical or editorial errors or omissions contained herein. Product notice Software terms This guide describes features that are common to most models. Some features may not be available on your computer. By installing, copying, downloading, or otherwise using any software product preinstalled on this computer, you agree to be bound by the terms of the WeWi End User License Agreement (EULA). If you do not accept these license terms, your sole remedy is to return the entire unused product (hardware and software) within 14 days for a refund subject to the refund policy of your place of purchase. To obtain the latest information in this guide, go to the WeWi Web site at http://www.wewi.ca For any further information or for requesting a full refund of the computer, please contact your local point of sale (the seller). WARNING! To reduce the possibility of heat-related injuries or of overheating the computer, do not place the computer directly on your lap or obstruct the computer air vents. Use the computer only on a hard, flat surface. Do not allow another hard surface, such as an adjoining optional printer, or a soft surface, such as pillows or rugs or clothing, to block airflow. Also, do not allow the AC adapter to come into contact with the skin or a soft surface, such as pillows or rugs or clothing, during operation. The computer and the AC adapter comply with the user-accessible surface temperature limits defined by the International Standard for Safety of Information Technology Equipment (IEC 60950). Notes, Cautions, and Warnings NOTE: A NOTE indicates important information that helps you make better use of your computer. CAUTION: A CAUTION indicates potential damage to hardware or loss of data if instructions are not followed. WARNING: A WARNING indicates a potential for property damage, personal injury, or death. Information in this document is subject to change without notice. © 2013 WeWi Telecommunications Inc. All rights reserved Changes may be made periodically to the information in this publication without obligation to notify any person of such revisions or changes. Such changes will be incorporated in new editions of this manual or supplementary documents and publications. This company makes no representations or warranties, either expressed or implied, with respect to the contents hereof and specifically disclaims the implied warranties of merchantability or fitness for a particular purpose. No part of this publication may be reproduced, stored in a retrieval system, or transmitted, in any form or by any means, electronically, mechanically, by photocopy, recording or otherwise, without the prior written permission of WeWi Telecommunications Inc. Before You Begin – Information for Your Safety and Comfort Safety Instructions Read these instructions carefully. Keep this document for future reference. Follow all warnings and instructions marked on the product. Turning the product off before cleaning Unplug this product from the wall outlet before cleaning. Do not use liquid cleaners or aerosol cleaners. Use a damp cloth for cleaning. CAUTION for plug as disconnecting device Observe the following guidelines when connecting and disconnecting power to the power supply unit: Install the power supply unit before connecting the power cord to the AC power outlet. Unplug the power cord before removing the power supply unit from the computer. If the system has multiple sources of power, disconnect power from the system by unplugging all power cords from the power supplies. CAUTION for accessibility Be sure that the power outlet you plug the power cord into is easily accessible and located as close to the equipment operator as possible. When you need to disconnect power to the equipment, be sure to unplug the power cord from the electrical outlet. CAUTION for bundled dummy cards (only for certain models) Your computer shipped with plastic dummies installed in the card slots. Dummies protect unused slots from dust, metal objects or other particles. Save the dummies for use when no cards are in the slots. CAUTION for listening To protect your hearing, follow these instructions. Increase the volume gradually until you can hear clearly and comfortably. Do not increase the volume level after your ears have adjusted. Do not listen to music at high volumes for extended periods. Do not increase the volume to block out noise from your environment. Decrease the volume if you can't hear people speaking near you. Warnings • Do not use this product near water. • Do not place this product on an unstable cart, stand or table. If the product falls, it could be seriously damaged. • Slots and openings are provided for ventilation to ensure reliable operation of the product and to protect it from overheating. These openings must not be blocked or covered. The openings should never be blocked by placing the product on a bed, sofa, rug or other similar surface. This product should never be placed near or over a radiator or heat register, or in a built-in installation unless proper ventilation is provided. • Never push objects of any kind into this product through cabinet slots as they may touch dangerous voltage points or short-out parts that could result in a fire or electric shock. Never spill liquid of any kind onto or into the product. • To avoid damage of internal components and to prevent battery leakage, do not place the product on a vibrating surface. • Never use it under sporting, exercising, or any vibrating environment which will probably cause an unexpected short current or damage rotor devices, HDD, optical drive, and even to exposure risk from the lithium battery pack. • The bottom surface, areas around ventilation openings and AC adapter may get hot. To avoid injury, ensure they do not come in contact with your skin or body. • Your device and its enhancements may contain small parts. Keep them out of the reach of small children. Using electrical power • This product should be operated from the type of power indicated on the marking label. If you are not sure of the type of power available, consult your dealer or local power company. • Do not allow anything to rest on the power cord. Do not locate this product where people will walk on the cord. • If an extension cord is used with this product, make sure that the total ampere rating of the equipment plugged into the extension cord does not exceed the extension cord ampere rating. Also, make sure that the total rating of all products plugged into the wall outlet does not exceed the fuse rating. • Do not overload a power outlet, strip or receptacle by plugging in too many devices. The overall system load must not exceed 80% of the branch circuit rating. If power strips are used, the load should not exceed 80% of the power strip's input rating. • This product's AC adapter is equipped with a three-wire grounded plug. The plug only fits in a grounded power outlet. Make sure the power outlet is properly grounded before inserting the AC adapter plug. Do not insert the plug into a non-grounded power outlet. Contact your electrician for details. WARNING! Warning! The grounding pin is a safety feature. Using a power outlet that is not properly grounded may result in electric shock and/or injury. NOTE: Note: The grounding pin also provides good protection from unexpected noise produced by other nearby electrical devices that may interfere with the performance of this product. Product servicing Do not attempt to service this product yourself, as opening or removing covers may expose you to dangerous voltage points or other risks. Refer all servicing to qualified service personnel. Unplug this product from the wall outlet and refer servicing to qualified service personnel when: • • • • • • the power cord or plug is damaged, cut or frayed liquid was spilled into the product the product was exposed to rain or water the product has been dropped or the case has been damaged the product exhibits a distinct change in performance, indicating a need for service the product does not operate normally after following the operating instructions NOTE: Note: Adjust only those controls that are covered by the operating instructions, since improper adjustment of other controls may result in damage and will often require extensive work by a qualified technician to restore the product to normal condition. Guidelines for safe battery usage This notebook uses a lithium-ion battery. Do not use it in a humid, wet or corrosive environment. Do not put, store or leave your product in or near a heat source, in a high temperature location, in strong direct sunlight, in a microwave oven or in a pressurized container, and do not expose it to temperatures over 60°C (140°F). Failure to follow these guidelines may cause the battery to leak acid, become hot, explode or ignite and cause injury and/or damage. Do not pierce, open or disassemble the battery. If the battery leaks and you come into contact with the leaked fluids, rinse thoroughly with water and seek medical attention immediately. For safety reasons, and to prolong the lifetime of the battery, charging will not occur at temperatures below 0°C (32°F) or above 40°C (104°F). The full performance of a new battery is achieved only after two or three complete charge and discharge cycles. The battery can be charged and discharged hundreds of times, but it will eventually wear out. When the operation time becomes noticeably shorter than normal, buy a new battery. Use only the approved batteries, and recharge your battery only with the approved chargers designated for this device. Use the battery only for its intended purpose. Never use any charger or battery that is damaged. Do not short-circuit the battery. Accidental short-circuiting can occur when a metallic object such as a coin, clip or pen causes direct connection of the positive (+) and negative (-) terminals of the battery. (These look like metal strips on the battery.) This might happen, for example, when you carry a spare battery in your pocket or purse. Short-circuiting the terminals may damage the battery or the connecting object. The capacity and lifetime of the battery will be reduced if the battery is left in hot or cold places, such as in a closed car in summer or winter. Always try to keep the battery between 15°C and 25°C (59°F and 77°F). A device with a hot or cold battery may not work temporarily, even when the battery is fully charged. Battery performance is especially limited in temperatures well below freezing. Do not dispose of batteries in a fire as they may explode. Batteries may also explode if damaged. Dispose of batteries according to local regulations. Please recycle when possible. Do not dispose as household waste. Wireless devices may be susceptible to interference from the battery, which could affect performance. Replacing the battery pack The notebook uses lithium-ion batteries. Replace the battery with the same type as that which came bundled with your product. Use of another battery may present a risk of fire or explosion. WARNING! Warning! Batteries may explode if not handled properly. Do not disassemble or dispose of them in fire. Keep them away from children. Follow local regulations when disposing of used batteries. Operating environment WARNING! Warning! For safety reasons, turn off all wireless or radio transmitting devices when using your laptop under the following conditions. These devices may include, but are not limited to: wireless lan (WLAN), Bluetooth and/or 3G. Remember to follow any special regulations in force in any area, and always switch off your device when its use is prohibited or when it may cause interference or danger. Use the device only in its normal operating positions. This device meets RF exposure guidelines when used normally, and it and its antenna are positioned at least 1.5 centimeters (5/8 inches) away from your body (refer to the figure below). It should not contain metal and you should position the device the above-stated distance from your body. To successfully transmit data files or messages, this device requires a good quality connection to the network. In some cases, transmission of data files or messages may be delayed until such a connection is available. Ensure that the above separation distance instructions are followed until the transmission is completed. Parts of the device are magnetic. Metallic materials may be attracted to the device, and persons with hearing aids should not hold the device to the ear with the hearing aid. Do not place credit cards or other magnetic storage media near the device, because information stored on them may be erased. Medical devices Operation of any radio transmitting equipment, including wireless phones, may interfere with the functionality of inadequately protected medical devices. Consult a physician or the manufacturer of the medical device to determine if they are adequately shielded from external RF energy or if you have any questions. Switch off your device in health care facilities when any regulations posted in these areas instruct you to do so. Hospitals or health care facilities may be using equipment that could be sensitive to external RF transmissions. Pacemakers: Pacemaker manufacturers recommend that a minimum separation of 15.3 centimeters (6 inches) be maintained between wireless devices and a pacemaker to avoid potential interference with the pacemaker. These recommendations are consistent with the independent research by and recommendations of Wireless Technology Research. Persons with pacemakers should do the following: • Always keep the device more than 15.3 centimeters (6 inches) from the pacemaker. • Do not carry the device near your pacemaker when the device is switched on. If you suspect interference, switch off your device, and move it. Hearing aids. Some digital wireless devices may interfere with some hearing aids. If interference occurs, consult your service provider. Vehicles RF signals may affect improperly installed or inadequately shielded electronic systems in motor vehicles such as electronic fuel injection systems, electronic antiskid (antilock) braking systems, electronic speed control systems, and air bag systems. For more information, check with the manufacturer, or its representative, of your vehicle or any equipment that has been added. Only qualified personnel should service the device, or install the device in a vehicle. Faulty installation or service may be dangerous and may invalidate any warranty that may apply to the device. Check regularly that all wireless equipment in your vehicle is mounted and operating properly. Do not store or carry flammable liquids, gases, or explosive materials in the same compartment as the device, its parts, or enhancements. For vehicles equipped with an air bag, remember that air bags inflate with great force. Do not place objects, including installed or portable wireless equipment in the area over the air bag or in the air bag deployment area. If in-vehicle wireless equipment is improperly installed, and the air bag inflates, serious injury could result. Using your device while flying in an aircraft is prohibited. Switch off your device before boarding an aircraft. The use of wireless teledevices in an aircraft may be dangerous to the operation of the aircraft, disrupt the wireless telephone network, and may be illegal. Potentially explosive environments Switch off your device when in any area with a potentially explosive atmosphere and obey all signs and instructions. Potentially explosive atmospheres include areas where you would normally be advised to turn off your vehicle engine. Sparks in such areas could cause an explosion or fire resulting in bodily injury or even death. Switch off the device at refueling points such as near gas pumps at service stations. Observe restrictions on the use of radio equipment in fuel depots, storage, and distribution areas; chemical plants; or where blasting operations are in progress. Areas with a potentially explosive atmosphere are often, but not always, clearly marked. They include below deck on boats, chemical transfer or storage facilities, vehicles using liquefied petroleum gas (such as propane or butane), and areas where the air contains chemicals or particles such as grain, dust or metal powders. Do not switch the notebook on when wireless phone use is prohibited or when it may cause interference or danger. Emergency calls Warning: You cannot make emergency calls through this device. To make an emergency call you shall dial out through your mobile phone or other telephone call system. Disposal instructions Do not throw this electronic device into the trash when discarding. To minimize pollution and ensure utmost protection of the global environment, please recycle. Tips and information for comfortable use Computer users may complain of eyestrain and headaches after prolonged use. Users are also at risk of physical injury after long hours of working in front of a computer. Long work periods, bad posture, poor work habits, stress, inadequate working conditions, personal health and other factors greatly increase the risk of physical injury. Incorrect computer usage may lead to carpal tunnel syndrome, tendonitis, tenosynovitis or other musculoskeletal disorders. The following symptoms may appear in the hands, wrists, arms, shoulders, neck or back: • • • • • numbness, or a burning or tingling sensation aching, soreness or tenderness pain, swelling or throbbing stiffness or tightness coldness or weakness If you have these symptoms, or any other recurring or persistent discomfort and/or pain related to computer use, consult a physician immediately and inform your company's health and safety department. The following section provides tips for more comfortable computer use. Finding your comfort zone Find your comfort zone by adjusting the viewing angle of the monitor, using a footrest, or raising your sitting height to achieve maximum comfort. Observe the following tips: • • • • • • • refrain from staying too long in one fixed posture avoid slouching forward and/or leaning backward stand up and walk around regularly to remove the strain on your leg muscles take short rests to relax your neck and shoulders avoid tensing your muscles or shrugging your shoulders install the external display, keyboard and mouse properly and within comfortable reach if you view your monitor more than your documents, place the display at the center of your desk to minimize neck strain Taking care of your vision Long viewing hours, wearing incorrect glasses or contact lenses, glare, excessive room lighting, poorly focused screens, very small typefaces and low-contrast displays could stress your eyes. The following sections provide suggestions on how to reduce eyestrain. Eyes • Rest your eyes frequently. • Give your eyes regular breaks by looking away from the monitor and focusing on a distant point. • Blink frequently to keep your eyes lubricated and from drying out. Display • Keep your display clean. • Keep your head at a higher level than the top edge of the display so your eyes point downward when looking at the middle of the display. • Adjust the display brightness and/or contrast to a comfortable level for enhanced text readability and graphics clarity. • Eliminate glare and reflections by: o placing your display in such a way that the side faces the window or any light source o minimizing room light by using drapes, shades or blinds using a task light o changing the display's viewing angle o using a glare-reduction filter o using a display visor, such as a piece of cardboard extended from the display's top front edge o avoid adjusting your display to an awkward viewing angle o avoid looking at bright light sources, such as open windows, for extended periods of time Developing good work habits Develop the following work habits to make your computer use more relaxing and productive: • Take short breaks regularly and often. • Perform some stretching exercises. • Breathe fresh air as often as possible. • Exercise regularly and maintain a healthy body. WARNING! Warning! We do not recommend using the computer on a couch or bed. If this is unavoidable, work for only short periods, take breaks regularly, and do some stretching exercises. First things first We would like to thank you for making SOL your choice for meeting your mobile computing needs. Basic care and tips for using your computer Turning your computer on and off To turn on the computer, simply press and release the power button below the LCD screen beside the easy-launch buttons. Please refer to "Quick Guide" for the location of the power button. To turn the power off, do any of the following: • Use the Linux Ubuntu system shutdown button • Use the Linux shutdown command • Use the power button NOTE: Note: If you cannot power off the computer normally, press and hold the power button for more than four seconds to shut down the computer. If you turn off the computer and want to turn it on again, wait at least two seconds before powering up. Taking care of your computer Your computer will serve you well if you take care of it. Do not expose the computer to direct sunlight. Do not place it near sources of heat, such as a radiator. • • • • • • • • • o o o o Do not expose the computer to temperatures below 0 C (32 F) or above 50 C (122 F). Do not subject the computer to magnetic fields. Do not expose the computer to rain or moisture. Do not spill water or any liquid on the computer. Do not subject the computer to heavy shock or vibration. Do not expose the computer to dust or dirt. Never place objects on top of the computer. Do not slam the computer display when you close it. Never place the computer on uneven surfaces. Taking care of your AC adapter Here are some ways to take care of your AC adapter: • Do not connect the adapter to any other device. • Do not step on the power cord or place heavy objects on top of it. Carefully route the power cord and any cables away from foot traffic. • When unplugging the power cord, do not pull on the cord itself but pull on the plug. • The total ampere ratings of the equipment plugged in should not exceed the ampere rating of the cord if you are using an extension cord. Also, the total current rating of all equipment plugged into a single wall outlet should not exceed the fuse rating. Taking care of your battery pack Here are some ways to take care of your battery pack: • Use only batteries of the same kind as replacements. Turn the power off before removing or replacing batteries. • Do not tamper with batteries. Keep them away from children. • Dispose of used batteries according to local regulations. Recycle if possible. Taking care of the solar pack Here are some ways to take care of your solar pack: • Do not place items on the panels. • Avoid any exposure to water. • Avoid scratches and dirt accumulation. • Keep clean (use a soft, damp towel to clean). Cleaning and servicing When cleaning the computer, follow these steps: 1. Turn off the computer and remove the battery pack. 2. Disconnect the AC adapter and Solar Pack. 3. Use a soft, moist cloth. Do not use liquid or aerosol cleaners. Electrostatic Discharge Electrostatic discharge is the release of static electricity when two objects come into contact—for example, the shock you receive when you walk across the carpet and touch a metal door knob. A discharge of static electricity from fingers or other electrostatic conductors may damage electronic components. To prevent damage to the computer, damage to a drive, or loss of information, observe these precautions: • If removal or installation instructions direct you to unplug the computer, unplug it after being properly grounded and before removing a cover. • Keep components in their electrostatic-safe containers until you are ready to install them. • Avoid touching pins, leads, and circuitry. Handle electronic components as little as possible. • Use nonmagnetic tools. • Before handling components, discharge static electricity by touching an unpainted metal surface of the component. • If you remove a component, place it in an electrostatic-safe container. • If you need more information about static electricity or assistance with component removal or installation, contact support. Getting to know SOL Right Side Component Description (1) USB 2.0 Ports (2) Connect optional USB 2.0 devices and provide enhanced USB power performance. (2) Firewire Port Connect optional Firewire devices. (3) Digital Media Slot Supports the following digital card formats: ● Secure Digital (SD) Memory Card ● Secure Digital High Capacity (SDHC) Memory Card ● Secure Digital Extended Capacity (SDxC) Memory Card ● Multi Media Card (MMC) Left Side Component Description (1) AC/Solar Power Input Connects an AC adapter/ Solar Charger HDMI Port Connects a Hi-Definition HDMI (TV/Projector) (3) sVGA Port Connects a standard monitor (4) USB 2.0 Port Connect optional USB 2.0 devices and provide enhanced USB power performance (5) Headphones Connect headphones/speakers (6) Microphone Connect a microphone (2) HDMI Front Side Component Description (1) (2) Camera Power Button Web Camera Power Button to power up/down the computer (3) (4) Speakers Touch Pad (5) Left Button (6) Right Button Internal speakers Moves the on-screen pointer and selects or activates items on the screen. Functions like the left button on an external mouse Functions like the right button on an external mouse Using the Touch Pad Scrolling Scrolling is useful for moving up, down, or sideways on a page or image. Place two fingers slightly apart on the TouchPad zone and then drag them up, down, left, or right. Tapping To make an on-screen selection use the tap function on the TouchPad. Point to an item on the screen, and then tap one finger on the TouchPad zone to make a selection. Double-tap an item to open it. Top Side Component Description (1) Charger Release mechanism Mechanism to disjoint the Solar charger unit from the laptop (2) Charger Open button Open the solar charger (while still connected to SOL) Understanding the Ubuntu Desktop Note: The installation media (USB Thumb Drive) packaged with SOL contains a complete version of Ubuntu user guide. Please refer to the guide. Welcome to Ubuntu Ubuntu features Unity, a reimagined way to use your computer. Unity is designed to minimize distractions, give you more room to work, and help you get things done. This guide is designed to answer your questions about using Unity and your Ubuntu desktop. First we will take a moment to look at some Unity's key features, and how you can use them. Getting started with Unity The Launcher The Launcher appears automatically when you log in to your desktop, and gives you quick access to the applications you use most often. The Launcher is one of the key components of the Unity desktop. When you log in to your desktop, it will appear along the left-‐hand side of the screen. The Launcher provides you with quick access to applications, workspaces, removable devices and the trash. If an application that you want to start using is present in the Launcher, you can click on that application's icon, and it will start up, ready for you to use. When you start an app, the Launcher icon pulses to let you know that Ubuntu is starting your app. This is useful because while some apps start immediately, others may take a minute to load. Once the app has finished starting, a small white triangle will show to the left of the Launcher square. Two triangles means that you two windows of the same app open. If you have three or more windows of the same app open, three triangles will show. Change which applications show in the Launcher To add an application to the Launcher for easy access: • • Drag the application's icon from the Dash onto the Launcher. Alternatively, when an application is running, right click on the application icon and select Lock to Launcher. The Launcher icon order can be changed by dragging an icon off of the Launcher, and then back onto it in the desired location. To remove an application icon from the Launcher, right click on the application icon and select Unlock from Launcher. The Dash The Ubuntu Button sits near the top left corner of the screen and is always the top item in the Launcher. If you click the Ubuntu Button, Unity will present you with an additional feature of the desktop, the Dash. The Dash is designed to make it easier to find, open, and use apps, files, music, and more. For example, if you type the word "document" into the Search Bar, the Dash will show you applications that help you write and edit documents. It will also show you relevant folders and documents that you have been working on recently. The Dash allows you to search for applications, files, music, and videos, and shows you items that you have used recently. If you have ever worked on a spreadsheet or edited an image and forgot where you saved it, you will surely find this feature of the Dash to be useful. To start using the Dash, click the top icon in the Launcher. This icon has the Ubuntu logo on it. For faster access, you can just press the Super key. To hide the Dash, click the top icon again or press Super or Esc. Search everything from the Dash home The first thing you'll see when opening the Dash is the Dash Home. Without typing or clicking anything, the Dash Home will show you apps and files you've used recently. Only one row of results will show for each type. If there are more results, you can click See more results to view them. To search, just start typing and related search results will automatically appear from the different installed lenses. Click on a result to open it, or you can press Enter to open the first item in the list. Add and remove software The Ubuntu development team has chosen a default set of applications that we think makes Ubuntu very useful for most day-‐to-‐day tasks. However, you will certainly want to install more software to make Ubuntu more useful to you. To install additional software, complete the following steps: 1. 2. 3. 4. 5. 6. 7. Connect to the Internet using a wireless or wired connection. Click the Ubuntu Software Center icon in the Launcher, or search for Software Center in the Dash. When the Software Center launches, search for an application, or select a category and find an application from the list. Select the application that you are interested in and click Install. You will be asked to enter your password. Once you have done that the installation will begin. The installation usually finishes quickly, but could take a while if you have a slow Internet connection. A shortcut to your new app will be added to the Launcher. To disable this feature, uncheck View ▸ New Applications in Launcher. The Ubuntu Software Center makes it easy to remove software that you no longer use. 1. 2. 3. 4. 5. Click the Ubuntu Software Center icon in the Launcher, or search for Software Center in the Dash. When the Software Center opens, click the Installed button at the top. Find the application that you want to remove by using the search box, or by looking through the list of installed applications. Select the application and click Remove. You may be asked to enter your password. After you have done that, the application will be removed. Some applications depend on others being installed in order to work properly. If you try to remove an application which is needed by another application, both of them will be removed. You will be asked to confirm that this is what you want to happen before the applications are removed. Manage apps & settings with the menu bar The menu bar is the dark strip on the top of your screen. It contains the window management buttons, the app menus, and the status menus. Window management buttons The window management buttons are on the top left corner of windows. When maximized, the buttons are in the top left of the screen. Click the buttons to close, minimize, maximize or restore windows. App menus The app menus are located to the right of the window management buttons. Unity hides the app menus and the window management buttons unless you move your mouse pointer to the top left of the screen or press Alt+F10. This feature enables you to see more of your content at once, which is especially valuable on small screens like netbooks. Status menus Ubuntu has several different status menus (sometimes referred to as indicators) on the right side of the menu bar. The status menus are a convenient place where you can check and modify the state of your computer and applications. Windows and workspaces Like other desktops, Unity uses windows to display your running applications. Using both the Dash and the Launcher, you can launch new applications and control which window is active. In addition to windows, you can also group your applications together within workspaces. Visit the window and workspace help topics below to better learn how to use these features. Working with windows Maximize/minimize a window: You can maximize a window to take up all of the space on your desktop and unmaximize a window to restore it to its normal size. You can also maximize windows vertically along the left and right sides of the screen, so you can easily look at two windows at once. See Tile windows for details. To maximize a window, grab the titlebar and drag it to the top of the screen, or just double-‐click the titlebar. To maximize a window using the keyboard, hold down Ctrl and Super and press ↑. To restore a window to its unmaximized size, drag it away from the edges of the screen. If the window is fully maximized, you can double-‐click the titlebar to restore it. You can also use the keyboard shortcut Ctrl+Super+↓. Switch between windows: Press Alt+Tab to bring up the window switcher. • • • • Release Alt to select the next (highlighted) window in the switcher. Otherwise, still holding down the Alt key, press Tab to cycle through the list of open windows, or Shift+Tab to cycle backwards. You can also move between the application icons in the window switcher with the → or ← keys, or select one by clicking it with the mouse. Previews of applications with a single window can be displayed with the ↓ key. What is a workspace, and how will it help me? Workspaces refer to the grouping of windows on your desktop. These virtual desktops increase the size of your working area. Workspaces are meant to reduce clutter and make the desktop easier to navigate. Workspaces can be used to organize your work. For example, you could have all your communication windows, such as e-‐mail and your chat program, on one workspace, and the work you are doing on a different workspace. Your music manager could be on a third workspace. Open the Launcher and click the workspace switcher icon near the bottom. By default, Ubuntu shows 4 workspaces, arranged in 2 rows and 2 columns. You can change the number of workspaces: Switch between workspaces Using the mouse: Open the Launcher and click the workspace switcher button near the bottom. Double-‐click on any window or workspace to switch to it, or press the workspace switcher button again to return to your previous workspace. Using the keyboard: • • • • Press Ctrl+Alt+→ to move to a workspace which is to the right of the current workspace. Press Ctrl+Alt+← to move to a workspace which is to the left of the current workspace. Press Ctrl+Alt+↓ to move to a workspace which is below the current workspace. Press Ctrl+Alt+↑ to move to a workspace which is above the current workspace. What is the HUD? The HUD or Heads Up Display is a search-‐based alternative to traditional menus and is a brand new feature in Ubuntu 12.04 LTS. Some apps like Gimp or Inkscape have hundreds of menu items. If you're using apps like these, you may remember the name of a menu option, but you might not remember how to find it in the menus. Using a search box can be quite a bit easier and even faster than navigating complicated hierarchies of menus. The HUD also can be more accessible than normal menus as some people are unable to precisely control a mouse pointer. Use the HUD It's easy to try the HUD: 1. 2. 3. 4. Tap Alt to open the HUD. Start typing. When you see a result that you want to run, use the up and down keys to select the result, then press Enter, or just click your desired search result. If you change your mind and want to exit the HUD, simply tap Alt again or Esc. You can also click anywhere outside the HUD to close the HUD. The HUD keeps track of your search history and adjusts the search results to be even more useful the more you use it. Log out, power off, switch users When you've finished using your computer, you can turn it off, suspend it (to save power), or leave it powered on and log out. Log out or switch users To let other users use your computer, you can either log out, or leave yourself logged in and just switch users. If you switch users, all of your applications will continue running, and everything will be where you left it when you log back in. To log out or switch users, click the system menu at the very right of the menu bar and select the appropriate option. Lock the screen If you're leaving your computer for a short time, you should lock your screen to prevent other people from accessing your files or running applications. When you return, simply enter your password to log back in. If you don't lock your screen, it will lock automatically after a certain amount of time. To lock your screen, click the system menu in the menu bar and select Lock Screen. When your screen is locked, other users can log in to their own accounts by clicking Switch User on the password screen. You can switch back to your desktop when they are finished. Suspend To save power, suspend your computer when you aren't using it. If you use a laptop, Ubuntu suspends your computer automatically when you close the lid. This saves your state to your computer's memory and powers off most of the computer's functions. A very small amount of power is still used during suspend. To suspend your computer manually, click the system menu in the menu bar and select Suspend. If you leave your computer for a few minutes, the screen will automatically lock itself so you have to enter your password to start using it again. This is done for security reasons (so no one can mess with your work if you leave the computer unattended), but it can be annoying if the screen locks itself too quickly. To wait a longer period before the screen is automatically locked: 1. 2. 3. Click the icon at the very right of the menu bar and select System Settings. Click Brightness & Lock. Change the value in the Lock screen after drop-‐down list. Power off or restart If you want to power off your computer entirely, or do a full restart, click the system menu and select Shut Down. If there are other users logged in, you may not be allowed to power off or restart the computer, because this will end their sessions. If you are an administrative user, you may be asked for your password to power off. Files, folders & search Browse files and folders Use the Files file manager to browse and organize the files on your computer. You can also use it to manage files on storage devices (like external hard disks), on file servers, and network shares. To open the file manager, open Files in the Dash. You can also search for files and folders with the Dash in the same way you would search for applications. They will appear under the heading Files and Folders. Another way to open the file manager is to select the Home Folder shortcut in the Launcher. Exploring the contents of folders In the file manager, double-‐click any folder to view its contents, and double-‐click any file to open it with the default application for that file. You can also right-‐click a folder to open it in a new tab or new window. In list view, you can also click the expander next to a folder to show its contents in a tree. The path bar above the list of files and folders shows you which folder you're viewing, including the parent folders of the current folder. Click a parent folder in the path bar to go to that folder. Right-‐ click any folder in the path bar to open it in a new tab or window, copy or move it, or access its properties. If you want to quickly skip to a file in the folder you're viewing, start typing its name. A search box will appear at the bottom of the window and the first file which matches your search will be highlighted. Press the down arrow key or Ctrl+G, or scroll with the mouse, to skip to the next file that matches your search. You can quickly access common places from the sidebar. If you do not see the sidebar, click View ▸ Sidebar ▸ Show Sidebar. You can add bookmarks to folders that you use often and they will appear in the sidebar. Use the Bookmarks menu to do this, or simply drag a folder into the sidebar. If you frequently move files between nested folders, you might find it more useful to show a tree in the sidebar instead. Click View ▸ Sidebar ▸ Tree to enable the tree sidebar. Click the expander arrow next to a folder to show its child folders in the tree, or click a folder to open it in the window. Copy or move files and folders A file or folder can be copied or moved to a new location by dragging and dropping with the mouse, using the copy and paste commands, or by using keyboard shortcuts. For example, you might want to copy a presentation onto a memory stick so you can take it to work with you. Or, you could make a back-‐up copy of a document before you make changes to it (and then use the old copy if you don't like your changes). These instructions apply to both files and folders. You copy and move files and folders in exactly the same way. Copy and paste files 1. 2. 3. 4. Select the file you want to copy by clicking on it once. Click Edit ▸ Copy, or press Ctrl+C. Navigate to another folder, where you want to put the copy of the file. Click Edit ▸ Paste to finish copying the file, or press Ctrl+V. There will now be a copy of the file in the original folder and the other folder. Cut and paste files to move them 1. 2. 3. 4. Select the file you want to move by clicking on it once. Click Edit ▸ Cut, or press Ctrl+X. Navigate to another folder, where you want to move the file. Click Edit ▸ Paste to finish moving the file, or press Ctrl+V. The file will be taken out of its original folder and moved to the other folder. Drag files to copy or move 1. 2. 3. Open the file manager and go to the folder which contains the file you want to copy. Click File ▸ New Window (or press Ctrl+N) to open a second window. In the new window, navigate to the folder where you want to move or copy the file. Click and drag the file from one window to another. This will move it if the destination is on the same device, or copy it if the destination is on a different device. For example, if you drag a file from a USB memory stick to your Home folder, it will be copied, because you're dragging from one device to another. You can force the file to be copied by holding down the Ctrl key while dragging, or force it to be moved by holding down the Shift key while dragging. Delete files and folders If you don't want a file or folder any more, you can delete it. When you delete an item it is moved to the Trash folder, where it is stored until you empty the trash. You can restore items in the Trash folder to their original location if you decide you need them, or if they were accidentally deleted. To send a file to the trash: 1. 2. Select the item you want to place in the trash by clicking it once. Press Delete on your keyboard. Alternatively, drag the item to the Trash in the sidebar. To delete files permanently, and free up disk space on your computer, you need to empty the trash. To empty the trash, right-‐click Trash in the sidebar and select Empty Trash. Permanently delete a file You can immediately delete a file permanently, without having to send it to the trash first. To permanently delete a file: 1. 2. 3. Select the item you want to delete. Press and hold the Shift key, then press the Delete key on your keyboard. Because you cannot undo this, you will be asked to confirm that you want to delete the file or folder. Rename a file or folder You can use the file manager to change the name of a file or folder. To rename a file or folder: 1. 2. Right-‐click on the item and select Rename, or select the file and press F2. Type the new name and press Enter. You can also rename a file from the properties window. When you rename a file, only the first part of the name of the file is selected, not the file extension (the part after the "."). The extension normally denotes what type of file it is (e.g. file.pdf is a PDF document), and you usually do not want to change that. If you need to change the extension as well, select the entire file name and change it. If you renamed the wrong file, or named your file improperly, you can undo the rename. To revert the action, immediately click Edit ▸ Undo to restore the former name. File properties To view information about a file or folder, right-‐click it and select Properties. You can also select the file and press Alt+Enter. The file properties window shows you information like the type of file, the size of the file, and when you last modified it. If you need this information often, you can have it displayed in list view columns or icon captions. The information given on the Basic tab is explained below. There are also Permissions and Open With tabs. For certain types of files, such as images and videos, there will be an extra tab that provides information like the dimensions, duration, and codec. Removable drives and external disks Safely remove an external drive When you use external storage devices like USB flash drives, you should safely remove them before unplugging them. If you just unplug a device, you run the risk of unplugging while an application is still using it. This could result in some of your files being lost or damaged. When you use an optical disc like a CD or DVD, you can use the same steps to eject the disc from your computer. To eject a removable device: 1. 2. Open the file manager. Locate the device in the sidebar. It should have a small eject icon next to the name. Click the eject icon to safely remove or eject the device. Alternately, you can right-‐click the name of the device in the sidebar and select Eject. Safely remove a device that is in use If any of the files on the device are open and in use by an application, you will not be able to safely remove the device. You will be prompted with a window telling you that "the volume is busy," and listing all the open files on the device. Once you close all the files on the device, the device will automatically be safe to remove. At that time you can unplug or eject it. If you can't close one of the files, for example if the application using the file is locked up, you can right-‐click the file in the Volume is busy window and select End Process. This will force the entire locked up application to close, which could close other files you have open with that application. You can also choose Unmount Anyway to remove the device without closing the files. This may cause errors in applications that have those files open.