1
Project Acronym:
OPTIMIS
Project Title:
Optimized Infrastructure Services
Project Number:
257115
Instrument:
Integrated Project
Thematic Priority:
ICT-2009.1.2 – Internet of Services, Software and
Virtualisation
D2.1.3.2 – OPTIMIS IDE
Activity 2:
Service Construction
WP 2.1:
Programming Model
Due Date:
M30
Submission Date:
30/11/2012
Start Date of Project:
01/06/2010
Duration of Project:
36 months
Organisation Responsible for the Deliverable:
BSC
Version:
1.0
Status
Final
Author(s):
Jorge Ejarque
Francesc Lordan
Raül Sirvent
BSC
BSC
BSC
Reviewer(s)
George Kousiouris
Wolfgang Ziegler
NTUA
SCAI
© OPTIMIS Consortium
D2.1.3.2 - OPTIMIS IDE
Project co-funded by the European Commission within the Seventh Framework Programme
Dissemination Level
PU
Public
PP
Restricted to other programme participants (including the Commission)
RE
Restricted to a group specified by the consortium (including the Commission)
CO
Confidential, only for members of the consortium (including the Commission)
© OPTIMIS Consortium
X
D2.1.3.2 - OPTIMIS IDE
Version History
Version
Date
Comments, Changes, Status
Initial draft to be delivered for
M30 Interim Review
Authors, contributors, reviewers
Jorge Ejarque, Francesc Lordan, Raül
Sirvent (BSC)
0.1
30/10/2012
0.2
19/11/2012 Final version for internal review
Raül Sirvent (BSC)
0.3
Reviewers’ updated version with
20/11/2012 comments
George Kousiouris (NTUA)
0.4
27/11/2012
1.0
30/11/2012 Final version for submission
© OPTIMIS Consortium
Final version with reviewer’s
corrections implemented
Wolfgang Ziegler (SCAI)
Jorge Ejarque, Raül Sirvent (BSC)
Malena Donato (ATOS)
Page 1 of 28
D2.1.3.2 - OPTIMIS IDE
Table of Contents
EXECUTIVE SUMMARY ........................................................................................................................... 4
1
INTRODUCTION ............................................................................................................................. 5
1.1
1.2
2
FUNCTIONALITIES .......................................................................................................................... 6
2.1
2.2
3
PURPOSE ........................................................................................................................................ 5
GLOSSARY OF ACRONYMS .................................................................................................................. 5
SERVICE IMPLEMENTATION ................................................................................................................ 6
SERVICE BUILDING & DEPLOYMENT ...................................................................................................... 6
DETAILED DESIGN AND IMPLEMENTATION ................................................................................... 8
3.1
TECHNICAL FOUNDATION ................................................................................................................... 8
3.2
INTERNAL ARCHITECTURE .................................................................................................................. 8
3.2.1 Eclipse SDK .............................................................................................................................. 8
3.2.2 Service Element Creation Wizards .......................................................................................... 9
3.2.3 OPTIMIS Actions ..................................................................................................................... 9
3.2.4 OPTIMIS Service Project ........................................................................................................ 10
3.2.5 OPTIMIS Service Editor ......................................................................................................... 10
3.2.6 OPTIMIS Menu ...................................................................................................................... 10
3.3
EXTERNAL INTERFACES .................................................................................................................... 10
3.4
SEQUENCE DIAGRAMS ..................................................................................................................... 12
4
INTEGRATED DEVELOPMENT ENVIRONMENT USAGE .................................................................. 17
4.1
BUILDING AN OPTIMIS APPLICATION ................................................................................................ 17
4.1.1 Step 1: Create a new Project ................................................................................................. 17
4.1.2 Step 2: Create a new Service Class ........................................................................................ 18
4.1.3 Step 3: Create a Orchestration Element in a Service Class ................................................... 18
4.1.4 Step4: Create a Core Element Service Class .......................................................................... 19
4.1.5 Optional step: Add Elasticity to a Method Core Element ...................................................... 20
4.1.6 Optional Step: Add constraints to an Element ...................................................................... 20
4.1.7 Step 5: Invoke an Core Element from an Orchestration Element ......................................... 21
4.1.8 Step 6: Create service packages............................................................................................ 21
4.1.9 Step 7: Test the application deploying in Localhost .............................................................. 22
4.1.10
Step 8: Create service images and license tokens. ........................................................... 22
4.1.11
Step 9: Define non-functional properties. ........................................................................ 23
4.1.12
Step 10: Deployment. ....................................................................................................... 23
5
CONCLUSIONS ............................................................................................................................. 24
REFERENCES ......................................................................................................................................... 25
ANNEX A.
LICENSE CONDITIONS. ..................................................................................................... 26
© OPTIMIS Consortium
Page 2 of 28
D2.1.3.2 - OPTIMIS IDE
Index of Figures
Figure 1. The OPTIMIS IDE internal architecture .......................................................................... 8
Figure 2. OPTIMIS Service Project Creation Diagram .................................................................. 12
Figure 3. Service Class Creation Diagram .................................................................................... 13
Figure 4. Implementation Actions Diagram ................................................................................ 13
Figure 5. Service Package Building Diagram................................................................................ 14
Figure 6. Image Creation Diagram............................................................................................... 14
Figure 7. License Token Generation Diagram ............................................................................. 15
Figure 8. Service Manifest Generation Diagram ......................................................................... 15
Figure 9. Service Deployment Diagram ....................................................................................... 16
Figure 10. OPTIMIS IDE Service Editor ........................................................................................ 17
Figure 11. Service Class wizard.................................................................................................... 18
Figure 12. Orchestration Element Wizard................................................................................... 19
Figure 13. Core Element Wizard ................................................................................................. 20
Figure 14. Orchestration Element implementation .................................................................... 21
Figure 15. Building and Deployment Tab .................................................................................... 22
Index of Tables
Table 1- IDE interface .................................................................................................................. 12
© OPTIMIS Consortium
Page 3 of 28
D2.1.3.2 - OPTIMIS IDE
Executive Summary
This is the second deliverable of WP2.1, and its purpose is to describe in detail the Integrated
Development Environment created in OPTIMIS, as a complement for the OPTIMIS
Programming Model. Its main objective is to provide a graphical tool where service developers
can develop or port their applications and services and easily deploy them in the cloud.
Section 2 describes the main capabilities of the IDE, listing and giving a general description of
the functionalities available, and detailing which are the requirements accomplished by the
implementation of the IDE. The functionalities are classified in terms of service
implementation, building and deployment, and they include the creation of service elements,
integration with legacy software, definition of a service element constraints, creation and
configuration of service packages, creation of service VM images, creation of license tokens,
specification of TREC and legal constraints, generation of service manifest and integration of
service deployment and undeployment. The requirements accomplished are those related
with Service Construction and to the Cloud Programming Model use case.
Section 3 explains the detailed design of the IDE, including the technical foundations as well as
describing its internal architecture and how the different functionalities have been
implemented. It also includes a description of the external interfaces, and the sequence
diagrams depicting the interaction of the different components of the IDE. The IDE has been
implemented as an Eclipse plug-in, and its architecture is organized correspondingly to its
functionality (components corresponding to actions, wizards, menus and editors). The external
interfaces provided by the IDE have been created for completeness, but were not initially
pretended to be used by any other component or software.
In Section 4 a description on how the IDE is used is provided. This section can be seen as some
kind of user manual. It provides a step by step guide in order to create a new project, a service
class, a orchestration element, a core element, include elasticity and constraints to elements,
create service packages, and deploy both in localhost or the OPTIMIS infrastructure..
Finally, Section 5 provides conclusions about this document. The IDE is an important tool in the
OPTIMIS platform, because it provides a friendly interface for service developers to use the
OPTIMIS Programming Model, including wizards to facilitate even more the creation of new
services. It is a tool that integrates different capabilities to provide a service cloudification
environment. Our exploitation plans regarding the IDE include interesting possibilities of
exploitation related to the Eclipse community.
© OPTIMIS Consortium
Page 4 of 28
D2.1.3.2 - OPTIMIS IDE
1
Introduction
1.1
Purpose
The purposes of this deliverable are as follows:
1.2
To provide a description of the designed Integrated Development Environment
To provide details on the design and implementation of the Integrated Development
Environment
To provide a description of the usage of the Integrated Development Environment
Glossary of Acronyms
Acronym
AC
CO
CE
D
DM
FTE
IDE
IP
JDT
OE
PM
SDO
SLA
SP
VM
VMM
WP
Definition
Admission Control
Cloud Optimizer
Core Element
Deliverable
Data Manager
Fault Tolerance Engine
Integrated Development Environment
Infrastructure Provider
Java Development Tools
Orchestration Element
Programming Model
Service Deployment Optimizer
Service Level Agreement
Service Provider
Virtual Machine
Virtual Machine Manager
Work Package
© OPTIMIS Consortium
Page 5 of 28
D2.1.3.2 - OPTIMIS IDE
2
Functionalities
The Integrated Development Environment (IDE) is provided as the main tool for Service
Developers to create services for the OPTIMIS framework. The IDE is responsible of achieving
partially or completely the requirements SC_08, SC_09, SC_10, SC_11, SC_16, SC_21, SC_23,
SC_24, SC_25, SC_26, SC_28, CPM_7, CPM_8, CPM_9, CPM_18, CPM_19 defined in D1.1.1.2
[2] and D.1.1.1.3 [3], and it is a key component for the usability of the OPTIMIS toolkit in the
service construction phase. To achieve the aforementioned requirements, the IDE provides
functionalities for implementing, building and deploying a service in a single graphical user
interface, offering to service developers an attractive and understandable environment to build
OPTIMIS services.
2.1
Service Implementation
Creation of the Service Elements
An Service implemented with the OPTIMIS programming model is composed by two types of
elements: Core Elements which are parts of code with a certain computation potentially
executed in parallel; and Orchestration Elements which are compositions of Core Elements for
implementing the service functionality. The IDE offers graphical user interfaces to create the
Java projects, classes, interfaces, methods and code required to implement the Orchestration
and Core Elements for developing an OPTIMIS service.
Integration of Legacy Software
In addition to the functionality of creating service elements from scratch, the IDE offers the
functionality of creating service elements from existing software, such as web services, binary
files, commands, jar libraries or war packages.
Definition of Element Constraints
The IDE also offers a graphical interface to add to the service element the different constraints
that the cloud infrastructure has to fulfill for a correct execution of the service. These
constraints include:
2.2
Hardware constraints: specify the minimum requirements for CPU, memory and disk
space.
License constraints: specify the software licenses required by the service elements
Legal constraints: specify the data protection requirements for shared disk spaces
such as encryption, location, etc.
Service building & deployment
Creation and Configuration of Service Packages
Once the service is implemented, the IDE offers a graphical interface to group the service
elements manually or automatically and after that automatically compile and instrument the
service code, and create the service packages including the Programming Model runtime, its
configuration files and the service element dependencies.
Creation of Service VM Images
The main requirement to deploy a service in the cloud is generating the VM images. The IDE
offers the functionality of creating the VM images for the implemented service with the help of
© OPTIMIS Consortium
Page 6 of 28
D2.1.3.2 - OPTIMIS IDE
the Image Creation Service with the minimum developer intervention (one-click creation).
Generation of License Tokens
In case service elements with legacy software require licenses, the IDE detects it and provides
to the user a graphical interface for generating the license tokens for running the software.
Specification of TREC & Service-Level Legal Constraints
The IDE also offers a graphical user interface to set requirements for cloud deployment such as
the required trust and risk levels, the energy and ecological efficiency, the maximum cost and
service-level legal capabilities to be included in the Service Manifest such as data
anonymization or the property rights of generated data.
Generation of Service Manifest
Once the service packages have been created the IDE automatically generates a Service
Manifest for the service defining a component for each of the defined packages. Then, every
time we perform an action, which requires a modification of the Service Manifest, the IDE will
regenerate this manifest
Integration of Service Deployment & Undeployment
Finally, the IDE also provides a graphical interface for initiating the service deployment and
accessing the status of the deployment process. Once the service is deployed the IDE shows
the information about the selected infrastructure provider and IP addresses of the service
VMs.
© OPTIMIS Consortium
Page 7 of 28
D2.1.3.2 - OPTIMIS IDE
3
3.1
Detailed Design and Implementation
Technical foundation
The Integrated Development Environment has been implemented on top of the Eclipse
platform [1]. The implementation of the OPTIMIS IDE consists of creating a plug-in which
extends the basic Java Development Tools provided by Eclipse, to facilitate the definition and
implementation of new services following the OPTIMIS Programming Model specification.
3.2
Internal Architecture
The OPTIMIS IDE component is designed as a plugin for the Eclipse IDE that provides the basic
functionalities for implementing software. The OPTIMIS plugin is composed of a set of wizards,
menus, actions and editors that extend the Eclipse basic functionalities to facilitate the
implementation of services for the OPTIMIS infrastructure. Moreover, the OPTIMIS IDE will
make use of the Image Creation, License Management and Service Deployment components
for creating the required images, license tokens and deploying the service in the Cloud
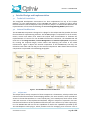
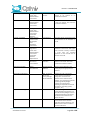
infrastructure. Figure 1 depicts the internal components of the OPTIMIS IDE, how they are
related to each other and how they use the external components. More details about all these
components are provided in the following paragraphs.
Figure 1. The OPTIMIS IDE internal architecture
3.2.1 Eclipse SDK
The Eclipse SDK is mainly composed of three components: the Runtime, which provides basic
common useful functionalities for developing software; the User Interface, which provides an
access to the IDE functionalities in a user friendly way; and a Workspace, which stores all the
code and resources of the implemented Software. Plugins in Eclipse are exposed in the User
interface and make use of the capabilities offered by the core runtime or by other eclipse plugins. The OPTIMIS IDE will use the core capabilities as well as the capabilities provided by the
Java Development Tools plug-in, which provides tools for managing Java resources such as
© OPTIMIS Consortium
Page 8 of 28
D2.1.3.2 - OPTIMIS IDE
classes, interfaces, annotations, methods, etc.
3.2.2 Service Element Creation Wizards
The Service Element Creation Wizards are designed to help and guide the developer during the
creation of new service elements of an OPTIMIS project. They request some information from
the user, infer extra information from those provided by the user and the project status, and
automate the process of creating a new service element. The OPTIMIS IDE includes the
following wizards:
-
-
Project Creation Wizard: Facilitates the creation of an OPTIMIS project which
includes packages and configuration files required to implement an OPTIMIS
service
Service Class Creation Wizard: Assists the user in the creation of classes which
contain Orchestration Elements
Orchestration Element Creation Wizard: Facilitates the definition and creation of
Orchestration Elements which contains a composition of Core Elements
Core Element Creation Wizard: Automates the definition and creation of Core
Elements.
3.2.3 OPTIMIS Actions
The actions implemented by the OPTIMIS IDE plugin are grouped in two types: the
Implementation actions which are used to perform operations when the developer is coding
the service; and the Building & Deployment actions which are used to perform operations to
build and deploy the implemented OPTIMIS service.
-
Implementation Actions
o Convert to Orchestration Element Action: It defines an Orchestration Element from a
selected existing method by adding the required annotations in order to be identified
as an Orchestration Element.
o Convert to Core Element Action: It defines a Core Element from a selected method by
adding this method in the Core Element Interface.
o Add Core Element Invocation Action: It includes an invocation of a Core element
inside the selected Orchestration Element.
-
Building & Deployment Actions
o The Building action compiles the Java code generated during the implementation
phase, instruments the classes for intercepting Orchestration and Core Element
invocations, groups the Service Elements with compatible constraints and creates the
service packages for each of these groups.
o The Images Creation action contacts to the Image Creation service to build the
different images types according to the Service Elements’ constraints installing the
created packages and other service data on these images
o The License Token Generation action creates a license token request according to
license requirements of a Service Application.
o The Service Manifest Generation action creates a Service Manifest for deploying the
service in an OPTIMIS SP. This action generates a basic Service Manifest, which
describes the required Virtual Systems according to the hardware Service Element
constraints included in the defined service packages. Once the basic manifest has been
generated, the action includes information about the service elasticity rules, the
desired TREC parameters for deployment and the legal constraints provided by the
developer.
© OPTIMIS Consortium
Page 9 of 28
D2.1.3.2 - OPTIMIS IDE
o
Finally, the Deployment action interacts with the Service Deployment component for
submitting the deployment on the SP selected by the user
3.2.4 OPTIMIS Service Project
The OPTIMIS Service Project is an extension of a Java Project. It stores and provides access to
the packages, classes, libraries, folders and configuration files required to build an OPTIMIS
service. OPTIMIS Service Projects are stored in the Eclipse’s workspace as the other eclipse
project types.
3.2.5 OPTIMIS Service Editor
The OPTIMIS Service Editor provides an interface to developers to visualize an overview of an
OPTIMIS Service and the details of the defined elements for this service. It also allows the
addition of new service elements automatically running the Service Element Creation Wizards
and Building and Deployment actions, as well as the modification of different service
configuration files.
The OPTIMIS Service editor has two tabs, to differentiate when the user is in the
implementation phase or in the building and deployment phase.
3.2.6 OPTIMIS Menu
Some of the actions provided by the OPTIMIS IDE plugin, such as Implementation Actions,
cannot be accessed by means of the OPTIMIS Service Editor because these actions require the
selection of part of the service code. Therefore, the IDE plugin includes an OPTIMIS menu for
providing the developer an easy way to access all the IDE functionalities.
3.3
External interfaces
The OPTIMIS Integrated Development Environment does not offer any API. The functionalities
provided by this component have been implemented as an Eclipse plug-in SDK, so the
operations that implement these capabilities can be accessed by means of the Eclipse User
Interface, using the extended wizards, editors, menus and actions. Table 1 enumerates and
describes the operations provided by the IDE.
Operation
Input
Output
Description
CreateOPTIMISProject
- Service Name
- Main Package
- Runtime location
Optional
Parameters:
-Workspace
location
- JRE options
- External Libraries
- Class name
- OPTIMIS Project
Creates a new project to implement
a OPTIMIS Service
- Service Class
Creates a new Java class in the main
service package to insert and
implement Orchestration Elements
- Service Class
- Method Name
- Constraints
- Parameters
- Orchestration
Element
Creates the method in a service class
with special annotations to be
treated as an Orchestration Element
CreateServiceClass
CreateNewOE
© OPTIMIS Consortium
Page 10 of 28
D2.1.3.2 - OPTIMIS IDE
CreateOE_fromMethod
- Package
- Class name
- Method Name
- Constraints
- Orchestration
Element
Creates the special annotations in a
method to be treated as an
Orchestration Element.
CreateNewCE
- Class name
- Method Name
- Parameters
- Constraints
- Core Element
Includes a CE definition in the CEI and
a new core element class with the
core element method
CreateCE_fromMethod
- Package
- Class name
- Method Name
- Constraints
- Parameter
directions
- WSDL location
- Service name
- Namespace
- Port
- Operation
- Constraints
- Command
- Arguments
- Class name
- Method Name
- Constraints
- Parameter
directions
-Dependencies
- Orchestration
Element line
- Core Element
- Core Element
Includes a CE definition in the CEI.
- Core Element
Generates classes used by the service
and introduces the CE definition in
the CEI
- Core Element
Generates a method in the class
specified as “Class name” with a glue
code to execute a binary, command
or script with the specified
arguments. It also includes the CE
definition in the CEI.
-Core Element
invocation
Inserts the call to invoke a Core
Element in the chosen line of the
Orchestration Element method
-Name
-Core Elements
- Service Package
definition
Defines a service package in the
service project as a group of core
elements
-War, jar and zip
files for the
service packages
-Service Manifest
Compiles the code, instruments
service classes and creates the
package files and the Service
Manifest for the defined service
packages. If no packages are defined
it will first generate packages
grouping the Core Elements
according to compatible constraints
(architecture, operating system,
encryption, etc.)
Creates the images for each of the
service packages using the ICS, and
install the service packages on them.
Includes the URL where the images
are stored to be included in the
Service manifest
Requests the license token from the
License Server for the software
required by the Core elements. The
obtained License token is added to
the Service Manifest.
CreateCE_fromWSDL
CreateCE_fromCommand
InsertCEInvocation
DefineServicePackage
GenerateServicePackages
GenerateServiceImages
RequestLicenseTokens
© OPTIMIS Consortium
Page 11 of 28
D2.1.3.2 - OPTIMIS IDE
DeployService
- Non functional
properties (TREC,
legal,etc)
UndeployService
-Service ID
-Service ID
Submits the service deployment in
the OPTIMIS Service Provider (SP) by
means of the Service Deployer.
Submits the service undeployment of
a running service at an OPTIMIS
Service Provider through the Service
Manager.
Table 1- IDE interface
3.4 Sequence diagrams
This section provides the details about how the different internal components interacting to
each other, and how the IDE interacts with other components of the OPTIMIS framework. This
section has been split in two groups of diagrams: the implementation diagrams, which show
how the Service Element Creation Wizards and Implementation Actions are working to
implement an OPTIMIS service; and the Building & Deployment diagrams, which show how the
implemented service is deployed in the OPTIMIS infrastructure by using the Building and
Deployment actions. The following paragraphs provide more details about the interactions
described in the sequence diagrams.
Developers can run the different operations interacting with the Eclipse user interface starting
wizards, clicking buttons in the OPTIMIS Service Editor once the project is created, or opening
the implementation menu and selecting one of the implementation actions. These interactions
create events, which fire the execution of wizards and actions.
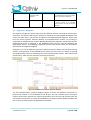
Figure 2. OPTIMIS Service Project Creation Diagram
The first implementation sequence diagram (Figure 2) shows the different interactions to
perform the creation of a new OPTIMIS service project. The user interface opens the Project
Creation wizard that requests the required information from the user and interacts with JDT
and Runtime components to create the OPTIMIS Service project and the different folders and
files. Finally, the wizard opens the OPTIMIS service editor.
© OPTIMIS Consortium
Page 12 of 28
D2.1.3.2 - OPTIMIS IDE
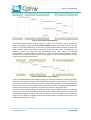
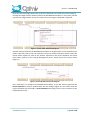
Figure 3. Service Class Creation Diagram
The second implementation diagram (Figure 3) shows the interactions when a developer
selects an operation using the OPTIMIS Service Editor and the generated event will run the
wizard of the selected operation. In this case, the event performs the execution of the Service
Class Creation Wizard. This wizard creates the service class and their corresponding Core
Element interface by using the Java Development Tools (JDT) plugin and Runtime
functionalities. A similar diagram is done for the Core and Orchestration element creation
wizards with the difference that they use the JDT plugin to create Java methods in the service
class and the Core Element interface.
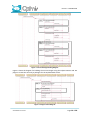
Figure 4. Implementation Actions Diagram
Finally, the third implementation diagram (Figure 4) shows the interaction of the components
when the user selects an action in the implementation menu. In this case, the user interface
generates an event, which fires the execution listener implementation in the Implementation
Menu. This listener runs the selected action (Add CE Invocation in the figure) that will interact
with the Eclipse Runtime component to perform the changes in the project files.
Once the service implementation has finished, the IDE can also help developers to build and
deploy the service in the OPTIMIS infrastructure. The OPTIMIS Service Editor contains a tab
with different widgets to define and build the different service packages, create the service
images for the defined packages, generate the license tokens required by the service core
elements and deploy the service.
© OPTIMIS Consortium
Page 13 of 28
D2.1.3.2 - OPTIMIS IDE
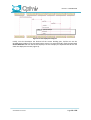
Figure 5. Service Package Building Diagram
Figure 5 shows the diagram for building the service images using the Eclipse Runtime and JDT
plugin to create the war and jar packages for the implemented service.
Figure 6. Image Creation Diagram
© OPTIMIS Consortium
Page 14 of 28
D2.1.3.2 - OPTIMIS IDE
Once the service packages have been created, the developer can create the service images by
running the Image Creation Action located in the OPTIMIS Service Editor. In this action, the IDE
contacts the Image creation service to create the service images as depicted in Figure 6.
Figure 7. License Token Generation Diagram
Another action provided in the OPTIMIS Service Editor is the generation of the required license
tokens. Once the event in the User Interface is fired, the Token Generation action creates the
license token request for each of the licenses required by the service elements and sends
these token requests to the License Management Server, which returns the license tokens
(Figure 7).
Figure 8. Service Manifest Generation Diagram
Every time there is a change in the OPTIMIS Service Editor, it runs the action to generate the
Service Manifest to keep it updated with the last changes (Figure 8). The action reads the
project metadata file and builds a Service Manifest according to the current situation of the
implemented service.
© OPTIMIS Consortium
Page 15 of 28
D2.1.3.2 - OPTIMIS IDE
Figure 9. Service Deployment Diagram
Finally, once the developer has finished all the service building part, he/she can use the
OPTIMIS Service Editor to fire the Deployment Action. This action basically reads the generated
Service Manifest and calls the Service Deployer service to deploy the implemented service and
check the deployment status (Figure 9).
© OPTIMIS Consortium
Page 16 of 28
D2.1.3.2 - OPTIMIS IDE
4
Integrated Development Environment Usage
The following paragraphs describe how a user can use the IDE plugin to achieve the main
functionalities provided by the IDE component.
4.1
Building an OPTIMIS application
If the IDE plug-in has been successfully installed an OPTIMIS menu with different actions
should appear in the Menu bar and a set of OPTIMIS wizards should appear in the “File>New…” sub menu when the Eclipse platform is initiated. There is also a Service Editor (Figure
10), which will be available when a new project is created. You can use these actions, wizards
and editor to easily create a new service with different Orchestration and Core Elements in ten
steps.
4.1.1
Step 1: Create a new Project
A user can start the wizards for creating a new OPTIMIS service project, using the standard
Eclipse menu “File-> New… -> Project” or the “Create Project” action in the “OPTIMIS->
Implementation” menu. This wizard contains some fields to set the name of the project and
the main package. There is also a field to select the location where the Programming Model
runtime is installed.
Once you have filled these three fields, the user can either define other Java project settings in
the second page or finalize the wizard. To finalize the wizard, the user has to click “Finish”, and
the IDE automatically creates the source folder with the main package and a core elements
sub-package. It also creates some metadata files to store the project configuration and finally
it opens the Service Editor where the user can visualize and manage the implementation of the
service as shown in Figure 10.
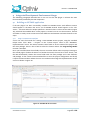
Figure 10. OPTIMIS IDE Service Editor
© OPTIMIS Consortium
Page 17 of 28
D2.1.3.2 - OPTIMIS IDE
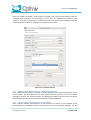
4.1.2 Step 2: Create a new Service Class
Once a service is created, a user can create a service class clicking “New…” in the service class
section of the Service Editor Implementation tab (Figure 10. Step 2), or selecting the “Create
Service Class” action in the “OPTIMIS-> Implementation” menu. Both actions open a service
class creation wizard (such as Figure 11). It contains a field to set the class name and it
optionally allows the user to change the package and source folder of the service class. Once
the wizard is finalized (by clicking “Finish”) a new service class and its corresponding Core
Element Interface are created in the main package of the project and the new service class
automatically appears in the Service Editor.
Figure 11. Service Class wizard
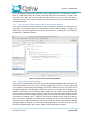
4.1.3 Step 3: Create a Orchestration Element in a Service Class
After the creation of the Service Class, a user can create an Orchestration Element, selecting
the Service Class in the combo box and clicking “New…” in the Orchestration Element Section
of the Service Editor implementation Tab (Figure 10-Step 3). The orchestration element wizard
contains some fields to set the element name, its input parameters, return values, constraints
and if it is going to be part of the Web Service interface. Once the wizard is finalized a new
method is created in the service class with the corresponding parameters and annotations. In
this method a workflow with different Core Element invocations will be programmed (Step 5)
to implement the application functionality
© OPTIMIS Consortium
Page 18 of 28
D2.1.3.2 - OPTIMIS IDE
Figure 12. Orchestration Element Wizard
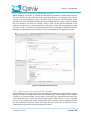
4.1.4 Step4: Create a Core Element Service Class
The Core Elements invoked from the Orchestration Elements of a Service Class must be defined
in the Core Element Interface created when adding a Service Class. So, to do it, the user can
create a new Core Element, selecting the Service Class in the combo box and clicking “New…”
in the Core Element Section of the Service Editor Implementation tab (Figure 10 Step 4). In the
first page, of the New Core Element wizard, the user can select the way to add a new Core
Element from the following options.
-
Method Core Element from scratch, where the user provides all the parameters,
return types and constraints.
-
Method Core Element from an existing class, where the user selects a method from
an existing class, adding only the constraints.
-
Method Core Element from an executable, where the user introduces the command
or binary to execute and the arguments indicating if one of this corresponds to a
parameter of the Core Element interface.
-
Service Core Element from WSDL, where the users select a method from a deployed
web service.
-
Service Core Element from War, where the user selects the war package location, the
service and method.
© OPTIMIS Consortium
Page 19 of 28
D2.1.3.2 - OPTIMIS IDE
Once the wizard is finalized a new method is created in the service class interface with the
corresponding parameters and annotations. In the case of a Method Core Element from
scratch, a new class and method is created within the Core Element sub-package. Figure 13
shows the wizard window for adding a Core element from scratch.
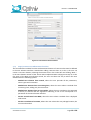
Figure 13. Core Element Wizard
4.1.5 Optional step: Add Elasticity to a Method Core Element
Once a Method Core Element is created, it can be selected in the Core Element Section of the
Service Editor. The description of this Core Element will be printed in the Core Element
Description section. This section contains an Elasticity description where the user can specify
the maximum and minimum number of Core Elements will be deployed.
4.1.6 Optional Step: Add constraints to an Element
Once a service element (Orchestration or Core element) is created, it has to appear in the
Orchestration or Core Element section of the service class. If you select the element, you will
© OPTIMIS Consortium
Page 20 of 28
D2.1.3.2 - OPTIMIS IDE
see its description in the element description section located below. In this description section,
there is a table that shows the current constraints defined for this element. To add a new
constraint, click “Add” and a new window will open where the user can select the type of
constraint and their value. Note, inside the type of constraints you can find hardware license
and legal constraints.
4.1.7 Step 5: Invoke an Core Element from an Orchestration Element
Once a Core Element has been defined to the Core Element interface, the developer can
implement its invocation inside the Orchestration Element code (Depicted in Figure 14).
Repeat step 4 and 5 to implement the service functionality as a composition Core Elements
invocations in a sequential fashion.
Figure 14. Orchestration Element implementation
4.1.8 Step 6: Create service packages
Once you have implemented the service, move to the Building and Deployment Tab (Figure 15)
of the Service Editor. In this tab, there is Service package section that is in charge of grouping
and compiling, instrumenting and packaging the service element. The user can select one of
the following options: the Automatic mode which group the core element according to the
hardware constraints; and the Manual Mode, where the user defines which Method Core
element will be included in each package. In case the user selects the Manual Mode, he/she
has to define the service packages by grouping the Core Elements with similar requirements or
functionality by clicking “New...” button of the Service Packages section (Figure 15-Step 6).
Once the Service Developer has defined the packages for all the Core Elements or the
automatic mode is selected, he/she has to click the “Generate” button to generate the defined
packages (Figure 15- Step 6b). As result of the package generation process a set of war, jar and
zip files will be generated in the “output” folder of the OPTIMIS Service project.
© OPTIMIS Consortium
Page 21 of 28
D2.1.3.2 - OPTIMIS IDE
4.1.9 Step 7: Test the application deploying in Localhost
Before deploying the service in a Cloud, the IDE offers the possibility of testing the service in
the user’s machine in order check the correct application behavior. For doing this test, the user
only has to set the Deployment Type to “Localhost” (Figure 15-Step 7), select the folder where
the Apache Tomcat is installed to deploy the orchestration elements, select a folder to deploy
the core elements and click the “Deploy” button. Then, service will be deployed in the
Tomcat’s container and its execution will be performed by means of the programming model
runtime in order to test that the Orchestration Elements are executed as expected. Once the
developer has checked the correct behavior select the “OPTIMIS cloud” deployment option.
Figure 15. Building and Deployment Tab
4.1.10 Step 8: Create service images and license tokens.
Service developers can create the service VM images by opening the Image Creation options,
setting the location of Image Creation Service and clicking the “Create Images” button. (Figure
15-Step 8). A similar procedure can be done for generating the required license token. The
service developer has to open the License Token options where there is a list of required
licenses. It has to define the License Management Server location and the properties file for
the user certificates and finally select the license and click “Generate” or alternatively click
“Generate All” to generate all the required license tokens.
© OPTIMIS Consortium
Page 22 of 28
D2.1.3.2 - OPTIMIS IDE
4.1.11 Step 9: Define non-functional properties.
The user can define non-functional properties by filling different options section of the
required OPTIMIS cloud infrastructure. In the TREC section, the user can define the minimum
levels of Trust, Risk, Eco-efficiency and cost for each of the service packages. In the data
protection section, the user can define different protection options for the data spaces, and
affinity rules, define constraints about the deployment affinity between the different service
packages. (Figure 15- Step 9)
4.1.12 Step 10: Deployment.
Deploy in the OPTIMIS Cloud by defining the Service Deployer location in the Deployment
Service Section and clicking “Deploy” (Figure 15-Step 10)
© OPTIMIS Consortium
Page 23 of 28
D2.1.3.2 - OPTIMIS IDE
5
Conclusions
This deliverable describes in detail the Integrated Development Environment as an essential
part of the service construction in OPTIMIS. This interface is the main access point for a user in
order to program a new service, thus acting as a main interface to start interactions with an
OPTIMIS Cloud.
The capabilities of the IDE have been described, together with its detailed design and a
description on how to use it. This description is somehow a user manual for the IDE. The IDE is
a GUI supporting the OPTIMIS Programming Model to create a composite service. It includes
wizards to facilitate the creation of new services and the integration of legacy applications, the
possibility of defining TREC parameters, constraints (even the legal ones) and elasticity rules
and enables the deployment in the cloud infrastructure using ICS and SD/DO components.
Although the IDE itself is not innovative, since it is a graphical interface and many other tools in
the market have them, all the capabilities that the IDE gathers make it innovative, since no
other graphical tool has them. The IDE acts as a showcase for the OPTIMIS Programming
Model and the TREC capabilities of the OPTIMIS Toolkit. It offers, at the same time a complete
and integrated service cloudification environment, providing functionality to compile and
instrument the code, to automatically generate OVF (Service Manifest), to generate
automatically configuration files, license tokens and elasticity rules, and it includes
functionality for packaging and image creation.
Our exploitation plans regarding the IDE include its submission to the Eclipse Marketplace [4],
as mentioned in BSC exploitation plans in WP7.3 deliverable D7.3.1.3: Intermediate
Exploitation Plan [5]. This portal has more than one hundred thousand registered users. This
way, we want not only to increase the visibility of the IDE, but also of the OPTIMIS Toolkit,
since the IDE depends on the Toolkit to exploit all its capabilities.
© OPTIMIS Consortium
Page 24 of 28
D2.1.3.2 - OPTIMIS IDE
References
[1]
[2]
[3]
[4]
[5]
Eclipse Open Source IDE: http://www.eclipse.org/
OPTIMIS deliverable D1.1.1.2: Requirements Analysis.
OPTIMIS deliverable D1.1.1.3: Requirements Analysis.
Eclipse Marketplace: http://marketplace.eclipse.org/
OPTIMIS deliverable D7.3.1.3: Intermediate Exploitation Plan
© OPTIMIS Consortium
Page 25 of 28
D2.1.3.2 - OPTIMIS IDE
Annex A.
License conditions.
This is a public deliverable that is provided to the community under the license Attribution-NoDerivs 2.5 defined by creative
commons http://www.creativecommons.org
This license allows you to
to copy, distribute, display, and perform the work
to make commercial use of the work
Under the following conditions:
Attribution. You must attribute the work by indicating that this work originated from the ISTOPTIMIS project and has been partially funded by the European Commission under contract
number IST - 257115
No Derivative Works. You may not alter, transform, or build upon this work without explicit
permission of the consortium
For any reuse or distribution, you must make clear to others the license terms of this work.
Any of these conditions can be waived if you get permission from the copyright holder.
This is a human-readable summary of the Legal Code below:
License
THE WORK (AS DEFINED BELOW) IS PROVIDED UNDER THE TERMS OF THIS CREATIVE COMMONS PUBLIC LICENSE ("CCPL" OR
"LICENSE"). THE WORK IS PROTECTED BY COPYRIGHT AND/OR OTHER APPLICABLE LAW. ANY USE OF THE WORK OTHER THAN AS
AUTHORIZED UNDER THIS LICENSE OR COPYRIGHT LAW IS PROHIBITED. BY EXERCISING ANY RIGHTS TO THE WORK PROVIDED
HERE, YOU ACCEPT AND AGREE TO BE BOUND BY THE TERMS OF THIS LICENSE. THE LICENSOR GRANTS YOU THE RIGHTS
CONTAINED HERE IN CONSIDERATION OF YOUR ACCEPTANCE OF SUCH TERMS AND CONDITIONS.
1. Definitions
"Collective Work" means a work, such as a periodical issue, anthology or encyclopedia, in which the Work in its entirety in
unmodified form, along with a number of other contributions, constituting separate and independent works in themselves, are
assembled into a collective whole. A work that constitutes a Collective Work will not be considered a Derivative Work (as defined
below) for the purposes of this License.
"Derivative Work" means a work based upon the Work or upon the Work and other pre-existing works, such as a translation,
musical arrangement, dramatization, fictionalization, motion picture version, sound recording, art reproduction, abridgment,
condensation, or any other form in which the Work may be recast, transformed, or adapted, except that a work that constitutes a
Collective Work will not be considered a Derivative Work for the purpose of this License. For the avoidance of doubt, where the
Work is a musical composition or sound recording, the synchronization of the Work in timed-relation with a moving image
("synching") will be considered a Derivative Work for the purpose of this License.
"Licensor" means all partners of the OPTIMIS consortium that have participated in the production of this text
"Original Author" means the individual or entity who created the Work.
"Work" means the copyrightable work of authorship offered under the terms of this License.
"You" means an individual or entity exercising rights under this License who has not previously violated the terms of this License
with respect to the Work, or who has received express permission from the Licensor to exercise rights under this License despite a
previous violation.
2. Fair Use Rights. Nothing in this license is intended to reduce, limit, or restrict any rights arising from fair use, first sale or other
limitations on the exclusive rights of the copyright owner under copyright law or other applicable laws.
3. License Grant. Subject to the terms and conditions of this License, Licensor hereby grants You a worldwide, royalty-free, nonexclusive, perpetual (for the duration of the applicable copyright) license to exercise the rights in the Work as stated below:
to reproduce the Work, to incorporate the Work into one or more Collective Works, and to reproduce the Work as incorporated in
the Collective Works;
to distribute copies or phonorecords of, display publicly, perform publicly, and perform publicly by means of a digital audio
transmission the Work including as incorporated in Collective Works.
For the avoidance of doubt, where the work is a musical composition:
Performance Royalties Under Blanket Licenses. Licensor waives the exclusive right to collect, whether individually or via a
performance rights society (e.g. ASCAP, BMI, SESAC), royalties for the public performance or public digital performance (e.g.
© OPTIMIS Consortium
Page 26 of 28
D2.1.3.2 - OPTIMIS IDE
webcast) of the Work.
Mechanical Rights and Statutory Royalties. Licensor waives the exclusive right to collect, whether individually or via a music rights
society or designated agent (e.g. Harry Fox Agency), royalties for any phonorecord You create from the Work ("cover version") and
distribute, subject to the compulsory license created by 17 USC Section 115 of the US Copyright Act (or the equivalent in other
jurisdictions).
Webcasting Rights and Statutory Royalties. For the avoidance of doubt, where the Work is a sound recording, Licensor waives the
exclusive right to collect, whether individually or via a performance-rights society (e.g. SoundExchange), royalties for the public
digital performance (e.g. webcast) of the Work, subject to the compulsory license created by 17 USC Section 114 of the US
Copyright Act (or the equivalent in other jurisdictions).
The above rights may be exercised in all media and formats whether now known or hereafter devised. The above rights include
the right to make such modifications as are technically necessary to exercise the rights in other media and formats, but otherwise
you have no rights to make Derivative Works. All rights not expressly granted by Licensor are hereby reserved.
4. Restrictions. The license granted in Section 3 above is expressly made subject to and limited by the following restrictions:
You may distribute, publicly display, publicly perform, or publicly digitally perform the Work only under the terms of this License,
and You must include a copy of, or the Uniform Resource Identifier for, this License with every copy or phonorecord of the Work
You distribute, publicly display, publicly perform, or publicly digitally perform. You may not offer or impose any terms on the Work
that alter or restrict the terms of this License or the recipients' exercise of the rights granted hereunder. You may not sublicense
the Work. You must keep intact all notices that refer to this License and to the disclaimer of warranties. You may not distribute,
publicly display, publicly perform, or publicly digitally perform the Work with any technological measures that control access or
use of the Work in a manner inconsistent with the terms of this License Agreement. The above applies to the Work as
incorporated in a Collective Work, but this does not require the Collective Work apart from the Work itself to be made subject to
the terms of this License. If You create a Collective Work, upon notice from any Licensor You must, to the extent practicable,
remove from the Collective Work any credit as required by clause 4(b), as requested.
If you distribute, publicly display, publicly perform, or publicly digitally perform the Work or Collective Works, You must keep
intact all copyright notices for the Work and provide, reasonable to the medium or means You are utilizing: (i) the name of the
Original Author (or pseudonym, if applicable) if supplied, and/or (ii) if the Original Author and/or Licensor designate another party
or parties (e.g. a sponsor institute, publishing entity, journal) for attribution in Licensor's copyright notice, terms of service or by
other reasonable means, the name of such party or parties; the title of the Work if supplied; and to the extent reasonably
practicable, the Uniform Resource Identifier, if any, that Licensor specifies to be associated with the Work, unless such URI does
not refer to the copyright notice or licensing information for the Work. Such credit may be implemented in any reasonable
manner; provided, however, that in the case of a Collective Work, at a minimum such credit will appear where any other
comparable authorship credit appears and in a manner at least as prominent as such other comparable authorship credit.
5. Representations, Warranties and Disclaimer. UNLESS OTHERWISE MUTUALLY AGREED TO BY THE PARTIES IN WRITING,
LICENSOR OFFERS THE WORK AS-IS AND MAKES NO REPRESENTATIONS OR WARRANTIES OF ANY KIND CONCERNING THE
MATERIALS, EXPRESS, IMPLIED, STATUTORY OR OTHERWISE, INCLUDING, WITHOUT LIMITATION, WARRANTIES OF TITLE,
MERCHANTIBILITY, FITNESS FOR A PARTICULAR PURPOSE, NONINFRINGEMENT, OR THE ABSENCE OF LATENT OR OTHER DEFECTS,
ACCURACY, OR THE PRESENCE OF ABSENCE OF ERRORS, WHETHER OR NOT DISCOVERABLE. SOME JURISDICTIONS DO NOT ALLOW
THE EXCLUSION OF IMPLIED WARRANTIES, SO SUCH EXCLUSION MAY NOT APPLY TO YOU.
6. Limitation on Liability. EXCEPT TO THE EXTENT REQUIRED BY APPLICABLE LAW, IN NO EVENT WILL LICENSOR BE LIABLE TO YOU
ON ANY LEGAL THEORY FOR ANY SPECIAL, INCIDENTAL, CONSEQUENTIAL, PUNITIVE OR EXEMPLARY DAMAGES ARISING OUT OF
THIS LICENSE OR THE USE OF THE WORK, EVEN IF LICENSOR HAS BEEN ADVISED OF THE POSSIBILITY OF SUCH DAMAGES.
7. Termination
This License and the rights granted hereunder will terminate automatically upon any breach by You of the terms of this License.
Individuals or entities who have received Collective Works from You under this License, however, will not have their licenses
terminated provided such individuals or entities remain in full compliance with those licenses. Sections 1, 2, 5, 6, 7, and 8 will
survive any termination of this License.
Subject to the above terms and conditions, the license granted here is perpetual (for the duration of the applicable copyright in
the Work). Notwithstanding the above, Licensor reserves the right to release the Work under different license terms or to stop
distributing the Work at any time; provided, however that any such election will not serve to withdraw this License (or any other
license that has been, or is required to be, granted under the terms of this License), and this License will continue in full force and
effect unless terminated as stated above.
8. Miscellaneous
Each time You distribute or publicly digitally perform the Work, the Licensor offers to the recipient a license to the Work on the
same terms and conditions as the license granted to You under this License.
If any provision of this License is invalid or unenforceable under applicable law, it shall not affect the validity or enforceability of
the remainder of the terms of this License, and without further action by the parties to this agreement, such provision shall be
reformed to the minimum extent necessary to make such provision valid and enforceable.
No term or provision of this License shall be deemed waived and no breach consented to unless such waiver or consent shall be in
© OPTIMIS Consortium
Page 27 of 28
D2.1.3.2 - OPTIMIS IDE
writing and signed by the party to be charged with such waiver or consent.
This License constitutes the entire agreement between the parties with respect to the Work licensed here. There are no
understandings, agreements or representations with respect to the Work not specified here. Licensor shall not be bound by any
additional provisions that may appear in any communication from You. This License may not be modified without the mutual
written agreement of the Licensor and You.
© OPTIMIS Consortium
Page 28 of 28